Aobosi HL20L-GS User manual

0
Air Fryer Steam Oven
INSTRUCTION MANUAL
MODEL: HL20L-GS
120V 60Hz 1250W
HOUSEHOLD USE ONLY
IMPORTANT SAFETY INSTRUCTIONS

1
CONTENTS
Precautions for Safety Use …………………………………………………… 2
Getting to Know Your New Air Fryer Steam Oven ……………………….... 3
Before Using Your AIR FRYER STEAM OVEN …………………………... 4
How to Use the Oven …………………………………………………………. 5
Select Auto Menu ……………………………………………………………... 5
Use DIY menu …………………………………………………………………. 8
Use Steam Function …………………………………………………………… 9
Default Temp. and Time for Menus ………………………………………….. 9
How to Use Accessories ……………………………………………………….. 10
Trouble Shooting …………………………………………………………….... 10
Care & Cleaning ……………………………………………………………..... 11
Warranty ………………………………………………………………………. 12

2
PRECAUTIONS FOR SAFETY USE
When using your Digital Oven, basic safety precautions should always be observed, including the following:
Please read all instructions.
1. Do not touch hot surfaces.Always use handles or
knobs.
2. Close supervision is necessary when any appliance is
used by or near children.
3. To protect against electric shock, do not immerse cord,
plug or any parts of the oven in water or any other
liquids.
4. Do not let cord hang over edge of table or counter, or
touch hot surfaces.
5. Do not operate appliance with damaged cord or plug or
after the appliance malfunctions or has been damage in
any manner. Return appliance to the nearest authorized
service facility for examination, repair or adjustment.
6. The use of accessory attachments not recommended by
the appliance manufacturer may cause hazard or injury.
7. Do not place on or near a hot gas or electric burner.
8. When operating the oven, keep at least four inches of
free space on all sides of the oven to allow for adequate
air circulation.
9. Unplug from outlet when not in use and before cleaning.
Allow to cool before putting on or taking off parts, and
before cleaning.
10. To disconnect, turn the time control to OFF, then
remove the plug. Always hold the plug, and never pull
the cord.
11. Extreme caution must be used when moving a drip pan
containing hot oil or other hot liquids.
12. Do not cover crumb tray or any part of the oven with
metal foil. This may cause the oven to overheat.
13. Use extreme caution when removing the tray, racks or
disposing of hot grease or other hot liquids.
14. Do not clean the inside of the oven with metal scouring
pads, pieces can break off the pad and touch electrical
parts, creating a risk of electric shock.
15. Over-sized foods or metal utensils must not be inserted
in a toaster oven as they may create a fire or risk of
electric risk.
16. A fire may occur if the oven is covered or touching
flammable material, including the curtain, draperies,
walls, and the like, when in operation. Do not store any
item on top of the appliance when in operation.
17. Extreme cautions should be exercised when using
cooking or baking containers constructed of anything
other than metal or ovenproof glass.
18. Be sure that nothing touches the top or bottom elements
of the oven.
19. Do not place any of the following materials in the oven:
cardboard, plastic, paper, or anything similar.
20. Do not store any materials other than manufacturer’s
recommended accessories in this oven when not in use.
21. Always wear protective, insulated oven gloves when
inserting or removing items from the hot oven.
22. This appliance has a tempered, safety glass door. The
glass in stronger than ordinary glass and more resistant
to breakage. Tempered glass can still break around
edges. Avoid scratching door surface or nicking edges.
23. This appliance is OFF when the Timer Control button is
in the “OFF” position.
24. Do not use outdoors.
25. Do not use appliance for other than intended use.

3
SAVE THESE INSTRUCTIONS FOR
HOUSEHOLD USE
Getting to Know Your New Air Fryer Steam Oven
MAIN COMPONENT
Pizza pan Frying Basket
Illustrations may differ from actual product.

4
Read all the sections of this booklet and follow all the instructions carefully.
Before Using Your AIR FRYER STEAM OVEN
▲Before using your air fryer steam oven for the first time, be sure to:
1. Read all the instruction included in this manual.
2. Make sure that the oven is unplugged.
3. Wash all the accessories in hot, soapy water or in the dishwasher.
4. Thoroughly dry all accessories and re-assemble in oven, plug oven into outlet and you are ready to use your new toaster
oven.
5. After re–assembling your oven, we recommend that you run it at the highest temperature (450°F) for approximately 15
minutes to eliminate any packing residue that may remain after shipping. This will also remove all traces of odor initially
present.
Please Note: Initial start-up operation may result in minimal smell and smoke (about 15 minutes). This is normal
and harmless. It is due to burning of the protective substance applied to the heating elements in the
factory.
OPERATION
6. Place food on the wire rack.
7. Place the wire rack on the unit support guide.
8. Choose the function accordingly, push the start key.
9. There's four beeps when the program done, take out the food, unplug the powder cord.
10. Clean the oven when it’s cooling down.
WARNING: TO AVOID RISK OF INJURY OR BURNS, DO NOT TOUCH HOT SURFACES
WHEN OVEN IS IN USE. ALWAYS USE OVEN MITTS.
CAUTION: Always use extreme care when removing bake tray, wire rack or any hot container from a
hot oven. Always use the rack handle, or an oven mitt when removing hot items from
the oven.

5
HOW TO USE THE OVEN
CONTROL PANEL:
SELECT AUTO MENU:
Air Fry
1、Push the “ ” button to the “Air fry” function, the “Air Fry” function light and the default temperature “400°F”
will start to twinkle, and the default time “0:10” will light at the same time.
2、After confirming the function, you can rotate the “ ” knob to adjust the default temperature, and push again
the knob to adjust the default time.
3、After confirming the temperature and time, press the “Start/Stop” button to start the cooking, the display will show the
actual temperature, the “Preheat” and the setting time will light. The “Ready” will light after the oven temperature reach the set
temperature, the preset timer will go to count down till the program end.
Toast
1、Push the “ ” button to the “Toast” function, the “Toast” function light and the default temperature “350°F” will
start to twinkle, and the default time “0:18” will light at the same time.
2、After confirming the function, you can rotate the “ ” knob to adjust the default temperature, and push again
the knob to adjust the default time.
3、After confirming the temperature and time, press the “Start/Stop” button to start the cooking, the display will show the
actual temperature, the “Preheat” and the setting time will light. The “Ready” will light after the oven temperature reach the set
temperature, the preset timer will go to count down till the program end.
Bake
1、Push the “ ” button to the “Bake” function, the “Bake” function light and the default temperature “350°F” will

6
start to twinkle, and the default time “0:30” will light at the same time.
2、After confirming the function, you can rotate the “ ” knob to adjust the default temperature, and push again
the knob to adjust the default time.
3、After confirming the temperature and time, press the “Start/Stop” button to start the cooking, the display will show the
actual temperature, the “Preheat” and the setting time will light. The “Ready” will light after the oven temperature reach the set
temperature, the preset timer will go to count down till the program end.
Broil
1、Push the “ ” button to the “Broil” function, the “Broil” function light and the default temperature “450°F” will
start to twinkle, and the default time “0:05” will light at the same time.
2、After confirming the function, you can rotate the “ ” knob to adjust the default temperature, and push again
the knob to adjust the default time.
3、After confirming the temperature and time, press the “Start/Stop” button to start the cooking, the display will show the
actual temperature, the “Preheat” and the setting time will light. The “Ready” will light after the oven temperature reach the set
temperature, the preset timer will go to count down till the program end.
Fries
1、Push the “ ” button to the “Fries” function, the “Fries” function light and the default temperature “400°F” will
start to twinkle, and the default time “0:20” will light at the same time.
2、After confirming the function, you can rotate the “ ” knob to adjust the default temperature, and push again
the knob to adjust the default time.
3、After confirming the temperature and time, press the “Start/Stop” button to start the cooking, the display will show the
actual temperature, the “Preheat” and the setting time will light. The “Ready” will light after the oven temperature reach the set
temperature, the preset timer will go to count down till the program end.
Bagel
1、Push the “ ” button to the “Bagel” function, the “Bagel” function light and the default temperature “350°F” will
start to twinkle, and the default time “0:20” will light at the same time.
2、After confirming the function, you can rotate the “ ” knob to adjust the default temperature, and push again
the knob to adjust the default time.
3、After confirming the temperature and time, press the “Start/Stop” button to start the cooking, the display will show the
actual temperature, the “Preheat” and the setting time will light. The “Ready” will light after the oven temperature reach the set
temperature, the preset timer will go to count down till the program end.
Pizza

7
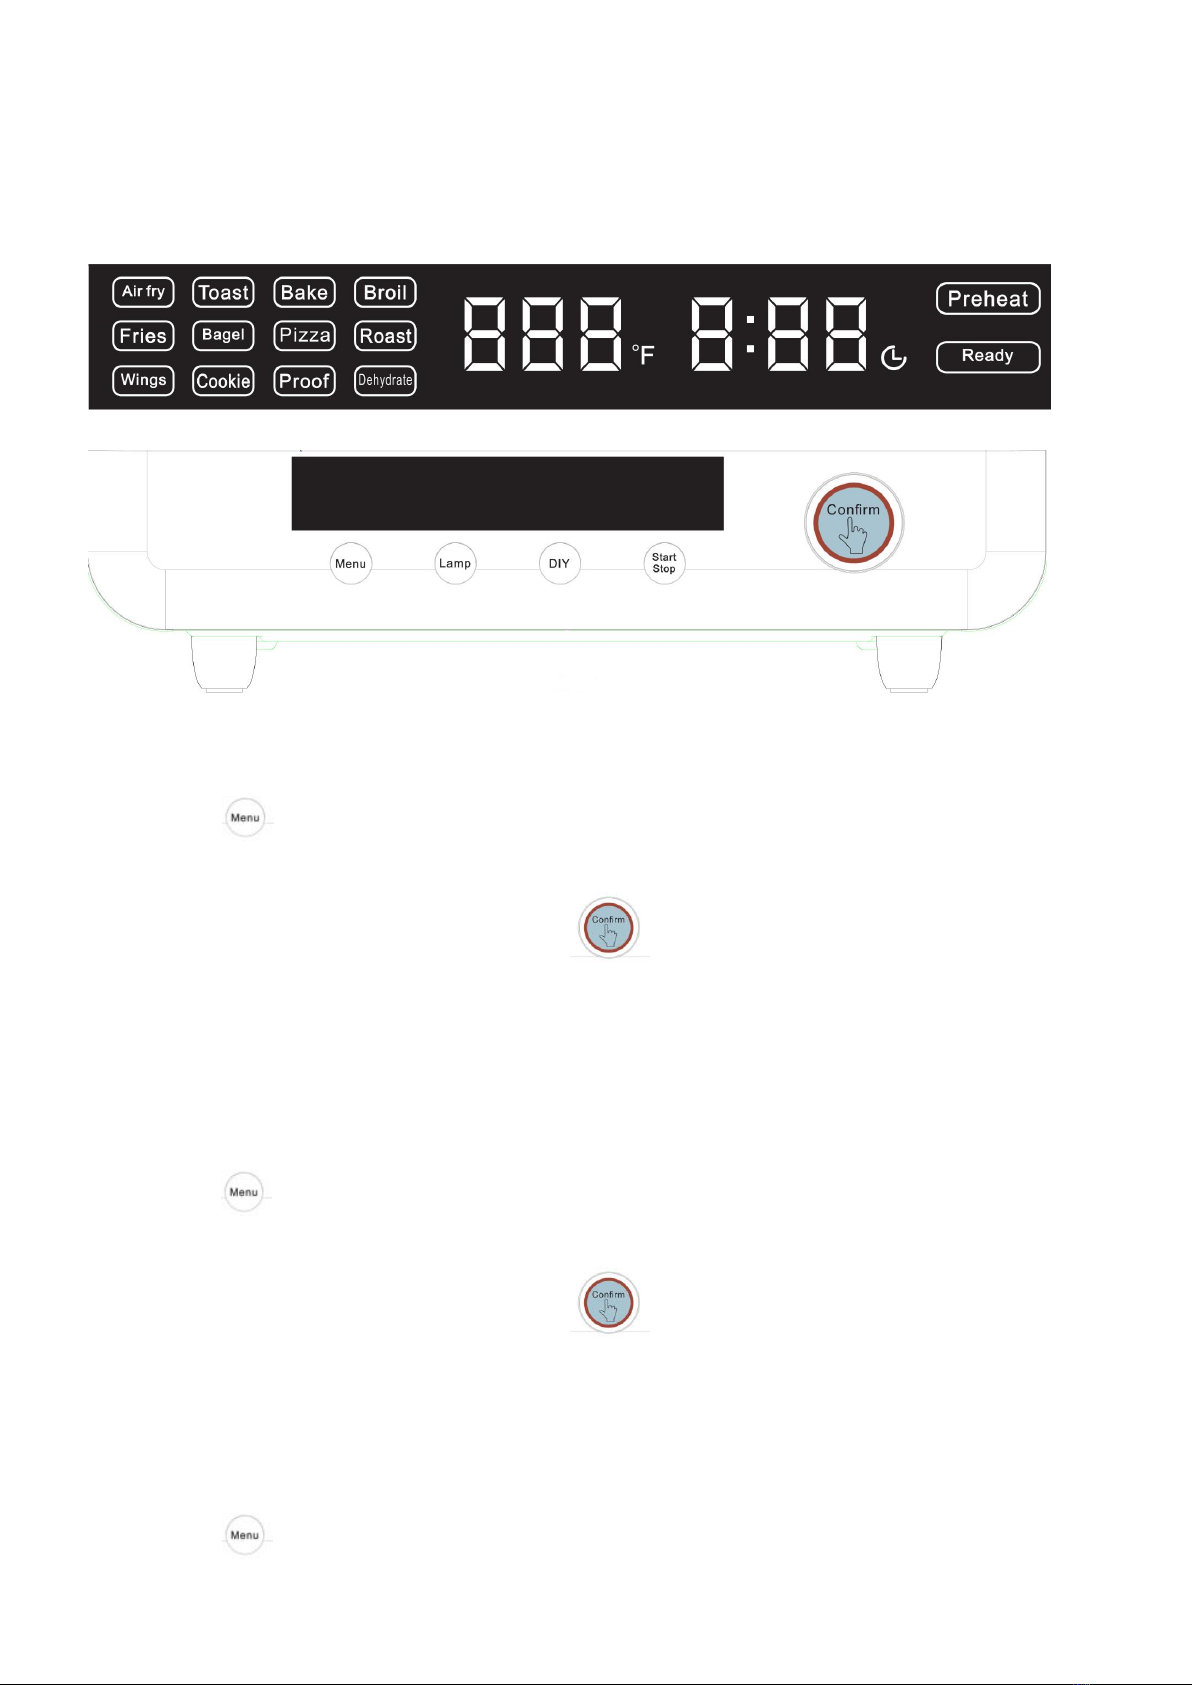
1、Push the “ ” button to the “Pizza” function, the “Pizza” function light and the default temperature “450°F” will
start to twinkle, and the default time “0:10” will light at the same time.
2、After confirming the function, you can rotate the “ ” knob to adjust the default temperature, and push again
the knob to adjust the default time.
3、After confirming the temperature and time, press the “Start/Stop” button to start the cooking, the display will show the
actual temperature, the “Preheat” and the setting time will light. The “Ready” will light after the oven temperature reach the set
temperature, the preset timer will go to count down till the program end.
Roast
1、Push the “ ” button to the “Roast” function, the “Roast” function light and the default temperature “375°F” will
start to twinkle, and the default time “0:45” will light at the same time.
2、After confirming the function, you can rotate the “ ” knob to adjust the default temperature, and push again
the knob to adjust the default time.
3、After confirming the temperature and time, press the “Start/Stop” button to start the cooking, the display will show the
actual temperature, the “Preheat” and the setting time will light. The “Ready” will light after the oven temperature reach the set
temperature, the preset timer will go to count down till the program end.
Wings
1、Push the “ ” button to the “Wings” function, the “Wings” function light and the default temperature “400°F” will
start to twinkle, and the default time “0:25” will light at the same time.
2、After confirming the function, you can rotate the “ ” knob to adjust the default temperature, and push again
the knob to adjust the default time.
3、After confirming the temperature and time, press the “Start/Stop” button to start the cooking, the display will show the
actual temperature, the “Preheat” and the setting time will light. The “Ready” will light after the oven temperature reach the set
temperature, the preset timer will go to count down till the program end.
Cookies
1、Push the “ ” button to the “Cookies” function, the “Cookies” function light and the default temperature “320°F”
will start to twinkle, and the default time “0:20” will light at the same time.
2、After confirming the function, you can rotate the “ ” knob to adjust the default temperature, and push again
the knob to adjust the default time.
3、After confirming the temperature and time, press the “Start/Stop” button to start the cooking, the display will show the
actual temperature, the “Preheat” and the setting time will light. The “Ready” will light after the oven temperature reach the set
temperature, the preset timer will go to count down till the program end.

8
Proof
1、Push the “ ” button to the “Proof” function, the “Proof” function light and the default temperature “90°F” will
start to twinkle, and the default time “0:45” will light at the same time.
2、After confirming the function, you can rotate the “ ” knob to adjust the default temperature, and push again
the knob to adjust the default time.
3、After confirming the temperature and time, press the “Start/Stop” button to start the cooking, the display will show the
actual temperature, the “Preheat” and the setting time will light. The “Ready” will light after the oven temperature reach the set
temperature, the preset timer will go to count down till the program end.
Dehydrate
1、Push the “ ” button to the “Dehydrate” function, the “Dehydrate” function light and the default temperature
“130°F” will start to twinkle, and the default time “2:00” will light at the same time.
2、After confirming the function, you can rotate the “ ” knob to adjust the default temperature, and push again
the knob to adjust the default time.
3、After confirming the temperature and time, press the “Start/Stop” button to start the cooking, the display will show the
actual temperature, the “Preheat” and the setting time will light. The “Ready” will light after the oven temperature reach the set
temperature, the preset timer will go to count down till the program end.
USE DIY MENU:
1. Push the “DIY” key, and the default temperature “400°F” will start to twinkle, and the default time “0:30” will light at the
same time.
2. You can rotate the “ ” knob to adjust the default temperature, and push again the knob to adjust the default time.
3、After confirming the temperature and time, press the “Start/Stop”button to start the cooking, the display will show the
actual temperature, the “Preheat”and the setting time will light. The “Ready”will light after the oven temperature reach
the set temperature, the preset timer will go to count down till the program end.
4、When program end, unplug the power, clean the oven when it’s cooling down.

9
USE THE STEAM FUNCTION:
Fill water into the tank, hang on the cavity of the oven, steam will come out during cooking. The steam function is suggested to
use for BAGEL and TOAST function, which can humidify the skin of the bagel and toast, to enhance the taste.
Default Temp. And Time for Menus (see table)
NO.
Function
Time Range
Default Time
Temp. Range
Default Temp. °F
1
Air fry
0:01-2:00
0:10
80°F-450°F
400°F
2
Toast
0:01-2:00
0:18
80°F-450°F
350°F
3
Bake
0:01-2:00
0:30
80°F-450°F
350°F
4
Broil
0:01-2:00
0:05
80°F-450°F
450°F
5
Fries
0:01-2:00
0:20
80°F-450°F
400°F
6
Bagel
0:01-2:00
0:20
80°F-450°F
350°F
7
Pizza
0:01-2:00
0:10
80°F-450°F
450°F
8
Roast
0:01-2:00
0:45
80°F-450°F
375°F
9
Wings
0:01-2:00
0:25
80°F-450°F
400°F
10
Cookies
0:01-2:00
0:20
80°F-450°F
325°F
11
Proof
0:10-2:00
0:45
80°F-450°F
90°F
12
Dehydrate
1:00-9:50
2:00
80°F-450°F
125°F
13
DIY
0:10-2:00
0:30
80°F-450°F
400°F

10
HOW TO USE ACCESSORIES:
1. Bake tray: used when making cakes, broiling or roasting meat, poultry, fish and various foods. It can be placed on cavity
Position A, B, or C.
2. Wire rack: used when broiling and roasting meat, poultry, fish and various foods. It can be placed on cavity Position A, B, or
C.
3. Tray Handle: used to move out the wire rack and bake tray when they are hot.
4. Water tank: used when bagel, broiling or roasting meat, poultry, fish and various foods in order to add humidity to the taste.
5. Pizza pan: used when making pizza. It needs to be placed on the wire rack. It should be placed on cavity Position A.
6. Frying basket: used when making potato chips, fish chips and the like. It should be placed on cavity Position B.
TROUBLE SHOOTING
Problem
Possible Cause
Solution
The air oven is not turning on
1. The appliance is not plugged in
2. You have not pressed “START”
1. Plug the appliance into a grounded
wall socket
2. Press “ ” button after you have
chosen the desired recipe, time &
temperature
The ingredients fried with the
air oven are not done
1. The amount of ingredients is too much
2. The set temperature is too slow
3. The set time is too short
1. Put smaller amount of ingredients at
one time
2. Press “ ”knob, turn clockwise
to increase the cooking temperature,

11
CARE & CLEANING
Warning: Be sure to unplug the oven and allow it to cool before cleaning.
Any spattering that occurs while cooking and comes into contact with the continuous coating is oxidized while the oven is in
operation. If desired, wipe the walls with a damp sponge, cloth or nylon scouring pad and mild detergent.
then press it again to confirm
3. Press “ ”knob, turn clockwise
to increase the cooking time, then
press it again to confirm
The ingredients are fried
unevenly in the air oven
1. Certain types of ingredients need to be
turn up-side-down halfway during the
cooking time
1. During halfway of the cooking time,
press “STOP” to shut off the air oven,
carefully turn the food up-side-down,
then re-cook it with the same recipe,
temperature and 1/2 time
Fried snacks are not crispy after
frying
1. You use a type of snacks meant to be
prepared in a traditional deep fryer
1. Use oven snacks or lightly brush some
oil onto the snacks for a crispier result
White smoke comes out of the
appliance
1. It is normal for white smoke to appear
when prepping greasy ingredients
2. The bake tray still contains grease
residues
1. When you cook greasy ingredients in
the air oven, a large amount of oil will
leak into the bake tray. The oil
produces white smoke and the tray
may heat up more than usual. This
does not affect the appliance or the
end result
2. White smoke is caused by grease
heating up in the bake tray. Make sure
you clean the tray properly after each
use
Fresh fries are fried unevenly in
the air oven
1. You did not soak the potato sticks
properly before you fry them
2. You did not use the right potato type
1. Soak the potato sticks in a bowl for at
least 30 minutes, take them out and
dry them with kitchen paper
2. Use fresh potato sticks smaller for a
crispier result. Add slightly more oil
for a crispier result
Fresh fries are not crispy when
they come out of the air oven
1. The crispiness of the fries depends on
the amount of oil water in the fries
1. Cut the potato sticks smaller for a
crispier result. Add slightly more oil
for a crispier result
2. Cut the potato sticks smaller for a
crispier result
3. Add slightly more oil for a crispier
result

12
DO NOT USE STEEL WOOL SCOURING PADS, ABRASIVE CLEANERS OR SCRAPE THE WALLS WITH A
METAL UTENSIL, AS ALL OF THESE METHODS MAY DAMAGE THE CONTINUOUS CLEAN COATING.
All accessories should be washed in hot soapy water or can be cleaned in a dishwasher. The door can be wiped with a damp
sponge and wiped dry with a paper or cloth towel. Clean the outside with a damp sponge.
DO NOT USE AN ABRASIVE CLEANER AS IT MAY DAMAGE THE EXTERIOR FINISH.
DO NOT USE AN ABRASIVE CLEANER OR STEEL WOOL SCOURING PAD ON THE DRIP PAN AS IT MAY
DAMAGE
THE PORCELAIN ENAMEL FINISH.
LET ALL PARTS AND SURFACES DRY THOROUGHLY PRIOR TO PLUGGING OVEN IN AND USING
WARRANTY
Thank you for purchasing our product, which has been made to meet high quality standards. The manufacturer's warranty
covers the product for a period of 12 months from the date of purchase against manufacturing faults.
All Aobosi warranties are automatically kept track of in our system, so there is no need to register your product.
For 6 month extra free of charge warranty, please register at website www.iaobosi.com or fill in and take picture of bellow
Warranty Card sending to info@iaobosi.com.
Due to continuous product improvement, we reserve the right to change the product specification without prior notice.
Table of contents