Ape Labs Light Can User manual

INSTRUCTION MANUAL


Table of Contents
Safety Intructions ..................................................................... 1
Warning .................................................................................... 2
General (Features) ................................................................... 3
Operation ................................................................................. 4
Turn On and Off ................................................................... 4
Assignment of a Group ....................................................... 5
Using the Remote Control .................................................. 5
List of Programs ....................................................................... 7
Battery State/Charging ............................................................ 8
Disabling of the Battery Status Indicator ........................... 9
Enabling of the Battery Status Indicator ............................ 9
Changing the Lens .................................................................. 10
W-Ape Transceiver ................................................................. 10
Group ................................................................................. 11
Control Mode .................................................................... 11
More Functions and Updates ................................................ 13

Pairing ................................................................................ 13
Pairing an ApeRemote with a Fixture:.............................. 13
Reset or Update of Firmware ........................................... 14
Troubleshooting ..................................................................... 15
Disposal .................................................................................. 17
DMX Modes/DMX Sheets ...................................................... 18
3 Channel Mode ................................................................ 18
4 Channel Mode ................................................................ 19
8 Channel Mode ................................................................ 20

1
Safety Intructions
› The LightCan generates heat during operation and while
charging. Therefore, make sure there is adequate
ventilation and do not cover the light.
› If you charge the LightCan in the Tourcase (optional), the
LightCan Tourcase must remain open.
› Do not use the LightCan in areas where the use of radio
equipment is prohibited.
› Do not look directly into the LEDs. This can cause damage
to the eyes.

2
Warning
› All ApeLabs products use the same charging/power cord.
Ape Labs products are specifically designed and
engineered based on the Ape Labs power source (Ape
Labs PSU). Do not use a different charging/power cord to
power or charge the units (other than the Ape Labs
charging road cases or Ape Labs PSU). Using a different
power source may void your warranty.

3
General (Features)
› The LightCan has a power LED below the lens.
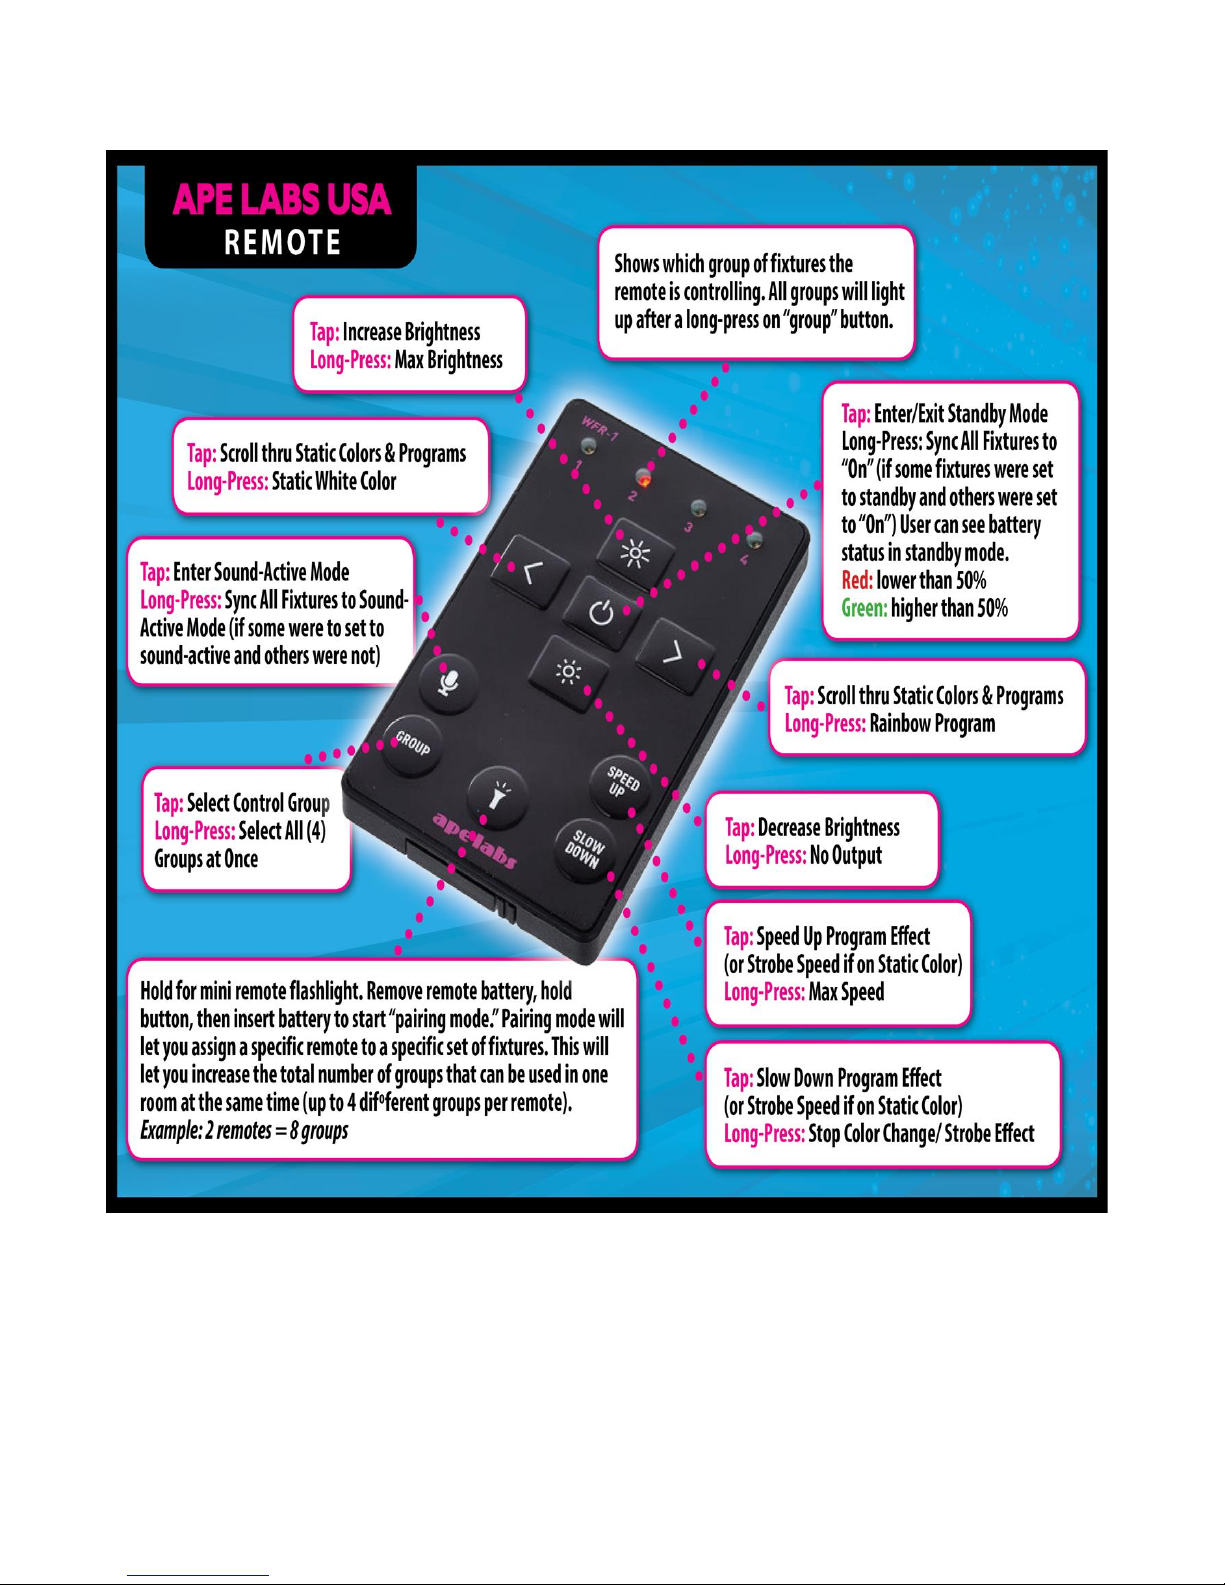
› This device has 20 built-in auto programs. (See “List of
Programs” below for details). Scroll thru the different
pre-sets with the left and right buttons on the
ApeRemote. If you’re on a static color, the Speed Up/
Slow Down buttons will control the strobe speed. If
you’re on a chase program, they will control the color
changing speed. By default, the Speed is set to it’s
lowest setting, which stops the speed effect.
› This device can be wirelessly controlled with either the
ApeRemote or W-Ape Transceiver (in combination with
your favorite DMX controller).
› All Ape Labs fixtures can be mixed/matched and
controlled in the same room with the same remote (or
DMX controller). To control certain fixtures differently
from others in the same room, address the fixtures at the
time they are turned on. For use with the ApeRemote,
each fixture can be assigned to one of four groups. (See
“Operation” section below for details on setting the
fixture group).

4
› If more than four groups are needed in a room,
additional remotes can be used to add four additional
groups per remote, as long as the added remotes are
paired with the respective light fixtures. (“See Pairing
Section” for additional details)
› For use with the W-Ape (and a DMX controller), each
fixture can be assigned to a DMX-512 address. By
default, the device is set to DMX address one, but it can
be assigned to any address when it is turned on by going
into Set-Up mode on the W-Ape.
› The device has a built-in microphone. It can be activated
on the remote control to create sound active effects.
Operation
Turn On and Off
› Press the button on the bottom of the LightCan for about
one second. The unit turns on and remembers the
previously selected program/brightness.
› To turn the device off, press the button again for about a
second.
Note: The LightCan ignores very short presses of the power
button to prevent unintentional operation.

5
Assignment of a Group
Each Ape Labs lighting fixture can be assigned to a specific
group (so certain fixtures can be controlled differently than
others in the same room).
› Immediately after turning the LightCan on, the current
group setting of the LightCan flashes on the remote
control. (Factory setting is group 1.)
› While the group LED is flashing, tap the Group Button
again to change groups. The selected group LED will
change as you tap the Group Button.
Note: The remote control switches to a power-save mode
after a few minutes and will not detect the power-on event
of a LightCan. Press any key of remote control to stop the
power-save mode.
Using the Remote Control
› To select the group you’d like to control, tap the “Group”
button until the group LED is lit up. To control all groups
at once, press and hold the “Group” button until all four
group LEDs light up.
› Programs, brightness, speed and sound active mode can
be controlled by the corresponding keys (see figure).

6

7
List of Programs
No Program
1
White
2
Red
3
Orange
4
Amber
5
Lime
6
Green
7
Green/Blue
8
Blue/Green
9
Blue
10
Blue
/
Magenta
11
Magenta
12
Red
/White
13
Green
/White
14
Blue
/White
15
Red > Blue
16
Magenta > White
17
White > Blue
18
Red
/White
> Green
/White
> Blue
/White
19
Amber > Magenta > Blue
20
Rainbow
(All Colors)

8
Hint: A long press on the left arrow will provide a static white color. A
long press on the right arrow will provide a rainbow program. A long
press on “Slow Down” stops a flash effect/color change in a multi-color
program and will stay on single color. A long press on “Speed Up” will
toggle between colors in selected program. In a multi-color program,
the “Slow Down” button will also provide a fade effect opposed to
flash effect/color change. In the Rainbow Program, a flash effect/color
change will not occur, only a fade effect or single random color.
Battery State/Charging
› If the brightness of the LightCan is reduced to zero (by
“Power” or ”Dimmer” button of the remote control), the
fixture will show the battery state at low brightness:
o LEDs glow green: battery level above 50%
o LEDs glow red: battery level below 50%
Note: The calculation of the battery level needs at least
one full charge/discharge cycle.
› If the battery is completely empty, the device will blink 3
times red and turn itself off. Connect the provided power
supply (18V DC) or put the device into the Tourcase.
› If the battery charge is dropped to extremely low, the
fixture may not blink Red (or show any signs of charging)
during the first two hours of charging.
› The LightCan flashes red while charging. As soon as the
battery is fully charged, the device will flash green.

9
› The device can also be used while a power supply is
connected. The battery will charge very slowly.
Disabling of the Battery Status Indicator
The red/green glowing indicator of the battery level can be
disabled.
› Step 1: Press and hold the power button on fixture until
it flashes blue/white (This is also placing the fixture into
Service Mode).
› Step 2: Remove the battery compartment out of the
ApeRemote.
› Step 3: Slide the battery compartment back into the
remote while pushing the “flashlight” symbol. (Remote
will be flashing red on groups 1 & 4).
› Step 4: Push the “Dim” button on the remote.
› Step 5: Press the power button on fixture one time.
› Step 6: Press the “Power” button on the remote.
Enabling of the Battery Status Indicator
› Step 1: Press and hold the power button on fixture until
it flashes blue/white (This is also placing the fixture into
Service Mode).
› Step 2: Remove the battery compartment out of the
ApeRemote.

10
› Step 3: Slide the battery compartment back into the
remote while pushing the “flashlight” symbol. (Remote
will be flashing red on groups 1 & 4).
› Step 4: Push the “Bright” button on the remote.
› Step 5: Press the power button on fixture one time.
› Step 6: Press the “Power” button on the remote.
Changing the Lens
› You can change the lens by unscrewing the metal ring on
top of the LightCan. You will be able to change the effect
of the light depending on the lens.
› Effect Lens: The effect lens produces a light beam with
hard edes. Important: The rough side of the lens must be
facing out.
› Frost Filter: The frost filter distributes the light in all
directions.
10 Degree Lens (optional accessory): The 10 degree lens
produces a narrow beam with soft edges.
W-Ape Transceiver
The W-Ape Transceiver is for use with all ApeLabs products
to control via DMX; since there are no controls on the

11
fixtures themselves.. Multiple W-Apes can be used in the
same room on different universes if they are set to different
groups.
The W-Ape Transceiver has the following built-in modes
(selected with Up/Down buttons on left of unit). Pressing
the +/- buttons on the right of the unit will scroll thru the
different options of each mode. If a light fixture is in set-up
mode with the W-Ape, the screen will display info for the
light fixture rather than the W-Ape.
Group
› Use +/- buttons to select the specific group.
Control Mode
› Sound Master: While the W-Ape is set to Sound Master
mode, it will use the internal mic built in to the W-Ape to
sync the Sound Active feature among all light fixtures
(instead of using the internal mic built in to each fixture).
In this mode, units will be controlled with an ApeRemote,
thru the W-Ape. This feature extends the wireless range
on the remote from it’s rated 200ft range, to the W-
Ape’s rated wireless range of 3,000ft.
› DMX: To use DMX controller, set W-Ape to “DMX” and
connect your DMX controller to W-Ape input with 3-pin
DMX cable.
› W-Ape (Receiver): If multiple W-Apes are being used in
one room, some W-Ape’s can be set as a receiver. In this

12
case, set W-Ape to “W-Ape (Reciever)” and connect a 3-
pin DMX cable from the DMX output of the W-Ape to the
DMX input of the light fixture (to wirelessly control a
fixture that does not have wireless DMX built-in, such as
a fixture from a brand other than Ape Labs).
Info
› Battery: During set-up mode, this will display the precise
battery level of each light fixture.
› Serial: This will display the serial number of the fixture.
› Firmware: This will display the firmware version of the
fixture.
DMX Mode
› During set-up mode with given fixture, this will let you
select the number of DMX mode for the fixture.
o Off: W-APE/DMX-Mode is not activated - the device
is only controllable by the remote control
o 3C: 3 channels: Dimmer, Program, Speed
o 4C: 4 channels: Red, Green, Blue, White (each is 1-
DMX channel/8 Bit)
o 8C: 8 channels: Red, Green, Blue, White (each is 2-
DMX channels/16 Bit: coarse + fine)

13
More Functions and Updates
Pairing
Ape Labs lights and ApeRemotes can be paired permanently
to one another so that they will no longer synchronize with
other fixtures. Pair as many lights to one remote as you
would like. This will allow users to create up to four groups
on one remote and up to four more groups on each
additional remote that is being used at the same time.
Pairing an ApeRemote with a Fixture:
› Step 1: Remove battery from ApeRemote
› Step 2: While holding down flashlight button, insert
battery into ApeRemote (if done correctly, group 1 and
group 4 will flash on remote).
› Step 3: Turn on fixture with long press on power button
(5 seconds – if done correctly, fixture will blink blue).
› Step 4: Press Right Arrow button to pair remote and
light.
› Step 5: Turn light off then back on. It will now only be
controlled with that specific remote.
› Step 6: To unpair, follow steps 1-3, then press Left Arrow
button to unpair.

14
NOTE: In case you lose paired remote, any remote can be
used to unpair fixtures.
Reset or Update of Firmware
Press and hold the power button of the LightCan for about
10 seconds. The device will restart and stay in update mode
for about 15 seconds (flashes red). During this period, an
update can be started. If no update occurs, the device will
go back to normal function. You can find firmware updates
at www.apelabsusa.com or at your dealer.

15
Troubleshooting
Problem
Possible
Reason Solution
LightCan is
dimmed and
flashes
sometimes
Sound
active
mode is
active.
Press the microphone
button on the remote
control to deactivate
sound active mode.
LightCan flashes
slowly
Regular
flash effect
Long press (2s) “Slow
Down” on the remote
control, to reduce the
effect speed to 0.
LightCan
flashes 3
times red and
turns itself off
B
attery
empty
Connect the power supply
to charge the battery.

16
Problem
Possible
Reason Solution
LightCan
cannot be
turned on
P
ower
button was
pressed too
short
Press and hol
d the button
for about 1 second
B
rightness is
at lowest
level.
Press
“
Brighter
”
button
on
the remote control
Battery is
deeply
discharged
Connect the 18V power
supply or charge the
LightCan in the Tourcase. It
may take several hours
until the charge will start
LightCan glows
permanently
red/green
Regular
battery
status
indicator
The battery status will be
shown by a glow of LEDs.
This feature can be
disabled. Instructions can
be found above in
“Disabling of the Battery
Status Indicator” section
This manual suits for next models
3
Table of contents
Other Ape Labs Dj Equipment manuals