Appliance AAC Design 11000 A - PTC User manual

AAC Design 11000 A - PTC
2
6
5
3
4
FIN
GEBRAUCHSANWEISUNG
BRUGSANVISNING
INSTRUCCIONES DE USO
MANUEL D'UTILISATION
KÄYTTÖOHJE
OPERATING MANUAL
2
22
42
62
82
102
man_AAC design 11000_1.qxd 07-03-2008 14:21 Pagina 1

4
102
CONTENTS
A. Safety instructions
B. Parts
identification
C. Operation with remote control
D. Special function
E. Manual operation.
F. Adjusting air flow direction.
G. Operation tips
H. How the air conditioner works
I. Operation tips
J. Cleaning and maintenance
K. Troubleshooting tips
L. Guarantee conditions
M. Technical data
READ THIS MANUAL
Inside you will find many helpful hints on how to use and maintain your air conditioner properly. Just a litt-
le preventative care on your part can save you a great deal of time and money over the life of your air con-
ditioner. You'll find many answers to common problems in the chart of troubleshooting tips. If you review
the chart of Troubleshooting Tips first, you may not need to call for service.
G
CAUTION
•Contact an authorised service technician for repair or maintenance of this unit. The installation
must be performed in accordance with national standards and legislation.
G
IMPORTANT NOTES
•Do not operate unit with horizontal louver in closed position.
•Do not operate unit without the air filter.
man_AAC design 11000_1.qxd 07-03-2008 14:22 Pagina 102

ASAFETY INSTRUCTIONS
Install the device only when it complies with local regulations, by-laws and standards. The unit is only sui-
table for use in dry locations, indoors. Check the mains voltage and frequency. This unit is only suitable for
earthed sockets, connection voltage 220 - 240 V. / 50 Hz.
Before connecting the unit, check the following:
•The voltage supply must correspond with the mains voltage stated on the rating label.
• The socket and power supply must be suitable for the current stated on the rating label.
• The plug on the cable of the device must fit into the wall socket.
• The device must be placed and mounted on a stable surface.
The electricity supply to the device must be checked by a recognised professional if you have any doubts
regarding the compatibility.
•This device is manufactured according to CE safety standards. Nevertheless, you must take care, as with
any other electrical device.
• Do not cover the air inlet and outlet grill.
• Never allow the device to come into contact with chemicals.
• Never spray the unit with or submerge in water
• Do not insert hands, fingers or objects into the openings of the unit.
• Never use an extension cable to connect the device to the electric power supply. If there is no suitable,
earthed wall socket available, have one installed by a recognised electrician.
• For safety reasons take care when children are in the surrounding of the device, as with any other elec-
trical device.
• Have any repairs and/or maintenance only carried out by a recognised service engineer or your recognised
Appliance supplier. Follow the instructions for use and maintenance as indicated in the user manual of this device.
• Always remove the plug of the unit from the wall socket when it is not in use.
•Adamaged power cord or plug must always be replaced by a recognised electrician or your supplier.
• Do not operate or stop the airconditioner by inserting or pulling out the power plug. Only use the dedi-
cated buttons on the airconditioner or on the remote control.
•Do not open the airconditioner when it is in operation. Always pull out the electrical plug when ope-
ning the device.
• Always pull out the electrical plug when cleaning or servicing the airconditioner.
• Do not place gas burners, ovens and/or stoves in the airstream.
• Do not operate the buttons or touch the airconditioner with wet hands.
•Note that the outdoor unit produces sound when in use, this could interfere with local legislation, it is the
responsibility of the user to check and to make sure the equipment is in full compliance with local legislation.
G
IMPORTANT
•The device MUST always have an earthed connection. If the power supply is not earthed, you
may not connect the unit. The plug must always be easily accessible when the unit is connected.
Read these instructions carefully and follow the instructions.
•The airconditioner contains a refrigerant and can be classified as pressurized equipment.
Therefore always contact an authorized installation specialist for installation and maintenance
of the airconditioner. It is to be advised that the airconditioner is inspected and serviced on an
annual base by an authorized airconditioning engineer.
4
103
man_AAC design 11000_1.qxd 07-03-2008 14:22 Pagina 103

4
104
• It is advised to stay out of the direct airstream.
• Never drink the drain water from the airconditioner.
To prevent injury to the user or other people and property damage, the following instructions must be fol-
lowed. Incorrect operation due to ignoring of instructions may cause harm or damage. The seriousness is
classified by the following indications.
CAUTION This symbol indicates the possibility of death or serious injury.
WARNING This symbol indicates the possibility of injury or damage to property.
*Meanings of symbols used in this manual are as shown below.
CAUTION Never do this.
WARNING Always do this.
G
ATTENTION!
• Never use the device with a damaged power cord, plug, cabinet or
control panel.
• Failing to follow the instructions may lead to nullification of the
guarantee on this device.
Plug in power plug properly. Do not operate or stop the unit by inserting or
pulling out the power plug.
Do not damage or use an unspecified power
cord.
• Otherwise, it may cause electric shock or fire
due to excess heat generation.
• It may cause electric shock or fire due to heat
generation.
•It may cause an explosion or fire.
• If the power cord is damaged, it must be repla-
ced by the manufacturer or an authorised serv-
ice center or a similarly qualified person in
order to avoid a hazard.
Do not modify power cord length or share the
outlet with other appliances.
Do not operate with wet hands or in damp
environment.
Always install circuit breake and a dedicated
power circuit.
•It may cause electric shock or fire due to heat
generation. •It may cause fire and electric shock. •No installation may cause fire and electric
shock.
Always ensure effective earthing. Do not allow water to run into electric parts. Do not open the unit during operation.
• No earthing may cause electric shock. • It may cause failure of machine or electric
shock.
• It may cause failure of machine or electric
shock.
Unplug the unit if strange sounds, smell or
smoke comes from it. Do not use the socket if it is loose or damaged.
Do not use the power cord near flammable gas
or combustibles, such as gasoline, benzene,
thinner, etc.
• It may cause electric shock. • It may cause fire and electric shock. • It may cause explosion, fire and, burns.
Ventilate room before operating air conditio-
ner if there is a gas leakage from another
appliance.
Do not use the power cord close to heating
appliances. Do not disassemble or modify unit.
• It may cause explosion, fire and, burns. • It may cause fire and electric shock. • It may cause failure and electric shock.
man_AAC design 11000_1.qxd 07-03-2008 14:22 Pagina 104

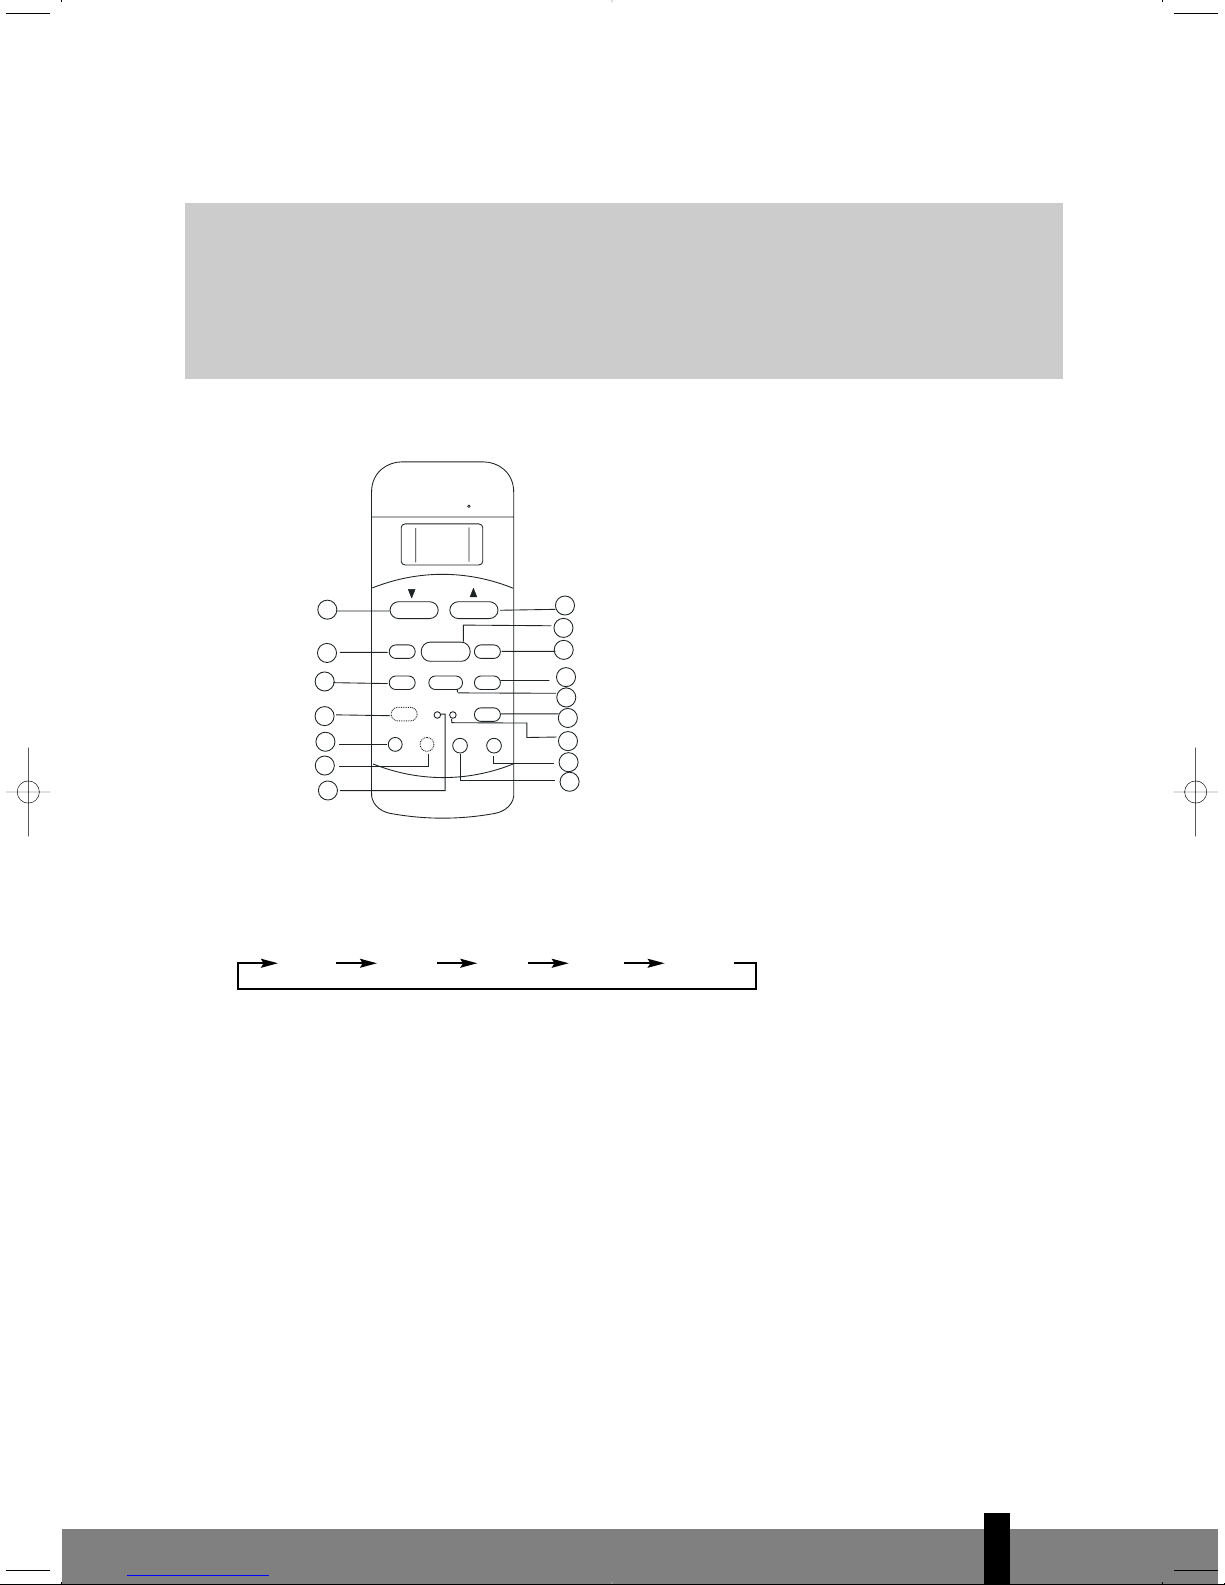
SAFETY PRECAUTIONS • PRIOR TO OPERATION
Preparing for operation
1. Plug in the power plug properly.
2. Do not use a damaged or non-standard power cord.
3. Do not share the same outlet with other appliances.
4. Do not use an extension cord.
5. Do not start/stop operation by plugging/unplugging the power cord.
Usage
1. Exposure to direct airflow for an extended period of time could be hazardous to your health. Do not
expose occupants, pets, or plants to direct airflow for extended periods of time.
2. Ventilate the room well when used together with a stove or other sources of combustion to avoid the
risk of oxygen shortage.
3. Do not use this air conditioner for non-specified special purposes (e.g. Preserving precision devices,
food, pets, plants, and art objects). Usage in such a manner could harm such property.
Cleaning and maintenance
1. Do not touch the metal parts of the unit when removing the filter. Injuries can occur when handling
sharp metal edges.
2. Do not use water to clean inside the air conditioner.Exposure to water can destroy the insulation,
leading to possible electric shock.
4
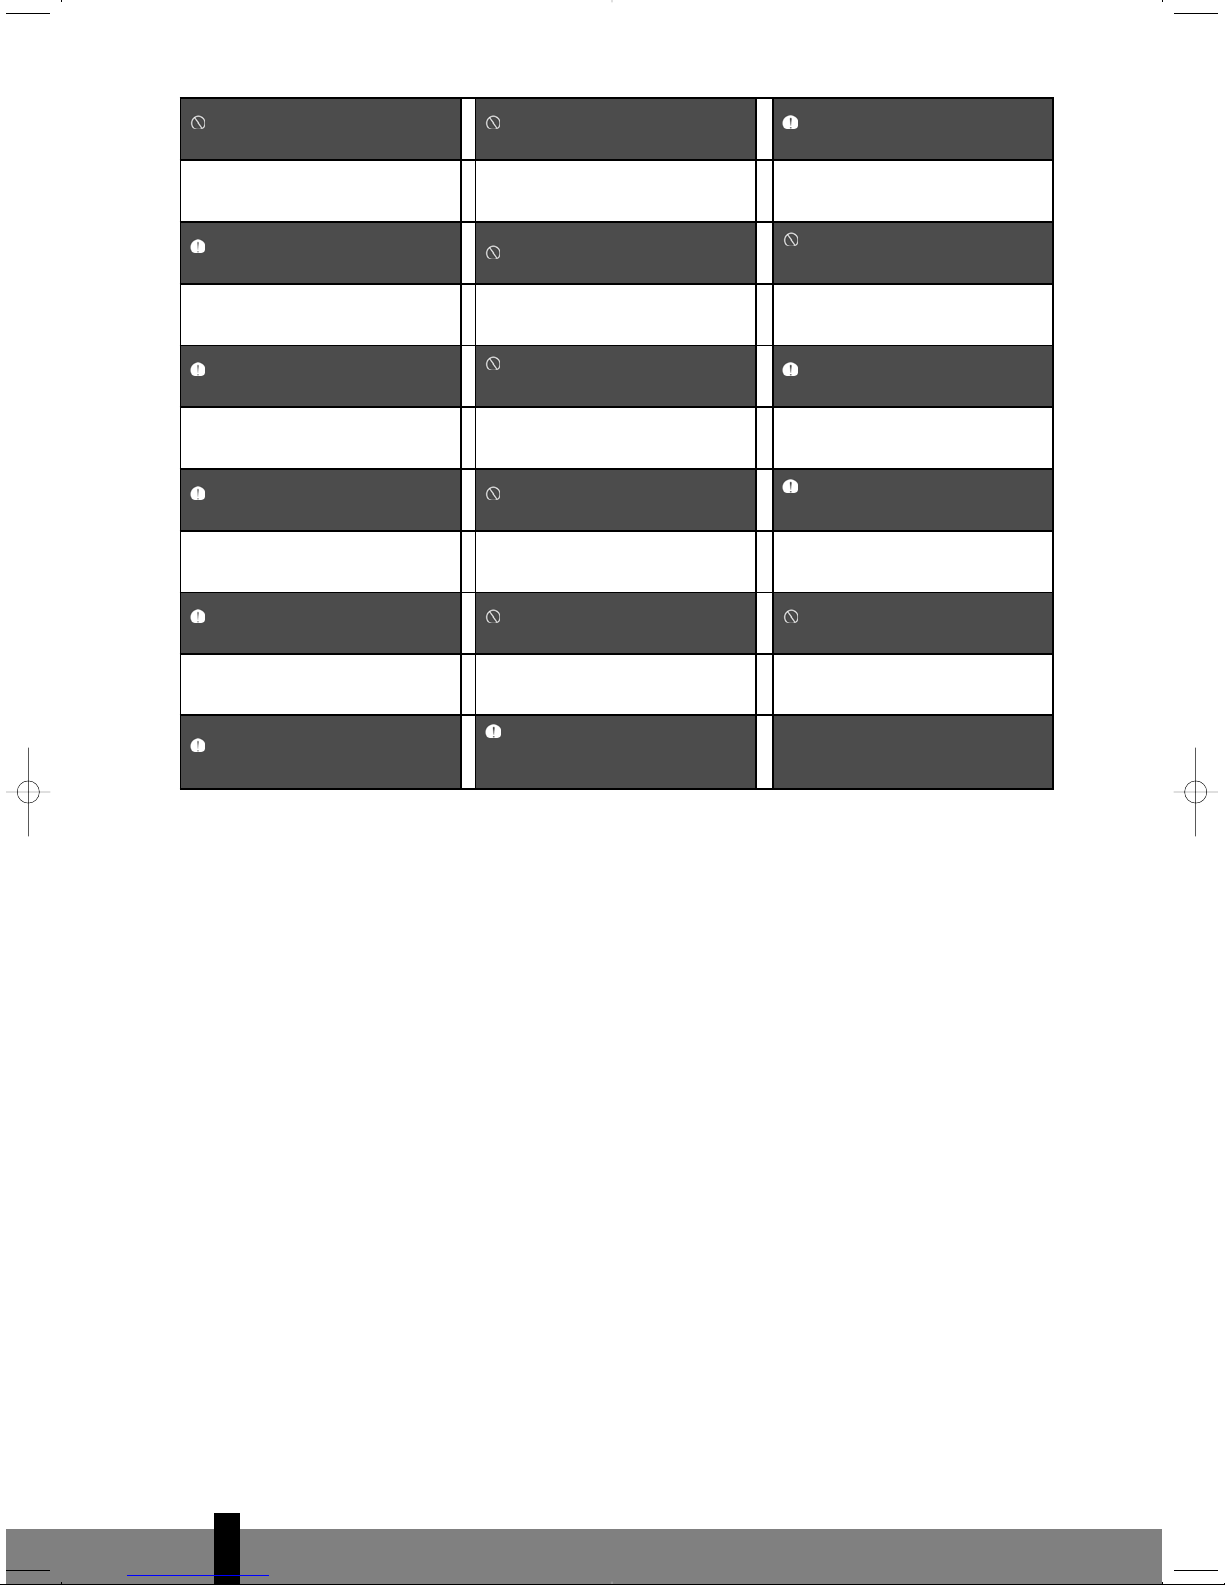
When the air filter is to be removed, do not
touch the metal parts of the unit.
Do not operate or stop the unit by inserting or
pulling out the power plug.
Ventilate the room well when used together
with a stove, etc.
• It may cause an injury. • It may cause electric shock or fire due to heat
generation. • An oxygen shortage may occur.
When the unit is to be cleaned, switch off, and
turn off the circuit breaker. Do not clean the air conditioner with water.
Do not use this air conditioner to preserve pre-
cision devices, food, pets, plants, and art
objects.
• Do not clean unit when power is on as it may
cause fire and electric shock, it may cause an
injury.
• Water may enter the unit and degrade the
insulation. It may cause an electric shock. • It may cause deterioration of quality, etc.
Stop operation and close the window in storm
or hurricane .
Do not put a pet or house plant where it will
be exposed to direct air flow. Turn off the main power switch when not
using the unit for a long time.
• Operation with windows opened may cause
wetting of indoor and soaking of household
furniture.
• This could injure the pet or plant. • It may cause failure of product or fire.
Hold the plug by the head of the power plug
when taking it out.
Do not place obstacles around air inlets or insi-
de of air-outlet.
Ensure that the installation bracket of the out-
door appliance is not damaged due to prolon-
ged exposure.
• Failure to do so may cause electric shock and
damage. • It may cause failure of appliance or accident. • If bracket is damaged, there is concern of
damage due to falling of unit.
Always insert the filters securely. Clean filter
once every two weeks.
Do not use strong detergent such as wax or
thinner. Use a soft cloth forcleaning.
Do not drink water drained from air conditio-
ner.
• Operation without filters may cause failure.
• Appearance may be deteriorated due to change
of product colour or scratching of its surface.
• There is danger of fire or electric shock.
• It contains contaminants and could make you
sick.
Use caution when unpacking and installing.
Sharp edges could cause injury.
If water enters the unit, turn the unit off at the
power outlet and switch offthe circuit breaker.
Isolate supply by taking the powerplug out
and contact a qualified service technician.
105
man_AAC design 11000_1.qxd 07-03-2008 14:22 Pagina 105

4
106
3. When cleaning the unit, first make sure that the power and circuit breaker are turned off.
Service
For repair and maintenance, contact your authorised service dealer.
Operating Temperature
BPARTS IDENTIFICATION
INDOOR UNIT INDOOR UNIT
aFront panel frame
bRear air intake grille
cFront panel
dAir Purifying filter & Air filter
eHorizontal airflow grille
fLCD display window
gVertical airflow grille (manual)
hManual control switch/auto-cool
iDrain pipe
OUTDOOR jRemote controller holder
UNIT kRemote controller
OUTDOOR UNIT
lConnecting pipe
mConnective cable
nStop valve
oFan hood
G
NOTE:
•All the pictures in this manual are for explanation purpose only.They may be slightly different
from the air conditioner you purchased. The actual shape shall prevail.
G
NOTE:
•Optimum performance will be achieved within these operating temperatures.
COOLING MODE
INDOOR OUTDOOR
MAX. MIN. MAX. MIN.
32°C 17°C 43°C 11°C
HEATING MODE
INDOOR OUTDOOR
MAX. MIN. MAX. MIN.
27°C 10°C 24°C -15°C
Signal transmitter
Air intake
Air outlet
Air intake
fig. 1
Air intake
man_AAC design 11000_1.qxd 07-03-2008 14:22 Pagina 106

LCD DISPLAY WINDOW
OPERATION indication lamp
This lamp illuminates when the air conditioner is in operation.
AUTO CLEAN indication lamp (optional)
Lights up during the Auto operation.
TIMER indication lamp
Lights up during Timer operation.
CLEAN AIR indication lamp
Lights up when CLEAN AIR feature is activated and Ionizer can generate abundant anions to fill the
room with refreshing and natural air.
TURBO indication lamp (only 14000 A-PCT)
Lights up when select TURBO function on cooling operation or on heating operation.
DEFROST indication lamp
(For reverse cycle model only): Lights up when the air conditioner starts defrosting automatically or
when the warm air control feature is activated in heating operation.
DIGITAL DISPLAY indication lamp (only 14000 A-PCT)
Displays the current setting temperature when the air conditioner is in operation. When AUTO CLEAN
feature is activated, it displays.
FAN SPEED indication lamp
Displays the selected fan speed: AUTO(nothing) and three fan speed levels: LOW, MED and HIGH
This display is separated into three zones. Once the indoor fan is on, the zones illuminate gradually.
4
107
fig. 2
man_AAC design 11000_1.qxd 07-03-2008 14:22 Pagina 107

4
108
COPERATION WITH REMOTE CONTROL
Introduction of Function Buttons on the Remote Controller
aOn/offButton: Push this button to start the unit operation. Push the button again to stop the unit
operation.
bMode Button: Each time you press the button, a mode is selected in a sequence that goes from AUTO
COOL DRY HEAT and HEALTH as the following figure indicates:
AUTO COOL DRY HEAT HEALTH
c▲Button: Push the button to increase the indoor temperature setting to 30ºC.
d▼Button: Push the button to decrease the indoor temperature setting to 17ºC.
eFan Speed Button: This button is used for selecting Fan Speed. Each time you press the button, a fan
speed is selected in a sequence that goes from AUTO, LOW, MED to HIGH, then back to AUTO. When
you select the AUTO or DRY mode, the fan speed will be automatically controlled and you can not set
the fan speed.
fSLEEP Button: Press this button to go into the Energy-Saving operation mode. Press it again to cancel.
This function can only be used on COOL, HEAT and AUTO mode and maintain the most comfortable
temperature for you.
NOTE: While the unit is running under SLEEP operation mode, it would be cancelled if you press the
other button.
gSwing Button: Press the SWING button to activate the swing feature. Push the button again to stop.
Press this button to change the swing angle of the louver. The swing angle of the louver is 6ofor each
press. When the louver swing at a certain angle which would affect the cooling and heating effect of
the air conditioner,it would automatically change the swing direction. No symbol will appear in the dis-
play area when this button is pressed.
ADJUST
AUTO
COOL
DRY
HEAT
HEALTH
HIGH
MED
LOW
MODE FAN SPEED
DIRECTION
/SWING
TIMER ON
SLEEP
ON/OFF
TIMER OFF
SELF
CLEAN
RESET LOCK
43
7
15
16
2
10
14
1
5
8
6
9
SET TEMPERATURE( C)
FOLLOW
ME LED
DISPLAY
11
CLEAN
AIR
TURBO
13
12
G
NOTE!
• Always aim the remote controller towards the receiver on the indoor unit and make sure there
are no obstacles in between the remote control and the receiver on the indoor unit. Otherwise
the remote control signal will not be picked up by the receiver and the air conditioner will not
work properly.
• The maximum distance at which the remote control will work is approximately 6 to 7 meters.
fig. 3
man_AAC design 11000_1.qxd 07-03-2008 14:22 Pagina 108

hTimer on Button: Press this button to initiate the auto-on time sequence. Each press will increase the
auto-timed setting in 30 minutes increments. When the setting time displays 10Hr, each press will incre-
ase the auto-timed setting 60 minutes increments. To cancel the auto-timed program, continue pressing
the button until time setting is 0.0.
iTimer off Button: Press this button to initiate the auto-off time sequence. Each press will increase the
auto-timed setting in 30 minutes increments. When the setting time displays 10Hr, each press will incre-
ase the auto-timed setting 60 minutes increments. To cancel the auto-timed program, continue pressing
the button until time setting is 0.0.
jRESET Button: When you press the recessed RESET button, all current settings are cancelled and the
control will return to the initial settings.
kLOCK Button: When you press the recessed LOCK button, all current settings are locked in and the
remote controller does not accept any operation except that of the LOCK. Press again to cancel the
LOCK mode.
lLED DISPLAY Button: Press this button to clear the digit display in the air conditioner, press it again
to activate it, max. 30 minutes. (Not applicable to units without this function).
mTURBO Button: Push this button on COOL mode, the air conditioner goes into powerful cooling ope-
ration. Push again to cancel the TURBO function. (Not applicable to units without this function)
nFollow Me function: The remote control serves as a remote thermostat allowing you to precisely
adjust the temperature at the location of the remote control near you. To activate the Follow Me fea-
ture, point the remote control towards the unit and press the Follow Me button. The display on the
remote control shows the actual temperature at its location. The remote control will send this infor-
mation to the air conditioner every 3 minutes, until the Follow Me button is pressed again. If the unit
does not receive the Follow Me signal for 7 minutes, the unit will beep to indicate that the Follow Me
mode has ended.
oCLEAN AIR function: Air quality is the key to comfort, this air conditioner is equipped with Ionizer
device. Ionizer can generate abundant anions to fill the room with refreshing and nature air. Your
whole family will enjoy a natural, pure and healthy air everyday.
pAuto Clean function (optional): Function used after the Shut Down of cooling operation to clean
the Evaporator and keep it as fresh for the next operation. This function is only available under
COOL(AUTO COOL, FORCED COOL) and DRY mode. Once the Auto Clean function is activated, all TIMER
setting will be cancelled. During Auto Cleaning operation, Press the AUTO CLEAN button again will
stop the operation and turn off the unit.
Names and Functions of indicators on Remote Controller
TIMERONOFF
SET TEMPERATURE
4213
4
7
8
6
5
4
fig. 4
109
man_AAC design 11000_1.qxd 07-03-2008 14:22 Pagina 109

4
110
Display Panel
aDIGITAL DISPLAY area: This area will show the set temperature and, if in the TIMER mode, will show
the ON and OFF settings of the TIMER. If in the HEALTH mode, nothing is appeared.
bTRANSMISSION Indicator: This indicator lights when remote controller transmits signals to the indoor
unit.
cON/OFF Indicator: This symbol appears when the unit is turned on by the remote controller, and disap-
pear when the unit is turned off.
dOPERATION MODE Indicator: When press the MODE button, it shows the current operating mode --
AUTO COOL DRY HEAT (Cooling only model without) HEALTH mode.
eLOCK Indicator: LOCK display is displayed by pushing the LOCK button. Push the LOCK button to clear
display.
fTIMER DISPLAY Indicator: This display area shows the settings of the TIMER. That is, if only the star-
ting time of operation is set, it will display the TIMER ON. If only the turning off time of operation is
set, it will display the TIMER OFF. If both operations are set, it will show TIMER ON-OFF which indicates
you have chosen to set both the starting time and off time.
gFAN SPEED Indicator: Press the FAN SPEED button to select the desired fan speed setting (Auto-Low-
Med-High). Your selection will be displayed in the LCD window except the Auto fan speed.
hFOLLOW ME Indicator: This symbol appears when the FOLLOW ME button is pressed
Operating the Remote Controller
Install / Replace Batteries
Use two dry alkaline batteries (AAA/LR03).
Do not use rechargeable batteries.
1. Remove the battery cover on the back of the Remote Control by pulling it according to the arrow
direction shown on the cover.
2. Insert new batteries making sure that the (+) and (-) of battery are installed correctly.
3. Reattach the cover by sliding it back into position.
AUTOMATIC Operation
When the Air Conditioner is ready for use, switch on the power and the OPERATION indicator lamp on the
display panel of the indoor unit starts flashing.
1. Use the Mode select button to select AUTO.
G
NOTE!
•When replacing batteries, do not use old batteries or a different type battery. This may cause
the remote controller to malfunction.
•If you do not use the remote controller for several weeks remove the batteries. Otherwise
battery leakage may damage the remote controller.
•The average battery life under normal use is about 6 months.
•Replace the batteries when there is no answering beep from the indoor unit or if the
Transmission Indicator light fails to appear.
•Never mix new and old batteries. Never use different battery types (e.g. alkaline and
manganese dioxide) simultaneously.
G
NOTE!
All signs shown in the Fig.4 is for the purpose of clear presentation. But during the actual
operation only the relative functional signs are shown on the display panel.
man_AAC design 11000_1.qxd 07-03-2008 14:22 Pagina 110

2. Push the ▲or ▼button to set the desired room temperature. The most comfortable temperature set-
tings are between 21ºC to 28ºC.
3. Push the On/offbutton to start the air conditioner. The OPERATION lamp on the display panel of the
indoor unit lights. The operating mode is AUTO. The FAN SPEED is automatically controlled.
4. Push the On/off button again to stop the unit operation.
COOL, HEAT, and HEALTH (Fan only) Operation
1. If the AUTO mode is not comfortable, you may manually override the settings by using COOL, DRY,
HEAT (HEAT PUMP units only) or HEALTH modes by pressing button b.
2. Push
the ▲or ▼button (cand d)to set the desired room temperature. When in COOLING mode, the
most comfortable settings are 21ºC or above. When in HEATING mode, the most comfortable settings
are 28ºC or below.
3. Push the Fan Speed button eto select the FAN mode of AUTO, HIGH, MED or LOW.
4. Push
the On/off button a.The operation lamp lights and the air conditioner starts to operate per your
settings. Push the On/off button aagain to stop this unit operation.
DRYOperation
1. Push the Mode button bto select DRY.
2. Push the ▲or ▼button (cand d)to set the desired temperature from 21ºC to 28ºC.
3. Push the On/off button a.The operation lamp lights and the air conditioner starts to operate in the DRY
mode. Push the On/off button aagain to stop this unit operation.
TIMER Operation
Push Timer on/off button (iand j)to set the on and off times of the unit. The effective operation time
set by the remote controller for the timer function is limited to a period of between 0.5 and less than 24
hours.
1. To set the STARTING time.
1.1
Push the Timer on button i,then the remote controller display shows ON TIMER,the last set time for
the starting operation and the signal "Hr"will be shown on the digital display area. You are now ready
to reset the time to START the operation.
G
NOTE!
Due to the difference of the set temperature of the unit and the actual indoor temperature, the
Air Conditioner when in DRY mode will automatically operate many times without running the
COOL and FAN mode.
G
NOTE!
The HEALTH mode cannot be used to control the temperature. In this mode, only steps 1, 3 and 4
are applicable.
G
NOTE!
•In the AUTO mode, the air conditioner can logically choose the mode COOL, FAN, HEAT and
DRY by sensing the difference between the actual ambient room temperature and the set
temperature on the remote controller.
•If the AUTO mode is not comfortable for you , the desired mode can be selected manually.
4
111
man_AAC design 11000_1.qxd 07-03-2008 14:22 Pagina 111

4
112
1.2
Push the Timer on button iagain to set desired unit start time.
1.3
After setting the Timer on ,there will be half a second delay before the remote controller transmits the
signal to the air conditioner. Then, after approximately another 2 seconds, the signal "h" disappears
and the set temperature will re-appear on the digital display.
2. To set the STOPPING time.
2.1
Push the Timer off button jand the remote controller display will show OFF TIMER and the last set
time for the timer off operation in hours will be shown on the Timer display area. You are now ready
to reset the time of the STOP operation.
2.2
Push the Timer off button jagain to set the time you want to stop the operation.
2.3
After setting the Timer off,there will be half a second delay before the remote controller transmits
the signal to the air conditioner. Then, after approximately another 2 seconds, the signal "h" disappe-
ars and the set temperature will re-appear on the digital display.
3. Set the starting & stopping time
3.1
Push the Timer on button i,the remote controller display will show ON TIMER,the last set time for
Timer on operation in hours will be shown on the Timer display area. You are now ready to readjust
the Timer on to start the operation.
3.2
Push the Timer on button iagain to set the time you want to start the operation.
3.3
Push the Timer off button j,the remote controller will show OFF TIMER,the last set time for STOP
operation and the signal "Hr" will be shown on the Timer display area. You are now ready to set the
time to STOP operation.
3.4
Push the Timer off button jagain to set the time you want to stop the operation.
3.5
After setting the TIMER, there will be half a second delay before the remote controller transmits the
signal to the Air Conditioner. Then, after approximately another 2 seconds, the signal "h" disappears
and the set temperature will re-appear on the digital display.
DSPECIAL FUNCTION
Follow Me function
The remote control serves as a remote thermostat allowing you to precisely adjust the temperature at the loca-
tion of the remote control near you.
G
WARNING
• Keep the Remote Controller away from all liquids.
• Protect the Remote Controller from high temperatures and exposure to radiation.
• Keep the indoor receiver out of direct sunlight or the Air Conditioner may malfunction.
• Never mix new and old batteries. Never use different battery types (e.g. alkaline and
manganese dioxide) simultaneously.
G
NOTE!
• If the same time is set for both START and STOPPING settings, the stopping time will
automatically increase 0.5hr (the set time displays less than 10Hr) or one hour (the set time
displays 10Hr or more).
• Tochange the Timer on/off time, just press the corresponding TIMER button and reset the
time.
• The setting time is relative time. That is the time set is based on the delay of the current time.
man_AAC design 11000_1.qxd 07-03-2008 14:22 Pagina 112

To activate the Follow Me feature, point the remote control towards the unit and press the Follow Me button.
The display on the remote control shows the actual temperature at its location. The remote control will send
this information to the air conditioner every 3 minutes, until the Follow Me button is pressed again. If the unit
does not receive the Follow Me signal for 7 minutes, the unit will beep to indicate that the Follow Me mode
has ended.
CLEAN AIR function
Air quality is the key to comfort, this air conditioner is equipped with Ionizer device. Ionizer can generate
abundant anions to fill the room with refreshing and nature air. Your whole family will enjoy a natural, pure
and healthy air everyday.
Auto Clean function(optional)
Function used after the Shut Down of cooling operation to clean the Evaporator and keep it as fresh for the
next operation. This function is only available under COOL(AUTO COOL, FORCED COOL) and DRY mode.
Once the Auto Clean function is activated, all TIMER setting will be cancelled. During Auto Cleaning opera-
tion, Press the AUTO CLEAN button again will stop the operation and turn off the unit.
Dry & Antibacterial function
When turning off the unit on COOL, DRY, AUTO (Cool) mode, the air conditioner will continue operating
for 10 minutes at LOW fan speed. This will help to dry up the water (sweating) inside the evaporator, and
prevent bacterial from multiplying, supply clean and fresh air. This function is a factory default setting. If
you want to cancel it, use the remote controller to select the FAN mode, press the ON/OFF button to turn
on the unit, press the ON/OFF button again to turn offthe unit after 5 seconds.
EMANUAL OPERATION
Manual operation can be used temporarily in case you can't find the remote con-
troller or its batteries are exhausted.
1. Open and lift the front panel up to an angle until it remains fixed with a clic-
king sound.
2. Press the button and the Operation lamp lights up, the unit will operate in
"AUTO" mode (the setting temperature is locked on 24 ºC).
3. Press the button twice to turn offthe air conditioner.
G
CAUTION
• Once you push the manual control button, the operation mode is shifted in an order as: AUTO-
-COOL--OFF.
• Push the manual control button to operate in forced COOL mode, this is used for testing
purposes only.
• To restore the remote controller operation, use the remote controller directly.
G
NOTE!
Under DRY & Antibacterial mode, do not restart the air conditioner until the unit is completely
off.
4
AUTO /
COOL
Manual
control
button fig. 5
113
man_AAC design 11000_1.qxd 07-03-2008 14:22 Pagina 113

4
114
FADJUSTING AIR FLOW DIRECTION
•Adjust the air flow direction properly otherwise, it might cause discomfort
or cause uneven room temperatures.
• Adjust the horizontal louver using the remote control.
• Adjust the vertical louver manually.
Adjusting the Vertical Air Flow Direction (up - down)
The air conditioner automatically adjusts the vertical air flow direction in accor-
dance with the operating mode.
To set the vertical air flow direction
Perform this function while the unit is in operation. Press the SWING button on the
remote control to move the louver, and press it again when the louver gets to the
desired direction.
• Adjust the vertical air flow direction to the desired direction.
• When starting operations, the vertical air flow is automatically set in the
direction written in micro-processor.
To set the horizontal air flow direction (left - right)
Adjust the vertical louver manually using the lever on the left or right side of the
vertical louver arm (depending on model). Take care not to catch fingers on the
fan, horizontal louver or to damage vertical louvers.
When the air conditioner is in operation and the horizontal louver is in a specific
position, move the lever at left (or right, depending on model) end of the air out-
let to the desired position.
To automatically swing the air flow direction (up - down)
Perform this function while the air conditioner is in operation. Keep pressing the SWING button on the
remote control for more than 2 seconds, the horizontal louvers swing automatically.
•To stop the function, press the SWING button once again.
G
CAUTION
• The SWING buttons will be disabled when the air conditioner is not in operation.
• Do not operate the air conditioner for long periods with the air flow direction set downward
in cooling or dry mode. Otherwise, condensation may occur on the surface of the horizontal
louver causing moisture to drop on to the floor or furnishing.
• Do not move the horizontal louver manually.Always use the SWING button. If you move this
louver manually, it may malfunction during operation. If the louver malfunctions, stop the air
conditioner once and restart it.
• When the air conditioner is started immediately after it is stopped, the horizontal louver might
not move for approximately 10 seconds.
• Open angle of the horizontal louver should not be set too small, as Cooling or Heating
performance may be impaired due to too restricted air flow area.
• Do not operate unit with horizontal louver in closed position. When the air conditioner is
connected to power (initial power), the horizontal louver may generate a sound for 10
seconds, this is a normal operation.
• When the air conditioner is connected to power (initial power), the horizontal louver may
generate a sound for 10 seconds, this is a normal operation.
Range
fig. 6
man_AAC design 11000_1.qxd 07-03-2008 14:22 Pagina 114

GOPTIMAL OPERATION
To achieve Optimal performance, please note the following:
•Adjust the air flow direction correctly so that it is not directed on people. Adjust the temperature to
achieve the highest comfort level. Do not adjust the unit to excessive temperature levels.
•Close doors and windows on COOL or HEAT modes, otherwise performance may be reduced. Use
Timer ON button on the remote control to select a time you want to start your air conditioner.
•Do not put any object near air inlet or air outlet, as the efficiency of the air conditioner may be redu-
ced and the air conditioner may stop running.
•Clean the air filter periodically, otherwise cooling or heating performance may be reduced.
•Do not operate unit with horizontal louver in closed position.
HHOW THE AIR CONDITIONER WORKS
AUTOMATIC OPERATION
• When you set the air conditioner in AUTO mode, it will automatically select
cooling, heating(cooling/heating models only), or fan only operation depen-
ding on what temperature you have selected and the room temperature.
• The air conditioner will control room temperature automatically round the
temperature point set by you.
•If the AUTO mode is uncomfortable, you can select desired conditions manu-
ally.
SLEEP OPERATION
•When you push SLEEP button during cooling, heating (cooling only type without),
or AUTO operation, the air conditioner will automatically increase (cooling)
or decrease (heating) 1 ºC per hour. The set temperature will be steady 2
hours later. The fan speed will be automatically controlled. Note: The unit
will be automatically turned off after 7 hours when on SLEEP operation.
DRYING OPERATION
• The dry mode will automatically select the drying operation based on the
difference between the set temperature and the actual room temperature.
• The temperature is regulated while dehumidifying by repeating turning on
and off of the cooling operation or fan only. The fan speed is LOW.
IOPERATION TIPS
The following events may occur during normal operation.:
1. Protection of the air conditioner.
•Compressor protection
•The compressor can't restart for 3 minutes after it stops.
•Anti-cold air (Reverse cycle models only)
The unit is designed not to blow cold air on HEAT mode, when the indoor heat exchanger is in one
of the following three situations and the set temperature has not been reached.
A) When heating has just starting.
B) Defrosting.
1
1
1
1
4
Press Sleep button
Press Sleep button
COOLING
HEATING
DRYING
Set
Tempe-
rature
1hour 1hour
1hour 1 hour
Set
Tempe-
rature
Set temperature
Time
Room
tempe-
rature
Cooling Fan only Cooling Fan only Cooling
fig. 7
115
man_AAC design 11000_1.qxd 07-03-2008 14:22 Pagina 115

4
116
C) Low temperature heating.
The indoor or outdoor fan stop running when defrosting (Reverse cycle models only).
•Defrosting (Reverse cycle models only)
Frost may be generated on the outdoor unit during heat cycle when outdoor temperature is low
and humidity is high resulting in lower heating efficiency of the air conditioner.
•Under this condition, the air conditioner will stop heating operation and start defrosting automa-
tically.
•The time to defrost may vary from 6 to 10 minutes according to the outdoor temperature and the
amount of frost build up on the outdoor unit.
2. A white mist coming out from the indoor unit
•Awhite mist may generate due to a large temperature difference between air inlet and air outlet
on COOL mode in an indoor environment that has a high relative humidity.
•Awhite mist may generate due to moisture generated from defrosting process when the air con-
ditioner restarts in HEAT mode operation after defrosting.
3. Low noise of the air conditioner
•You may hear a low hissing sound when the compressor is running or has just stopped running. This
sound is the sound of the refrigerant flowing or coming to a stop.
•You can also hear a low "squeak" sound when the compressor is running or has just stopped run-
ning. This is caused by heat expansion and cold contraction of the plastic parts in the unit when the
temperature is changing.
• A noise may be heard due to louver restoring to its original position when power is first turned on.
4. Dust is blown out from the indoor unit.
This is a normal condition when the air conditioner has not been used for a long time or during first
use of the unit.
5. Apeculiar smell comes out from the indoor unit.
This is caused by the indoor unit giving offsmells permeated from building material, from furniture,
or smoke.
6. The air conditioner turns to FAN only mode from COOL or HEAT (reverse cycle models only) mode.
When indoor temperature reaches the temperature setting on air conditioner, the compressor will
stop automatically, and the air conditioner turns to FAN only mode. The compressor will start again
when the indoor temperature rises on COOL mode or falls on HEAT mode (reverse cycle models only)
to the set point.
7. Dripping water may generate on the surface of the indoor unit when cooling in a high relatively
humidity (relative humidity higher than 80%). Adjust the horizontal louver to the maximum air out-
let position and select HIGH fan speed.
8. Heating mode (Reverse cycle models only)
The air conditioner draws in heat from the outdoor unit and releases it via the indoor unit during
heating operation. When the outdoor temperature falls, heat drawn in by the air conditioner decre-
ases accordingly.At the same time, heat loading of the air conditioner increases due to larger diffe-
rence between indoor and outdoor temperature. If a comfortable temperature can't be achieved by
the air conditioner, we suggest you use a supplementary heating device.
9. Auto-restart function
After the power cut-off, the air conditioners can automatically restore the previous function setting.
10. Lightning or a car wireless telephone operating nearby may cause the unit to malfunction.
Disconnect the unit with power and then re-connect the unit with power again. Push the ON/OFF but-
ton on the remote controller to restart operation.
man_AAC design 11000_1.qxd 07-03-2008 14:22 Pagina 116

JCLEANING AND MAINTENANCE
Cleaning the indoor unit
1. Use a dry cloth.
2. A cloth dampened with cold water may be used if the indoor unit is very dirty.
3. The front panel of the indoor unit can not be removed. Wipe it with a dry
cloth after cleaned.
Cleaning the Air filter
The air filters behind the front panel should be checked and cleaned once every 2
weeks or more often if necessary. A clogged air filter will reduce cooling/heating
efficiency.
1. Grasp both sides of the panel and pull it down, the panel opened upward to an angle of 15º. Push the
panel upward and then lift it up.
2. Take hold of the handle of the air filter and lift it up slightly to take it out from the filter holder, then
pull it downwards.
3. Remove the AIR FILTER from the indoor unit.
•Clean the AIR FILTER once two weeks.
•Clean the AIR FILTER with a vacuum cleaner or water, then dry it up in cool place.
4. Install the air filter back into position.
5. Insert the upper portion of air filter back into the unit taking care that the left and right edges line up
correctly and place filter into position.
Cleaning the Rear Air Inlet Grille
G
CAUTION!
• Do not use detergent or other chemical products during cleaning.
Further, do not put these products near the indoor unit.
• Do not use benzene, thinner, polishing powder or other similar
solvent to clean the unit.
G
CAUTION
Turn the system off before cleaning.
G
WARNING
Before performing any maintenance, turn off the main power to the
system.
4
Filter handle
Rear air inlet grille Rear air inlet grille
fig. 8
fig. 9
117
man_AAC design 11000_1.qxd 07-03-2008 14:22 Pagina 117

4
118
The rear air inlet grille should be checked and cleaned once every 2 weeks or more often if necessary. A clog-
ged air inlet grille will reduce cooling/heating efficiency.
1. Push the right and left sides of the grille with your thumb and lift it upward, then take it out.
2. Clean it with water, then use a dry cloth to wipe it.
3. Insert the upper portion of grille back into the unit, taking care that the left and right edges line up
correctly and place grille into position.
MAINTENANCE
Check if the air inlet or outlet is blocked after the air conditioner has not been used for a long time. If
yes, clean them.
•Perform the following operation if the air conditioner is not going to be used for a long time:
1. Clean the indoor unit and air filter.
2. Select HEALTH mode, let the indoor fan run for a while to dry the inside of the unit.
3. Disconnect the power supply and remove battery from the remote control.
4. Check components of the outdoor unit periodically. Contact a local dealer or a customer service cen-
tre if the unit requires servicing.
•Check beforeoperate the unit after a long time unused:
1. Check that the wiring is not damaged or disconnected.
2. Check that the air filter is installed.
3. Check if the air outlet or inlet is blocked.
G
NOTE!
Before you clean the air conditioner, be sure to switch the unit off and disconnect the power
supply plug.
man_AAC design 11000_1.qxd 07-03-2008 14:22 Pagina 118

KTROUBLE SHOOTING TIPS
Malfunctions and Solutions
Problem Cause Solution
Power cut Wait for power to be restored.
Unit may have become unplugged.
Check that plug is securely in wall
receptacle.
Fuse may have blown.
Replace fuse / reset relay / reset
circuitbraker
Battery in Remote controller may have
been exhausted.
Replace the battery.
Distance remote controller to receiver on
the indoor unit is more than 6 to 7 meters,
or there are obstacles in between the
remote controller and the receiver.
Shorten the distance. Remove possible
obstacles. Aim the remote controller
towards the receiver on the indoor unit.
The time you have set with timer is
incorrect.
Wait or cancel timer setting.
Inappropriate temperature setting.
Set temperature correctly. For detailed
method please refer to "operation with
remote control" chapter E.
Air filter is blocked. Clean the air filter.
Doors or windows in room are open. Close the doors or windows.
Air inlet or outlet of indoor or outdoor
unit has been blocked.
Clear obstructions away first, then restart
the unit.
Compressor 3 minutes delay protection
has been activated.
Defrosting of outdoor unit being
performed.
Air conditioner is in automode
Air conditioner is in dry mode
TEMP. Indicator is not
shown
Air conditioner is in fan mode Temperature cannot be set in FAN mode
Wait.
Fan speed cannot be
changed
Fan speed can only be changed in HEAT,
COOL and FAN mode
Unit not cooling or
heating room very well
while air flowing out
from the air
conditioner
Unit does not start
G
Stop the air conditioner immediately if one of the following faults occur. Disconnect the power
and contact the nearest customer service centre.
• Any one of E1, E2, E3, E4, E5 and E6 displays on the indoor unit.
• Fuse blows or circuit breaker trips frequently.
• Other objects or water penetrate the air conditioner.
• The remote controller won't work or works abnormally.
• Other abnormal situations.
4
119
man_AAC design 11000_1.qxd 07-03-2008 14:22 Pagina 119

4
120
If the trouble has not been corrected, please contact a local dealer or the nearest customer service centre.
Be sure to inform them of the detailed malfunctions and unit model.
LGUARANTEE CONDITIONS
The air conditioner is supplied with a 24-month guarantee, commencing on the date of purchase. All mate-
rial and manufacturing defects will be repaired or replaced free of charge within this period. The following
rules apply:
1. We expressly refuse all further damage claims, including claims for collateral damage.
2. Repairs to or replacement of components within the guarantee period will not result in an extension
of the guarantee.
3. The guarantee is invalidated if any modifications have been made, non genuine parts are fitted or
repairs are carried out by third parties.
4. Components subject to normal wear, such as the filter, are not covered by the guarantee.
5. The guarantee is valid only when you present the original, dated purchase invoice and if no modifica-
tions have been made.
6. The guarantee is invalid for damage caused by neglect or by actions that deviate from those in this
instruction booklet.
7. Transportation costs and the risks involved during the transportation of the air conditioner or air con-
ditioner components shall always be for the account of the purchaser.
8. Damage caused by not using suitable filters is not covered by the guarantee.
9. Refrigerant loss and/or leakage because of incompetent (dis)connecting the units is not covered by the
guarantee conditions applicable to this product.
To prevent unnecessary expense, we recommend that you always first carefully consult the instructions for
use. Take the air conditioner to your dealer for repairs if these instructions do not provide a solution.
G
NOTE!
Do not attempt to repair the unit yourself. Always consult an authorised service provider.
man_AAC design 11000_1.qxd 07-03-2008 14:22 Pagina 120
Table of contents
Other Appliance Air Conditioner manuals
Popular Air Conditioner manuals by other brands

Samsung
Samsung AM***FN*D series user manual

Daikin
Daikin J Series Service manual

Daikin
Daikin FTKS40JVLT Service manual

Diplomat
Diplomat DX-80CHRC instruction manual

Fujitsu
Fujitsu AS*G09KXCA Series Service instruction

Trane
Trane Packaged TerminalAir Conditioners & Heat... Installation operation & maintenance