APQS Lenni User manual

Lenni - Lucey Installation Manual for Standard Table
Welcome to APQS Family!
Thank you for selecting APQS as your longarm quilting company! As a family-owned company, we work
hard to make our “new” family members feel welcome, and we provide lifetime customer support. We
are honored to serve you.
This manual includes the necessary information to assemble your Lenni or Lucey Quilting System.
If you are missing any parts or have received incorrect or damaged parts, please call our Customer
Service Team at 800-426-7233 so we can resolve the problem quickly for you. You can also reach us by
email at service@apqs.com.
Even if you are not assembling the machine yourself, please read the assembly instructions and
familiarize yourself with their contents. You’ll learn the different part names and will better understand
your set up should you ever need to call us for service.
Every machine purchased directly from APQS includes a free, 6-hour beginner class. Visit our Event
Calendar to locate a beginner class near you, or contact your local dealer for more information.
Be sure to join the APQS Quilting Channel on YouTube – you’ll find video tutorials on everything from
how to thread your machine to how to quilt feathers, along with helpful maintenance videos. Don’t
forget to “like” us on Facebook and follow the “We Love APQS” Facebook page!
You’ll also find helpful tips on the APQS website at www.apqs.com. Visit the “Resources” and the
“Service and Support” tabs for more videos, our blog, and the answers to the most frequently asked
service questions.
If you have any questions, please contact us. We are here to help!
APQS
1-800-426-7233

2
Lenni – Lucey Standard Table Manual
9-22-21
APQS.com
Table of Contents
APQS Customer Service & Suport ..............................................................................................5
APQS Certified Technicians ........................................................................................................5
Warranty Information ................................................................................................................5
Assembly Preparation Tips.........................................................................................................6
General Assembly Order ............................................................................................................8
Assembly Tools...........................................................................................................................9
Shipping Box Content...............................................................................................................10
Standard Table Step 1: Assemble the Rails & Legs.................................................................11
Standard Table - Step 2: Determine Table Orientation & Attach Legs to Rails.......................13
Standard Table - Step 3: Install the Table Top ........................................................................20
Standard Table - Step 4: Install the Roller End Arms...............................................................22
Step 5 (a): Install the Carriage (Bliss Track) .............................................................................25
Step 5 (b): Install the Carriage (NON-Bliss Track)....................................................................27
Step 6: Install the Sewing Head...............................................................................................31
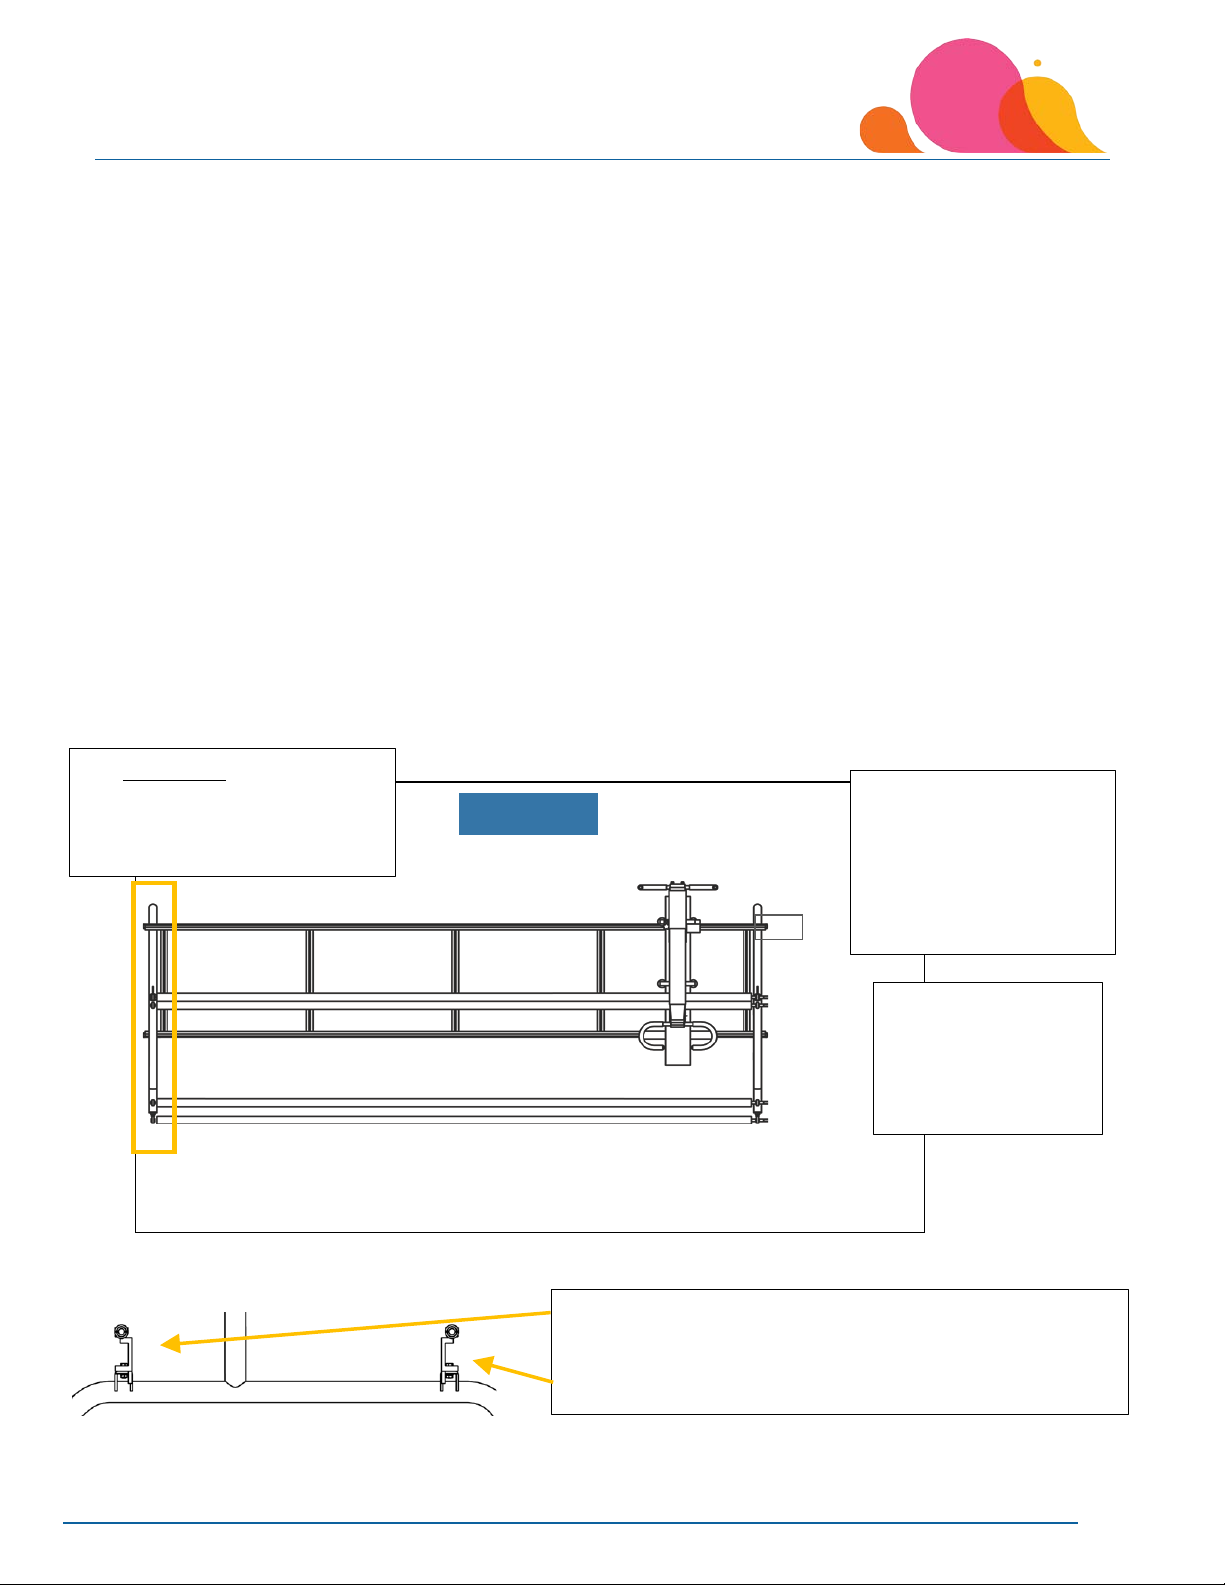
Standard Table - Step 7: Install the Rollers .............................................................................34
Standard Table - Step 8: Install the Roller Hardware...............................................................37
Step 9: Install the Thread Stand & Laser Bolt...........................................................................40
Step 10: Install the Rear Handles .............................................................................................41
Step 11: Connect Cables and Power (Non-Quilt Path).............................................................43
Step 12: Machine Operation of Lenni & Lucey ........................................................................46
APQS Bobbin Winder Setup & Maintenance ...........................................................................53
Daily Machine Maintenance ....................................................................................................64
General Machine Maintenance................................................................................................69
Fuses ....................................................................................................................................69
Main Fuse Location and Replacement (ALL APQS Machines)..............................................69
Circuit Board Fuse ................................................................................................................72
Fuse Replacement (CSA Models) ........................................................................................76
Hopping Foot Height Verification........................................................................................80

3
Lenni – Lucey Standard Table Manual
9-22-21
APQS.com
Hopping Foot Height Adjustment .......................................................................................81
Stitch Encoders ....................................................................................................................84
Carriage Encoder – Deluxe Non-Bliss Table .........................................................................84
Carriage Encoder – Bliss Table ........................................................................................86
Head Encoder – All Tables...............................................................................................88
Motor Brushes .....................................................................................................................90
Needle Up/Down Speed Adjustment (Needle Positioner) .................................................93
Tension Assembly Maintenance..........................................................................................97
Tension Check Spring Replacement ....................................................................................99
Bobbin Thread Cutter – Millie & Millie 30 ........................................................................109
Wave Washer and/or Cutting Blade Replacement...........................................................113
Timing Belt Adjustment.....................................................................................................118
Timing Your APQS Machine...............................................................................................121
Hook Assembly Maintenance Instructions .......................................................................140
Quick Troubleshooting Guide............................................................................................142
Quilting Basics ........................................................................................................................149

4
Lenni – Lucey Standard Table Manual
9-22-21
APQS.com
Learn more about your APQS Machine …
•Click on the Education Tab on our website for information about Beginner Classes in your area, starting a
business, inspiration, blogs and more.
•Need help? Click on our Support Tab for FAQs, service information and helpful how-to videos.
•Ready to quilt? Want some design ideas? Subscribe to the APQS Quilting Channel on YouTube to see
hundreds of APQS videos that show you everything from loading the machine to quilting feathers!
•Join us on the APQS Forum for fun conversation, information sharing, and every day tips and hints.
Everyone is welcome; we’d love to see photos of your projects, hear about your successes, and even
welcome your questions and suggestions on improving our machine and company. To join, visit the APQS
website at www.apqs.com . Select the “Education” tab on the home page and click on “Forum” in the
drop-down menu.Or, or “like” us on Facebook at “We Love APQS”.

5
Lenni – Lucey Standard Table Manual
9-22-21
APQS.com
Need More Help?
APQS Customer Service & Suport
We want you to have the best possible quilting experience. We take pride in leading the industry with our
superior customer service and support, and we can’t help you if we don’t hear from you.
Monday-Friday, 8 a.m. – 5 p.m. CST
800-426-7233
APQS Online Store
Visit our Online Store for needles, bobbins, thread, oil, replacement parts, and accessories for your APQS Longarm
machine.
APQS Certified Technicians
In addition to factory-direct support, APQS has trained several APQS Dealers with
advanced troubleshooting and support skills. These APQS Certified Technicians work
closely with the factory team to solve problems and help you get back to quilting as
quickly as possible. Look for the Certified Technician symbol on the APQS Retailer
listings to see if one is near you.
Warranty Information
New APQS Machines sold directly through APQS includes a Limited Lifetime Warranty to the original owner. Demo
machines and Certified Used machines carry different warranties. For information about your warranty coverage
or how to make a warranty claim, consult the warranty document included with your machine, visit our Lifetime
Warranty Page, or contact APQS Customer Service at 800-426-7233.

6
8-1-2021
APQS.com
Lenni – Lucey Standard Table Manual
Assembly Preparation Tips
Even if you are not assembling the machine yourself, please read through the assembly instructions thoroughly to better
understand your machine.
Before assembling your machine, answer these questions:
Where will the machine be located, and how will it be oriented in the room?
It is important before you move the shipping boxes into your sewing room to identify where your longarm will be placed.
Consider where you want the ‘needle side’ of your machine placed in relation to your space. When facing the ‘needle
side’ of the machine, the left or right side of the table can rest next to a wall giving you more space on the opposite side.
Before bringing in the long roller/rail boxes (shipping boxes 1 & 2), these boxes are heavy and it is easiest to open the
boxes and move the rollers and rails separately. The three rollers with canvas are labeled on the right side of the rollers.
The roller with no canvas is the Leveler Bar and is not labeled, be sure the labeled end of this canvas/bar is brought into
your sewing space with the label end going toward the right of your ‘needle side’ of the table.
Be aware of your chosen orientation and which way the rollers need to be carried into your sewing space (you may need
to flip the rollers around in your room if they were brought in incorrectly and if you don’t have room to flip them, you may
need to take them to a space where they can be flipped around).
FRONT
Freehand (needle) side
REAR
Pantograph
Top View
Pick Up Roller
Leveler Bar
(no label)
Quilt Top Roller
Backing Roller
Rollers are labeled on the
right side of each canvas,
these labels need to be
placed to the right of the
‘needle’ side of the
carriage.
The labeled end of each roller
canvas is placed to the right side
of your table. The Leveler Bar
does not have canvas and is not
The carriage rails are also directional in that the flat side of
both rails should face each other when bringing them into
your sewing space. In other words, the C shape of the rails
should face outward.

7
8-1-2021
APQS.com
Lenni – Lucey Standard Table Manual
Do you have easy access to electrical outlets?
Your quilting machine draws no more power than a normal household appliance. However, a surge protector can reduce
the damage risk from electrical spikes. If you need to use an extension cord to reach an outlet, use a standard “heavy duty”
14-gauge extension cord. It should be a three-prong grounded cord. Do not bypass the grounding feature by using a two-
prong adapter for your outlet. To protect yourself and your machine, have a certified electrician re-wire your outlet if it is
not properly grounded. Even with a surge protector, consider unplugging your machine from the outlet during severe
electrical storms to prevent a surge from damaging the electronics.
Are you adding the Quilt Path computerized system?
See Quilt Path Installation Manual. We strongly encourage you to invest in a Dual-Conversion, Pure Sine Wave
Uninterruptible Power Supply (UPS). This auxiliary unit protects your machine and computer from power drops and
surges, but also provides clean power to the system if your power fails, allowing you enough time to properly save your
work and shut down the system. The UPS MUST be a Pure Sine Wave model to work correctly with your machine. Here
are to models recommended by APQS Engineers:
Opti-UPS Durable Series DS1500B 1500VA
Tripp Lite SU1000XLA
Are you adding the optional hydraulic lift or overhead lighting to your table?
See Hydraulic Lift or Overhead Lighting Intallation Manuals. These instructions will tell you when it will be best to add
those parts and are referenced so you can go to the appropriate Installation Manuals. Full instructions for accessory
installations are included ON-LINE and are in your shipping material.
What flooring material is in your room?
Wood or parquet floors may be easily scratched if you try to move the machine after putting it together. Consider cutting
a small square of tightly woven carpet to act as a “coaster” for each leg, then placing the carpet face down under each leg
as you put the table together. If your room has plush carpet and padding, the table’s weight may eventually break down
the pad under the legs. You may want to place additional padding under the legs, just as you might under a heavy sofa. If
you park your machine at one end of your table routinely, heavy carpet pad could eventually break down on that end,
throwing your machine out of level. Re-check the table if you have difficulty moving the machine. In addition, machines
on hard concrete or tile floors benefit from padding under the legs to reduce residual vibration reflected back up the legs
from the hard flooring.

8
8-1-2021
APQS.com
Lenni – Lucey Standard Table Manual
General Assembly Order
Your new quilting machine is not difficult to assemble. It can
usually be accomplished in just a few hours. While the basic
assembly is possible alone, extra hands are very helpful
throughout the process.
Assembly Process Overview
1. Add the rear Aluminum Table Rail to the two Table Legs
If installing optional casters, put them on before this step
2. Install the Rail Cross Tubes.
3. Add the front Aluminum Table Rail to the two Table Legs
If installing optional Quilt Path, Overhead Lighting or a Hydraulic Lift, add those BEFORE installing the Table Top.
4. Install the Tabletop pads and bumpers, then add the Table Top
5. Assemble and mount the Carriage
6. Assemble and install the Sewing Head
7. Install the Pick-Up Roller and Leveler Bar
8. Deluxe or Standard Table
9. Deluxe Table - add the optional Auto Quilt Advance
10. Standard Table - install one Roller Brake
11. Install the Quilt Top and Quilt Backing Rollers
12. Add the Roller Brake to these two Rollers
13. Complete the electrical connections

9
8-1-2021
APQS.com
Lenni – Lucey Standard Table Manual
Assembly Tools
Helpful but not required:
Wire Cutter to cut zip ties
Power Screwdriver the #2 Bit
Assembly Tools (includes tools for optional accessories)

10
8-1-2021
APQS.com
Lenni – Lucey Standard Table Manual
Shipping Box Content
Box ID
Contents
1
(2) Aluminum Rails
2
(3) Fabric Rollers, (1) Leveler bar
3
Lexan Tabletop
4
Carriage, Table Assembly Hardware, Cross Tubes, Optional Accessories (e.g. Auto Quilt Advance)
5
Table Leg
6
Table Leg
7
Sewing Head (Handles, Thread Stand, Power Cord, Optional Bliss Carriage Axle, Optional Accessories)
8, 9, 10
(optional accessories not shown) -- Overhead Lighting, Hydraulic Lift, Quilt Path (Quilt Path will be labeled
as the highest number in the shipment. For example, if you do not order the Overhead Lighting or Lift, but
you DO order Quilt Path, “Box 8” will be your Quilt Path unit. If you order Overhead Lighting AND Quilt
Path, the lighting will be “Box 8” and your Quilt Path will be “Box 9”.)
①
②
⑦
⑥
⑤
④
③
IMPORTANT: Please keep the sewing head box ⑦ plus all foam inserts and all packing
boxes/materials that were inside the head box. These are necessary to protect your machine
for moving or to safely ship the head to your APQS Certified Technician or back to APQS for
factory service.
All other packing boxes can be recycled or discarded.

11
8-1-2021
APQS.com
Lenni – Lucey Standard Table Manual
Standard Table Step 1: Assemble the Rails & Legs
Tools Utility knife
Required: Wire Cutter or Scissors
Phillips Screwdriver
½-inch Box End Wrench
½-inch Socket Wrench
3/4-inch Box End Wrench
or Crescent Wrench
Rails Box (Box 1)
THE RAIL BOX DOES NOT NEED TO BE MOVED TO YOUR SEWING AREA IMMEDIATELY, it is a heavy box and can be opened
before moving.
1. Remove two Phillips Head screws from each side of the top cover of box
2. Using utility knife, cut packing tape on box
3. Once open, cut zip ties from rails using wire cutters or scissors
4. Locate all hardware (attached to rails under a zip tie, it is packed in plastic … do not throw this away)
5. MOVE rails to sewing area individually, be aware of sewing table orientation before moving the rollers and rails.
Each roller is stamped for the use of each, “Backing”, “Pick-Up”, “Quilt Top”. The stamped portion of the roller
will be installed to the right or needle side of the frame. The rails will be installed with the flat side of each rail
facing each other.

12
8-1-2021
APQS.com
Lenni – Lucey Standard Table Manual
Leg Box (Boxes 5 & 6)
1. Tilt each box on its side to make it easier to pull each leg out of the box (opening box so “up” stamped on box is
horizontal). Discard any packing sleeves on the base of each leg.
2. Adjust Leg Height
a. Measure the distance between the front roller support to your naval or as your arm is straight across your
body. Each of the four leg adjusting rods should be moved to this height. Once the table is assembled
completely, you can make minor adjustments if needed.
b. Loosen the leg jam nut with the leg wrench, the leg wrench is included in shipping contents.
c. Once you have loosened the leg jam nut with the leg wrench, you can turn the threaded leg
counterclockwise to extend the leg to the correct distance. Re-tighten the jam nut when you are at your
desired height. Repeat the process for each leg.
Measure from the floor to your naval as your arm crosses your mid-section across your body. This
is the height your table legs should be set to on the first roller (Backing Roller).
1. Leg Jam Nut
a. Use large black leg wrench that is included in
your shipping boxes
2. Threaded Leg
3. ¾” Nut
3. To adjust the leg
levelers, loosen
the large jam nut
directly
underneath the
leg with the leg
4. Place a ¾ - inch open-
end wrench (or crescent
wrench) on the foot pad
nut. Turn the nut
clockwise to lower the
leg; counterclockwise
will raise the leg.
5. When the table is
level in all directions,
tighten the jam nut
against the top of
the leg with the leg
wrench.

13
8-1-2021
APQS.com
Lenni – Lucey Standard Table Manual
Standard Table - Step 2: Determine Table Orientation & Attach Legs to
Rails
Table Orientation
The two standard table legs are identical. However, the table’s orientation in your room will determine which becomes the
“right” and “left” leg and which way the machine faces (as reviewed in “how will your table be oriented”). When
assembling the machine, the “freehand (needle) side” represents the “front” of the system. Decide which direction you
want the needle side of the machine to face, and then use the side view diagram below to orient your two legs in the
correct direction to match.
The Standard table footprint for Lucey is 5’3” and for Lenni it is 4’6” deep with the head pushed as far back as possible
toward the rear (Pantograph side). Standard table lengths are 8’, 10’, or 12’.
With the machine oriented as shown below, the left side of the table can be against a wall if desired. Plan on another 2
feet on the remaining sides of the quilting system for comfort.
FRONT
Freehand (needle) side
REAR
Pantograph (table) side
Lucey 5’3”
Lenni 4’6”
Top View
Freehand (needle) side
Pantograph (table) side

14
8-1-2021
APQS.com
Lenni – Lucey Oparation
Attach Legs to Rails
Tools ½ - inch Box End Wrench Hardware Required:
Required: ½ - inch Socket Wrench
Parts 2 Rails
Required: 2 Leg Ends
Install the Rear Rail to the Table Legs
1. Images below show adding the rear rail to the right leg first, based on the orientation described above. However,
you could start with the left leg if it is more convenient, but keep in mind of the photo orientation.
1. The flat rail side faces the leg’s center. Lift the rail end
on to the leg’s rear mounting bracket. Tilt the leg
toward the rail so that the rail is flush with the
mounting bracket on the leg.
2. Insert two bolts (B) through the
rail and leg mounting bracket.
Add lock washers (C) and nut (D).
HAND TIGHTEN FOR NOW.

15
8-1-2021
APQS.com
Lenni – Lucey Oparation
4. Using a 1/2-inch socket wrench and a ½-inch
open-end wrench, temporarily snug up the
outer-most bolts
on each end of the rear rail.
This will keep the rail and legs solid as you
install the cross tubes in the next step.
5. Table with rear rail installed
3. Move to the opposite table leg and attach the
rail to the other back leg using two of the bolts
through the rail leg mounting bracket along
with the lock washers and nuts.

16
8-1-2021
APQS.com
Lenni – Lucey Oparation
Install the Cross Tubes
Tools ½ - inch Open-End Wrench Cross Tube Box Contents:
Required: ½ - inch Socket Wrench
Open the Carriage Box 4 and unpack the Cross Tube Box and Hardware. You will need the cross tubes, serrated bolts and
spacers for this step. You will only need 10 bolts and spacers – we have included an extra bolt and spacer. Set the felt
dots and bumpers aside for now.
NOTE: Ignore the labels on the cross tubes; our vendor uses that information to package the tubes for APQS.
The 5 cross tubes keep the rails parallel and support the pantograph table top. Install the cross tubes to the rear table rail
as shown in the next steps.

17
8-1-2021
APQS.com
Lenni – Lucey Oparation
1. Slip one
spacer (L)
onto one
serrated bolt
(K)
4. Keep the cross tubes
“square” or parallel
with the top and
bottom of the rail. Hold
the cross tube in place
as you HAND TIGHTEN
the serrated bolt.
After you start the bolt,
slip the spacer into the
rail hole.
2. The cross tube has a
threaded center hole.
Align this with the rail
mounting hole.
3. Hold the cross tube on
the inside of the rail
and start the bolt into
the threaded
mounting hole. After
you start the bolt, slip
the spacer into the rail
hole.
5. Repeat steps 1-4 for the remaining cross tubes along the rear rail. Be sure that the spacers remain
inside the rail holes as you hand tighten each serrated bolt.

18
8-1-2021
APQS.com
Lenni – Lucey Oparation
Install the Front Rail
Tools ½ - inch Open-End Wrench
½ - inch Socket Wrench
1. Lift the front rail in place with the flat side
toward the cross tubes. Slide one end
into one leg opening: center rail between
both legs.
2. Align the rail mounting holes with each leg
bracket. Move the leg slightly left or right if
necessary. Slip a 5/6” x 1” bolt (B) into the
mounting holes on both rail ends. Add the lock
washer (C) and nut (D) to each rail mounting
bolt, HAND TIGHTEN ONLY at this point.

19
8-1-2021
APQS.com
Lenni – Lucey Oparation
1. Slip a 5/16” x 9/32” spacer (L) on a 5/16” x 1” serrated bolt (K). Insert the bolt and spacer
through the front rail and into the center cross tube. Push the rail toward the cross tube if
necessary.
2. Screw the bolt into the cross tube just far enough to keep the spacer in place.
3. Insert the 4 remaining spacers and serrated bolts through the rail and into the corresponding
cross tubes. Double-check that each cross tube is square with the rail.
4. Use a ½” open-end wrench to tighten the 5 serrated bolts for both the front and rear rails.
5. Check that the table legs are straight vertically.

20
8-1-2021
APQS.com
Lenni – Lucey Oparation
Standard Table - Step 3: Install the Table Top
NOTE: If you are installing Quilt Path computerized system or Hydraulic Lift go to
those manuals before going forward.
Peel the paper backing off the table top bumpers (O). Press firmly into position as instructed in the next steps.
1. Position 6 bumpers on the center
cross tube straddling the cross tube’s
center channel. The table top sections
will meet at the center cross tube.
2. Stick 3 bumpers on each of the 4
remaining cross tubes. Put them on
one side of the cross tube’s center
channel or the other. Press into place.
This manual suits for next models
1
Table of contents
Other APQS Sewing Machine manuals