Arbor Technology Triple Bay Log Store Manual

01945 410950
support@arborgardensolutions.co.uk
http://www.arborgardensolutions.co.uk
Trading address: Unit 11, Cattle Dyke, Wisbech, England, PE1 34NR
Generic build instructions –Triple Bay log store
Before you commence the assembly process, we recommend that you read these
instructions thoroughly beforehand to familiarise yourself with the assembly process and to
also check that you have the correct components.
We highly recommend that any assembly is carried out on a flat, level surface if possible
and that you use another person to assist you if necessary.
You can check our YouTube channel for assemble video, click on the link below:
Triple Bay wooden log store - assembly video
Package contents:
Tools required:
Electric screwdriver (No.2 Pozi bit) or
Screwdriver
•3x Doors (If with doors)
•2x Side panels
•3x Back panels
•1x Base
•1x Lattice
•1x Kindling shelf (If bought one)
•1x Roof
•4x Centre posts
•65mm screws
•85mm screws (For the base only)
•2x Spacer blocks

01945 410950
support@arborgardensolutions.co.uk
http://www.arborgardensolutions.co.uk
Trading address: Unit 11, Cattle Dyke, Wisbech, England, PE1 34NR
Using the 65mm screws provided, attach the batten on the back
panel to the post of the end panel, ensuring that the batten
remains vertically aligned to the post.
Arrange the 2 spacer blocks on the ground adjacent to the
end panel as shown in the photo above. Now place a back
panel on the blocks, at 90° to the end panel, aligning the 2
panels ready for fixing.
Step 1
Step 2
Step 3
Step 4
Stand the left-hand end panel (or right hand for the
reversed roof version) upright on a flat, level surface.
Align one of the longer posts (shorter for a reversed
roof) with the other end of the back panel. And
secure it with the provided screws. Repeat steps 1-4
to complete the rest of the triple log store bays.

01945 410950
support@arborgardensolutions.co.uk
http://www.arborgardensolutions.co.uk
Trading address: Unit 11, Cattle Dyke, Wisbech, England, PE1 34NR
Secure the base with the provided 85mm screws, just as
shown in the picture. If you brought a version with a kindling
shelf, please continue to steps 8-11; if not, then omit steps 8-
11 and continue to step 12
Attach the front posts before fitting the kindling shelf lattice.
Please make sure that there would be one metre gap between
each post before securing it with the screws.
Step 5
Step 6
Step 7
Step 8
At this point your assembly should look like this. Please
continue to step 6 for fitting in the base.
Slide the base into position as shown, ensuring that the
centre post and the central cross member of the base are
aligned in the middle of the back assembly.

01945 410950
support@arborgardensolutions.co.uk
http://www.arborgardensolutions.co.uk
Trading address: Unit 11, Cattle Dyke, Wisbech, England, PE1 34NR
Place the kindling shelf on the braces and attach two last
middle support braces in the middle between the front
and back central posts using the provided screws, ensuring
that the kindling shelf sits at the same level.
After ensuring that the gap at the bottom is the same as in
the top, attach the centre post to the base panel with the
provided 80mm screw.
Carefully place the roof on top of the log store. (Version
without the kindling shelf)
Step 9
Step 10
Step 11
Step 12
Please attach the side braces at your required height on both
side panels, secure it with the provided screws and lay the
lattice section on top (If you don’t have the kindling shelf,
please skip this step.)

01945 410950
support@arborgardensolutions.co.uk
http://www.arborgardensolutions.co.uk
Trading address: Unit 11, Cattle Dyke, Wisbech, England, PE1 34NR
After placing the roof attach the front posts. Please make
sure that there would be one metre gap between each post
before securing it with the screws. (The space from the side
panel to the central post must equal the back panels
measurements).
Check that the batten ends sit flush with the posts as
shown. Now attach the roof to each end panel post with
65mm screws. Secure the rear of the roof using provided
screws as well.
Ensure that both centre post sits flush with the roof's
batten ends and is secure in place with 2 of the 65mm
screws.
After ensuring that the gap at the bottom is the same as in
the top, attach two of the centre posts to the base panel with
the provided 80mm screws.
Step 13
Step 14
Step 15
Step 16

01945 410950
support@arborgardensolutions.co.uk
http://www.arborgardensolutions.co.uk
Trading address: Unit 11, Cattle Dyke, Wisbech, England, PE1 34NR
Align the top hinge in place, ensuring that the gap
between the door and post is consistent at the top and
bottom, then secure the top hinge in place using more
of the black hinge screws.
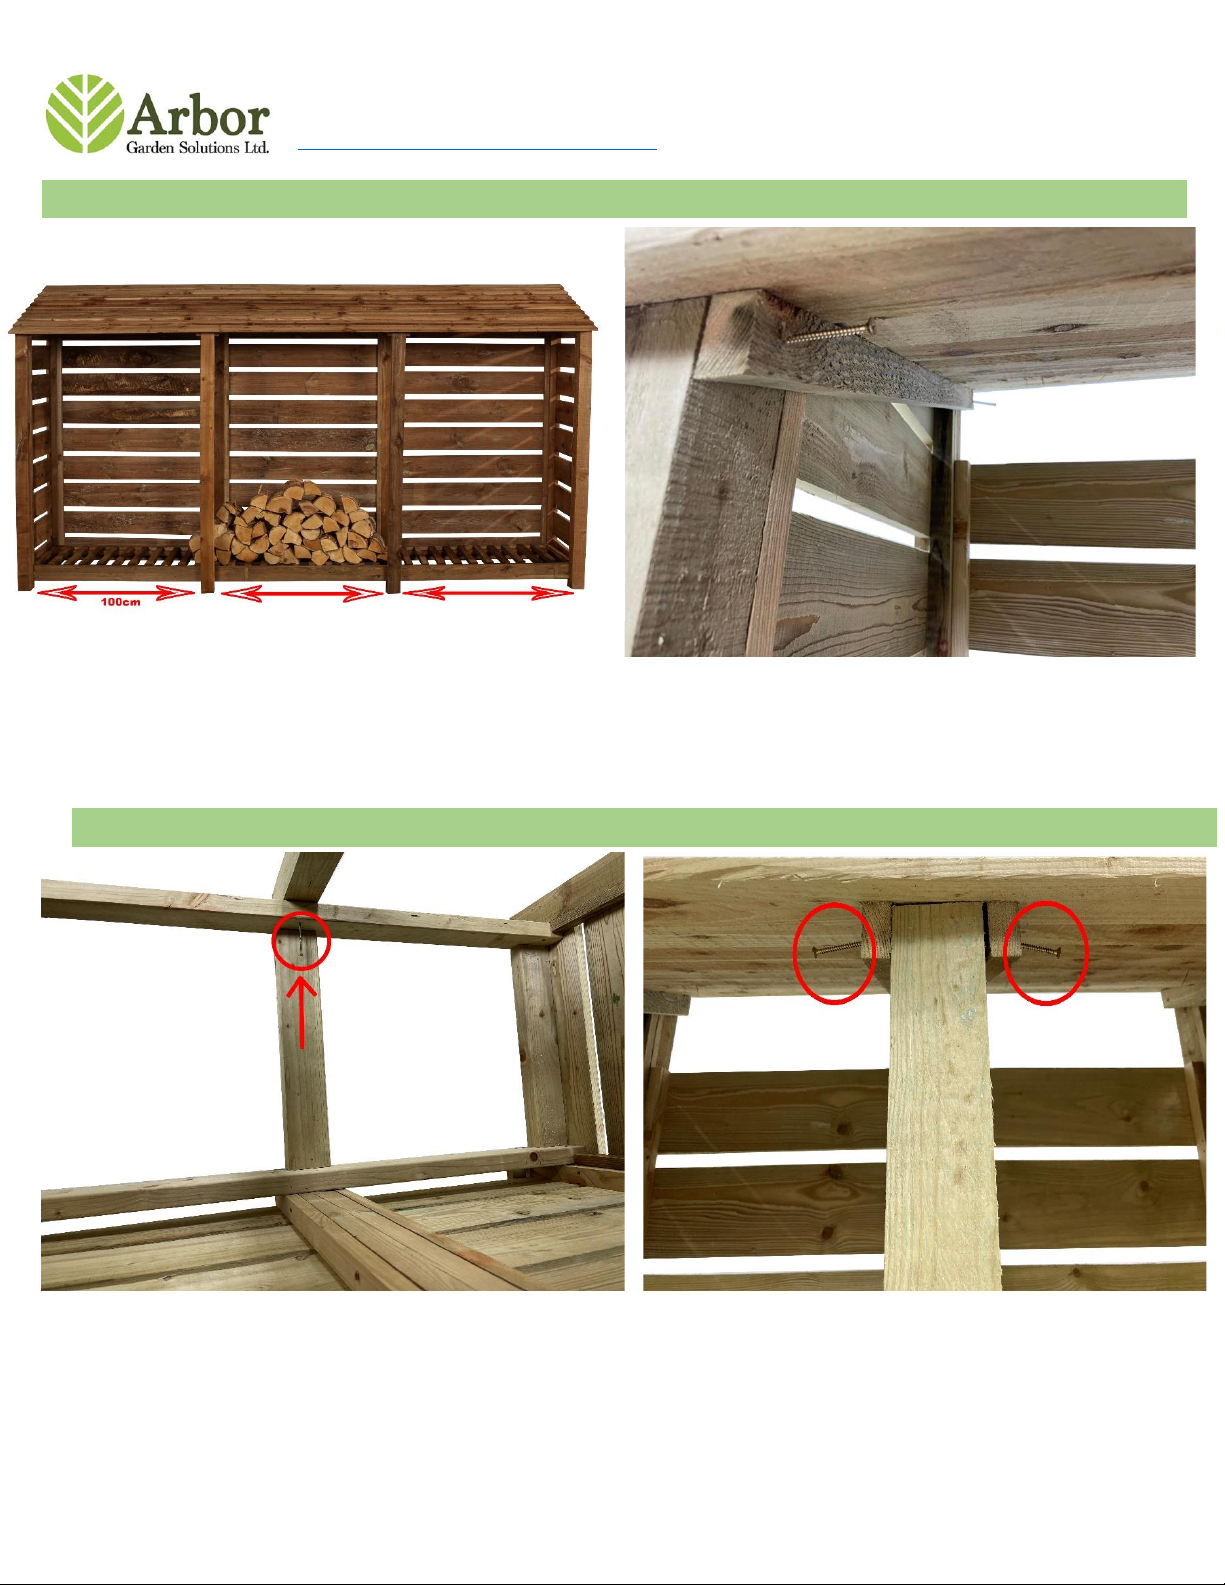
Your Triple Bay log store is now complete. If you are
fitting doors, please proceed with step 16 hinge to the
post.
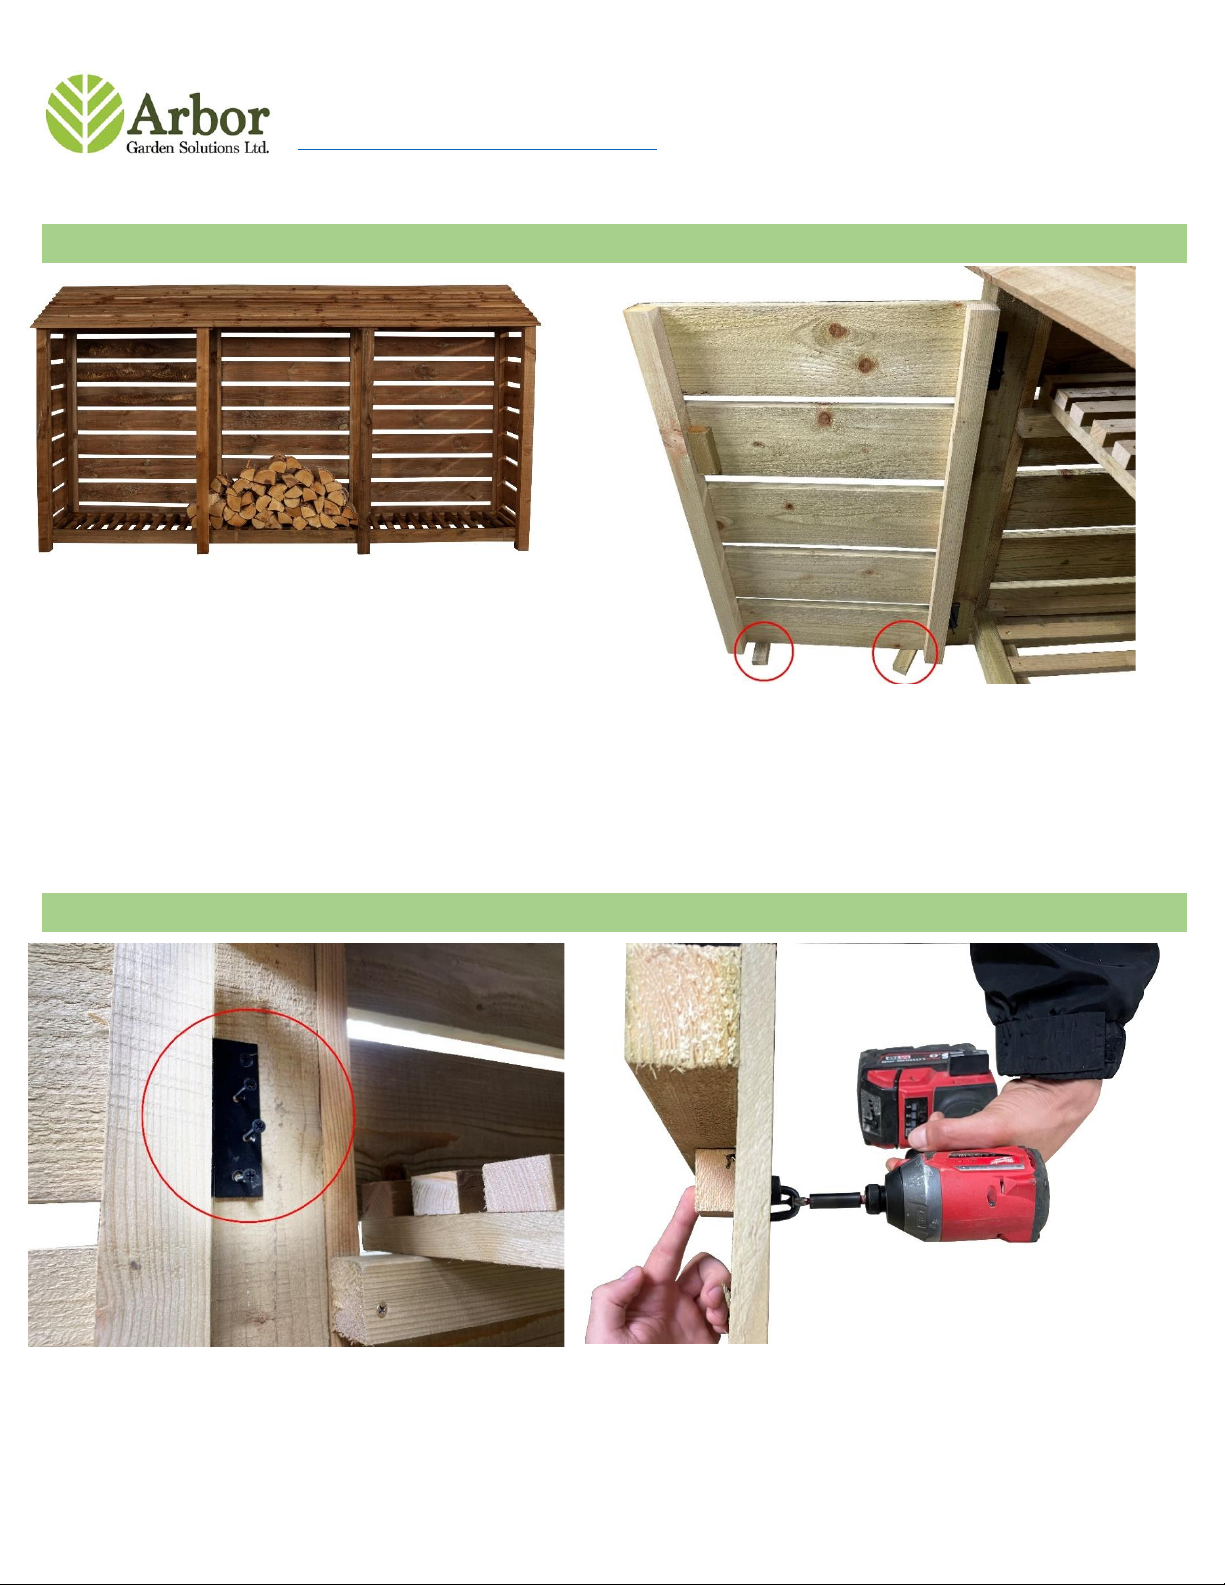
Place a spacer block at the front of the log store adjacent
to the front-end post and rest the hinge side of the
appropriate door on the block, aligning it vertically and
horizontally for a good fit. Now use four of the supplied
black hinge screws to affix the hinge to the post.
Fit the hook to the opposite side of the doors from the
hinges to whichever height is the best for you with 2x
black screws. Don’t forget to attach the provided batten
to the other side of the doors while screwing in the
black screws to hide the pointy screw end’s sticking out
of doors.
Step 17
Step 18
Step 19
Step 20

01945 410950
support@arborgardensolutions.co.uk
http://www.arborgardensolutions.co.uk
Trading address: Unit 11, Cattle Dyke, Wisbech, England, PE1 34NR
Your Slatted Triple Bay log store is now completed!
We hope that you found your product quick and easy to assemble but if not and you require further
assistance or have any questions you can contact us via details above.
Also, you can check our YouTube channel for assemble videos, click on the link below:
https://www.youtube.com/watch?v=z-XDsxNk50g&t=282s
Or
Type in YouTube search box Arbor Garden Solutions.
Step 21
Step 22
To fit the latch keeper plate, shut the door and hold the latch in
the horizontal position. Now fit the keeper and mark its correct
fixing position on the post using a pencil or bradawl before
securing it in place using the screws provided.
Your slatted Triple Bay log store with doors is now
completed!
Other Arbor Technology Outdoor Storage manuals