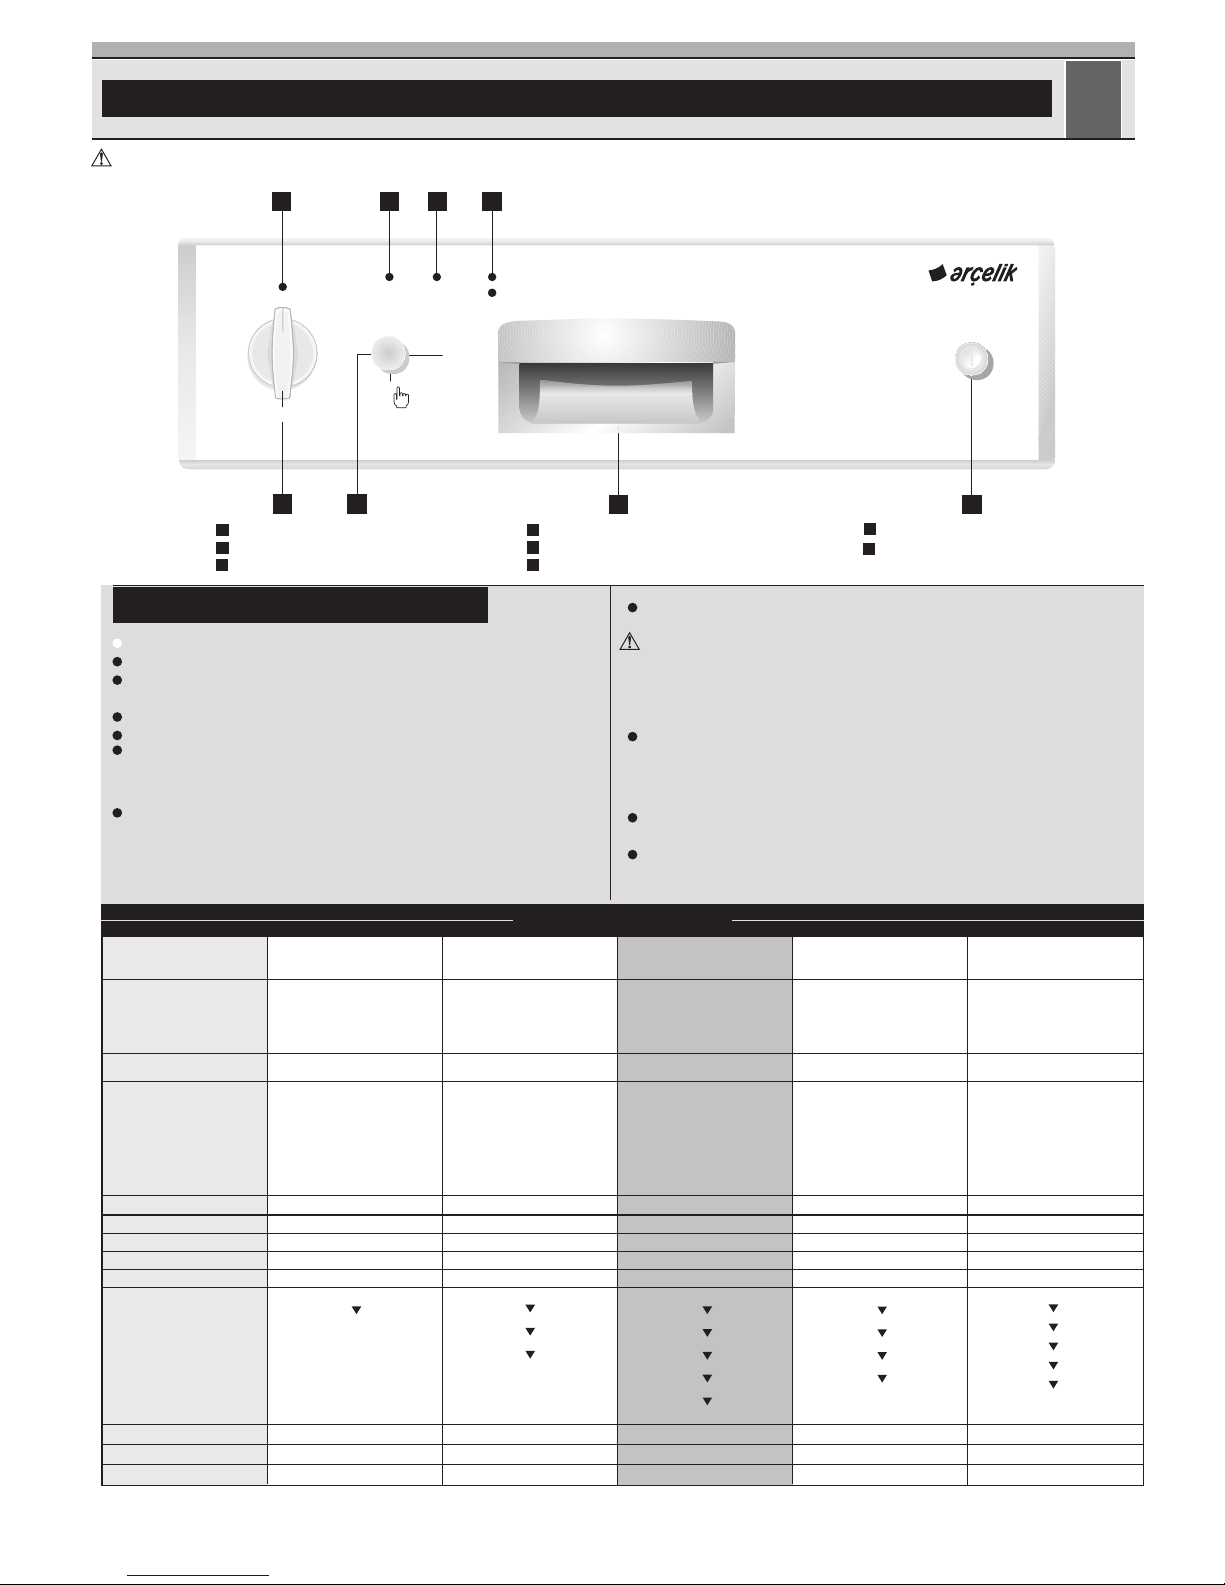
Arcelic 6354 EI User manual

QUICK REFERENCE GUIDE
GB
Start the program with the Start/Stop button:
Attention
Avoid opening the door during the washing process. This interrupts the
washing process, and hot steam will escape. When the door is closed, the
program will continue.
Use the on / off button to turn the machine off again.
When the progress indicator light program end lights up, the program is
complete.
Close the water tap.
Pull out the plug.
Allow your dishes to cool for 15 minutes, with the door open.
Unload the dishes. Begin with the lower basket.
How to use your dishwasher:
Open the water tap.
Plug to the mains.
Open the door and load the dishwasher. Check if both upper and lower
spray arms move freely.
Fill enough detergent into the detergent dispenser and close the door.
Use the on / off button to turn the machine on.
Check the salt and rinse aid level indicator lights (depends on the model).
If necessary, refill salt and/or rinse aid.
Use the program selection Knob to choose your washing program.
The consumption values shown in the table were determined under standard conditions. For this reason, deviations are possible under practical conditions.
** Reference program for test institutes
The tests in accordance with EN 50242 must be carried out with a full salt container of the water softener, a full reservoir for the rinse aid and the testing program.
PR GRAM TABLE
Cleaning temperature
Program number
Program name
Detergents
Degree of dirtiness
Suited to
Program process
15 cm³
15-25 cm³
+ 5 cm³
Duration (min)
Energy (kWh)
Water (I)
Attention
Please read the operating manual prior to operating the machine for the first time.
7
Door handle
Start/Pause button
6
LED progress indicator lights
4
Salt Level Indicator light
3
Rinse aid level indicator light
2
On/Off indicator light
1
On/Off Button
8
Programme selection knob
5
Yoðun
Intensive
Especially dirty
dishes with food
leftovers which
are dried on
70°C
High
115
1,30
14,4
5
Pre-wash
Wash
Cold rinse
Hot rinse
Dry
End
-
x
x
Ekspres 58'
Express
60°C
4
Normally dirty
dishes with starch
containing food
leftovers which
are not dried on
Medium
58
10,6
1,15
W
ash
Cold rinse
Hot rinse
Dry
End
-
x
Ön Yýkama
Pre-Wash
-
-
-
15
-
3,6
1
Pre-Wash
End
-
-
-
Hýzlý 30'
30 Min
Dessert and
coffee dishes with
food leftovers
which are not
dried on
35°C
Few
30
0,75
10,2
2
Wash
Cold rinse
Hot rinse
End
x
-
-
Ekonomi
Eco
Normally dirty
dishes with starch
containing food
leftovers which
are not dried on
x
50°C
3 Reference **
Medium
140
13
1,01
Pre-wash
W
ash
Cold rinse
Hot rinse
Dry
End
-
x
Bitti
Yýkama
Kurutma
Parlatýcý Tuz
1
2
3
4
5
Açma / Kapama
2
30 Dakika
35°C
Ekonomi
50°C
35
Yoðun
70°C
4
Ekspres 58 dk.
60°C
1
Ön Yýkama
58
123 4
7
Ýptal
3 sn.
Baþlat
Beklet

n/off button
You turn your dishwasher on / off with this button. When turning
on, the indicator light for the last used program will light up.
Start/Pause button
You use this button to start the selected program; the light on
the button lights up.
Stop the program with the start / pause button if you would like
to open the door once the dishwashers washing program is
running.
Program selection Knob
Use the program selection Knob to choose your washing
program.
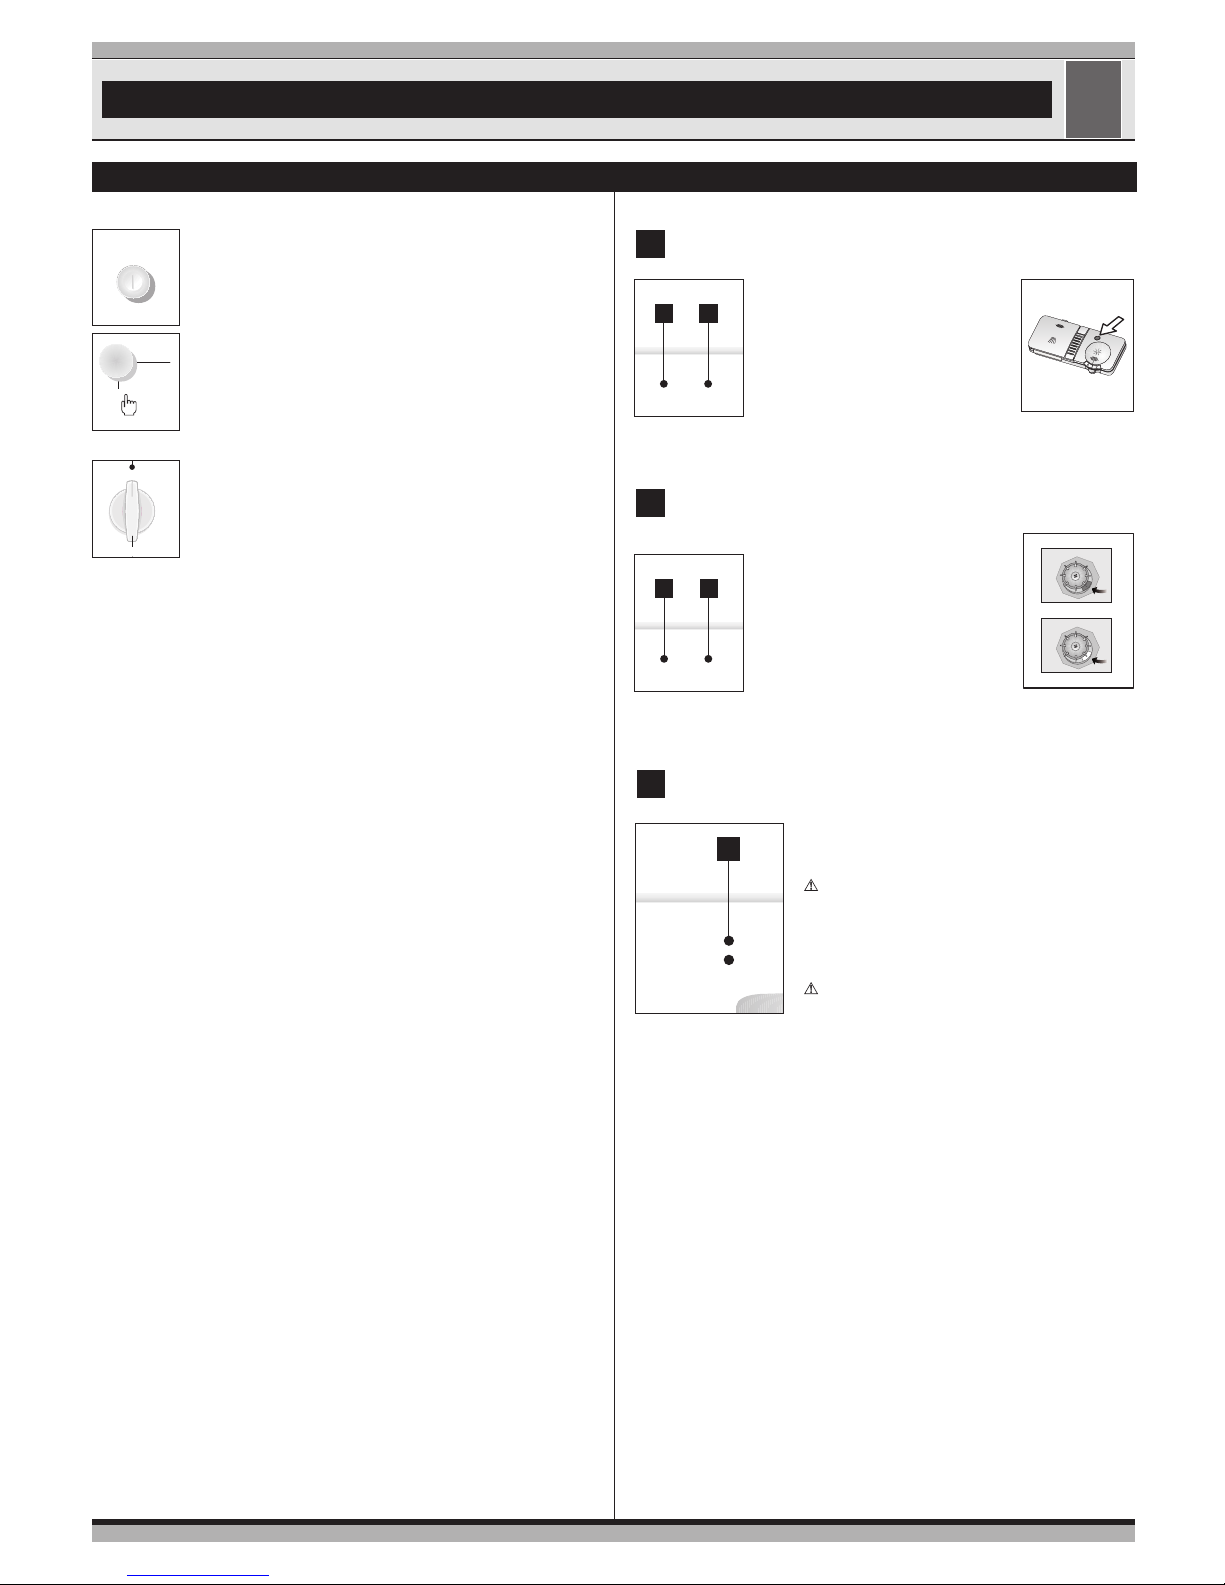
How to cancel the washing program
To cancel a program while the machine is operating:
Press start/stop button for 3 seconds. The machine will drain
the water inside the machine for 45 seconds. The program is
cancelled when washing light goes off. Then, you can choose
and start a new program.
! Important: Depending on the stage of the program you
have cancelled, there may be detergent residue or rinse aid
inside the machine and on the load. Make sure the items in
the dishwasher are not used before washing properly.
How to change the washing program
To change the program selection while the machine is operating:
Press start/stop button. The washing light will go off.
Select the new program. Press start/stop button. The washing
light will be on and new program will start.
! Important: The new program will NOT right from the
beginning. It will start from the stage last carried out by the
previous program selection.
Function buttons Control indicator lights
FUNCTI N BUTT NS
GB
LED progress indicator lights
4
The program sequence throughout the washing
process can be monitored from the progress indicator
lights on the control panel.
Following the washing stage, in order to drain
and remove water from inside the machine
completely, the machine will pause for
approximately 35 minutes. Do not worry this is
not a fault. Then End progress indicator light
will come on.
Do not switch the machine off before End light
comes on.
( Wash / Dry )
( End )
You can also tell whether rinse aid must
be refilled by looking at the rinse aid
dispenser. When the visual fill indicator
is dark, there is enough rinse aid in the
dispenser.
When the colour is light, open the
dispenser and refill rinse aid.
(Rinse) (Salt)
Rinse aid level indicator light
2
Salt level indicator light
3
When this indicator light comes on, you
must refill special salt.
In machines which do not possess an
electrical salt indicator, the salt content
can be read on the container for the salt.
When the visual fill indicator is dark, there
is enough salt in the container.
When the colour is light, open the
container and add dishwasher salt.
S
A
L
Z
T
U
Z
S
A
L
T
S
E
L
Empty
S
A
L
Z
T
U
Z
S
A
L
T
S
E
L
Full
(Rinse) (Salt)
Açma / Kapama
Ýptal
3 sn.
Baþlat
Beklet
1
2
3
4
5
B
Parlatýcý Tuz
23
B
Parlatýcý Tuz
23
Bitti
Yýkama
Kurutma
4
18 9901 8001 00

Dishwasher
Instruction Manual

Dear customer,
Please read carefully right through this instruction booklet before installing or
operating your dishwasher. The following instructions should prevent the risk of
personal injury and/or damage to the appliance.
Please keep these documents in a safe place for later reference.
This operating manual has been written for several different machines, and some
of the features mentioned here may not apply to your particular model.

TABLE OF CONTENTS
1 Getting To Know Your Machine 3
View of the Machine 3
Technical Specications 4
2 Safety Instructions 4
Before Installation 4
Before First Use 4
Child Safety 4
For daily operation 5
Problems 5
What should not be washed in your
dishwasher 5
3 Directions for Assembly 6
Safety notes for installation 6
Installing Your Dishwasher 6
Water connection 7
Connect water inlet hose 7
Water drainage 8
Electrical connection 8
Disposal 8
4 Using Your Dishwasher 9
Filling the dishwasher salt 9
When operating for the rst time: 10
Filling the Rinse Aid Dispenser 11
Filling the Detergent Dispenser 11
Detergent 12
Multipurpose Detergents 13
Loading the dishwasher 13
Suggestions for loading the
dishwasher 14
Loading suggestions 15
5 How to clean your dishwasher 17
Cleaning the lters 17
Cleaning the spray arms 18
6 Troubleshooting: 19
What to do if the dishwasher will not
run 19
The cleaning results are
unsatisfactory 19
Service 24

3GB
1Getting To Know Your Machine
View of the Machine
1. Upper dish basket with shelf
2. Guide rail for the upper dish
basket
3. Salt container
4. Cutlery basket
5. Detergent dispenser
6. Door
7. Control panel
8. Filters
9. Lower sprayer arm
10. Lower basket
11. Upper sprayer arm
12. Housing (depends on the model)
13. Turbo fan heat drying system
(depends on the model)

4GB
Technical Specications
Permitted water pressure: 0,3 –10
bar (= 3 – 100 N/cm² = 0,01-1,0Mpa)
Electrical connection: 220-240 Volts,
10 Amps (see type plate)
Output: 1900-2200 W
Heat output: 1800 W
This device corresponds to the
following EU directives:
2006/95/EC: Low Voltage Directive
2004/108/EC: EMV Directive
DIN EN 50242: Electrical dishwasher
for home use Testing procedures for
practical service conditions
Because we continually strive to
improve our products, we may change
our specications and designs without
prior notice.
Note for Testing Institutes
The necessary information for
performance testing will be provided
upon request. The request can be
done by e-mail through:
Please do not forget to write the model
code and stock code information of
the appliance besides your contact
information in the e-mail. The model
code and stock code information can
be found on the rating label, which is
placed on the side of the door.
2Safety Instructions
Before Installation
Check the appliance for transit
damage. Never install or use damaged
machines. If in doubt, contact your
supplier.
Before First Use
• See Notes for Installation on page
6.
• Have the grounding system
installed by a qualied electrician.
The manufacturer cannot be held
liable for any damage caused by
operating the appliance without
proper grounding.
• Before operating the system,
please check that the information
on the type plate corresponds to
the information on your power
supply.
• The dishwasher must be
disconnected from the mains
during installation.
• The appliance must not be
connected to the mains using
an extension cable. Extension
cables do not provide the
necessary safety (e.g. danger of
overheating).
• Always use the original plug
delivered with the appliance.
• The plug must be freely accessible
after the appliance has been
installed.
Child Safety
• Do not allow children to play with
the appliance.
• Dishwasher detergents are caustic
and may cause injury to the eyes,

5GB
mouth and throat. Please note the
safety instructions provided by the
manufacturers of the detergents.
• Never leave children unsupervised
while the appliance is open, as
the appliance may still contain
detergent leftovers.
• The water in the dishwasher is not
drinking water. Danger of caustic
injuries.
• Always place long and sharp/
pointed objects (e.g. serving forks,
bread knives) into the cutlery
basket with the pointed end down
or at on the upper basket to avoid
possible injuries.
For daily operation
• Use your appliance only for the
following domestic uses: Washing
household dishes.
• Do not use chemical solvents in
the appliance; there is a danger of
explosion.
• Do not sit or stand on the opened
door or place other objects on it.
The appliance may tip over.
• Do not open the door while the
appliance is running, as hot water
or steam may escape.
• Do not leave the door open – an
open door can be a hazard.
Problems
• Repairs and modications to the
appliance may only be carried
out by qualied customer service
personnel.
• In the event of a problem, or
before performing a repair,
disconnect the appliance from the
mains supply:
- disconnect the appliance by
pulling out the mains plug
- shut off the power.
• Do not pull on the cable – pull on
the plug. Turn off the water supply
tap.
What should not be washed in
your dishwasher
• Rust sensitive steel parts
• Cutlery with wooden or horn
handles
• Cutlery with mother of pearl or
porcelain handles
• Non heat resistant plastic parts
• No glued dish or cutlery parts
• No items made out of copper, tin
or aluminium
• Sensitive decorative glasses and
porcelain parts
• Lead crystal glasses
• Art and crafted articles
• Aluminium and silver tend to
discolour
• Glass and crystal articles may lose
their shine over time
• Sponges and dishcloths
Note
Do not wash items soiled with cigarette
ash, candle wax, varnish, paints or
chemicals.
Recommendation:
When buying new dishes, note whether
they are suitable for the dishwasher.
(marked as dishwasher proof)

6GB
3Directions for Assembly
Safety notes for installation
Prior to installing and using your
appliance, please check it for possible
transit damage.
If the appliance is damaged, please
contact your supplier.
Never install or use a damaged
appliance.
The following directions must be
followed to connect the dishwasher
properly.
• Before operating your dishwasher,
please ensure that the information
on the type plate corresponds to
the current and voltage of your
power supply.
• The appliance may only be
connected using a properly
grounded socket. Ensure that the
appliance is grounded according
to regulations.
• The grounded socket must be
easily accessible and close to the
appliance.
• Do not use extension cables or
multiple adapters, as this can lead
to overheating, which can be a re
hazard.
• Hardwiring may only be carried out
by a qualied electrician.
• Check the power cable, the
water inlet hose and the drainage
hose. Damaged parts may only
be replaced by customer service
personnel or by a qualied
electrical service expert.
Installing Your Dishwasher
• Choose a suitable location for your
dishwasher. Take care to ensure
that the appliance is stable on a
level surface.
• Unevenness in the oor can be
equalised by adjusting the screw
feet. When the appliance is
standing correctly, the door can be
closed without difculty.
• Water inlet and drainage hoses
must be positioned so that they
can move freely without bending
or squeezing.
• The appliance may not be installed
in a room where the temperature
is below 0° Celsius.

7GB
1010
tap with a ¾ inch external thread. If
required, use a lter insert to lter
deposits from the pipes.
Check that the connection does not
leak.
Important
For safety reasons, turn off the tap
after every rinse process.
Water connection
• There are two different types of
water inlet hoses:
- Cold water inlet hose (up to
25°C)
- Hot water inlet hose (up to
60°C)please check which one is
applicable to your model.
If you are willing to connect
your machine to natural
energy resources or to the central
hot water supply, rst check out
whether your water inlet hose
type is suitable by checking the
temperature values written on the
hose. If your hose is not suitable,
apply to your authorized service to
change the hose.
• The dishwasher may not be
connected to open warm water
devices or ow-through water
heaters.
Permitted water pressure:
Lowest permitted water pressure: 0.3
bars = 3 N/cm² = 30 kPa
When the water pressure is below 1
bar, please contact your technician.
Highest permitted water pressure: 10
bar = 100N/cm² = 1Mpa
When the water pressure is above 10
bars, a pressure reduction valve must
be installed (available in trade supply
stores).
Connect water inlet hose
Ensure that the water inlet hose is not
bent or squeezed. Do not install a used
hose set.
Use a screw-on hose connector to
connect the water inlet hose to a water
1009
AQUASAFE+ (some models)
The Aquasafe+ System protects
against water damage hich may be
caused at the water inlet hose.
Do not immerse the system’s valve
box into water; it contains electrical
components.
In case of damage, pull out the power
supply plug.
Do not shorten or lengthen the hose
insert as it contains electrical cables
and components.

8GB
Water drainage
Connecting the drainage hose.
Take care to ensure that the drainage
hose is not bent or squeezed.
Check that the drainage hose is rmly
seated.
1011
Extension hoses
If a hose extension is required, a
drainage hose of equal quality must be
used.
The maximum length must not exceed
4m. Using a longer hose will produce
poorer cleaning results.
Siphon connection
The drainage height must be between
50 and 100cm above the oor.
Use hose clamps to fasten the
drainage hose to the siphon.
Electrical connection
Please refer to the type plate for
information on current type, mains
voltage, and fuse protection.
The type plate is located on the inside
of the door.
The mains plug must be freely
accessible after installation.
Power cables and insulated cables
must not be accessible (exposed) after
installation.
Disposal
Packaging
The packaging and some parts of your
appliance are made from recyclable
materials. These materials are marked
with the recycling symbol and the
relevant material type (PE, PS, POM).
Before operating your appliance,
remove the packaging material and
dispose of it in accordance with
regulations.

9GB
softening device.
Remove the lower basket from the
appliance.
Open the screw-in cap of the salt
container by turning it counter
clockwise (g. A,B).
4Using Your Dishwasher
Important
The electricity and water connections
of the dishwater must be in compliance
with the instructions in this booklet.
Filling the dishwasher salt
Important
Only use special dishwasher salt in
your appliance.The manufacturer is
not liable for damage resulting from the
use of the wrong type of salt.
Do not use coarse-grained salt. Small
grains or powdered salt is more easily
soluble. Never use culinary or table
salt. These types of salt do not dissolve
in water easily and will damage the
Warning
Packaging materials may be
dangerous to children.Reusable
substances may be dropped off at your
local disposal facilities. You may obtain
further information from your local
authorities and disposal facilities.
Used appliances –
Environmental notice
This product must not
be disposed of with your
regular household waste.
Instead, you need to dispose of the
waste equipment by handing it over
to a designated collection point for
the recycling of waste electrical
and electronic equipment. This is
indicated by a symbol to be found on
the product, it’s packaging or in the
manual.
Materials used are recyclable
according to their labelling. Reuse,
recycling of materials and further
reutilization of used products are
important contributions to protect our
environment.
Please ask your local town council for
the nearest collection point.
To avoid possible dangers, disable
your waste appliance prior to
discarding it. Pull the mains plug and
cut the power cord. Disable any door
locks.

10 GB
When operating for the rst
time:
Pour 1 litre of water into the salt
container (Fig. C).
Pour the salt into the container with the
aid of the salt funnel provided (Fig. D).
Pour in enough salt to ll the container.
The container holds approx. 2 kg.
To speed up the rate of dissolution of
salt in water, stir it with a spoon.
Close the cap tightly.
Begin a washing program immediately
after lling the salt container. The
washing program prevents damage to
the appliance which may be caused by
any spilled salt solution. After the rst
washing cycle, the salt level indicator
light will go out.
Important
Depending on the particle sizes of
different salt brands in the market,
tablet properties and water hardness,
dissolution of the salt in water may take
a couple of hours.
So, the salt indicator continues lighting
for a while after lling salt into the
machine. (For models with a salt
indicator)
1012

11 GB
1013
Filling the Rinse Aid
Dispenser
Rinse aids allow washing water to
rinse off more cleanly and prevent
watermarks or streaks on the dishes.
Only use rinse aid designed for use in
dishwashers.
Note
If you use “2 in 1” or “3 in 1“ detergents
/ tablets, you do not need an additional
rinse aid.
Open the rinse aid dispenser by
pressing the locking lever (B)
Carefully pour in rinse aid to the MAX
mark. Close the lid until it clicks (3).
Carefully wipe off spilled rinse aid.
Excessive rinse aid causes excessive
foam formation, which may hinder
cleaning.
Set the dose of rinse aid
The dose of rinse aid to be used can
be set by means of the dispenser
regulator (between levels 1 and 6) (4).
Your appliance is pre-set at the factory
to level 3.
Only change the setting if the following
applies after washing:
• Watermarks are visible on the
dishes: Set dosage higher
• Streaks are visible on the dishes:
Set dosage lower
Filling the Detergent
Dispenser
Note
Only use detergents formulated for use
in dishwashers.
Open the detergent container by
pushing the locking lever to the right
(A).
The lines on the inside of the detergent
container will help you measure the
correct amount of detergent.
The detergent container holds a total of
40 cm³ of detergent (1).

12 GB
1014
Detergent
Please use detergents produced
specially for the dishwashers in your
machine.
Keep the opened detergent packages
in a cool and dry place where children
can not reach.
Put the detergent into the detergent
dispenser just before operating the
machine.
Please contact the manufacturer to
get detailed information about the
detergent you are using.
Always use powder detergents in
short programs without pre-washing.
Fill in the powder detergent into the
compartment nr. 2 with a grid cover
as shown in the picture and close the
detergent box lid. When completely
full, this compartment will contain 6 g
of powder detergent.
Do not use tablet detergents in short
programs since the solubility of them
changes depending on the temperature
and time.
In programs with pre-washing and high
temperature, in which you may use
tablet detergents, make sure that the
detergent box lid is closed rmly.
Excessive usage of powder detergents
can cause the detergent not dissolve
completely and can also cause
scratches on the glassware.
When the dishwasher is fully loaded
and the dishes are very dirty, we
recommend lling the detergent
container up to the 25 cm³ mark. When
the dishes are less dirty, it is generally
sufcient to ll the detergent up to the
15 cm³ mark.
If your dishes have been in the
dishwasher for some time without
being washed, you should also ll the
small detergent container up to the line
(2).
The programme table shows the
amounts of detergent required for the
different wash programmes.
These may differ according to how dirty
the dishes are and the water hardness
in your location.

13 GB
Multipurpose Detergents
The best washing results in
dishwashers is obtained by using
detergent, rinse aid and water
softening salt individually.
New products of the detergent
producers what they call as
“Multipurpose Detergent” can act as
water softening salt and/or rinse aid
in addition to acting as a detergent.
Some types of these detergents can
also contain special-purpose washing
chemicals such as glass and stainless
steel protectors.
Multipurpose detergents commonly
found in the market:
2in1: Those contain detergent, rinse
aid or water softening salt.
3in1: Those contain detergent, rinse
aid and water softening salt.
4in1: Those containing glass protectors
in addition to detergent, rinse aid and
water softening salt.
5in1: Those containing glass and
stainless steel protectors in addition
to detergent, rinse aid and water
softening salt.
Multipurpose detergents give satisfying
results only under certain usage
conditions. Observe the instructions
of the detergent manufacturer on the
package when using such detergents.
Contact the detergent producer if your
dishes are wet and/or if you notice lime
spots particularly on your glasses after
the washing program is over.
When you give up using such
detergents:
Make sure that salt and rinse aid
compartments are full.
Set the water hardness to its highest
degree and perform an empty run.
After the empty washing review the
user manual and readjust the water
hardness level so as to suit your water
supply.
Make the appropriate rinse aid
settings.
Depending on the model, salt indicator
and/or rinse aid indicator should be
enabled again if they are disabled
before.
Loading the dishwasher
General:
Before you load the dishwasher with
dishes
• Remove coarse food leftovers
• Place all containers such as
cups, glasses and pots into the
machine with the opening facing
downwards (so that no water can
collect)
• Dishes and cutlery may not be
placed above each other
• Glasses may not touch
• The movement of the spray arms
must not be hindered
• Place all large and very dirty items
in the lower basket.
• Small and light items can go into
the upper basket.
• Long and narrow items are placed
in the middle of the baskets.

14 GB
Attention
Knives and other utensils with sharp
tips and edges must be placed
horizontally into the upper basket due
to risk of injury.
Please do not overload your
dishwasher and pay attention to the
notes regarding dishes which are
suited to the dishwasher.
Only in this manner will you obtain
optimal washing results with a sensible
use of energy.
Suggestions for loading the
dishwasher
Use the lower basket for plates, bowls,
pots etc.
1016
2 folding plate support rods
(depending on the model)
There are two separate “folding plate
support rods” in the lower basket of
your dishwasher designed to allow
you more space to accommodate
saucepans and large bowls in the
lower basket. You can either fold each
section (1, 2) individually or, all at once,
to create a large empty space. Simply
press the handgrips (A) and fold them
down.
1018

15 GB
1024
Cutlery basket
1029
Loading suggestions
Load the upper basket with dessert
plates, cups, glasses etc.
1028
Rack

16 GB
1022
Height setting with empty basket
(depends on the model)
In this model, the height setting of the
upper basket may be changed using
the wheels which are mounted at two
different heights.
Release the latches on both the right
and left tracks of the upper basket by
pushing them outwards (C).
Pull out the basket out completely (D).
Place the basket back into the tracks at
the desired height (E).
Push the latches back into the correct
position.

17 GB
5How to clean your dishwasher
Cleaning your machine at regular
intervals ensures longer product life
and reduces the risk of reccurring
problems.
Warning
Always unplug the machine and turn
off the water supply before cleaning.
Use a gentle household cleaner for the
outside and the door seals. Clean the
control panel only with a moist cloth
and clear water.
Cleaning the lters
Clean the lters and the spray arms
regularly. A dirty machine will have a
negative effect on the cleaning results.
1. Main lter
2. Coarse lter
3. Micro lter
1. Remove the lower basket from the
machine.
2. Turn the coarse lter to the right
and pull it out in an upward
direction (A).
3. Pull out the main lter (B).
4. Press on the two tongues of the
coarse lter and remove the micro
lter (C).
5. Clean the lters thoroughly under
running water. Use a brush if
necessary.
6. Replace main tler.
7. Replace the micro lter and the
coarse lter into the main lter.
Twist it clockwise until it clicks in.
Warning
Do not operate your dishwasher
without a lter. Ensure that your lters
are correctly installed. Clean the lters
regularly.
1031
Table of contents