Arec CI-T10 User manual

CI-T10
Auto-Tracking PTZ Conferencing Camera
Quick Installation Guide English
AREC Inc.© All Rights Reserved 2021. l www.arec.com
All information contained in this document is Proprietary

CI-T10 Quick Installation Guide
This manual introduces the function installation and operation of the Camera.
Prior to installation and usage, please read the manual thoroughly.
1. Warning
(1) This product can be only used in specied range in order to avoid any damage or danger;
(2) Don’t expose the camera to rain or moisture place
(3) Don’t remove the cover to reduce the risk of electric shock. Refer servicing to qualied
personnel.
(4) Never operate the camera under unqualied temperature , humidity and power supply;
(5) Please use the soft cloth to clean the camera. Use neuter cleanser if bad smeared .Don’t
use the strong or cleanser avoiding scufng.
2. Electric Safety
Installation and operation must accord with electric safety standard.
3. Caution to transport
Avoid stress,vibration and soakage in transport,storage and installation.
4. Polarity of power supply
This product uses DC 12V power supply.
5. Careful of installation
(1) This series item must put on the smooth desk or platform,and it can not be installed
slant ways.
(2) Don’t apply in corrosive liquid,gas or solid environment to avoid the cover which is made
up of organic material.
(3) This product has a heating device inside, please keep ventilated.
(4) Never power on before installation is completed.
6. Don’t disassemble discretionarily
We are not responsible for any unauthorized modication or dismantling.
7. Attention
Electromagnetic led under certain rate may affect camera image!
Preface
01

CI-T10 Quick Installation Guide
CI-T10 Auto-Tracking PTZ Camera is a cost-effective and high-performance pan-tilt-zoom camera. It can automatically
track a moving presenter in medium to large conference rooms while shooting video. CI-T10 can bridge the feature and
price gap between current webcam and professional PTZ cameras in the market.
Product Overview
1. Dimension
02
141.5
119
151
125.2
151
Ø5
168
157.8
50
1/4”-20UNC

CI-T10 Quick Installation Guide
03
2. Accessory
No. CI-T10
1Power Adaptor
2RS-232 Cable
3USB2.0 Cable
4Remote Controller
5AM-600 (include USB Cable & QIG)
63.5mm phone jack to USB Cable (PC Cong Tool setting cable)
7Quick Installation Guide
The camera offers perfect functions, superior performance and versatile interfaces. The features include advanced ISP
processing algorithms to provide vivid images with a strong sense of depth, high resolution and fantastic color rendition.
It supports H.264/H.265 encoding which makes motion video fluent and clear even with less than ideal bandwidth
conditions. By adopting high accuracy step driving motor mechanism, it works extremely quiet and moves smoothly and
very quickly to designated position. Product works stable and reliable, and it is easy to use, installation and maintenance.
3. Camera performance
4. Technical specication
Camera Parameter
Optical Zoom 10X
Focal length f=4.7~46.3mm
Effective Pixels 2.07 megapixel
Video Output Port USB 2.0 / Ethernet
Iris F1.8--F2.8
Horizontal Angle of View 55.5° ~ 6.5°
Vertical Angle of View 35.1° ~ 3.6°
Digital Zoom 16X
Minimum Illumination 0.5Lux @ (F1.8, AGC ON)

CI-T10 Quick Installation Guide
04
DNR 2D & 3D DNR
White Balance Auto / Manual / One Push / Indoor / Outdoor / VAR
Exposure Auto / Manual / Brightness priority / Shutter priority
Focus Auto / Manual
Aperture Auto / Manual
Electronic Shutter 1/30s ~ 1/10000s
BLC ON / OFF
WDR OFF / Dynamic level adjustment
Video Adjustment Brightness, Color, Saturation, Contrast, Sharpness, B/W mode, Gamma curve
SNR ≥55dB
Input/Output Interface
Video Interfaces LAN, USB2.0
Image Code Stream Dual stream output
Video Compression
USB 2.0
UVC 1.0
- MJPEG : MAX. 1080@30fps
- YUV : MAX. 1080@5fps
IP Stream
H.264, H.265, MJPEG
Note:
When you connect CI-T10 to a PC or other UVC device using the USB 2.0 port, and at
the same time connect to the AREC Media Station using the RJ45 port, it will cause the
streaming video to go black.
To resolve this situation, please disconnect the UVC rst, and reboot CI-T10. There are
two ways to reboot the device. You can reconnect the power supply, or go to the web
management interface (as shown below), click "System Settings", and click "Reboot",
then the stream image will be resumed.
1
2

CI-T10 Quick Installation Guide
Audio Compression AAC
HD IP Interface 100Mbps
Network Protocol TCP/IP, HTTP, RTSP, RTMP(S), DHCP, Multicast, ONVIF
Control Interface RS232
Control Protocol RS-232: VISCA / Pelco-D / Pelco-P
Network: VISCA over IP, Sony VISCA, ONVIF
Supply Adapter AC100V-AC240V to DC12V/1.5A
Input Voltage DC12V±10%
Input Current 0.5A (Max)
Consumption 6W
PTZ Parameter
Pan Rotation ±170°
Tilt Rotation -30°~+90°
Pan Control Speed 2.7-35.7°/ sec
Tilt Control Speed 2.7-31.5°/ sec
Preset Number 255 presets (0~254)
Tracking Parameter
Tracking Distance* 3~10m
Battery life of AM-600** Approximate continuous operating time: 4 hours
Other Parameter
Store Temperature -40°C ~ +60°C
Working Temperature -10°C ~ +40°C
Dimension (L x W x H) 141.5 x 151 x 168 mm
Weight About 1.3Kg
Using Environment Indoor
05
* Without wall, human body or any large size barrier in between.
** Power saving function: The AM-600 will automatically power off, if it has been placed flat and static for more than 5
minutes.

CI-T10 Quick Installation Guide
06
The maximum distance
between the presenter and
the camera cannot exceed 10
meters.
Please make sure the straight
distance between the camera
and the presenter(positioner)
is not exceed 10 meters when
the camera is installed on the
ceiling.
Quick Installation Instructions
1. Camera interface and indicators description
No. CI-T10
1Auto-Tracking Receiver
2Camera lens
3Remote Controller Receiver (Standby / Power Indicator)
4Standard 1/4”20 UNC screw
5Mounting hole
AEthernet RJ-45
BUSB2.0 output
CRS-232 port
D
Tracking Module setting port
*This is not an audio input. Misconnection may cause damage
to the device.
EDC12V Input Power Supply Socket
No. LED lights LED Color Glow Rule Operation
3Standby Indicator yellow-green light turns on Camera in standby mode
light flashes Receive remote control signal
Power Indicator blue light turns on Power on
STANDBY
POWER
2
1
3
4
5
A B C D E
Figure 1
CI-T10
10M
CI-T10
10M
10M

CI-T10 Quick Installation Guide
07
(1) Power on: Connect DC12V power supply adapter with power supply socket.
(2) Initial conguration: Power on with power indicator light on and remote control receiver light blinking, camera enters
the initialization mode, turn to the left side, and then goes to the HOME position (intermediate position of both
horizontal and vertical ),while the camera module stretches. When remote control receiver light stops blinking, the
setting is nished.
Note:
1. The default address of the remote controller is the 1# address.
2. If you set preset 0, when the setting is completed, the camera automatically moves to the preset 0 position.
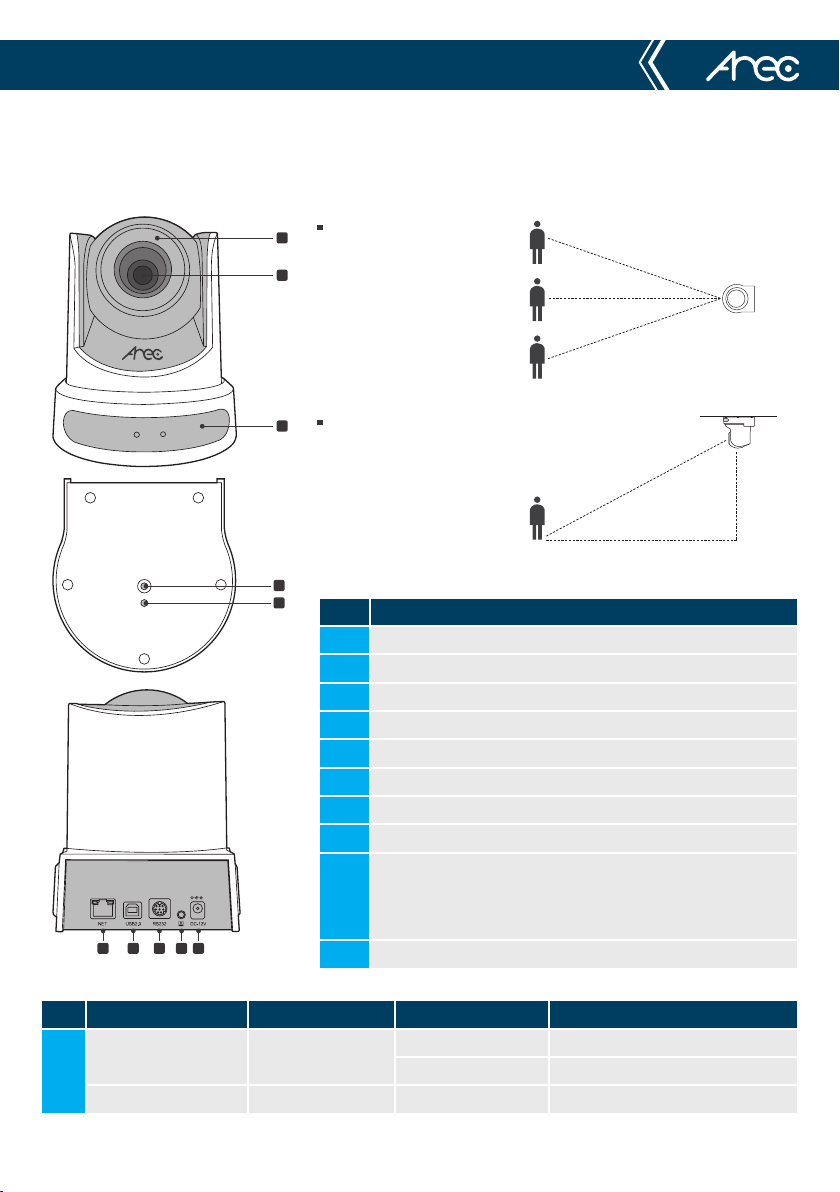
(1) Video Output from LAN
a. Network Cable Connection Port: Connect this product and your computer through network cable, the device LAN
interface refers to NO. A in Figure 1.
b. Webpage Login: Open your browser and enter 192.168.11.202 in the address bar (factory default); press Enter to
enter into the login page; click on the “player is not installed, please download and install!" and follow the
installation steps for installation. Then enter the user name admin and password admin (factory default); press
Enter to enter into the preview page, users can carry out PTZ control, video recording, playback, conguration and
other operations.
( Note: If you forget your user name, password, IP address, you can manually restore the default by the remote
controller key combination * # )
(2) USB2.0 video output
a. USB2.0 video cable connection: CI-T10 refer to No.B in Figure 1
b. Connect the camera and the monitor via USB2.0 video cable, open video display software, select this device, and
then video output will be available.
1.1 Power on initial conguration
1.2 Video output

CI-T10 Quick Installation Guide
08
2. AM-600 interface and indicators description
2
1
3
4
No. Interface Light Color Glow Rule Operation
1Positioner - - -
2
Power ON / OFF
and Tracking
pause
Red / Green
dual-color
light
Green light turns on Power ON
Red light is on
When auto tracking function is Suspended
Note: When the tracking function is
paused, the Tracking Camera will return to
the full-view position.
Red light flashes When power is low
Red light flashes 1 sec Press the button to power off
3Microphone
pairing / mute - - Workable with AREC Media Station
4
Power input
(USB Micro-B
port)
Green
Green light is on During power charging
Light goes off When the charging is complete
Green light flashes Charging error

CI-T10 Quick Installation Guide
Connection and Settings
Step 1 Connection
VCR
PC NB
TV
Media Station
09
A B C D E
Figure 1
Video Out
PTZ control
Tracking Module setting port
Power Supply
Video Out RJ45 Cable
USB 2.0 Cable
USB to 3.5
RS-232 Cable
Power Adaptor
A
C
B
D
E

CI-T10 Quick Installation Guide
Step 2 Wear the positioner
Getting start
10
Fix your AM-600 to the target person or object properly. For
better tracking effect, wear a positioner with the smooth and
transparent side facing out. Turn on AM-600 to start auto
tracking.
Note: Be sure to wait until the tracking camera is power on and
reset to the initial position, before power on the AM-600.
Accurate and Smooth Tracking Performance
In order to capture presenter’s best performance, CI-T10 provides superior continued smooth movement even in
situations where a presenter is writing on a whiteboard or close-up shots, just like a professional cameraman does.
Front Back

AREC Inc.© All Rights Reserved 2021. l www.arec.com
All information contained in this document is Proprietary
AREC have the right to change or improve product specications, without obligation to notify any user.
Go to www.arec.com get the latest information related to the product or additional information.
Made in Taiwan
Date : 2021.1.1
Version : v8.1.29
Other manuals for CI-T10
2
Table of contents
Other Arec IP Camera manuals