Argo Aurora 800 User manual

OPERATOR’S
MANUAL
Do not remove this
manual from this vehicle.
Aurora 800 SX Huntmaster
Aurora 800
Aurora 800 SX
Aurora 800 Limited
Aurora 950 SX
Aurora 850 Limited
Aurora 950 SX-R
Aurora 950 Huntmaster
Aurora 850 SX-R
Aurora 850 SX Aurora 850 SX-R 8x8i
Aurora 950 SX-R 8x8i
Aurora 850 Huntmaster
MANUAL NO. 10690C rev.1 Printed in Canada 08/2020

Read this manual before you operate your ARGO. It contains safe operating
instructions and warns the user about potential hazards that can result in personal
injury.
Warnings are identied in the text by the following symbol:
Warning text warns the user about potential hazards that can result in personal
injury or death.
Cautions are identied in the text by the following symbol:
This manual is based on the latest product information available at the time of
printing. Ontario Drive & Gear Limited reserves the right to make changes at
any time and without obligation.
Reproduction of any part of this publication is prohibited without prior written
permission.
Une version francaise du manuel d’operation est disponsible sous le numero
suivant 10690CFR.
© 2019 Ontario Drive & Gear Limited
I
Caution text contains cautions that can prevent damage to the vehicle.
This product can expose you to chemicals including gasoline engine
exhaust, which is known to the State of California to cause cancer, and
carbon monoxide, which is known to the State of California to cause
birth defects or other reproductive harm. For more information go to
www.P65Warnings.ca.gov.
WARNING: Cancer and Reproductive Harm - www.P65Warnings.ca.gov.

A MESSAGE FROM THE PEOPLE WHO BUILT YOUR ARGO
Thank you for selecting an ARGO amphibious, o-road utility vehicle!
Ontario Drive & Gear Limited has been building ARGO vehicles since 1967. By listening carefully
to our customers and responding to their needs, we have been constantly improving the ARGO
and will continue to do so.
Over thirty thousand ARGO vehicles have provided reliable service all over the world. From
Britain to the Far East, Alaska to the Antarctic, and from the tropical forests of South America
to the deserts of Saudi Arabia. We are proud to provide you with a vehicle that represents the
ultimate in amphibious, all-terrain transportation.
Your safety and the safety of all ARGO users is of the greatest concern to us. You will nd numer-
ous safety statements in this manual. Please read and follow them carefully. Always be safety
conscious when you operate your ARGO and remember it is a motorized vehicle.
The ARGO is easy to drive and you will soon be tempted to take on new challenges. Please take
the time to develop your driving skills before doing so. Observe the recommendations outlined in
this Operator’s Manual and remember; some things are just impossible, even with an ARGO.
WELCOME TO THE WORLD WIDE ARGO FAMILY!

II
PREFACE
This manual describes the controls, operation and basic maintenance procedures for all Aurora models of the ARGO from date
of printing. Please take the time to read this manual carefully, for your safety and that of others. By following these instruc-
tions, you will ensure extended, trouble free operation of your vehicle.
For maintenance and adjustment of the engine, refer to the engine manufacturer’s operation and maintenance manual included
in your vehicle’s information package.
Before you drive your ARGO, make sure you understand how to use all controls, particularly the brakes and steering system.
Learn how to drive your vehicle in an open level area, away from buildings, trees and other obstacles, until you are completely
familiar with its operating characteristics. Drive very slowly until your driving skills improve, and drive with caution and
consideration at all times. The risk of accident or injury is greatest during the rst weeks of use. Take special care during this
period. ALWAYS RESPECT OUR ENVIRONMENT.
CAUTION TO THE ARGO OWNER/OPERATOR
• Make sure everyone who drives this vehicle receives proper operating instructions and reads this Operator’s Manual.
• No one under the age of 16 should be allowed to operate the ARGO. Children under the age of 16 may not have the skills,
abilities or judgement needed to operate theARGO safely and may be involved in an accident causing severe injury or death.
• Never allow anyone under the inuence of alcohol or any other intoxicating substance to drive or ride in the vehicle.
• Wear an approved safety helmet and eye protection when driving or riding in the vehicle.
• Special operating and safety procedures described in this manual must be observed before and during water operation as
outlined in Section 5.
• When operating your vehicle for extended periods of time, we recommend the use of approved hearing protection.
• Equip your vehicle with a re extinguisher and a rst aid kit.
• Equip your vehicle with basic tools for emergency repairs.
• Before starting your engine, check for spilled gasoline and wipe any up immediately. Gasoline is a potentially explosive
substance that can cause serious personal injury when ignited.
• Keep the oor pans secured in place at all times. Fingers, feet, animal tails or paws can be injured in the drive components
beneath the oor pans. The oor pans also help keep damaging debris out of the drive components.
• Make sure all passengers remain seated while the vehicle is in motion. Advise your passengers to hold onto the vehicle at
all times.
• Never overload your vehicle. Trying to steer an overloaded vehicle can overheat the brakes. This will lead to brake fade
which means loss of steering control and the ability to stop the vehicle. Overloading your vehicle can lead to premature
brake system failures and costly damage to drive chains, axles or bearings. Follow the recommended load capacity for your
vehicle listed in Section 1.
• Do not drive the vehicle at high speeds over unfamiliar or rough terrain. Personal injury or vehicle damage may result.
• Certain terrain and steep hills cannot be traversed safely with the ARGO or any other vehicle. Do not attempt to drive over
terrain that is questionable.
• Avoid driving your vehicle on asphalt or concrete roadways when possible. When the vehicle turns, its tires skid on the
driving surface. Asphalt or concrete causes extensive tire wear.
• Use common sense at all times when driving your vehicle.
IMPORTANT
Operate this vehicle with safety constantly in mind. O-road vehicles face unpredictable and often hazardous terrain condi-
tions. It is ultimately the operator’s responsibility to handle the vehicle safely within its limitations and to decide when and
where to travel.

TABLE OF CONTENTS
1.0 GENERAL INFORMATION
1.1 AMPHIBIOUS OPERATION............................................................................................ 1
1.2 MAINTENANCE PROCEDURES ................................................................................... 1
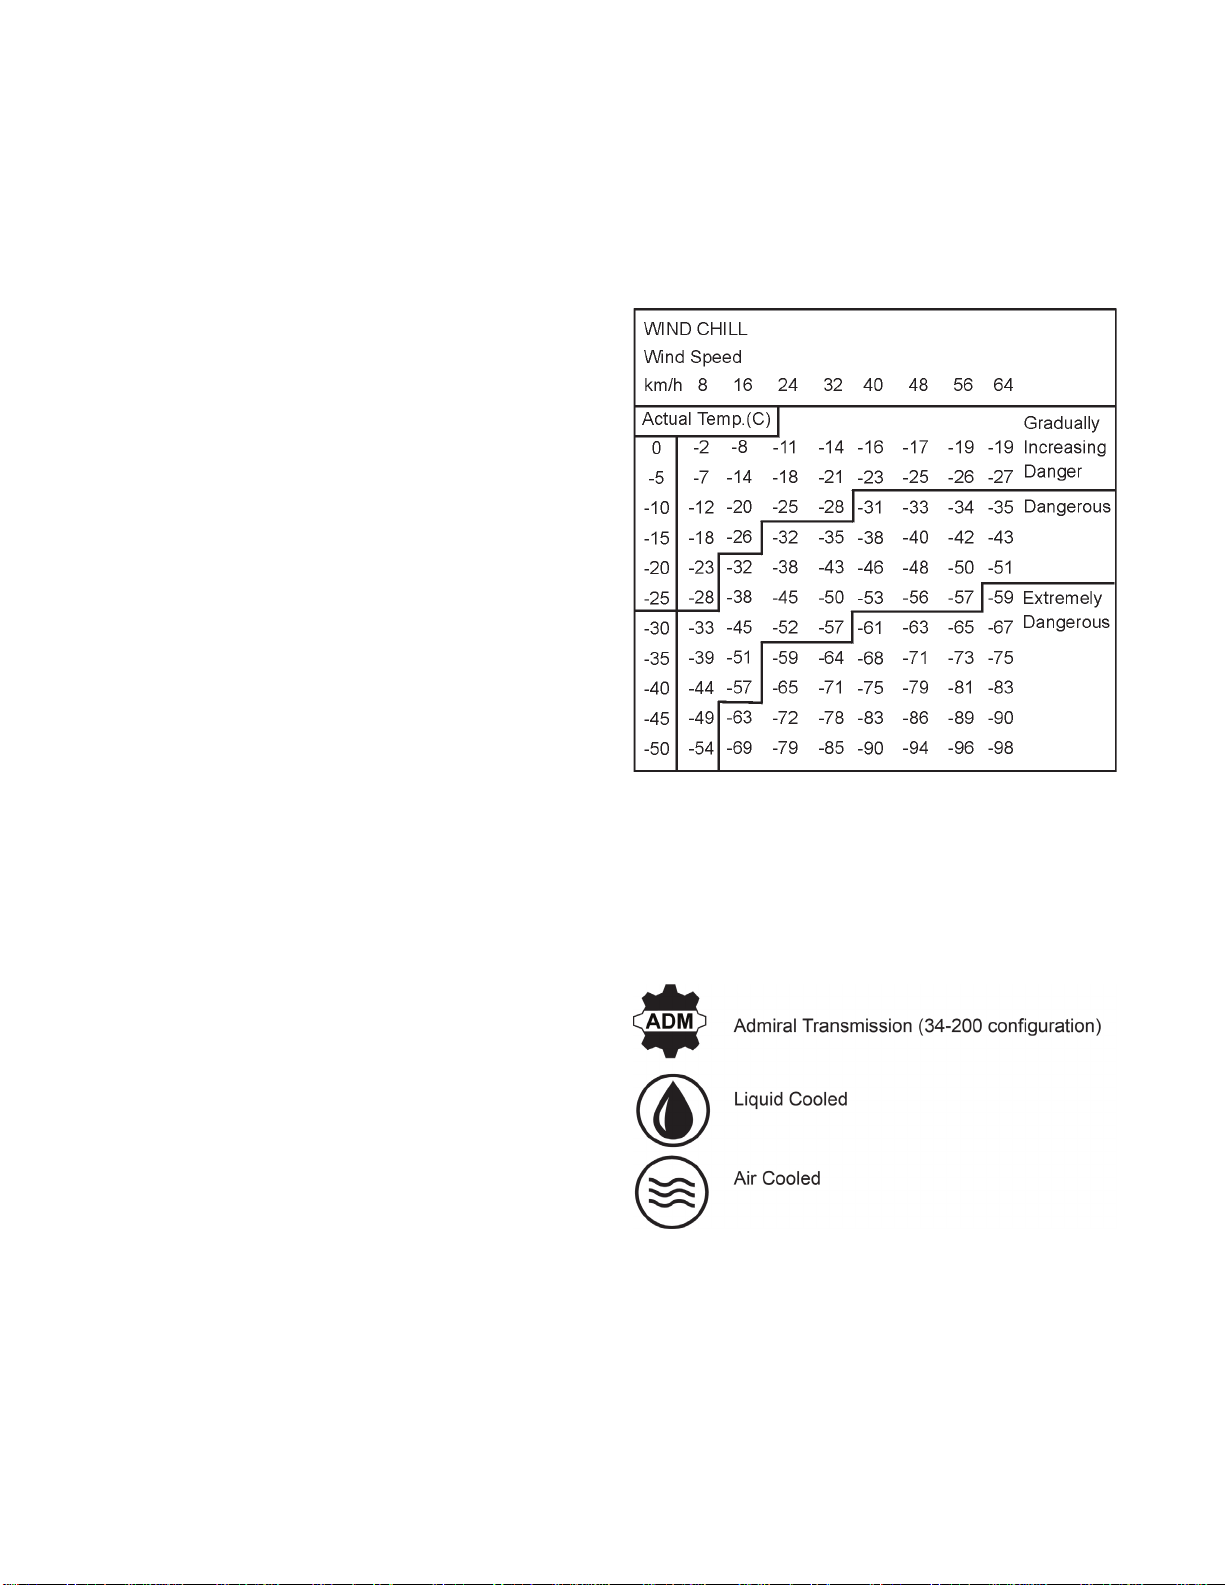
1.3 WIND CHILL FACTOR ................................................................................................. 1
1.4 LEGEND FOR OPERATOR’S MANUAL ....................................................................... 1
1.4.1 Argo Vehicle Capacity............................................................................................... 3
1.4.2 Amphibious Trailer Capacity .................................................................................... 3
1.5 REAR SEATS - 8 WHEEL MODELS............................................................................... 3
1.6 AURORA VEHICLE MATRIX......................................................................................... 5
1.7 IDENTIFICATION AND LOCATION OF CONTROLS.................................................. 8
1.8 INFORMATION LABELS ................................................................................................ 9
2.0 GENERAL OPERATING INSTRUCTIONS
2.1 NEW VEHICLE “BREAK-IN” PROCEDURE ................................................................ 10
2.2 PRE-OPERATION CHECKS ............................................................................................ 10
2.3 CARRYING PASSENGERS AND CARGO..................................................................... 10
2.4 OPERATORS WITH DISABILITIES............................................................................... 11
2.5 FUELING THE VEHICLE................................................................................................ 12
2.6 VENTED FUEL SYSTEM - ALL MODELS.................................................................... 12
2.7 INSTRUMENT CLUSTER............................................................................................. 12
3.0 OPERATING INSTRUCTIONS
3.1 BRAKES AND STEERING .............................................................................................. 14
3.2 EMERGENCY/PARKING BRAKE SYSTEM ................................................................ 14
3.3 THROTTLE CONTROL ................................................................................................... 14
3.4 STARTING PROCEDURE................................................................................................ 14
3.5 PRIMING PROCEDURE.................................................................................................. 15
3.6 STOPPING THE ENGINE ................................................................................................ 15
3.7 SELECTING AND CHANGING TRANSMISSION GEARS ......................................... 15
3.8 HEADLIGHTS ............................................................................................................... 16
4.0 DRIVING PROCEDURES
4.1 DRIVING STRAIGHT AHEAD ....................................................................................... 17
4.2 STOPPING THE VEHICLE.............................................................................................. 17
4.3 TURNING THE VEHICLE............................................................................................... 17
4.3.1 Left Turn.................... ............................................................................................... 17
4.3.2 Right Turn ................ ................................................................................................ 17
4.4 BACKING THE VEHICLE UP......................................................................................... 17
4.4.1 Turnin the vehicle while backing up ........................................................................ 17
4.5 GEAR SELECTION - ADMIRAL TRANSMISSION ........................................................... 18
5.0 DRIVING PROCEDURES DURING UNUSUAL CONDITIONS
5.1 REMOTE AREA USE ..........................................................................................................19
5.2 ANGLE OF OPERATION....................................................................................................19
5.3 UPHILL OPERATION .........................................................................................................19
5.4 DOWNHILL OPERATION..................................................................................................19
5.5 SIDE SLOPE OPERATION .................................................................................................20
5.6 AMPHIBIOUS OPERATION - GENERAL.........................................................................20
5.6.1 Entering Water ........................................................................................................21
5.6.2 Driving Procedures in Water...................................................................................21
5.6.3 Driving Out of Water..............................................................................................22
5.6.4 Outboard Motor Bracket.........................................................................................22
III
SECTION
PAGE

SECTION PAGE
5.7 WINTER OPERATION........................................................................................................22
5.7.1 Use on Ice Covered Bodies of Water......................................................................22
6.0 OIL, FILTER AND LUBRICATION INFORMATION
6.1 ENGINE OIL INFORMATION............................................................................................23
6.1.1 Checking the Engine Oil Level...............................................................................23
6.1.2 Recommended Engine Oil.....................................................................................23
6.1.3 Changing Engine Oil .............................................................................................24
Draining the Engine Oil..........................................................................................24
Relling the Engine ...............................................................................................24
6.2 TRANSMISSION OIL INFORMATION.............................................................................24
6.2.1 Checking the Transmission Oil Level.....................................................................24
6.2.2 Changing the Transmission Oil .............................................................................24
6.2.3 Relling the Transmission.....................................................................................25
6.3 FILTER INFORMATION.....................................................................................................25
6.3.1 Air Filter .................................................................................................................25
6.3.2 Fuel Filter...............................................................................................................25
6.3.3 Oil Filter..................................................................................................................26
6.4 LUBRICATION INFORMATION ......................................................................................26
6.4.1 General...................................................................................................................26
6.4.2 Clutch Lubrication.................................................................................................26
6.4.3 Drive Chain Lubrication.........................................................................................26
6.4.4 Automatic Chain Oiler System..............................................................................26
6.4.5 Outer Axle Bearing Lubrication ............................................................................27
6.4.6 Idler Shaft Outer Bearing Lubrication .................................................................27
6.4.7 Output Shaft Coupler Lubrication .........................................................................28
6.4.8 Inner Axle Bearing Lubrication..............................................................................28
7.0 MAINTENANCE INFORMATION
7.1 ELECTRICAL SYSTEM ......................................................................................................29
7.1.1 GENERAL.............................................................................................................29
7.1.2 AGM BATTERY ...................................................................................................29
Activating & Charging the Battery.........................................................................29
Cleaning the Battery Terminals and Cable Connections ........................................31
Cleaning the Battery ...............................................................................................31
7.1.3 ELECTRICAL SYSTEM FUSES ..........................................................................31
7.1.4 SPARK PLUGS ......................................................................................................31
7.1.5 SPARK ARRESTER...............................................................................................31
7.2 DRIVE SYSTEM & TIRES..................................................................................................32
7.2.1 DRIVE BELT..........................................................................................................32
Drive Belt Adjustment............................................................................................32
Drive Belt Removal ................................................................................................33
Drive Belt Installation.............................................................................................33
7.2.2 CLUTCH MAINTENANCE..................................................................................33
Clutch Inspection....................................................................................................33
IV
TABLE OF CONTENTS

TABLE OF CONTENTS
7.2.3 DRIVE CHAINS ....................................................................................................34
Drive Chain Removal............................................................................................. 34
Drive Chain Installation..........................................................................................34
7.2.4 DRIVE CHAIN TAKE-UP SYSTEM ....................................................................35
Replacement of Slider Blocks ................................................................................35
7.2.5 TIRE INFLATION..................................................................................................36
7.2.6 TIRE REPAIR AND REPLACEMENT.................................................................37
7.2.7 AXLE BEARING MOUNTING ............................................................................38
7.3 HYDRAULIC BRAKES ......................................................................................................38
7.3.1 GENERAL..............................................................................................................38
7.3.2 BRAKE FLUID LEVEL ........................................................................................38
7.3.3 CHANGING BRAKE FLUID................................................................................39
7.3.4 HYDRAULIC BRAKE PAD INSPECTION .........................................................39
Firewall Removal....................................................................................................39
Brake Pad Inspection Procedure.............................................................................39
Re-installation of Brake Pads .................................................................................39
7.3.5 HANDBRAKE INSPECTION...............................................................................40
Brake Pad Inspection Procedure.............................................................................40
Re-installation of Firewall ......................................................................................41
Service Brake Bedding in Procedure......................................................................41
7.3.6 EMERGENCY/PARKING BRAKE ADJUSTMENT ...........................................42
7.3.7 BRAKE PLUNGER ADJUSTMENT ....................................................................42
7.3.8 BRAKE COOLING SYSTEM...............................................................................42
7.3.9 ENGINE COOLING & EXHAUST SYSTEM......................................................42
7.4 DAILY CHECKLIST ............................................................................................................44
20/20 Service Chart ................................................................................................44
100/20 Service Chart ..............................................................................................45
7.5 MAINTENANCE SCHEDULE............................................................................................46
8.0 TROUBLESHOOTING...........................................................................................................................47
9.0 CLEANING AND STORAGE
9.1 CLEANING THE VEHICLE................................................................................................49
9.2 STORING THE VEHICLE ...................................................................................................49
Cleaning the Vehicle..............................................................................................................49
Drain the Fuel System ...........................................................................................................49
Prepare the Battery for Storage .............................................................................................49
Protect the Electrical System.................................................................................................49
Raise the Vehicle ..................................................................................................................49
Preparing the Engine for Storage ..........................................................................................49
10.0 POTENTIAL HAZARDS ..................................................................................................................50
V
SECTION PAGE

SECTION PAGE
TABLE OF CONTENTS
11.0 ACCESSORY INFORMATION
11.1 GENERAL ...........................................................................................................................54
11.2 CARGO TIE-DOWNS (Part No. 614-06) ...........................................................................54
11.3 ARGO TRACK SYSTEMS (Standard Track and Super Track)..........................................54
11.4 RUBBER TRACK INSTALLATION ..................................................................................55
11.4.1 Removal Rubber Track System .............................................................................56
11.5 Operating Precautions (Track System).................................................................................56
11.6 ICE CLEAT KIT .................................................................................................................56
11.7 OUTBOARD MOTOR BRACKET - SIDE MOUNT ........................................................57
11.8 ARGO STORAGE COVERS .............................................................................................57
11.9 POWER WINCH ................................................................................................................57
11.9.1 Rules for Safe Operation .......................................................................................57
11.9.2 Tips for Extending the Life of Your Winch ...........................................................58
11.10 REAR MUD FLAP ACCESSORY ......................................................................................59
11.11 BILGE PUMP ACCESSORY .............................................................................................59
11.12 HANDRAIL ACCESSORY ................................................................................................59
11.13 TOW HOOK ACCESSORY ...............................................................................................59
11.14 WINDSHIELD .................................................................................................................59
11.15 CONVERTIBLE TOP .........................................................................................................60
11.16 ALTERNATOR ACCESSORY for Avenger .......................................................................60
11.17 SNOW PLOW ACCESSORY .............................................................................................60
11.18 AMPHIBIOUS TRAILER (4-Wheel & 8-Wheel)................................................................61
11.18.1 Operating Precautions............................................................................................61
11.19 HEATER ACCESSORY.......................................................................................................62
11.20 ROLL OVER PROTECTIVE STRUCTURES ...................................................................62
11.21 BRUSHGUARD KIT ..........................................................................................................62
WARRANTY POLICY........................................................................................................64
VI

1
SECTION 1
GENERAL INFORMATION
1.1 AMPHIBIOUS OPERATION
All models of the ARGO are amphibious and capable of tra-
versing calm water. Special operating procedures and safety
precautions must be observed before entering the water and
during amphibious operation. Do not drive your vehicle into
water until you have read Section 5.6 Amphibious Operation.
Operators with disabilities need to take certain precautions
in the interest of their own safety. Refer to Section 2.4 of this
manual for more details.
1.2 MAINTENANCE PROCEDURES
Maintenance procedures described in this manual can be car-
ried out by the operator. These procedures include:
1. checkinguidlevels
2. changing the engine and transmission oil
3. cleaningandreplacinglters
4. preventative maintenance
5. inspections, adjustments, repairs and trouble-shooting
If you perform your own maintenance, carefully follow the
lubrication and preventative maintenance schedule (Section
7.5). By following this schedule, you will receive trouble
free, long term service from your vehicle.
Your Argo dealer will perform regular maintenance and lu-
brication for a reasonable service charge.
The trouble-shooting chart (Section 8) contains information
for locating and correcting mechanical problems. In many
cases,potentialproblemscanbeidentiedbyunusualnoises,
sluggishness or vibration, before they result in a breakdown.
Refer to the chart to identify these symptoms. Take immedi-
ate corrective action or take the vehicle to an Argo dealer for
service.
This manual does not provide detailed maintenance or servic-
ing information for the engine. Refer to the engine manu-
facturer’s manual (supplied with each Argo) for important
warranty, service and operating information.
If the engine requires servicing, take the vehicle to an author-
ized engine service outlet.
1.3 WIND CHILL FACTOR
Why does it feel much colder outdoors on a windy day than
when there’s no wind, especially in winter?
Thecoolingeectofthewindmakesitfeelthatit’scolderthan
itreallyis.Thiscombinedeectofwindandlowtemperature
is known as the “wind chill factor”.
Argo operators should be aware of the wind chill factor. Dress
warmly and make sure exposed skin is protected. Pay par-
ticular attention that young passengers are properly “bundled
up” with their hands and faces well protected.
1.4 LEGEND FOR OPERATOR'S MANUAL
Belowaresomeiconsyouwillndthroughoutthismanual.
These icons will indicate that the information is relevant only
for vehicles with that feature.

2
SECTION 1
GENERAL INFORMATION
Vehicle Transmission
Option
Engine
Type
H.P.
Aurora 800 8x8
30HP
Aurora 800 Huntmaster
30hp
Aurora 800 SX 8x8
30HP
Aurora 800 Limited 8x8
30HP
Aurora 950 SX 8x8
40HP
ADM
ADM
ADM
ADM
ADM
Argo produces and manufactures several Aurora Models. They are listed in the table below with
their corresponding transmission, engine type and horse power.

3
SECTION 1
GENERAL INFORMATION
1.5 REAR SIDE SEATS - 8 WHEEL MODELS
SomeAurora8wheelmodelsarettedwith“quick-release”
side rear seats.
Removal
1. Grasp the inner edge of the rear seat at both ends.
2. Lift the inner edge of the rear seat upwards until both plastic
bumpers are clear of the upper body.
3. Using an upward motion, pull the seat toward the centre
of the rear compartment.
4. Remove the seat.
Installation
1. Place the rear seat over the seat mounting holes in the upper
body. Insert the large seat washers through the holes.
2. Using downward pressure, slide the seat towards the out-
side of the vehicle to lock it in place.
1.5A REAR SEATS - 8 WHEEL MODELS
SomeAurora8wheelmodelsarettedwitha“quick-release”
rear bench seat.
Removal
1. Standing at the rear of the bench seat, pull back on the
left and right side release pins allowing the seat to pop up.
Figure 1-5 & 1-6
2. Tilt the seat forward slightly.
3. Lift up and out of the vehicle.
Installation
1. With the rear bench seat tilted forward, align and attach
thefrontseatpinsrsttothelowerbenchseatframe.
2. Lower the back end of the seat. Click and lock pins into
slots at the rear of the seat bracket securely.
Figure 1-5. Release latches, tilt seat forward
1.4.1 Argo Vehicle Capacity
Vehicle capacity includes occupants, cargo, fuel, and
all additional accessories. Capacity for occupants and
cargo is reduced by the weight of accessories as shown
in the following chart.
Some models come with accessories included. Available vehicle
capacity must be reduced if your vehicle is equipped with any
additional accessories. Reduce the available capacity by the total
weightofadditionalaccessoriesttedtoyourvehicle.
Load capacity on water is reduced by 100lbs. if your
8x8 Argo is equipped with optional smaller 24x10.00-8
tires when the standard spec would include 25x12.00-9.
The reduced buoyancy could cause the Argo to become
swamped and sink, causing injury or drowning to the
driver and passengers.
Reduce By
Accessory (lbs./kg) On On
On Vehicle Land Water
Rubber Track 8x8 295 (135) 175 (80)
Winch Kit 30 (6.8 ) 50 (23)
Brush Guard 15 (5) 11 (5)
Windshield 33 (15) 33 (15)
Convertible Top 27 (12) 27 (12)
Snow Plow 190 (85) SEE WARNING
Rear Bench Seat 34 (15) 34 (15)
ROPS 195 (88.5) (195) (88.5)
Cargo Liner 21 (9.5) 21 (9.5)
Hood Extraction Fan 11 (5) 11 (5)
Do NOT use an Argo on water when equipped with a snow
plow. The increased weight of the snow plow out front
will make the Argo unstable and could cause the vehicle
to capsize, causing injury or drowning to the driver and
passengers.
1.4.2 Amphibious Trailer Capacity
4 Wheel Trailer
Load Capacity: 270 kg (600 lbs.)
Trailer Weight: 183 kg (404 lbs.)
4 Wheel V-Trailer
Load Capacity: 270 kg (600 lbs.)
Trailer Weight: (25" Tires) 147 kg (324 lbs.)
8 Wheel Trailer
Load Capacity: 590 kg (1300 lbs.)
Trailer Weight: 322 kg (710 lbs.)
Gross Vehicle Rating: 907 kg (2000 lbs.) on land
817 kg (1800 lbs.) on water
* Load capacity equals gross weight rating minus the weight of the trailer
and accessories.

4
Figure 1-6 Pull back latch (left & right side of seat)
Always ensure that the spring loaded pull pin on each
side is fully engaged after installing the seat. Pull the
seat hard to ensure that it is secured properly.
Never attach a tow line to the handrail of the seat back
rest.
When a roll over protection structure (ROPS) is installed,
seat belts must be installed for rear bench seat passen-
gers and used properly.
SECTION 1
GENERAL INFORMATION

5
SECTION 1
GENERAL INFORMATION
Model
Aurora 800 Aurora 800 SX Aurora 800 SX
Hunt Master
Aurora 800
Limited
Aurora 950 SX
Engine Kohler (30 hp) EFI V-twin 4 cycle, liquid cooled Briggs 40HP Twin EFI
fan cooled
Transmission (ADMIRAL) Forward, neutral and reverse with high/low range
Clutch Belt-driven, Continuously Variable Transmission (CVT) maximizes engine power to the transmission
Fuel Capacity 27 L (7.1 U.S Gal.)
Steering/Brakes Argo Progressive Steering (APS) Hydraulic steering disc brakes with hydraulic disc stopping brakes
Drive Chains Double RC 50 & Single RC 60 Roller chain
Electrical 30 Ah(10H-R) Regular Charge Current (Amp) 3.C.C.A. @ 0F (-18C) 400
30 Ah(10H-R) Regular
Charge Current (Amp)
3.C.C.A. @ 0F (-18C)
400
Load
Capacity
Land 1010 lbs. (459 kg) 925lbs. (420 kg) 925lbs. (420 kg) 950lbs. (432 kg) 925lbs.(420kg)
Water 710 lbs (323 kg) 625lbs (284 kg) 625lbs (284 kg) 650lbs (295 kg) 625lbs. (284kg)
Seating
Capacity
Land 4 persons
Water 4 persons
Shipping Weight 1540 lbs (700 kg) 1625 lbs (739 kg) 1625lbs (739 kg) 1600 lbs (727 kg) 1625lbs (739kg).
Accessory
Brake Cooling No No No No No
Brake lights Yes Yes Yes Yes Yes
Brushguard No Yes Yes Yes Yes
Drive Belt 127-137HD 127-137HD 127-137HD 127-137HD 127-159HD
Tires 25"XT 25"XT 25"XT 25"XT 25"XT
Rims Steel Offset Steel Bead Lock Steel Bead Lock Aluminum Bead
Lock Steel Bead Lock
Winch No 3500 lb. 3500 lb. 3500 lb. 3500 lb.
Alternator Output 40 AMPS 40 AMPS 40 AMPS 40 AMPS 50 AMPS
ROPS No No No No No
Cargo Liner No No No No No
Bearing Extensions Yes Yes Yes Yes Yes
Hood Extraction Fan No No No No Yes
Hitch Capacity Draw
Bar Pull
N / LBS
4448/1000
N/ LBS
4448/1000
N / LBS
4448/1000
N / LBS
4448/1000
N / LBS
4448/1000
Hitch Capacity Vertical
Tongue Load
N / LBS 445/100 N / LBS 445/100 N / LBS 445/100 N / LBS 445/100 N / LBS 445/100
* Speed is 20% less with 34-200-8.1
** Load capacity in water is 100lbs. less if equipped with optional 24x10.00-8NHS tires.
1.6 Aurora 8x8 (2019MY) VEHICLE MATRIX

6
SECTION 1
GENERAL INFORMATION
Model
Aurora 850 Limited 8x8 Aurora 950 SX-R 8x8
Aurora 950
Huntmaster 8x8
Aurora 850 SX-R 8x8
Engine Briggs (33 hp) EFI V-twin
4 cycle, air cooled
Briggs (40 hp) V-Twin 4
cycle EFI.air cooled
Briggs (40 hp) V-Twin 4
cycle EFI.air cooled
Briggs (33 hp) EFI V-twin
4 cycle, air cooled
Transmission (ADMIRAL) Standard (ADMIRAL)
Standard or High Torque
ADMIRAL)
Standard or High Torque
ADMIRAL)
Standard or High Torque
Clutch Belt-driven, Continuously Variable Transmission (CVT) maximizes engine power to the transmission
Fuel Capacity 27 L (7.1 U.S Gal.)
Steering/Brakes Argo Progressive Steering (APS) Hydraulic steering disc brakes with hydraulic disc stopping brakes
Drive Chains Double RC 50 & Single RC 60 Roller chain
Electrical 30 Ah(10H-R) Regular Charge Current (Amp) 3.C.C.A. @ 0F (-18C) 400
Load
Capacity
Land 1100lbs. (499kg) 850lbs.(386 kg) 925lbs (422 kg) 870lbs. (395 kg)
Water 800lbs. (363kg) 550lbs. (249k kg) 625lbs (354 kg) 570lbs. (259 kg)
Seating
Capacity
Land 4 persons
Water 4 persons
Shipping Weight 1450lbs (658kg). 771/1700 1625lbs (667 kg) 1680lbs. (762 kg)
Accessory
Brake Cooling No No No No
Tail Lights Yes Yes Yes Yes
Brushguard No No Yes No
Drive Belt 127-159 Standard 127-159 HD 127-159HD 127-159 Standard
Tires 25"XT 25"XT 25"XT 25"XT
Rims Bead Lock Aluminum Steel Bead Lock Steel Bead Lock Steel Bead Lock
Rear Seats Bench Bench Rear Side Seats Bench
Gauge Premium Premium Premium Premium
Winch No No. 3500 lb. No
Alternator Output 20/50 AMPS 20/50 AMPS 20/50 AMPS 20/50 AMPS
ROPS No Yes No Yes
Cargo Liner No Yes Yes Yes
Bearing Extensions Yes Yes Yes Yes
Hood Extraction Fan No Yes Yes No
Hitch Capacity Draw
Bar Pull
N / LBS
4448/1000
N/ LBS
4448/1000
N / LBS
4448/1000
N / LBS 4448/1000
Hitch Capacity Vertical
Tongue Load
N / LBS 445/100 N / LBS 445/100 N / LBS 445/100 N / LBS 445/100
* Speed is 20% less with 34-200-8.1
** Load capacity in water is 100lbs. less if equipped with optional 24x10.00-8NHS tires.
1.6 Aurora 8x8 (2020MY)VEHICLE MATRIX

7
SECTION 1
GENERAL INFORMATION
Model
Aurora 850 SX 8x8 Aurora 850 Huntmaster 8x8 Aurora 850 SX-R 8x8i Aurora 950 SX-R 8x8i
Engine Briggs (33 hp) EFI V-twin
4 cycle, air cooled
Briggs (33 hp) EFI V-twin
4 cycle, air cooled
riggs (33 hp) EFI V-twin
4 cycle, air cooled
Briggs (40 hp) V-Twin 4
cycle EFI.air cooled
Transmission (ADMIRAL)
Standard or High Torque
(ADMIRAL)
Standard or High Torque
ADMIRAL)
Standard or High Torque
ADMIRAL)
Standard or High Torque
Clutch Belt-driven, Continuously Variable Transmission (CVT) maximizes engine power to the transmission
Fuel Capacity 27 L (7.1 U.S Gal.)
Steering/Brakes Argo Progressive Steering (APS) Hydraulic steering disc brakes with hydraulic disc stopping brakes
Drive Chains Double RC 50 & Single RC 60 Roller chain
Electrical 30 Ah(10H-R) Regular Charge Current (Amp) 3.C.C.A. @ 0F (-18C) 400
Load
Capacity
Land 1098lbs. (498kg). 1020lbs. (463 kg) 870lbs. (395 kg) 850lbs.(386 kg)
Water 898lbs. (407kg) 720lbs. (327 kg) 570lbs. (259 kg) 550lbs. (249k kg)
Seating
Capacity
Land 4 persons
Water 4 persons
Shipping Weight 1452lbs. (657 kg) 1530lbs. (694 kg) 1680lbs. (762 kg) 771/1700
Accessory
Brake Cooling No No Yes Yes
Tail Lights Yes Yes Yes Yes
Brushguard No Yes
Drive Belt 127-159 Standard 127-159 Standard 27-159 HD 27-159 HD
Tires 25"XT 25"XT 25"XT 25"XT
Rims Steel Bead Lock Steel Bead Lock Steel Bead Lock Steel Bead Lock
Rear Seats Rear Side Seats Rear Side Seats Bench Seat Bench Seat
Gauge Premium Premium Premium Premium
Winch No 3500 lb.
Alternator Output 20/50 AMPS 20/50 AMPS 20/50 AMPS 20/50 AMPS
ROPS No No Yes Yes
Cargo Liner Yes Yes Yes Yes
Bearing Extensions Yes Yes Yes Yes
Hood Extraction Fan No No No Yes
Hitch Capacity Draw
Bar Pull
N / LBS
4448/1000
N/ LBS
4448/1000
N/ LBS
4448/1000
N/ LBS
4448/1000
Hitch Capacity Vertical
Tongue Load
N / LBS 445/100 N / LBS 445/100 N / LBS 445/100 N / LBS 445/100
* Speed is 20% less with 34-200-8.1
** Load capacity in water is 100lbs. less if equipped with optional 24x10.00-8NHS tires.
1.6 Aurora 8x8 (2020MY con't) VEHICLE MATRIX

8
SECTION 1
GENERAL INFORMATION
1.7 IDENTIFICATION AND LOCATION OF CONTROLS
Firewall
Hood Release
Vehicle Identification
Number Plate
Light Switch
Hand Brake
Lever
Cup Holder
Forward/Reverse
Shifter
12 Volt Outlet
Right Grip
DigitalGauge
Ignition Switch
Steering Handle
Bar
Hi/Lo Range
Shifter
Winch
Bilge Pump
Finger Throttle

9
SECTION 1
GENERAL INFORMATION
1.8 INFORMATION LABELS
There are labels on all Aurora models which indicate operating hazards and provide special operating instructions. Informa-
tion about the use of the holding brake system, the use of the vehicle in water, correct fueling procedures and placement of the
oorpanshasbeenprovidedondistinctivecolouredlabelsfastenedtothevariouslocationsontheArgo.
Figure 1-1 Location of Information Labels - All Models

10
SECTION 2
GENERAL OPERATING INFORMATION
2.1 NEW VEHICLE “BREAK-IN” PROCEDURE
To obtain long term, trouble free service from your vehicle,
observe the following break-in guidelines:
1. Vary thespeed ofthevehicleforthe rsttank offuel.
Avoid full throttle operation during break-in period.
2. Check engine and transmission oil levels daily during
break-in period.
3. Change the transmission oil after initial 20 hours of opera-
tion. Failure to do so can result in damage to the transmis-
sion bearings or gear surfaces. Refer to Section 6.2 and
6.2.1 for transmission oil changing instructions.
4. Change the engine oil in the Kohler or Briggs engine after
therst20hoursofoperation.RefertoSection6.1.3
of this manual and the oil change section of each engine
owner’s manual for oil change information.
5. Never overload your vehicle. Trying to steer an overloaded
vehicle can overheat the brakes. This will lead to brake fade
which means loss of steering control and the ability to stop
the vehicle. Overloading the vehicle can lead to premature
brake system failures and costly damage to drive chains,
axles or bearings. Follow the recommended load capacity
for the vehicle listed in Section 1.4.
6. Do not allow the brakes to drag, particularly during the
rst10hoursofoperation.Tomaximizebrakepadlife,
start by making several low speed turns to both sides. Al-
low the brakes to cool by driving in a straight line. Repeat
the low speed turns. Allow the brakes to cool again. This
procedure will properly seat the brake pad friction material
to the brake disc. The handlebar should be kept centered
during straight ahead operation. Dragging the brakes will
cause overheating of the brake components and result in
brake fade.
2.2 PRE-OPERATION CHECKS
Carefully follow the engine manufacturer’s recommended
pre-operation/daily checks as well as the following:
1. Check the fuel level in the see-through tank located under
the driver’s seat.
2. Check the air pressure in all tires. NOTE: Improperly
inatedtirescan causethe vehicletopull toone side,
requiring constant steering correction. See Section 7.2.5
fortirepressurespecications.
3. Testtheoperationofthe ngergripthrottlecontrolby
squeezing it to the fully open position and releasing it. The
throttle must operate smoothly and return automatically
to the fully closed position. Take the vehicle to an ARGO
dealerifthengergripthrottlerequiresadjustment.
4. Check hand operated brake lever on left hand steering bar
for braking capability Section 7.3.5. Check steering handle
bar travel to the left and to the right for steering capability.
5. Check the engine intake and exhaust screen for obstruc-
tions. Clear any debris that has accumulated.
2.3 CARRYING PASSENGERS AND CARGO
1. Keep cargo as low as possible and evenly distributed.
2. Use extreme CAUTION when negotiating inclines with
a loaded vehicle. Heavy loads and high loads decrease
the stability of the vehicle and may cause it to roll. Be
prepared to shift occupant weight and load forward or have
passengers get out of the vehicle to climb an incline.
3. Secure cargo to prevent it from shifting while driving.
4. Donotmountanyheavyxturestotheupperbodywithout
support to the vehicle frame. The added weight may cause
body deformation that could result in the tires rubbing
through the body.
Make sure all passengers riding in an ARGO equipped
with tracks and ice cleats are informed to keep hands,
feet and clothing inside the vehicle, well away from
the tracks and ice cleats, while the ARGO is in motion.
Serious injury or death could result from getting caught
by the ice cleats.

11
SECTION 2
GENERAL OPERATING INFORMATION
2.4 OPERATORS WITH DISABILITIES
The information below pertains to safety procedures,
which, if not followed, can result in personal injury
or death or damage to the Argo vehicle.
We advise persons with disabilities who operate Argo vehicles,
to take certain precautions in the interest of their own safety.
Since the nature of disabilities can vary widely, it is impossible
togivecompleteinstructionsthatapplytoeveryspeciccase.
Therefore, it is the responsibility of the Argo driver to take
steps beyond the ones suggested in the following that take
the special nature of his/her disability into account in order
to operate the vehicle safely.
Please read this Operator’s Manual thoroughly BEFORE
OPERATING YOUR NEW ARGO VEHICLE.
Equipment
For mobility-impaired drivers, the following additional equip-
ment should be installed in the Argo vehicle:
- roll-over protection
- a special seat assisting the driver in maintaining his/her
seating position
- four-point safety harness
-reextinguisherwithinreachofthedriver
Maximum Payload
Due to the additionally installed equipment, including any
other ARGO accessories, the maximum available payload of
the vehicle must be reduced accordingly; refer to Section 1 in
your ARGO Operator’s Manual under Argo Vehicle Capacity.
Never exceed the maximum load capacity of the vehicle.
General
Ensurethatanon-boardreextinguisherisfullychargedat
alltimesandhaveitinspectedonaregularbasisbyqualied
personnel.
We recommend that you do not venture out in your Argo
without being accompanied by an able-bodied person to assist
youincaseyouencounterdiculty.Ifthisisnotpossible,
make sure that adequate communications equipment (eg. cell
phone, two-way radio) with an independent power supply is
on-board and communication lines are open at all times to call
for help if necessary. Remember, a simple technical failure
could leave you stranded.
If parts of your body are pain insensitive, please take extra
care to ensure that your skin does not touch components of
the Argo that may be hot. Also, be aware of hot air exhaust
outlets and moving parts.
Water Operation
Carefully read Section 5 of the Operator’s Manual covering
water operation.
Enterthewaterfromarmgradualslope.Ifthewaterisdeep
enoughforthevehicletooat,unlatchallsafetybeltsand
restraining devices, including the operator's. In shallow water
be prepared to free yourself from restraining devices quickly.
If an emergency arises, you and your passengers may have to
leave the vehicle quickly.
If the vehicle is equipped with an optional convertible top
assembly, fold the top assembly down to allow for a quick
exit in case the vehicle submerges and to reduce the surface
exposed to the wind.
Be aware that the weight of the ROPS makes the vehicle more
likelytorolloverinwaterthananunmodiedvehicle.
We do not recommend the use of your Argo on frozen water
surfaces because of the danger of breaking through the ice and
the risk of exposure in cold water. (Refer to Section 5 of the
Operator’s Manual.) If you must cross ice-covered bodies of
water,takealonganable-bodiedpersontoassistifdiculties
are encountered.
Land Operation
When operating the vehicle on land, make sure all occupants
including yourself are wearing the seat belts and you are
strappedinyourseatrmlyatalltimes.Lossofseatingposi-
tion could result in loss of control of the vehicle.
Be constantly aware of the overall height and width of your
Argo vehicle equipped with the ROPS. Watch out for low
objects, eg. brush, branches, etc. which could strike the ROPS
and cause the vehicle to stop abruptly, rollover, or go out of
control.
Due to the weight of the ROPS, your vehicle is more likely
to rollover on land than a standard Argo vehicle. Ensure pas-
sengers and operator remain seated at all times and keep all
cargo low and evenly distributed.
Seat belts must be properly adjusted and worn by all occupants
atalltimesEXCEPTwhenthevehicleisoatinginwater.

12
We have provided this information because we want you
to enjoy your mobility in the outdoors safely. However,
please keep in mind that all the warnings and instructions
in the world cannot replace common sense. You’ve got
it – please use it.
2.5 FUELING THE VEHICLE
Gasoline is extremely ammable and can explode
under certain conditions. Do not add fuel while the
engine is running or hot. If fuel is spilled in, on or
around the vehicle, wipe it up immediately. Flush out
any fuel spilled in the vehicle with water and allow
it to drain out through the drain plug holes. Do not
smoke when lling the fuel tank.
Use clean, fresh, unleaded gasoline in all models of the ARGO.
Minimum 87 octane fuel is recommended.
Leaded gasoline can be used as a substitute fuel. However, if
leaded gasoline is used, the engine will require more frequent
servicing.
Never use gasoline containing methanol or white gas since
engine or fuel system damage could occur.
All Argo models are equipped with a 27 litre (5.9 Imp. Gal,
7.1 U.S. Gal.) "see-thru" polyethelene fuel tank located under
the driver's seat. Depending on loading and driving condi-
tions, an ARGO can be driven for 7 to 12 hours on one tank
of fuel. Verify your vehicle’s actual fuel consumption before
attempting any long trips. Never travel in remote areas or set
out on long trips without a full tank of fuel and adequate spare
fuel stored in approved watertight fuel containers.
Thefuelllerneckandfuelcaparelocatedontherightside
of the vehicle behind the driver’s seat. Replace the fuel cap
if fuel leakage occurs, or if moisture is detected in the fuel.
Use ARGO Part No. 126-100 fuel cap.
Neverllthetanktothepointwherethefuellevelrisesinto
thellerneck.Ifthetankisoverlled,heatmaycausethe
fueltoexpandandoverowthroughthevent.
Portable fuel containers may contain contaminants (dirt, water,
etc.) that will cause engine operating problems. Use only
clean, approved gasoline containers.
Afterllingthefueltank,besurethefuelcapisreplaced
securely. Do not drive the vehicle unless the fuel cap is
properly in place.
Never use untreated gasoline that has been stored
for more than 45 days. Stale gasoline can cause
deposits to form in the fuel lines and carburetor. These
deposits clog the fuel system and cause engine starting
and operating problems.
When storing the ARGO for 45 days or more, use
ARGO Part No. 130-107 Fuel Stabilizer to treat fuel
in the fuel tank and fuel containers.
2.6 VENTED FUEL SYSTEM - ALL MODELS
All ARGO models have fuel systems that are vented through
aspecialhoseconnectedtothellerneckassemblythatruns
along the upper body forward to the engine.
When installing the Convertible Top Kit; Since the fuel
vent hose runs along the under side of the upper body,
care must be taken when drilling mounting holes. The
fuel vent hose could be pierced during the drilling pro-
cess, resulting in a dangerous fuel leak into the vehicle
and a costly repair procedure.
Never use gasoline or other harsh solvents to clean the
Argo body. All Camouage material is especially vulner-
able to damage and peeling if it comes into contact with
gasoline. Take precautionary action when refueling to
protect the body from any such occurances.
2.7 INSTRUMENT CLUSTER
Argo Aurora's are equipped with an LCD instrument cluster.
Figure 2-1.
The LCD cluster displays battery voltage, hour meter, odom-
eter, speedometer, coolant temperature (liquid cooled engines
only) and tachometer. There are indicator lights for parking
brake, low oil pressure, and diagnostic light.
Gauges can be calibrated in km or miles both in speed and
distance.
SECTION 2
GENERAL OPERATING INFORMATION
This manual suits for next models
10
Table of contents
Other Argo Offroad Vehicle manuals

Argo
Argo Frontier 650 8x8 User manual

Argo
Argo Avenger Series User manual

Argo
Argo S Series User manual

Argo
Argo Explorer XRT 1000 LE User manual

Argo
Argo Conquest Series User manual

Argo
Argo Frontier 650 8x8 2021 User manual

Argo
Argo P-750 HDi User manual

Argo
Argo Standard Series User manual

Argo
Argo All 8X8 User manual

Argo
Argo 8x8 Titan User manual