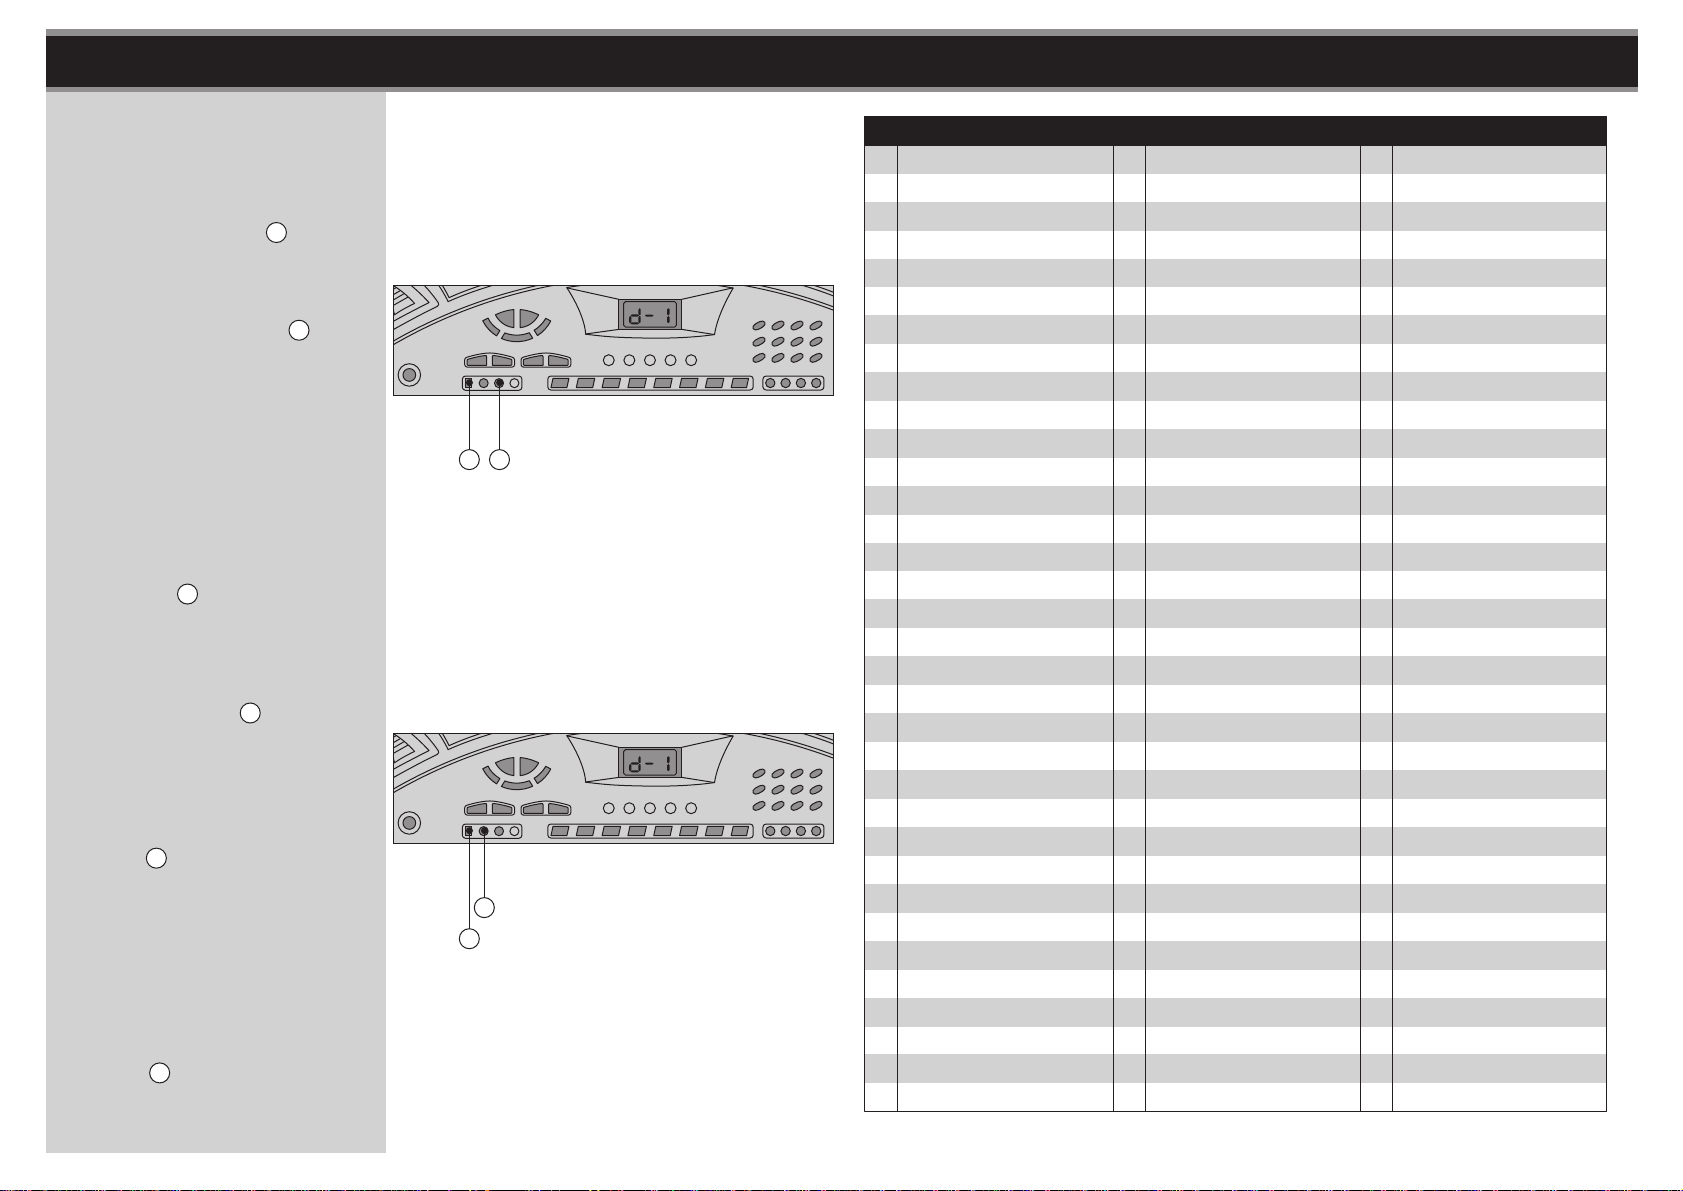
Argos MK-2054 User manual

Instruction Manual - Please keep for future reference
Acoustic Solutions Midsize Keyboard
MK-2054
03-06
PRODUCT GUARANTEE
This product is guaranteed against manufacturing defects for a period of
This product is guaranteed for twelve months from the date of original purchase. Any
defect that arises due to faulty materials or workmanship will either be replaced,
refunded or repaired free of charge where possible during this period by the dealer
from whom you purchased the unit.
The guarantee is subject to the following provisions:
- The guarantee does not cover accidental damage, misuse, cabinet parts, knobs
or consumable items.
- The product must be correctly installed and operated in accordance with the
instructions contained in this manual.
- It must be used solely for domestic purpose.
- The guarantee will be rendered invalided if the product is re-sold or has been
damaged by inexpert repair.
- Specifications are subject to change without notice.
- The manufacturer disclaims any liability for the incidental or consequential damages.
- The guarantee is in addition to, and does not diminish your statutory or legal rights.
Guarantor: Argos Ltd
489 - 499 Avebury Boulevard
Central Milton Keynes
MK9 2NW
Year

1
CAUTION -Use of controls or adjustments or performance of procedures
other than those specified herein may result in a hazard.
IMPORTANT SAFETY INSTRUCTIONS
Read all instructions before use and keep for future reference.
WARNING -To reduce the risk of fire or electric shock, do not expose
this appliance to rain or moisture.
PRECAUTIONS
To Maintain Optimum Performance
Do not use the unit in places which are extremely hot, cold, dusty or humid. Do not use or keep
the unit in following places.
• In a high humidity area such as a bathroom or near a heater.
• In an area exposed to direct sunlight (where it can become extremely hot).
•Near sources of strong magnetism, such as televisions, speakers, or magnets.
•Where there is a lot of movement, vibration or an unstable shelf.
For safety
•Take care not to drop the unit or subject it to strong shocks.
Children
•Children do not understand the dangers associated with operating electrical appliances. Never
allow children to use this appliance.
Mains Lead
•If this unit has a mains lead or is connected with a mains adaptor do not allow the lead to become
strained or damaged as it creates a hazard.
Ventilation Warning
•Do not allow water or liquids to splash onto the main body as it contains live parts.
•Do not cover the body with a cloth and allow the unit to be well ventilated.
Electrical Requirements
Check that the voltage on the rating plate of your product corresponds with your house
electricity supply which must be A.C. (Alternating Current).
If the socket outlets in your home are not suitable for the plug supplied with this product, check
with a qualified electrician for replacement.

32
MIC OUT d.c 9V
efg
KNOW YOUR MACHINEKNOW YOUR MACHINECONTENTS
Know Your Machine .........................................................................................3
Using With Batteries ........................................................................................4
Using With AC/DC Adaptor...............................................................................5
Set Up .................................................................................................................6
Basic Operation ................................................................................................7
1. Volume Adjustment.........................................................................................7
2. Performance of Demo Songs..........................................................................8
3. Timbres Selectiont...........................................................................................9
4. Rhythmic Accompaniment ..............................................................................10
5. Auto Bass Chord .............................................................................................12
6. Percussion Performing and Programming......................................................14
7. Record and playback ......................................................................................15
8. Teaching Function ..........................................................................................16
Appendix ...........................................................................................................17
1. Timbres Table..................................................................................................17
2. Rhythms Table ................................................................................................18
Specifications ...................................................................................................19
E
D
F
B1 x Music Stand
A1 x Keyboard
C1 x Adaptor
D D
E
FGHI
J
KLMNOQ
P
V
U
T
SXb
a
Z
Y
d
Z
Y
a
U
V
X
G
I
J
K
L
M
P
Q
R
S
T
H
Speaker
Power Switch
Record
Program
Master Volume
Play back
Accom Volume
Tempo
Sync
Insert
Digital Display
Fingered
Single
Chord Off
Key Pad
Demo
Guide
N
O
Rear Panel
R
b
e
f
g
d
One Key
Start/Stop
Percussion Keys
Timbre
Rhythm
Vibrato
Sustain
Accompany
Keyboard Area
Mic In
Audio Out
D.C. In

45
NOTES:
- Please read the important safety
instructions before use.
WARNING
NOTES:
- Before connecting to the mains
make sure that the rated voltage
shown on the rear panel matches
your mains voltage supply.
NOTE: Make sure your local
voltage is 230V/240V~, 50Hz.
fig. 1
fig. 3
MIC OUT d.c 9V
fig. 4
USING WITH AC/DC ADAPTORUSING WITH BATTERIES
1. Open the battery compartment.
See fig. 1
2. Insert six new size D batteries with
the and marks correctly
aligned.
See fig. 2
3. Carefully slide the battery door
closed.
See fig. 3
Battery replacement
• When the battery voltage drops,
there will be a reduction in
performance which might include
low sound, distortion, or failure of
the digital display to light. If this
happens, turn off the power, ensure
the unit is unplugged from the
mains and replace with a new set
of batteries.
Note on batteries:
• Do not mix different types of
batteries or an old battery with a
new one.
• To prevent the risk of leakage or
explosions, never recharge the
batteries, apply heat or take them
apart.
• When not using batteries, remove
them to prevent battery drain.
• If liquid leaks from the batteries,
throw them away. Thoroughly clean
the battery compartment with a dry
cloth.
1. Plug the Adaptor C into the
power supply and insert the jack
into the DC In g.
See fig. 4
Recommendation on the
AC/DC adaptor :
- Input : 230V~ 50Hz
- Output : DC 9V
- Only a safety isolating
transformer with CE marking
that complies with British
Standard BS EN 61588-1 and
BS EN 61588-2-6 as giving
presumption of compliance
with the essential requirements
in the Low Voltage Directive
73/23/EEC amended by
93/68/EEC should be used. In
case of any doubt, please
consult a qualified electrical
professional.
Using with AC/DC Adaptor
fig. 2
DC IN 9V
g
C

67
MIC OUT d.c 9V
fig. 5
fig. 7
MIC OUT d.c 9V
fig. 6
fig. 8
fig. 9
fig. 10
BASIC OPERATIONSET UP
1. Plug Microphone (not supplied)
into Mic In e to sing as you play.
See fig. 5
Basic Operation
- Press the POWER E to switch the
Keyboard power on or off. When
you turn on the power the system
will be in standby mode and the
digital display will show the default
tempo of 120 beats/minute. The
display also shows the options
available whilst scrolling through
the settings, but will revert back to
the current tempo setting
afterwards.
See fig. 8
1. Volume Adjustment
A.Master Volume
Press MASTER VOLUME H + / -
button to increase or decrease the
master volume. There are 16 levels
of adjustment V00-V15 which will
be shown on the display. Each time
the keyboard is turned on the
volume will revert back to its default
volume of 10. Pressing the two
volume buttons at anytime will
restore the volume to its default
setting.
See fig. 9
B. Accompany Volume
Press the ACCOM VOLUME J+
/ - buttons to adjust the volume of
the chord and rhythm parts. There
are 16 levels of volume control A00
~ A15 which will be shown on the
display, and the accompany
volume is relative to the master
volume. The default level is 15,
pressing the two buttons at anytime
will restore the default value.
See fig. 10
Before Using
- Slot the Music Stand B into the
top of the Keyboard A.
See fig. 7
2. You can connect external speakers
to the Audio Out f at the rear of
the unit.
See fig. 6
Microphone / External Speaker
B
A
e
Rear Panel
f
Rear Panel
External Speaker
E
H
J

89
fig. 11 fig. 12
fig. 13
fig. 14
BASIC OPERATIONBASIC OPERATION
B.Sound-effect Control
1) Sustain - to turn the sustain on or
off press the SUSTAIN b button.
When on S-1 will be displayed,
when off S-0 will be displayed. The
sustain is set to off when the
keyboard is first turned on.
See fig. 13
2) Vibrato - to turn the vibrato on or
off press the VIBRATO a button.
When on V-1 will be displayed,
when off V-0 will be displayed. The
vibrato is set to off when the
keyboard is first turned on.
See fig. 14
3. Timbres Selection
A. Timbres Selection
The keyboard has 100 timbres to
choose from, which are shown on
the display as t00-t99. To select
the timbre first press the TIMBRE
Ybutton, which will display the
current timbre, then use the Key
Pad R to type in the timbre number
or use the +/- buttons to scroll
through them.
For example, to select timbre 8,
type in 0 then 8, t08 will be shown
in the display.
See fig. 12
2. Performance of Demo Songs
Press the button DEMO S, the
current song will be played on a
loop and the tempo will be shown
on the display. Press the DEMO
Sbutton repeatedly to select the
desired song, there are 8 to choose
from. The display will show tracks
d-1 to d-8. To stop the demo song
press the DEMO S. The song's
tempo can be adjusted using the
TEMPO K buttons.
See fig. 11
S
K
Y
R
b
a

1110
fig. 15
fig. 16
fig. 17
fig. 18
fig. 19
BASIC OPERATION BASIC OPERATION
4. Rhythmic Accompaniment
A. Rhythm Selection
There are 100 rhythms saved in
the unit, which are shown on the
display as r00-r99, the default
rhythm is r00. Use the same
method as used to the select the
timbre, to select the rhythm. The
display shows flashing dots to
represent the beats.
See fig. 15
B. Accompaniment Control
1) Accompaniment Start
Press the START/STOP V button
to start rhythm accompaniment. If
the auto bass chord is on, press
one of the Accompany Keyboard
dkeys to select the chord relation.
There are 19 chords to choose
from, the accompaniment will then
start. To stop the performance
press the START/STOP V button.
See fig. 16
2) Insert Function
Press the INSERT M button, if the
rhythm is not playing, the unit will
play a period of intermezzo first,
and then play the auto
accompaniment. If the rhythm is
on, the unit will insert a period of
intermezzo into the rhythm, and
then play the homologous normal
rhythm.
See fig. 17
3) Synchronism Function
When the rhythm is off, press the
SYNC L button, the first dot in
the display will start flashing for
each beat. If you press the
INSERT M after the synchronism
function is started, the dots on the
left and the right side of the display
will start flashing for each beat.
When you press any key on the
accompany keyboard, the
accompaniment will play with your
performance. To stop the
accompaniment whilst the rhythm
is on, press the SYNC L button.
To stop the synchronism press
the START/STOP V button.
See fig. 18
4) Tempo Setting
The tempo speeds available range
from 60 to 240 beats /minute, there
are 46 levels in all. The default
tempo is 120 beats/minute. Press
the TEMPO K + / - buttons to
increase or decrease the tempo.
Press the two buttons together to
return to the default tempo of 120
beats/minute.
See fig. 19
Z
V
M
MV L
K

1312
fig. 20
fig. 21
fig. 23
fig. 22
BASIC OPERATION BASIC OPERATION
5. Auto Bass Chord
A. Single-finger Chord
When the rhythm is on, press the
SINGLE P button, and the display
will show C-1. Select the chord you
wish to play by pressing the keys
in the accompany keyboard area.
Single-finger Chord Method:
1 Major: Just press the basic key.
2 Minor: Press the basic key and
any white key on its left side.
3 Seventh: Press the basic key
and any white key on its left side.
4 Minor seventh: Press the basic
key and one white key, and one
black key on its left side.
See fig. 20
Single-Finger Chord Finger-Playing Table
B.Multi-Fingered Chord
When the rhythm is on, press the
FINGERED O button, the display
will show C-2. You can play multi-
finger chords by using the different
finger-playing methods in
accompany keyboard area. To
make the key of C for example,
the method of the multi-fingered
includes C, C7, CM, CM7, CDIM,
CSUS4, C9, CM9.
See fig. 21
C. Manual Chord
If the rhythm is not on, press the
SINGLE P button. The timbres of
the accompany keyboard area are
the homologous chord, and now
you can play manual chords freely.
See fig. 22
D.Chord Off
Pressing the CHORD OFF Q
button will turn off the single finger
or multi-fingered chords. The
accompany keyboard function is
disabled.
See fig. 23
The tone C fingering of multi finger mode
CM7 Cdim
Cdim7Caug Csus4 C7sus4 C6 Cm6
P
O
Q
P

1514
fig. 26
fig. 24
fig. 25
BASIC OPERATION BASIC OPERATION
6. Percussion Performing and
Programming
A. Percussion Performing
There are 8 percussion sounds, to
choose from, press one of
Percussion Keys X to select the
desired sound.
See fig. 24
B. Programming
Press the PROG G to display the
percussion currently selected.
Press the PROG G again to
record upto 32 pieces of
percussion.
Press the PLAYBACK I button,
the display will show PLy the self-
edited percussion rhythm will be
played as a loop, and the rhythm
chord can be selected for
accompaniment. Press the button
PLAYBACK I again or
START/STOP V to stop playing.
See fig. 25
7. Record and Playback
Press the REC F button, the
display will show rEC and any
notes played on the keyboard will
be recorded. Press the REC F
button again or after recording 52
syllables, the recording will stop,
with 1CH be being shown on the
display.
To listen to the recording press
the PLAYBACK I button, the
display will show PLy. To stop
playing the recording or replay it
press the PLAYBACK I button.
The REC F button may also be
used to stop playback.
See fig. 26
X
V
GI
I
F

1716
fig. 27
fig. 28
BASIC OPERATION APPENDIX
8. Teaching Function
A.One-key Function
Press the ONE KEY U button to
display the current song
accompaniments. You can select
the song which you want to learn
by pressing the DEMO S button
first. Pressing any key on the
keyboard will play the main
melody, the unit will accompany
you following your performance,
allowing you to get the timing right
without worrying about how to play
the right note. When the song has
ended, the keyboard will move to
the next song automatically. To
stop the accompaniment press the
ONE KEY U button.
See fig. 27
B.Teaching Function
Press the GUIDE T button and
the subsidiary melody of the
current song will be played with
its number being shown on the
display. You can also select the
demo songs first by pressing the
DEMO S button. Now you will
need to play the main melody
correctly, and the timbre of the
keyboard will be changed to the
timbre of the main melody. The
main melody will come in if you
do not play. After the song has
ended, the next song will be
selected automatically. Press the
GUIDE T button again to stop.
See fig. 28
TIMBRES TABLE
00 GRAND PIANO 34 E-PIANO 134 68 PAD 2
01 CLARINET 35 DULCIMER 69 PAD 3
02 VIBRAPHONE 36 OCARINA36 70 BASSOON
03 TRUMPET 37 FRETLESS BASS 71 OVERDRIVEN GTR
04 BANJO 38 BRASS SECTION 72 LEAD 3
05 FLUTE 39 KOTO 73 PAD 4
06 FINGER BASS 40 ENGLISH HORN 74 TREMOLO STRINGS
07 TUBA 41 SHANAI 75 MUSIC BOX
08 JAZZ GUITAR 42 PICCOLO 76 SOPRANO SAX
09 STRINGS ENSEMBLE 43 FRENCH HORN 77 CLAVICHORD
10 BRIGHT PIANO 44 STR ENSEMBLE 78 WHISTLE
11 SYNTH BRASS 45 SYNTH BRASS 79 LEAD 4
12 SYNTH BASS 46 LEAD 1 80 PIANO 2
13 SQUARE WAVE 47 E-PIANO 2 81 FX 5
14 MARIMBA 48 TENOR SAX 82 MUTED GUITAR
15 ELECTRIC PIANO 49 CELESTA 83 SLAP BASS 2
16 RAIN DROP 50 PIANO 1 84 PAD 5
17 ALTO SAX 51 PAD 1 85 BAGPIPC
18 TANGO ACCORDION 52 LEAD 2 86 SHAKUHACHI
19 STEEL DRUM 53 FX 2 87 FX 6
20 STRINGS ENSEMBLE 54 DISTORTION GUITAR 88 LEAD 5
21 ACOUSTIC GUITAR 55 FX 3 89 LEAD 6
22 TROMBONE 56 ELECTRIC BRASS 90 CLEAN GUITAR
23 ACOUSTIC BASS 57 PERCUSSIVE ORGAN 91 PAD 6
24 RECORDER 58 SYNTH VOICE 92 SITAR
25 SHAMISEN 59 REED ORGAN 93 TINKLE BELL
26 MUTED TRUMPET 60 HONKY-TONK PIANO 94 PAD 7
27 FX 1 61 SLAP BASS 95 CONTRABASS
28 OBOE 62 XYLOPHONE 96 PAD 8
29 HARPSICHORD 63 FX 4 97 SYNTH BASS
30 GLOCKENSPIEL 64 HARMONICA 98 FX 7
31 ACCORDIAN 65 STEEL GUITAR 99 FX 8
32 BARITONE SAX 66 PIZZICATO STRINGS
33 PAN FLUTE 67 FIDDLE
US
T
S

1918
APPENDIX SPECIFICATIONS
RHYTHMS TABLE
00 RHUMBA 34 BARREL HOUSE 68 CHARLESTON
01 SAMBA 35 SLOW ROCK 1 69 HOUSE 2
02 TANGO 1 36 TRIP HOP 70 BAROQUE
03 BEGUINE 37 OLDIEPOP 71 NEW SAIDI
04 POPS 1 38 ROCK 1 72 BOOGIE
05 LATIN 39 BIG BALLAD 73 DISCO BEAT
06 MARCH 1 40 MERENGUE 74 CANTALP
07 DISCO 1 41 KERONCONG 75 TECHNO
08 BOSSANOVA 42 GUARACHA 76 BALLAD
09 WALTZ 1 43 BIG BAND 77 DIXIE 1
10 16 BEAT 1 44 WALTZ 3 78 DISCO QUEE
11 ROCK ROLL 45 ROCK 2 79 ROCK 3
12 COUNTRY 1 46 PUNTA 80 HOUSE 3
13 REGGAE 47 JAZZ 81 BLUES 2
14 SLOW-ROCK 48 BEAT 2 82 DANCE 3
15 SWING 49 TRANCE 83 FUSNSHFL
16 8 BEAT 1 50 HOUSE 1 84 8 BEAT 5
17 CHA CHA 1 51 REGGAE 2 85 DANCE 4
18 MAMBO 52 SOUL 2 86 REGGAE 3
19 SALSA 53 POLKA 1 87 HAPPY LOVE
20 WALTZ 2 54 HIP-HOP 1 88 SKA
21 DANCE 1 55 16 BEAT 2 89 CHA CHA 2
22 LOUD FUSION 56 N.O.R&R 90 BROWN
23 POLKA 2 57 SLOW ROCK 2 91 MARCH 3
24 EURB 58 8 BEAT 3 92 16 BEAT 3
25 SOUL 1 59 PASODOBL 93 CALIFORNIA
26 RAP 60 DANCE 2 94 CUMBIA
27 TANGO 2 61 WORDPOP 95 BOLERO
28 REGGAE 1 62 SLOW ROCK 3 96 TEXMEX
29 RHUMBA 2 63 8 BEAT 4 97 ROCK 4
30 RAVE 64 QUICKSTP 98 DIXIE 2
31 COUNTRY 2 65 HIP-HOP 2 99 BOLERO
32 BEAT 1 66 MARCH 2
33 8 BEAT 2 67 BLUES 1
Technical Data
Model no. MK-4100
Timbres 100
Rhythms 100
Keyboard 54 Keys
Display LED
DEMO songs 8 demonstration songs
Effect control Vibrato, Sustain
Percussions 8 Front-panel Percussions
Auto Accom. Start/Stop, Sync, Insert, tempo
Chord Controller Single Finger, Multi Finger, Chord Off
Volume Controller Master Volume, Accompaniment Volume
Other controllers Program, Record, playback,
External ports Power , Microphone, Speaker(L/R)
Dimension 830 x 325 x 95(mm)
Weight 2.3KG
DC Input DC 9V
Table of contents