Argus RSM 48 UPF User manual

RSM 48/50 UPF
Modular Switched Mode Rectifier
010-511-B2

Argus Technologies Ltd. Visit www.argus.ca
Burnaby, British Columbia. Telephone: 604 436 5900 Fax: 604 436 1233
Argus Technologies reserves the right to make changes to the products and information contained in this document without notice.
Copyright 2008 Argus Technologies Ltd. Argus®is a registered trademark of Argus Technologies Ltd. All Rights Reserved.
Printed in Canada.
This page intentionally left blank.

Argus Technologies Ltd. 010-511-B2 Rev B WC
Printed in Canada. © 2006 Argus Technologies Ltd. ARGUS and UNITY SERIES are trademarks of Argus Technologies Ltd. All Rights Reserved.
RSM 48/50 UPF
Modular Switched Mode Rectifier
010-511-B2
The following documents and drawings are included in this manual to provide the necessary information required for
routine operation and fault diagnosis of the unit.
• Specifications, RSM 48/50 UPF: 010-511-B1 Rev A
• CSA/NRTL Equivalence: 048-554-10
• Warranty Policy: 048-507-10
• Installation and Operation Instructions: 010-030-C0 Rev E
• Factory Service Information: 048-527-10
(Patent #: 5,379,206)

SPECIFICATIONS FOR ARGUS TECHNOLOGIES’ SWITCH MODE RECTIFIER RSM 48/50 (UPF)
Output
Voltage: 42 - 62 VDC (test)
50 - 60 VDC (equalize)
48 - 57 VDC (float)
Current: 50 Amps DC nominal
Power: 3000 Watts continuous/module
Regulation: +/- 0.02% line and load (static, zero slope)
<1% deviation for 50 to 100% load step (dynamic)
Response Time: 2 msec to 0.1% of output for 50 to 100% load step
Time Stability: 0.2% per year
Temp. Stability: 100 ppm/degree C over the operating range
Noise: Less than 23 dBrnC (Voice Band)
10mVRMS 10kHz to 10MHz (Wide Band)
150mVp-p 10kHz to 100MHz
EMI: The unit meets requirements of FCC Rules
Part 15, Subpart B, Class A
Breaker Rating: 60 Amp, 5000 Amp interrupting capacity at 65 VDC
In Accordance with FCC requirements, we provide the following statement as specified in the FCC guide-
lines for conformance to Part 15, Class A:
NOTE: This equipment has been tested and found to comply with the
limits for a Class A digital device, pursuant to part 15 of the FCC Rules.
These limits are designed to provide reasonable protection against
harmful interference when the equipment is operated in a commercial
environment. This equipment generates, uses, and can radiate radio
frequency energy and if not installed and used in accordance with the
instruction manual, may cause harmful interference to radio
communications. Operation of this equipment in a residential area is
likely to cause harmful interference in which case the user will be
required to correct the interference at his own expense.
Any changes or modifications to this equipment not expressly approved in this manual could void FCC
compliance.
ARGUS TECHNOLOGIES 010-511-B1 Rev A Page 1 of 3

Input
Voltage: 184 to 264 VAC (47 to 63 Hz)
Current: 13A (240 VAC Nominal) @ 2800 Watts output power
14A (240 VAC Nominal) @ 3000 Watts output power
15A (208 VAC Nominal) @ 2800 Watts output power
16A (208 VAC Nominal) @ 3000 Watts output power
Power Factor: >0.99 for 40%-100% load
>0.96 for 20%-40% load
T.I.F. (Current): <100 at 100% load
Efficiency: 90% minimum 50 to 100% load
Hold-over time: 30ms from loss of AC line
Source Impedance: 5% inductive or resistive
Soft Start: Approximately 10% per second
Start Delay: 0-250 sec. (10 second increments)
Input Transient Suppression: Tested to IEEE/ANSI C62.41 Category B
Breaker Rating: 25 Amp, 10,000 Amp interrupting capacity at 250 VAC
Recommended Feeder Breaker: 25 Amps or greater (240 VAC)
Miscellaneous
Size: 3 Module Shelf: 267mm H x 432mm W x 381mm D
(10.5" H x 17.0" W x 15" D)
4 Module Shelf: 267mm H x 546mm W x 381mm D
(10.5" H x 21.5" W x 15" D)
Module: 262mm H x 132mm W x 343mm D
(10.3" H x 5.2" W x 13.5" D)
Mounting: Separate shelves are required
for 19" or 23" mounting.
Weight: 4 Module Shelf: 16 kg (36 lb.)
3 Module Shelf: 14 kg (31 lb.)
Module: 12 kg (26 lb.)
Acoustic Noise: 60 dBa at 1m (3 ft)
Alarm/Control Connections: 60 VDC, 0.5 A maximum
ARGUS TECHNOLOGIES 010-511-B1 Rev A Page 2 of 3

Environmental
Temperature: 0 to 60 deg C / +32 to 140 deg F (standard operating)
-40 to 60 deg C / -40 to 140 deg F (optional operating)
-40 to 70 deg C / -40 to 158 deg F (storage)
Humidity: 0 to 95% (non-condensing)
Elevation: -500 to 2800 m (-1640 to 9186 ft)
Recommended Wire Sizes (as per UL)
(Applies to RSM-48/50 and RSM-24/100)
Single Phase Operation:
# of shelf Minimum Minimum
slots connected main input module input
to main input. wire size wire size
(AWG) (AWG)
11212
2812
3612
4412
Three Phase Operation:
# of shelf Minimum Minimum
slots connected main input module input
to main input wire size wire size
(AWG) (AWG)
1812
2812
3812
4 4 (N/R)* 12 (N/R*)
For example, to connect 4 modules in one cabinet to a single phase input requires two
#8AWG main inputs or one #4AWG main input.
* N/R — Not recommended. Connecting 4 equivalent loads to a three phase source in
delta configuration will create an unbalanced load. It’s usually more feasible to run a sepa-
rate #10 AWG line directly to the 4th module.
(Specifications subject to change without notice)
ARGUS TECHNOLOGIES 010-511-B1 Rev A Page 3 of 3

What are the CSA and NRTL?
CSA (Canadian Standards Association also known as CSA International) was established in 1919 as
an independent testing laboratory in Canada. CSA received its recognition as an NRTL (Nationally
Recognized Testing Laboratory) in 1992 from OSHA (Occupational Safety and Health Administration) in
the United States of America (Docket No. NRTL-2-92). This was expanded and renewed in 1997, 1999,
and 2001. The specic notications were posted on OSHA’s ofcial website as follows:
Federal Register #: 59:40602 - 40609 [08/09/1994]
Federal Register #: 64:60240 - 60241 [11/04/1999]
Federal Register #: 66:35271 - 35278 [07/03/2001]
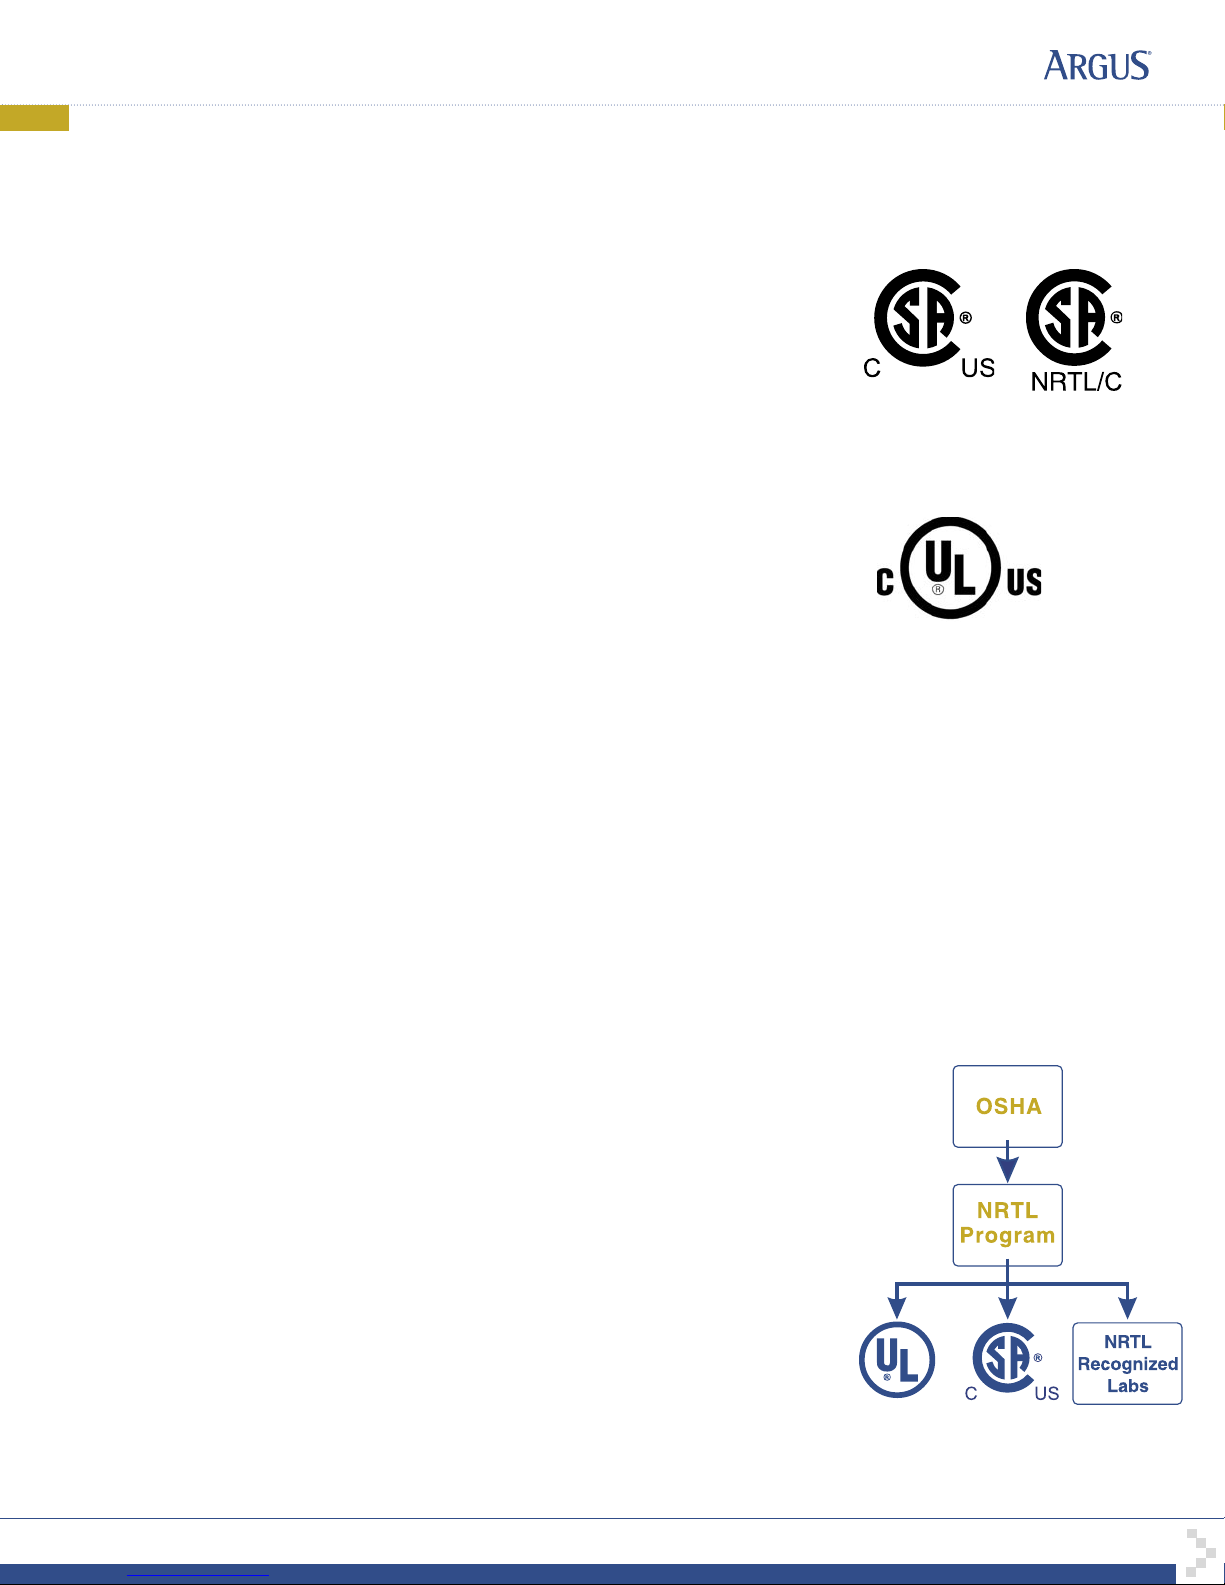
When these marks appear with the indicator “C and US” or “NRTL/C” it means that the product is
certied for both the US and Canadian markets, to the applicable US and Canadian standards. (1)
Argus rectier and power system products, bearing the aforementioned CSA marks, are
certied to CSA C22.2 No. 950 and UL 1950, or CSA/UL 60950.
As part of the reciprocal, US/Canada agreement regarding testing laboratories, the Standards Council
of Canada (Canada’s national accreditation body) granted Underwriters Laboratories (UL) authority to
certify products for sale in Canada. (2)
Only Underwriters Laboratories may grant a licence for the use of this mark, which indicates compliance
with both Canadian and US requirements. (3)
What are NRTLs and what do they do?
NRTLs are third party organizations recognized by OSHA, US Department of Labor, under the NRTL
program.
The testing and certications are based on product safety standards developed by US based standards
developing organizations and are often issued by the American National Standards Institute (ANSI). (4)
The NRTL determines that a product meets the requirements of an appropriate consensus-based
product safety standard either by successfully testing the product itself, or by verifying that a contract
laboratory has done so, and the NRTL certies that the product meets the requirements of the product
safety standard. (4)
When was the NRTL started and who governs it?
In 1983, in a suit brought on by an independent testing laboratory, OSHA was court ordered to remove
specic references to UL (Underwriters Laboratories) and FMRC (Factory Mutual Research Corporation)
from its regulations.
In 1988, OSHA revised its regulations to remove those references and the NRTL program was
established.
The NRTL Program is both national and international in scope with foreign labs permitted.
References:
Information in this document has been developed from the ofcial websites of the respective
organizations.
(1) www.csa-international.org
(2) www.scc.ca
(3) www.ulc.ca
(4) www.osha.gov
CSA/NRTL — MARKS — BACKGROUND
argusdcpower.com
048-554-10-I1 Rev C (2004/02)
The product on which either of these marks appear
has been certied by CSA as meeting applicable
Canada/US standards.
The product on which this mark
appears has been certied by UL
as meeting applicable Canada/US
standards.

MANUAL ADDENDUM
MANUAL ADDENDUM
FORM 954-010-10 - Add2.doc 2/5/98
P.1
Unit Description:
Applies to Manual P/N and Rev:
RSTs 010-016-B0 Rev A SDs 018-007-B0 Rev D
010-019-B0 Rev A 018-008-B0 Rev C
010-020-B0 Rev A 018-011-B0 Rev C
010-007-B0 Rev A 018-016-B0 Rev C
010-013-B0 Rev B
010-015-B0 Rev A RCS 030-527-B2 Rev P/A
010-006-B0 Rev A
010-002-B0 Rev B
010-023-B0 Rev A
010-008-B0 and B2 Rev A
RSMs 010-510-B2 Rev C 010-030-B2 Rev B
010-525-B2 Rev P/A 010-505-B2 Rev C
010-511-B2 Rev P/A 010-024-B2 Rev C
010-528-B2 Rev A 010-036-B2 Rev C
010-529-B2 Rev A 010-028-B2 Rev B
010-522-B2 Rev B 010-034-B2 Rev B
010-512-B2 Rev A 010-037-B2 Rev A
010-503-B2 Rev A 010-035-B2 Rev A
010-510-B2 Rev B 010-038-B2 Rev A
010-029-B2 Rev B 010-039-B2 Rev A
NOTE: THIS ADDENDUM SHEET IS TO BE INSERTED IN ALL OF THE ABOVE LISTED
PRODUCT MANUALS. THIS ADDENDUM REPLACES THE ADDENDUM
“ADDNEW.DOC” INCLUDED WITH DOCUMENT 022-000-C1.
EXPLANATION:
The market shift from vented or “wet cell” to valve regulated lead acid (VLRA) batteries has prompted Argus to
update its factory default settings to accomodate the requirements of these batteries.
The changes listed below are being implemented immediately as new factory default settings in all Argus power
products. However, as always, customer requested settings will take precedent over factory defaults.
This addendum is to accompany all new Argus user manuals. Questions about the new factory default settings
should be directed to our toll free 1-888-GO ARGUS Technical Support line.
TABLE 1-1: RSM/RST/RCS SYSTEMS (excluding RSM 48/7.5 and 24/15)
Function 12 volt systems (nom) 24 volt systems (nom) 48 volt systems (nom)
Float 13.5 27 54
Equalize 13.8 27.5 55
OVP 14.5 29 57
LVA 11 22 44
HVA 14 28 55.5
TABLE 1-2: RSM 48/7.5 and 24/15 (module) @ 25°C (77°F)

MANUAL ADDENDUM
MANUAL ADDENDUM
FORM 954-010-10 - Add2.doc 2/5/98
P.2
Function 24 volt systems (nom) 48 volt systems (nom)
Float 27 54
TABLE 1-3: RSM 48/7.5 and 24/15 SUPERVISORY/CONTROL MODULE
Function 24 volt systems (nom) 48 volt systems (nom)
LVD 21 42
TABLE 1-4: SUPERVISORY/CONTROL SYSTEMS (SD-02,03,04,05)
Function 12 volt systems (nom) 24 volt systems (nom) 48 volt systems (nom)
Load Out 10.5 21 42
Load In 12.5 25 50
LVA 12 24 48
HVA 14 28 55.5
HVSD n/a 29.5 58
NOTE: THIS ADDENDUM SHEET IS TO BE INSERTED IN ALL OF THE ABOVE LISTED
PRODUCT MANUALS. THIS ADDENDUM REPLACES THE ADDENDUM “ADDNEW.DOC”
INCLUDED WITH DOCUMENT 022-000-C1.

IMPORTANT SAFETY INSTRUCTIONS
SAVE THESE INSTRUCTIONS - This manual contains important safety and operating
instructions for battery charger models RSM 48/50, RSM 48/30, RSM 24/100, RSM 24/50.
1. Caution - Do not install or remove any modules with the
input breaker or output breaker in the closed position.
2. Before using battery charger, read all instructions and cautionary markings on:
(1) battery charger, (2) battery, and (3) product using battery.
3. CAUTION - To reduce risk of injury, charge only lead-acid type rechargeable
batteries. Other types of batteries may burst causing personal injury and damage.
4. Do not expose charger to rain or snow.
5. Use of an attachment not recommended or sold by the battery charger
manufacturer may result in a risk of fire, electric shock, or injury to persons.
6. Do not operate charger if it has received a sharp blow, been dropped,
or otherwise damaged in any way; take it to a qualified service center.
7. Do not disassemble charger; take it to a qualified service center when service or repair
is required. Incorrect reassembling may result in a risk of electrical shock or fire.

Installation and Operator's Manual for RSM series of Modular Switched Mode Rectifiers
Table of Contents
1.0 Warranty
2.0 Documentation - Part number information...............................................................................................1
2.1 Introduction..................................................................................................................................1
2.2 ARGUS Numbering system ........................................................................................................1
3.0 General.....................................................................................................................................................2
3.1 Scope ..........................................................................................................................................2
3.2 Introduction..................................................................................................................................2
3.3 Features ......................................................................................................................................2
3.3.01 LCD Display and Control Keys ......................................................................................2
3.3.02 Status Mode Indicators ..................................................................................................6
3.3.03 Status Indicator - Module OK ........................................................................................6
3.3.04 Status Indicator - Alarm Condition Present ...................................................................6
3.3.05 Status Indicator - Micro-Controller Fail / Reset .............................................................6
3.3.06 Module Fail Indicator......................................................................................................6
3.3.07 Float Mode .....................................................................................................................7
3.3.08 Equalize Mode ...............................................................................................................7
3.3.09 Test Mode ......................................................................................................................7
3.3.09.1 Manual test .................................................................................................7
3.3.09.2 Auto test - units without High Output Alarm feature: .................................7
3.3.09.3 Auto test - units with High Output Alarm feature: ......................................8
3.3.10 Alarms ............................................................................................................................8
3.3.11 True Module Fail Alarm .................................................................................................9
3.3.12 Low Voltage Alarm ........................................................................................................9
3.3.13 HighVoltage Alarm ........................................................................................................9
3.3.14 Current Limit...................................................................................................................9
3.3.15 Over Voltage Shutdown .................................................................................................10
3.3.16 Remote Equalize............................................................................................................10
3.3.17 Remote Shutdown..........................................................................................................10
3.3.18 Automatic High Voltage Shutdown Restart ...................................................................10
3.3.19 Start Delay .....................................................................................................................11
3.3.20 Soft Start ........................................................................................................................11
3.3.21 Slope or Forced Paralleling ...........................................................................................11
3.3.22 Input / Output Circuit Breakers ......................................................................................11
3.3.23 A.C. High / Low Voltage Shutdown ...............................................................................12
3.3.24 Demand Based Forced Cooling.....................................................................................12
3.3.25 Battery Eliminator Operation..........................................................................................12
3.3.26 Remote or Local Sensing ..............................................................................................12
3.3.27 Micro-controller Reset ....................................................................................................12
3.3.28 Output Voltage Test Points............................................................................................13
3.3.29 Remote monitoring.........................................................................................................13
3.3.30 A.C. Inrush / Transient Suppression..............................................................................13
3.3.31 Control Fail Safe & Memory ..........................................................................................13
3.3.32 Over Temperature Alarm ...............................................................................................13
3.3.33 Over Temperature Shutdown.........................................................................................13
3.3.34 UPF Heatsink Over Temperature Alarm........................................................................13
4.0 INSTALLATION INSTRUCTIONS............................................................................................................14
4.1 Tools Required............................................................................................................................14
4.2 Inspection ....................................................................................................................................14
4.3 Preparation/Mounting ..................................................................................................................14
4.3.1 3 Module Shelf ...............................................................................................................15
4.3.2 4 Module Shelf ...............................................................................................................15

4.4 Input Connections .......................................................................................................................15
4.4.1 Feeder Protection / Sizing .............................................................................................15
4.4.2 A.C. Connections ...........................................................................................................17
4.5 Output Connections ....................................................................................................................18
4.5.1 Alarm And Control Connections ....................................................................................18
4.5.2 D.C. Output Connections ...............................................................................................21
4.5.3 Output Bus Bars.............................................................................................................23
4.5.4 Module Installation .........................................................................................................23
4.6 Initial Start-up .............................................................................................................................24
4.6.1 A.C. Start-up ..................................................................................................................24
4.6.2 Float / Equalize (Initial) ..................................................................................................24
4.6.3 Current Limit...................................................................................................................24
4.6.4 Output High Voltage Protection (Initial) .........................................................................26
4.6.5 D.C. Start-up ..................................................................................................................26
4.6.6 Paralleling: Slope or Forced ..........................................................................................26
4.6.6.1 Negative Slope Paralleling .........................................................................27
4.6.6.2 Forced Paralleling.......................................................................................27
5.0 Operation..................................................................................................................................................28
5.1 Shutdown ....................................................................................................................................28
5.2 Start-up........................................................................................................................................28
5.3 Normal Mode...............................................................................................................................28
5.4 Float/Equalize/Test......................................................................................................................28
6.0 Status mode - Local.................................................................................................................................29
7.0 Adjustments ............................................................................................................................................30
7.1 Factory Settings / Ranges ..........................................................................................................30
7.1.1 48 volt units....................................................................................................................30
7.1.2 24 volt units....................................................................................................................30
7.1.3 Common to 24 volt and 48 volt units.............................................................................30
7.2 Float Voltage ...............................................................................................................................31
7.3 Equalize Voltage .........................................................................................................................31
7.4 Current Limit................................................................................................................................31
7.5 Test Voltage ................................................................................................................................31
7.6 Load Sharing Parallel Operation.................................................................................................32
7.6.1 Slope Control - RSM units in parallel with variable slope units ....................................32
7.6.2 Slope Control - Argus units in parallel with fixed slope units........................................32
7.6.3 Forced Paralleling - Argus RSM units in parallel with other RSM units........................32
7.7 Start Delay ..................................................................................................................................33
7.8 High Output Voltage Shutdown ..................................................................................................33
7.9 Low Output Voltage Alarm..........................................................................................................33
7.10 High Output Voltage Alarm (not on all models)..........................................................................33
7.11 Protected Adjustments ................................................................................................................33
7.11.1 Current Limit Alarm ........................................................................................................33
7.11.2 Equalize Time-out ..........................................................................................................33
7.11.3 Back Light Time-out .......................................................................................................34
7.11.4 Display Calibration .........................................................................................................34
7.11.5 (Section Deleted) ...........................................................................................................34
7.11.6 Local Access Alarm ......................................................................................................34
7.11.7 Security Code Set ..........................................................................................................34
8.0 Remote Access ........................................................................................................................................35
8.1 Serial Communications Interface (SCI) Board Connections ......................................................35
8.1.1 Multiple Shelf Connections (RS485)..............................................................................35
8.1.2 RS232 Interface .............................................................................................................36
8.1.3 Modem Connection ........................................................................................................37
8.1.3.1 Modem required:.........................................................................................37
8.1.3.2 Modem setup: .............................................................................................37
8.1.4 Local Terminal Connection ............................................................................................39
8.1.4.1 Terminal required:.......................................................................................39
8.1.4.2 Terminal setup: ...........................................................................................39

8.1.5 Communicating with the RSM .......................................................................................39
8.1.6 Access to the RSM ........................................................................................................40
8.1.6.1 Remote Access/Lockout .............................................................................40
8.1.6.2 Remote Adjust Access/Lockout..................................................................40
8.2 Module ID....................................................................................................................................41
8.3 Baud Rate ...................................................................................................................................41
8.4 Remote Disable...........................................................................................................................41
8.5 Remote Adjust Disable ...............................................................................................................41
9.0 Remote status / control............................................................................................................................42
9.1 Remote Terminal Status Format....................................................................................42
List of Figures and Tables
Figure 1 - Front Panel (RSM-48/30, RSM-24/50) ...................................................................................3
Figure 2 - Front Panel (RSM-48/50, RSM-24/100) .................................................................................3
Figure 3 - Menu Tree...............................................................................................................................4
Figure 4 - Outline (4 Module Shelf, RSM 48/50 & 24/100).....................................................................14
Figure 5 - Outline (4 Module Shelf, RSM 48/30 & 24/50).......................................................................15
Figure 6 - Shelf Connections (RSM-48/50 & 24/100 Shelf) ....................................................................16
Figure 7 - Shelf Connections (RSM-48/30 & 24/50 Shelf) ......................................................................16
Figure 8 - 1 Phase Hookup .....................................................................................................................16
Figure 9 - 3 Phase Hookup .....................................................................................................................17
Figure 10 - Alarm/Control Connections (RSM 48/50 & 24/100)..............................................................19
Figure 11 - Alarm/Control Connections (RSM 48/30 & 24/50)................................................................20
Figure 12 - DC Output Connections ........................................................................................................22
Figure 13 - Vertical Bus Bar Adaptor (RSM 48/50 & 24/100).................................................................22
Figure 14 - Display Adjustment Sequence and Syntax...........................................................................25
Figure 15 - Communications Connections ..............................................................................................35
Figure 16 - D-Shell connector pinouts.....................................................................................................36
Figure 17 - Remote Screen Layout .........................................................................................................42
Table 1 - Display Messages ....................................................................................................................5
Table 2 - TB5 Connections & Jumpers (RSM 48/50 & 24/100)..............................................................19
Table 3 - TB1, TB2, TB3 Connections & Jumpers (5KW & 7KW)..........................................................20

Warranty Policy
Argus Technologies Ltd. warrants all equipment manufactured by it to be free from defects in parts
and labor, excluding third party OEM materials (example: air conditioners, batteries), for a period of
two years from the date of shipment from the factory. For third party products the OEM’s warranty
shall apply. The liability of Argus applies solely to repairing, replacing or issuing credit (at Argus’ sole
discretion) for any equipment manufactured by it and returned by the customer during the warranty
period. The terms of the warranty are Ex Works (EXW) from Argus’ factory service location.
Argus reserves the right to void the warranty if:
(1) identification marks or serial numbers are removed or altered in any way,
(2) invoice is unpaid, or
(3) defect is the result of misuse, neglect, improper installation, environmental
conditions, non-authorized repair, alteration or accident.
Argus shall not be liable to the customer or other parties for any loss of profits, loss of use, costs for
removal or installation of defective equipment, damages or consequential damages based upon
equipment failure during or after the warranty period. There shall be no other obligations either
expressed or implied. Argus will not honor warranties for batteries and other third party products
without prior written Argus authorization.
Freight Policy
Customer is responsible for all shipping and handling charges (COD and freight collect will not be
accepted without prior approval from Argus Technologies).
Terms of Payment (North America)
Payment terms are net 30 days subject to prior credit approval. All other orders require payment
before shipping.
Terms of Payment (International)
Payment terms are subject to prior approval and are typically through Tele-Transfer.
Return Material Policy
Our RMA policy is designed to ensure prompt, efficient and high quality factory service. A Return
Material Authorization (RMA) number must be obtained before products can be accepted for
servicing by the Argus factory. For returns to an authorized service center (refer to “Authorized
Service Centers” for locations), please consult the individual service center for specific return policies
and instructions.
To obtain a RMA number for a factory return, customers must call the appropriate location with the
product serial and model number, as well as a brief description of the problem, shipment instructions
and billing details.
The original packing container should be used whenever possible. Both the shipping documents
and the outside of the box must have the RMA # clearly marked and the product shipped prepaid to
the Argus factory service center. Argus will endeavor to repair products within five working days of
receipt. Repairs to the returned product are warranted for a period of six months. A service charge
may be applied if no fault is found in the returned product. Argus will not accept products without an
RMA number.
Business Hours
Argus North American office hours are 7:30 am to 5:00 pm (Pacific Standard Time) Monday to Friday.
WARRANTY AND REPAIR INFORMATION
Canada and USA toll free 24 hour emergency technical support: +1 888 GO ARGUS (462 7487) Outside North America: +1 604 436 5547
Factory Service Centers
Canada and International
Argus Technologies Ltd.
ATTN: RMA Returns
7033 Antrim Avenue
Burnaby, BC, V5J 4M5 Canada
Tel: +1 604 436 5900
Fax: +1 604 436 1233
Email: returns@argusdcpower.com
USA
Argus Technologies Inc.
ATTN: RMA Returns
3116 Mercer Avenue
Bellingham, WA, 98225 USA
Tel: +1-360 756 4904
Fax: +1-360 647 0498
Email: returns-usa@argusdcpower.com
Asia-Pacific
PCM Electronics (Dong Guan) Co., Ltd.
Hongli Industrial Area, Miaobian, Liaobu Town,
Dongguan City, Guangdong Province,
523400 China
Tel: +86 755 8895 3310
Fax: +86 755 8895 3307
Authorized Service Center
Argentina
Argus Technologies de Argentina
Belen 315, Capital Federal, Buenos Aires,
1407l Argentina
Tel: +54 (11) 4672 4821
Fax: +54 (11) 4504 4698
Cell: +54 9 (11) 4993 9996
Email: [email protected]
Asia
Argus Technologies Asia Pte Ltd
Blk 6 Tagore Lane #160
Singapore 787570
Tel: +65 6458 8900
Fax: +65 6458 2122
Australia
CPS National
8/376 Newbridge Rd
Moorebank, NSW, 2170 Australia
Tel: +61 02 9822 8977
Fax: +61 02 9822 8077
Australia/New Zealand
Alpha Power Systems Pty Ltd
Unit 3, 30 Heathcote Road
Moorebank, NSW, 2170 Australia
Tel: +61 02 9602 8331
Fax: +61 02 9602 9180
Century Yuasa
37 - 65 Colbalt Street
Carole Park QLD 4300
Australian Sales & Service
Tel: +61 07 3361 6587
Fax: +61 07 3361 6705
New Zealand Sales & Service
Tel: +64 9 978 6689
Fax: +64 9 978 6677
Canada
Compower Systems Inc.
118 Tiffield Road
Toronto, ON, M1V 5N2 Canada
Tel: +1 416 293 3088
Fax: +1 416 293 0671
Europe
Alpha Technologies Europe Ltd.
Cartel Business Estate
Edinburgh Way
Harlow, Essex, CM20 2DU UK
Tel: +44 1279 422110
Fax: +44 1279 423355
Mexico & Central America
Technologies Argus First De Mexico SA de CV
Anatole France No. 17
Col. Polanco
Mexico City, 11560 Mexico
Tel: +52 55 5280 6990
Fax: +52 55 5280 6585
South America
Argus Technologies Argentina
Santo Tome 2573, Capital Federal
Buenos Aires, 1416 Argentina
Tel: +54 11 4504 4698
Cell: +54 9 11 4993 9996
E-pager: [email protected]
Turkey
IPC Enerji Elk San ve TIC AS
Inonu cad. Kanarya sok. No:20
Yenisahra - Kadikoy
Istanbul, Turkey
Tel: +90 216 317 41 42
Fax: +90 216 472 90 66
048-507-10-I1 Rev S (09/2007)

2.0 Documentation - Part number information
2.1 Introduction
Please read this manual thoroughly prior to use in order to become familiar with the unit's numerous
features and operating procedures. To obtain a maximum degree of safety, follow the prescribed
sequences as outlined.
This manual incorporates warnings and notes to the user. Points that are vital to the proper opera-
tion or safety of the operator are indicated by the heading: WARNING. Points that are important to
the performance or ease of use of the equipment are covered by a notation that is double under-
lined.
Items that refer to physical components or features such as indicator lights will be in Bold Italic
typeface. Items that refer to states or modes and generated messages such as found on the LCD
display panel will be in BOLD UPPERCASE typeface.
2.2 ARGUS Numbering system
ARGUS technologies uses a eight digit drawing number system which is broken into three blocks.
The first three digits describe the category of the product ie. rectifier or fuse panel. The next three
digits indicate the sequence in which the product number was allocated in a particular category.
The last two digits indicate the type of drawing ie:
05 .................Schematic
06..................Outline Drawing
20 .................Main Assembly
ARGUS Technologies uses a eight digit part numbering system for all components and sub assem-
blies. Each part is covered by its own unique number. Due to the quantity categories will not be
listed within this manual.
ARGUS TECHNOLOGIES 010-030-C0 Rev E Page 1 of 42

3.0 General
3.1 Scope
This instruction manual covers the installation, and operation of Argus Technologies' RSM 48/100
switched mode rectifier.
3.2 Introduction
The RSM series of rectifiers employs a high frequency switched mode conversion technique to pro-
vide a fully regulated and isolated DC output from the A.C. mains. The unit provides external con-
nections for input, output and alarm interfaces. The 48 volt rectifiers are used in a positive ground
configuration only. The units are fully functional battery eliminators and therefore do not require an
external battery to meet the performance requirements as outlined in the specification section of this
manual.
3.3 Features
The following sections (3.3.01 through 3.3.32) will cover the various features available on the RSM
48/100 Rectifier.
3.3.01 LCD Display and Control Keys
Located on the front panel of the unit is a 2 row by 16 character LCD display. All of the unit's oper-
ating parameters, status and alarms can be viewed with this display See Figure #1 for a detail of a
normal display. Normally, the display indicates:
- Output current of the module
- Output voltage of the module
- Float/ Equalize /Test Mode Status
- Current limit or soft start indication
- Corporate identification, Module Serial #
NOTE: The front panel may be powered up for up to 20 seconds after all power (input and output)
is removed from the unit.
Float, equalize, soft start, current limit and test mode status designators pulsate to differentiate
them from the output voltage and current readings. The serial number is displayed with normal
mode, & alarm mode messages. The corporate identity is displayed only during normal operation.
Please see Figure #3 and Table #1 for the complete menu tree and display messages possible.
Possible alarm messages are referenced in the minor alarm section. The display is updated two to
three times per second. Output voltage and current are displayed on the top line under all modes of
operation. Current readings are accurate to within 2% while voltage measurements are accurate to
0.2%. Sensing for voltage and current measurements is present before the output breaker of the
module. Therefore only the true output of the rectifier is displayed. Refer to Figure #14 when per-
forming adjustments in order to see how the front panel message display changes when accepting
input.
There are three control buttons on the front panel and are labelled with an up arrow, down arrow,
and a curved arrow. The first two (ADJUST/SCROLL) are used to scroll thru a list of items in for-
ward and reverse order, and the last button (ENTER/SELECT) is used to select the displayed item.
Initially the ADJUST/SCROLL buttons allow the user to change the display from its normal Volt-
age/Current/Alarms mode (NORMAL) to one of STATUS, ADJUSTMENTS, REMOTE COMMUNI-
CATIONS,orTEST MODE and the third button is used to switch between FLOAT and EQUALIZE
modes when the display is in the NORMAL mode.
010-030-C0 Rev E Page 2 of 42 ARGUS TECHNOLOGIES

ARGUS TECHNOLOGIES 010-030-C0 Rev E Page 3 of 42
Figure 1 - Front Panel (RSM-48/30, RSM-24/50)
Figure 2 - Front Panel (RSM-48/50, RSM-24/100)
(NOTE: View hole may or may not be present)

The display is back-lit any time a control key is depressed or when the unit first starts up. The dura-
tion of back-lighting is programmed during setup. The viewing angle of the display is changed by
one of two methods. If there is a small hole below the VIEW label, then a small screwdriver or
tweaker is used to adjust the viewing angle. If there is no hole, then the viewing angle is adjusted
by pressing and holding the ENTER/SELECT button, and pressing the right SCROLL/ADJUST but-
ton (labelled with an upwards arrow). The viewing angle can then be adjust by pressing either
SCROLL/ADJUST button repeatedly and then pressing the ENTER/SELECT button to return to
NORMAL mode.
Due the limited number of characters that can be displayed, abbreviated messages are used. The
manual uses both abbreviated and complete condition descriptions. See Table #1 for display mes-
sage abbreviations.
010-030-C0 Rev E Page 4 of 42 ARGUS TECHNOLOGIES
Figure 3 - Menu Tree
(NOTE: Features in parentheses may not be present on specific units)

ARGUS TECHNOLOGIES 010-030-C0 Rev E Page 5 of 42
ADJUSTMENTS .............................................enter adjustments menu
ADJ^^^^ EQLIZE V .......................................adjust equalize voltage
ADJ^^^^ FLOAT V ........................................adjust float voltage
ADJ^^^^ HV SHUTDN ...................................adjust output high voltage alarm value
AUTO TEST ...................................................starts auto test mode
BACKLIGHT TIMEOT ....................................enter backlight timeout adjustment
BAUD RATE ..................................................enter baud rate setting
BAUD RATE = 1200/2400/4800/9600 ...........adjust baud rate value
BKLT TO = XXmin .........................................display/adjust backlight timeout
CUR LIM = XX.XA .........................................display/adjust current limit
CURRENT LIMIT ...........................................enter current limit adjustment
DELAY = XXXsecs ........................................adjust start delay time
DISPL CALIBRATE ........................................adjust voltage display calibration
EQ TIMEOUT .................................................enter equalize timeout adjustment
EQ TMOUT = XXhrs ......................................display/adjust equalize timeout
EQUALIZE = XX.XV ......................................display equalize voltage
EQUALIZE VOLTAGE ...................................enter equalize voltage adjustment
EXIT ...............................................................return to regular display
*FAN SET = OFF/LOW/MED/HIGH ..............display fan setting
**FAN SET = OFF/ON ...................................display fan setting
*FAN SPEED = OFF/LOW/MED/HIGH .........display fan speed
**FAN SPEED = OFF/ON...............................display fan speed
FLOAT = XX.XV ............................................display float voltage
FLOAT VOLTAGE .........................................enter float voltage adjustment
FORCE SHAR DISAB/ENABL .......................display/adjust current share setting
HIGH O/P = XX.XV.........................................display/adjust output high voltage alarm value
HIGH O/P ALARM ..........................................enter output high voltage alarm value
HSNK TEMP = XXXC/XXXF .........................display heatsink temperature
***HV SD LEVEL ADJ.....................................enter output high voltage shutdown level
***HV SD = XX.XV..........................................display output high voltage shutdown level
I LIM ALRM ENAB/DISAB .............................display/adjust current limit alarm setting
I/P V = XXXVAC ............................................display AC input voltage
INT AMB TP = XXXC/XXXF ..........................display internal ambient temperature
LCL ACC ALM ENAB/DISAB ........................display/adjust local access alarm setting
LOAD SHARING ............................................enter current sharing menu
LOW O/P = XX.XV ........................................display/adjust output low voltage alarm value
LOW O/P ALARM ..........................................enter output low voltage alarm setting
MANUAL TEST ..............................................starts manual test mode
MODULE ID ...................................................enter module id# setting
MODULE ID = XX ..........................................adjust module id #
MODULE SETTINGS .....................................enter module settings menu
O/P HV = XX.XV ............................................display output high voltage shutdown level
O/P HV LEVEL ADJ ......................................enter output high voltage shutdown setting
OPEN O/P BREAKER ...................................open output breaker if not already open
PROTECTED ADJUST ..................................enter security controlled menu
REMOTE ACCESS/LOCKOUT .....................display/adjust remote access setting
REMOTE COMMUNIC ..................................enter remote communications menu
RETURN ........................................................return to previous menu
SECURITY = —- ............................................enter security code for access
SECURITY CODE = —- ................................adjust security code
SET SECURITY CODE .................................enter security code adjustment
SLOPE ...........................................................enter slope adjustment
SLOPE = X.XX% ...........................................display/adjust slope value
SOFTWARE V X.XX ......................................display software version number
START DELAY ..............................................enter start delay time adjustment
STATUS .........................................................enter status menu
STRT DELAY = XXXsec ...............................display start delay time
TEMP DISPL DEG C/F ..................................adjust temperature display mode
TEST MODE ..................................................enter test mode menu
Possible Menu Prompts:
AC MAINS FAIL
AC MAINS HIGH
CURRENT LIMIT
FAN FAIL
*FAN SPEED ERROR
HIGH O/P VOLTAGE
I/P BREAKER OPEN
LOW O/P VOLTAGE
MODULE FAIL
***NO OUTPUT POWER
O/P BREAKER OPEN
O/P HV SHUTDOWN
OVER TEMPERATURE
REMOTE EQUALIZE
REMOTE SHUT DOWN
START DELAY = XXX
TEMP SENSE FAIL
THERMAL SHUTDOWN
***UPF TEMP
* - RSM 48/50 and RSM 24/100
** - RSM 48/30 and RSM 24/50
*** - RSM 48/50 UPF and
RSM 24/100 UPF
Possible Alarm & Mode
Messages
Table 1 - Display Messages

3.3.02 Status Mode Indicators
The indicators provide visual indication of operational status and alarms. The conditions and associ-
ated colors are:
Module Status - OK ......................Green
Module Status - Micro-Controller fail/reset .....Red
Module Status - Alarm Condition Present .....Yellow
Module Fail.............................Red
Note that the Red Module Status - Micro-Controller fail/reset indicator is located behind the
frosted panel between the Green Module Status - OK and Yellow Module Status - Alarm Condi-
tion Present indicators and is normally not visible.
3.3.03 Status Indicator - Module OK
When both circuit breakers are closed and no alarm conditions are present the Module Ok indicator
will light. The indicator will not illuminate if a local operator is adjusting or interrogating the unit. Re-
mote or local access of module status does not affect module status. Remote adjustments will af-
fect the indicator.
3.3.04 Status Indicator - Alarm Condition Present
Any alarm condition will cause the Alarm Condition Present indicator to illuminate. Local adjust-
ment or entry into some of the menu modes (except status mode) will cause the LED to illuminate.
The indicator will continue to illuminate any time the criteria is meet and an external voltage is pres-
ent at the modules output. The indicator will not function if the micro-controller fails or is in reset.
Associated with the indicator is a minor alarm contact on the equipment shelf. A minor alarm condi-
tion on any module in a shelf will cause the relay to energize.
3.3.05 Status Indicator - Micro-Controller Fail / Reset
Located in between the Module Status - Ok and Alarm Condition Present indicators is a sepa-
rate Microcontroller Fail/Reset indicator to illuminate in the unlikely event that the micro-controller
fails. Failure of the micro-controller to respond to a watch-dog timer triggers the alarm. The LCD will
be suppressed during this mode of failure. The minor alarm contact at the shelf level will energize in
the event of a micro-controller failure on one of the modules. The indicator will continue to illuminate
any time the criteria is met and an external voltage is present at the module's output.
3.3.06 Module Fail Indicator
Located to the right of the status indicators is a separate Module Fail indicator. If any of the condi-
tions defined as a module failure (see True Module Fail Alarm) occur the indicator will illuminate.
The module fail relay is de-energized while the indicator is on. The indicator will continue to illumi-
nate any time the criteria is met and an external voltage is present at the module's output.
3.3.07 Float Mode
Normal operation of the module is in the FLOAT mode. The module will default to this mode when
A.C. power is supplied to the unit. When in the FLOAT mode the output voltage of the module is
determined by the FLOAT VOLTAGE setting found in the submenu ADJUSTMENTS. The
Float/Equalize mode control button (labelled Enter/Select) manually returns the unit to the FLOAT
mode from a locally initiated EQUALIZE.FLOAT mode is indicated by illumination of the FL beside
the output voltage reading on the LCD display. The level is protected by fail safe circuitry in the un-
likely event of micro-controller failure.
010-030-C0 Rev E Page 6 of 42 ARGUS TECHNOLOGIES
This manual suits for next models
1
Table of contents
Popular Industrial Electrical manuals by other brands

Murata
Murata GRM32EC81C476ME15 Series Reference sheet

Flaming River
Flaming River FR1058 manual

Eltroplan
Eltroplan REVCON RHD Series operating instructions

Murata
Murata GRM188R71H333KA61 Series Reference sheet

Murata
Murata GRM155R60G106ME44 Series Reference sheet

Pentair
Pentair Raychem JBU-100-E Installation instruction

Lucent Technologies
Lucent Technologies Lineage 2000 ECS Battery Plant product manual

Murata
Murata LLA315R71A474MA14 Series Reference sheet

Panasonic
Panasonic LP-RF Series Setup & maintenance guide

Murata
Murata GRM2165C1H301JA01 Series Reference sheet

Eaton
Eaton MODAN2000 Instruction leaflet

Pepperl+Fuchs
Pepperl+Fuchs SIL KCD2-SCS-Ex2.SP System manual