Arnova 9G3 User manual

▲
!
1
ENGLISH
STARTING UP
Installation Wizard
The first time you start up your ARNOVA, the installation wizard will bring you through a few screens to
help you set up the principal settings: language, country, time, etc.
Before using your ARNOVA for the rst time, completely charge the battery!
1. Connect the supplied power cable to the ARNOVA Power connector and to a wall outlet.
2. The ARNOVA device will turn on and start charging.
- The Power indicator light is red while the battery is charging.
- It will turn yellow when the battery is fully charged.
Charging the Battery

2
13
4
57
28
9
10
11
6
12
???
ENGLISH
DESCRIPTION OF THE DEVICE
IMPORTANT:
Your device is frozen. You can turn it off. Press the ON/OFF button 9for 10 seconds or press the reset
button. See Hardware Reset 4.
1. USB Host port: to connect a keyboard, a mouse or a mass storage USB device.
2. Power connector
3. Micro-USB port: to connect your ARNOVA to your computer, using the
included USB cable (to transfer les)
4. Hardware Reset: in the event that your ARNOVA freezes operation, you
can press the “pinhole reset” button by using a sharp object such as a
toothpick.
5. Micro-SD card slot
6. Charging indicator
- red light: battery charging
- yellow: battery charged.
7. Headphone jack
8. Microphone
9. On/Off button: enables to turn on or turn off the device.
10. Volume buttons
11. Home button
12. Camera

3
www
ENGLISH
CONNECTING TO THE WIFI NETWORK
For this procedure to work, you need to be in a WiFi zone that will allow you to connect to it. Every time the
ARNOVA is in range of a network that you have already configured once, it will attempt to make a connection.
* For free access WiFi points, there is no need to enter any special
information. For secured networks, you will need either a key (a
series of numbers and/or letters) of the type WEP, WPA, or WPA2.
To obtain the exact connection parameters required, contact the
Internet service provider.
How to congure a WiFi network
From the status bar, at the bottom right hand of the screen, you can access the WiFi
settings quickly.
1. Touch the time in the status bar. The status dashboard is displayed.
2. Touch the time in the status dashboard. The setting dashboard is displayed below.
3. Touch WiFi to open the WiFi settings.
4. If the WiFi is off, slide the WiFi switch to the On position.
Once the WiFi is on, the ARNOVA will scan for available WiFi networks.
Secured networks are indicated with a Lock icon. If the device finds a network that
you connected to previously, it connects to it.
5. Touch the network you want to connect to.
6. Enter the required network information* and touch Connect.
We recommend that you select Show password in order to be able to see the
characters you are typing.
Your ARNOVA will attempt to establish a connection to that WiFi access point.

4
ENGLISH
THE ARNOVA INTERFACE
These are default Android™
applications (Web Browser,
EMail, etc.). Tap on an icon
to open the corresponding
application. You can customize
the Home screen by adding/
removing shortcuts and
widgets, changing the wallpaper
etc. See next page.
All apps button
Tap on this icon to reveal all
the Android™ applications
and widgets installed on your
ARNOVA (games, various
tools, etc.). You can copy
them onto the Home screen.
You can get more Android™
applications from AppsLib
.
The All apps button - to nd all your apps and
widgets.
The Search button - to type terms to search
your tablet and the web.
The Recent Apps button - to navigate among your apps. -
to remove a thumbnail from the list, swipe it left or right.
The Home button - to return to the main screen.
The Back button - to go back to your previous
screen.
Main Touchscreen buttons
The Voice search button - to speak terms to
search your tablet and the web.
The navigation bar displays
the Back, Home and Recent
Apps buttons.
The status bar displays
notications and system
icons.
Home screen
Touch for text search or search by
voice
Your ARNOVA device is equipped with a capacitive touchscreen.
Use your fingertip to navigate.

5
ENGLISH
THE ARNOVA INTERFACE
Changing the Settings
Tap on Settings and choose a menu among
these categories: Wireless & networks,
Device, Personal, System.
Customizing the Home screen panels
-To change your wallpaper, hold your nger on the screen at an empty
location, then choose from the list.
Arranging & working with apps
-To move a Home screen item, touch and hold your nger onto it until
the positioning gridlines appear, then slide it to the desired location,
and release your nger.
-To remove a Home screen item, touch and hold it, slide your nger
towards the top of the screen and drop it over the Remove icon.
Removing an item from the All apps screens will uninstall the item.
CUSTOMIZING YOUR PRODUCT
The extended Home screen
Navigate between different home
screen panels by swiping left and
right.
Adding more applications with APPSLIB :with the ARNOVA
connected to the Internet, tap on the AppsLib icon .
This online library has thousands of applications to
download and use.
Creating application folders: you can combine several application icons in a
folder. Drop one app icon over another on a Home screen and the two icons
will be combined.
Zoom: In some apps
(such as Browser,
and Gallery), you can
zoom in and out by
placing two
fingers on the screen
at once and pinching
them together
(to zoom out) or
spreading them apart (to zoom in).

6
ENGLISH
CUSTOMIZING YOUR PRODUCT
Use the lock screen
To protect personal information, you can
adjust your tablet’s lock settings:
1. From the Home or All Apps screen,
touch the Settings icon .
2. Scroll down and touch Security.
3. Touch Screen lock.
4. Touch the type of lock you’d like to use.
After you set a lock here, a lock screen
is displayed whenever your screen
wakes up, requesting the pattern, PIN
or other specied key.
Add widgets
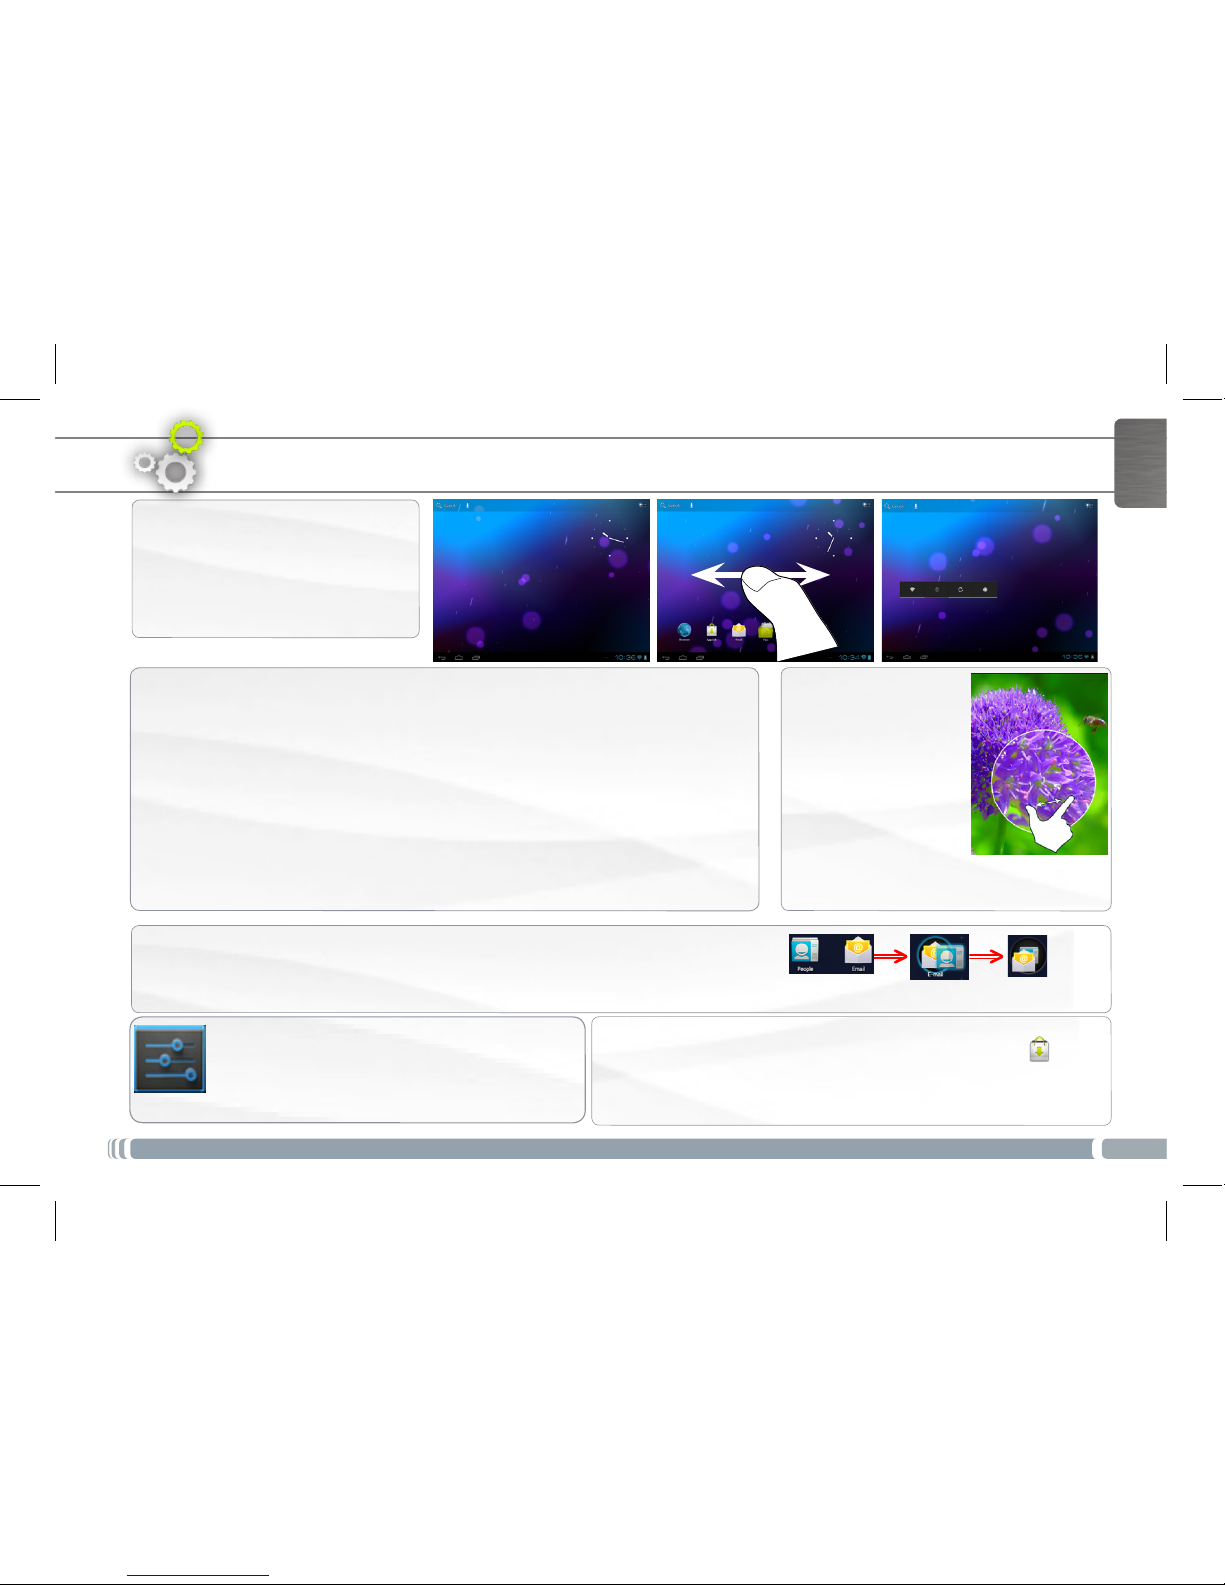
Widgets are like windows into your apps. They’re available from an All
Apps tab for you to move onto your Home screens.
To see your widgets:
1. Touch the All Apps icon on your Home screen.
2. Touch Widgets at the top of the screen.
3. From the main Widgets screen, you can:
-move between screens: Swipe left or right.
-drag a widget to a Home screen. Touch and hold the widget’s icon,
slide your nger where you want to place it and lift your nger.
You may be asked to make further choices before the widget
activates. If there isn’t room where you have dropped it, the widget
won’t be added to the Home screen.
Extend the life of your battery
-If you aren’t using WiFi, use the Settings app to turn it off.
-Turn down screen brightness and set a shorter Sleep timeout: Settings > Device > Display.
-If you don’t need it, turn off automatic syncing for all apps: Settings > Personal > Accounts & sync. Note that
this means you need to sync manually to collect messages, email, and other recent information, and won’t
receive notications when updates occur.

7
ENGLISH
TRANSFERRING MEDIA
For Windows: note that the below procedure requires at least Windows XP and Windows Media Player 11.
1. Connect your tablet to your computer using the USB cable.
Your device is automatically detected. It appears as an icon on “My Computer”.
2. You can transfer your media les to the ARNOVA by copy/pasting them into the respective folders.
3. Once all your le transfers are nished, close any program that may have read or written to the ARNOVA.
4. You can now unplug the USB cable.
For Macintosh:
You rst need to install the free Android File Transfer application (not included).
Download from http://www.android.com/letransfer.
After you install Android File Transfer, follow these steps:
1. If you are using Android File Transfer for the rst time, double-click it to open it.
After you start Android File Transfer once, it opens automatically whenever you connect your device
to your computer.
2. Connect your device to your computer with a USB cable.
Android File Transfer starts, if it’s not already running, and opens a window that displays the contents of
your device, along with storage space details at the bottom of the window.
3. You can transfer your media les to the ARNOVA by copy/pasting them into the respective folders.
4. Once all your le transfers are nished, close any program that may have read or written to the ARNOVA.
5. You can now unplug the USB cable.
For Linux: You need to install MTP tools (not included).

8
www
?
ENGLISH
NEED HELP?
As we are often updating and improving our products, your device’s software may have a slightly different appearance or modified
functionality than presented in this Quick Start Guide.
On our Website:see the Frequently Asked Questions section on http://arnovatech.com/faq
Contact our Technical Support Team: visit http://arnovatech.com/support for e-mail support.
Please register your product before contacting Technical Support (see Register your Product).
REGISTER YOUR PRODUCT!
We recommend that you take a few minutes to register it (http://arnovatech.com/register). This will allow you to get
access to ARNOVA technical support (http://arnovatech.com/support).
ÄOn the web at http://arnovatech.com/register

▲
!
9
FRANÇAIS
PREMIÈRE UTILISATION
Assistant d’installation
La première fois que vous allumez l’ARNOVA, l’assistant d’installation vous aide à configurer les principaux
réglages de l’appareil : la langue, le pays, l’heure, etc.
Avant d’utiliser votre ARNOVA pour la première fois, chargez complètement sa batterie !
1. Branchez le câble d’alimentation fourni sur le connecteur d’alimentation de l’ARNOVA et sur une prise secteur.
2. Votre ARNOVA s’allume et commence à se charger.
- Le témoin de charge est rouge lorsque la batterie est en charge.
- Le témoin de charge est jaune lorsque la batterie est complètement chargée.
Charger la batterie

10
13
4
57
28
9
10
11
6
12
???
FRANÇAIS
DESCRIPTION DE L’APPAREIL
1. Port USB hôte : permet de connecter un clavier, une souris ou une clé USB.
2. Connecteur d’alimentation
3. Port micro-USB : permet de connecter votre ARNOVA à un ordinateur, à
l’aide du câble USB fourni (pour transférer des fichiers).
4. Réinitialisation de l’appareil : si votre ARNOVA venait à se bloquer
totalement, vous pouvez appuyer sur le bouton reset en utilisant un objet
pointu tel qu’un trombone.
5. Emplacement pour cartes Micro-SD
6. Témoin de charge
- rouge : batterie en charge
- jaune : batterie chargée.
7. Prise casque
8. Microphone intégré
9. Bouton On/Off
10. Boutons de volume
11. Bouton Accueil
12. Caméra
IMPORTANT:
Votre produit ne réagit plus.Vous pouvez l’arrêter en actionnant pendant 10 secondes le bouton ON/OFF 9ou en
utilisant le bouton de réinitialisation (reset). Voir Réinitialisation de l’appareil 4.

11
www
FRANÇAIS
SE CONNECTER À UN RÉSEAU WIFI
Pour suivre cette procédure, vous devez vous situer dans une zone WiFi vous permettant de vous connecter.
Chaque fois que l’ARNOVA détectera un réseau que vous avez déjà configuré, il tentera de s’y connecter.
* Pour vous connecter à un réseau WiFi ouvert, il n’est pas
nécessaire de saisir les informations réseau. Pour un réseau
protégé, vous devrez soit entrer une clé (une suite de chiffres
et/ou de lettres) du type WEP, WPA ou WPA2. Pour obtenir les
paramètres de connexion exacts, contacter le fournisseur d’accès
à Internet.
Comment configurer un réseau WiFi
A partir de la barre de statut, dans le coin inférieur droit de l’écran, vous pouvez
accéder rapidement aux paramètres WiFi.
1. Touchez l’heure dans la barre de statut. Le panneau des statuts s’afche.
2. Touchez l’heure dans le panneau des statuts. Le tableau des paramètres s’afche.
3. Touchez WiFi pour afcher les paramètres WiFi.
4. Si le WiFi est désactivé, faites glisser le bouton WiFi sur Marche.
Lorsque le WiFi est activé, l’ARNOVA recherche les réseaux WiFi disponibles.
Les réseaux sécurisés sont associés à un icone représentant un cadenas.
Si l’appareil détecte un réseau que vous avez utilisé précédemment, il s’y connecte.
5. Sélectionnez le réseau auquel vous souhaitez vous connecter.
6. Saisissez les informations réseaux demandées*, puis touchez Connecter.
Il est conseillé de sélectionner Afficher le mot de passe pour afficher les
caractères saisis.
Votre ARNOVA va maintenant tenter d’établir une connexion avec le point d’accès
WiFi.

12
FRANÇAIS
Des raccourcis Android™
par défaut (Navigateur
Web, E-mail, etc.). Appuyez
sur un icone pour ouvrir
l’application correspondante.
Vous pouvez personnaliser
l’écran d’accueil en ajoutant/
supprimant des raccourcis et
des widgets, en changeant le
fond d’écran, etc. Voir page
suivante.
Icone Toutes les applications
Appuyez sur cet icone
pour afficher toutes les
applications Android™
installées sur votre ARNOVA
(jeux, différents outils, etc.). Il
est possible de les copier sur
l’écran d’accueil. Vous pouvez
obtenir d’autres applications
Android™ depuis AppsLib .
L’INTERFACE DE L’ARNOVA
L’icone Toutes les applications - pour voir tous
vos widgets et vos applications.
L’icone Recherche - pour saisir les termes de
recherche
L’icone Applications récentes - Pour ouvrir les
applications utilisées récemment. Pour fermer une
application, faites-la glisser vers la gauche ou vers la
droite.
L’icone Accueil - pour retourner à
l’écran d’accueil.
L’icone Retour - retour à l’écran précédent.
Principales boutons tactiles
Pour saisir vos termes de recherche
ou pour les énoncer.
La barre de navigation afche
les icones Retour, Accueil et
Applications récentes.
Ecran d’accueil
L’icone Recherche vocale - pour énoncer les
termes de recherche
La barre de statut afche des
notications et des icones
système.
Votre ARNOVA est équipé d’un écran tactile capacitif. Utiliser la pulpe de
votre doigt pour naviguer.

13
FRANÇAIS
PERSONNALISATION DE L’APPAREIL
Changer le fond d’écran
- Pour changer votre fond d’écran, maintenez votre doigt appuyé sur un
emplacement vide de l’écran, puis choisissez parmi la liste d’options.
Organiser et utiliser les applications
- Pour déplacer un élément, maintenez votre doigt appuyé sur l’icone
jusqu’à ce que s’afchent les lignes de positionnement, puis faites-le
glisser vers l’emplacement souhaité, et relâchez.
- Pour supprimer l’icone d’une application de l’écran d’accueil, maintenez
votre doigt appuyé sur l’icone, puis faites le glisser vers le haut de l’écran,
et déposez le sur l’icone Supprimer. En supprimant un icone à partir de
l’écran Toutes les applications, vous la désinstaller.
Modification des paramètres
Appuyez sur Paramètres et choisissez un
menu parmi ces catégories : Connexions et
réseaux, Appareil, Personnel, Système, etc.
L’écran d’accueil étendu
Faites glisser votre doigt
horizontalement sur l’écran pour
aller sur le côté gauche ou droit
de l’écran d’accueil étendu.
Ajouter d’autres d’applications avec APPSLIB
Connectez votre ARNOVA à un réseau WiFi, puis appuyez
sur l’icone AppsLib . Ce portail de téléchargement vous
propose des milliers d’applications gratuites et payantes à
télécharger.
Créer des dossiers d’applications : vous pouvez regrouper plusieurs icones
d’applications dans un dossier. Dans un écran d’accueil, déposez un icone sur
un autre pour les rassembler.
Zoomer : Dans des
applications telles
que les navigateurs,
vous pouvez zoomer
ou dézoomer. Il suft
de placer deux doigts
sur l’écran et les
écarter pour zoomer
ou les rapprocher
dans un mouvement de pincement
pour dézoomer.

14
FRANÇAIS
PERSONNALISATION DE L’APPAREIL
Utiliser le verrouillage écran
Pour protéger vos informations
condentielles, vous pouvez modier
les paramètres de verrouillage de votre
tablette :
1. Sur l’écran d’accueil ou sur l’écran
“Toutes les applications”, appuyez sur
l’icône Paramètres .
2. Faites déler l’écran vers le bas, puis
appuyez sur Sécurité.
3. Appuyez sur Verrouillage de l’écran.
4. Appuyez sur le type de verrouillage que
vous voulez utiliser.
Dès que vous avez sélectionné une option,
un écran de verrouillage s’afche chaque
fois que votre écran est réactivé. Vous êtes
alors invité à saisir le schéma, le code PIN
ou tout autre code spécié.
Ajouter des widgets
Les widgets sont comparables à des fenêtres ouvertes sur vos
applications. Vous pouvez les sélectionner dans l’onglet “Toutes les
applications”, puis les déplacer vers vos écrans d’accueil.
Pour afcher vos widgets, procédez comme suit :
1. Dans l’écran d’accueil, appuyez sur l’icône Toutes les
applications .
2. Appuyez sur Widgets en haut de l’écran.
3. Dans l’écran principal des widgets, vous pouvez effectuer les
actions suivantes :
-passer d’un écran à l’autre : faites glisser votre doigt vers la gauche
ou vers la droite.
-faire glisser un widget jusqu’à un écran d’accueil : appuyez de
manière prolongée sur l’icône d’un widget, faites glisser votre doigt
jusqu’à l’emplacement de votre choix, puis relevez le doigt.
Dans certains cas, vous serez invité à sélectionner d’autres options
pour activer le widget. S’il n’y a pas de place à l’emplacement où vous
déposez le widget, ce dernier ne sera pas ajouté à l’écran d’accueil.
Prolonger l’autonomie de votre batterie
-Pour désactiver les signaux que vous n’utilisez pas (WiFi), accédez à l’application Paramètres.
-Pour diminuer la luminosité de l’écran et dénir un délai de mise en veille plus court, appuyez sur Paramètres >
Appareil > Afchage.
-Si vous n’en avez pas besoin, désactivez la synchronisation automatique pour toutes les applications. Pour
ce faire, appuyez sur Paramètres > Personnel > Comptes et synchro. Notez que cela signie que vous devrez
effectuer une synchronisation manuelle pour récupérer vos messages, vos e-mails, ainsi que les autres
informations récentes. En outre, vous ne recevrez aucune notication pendant les mises à jour.

15
FRANÇAIS
TRANSFERT DE FICHIERS MULTIMÉDIA
Pour Windows : la procédure décrite ci-dessous nécessite au minimum le système d’exploitation Windows XP et
Windows Media Player 11.
1. Connectez votre tablette à votre ordinateur en utilisant le câble USB.
Votre appareil est automatiquement détecté. Il s’afche sous forme d’icone dans “Poste de travail”.
2. Vous pouvez transférer vos chiers multimédias sur votre ARNOVA en les copiant/collant dans les dossiers
correspondants.
3. Une fois le transfert de chiers terminé, fermez tout programme Windows lié à l’ARNOVA.
4. Vous pouvez maintenant déconnecter le câble USB.
Pour Macintosh :
vous devez tout d’abord installer l’application gratuite Android File Transfer (non fourni).
Télécharger la à partir de http://www.android.com/letransfer.
Une fois que vous avez installé Android File Transfer, procédez comme suit :
1. Si vous utilisez Android File Transfer pour la première fois, cliquez deux fois dessus pour l’ouvrir.
Après la première utilisation, il s’ouvre automatiquement chaque fois que vous connectez votre appareil à
l’ordinateur.
2. Connectez votre appareil à l’ordinateur à l’aide d’un câble USB.
L’application Android File Transfer démarre, si elle n’est pas déjà exécutée, et ouvre une fenêtre qui afche le
contenu de votre appareil, ainsi que les informations relatives à l’espace disponible, en bas de celle-ci.
3. Vous pouvez transférer vos chiers multimédias sur votre ARNOVA en les copiant/collant dans les dossiers
correspondants.
4. Une fois le transfert de chiers terminé, fermez tout programme Windows lié à l’ARNOVA.
5. Vous pouvez maintenant déconnecter le câble USB.
Pour Linux : vous devez tout d’abord installer MTP tools (non fourni).

16
www
?
FRANÇAIS
ENREGISTREZ VOTRE PRODUIT !
Ä Sur Internet : http://arnovatech.com/register
Nous vous conseillons de prendre quelques minutes pour l’enregistrer (http://arnovatech.com/register). Cela vous
permettra d’avoir accès au support technique ARNOVA (http://arnovatech.com/support).
BESOIN D’AIDE ?
Comme nous mettons à jour et améliorons régulièrement nos produits, le logiciel de votre appareil peut présenter une interface ou
des fonctionnalités légèrement différentes de celles décrites dans ce guide.
Sur notre site Web:Consultez la Foire Aux Questions (FAQ) sur http://arnovatech.com/faq
Contactez notre équipe d’assistance technique: Allez sur http://arnovatech.com/support pour une assistance
par e-mail. Veuillez enregistrer votre produit avant de contacter notre équipe d’assistance technique (voir
Enregistrez votre Produit).

▲
!
17
DEUTSCH
Installationsassistent
Wenn Sie Ihren ARNOVA das erste Mal in Betrieb nehmen, leitet Sie der Installationsassistent durch einige
Bildschirme, um Ihnen dabei zu helfen, die grundlegenden Einstellungen vorzunehmen. Sprache, Land,
Uhrzeit usw.
Vor der erstmaligen Verwendung des ARNOVA sollte der Akku vollständig aufgeladen werden!
Auaden des Akkus
STARTEN
1. Verbinden Sie das mitgelieferte Stromkabel mit dem ARNOVA-Stromanschluss und mit einer Steckdose.
2. Daraufhin schaltet sich der ARNOVA-Player ein und startet den Ladevorgang.
- Während der Akku aufgeladen wird, leuchtet die Leistungsanzeige rot.
- Diese wechselt zu Gelb, sobald der Akku vollständig geladen ist.

18
13
4
57
28
9
10
11
6
12
???
DEUTSCH
BESCHREIBUNG DES ARNOVA
1. USB Host Port : Zur Verwendung einer Tastatur, einer Maus oder ein USB-
Stick.
2. Stromanschluß
3. Micro USB Port: um Verbinden des ARNOVA mit dem Computer über
das mitgelieferte USB Kabel (zur Datei-Übertragung).
4. Hardware-Reset: Falls Ihr ARNOVA einmal abstürzt, können Sie die Reset-
Taste drücken, indem Sie einen scharfen Gegenstand verwenden, wie z. B.
einen Zahnstocher.
5. microSD Karten Steckplatz
6. Anzeige Lade-Status:
- Rote Anzeige: Akku wird geladen
- Gelbe Anzeige: Akku ist geladen.
7. Kopfhöreranschluss
8. Eingebautes Mikro
9. EIN/AUS-Taste
10. Lautstärke
11. Home-Taste
12. Webcam
WICHTIG:
Ihr Gerät ist abgestürzt, bitte schalten Sie es aus. Drücken und halten Sie die Ein-/Aus-Taste 9für 10
Sekunden oder drücken Sie den Reset-Schalter, Hardware-Reset 4.

19
www
DEUTSCH
WIFI-NETZWERKVERBINDUNG
* Für kostenlose WiFi-Access Points besteht kein Bedarf für das
Eingeben spezieller Informationen. Für abgesicherte Netzwerke
benötigen Sie entweder einen Schlüssel (eine Serie von Zahlen
und/oder Buchstaben) des Typs WEP, WPA oder WPA2. Um die
exakten Verbindungsparameter zu erhalten, kontaktieren Sie den
Internetprovider.
Dazu müssen Sie sich in Reichweite eines WLAN-Netzwerks befinden. Das ARNOVA Gerät erkennt bereits
konfigurierte Netzwerke und wird mit diesen eine Verbindung herstellen.
Konfiguration eines WiFi-Netzwerks
Von der Statusleiste aus können Sie schnell auf die WiFi-Einstellungen zugreifen.
1. Tippen Sie auf die Uhrzeit in der Statusleiste. Das Status-Dashboard wird
angezeigt.
2. Tippen Sie auf die Uhrzeit im Status-Dashboard. Es wird jetzt darunter das
Dashboard für Einstellungen angezeigt.
3. Berühren Sie WiFi, um die WiFi-Einstellungen zu öffnen.
4. Bei ausgeschaltetem WiFi schieben Sie den WiFi-Schalter in die Position AN.
Nachdem das WiFi eingeschaltet wurde, sucht das ARNOVA nach verfügbaren
WiFi-Netzwerken. Gesicherte Netzwerke werden mit einem Schlosssymbol
angezeigt. Findet das Gerät eine zuvor vorhandene Verbindung, wird diese
verwendet.
5. Berühren Sie das Netzwerk, zu dem Sie eine Verbindung herstellen möchten.
6. Geben Sie die erforderlichen Netzwerk-Informationen * ein und berühren
Sie Connect (Verbinden). Wir empfehlen, dass Sie Show Password (Passwort
anzeigen) wählen, damit Sie die Zeichen, die Sie tippen, sehen können.
Ihr ARNOVA wird jetzt eine Verbindung zu diesem WiFi-Access-Point herstellen.

20
DEUTSCH
Alle Apps Symbol
Tippen Sie auf dieses Icon, um
alle installierten Android™-
Anwendungen zu sehen
(Spiele, verschiedene Tools,
usw.). Bei Bedarf können
Sie diese Anwendungen auf
Ihren Desktop kopieren. Sie
finden weitere Android™-
Anwendungen in AppsLib .
Anzeige von Desktop-
Verknüpfungen von Android™
(WebBrowser, eMail, usw.).
Tippen Sie auf ein Icon, um die
entsprechende Anwendung zu
öffnen. Sie können den Home-
Screen nach Ihren Wünschen
anpassen, indem Sie Shortcuts
und Widgets hinzufügen oder
entfernen oder das Design des
Hintergundes ändern.
DIE ARNOVA BENUTZEROBERFLÄCHE
Das Symbol Alle Apps – um alle Ihre Apps und Widgets
anzuzeigen.
Das Suche Symbol -zum Eingeben von Begriffen, nach
denen das Tablet und das Web durchsucht werden sollen.
Letzte Apps - Öffnet eine Liste mit den Apps,
die Sie zuletzt verwendet haben. Schieben Sie
die Miniaturansicht nach links oder rechts, um
sie aus der Liste zu entfernen.
Startbildschirm - Öffnet den Startbildschirm.
Zurück - Zurück zum vorherigen Bildschirm.
Die wichtigsten Touch-Tasten
Ihr ARNOVA-Gerät ist mit einem Kapazitiven Touchscreen ausgerüstet. Die
Bedienung erfolgt durchBerührung des Touchscreens.
Suchbegriff eintippen oder
Spracheingabe verwenden
Das Sprach-Suche -Symbol - zum Sprechen von
Begriffen, nach denen das Tablet und das Web
durchsucht werden sollen.
Auf der Navigationsleiste werden
die Tasten Zurück, Startbildschirm
und Letzte Apps angezeigt.
Auf der Statusleiste werden
Benachrichtigungen und die
Systemsymbole angezeigt.
This manual suits for next models
1
Table of contents
Languages:
Other Arnova Tablet manuals