Art-Tech MAG-180 SPOT User manual

USER MANUAL

2
1. BEFORE YOU BEGIN
What is included
1 x Light
1 x Mounting bracket and screws
1 x Power cable
1 x User Manual
Unpacking Instructions
Congratulations on purchasing ART-TECH 180W moving head
spot fixture ! Now that you’ve got your moving head spot,you
should carefully unpack the carton and check the contents to
ensure that all parts are present and in good condition. Notify the
shipper immediately and retain packing material for inspection if
any parts appear damaged from shipping or the carton itself
shows signs of mishandling. Again,please save the carton and all
packing materials. If a fixture must be returned to the factory, it is
important that the fixture be returned in the original factory box
and packing.
Manual Conventions
Manual use the following conventions to differentiate certain types
of information from the regular text.
CONVENTION
MEANING
[10]
A LCD display to be configured
<Menu>
A key to be pressed on the fixture’s control panel
1~512
A range of values
50/60
A set of values of which only one can be chosen
Settings
A menu option not to be modified (for example,
showing the operating mode/current status)
MENU >Settings
A sequence of menu options to be followed
ON
A value to be entered or selected

3
Icons
This manual uses the following icons to indicate information that
requires special attention on the part of the user.
SAFETY INSTRUCTIONS
●Please keep this User Manual for future use. If you sell the unit to
someone else, be sure that they also receive this instruction
booklet.
● Always make sure that you are connecting to the proper voltage,
and that the line voltage you are connecting to is not higher than
that stated on the decal or rear panel of the fixture.
● Make sure there are no flammable materials close to the unit while
operating.
● Always disconnect from power source before servicing or
replacing fuse and be sure to replace with same fuse source.
ICONS
MEANING
This paragraph contains critical installation, configuration or
operation information. Failure to comply with this
information may render the fixture partially or completely
inoperative, cause damage to the fixture or cause harm to
the user.
This paragraph contains important installation or
configuration information. Failure to comply with this
information may prevent the fixture from functioning
correctly.
This paragraph reminds you of useful, although not critical,
information
Please read these instructions carefully. They
include important information about installation,
usage and maintenance of this product.

4
● Secure fixture to fastening device using a safety chain.
● Maximum ambient temperature (Ta) is 104° F (40° C). Do not
operate fixture at temperatures higher than this.
●In the event of a serious operating problem, stop using the unit
immediately.Never try to repair the unit by yourself. Repairs
carried out by unskilled people can lead to damage or malfunction.
Please contact the nearest authorized technical assistance
center.
● Never connect the device to a dimmer pack.
● Avoid direct eye exposure to the light source while it is on.
● Never carry the fixture by holding the head. Always use
the carrying handle.
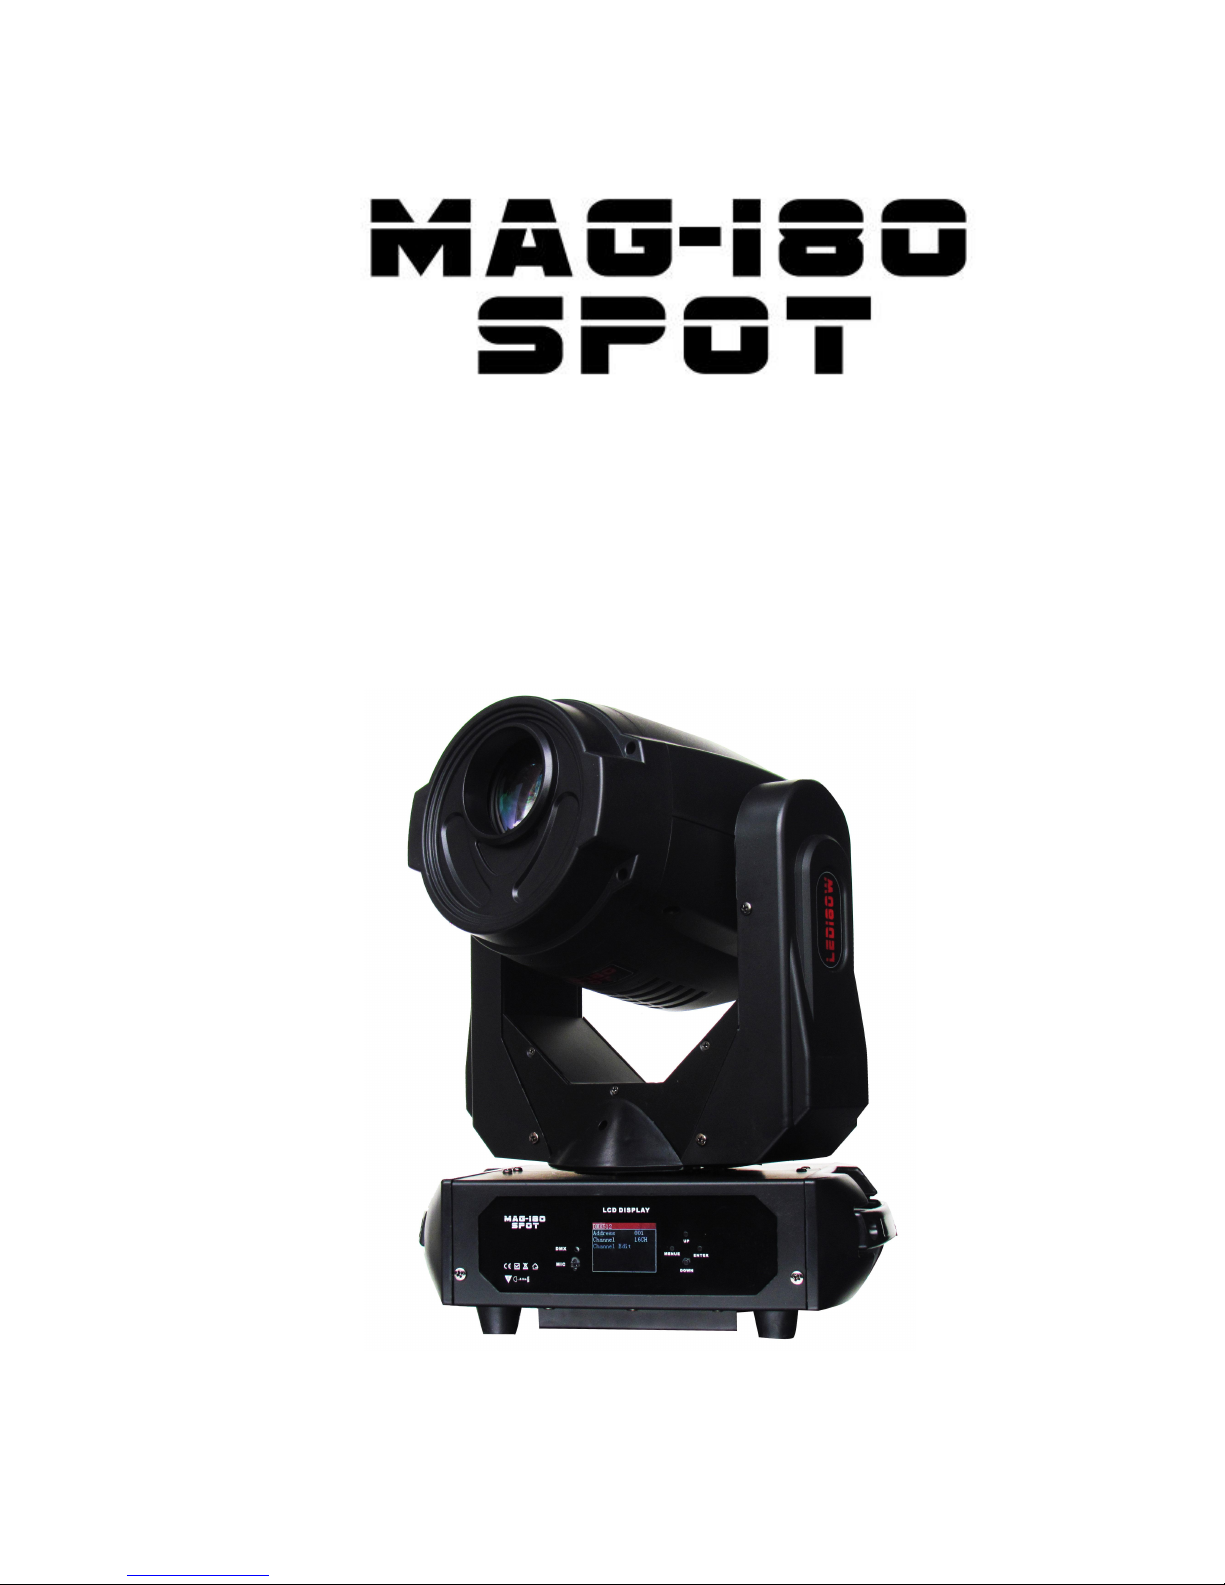
2. INTRODUCTION
MAG-180SPOT is a super bright led moving head with unique
180W led source, projected from a compact tiny body it can
produce output brighter than a traditional discharge 575w unit.
The efficient optical system provides a sharp cutting edge of the
spot without any shadows. Effect features including saturated
colors, fixed gobo wheel, rotating gobo wheel with replaceable
positions and real indexing feature, rotating prism wheel with 3
facet, motorized focus, full range dimmer, various strobe effect.
Brightness, efficiency and compactness are what
MAG-180SPOT stands for, Small unit gives you nice
performance!
· Light source: Advanced 180w white led
· Led life: 60.000 hours
· Luminous Flux: 21385lux@2.5m
· Control: DMX

5
· Ballast: switching mode power supply
Optical System
· Beam angle: 14°
X/Y
· Pan: 540°(2.3sec), Tilt: 265° (1.8 sec)
· 16-bit resolution
· Auto repositioning
Color
· 7+open, indexable and bidirectional rainbow effect
Gobo
· Outside ¢25.5mm, inside ¢21.5mm
· 6+ open custom interchangeable position for rotating gobo wheel
· 8+ open fixed gobos
· Real indexable and gobo shaking
· Distinctive gobo animation effect
Feature
· DMX channels: 18
· Color wheel: 7+1 colors
· Fixed gobo wheel: 8+1 gobos
· Rotating gobo wheel: 6+1 gobos
· Motorized auto focus
· Full range 0-100% dimmer
· Various strobe
· Rotating Effect wheel with 3 facets.
· Indicate temperature info of base, arm and lamp

6
· Fan speed auto change according to temperature
Power
· Max power consumption: 250W
· Powercon in and out
· Power supply: Electronic auto-ranging
· Input voltage range: 100–240V, 50-60Hz
Dimension and Weight
· Fixture:275X245X353MM
· Net Weight: 8.3KG
· Gross Weight: 9.7KG
Rigging
· Mounting points: 4 ¼-turn locks
· 2 x Omega brackets with ¼-turn quick locks
Product Dimensions

7
3. SET UP
AC Power
This fixture runs on 100-240VAC, 50/60 Hz. This fixture used
switch power supply, it can transform by itself when user input
power.
Always connect the fixture to a switched circuit.
Never connect the fixture to a rheostat (variable resistor) or
dimmer circuit, even if the rheostat or dimmer channel is
used only as a 0 to 100% switch.
Always connect the fixture to a circuit with a suitable
electrical ground.
Power Linking
This fixture contains power linking via the outlet located in front
of the power input cable.
Signal Linking (DMX)
The diagrams below illustrate the signal (DMX) linking for this
fixture. This is used both in DMX mode and when operating the
fixtures in Master/Slave mode. Please see the diagram below for
further explanation.
Fuse Replacement
With a flat head screwdriver unscrew the fuse holder out of its
housing, turning counter-clockwise. Remove the damaged fuse
from its holder and replace with exact same type fuse. Insert the
fuse holder back in its place and reconnect power.
Before replacing a fuse,disconnect
power cord. ALWAYS replace with the
same type and rating of fuse.

8
Mounting & Rigging
The Spot may be mounted in any safe position provided there is
adequate room for ventilation.
Be sure that the structure can support 10 times the
weight of the fixture. Please see the “Technical Specifications”
section of this manual for a detailed weight listing. Mount the
fixture securely. Two hanging clamps for truss mounting may be
used, or nuts and bolts for permanent installation may be used.
The holes in each bracket are 13 mm in size. When rigging,
consider routine maintenance and control panel access. Please
see the following steps for installation.
●If the power link out is intended to be used with multiple
fixture, take into account the length of each power cable,
and mount the fixtures close enough to one another to
accommodate for this.
●Attach both included bolts in the locations indicated below,
using a metric 8 mm Allen wrench.
●Attached 2 hanging clamps to the bracket in each of the two
locations indicated below
●Safety cables must always be used.
Do NOT mount this fixture sideways!

9
OPERATING
Configuration (DMX)
Set the product in DMX mode to control with a DMX controller.
1. Connect the product to a suitable power outlet.
2. Turn the product on.
3. Connect a DMX cable from the DMX output of the DMX
controller to the DMX input socket on the product.
Control Panel Functions
The Control Panel shows the current state of the unit. It is used
to select the operating mode, as well as the sub-features.
[MENU] menu selection or return to previous menu.
[UP] press [UP] through the menu list to increase/change the
value of the current function.
[DOWN] press [DOWN] through the menu list to decrease
/ change the value of the current function.
[ENTER] confirm & quit out current function setting.
DMX CHANNEL VALUES
16-CH
CH
value
Function
1CH Pan rotation
000-255
Pan rotation 0°-540°
2CH Pan Fine
000-255
Pan fine adjustment
3CH Tilt rotation
000-255
Tilt rotation 0°-270°
4CH Tilt Fine
000-255
Tilt fine adjustment
5CH Pan/Tilt Speed
000-255
Pan/Tilt speed from fast to slow
6CH Dimmer
000-255
From dark to bright
7CH Strobe
0-5
6-249
250-255
ON
Strobe from slow to fast
ON

10
8CH Color
0-9
10-19
20-29
30-39
40-49
50-59
60-69
70-79
80-89
90-99
100-109
110-119
120-129
130-139
140-149
150-180
181-255
White
White+Red
Red
Red+Green
Green
Green+Blue
Blue
Blue+Yellow
Yellow
Yellow+Rose
Rose
Rose+Warm White
Warm White
Warm White+Cambridge blue
Cambridge blue
Cambridge blue+White
Rainbow Effect(slow to fast)
9CH Focus
000-255
Focus, from near to far
10CH Gobo 1
000-139
Gobo1
140-255
Gobo rotating CW and CCW from slow
to fast)
11CH Gobo1.ROT
0-19
20-139
140-255
No function
Gobo self-rotating CW from slow to fast
Gobo self-rotating CCW from slow to
fast
12CH Gobo1 shake
000-255
Slow-fast
13CH Gobo 2
000-255
Gobo2
160-255
Gobo rotating CW and CCW from slow
to
fast
14CH Gobo2 shake
000-255
Slow-fast
15CH Prism
0-19
20-63
64-255
OFF
ON
Forward Rotating from fast to slow
16CH ControlL
1-199
200-219
220-255
No function
Reset after 3 second
No function

11
DMX Personalities
The 180W Moving Head Spot has an 16-channel personality
To select DMX personality to use, follow the steps below:
1. Press <MENU> repeatedly until RUN MODE, SETTINGS,
SPECIAL on the display
2. Press <UP> or <DOWN> to select RUN MODE
3. Press<UP> or <DOWN> to select DMX512
4. Press<ENTER>
Setting Address
To select the starting address, do the following:
1. Press <MENU> repeatedly until RUN MODE, SETTINGS,
SPECIAL on the display
2. Press <UP> or <DOWN> to select RUN MODE
3. Press<UP> or <DOWN> to select DMX512
4. Press<UP> or <DOWN> to select Address
5. Press<UP> or <DOWN> to set Address
6. Press<ENTER>
Sound-Active Mode
To enable the Sound-Active mode, do the following.
1. Press <MENU> repeatedly until RUN MODE, SETTINGS,
SPECIAL on the display
2. Press <UP> or <DOWN> to select RUN MODE
3. Press<UP> or <DOWN> to select Sound
4. Press<ENTER>
Automatic Mode
To enable the Automatic mode.
1. Press <MENU> repeatedly until RUN MODE, SETTINGS,
SPECIAL on the display
2. Press <UP> or <DOWN> to select RUN MODE
3. Press<UP> or <DOWN> to select Auto1 or Auto2
4. Press<ENTER>

12
Manual Mode
To enable the Manual mode, do the following.
1. Press <MENU> repeatedly until RUN MODE, SETTINGS,
SPECIAL on the display
2. Press <UP> or <DOWN> to select RUN MODE
3. Press<UP> or <DOWN> to select Manual
4. Press<ENTER>
INVERT/ PAN
To enable the invert/pan mode, do the following.
1. Press <MENU> repeatedly until one of the following shows on
the display: RUN,SETTINGS,SPECIAL.
2. Press <UP> or <DOWN> to select SETTINGS.
3. Press <UP> or <DOWN> to select Motor Invert
4 .Press <UP> or <DOWN> to select PAN
5. Press <UP> or <DOWN> to select Yes or No
6. Press <ENTER>
Please see the diagram below for further explanation.

13

14

15
5. APPENDIX
General Maintenance
To maintain optimum performance and minimize wear, fixtures
should be cleaned frequently. Usage and environment are
contributing factors in determining frequency. As a general rule,
fixtures should be cleaned at least twice a month. Dust build up
reduces light output performance and can cause overheating.
This can lead to reduced lamp life and increased mechanical
wear. Be sure to power off fixture before conducting
maintenance.
● Use a vacuum or air compressor and a soft brush to remove
dust collected on external vents.
● Clean all glass when the fixture is cold with a mild solution of
glass cleaner or Isopropyl Alcohol and a soft lint free cotton
cloth or lens tissue.
● Apply solution to the cloth or tissue and drag dirt and grime to
the outside of the lens.
● Gently polish optical surfaces until they are free of haze
and lint.
The cleaning of external optical lenses and/or mirrors must be
carried out periodically to optimize light output. Cleaning
frequency depends on the environment in which the fixture
operates. Damp, smoky or particularly dirty surroundings can
cause greater accumulation of dirt on the unit’s optics. Clean
with soft cloth using normal glass cleaning fluid. Clean the
external optics at least every 20 days. Clean the fixture at least
every 30/60 days.
Always dry the parts carefully after cleaning them.
Never spin a fan using compressed air.

16
General Troubleshooting
Symptom
Solution
Fixture auto shut
off
Check the fan in the fixture.If it is stopped or
moving slower than normal,the unit may
have shut itself off due to high heat. This is to
protect fixture from overheating. Clear the
fan of obstruction, or return the unit for
service.
No power
Check fuse,AC cord and circuit for
malfunction.
No light output
Check to ensure light is operating under
correct mode.
Slow movement
Verify that 220v/110v switch is in the correct
position if applicable. Also check whether
speed channels are setted appropriately.
Fixture moving
on its own
Verify proper mode of operation. Is it in
“Auto” mode?
No signal
Make sure all connectors are seated properly
and securely.
Use only DMX compatible cables.
Install a terminator.
Reset fixture.
Table of contents