Artist Guitars EDK924M User manual

EDK924M DRUM KIT
MANUAL

INFORMATION FOR YOUR SAFETY!
THE FCC REGULATION WARNING (for USA)
This equipment has been tested and found to comply with the limits for a
Class B digital device, pursuant to Part 15 of the FCC Rules.
These limits are designed to provide reasonable protection against harmful
interference in a residential installation. This equipment generates, uses, and
can radiate radio frequency energy and, if not installed and used in
accordance with the instructions, may cause harmful interference to radio
communications. However, there is no guarantee that interference will not
occur in a particular installation.
If this equipment does cause harmful interference to radio or television
reception, which can be determined by turning the equipment off and on,
the user is encouraged to try to correct the interference by one or more of
the following measures:
• Reorient or relocate the receiving antenna.
• Increase the separation between the equipment and receiver.
• Connect the equipment into an outlet on a circuit different from that to
which the receiver is connected.
• Consult the dealer or an experiencted radio/TV technician for help.
Unauthorized changes or modification to this system can void the user’s
authority to operate this equipment.
7
2
CAUTION
The normal function of the product may be disturbed by Strong
Electro Magnetic Interference. If so, simply reset the product to
resume normal operation by following the owner’s manual. In
case the function could not resume, please use the product in
other location.
EDK924M DRUM KIT MANUAL

PRECAUTIONS
Please keep this manual in a safe place for future reference.
Power Supply
Please connect the designated AC adaptor to an AC outlet of the correct
voltage.
Do not connect it to an AC outlet of voltage other than that for which your
instrument is intended.
Unplug the AC power adaptor when not using the instrument, or during
electrical storms.
Connections
Before connecting the instrument to other devices, turn off the power to all
units. This will help prevent malfunction and / or damage to other
devices.
Location
Do not expose the instrument to the following conditions to avoid
deformation, discoloration, or more serious damage:
• Direct sunlight
• Extreme temperature or humidity
• Excessive dusty or dirty location
• Strong vibrations or shocks
• Close to magnetic fields
Interference with other electrical devices
Radios and televisions placed nearby may experience reception
interference. Operate this unit at a suitable distance from radios and
televisions.
Cleaning
• Clean only with a soft, dry cloth.
• Do not use paint thinners, solvents, cleaning fluids, or chemical
impregnated wiping cloths.
3
EDK924M DRUM KIT MANUAL

Handling
• Do not apply excessive force to the switches or controls.
• Do not let paper, metallic, or other objects into the instrument.
• If this happens, unplug the AC adaptor from the wall outlet.
• Then have the instrument inspected by qualified service personnel.
Disconnect all cables before moving the instrument.
4
EDK924M DRUM KIT MANUAL

4 5 6
CONTENTS
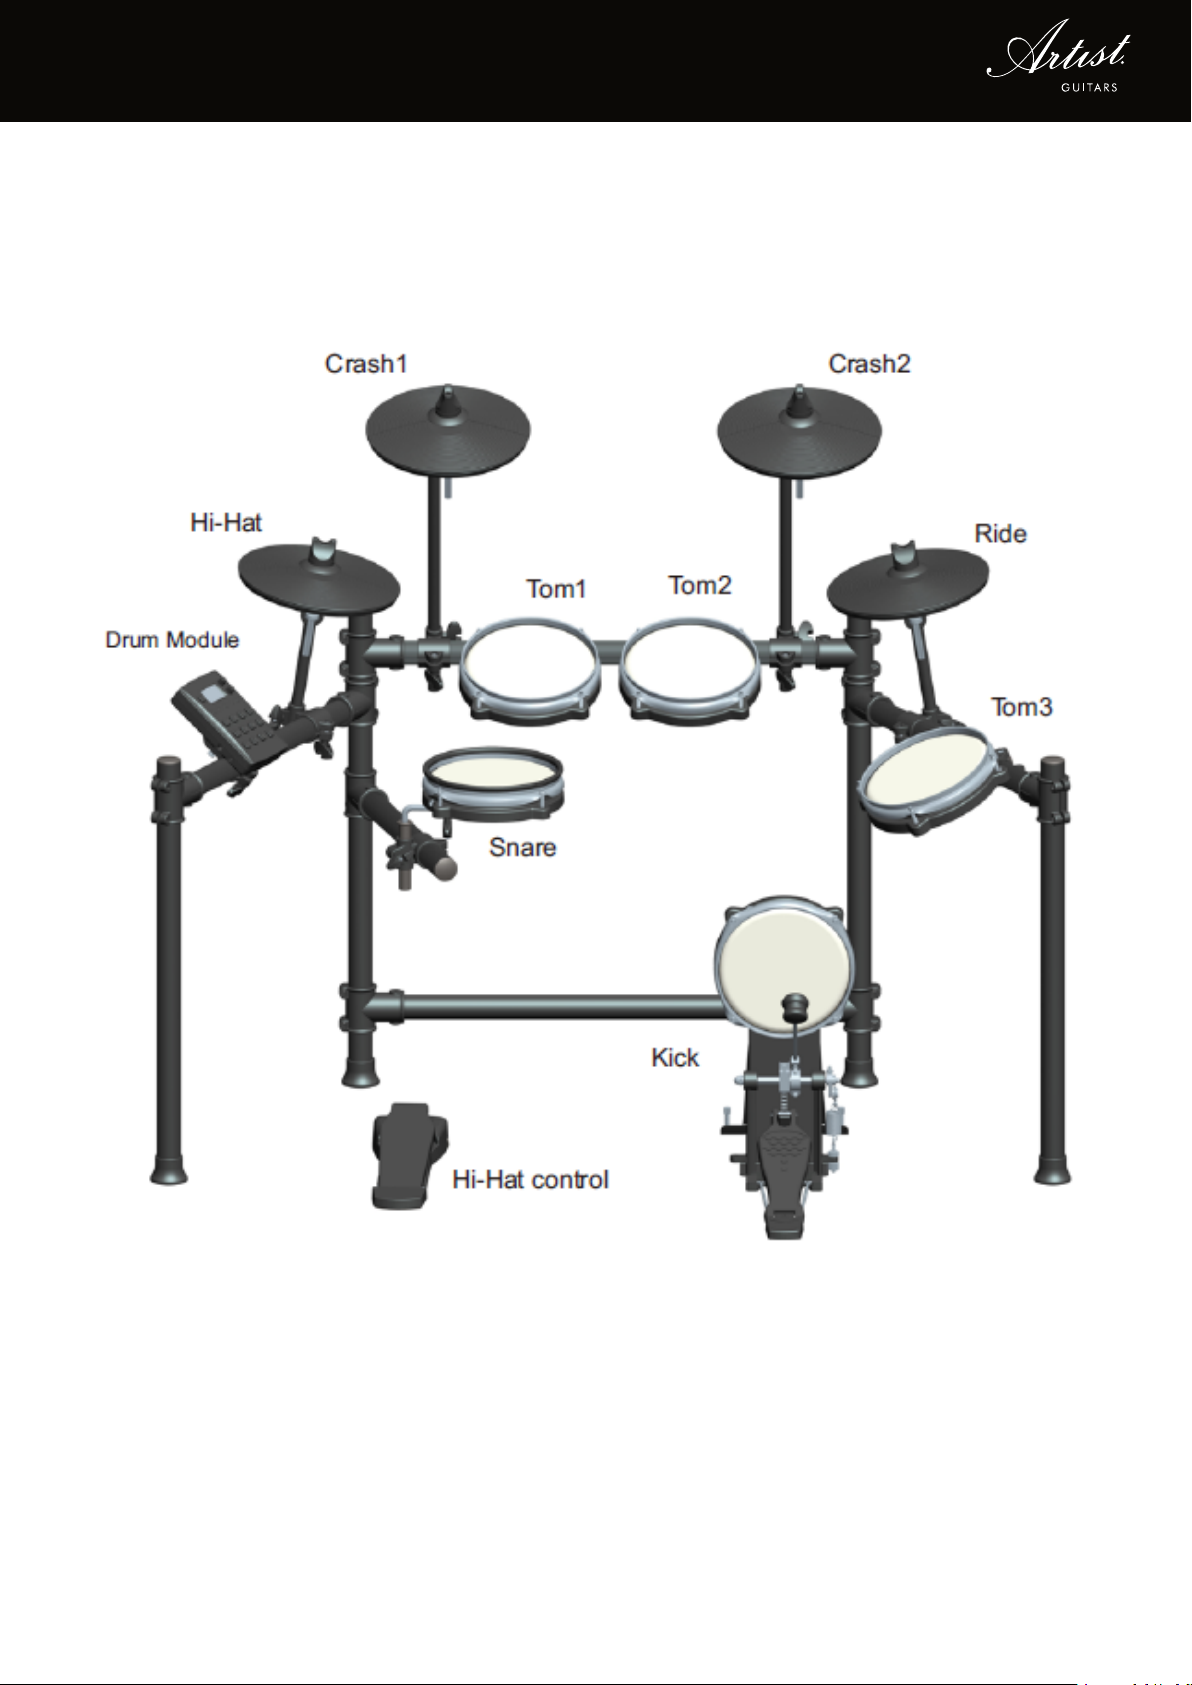
Installation Instructions
Installing frame ............................................................................................
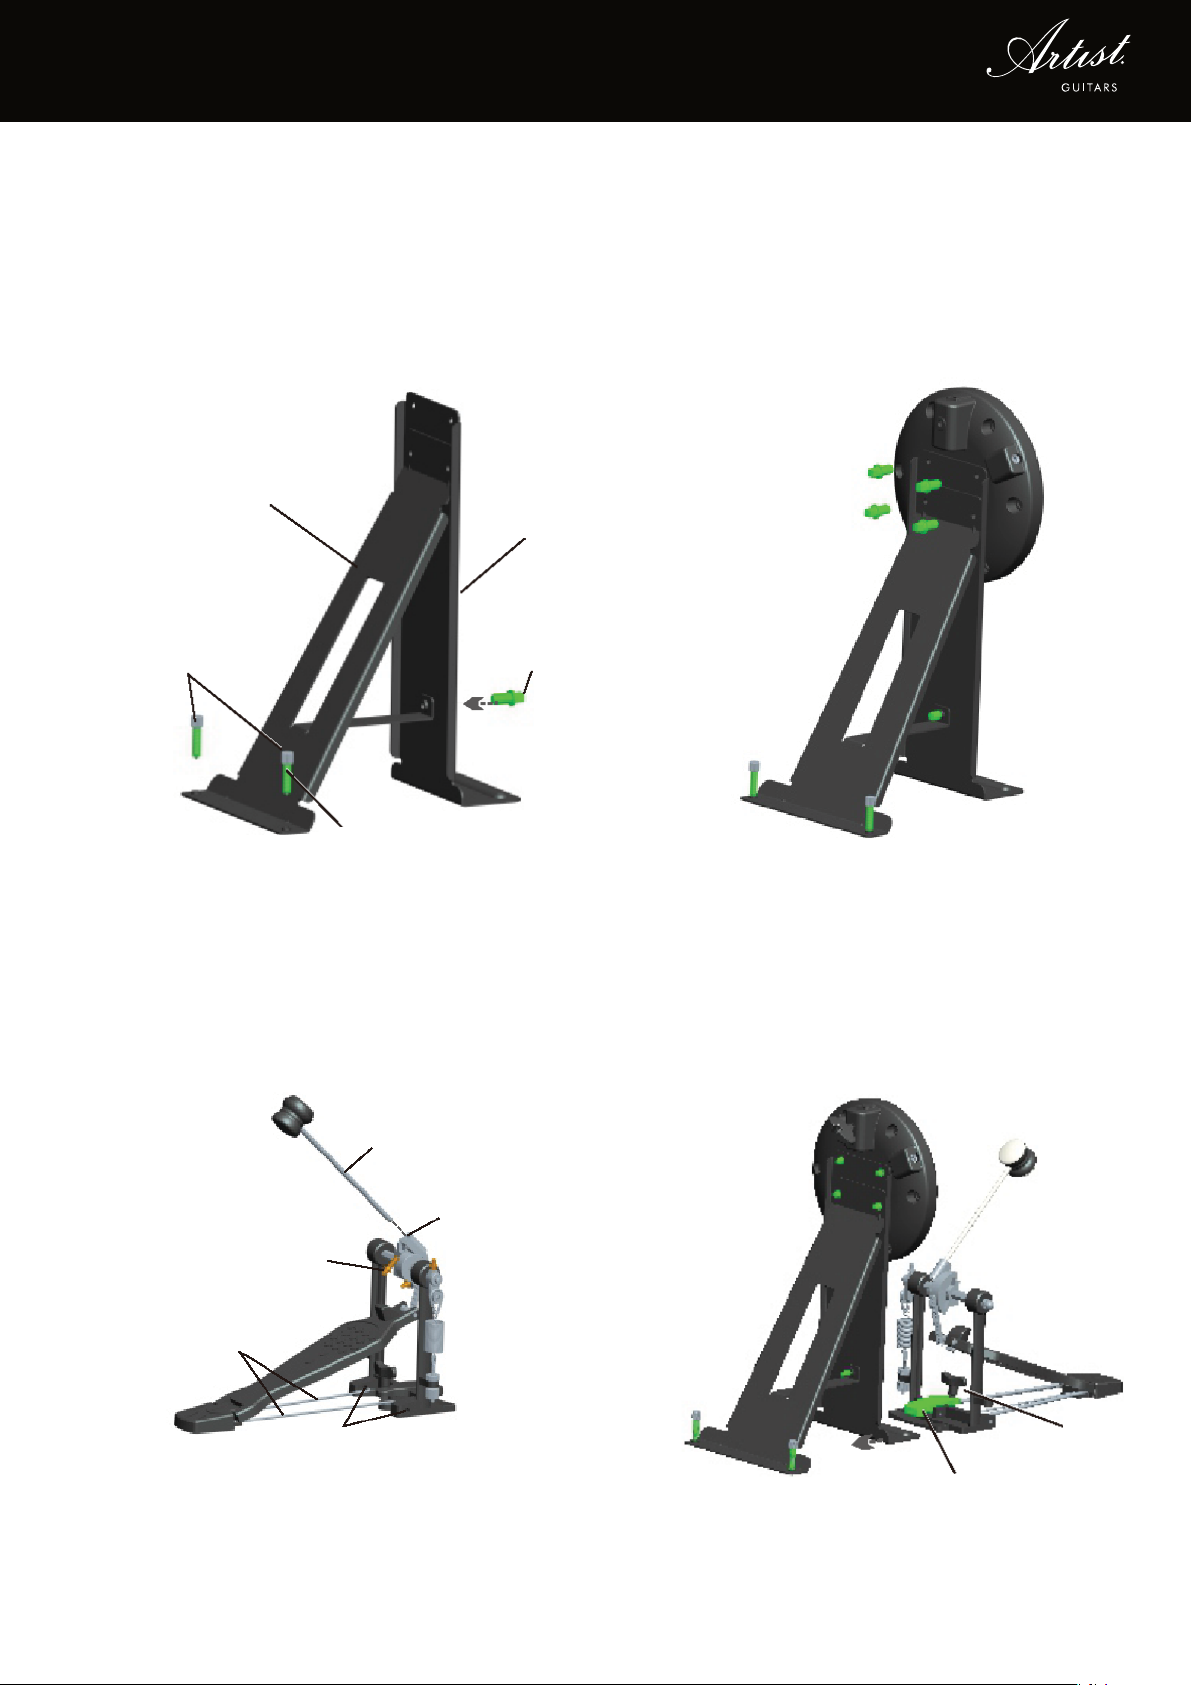
Install Kick Drum...........................................................................................
Install Drum Module ....................................................................................
Panel & Display Description
Front Panel ...................................................................................................
Rear & Side Panel ........................................................................................
QUICK START
Setup
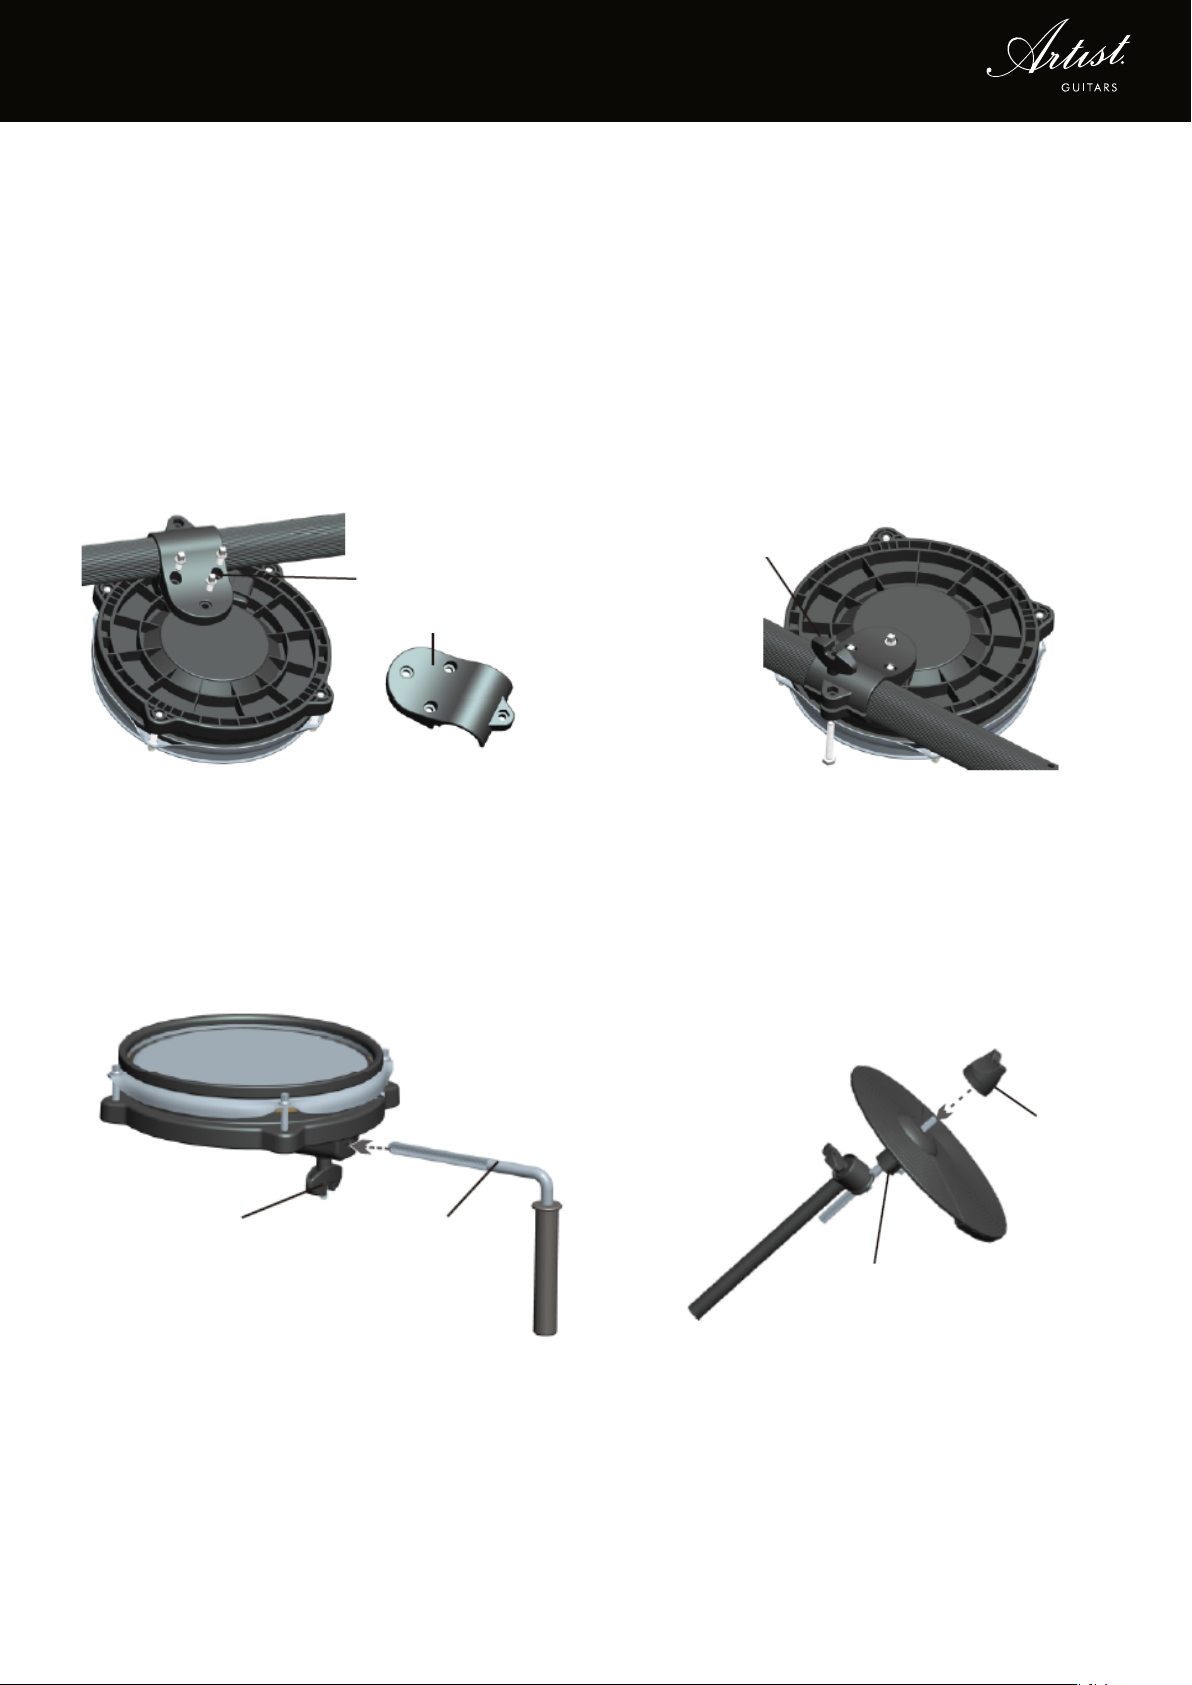
Connecting Pads and Pedals ......................................................................
Connections
Connecting an Audio Equipment ................................................................
Connecting a set of Headphones ...............................................................
Connecting an MP3/CD Player .................................................................
Connecting a Computer ..............................................................................
Connecting a Midi Keyboard .....................................................................
Power Supply & Switch ...............................................................................
Performing
Selecting a Drum Kit ....................................................................................
Playing the Pads ..........................................................................................
Adjusting the Sensitivity of a Pad ................................................................
Using the Metronome/Click Feature ..........................................................
Adjusting the Tempo ....................................................................................
Editing and Saving a Drum Kit
Adjusting the Volume of a Drum Kit ............................................................
Switching Reverb On/Off and Setting EQ ................................................
Selecting the Drum Instrument of the Pad ...................................................
Adjusting the Volume, Pan and Pitch of the Pad .........................................
Setting the Pads to Play Songs ....................................................................
Saving the Edited Kit ...................................................................................
8
10
11
12
13
14
15
15
15
16
16
16
17
17
18
19
19
20
20
20
20
20
21
5
EDK924M DRUM KIT MANUAL

Playing Along with Songs
Selecting and Playing Back a Song ..........................................................
Adjusting the Volume of the Accompaniment and Drum ..........................
Muting the Drums in Songs ....................................................................
Recordind your Performance
Recording Your Performance Quickly .......................................................
Playing Back Your Recorded Performance ................................................
Practicing
Selecting a Beat or Rhythm to Begin Practicing ........................................
Scoring Your Practice .................................................................................
Beat and Rhythm
Base type of Beat and Rhythm ..................................................................
Making the Settings for Pads
About Settings of Pads ..............................................................................
Adjusting the Pad Sensitivity .....................................................................
Setting the Pad Threshold ..........................................................................
Eliminating Crosstalk between Pads .........................................................
Selecting the Pad Curve ...........................................................................
Setting Rim Sensitivity on Pads .................................................................
Adjusting the Hi-Hat Pedal Splash Sensitivity ..........................................
Saving Settings of Pads ............................................................................
Drum Kit List ............................................................................................
Drum Instrument List ..............................................................................
Song List ..................................................................................................
21
22
21
23
23
24
24
25
26
26
26
26
27
27
27
28
29
29
31
6
EDK924M DRUM KIT MANUAL

Completed
Note: Use the drum key (V) to loosen or tighten the bolts of clamps when
assembling the kit or making adjustments.
INSTALLATION INSTRUCTIONS
,QVWDOOLQJIUDPH
ϲ
,QVWDOOWKHF\PEDOVWDQGVEHDWWHQWLRQWKHVKRUWHUWXEHLVIRU+LW+DW$GMXVWWKHKHLJKWKZLGWK
DQGWLJKWHQVFUHZVRIIUDPH7KHHOHFWULFGUXPIUDPHLVGRQH
$
$
$
$
$
%
%
%
$
$
$
$
$
%
%
%
༃
༃
༃
༃
༅
༆
༆
༆
༅
༅
༇
༇
༃
༄
༄
༄
༄
6G_GZZKTZOUTZUZNKJOXKIZOUT]NKTOTYZGRROTMZ[HK
SGQKY[XKZNKSUJ[RKNURJKXLGIKZUXOMNZYOJK
*X[S3UJ[RK.URJKX
4+>:
4+>:
4+>:
,QVWDOODWLRQRIVFUHZV
6QDUHGUXPMRLQW
7
EDK924M DRUM KIT MANUAL

1. Installing Frame
Install the cymbal stands, be attention, the shorter tube is for Hit-Hat. Adjust
the heigth, width , and tighten screws of frame. The electric drum frame is
done.
,QVWDOOLQJIUDPH
ϲ
,QVWDOOWKHF\PEDOVWDQGVEHDWWHQWLRQWKHVKRUWHUWXEHLVIRU+LW+DW$GMXVWWKHKHLJKWKZLGWK
DQGWLJKWHQVFUHZVRIIUDPH7KHHOHFWULFGUXPIUDPHLVGRQH
$
$
$
$
$
%
%
%
$
$
$
$
$
%
%
%
༃
༃
༃
༃
༅
༆
༆
༆
༅
༅
༇
༇
༃
༄
༄
༄
༄
6G_GZZKTZOUTZUZNKJOXKIZOUT]NKTOTYZGRROTMZ[HK
SGQKY[XKZNKSUJ[RKNURJKXLGIKZUXOMNZYOJK
*X[S3UJ[RK.URJKX
4+>:
4+>:
4+>:
,QVWDOODWLRQRIVFUHZV
6QDUHGUXPMRLQW
8
EDK924M DRUM KIT MANUAL

6
2. Installing Toms
Referring to Fig. ①, the drum is mounted on the drum frame, and the
installation method is as follows.
4
Tighten screw
Back cover
4 5
9
EDK924M DRUM KIT MANUAL
Locking screw
Tighten screw “L” shape bar
(1) Install the Tomdrum on the
aluminium tube, cover the
back cover and lock it with
three screws.
(2) Install the locking screw, adjust
the angle of the drum and lock
it tightly.
(3) Install Snare Drum to frame Put
pad in the “L” shape bar, and
tighten screw
(3) Install Hi-Hat,Crash,Ride to
frame. Put cymbal on the
straight bar, and tighten screw
of cap.
Cap
Straight bar
Note: the shorter tube is for Hi-Hat

4 5 6
V Shape stand
Anti skidding screws
L Shape stand
Screws and
spring washers
Spring
4. Install Kick Drum
(1) Connect L shape and V shape stand
by screws, and Install the anti-skidding
screws with springs on the V shape
stand.
(3) Install kick drum pedal: put the kick
drum hammer into the hole on the
pedal, and tighten screws.
(2) Install kick drum pad on
stand by 4 screws.
(4) Connect kick drum stand
and kick drum pedal through
locker , and tighten screw.
Kick drum hammer
Hole for hammer
Locking screw
Fixed rod
Mounting hole
Locker
Screw
10
EDK924M DRUM KIT MANUAL

5. Install Drum Module
(1) Put the cable snake into the holder of
drum machine.
(2) Connect drum module with
cable snake, and Lock it by
three screws.
Drum module
holder
Cable snake
11
EDK924M DRUM KIT MANUAL

PANEL DESCRIPTION
Front Panel
1. POWER Button
This button turns the power on and
off.
2. LINE OUT Knob
Adjust the volume of line output.
3. VOLUME Knob
Adjust the volume of phone.
4. KIT Button
Enter the kit menu.
5. COACH Button
Enter the coach menu.
6. SONG Button
Enter the Voice menu.
7. VOICE Button
Enter the Song menu.
8. Tempo Button
Adjust the current tempo.
9. CLICK Button
Turn the metronome on or off and
enter the Click menu.
10. RECORD Button
Enter the Record menu.
11. UTILITY Button
Enter the utility menu.
12. MENU Button
In the VOICE, SONG, CLICK
UTILITY mode, press the MENU
button to enter the submenu.
13. START/STOP Button
Start or Stop playing.
14. +/- Button
Press the [+] button increases and
[-] button decreases the current
parameter.
15. DIGIT TUBE Display
Parameter display.
16. LED Display
Indicators for Coach playing.
12
EDK924M DRUM KIT MANUAL

Real Panel & Side Panel
17. AUX IN Jack (1/8”)
This stereo input jack is for an external sound source, such as an MP3
player.
18. PHONES Jack (1/8”)
This stereo input jack is used to connect headphones to the unit.
19. LINE OUTPUT Jack (1/4”)
Stereo output connection to an audio system or drum amplifier.
20. USB Connector
This port is used to connect to a computer (MIDI In/Out via USB).
21. DC IN Jack
Connect the included DC 9V power adaptor.
22. PAD Connectors
Input connections for Kick, Snare, Tom, Cymba pads and Hi-Hat
control pedal
13
EDK924M DRUM KIT MANUAL

SET UP
CAUTION!
To prevent electric shock and damage to the device, make sure
the power is turned OFF on the drum and all related device before
making any connection.
Connecting Pads and Pedals
Standard: KICK, SNARE, TOM1-3, CRASH1-2, RIDE, HIHAT, HIHAT
CONTROL PEDAL using the provided cables, connect with kick, snare,
tom1~tom3, ride, crash1-2, hi-hat, hi-hat control triggers. Snare are stereo
input, support double triggering (increase edge triggering); crash1-2 and
ride are stereo input, which support choke; kick, hi-hat are mono input,
which can't response edge triggering. Hi-hat control pedal is mono input.
Note: For details on assembling the drum stand, attaching the digital drum
and connecting pads, refer to the installation manual.
14
EDK924M DRUM KIT MANUAL

CONNECTIONS
Connecting an Audio Equipment
When using an amplifier, connect the Output L/MONO jack located on the
side of the drum module.
Note: The line output volume is controlled by the LINE OUT knob.
Connecting a set of Headphones
Headphones can be connected to the PHONES jack located on the side of
the drum module.
Note: The headphones output volume is controlled by the VOLUME knob.
Connecting a MP3 Player
Connect MP3 player or other audio source to the stereo AUX IN jacK
located on the side of the drum module.
The input signal is mixed with the drum signal, allowing you to play along.
15
EDK924M DRUM KIT MANUAL

Connecting a Computer
Via the USB Connector, which can receives and transmits MIDI messages to
a computer.
Power Supply & Switch
Make sure the power is switched OFF. Connect the adaptor to the DC IN
jack on the side panel. After confirming that all connections have been
completed, rotate the volume knob to the left (minimum volume level) before
switching the power on. Press power button to turn on the drum, the digit
tube will show kit number 001.
*TURN OFF:
The drum kit will be turned off in 7 seconds after pressing power button for
more than 3 second.
Factory Reset
Press the [+] and [-] button at the same time and then turn on the power,
then the digital drum will complete the factory reset.
16
EDK924M DRUM KIT MANUAL

PERFORMING
Selecting a Drum Kit
After powering up, the digital drum will be in KIT menu (KIT button's led ON).
1. Use the [+] and [-] buttons to select the kit.
There are 15 kits in the digital drum:
• 10 preset kits (Kits 001-010)
• 5 user kits(Kits U01-U05), the parameter will display as
"U01-U05", with an additional letter “U”.
2. Hit the pad to play the current kit.
Playing the Pads
Similar to an acoustic drum kit, the digital
drum responds differently to various playing
techniques and dynamics. All the pads are
velocity sensitive. And some voices change
timbre depending on the striking force.
Drum Pad Head or Rim shot
The pad detects head and rim shots (rim shots
trigger the rim voice).
Cymbal Bow shot and Choke
The cymbals detect bow shot.
Only the Crash1-2 and Ride cymbals have
cymbal choke. To mute the sound, Choking
the cymbals' edge with the hand immediately
after hitting the Crash1-2 or Ride.
Head
Head
Rim
17
EDK924M DRUM KIT MANUAL

Hi-Hat
The Hi-Hat sound varies depending on the position of Hi-Hat pedal.
Open Hi-Hat: Strike the Hi-Hat pad without
pressing the pedal.
Closed Hi-hat: Strike the Hi-Hat pad with the pedal
Pressed completely down.
Pedal Close: Press the pedal completely down
without striking the pad.
Splash: Press the pedal completely down and
release it immediately
Adjusting the Sensitivity of a Pad
You may wish to adjust the sensitivity of the pads
according to your playing style and
desired dynamic range.
1. Press the [UTILITY] button.
The UTILITY' led will be ON.
2. Strike a pad or press [+] or [-] button
to select a pad or cymbal you want to adjust .
The digit tube shows the selected pad.
3. Press the [MENU] button twice to SENSITIVITY
submenu.
4. Press the [+] or [-] button to adjust the sensitivity.
(The sensitivity range is from 1 to 16).
5. After the sensitivity is adjusted, it will be saved
automatically.
18
EDK924M DRUM KIT MANUAL

Metronome/CLick Feature
Press CLICK button to Start/Stop Metronome function,
The click LED will flash accordingly when metronome
is Working.
Press Menu button to “Click” submenu,
Press once - Time signature
Press twice - Interval
Press three times - Volume
Then press the [+] or [-] button to set the time signature
interval and volume.
Time signature: 1~9/2, 1~9/4, 1~9/8, 1~9/16
Volume of metronome: 0~31
Adjusting the Tempo
You can adjust the tempo of the Metronome,
the current song, and the current coach practice.
1. Press the [TEMPO] button.
2. Press the [+] or [-] button to adjust the
current tempo.
Note: If there's no operation in 3 seconds, it will return to the previous
menu page automatically.
Time signature
Interval
Volume
Tempo
19
EDK924M DRUM KIT MANUAL

EDITING AND SAVING A DRUM KIT
In module, you can modify the parameters as you like and save to the
selected user kit.
Adjusting the Volume of a Drum Kit
1. Press the [KIT] button, press the [+] or [-]
button to select the kit you want to edit.
2. Press the [MENU] button once to
Volume page.
3. Press the [+] or [-] button.
Adjust the kit volume.
Volume: 0~31
Selecting Voice for Pad or Cymbal
1. Press the [VOICE] button.
2. Strike a pad or press [+] or [-] button
to Voice Page select the pad or
cymbal you want to adjust.
3. Press the [MENU] button to
Voice page.
4. Press the [+] or [-] button to select
the voice you like for the pad
you chose.
Voice List is at the page 24
Adjusting the Volume of the Pad
1. Press Voice button
2. Press the [MENU] button to
Volume page.
3. Press the [+] or [-] button.
Adjust the voice volume of pad
(range 0-31)
Volume
Pad
Voice Page
Volume
20
EDK924M DRUM KIT MANUAL
Table of contents
Other Artist Guitars Drum manuals