ARTRED AR-55 User manual

AR-55
Walk behind floor
Scrubber
ARTRED
SCRUBBER-DRYER
Company: Reddot Equipment Limited
Manufacturer: ARTRED smart tech co. ltd.
Factory add.: Room 101 Building 5 Lingfeng Street Xiaquan Village Anji
county Huzhou Zhejiang
Tel.: (+0571) 85889355
Fax: (+0571) 85809866
Owner’s Guide

This Guide provides necessary instructions on machine operation and
maintenance.
Before operation or use of this machine, please carefully read and understand
this Guide.
When ordering the replacement parts, please refer to the spare and accessory
parts manual attached to the machine. Before matching parts or accessories,
please firstly determine your machine model and serial number. You can order
parts and accessories from any authorized service center or dealer by telephone
or mail. This machine can provide excellent service. If the following can be
further done, the optimum efficiency can be obtained with the lowest cost:
Carefully operate the machine.
Maintain the machine according to the maintenance instructions provided
in the operation manual.
Use the OE or same-grade parts for maintenance.
Protect the environment
Please abandon the old machine components such as
packaging material, battery, etc. and toxic liquid such
as anti-freezing agent and oil according to your local
regulations on waste disposal and on the premise of
maintaining the environmental safety.
Please ensure to carry out the recycling well.
Machine Information
Please fill in when installing for future reference.
Model number-
Machine number-
Machine option-
Sales representative-
Tel. of sales representative-
Customer ID-
Installation date-

Content Precautions
This machine is suitable for industrial and commercial use and specially used
Precautions............................................................................................................
3
Instructions on Machine Operation.......................................................................
5
Reception of Machine............................................................................................
6
Machine Unpackaging......................................................................................
6
Battery Installation............................................................................................
6
Machine Cleaning Method....................................................................................
7
Information on Brush and Scouring Pad...............................................................
7
Machine Installation.............................................................................................
8
Installation and Connection of Squeegee Component......................................
8
Installation of Brush/Scouring Pad...................................................................
8
Machine Operation...............................................................................................
8
Pre-operational Examination............................................................................
8
Machine Operation...........................................................................................
9
Machine Operation Duration............................................................................
9
Battery Coulombmeter....................................................................................
10
Drainage of Water Tank......................................................................................
10
Drainage of WasteWater Tank........................................................................
10
Drainage of Clean Water Tank........................................................................
10
Battery Charging.................................................................................................
10
Machine Maintenance.........................................................................................
11
Daily Maintenance..........................................................................................
11
Monthly Maintenance.....................................................................................
12
Quarterly Maintenance...................................................................................
12
Machine Transport..............................................................................................
12
Machine Storage.................................................................................................
13
Troubleshooting..................................................................................................
13
Machine Parameters...........................................................................................
14
for cleaning indoor hard floor instead of other purposes. Please use the
suggested scouring pad and brush as well as the commercially available floor
cleaner suitable for this machine.
All operators must read, understand and observe the following safety
precautions.
The following are explanation for safety warning signs and [for safety]
headlines used in this Guide:
Warning: for warning of risks possibly causing personnel injury or death or
unsafe operations.
For safety: point out matters which must be observed when using the machine
to guarantee safety.
If the following warnings are not observed, it may cause: personnel injury,
electric shock, fire or explosion.
Warning: fire or explosion hazard:
-Do not use flammable liquid; do not operate the machine close to or in the
place where there is flammable liquid, air or dust.
This machine is not equipped with explosion-proof motor. If this machine is
used in the place where there is flammable air, liquid or dust, electric motor
may generate spark during the start and operation, which may cause flash fire or
explosion.
-Please do not pick up flammable materials or reactive metals.
-The battery releases hydrogen. Please be away from spark or open fire. The
battery cabin must be kept open when charging.
Warning: Electric shock hazard. Please firstly disconnect the battery wring
before maintaining the machine.
Warning: Operation of rotary brush. Do not get close with hands. Please turn
off the power before maintaining the machine.
The following information explains the conditions causing potential dangers to
the operators or equipment:
For safety:
1.
Please do not operate the machine:
-when contacting flammable liquid or getting close to flammable air, otherwise
it may cause explosion or flash fire.
-unless being trained and authorized to operate the machine.
-unless having read and understood the operation manual.
-unless in the conditions of correct operation.
2.
Before starting the machine:
-Please ensure that all safety equipment have been in place and operated
correctly.

3.
When using the machine:
-please walk slowly when encountering the slope and sliding surface.
-please wear anti-skid shoes.
-Please slow down when turning.
-report immediately when the machine is broken or the operation fails.
-do not let the children play on or around the machine.
-observe the mixing ratio and processing instructions on the chemical vessel.
4.
Before leaving or maintaining the machine:
-stop and place the machine on the stable ground.
-shut down the machine.
5.
When repairing the machine:
-avoid moving the parts. Please do not wear loose jacket, shirt or oversleeve.
-before operating the machine, please firstly disconnect the battery wiring.
-when treating battery or battery wiring, please wear protective gloves and eye
protectors.
-avoid contacting battery liquid acid.
-please do not spray this machine with high pressure or flush this machine with
water pipe.
-use the replacement parts provided or recognized by the manufacturer.
-all maintenance must be carried out by qualified maintenance personnel.
-please do not revise the original design of the machine.
6.
When transporting the machine:
-please shut down the machine.
-please do not transport the machine with the battery on.
-please transport the machine with the aid of the others.
-please use the suggested handling apron when handling the machine from the
truck or trailer.
-use the rope to fix the machine on the truck or trailer.
-lower the brush head to the lower position.
Instructions on Machine Operation

Reception of Machine
Machine Unpacking
1.
Please carefully check whether there is damage on the packing box of the
machine. If there is, please immediately reflect to the carrier.
2.
Check the freight list, if there is any omission, please contact the distributor.
Freight content:
3.
Carefully install the battery in the battery cabin and connect the battery cable
according to the following figure
Two 12V batteries - standard configuration
One 24V battery charger - standard configuration
One water-absorbing adhesive tape - standard configuration
One scrubbing brush - standard configuration
Other accessories - additionally purchased
Note: Please do not throw the battery into the battery cabin so as to avoid the
damage to the battery and the machine.
4.
Before connecting the battery, please firstly ensure whether the electrodes
and electric terminals are clean. Use electrode cleaning fluid and wire brush as
required.
3. Before unpacking the machine, please dismantle the cargo fixed parts and
ropes fixing the machine on the warehouse. Carefully unload the machine from
the warehouse with the aid of the others.
Note: If no handling apron is used, please do not push the machine directly so
Explanation: Paint a thin layer of metal-free lubricating oil or protective spray
on the connected wiring to avoid battery corrosion.
5. After the battery is installed, please check the scale of thebattery
coulomb meter. Charge the battery as required.
as to avoid machine damage. Machine Cleaning Method
Cleaning method:
Note: To avoid machine damage, please install the battery after unloading the
machine from the warehouse.
Battery Installation
Warning: fire or explosion hazard. The battery releases hydrogen. Please be
away from spark or open fire. The battery cover must be kept open when
charging.
For safety: Please wear protective gloves and eye protectors when treating the
battery and battery wiring when repairing the machine. Avoid contacting the
battery liquid acid.
1.
Stop and place the machine on the level ground and take out the key.
2.
Lift up the waste water tank to expose the touchable battery cabin.
Manually control the water valve to adjust the volume of the cleaning liquid
(water and detergent) flowing to the ground. The brush cleans the floor with the
solution mixing detergent and water. While the machine advances, absorb the
waste water on the floor with squeegee into the waste water tank.
Information on Brush and Scouring Pad
To ensure the optimum efficiency, please use the correct type of brush for
cleaning. The brush and scouring pad suggested for use are as follows:
Soft nylon brush (white) -
It is suggested to clean the coated floor without damaging the floor. Clean
without scratches.
Polishing pad (white) -
It is used for maintaining highly smooth or polished floor.
Crash pad (red) -
It is used for scrubbing slight dirt without damaging the floor.
Gravity folding pad (black) -
It is used for powerfully removing the heavy coating or base or super-powerful
scrubbing.
Blue
Red

Machine Operation
Machine Installation
Installation and Connection of Squeegee Component
1.
Stop and place the machine on the level ground and take out thekey.
2.
Lower the lifting rod of the squeegee to the lower position.
3.
Install the squeegee to the squeegee installation bracket as shown in the figure.
Ensure to fully place the fastening knob into the jack and then tighten the knob.
4.
Connect the vacuum suction pipe to the squeegee component.
5.
Examine the squeegee adhesive tape and reasonably adjust.
Installation of Brush/Scouring Pad
Explanation: As for the brush and scouring pad suggested for use, please
refer to the section of [Information on Brush and Scouring Pad] in this Guide or
consult your local authorized dealer.
1.
Stop and place the machine on the level ground and take out thekey.
2.
Step on the brush head lifting pedal to lift up the brush head from the ground.
3.
Place the scouring pad on the holder and then install the drive disc. Fasten the
central lock to fix the scouring pad.
4.
Align the holder/brush installation stud at the motor drive disc buckle and
press the motor switch of the brush.
5.
If the holder and brush are to be dismantled, step on the brush head lifting
pedal to lift up the brush head from the ground, press the motor switch of the
brush.
Machine Operation
For safety: Please do not operate this machine before reading and understanding
the operation manual.
Warning: fire or explosion hazard. Do not operate the machine close to or in
the place where there is flammable liquid, air or dust.
Pre-operational Examination
□Clean the dust on the ground.
□Check the scale of the battery coulomb meter. (refer to the
battery coulomb meter)
□Check the abrasion conditions of the scouring pad/brush.
□Check the abrasion conditions of the squeegee adhesive tape and reasonably
adjust the angle.
□Confirm that the waste water tank is blank and has been equipped with clean
floating filter screen.
1.
Switch the key of the main power supply to the position of (Ⅰ).
2.
Pull down the squeegee lifting rod to lower the squeegee component to the
ground.
3.
Step on the brush head lifting pedal to lower the brush head to theground.
4.
Switch on the clean water control knob.
5.
Press the motor switch of the brush and press the switch of water suction
motor.
6.
Motor drive model: adjust the speed control knob to the cleaning speed
required by you.
Explanation: It is suggested to use the cleaning speed of 45-60 meters/min.
Machine Operation Duration
Warning: fire or explosion hazard. Please do not pick up flammable materials
or reactive metals.
1.
Each cleaning path overlaps by 5cm.
2.
Let the machine advance constantly to avoid ground damage.
3.
If there is drag mark on the ground after the squeegee absorbs water, remove
the waste with duster cloth wiping adhesive tape. Clean in advance to prevent
drag mark.
4.
Do not operate the machine on the slope with a slope over 5% (3°).
5.
If there is too much foam, it is suggested to pour the used defoaming
solution into the waste water tank.
Note: Do not let the foam enter the filter screen so as to avoid damage to
vacuum motor. The foam will make the switch of the filter screeninvalid.
6.
Use double cleaning method to clean the extremely dirty area. Lift up the
squeegee firstly for cleaning, sink with solution for 3-5 min, lower the squeegee
for re-cleaning.
7.
Replace or rotate the scouring pad as required.
8.
Observe the power consumption of the battery coulomb meter (refer to
the battery coulomb meter).
9.
Observe the residual liquid amount through the liquid meter of the clean
water tank. In traditional scrubbing method, the consumption for each 10 min is
about 10l.
10.
When the solution in the clean water tank is used up, empty the waste water
tank firstly, then re-pour the solution.
11.
When the staff leaves the machine, stop and place the machine on the level
ground and take out the key.
12.
After cleaning, carry out daily maintenance procedure.
□Check the abrasion conditions of the skirt section of the brush head.

Battery Coulombmete
The battery coulombmeter will display the power quantity of the battery. When
the battery is full of power, all indicator lights will be on. Along with the
consumption of the power quantity, the indicator lights will go out from the right
to the left. To prolong the life of the battery, do not let the indicator lights go out
to below the following power consumption.
Explanation: To prolong the life of the battery, please ensure to charge the
battery after the total use time of the machine exceeds 30min.
Drainage of Water Tank
After each use, the waste water tank shall be drained and cleaned. The clean water
tank shall be periodically cleaned to remove any corroded parts. Carry the
machine to the drainage place, switch off the key of the power supply, and drain
the water according to the following drainage instructions: for safety: please stop
and place the machine on the level ground and shut down the machine and take
out the key before leaving or maintaining the machine.
Drainage of Waste Water Tank
1.
Unscrew the drain pipe cover of the waste water tank counterclockwise and
take it down.
2.
Open the cover of the waste water tank and flush the water tank.
3.
Dismantle and flush the floating filter screen in the waste water tank.
Battery Charging
Safety regulations for handling acid batteries
Park the scrubber securely before carrying out any work on the batteries.
Maintenance personnel : Batteries may only be charged, serviced or replaced
by trained personnel .The present operator manual and the manufacturer ’s
instructions concerning batteries and charging stations must be observed
when carrying out the work.
Fire protection :
Smoking and naked flames must be avoided when working with batteries.
Wherever a scrubber is parked for charging there shall be no inflammable
material or operating fluids capable of creating sparks within 2 meters around
the scrubber.
The area must be well ventilated.
Fire protection equipment must be provided.
Protection against electric shock:
Battery has high voltage and energy.
Do not bring short circuit.
Do not approach tools to the two poles of the battery,which can cause the
sparkle.
Charging the battery
To charge the battery, the scrubber must be parked in a closed and properly
ventilated room. When charging, the tops of the battery cells must be exposed
to provide sufficient ventilation.
Do not place any metal objects on the battery.
Before charging, check all cables and plug connections for visible signs of
damage.
Before start and finish charging to make sure power is turn OFF.
It is essential to follow the safety regulations of the battery and charging
station manufacturers.
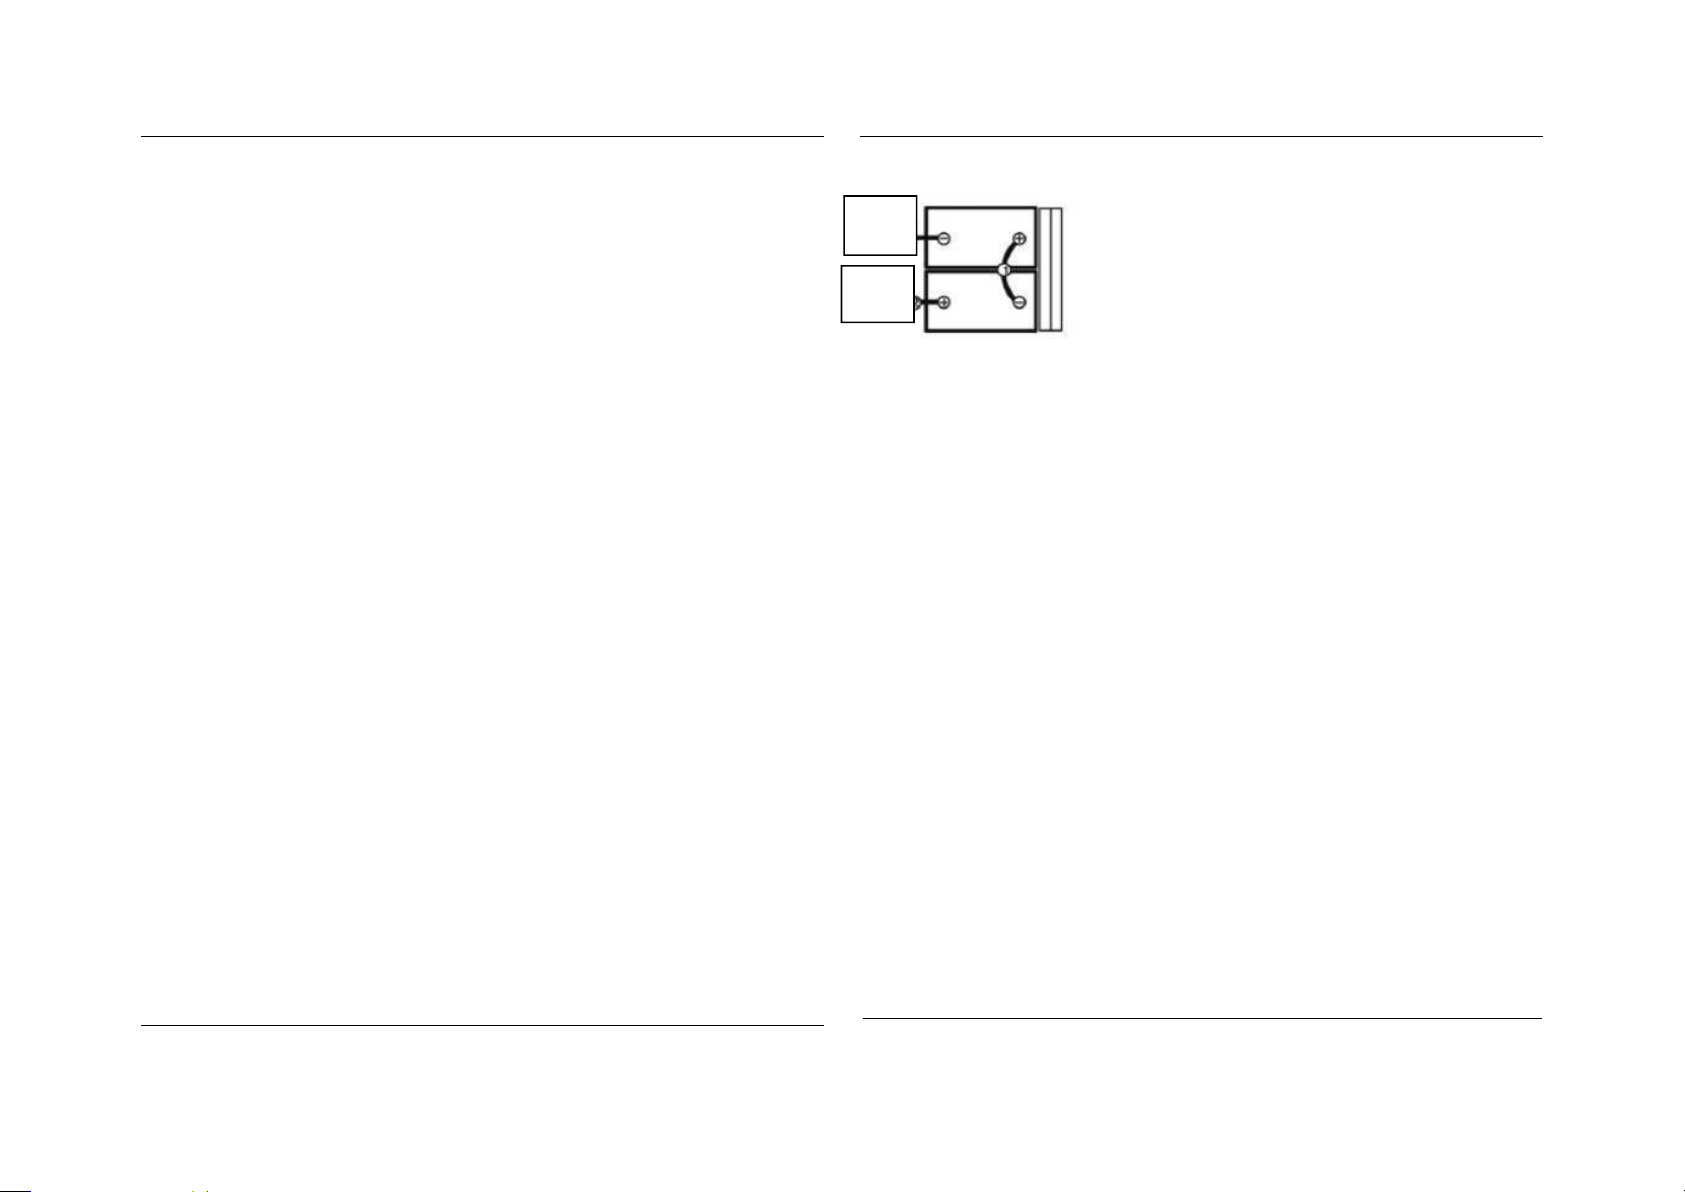
Charging step:
1.Place the charger and the machine in a well-ventilated place.
2.Turn off the power of the machine.
3.Insert the DC output terminal of the charger into the charging port of the
machine make sure the charger terminal engaged with charging port
completely.
4.Plug the AC power cord of the charger into a well-grounded power outlet.
5.When charging is completed, first unplug the ice dragon connected to the
AC power supply, and then unplug the output end of the charger from the
machine.
Warning!
Do not use dry cloth or fibre cloth to clean the battery,avoiding static to
bring the explosion.
Unfixing battery plug.
Cleaning with wet cloth.
Wearing glasses for protecting eyes rubber overshoes and rubber glove
Charger safety regulation
Do not disassemble the machine for repair or debugging without
authorization.Repair shall be done by professional personnel only.
To lengthen or replace the output cable is prohibited.
AC power socket shall match the plug of the charger and they are required to
be connected correctly.
Battery Disposal
Batteries may only be disposed of in accordance with national environmental
protection regulations or disposal laws.The
manufacturer’s disposal instructions must be followed.
Batteries contain an acid solution which is poisonous and corrosive
Therefore , always wear protective clothing and eye protection when carrying
out work on batteries . Above all avoid any contact with battery acid.
Nevertheless, should clothing, skin or eyes come in contact with acid the
affected parts should be rinsed with plenty of clean water-where the skin or
eyes are affected call a doctor immediately. Immediately neutralise any
spilled battery acid.
Only batteries with a sealed battery container may be used.
The weight and dimensions of the battery have considerable affect on the
operational safety of the scrubber. Battery equipment may only be
replaced with the agreement of the manufacturer.

Warning:
1.
Move the machine to the place with good ventilation for charging. fire or
explosion hazard. The battery releases hydrogen. Please be away from spark or
open fire. The battery cabin must be kept open when charging.
2.
Stop and place the machine on the level ground and turn the key to the close
position.
3.
Before charging, check the electrolyte level in each battery unit.
For safety: Please wear protective gloves and eye protectors when treating the
battery and battery wiring when repairing the machine. Avoid contacting the
battery liquid acid.
4.
When charging, please open the side of the waste water tank to
facilitate ventilation.
5.
Plug the AC (alternating current) power cord of the charger to the
power socket with sound grounding.
6.
Plug the DC (direct current) power cord of the charger to the battery
charging socket behind the waste water tank.
Warning: fire or explosion hazard. The battery releases hydrogen. Please be
away from spark or open fire. The battery cabin must be kept open when
charging.
5.
After the charging is completed, recheck the electrolyte level.
Machine Maintenance
Only by indeed following daily, weekly and monthly maintenance
procedure can the machine be kept in the optimum working state.
Warning: Electric shock hazard. Please firstly disconnect the battery wring
before maintaining the machine.
Daily Maintenance (after each use)
1.
Drain and clean the waste water tank
2.
Dismantle and flush the floating filter screen in the waste water tank
3.
Drain the clean water tank and flush the water tank with hot water of
no higher than 60℃as required
4.
Dismantle the scouring pad/brush for cleaning. If there is any
abrasion, overturn or replace the scouring pad
5.
Wipe the squeegee adhesive tape. Place the squeegee component in the
rising position to avoid damage to adhesive tape.
6.
Check the abrasion conditions of the scraper edge of the squeegee
adhesive tape. If there is any wear and tear, exchange two sides of the
adhesivetape.
7.
Use multi-purpose detergent and wet cloth to wipe the machine. For safety:
please do not spray this machine with high pressure or flush this machine with
water pipe when cleaning the machine to avoid failure of electronic component.
8.
Check the abrasion conditions of the skirt side of the brush head and
replace it if there is any wear and tear or damage.
9.
Charge the battery. To prolong the life of the battery and ensure the
optimum efficiency of the machine, the battery must be charged after the use
time of the machine exceeds 30min.

Quarterly Maintenance
Examine the abrasion conditions of the carbon brush of drive motor (drive
model), vacuum motor and brush motor every 250 hours. When the abrasion
length of the carbon brush is within 10mm, the carbon brush needs to be
replaced. If it is required to deliver the machine for maintenance, please contact
with the authorized service center.
Warning: Electric shock hazard. Please firstly disconnect the battery wring
before maintaining the machine.
Machine Transport
When transporting the machine with truck or trailer, please ensure to following
the following binding procedure:
1.
Lift up the brush head to the transport position
2.
Use the suggested handling apron to load and unload the machine.
3.
Lean the front of the machine closely against the front part of the truck or
trailer. When the machine is placed properly, lower down the brush head and
turn the key to the close position.
4.
Place blocks behind each driving wheel to prevent the machine from sliding.
5.
Use the rope to fix the top of the machine to prevent titling. You must install
bracket on the sweeping board of the truck or trailer. For safety: when
transporting the machine, please use the suggested handling apron
whenMachine Storage
1.
Please charge the battery before storage. Do not store the battery with
the power running out.
2.
Drain and flush thoroughly the bottom of teh water tank.
3.
Store the machine in a dry palce and the brush head shall be kept in the
rising position.
4.
Open the cover of the waste water tank. Note: Don not let the
machine subject to the rain and store it indoor.
5.
If the machine is stored in a cold environment, please indeed drain all liquid
in the machine.
Troubleshooting
Problem
Reason
Solution
The machine
can not be
operated
The battery has no power
Charge the battery
The battery fails
Replace the battery
The battery wiring is loose
Fasten the battery wiring
The main fuse blows out
Replace the fuse
The brush
motor does
not work
The brush head rises up from the ground
Lower down the brush head
The battery coulombmeter is locked and not
started
Charge the battery
The breaker of the brush motor circuit triggers
blackout
Reset the button of the breaker of the
brush circuit
The brush (upper/lower) switch fails
Please contact with the service center
The carbon brush of the motor wears
Please contact with the service center
The vacuum
motor does
not work
The squeegee rises up from the ground
Lower down the squeegee
The fuse of the vacuum motor blows out
Replace the fuse
The vacuum motor or wiring fails
Please contact with the service center
The carbon brush of the motor is worn
Please contact with the service center
A little or no
water flows
out
The filter or solution pipe of the clean water
tank is blocked
Clean the filter of the clean water tank
The speed of the flow control knob is set too
low
Adjust the water control knob
The screw of the control knob is loosened
Lubricate the knob and then fasten the
screw
The waste
water
recovery rate
is low
The waste water tank is full
Drain the waste water tank
The water-absorbing adhesive tape is worn
Replace the water-absorbing adhesive tape
The water suction pipe is blocked
Remove the blocked scraps
The sealing strip of the waste water tank is
damaged
Replace the sealing stripe
The vacuum motor fails
Please contact with the service center
The running
time shortens
The battery has flaws
Replace the battery
The battery charging fails
Repair or replace the charger
handling the machine from the truck or trailer and use the rope to fix the
machine on the sweeping board.

ARTRED SCRUBBER-DRYER
Technical Parameters
Parameters of AR-55 Ride behind Scrubber
Warranty Card of Series Products Card No.:
User Name: Telephone No.:
Address:
Postcode:
Purchase Date: Invoice No.:
Item No.: Serial No.:
Spare Part:
Trouble Description:
Signature of Dealer
1.
This document will be confirmed under the signature of dealer.
2.
This document have two copies will be kept by the customer and the dealer.
Receive warranty with the purchase voucher, thank you for cooperation!
Technical parameter
Unit
AR-55
Productivity
m2/h
2350
Squeegee width
mm
810
Cleaning width
mm
550
Clean water tank
capacity
L
60
Waste water tank
capacity
L
50
Working votage
v
24V/100AH
Brush motor
w
550
Vacuum motor
w
370
Brush pressure
Kpa
18-31
Noise level
dB(A)
60
Brush speed
Rpm
220
Machine weight
kg
68.5(no battery)
Dimension
mm
1190*640*1010
Working hours
h
4-5

ARTRED SCRUBBER-DRYER
Warranty Card of Series Products Card No.:
User Name: Telephone No.:
Address:
Postcode:
Purchase Date: Invoice No.:
Item No.: Serial No.:
Spare Part:
Trouble Description:
3.
This document will be confirmed under the signature of dealer.
4.
This document have two copies will be kept by the customer and thedealer.
Receive warranty with the purchase voucher, thank you forcooperation!
Certificate of Test Approval
Cable: ☑Charger: ☑
Batteries: ☑Switch: ☑
Outside: ☑Fittings: ☑
Speed: ☑Control: ☑
Fuselage: ☑Operation: ☑
Manual: ☑Packing: ☑
QC by: ☑Date: □
Customer acceptance: □Date: □
After the customer acceptance, please submit this card to the local agent.
All the cleaning equipment provided by this company have passed the ex-
factory acceptance test with good performance. To ensure no loss will be caused
during the transport, the equipment will be tested by local dealer before sales.
Please read the explanation before use.
Receive warranty with the purchase voucher, thank you for cooperation!
Signature of Dealer
Table of contents
Other ARTRED Scrubber manuals
Popular Scrubber manuals by other brands

JOHNY VAC
JOHNY VAC JVC70RIDER Operator's manual

U.S. Products
U.S. Products ADVANTAGE-100H-SC Information & operating instructions

Nacecare
Nacecare TTV 678-300T Owner's instructions

R.P.S. Corporation
R.P.S. Corporation MAGNUM series Service manual

Matco Tools
Matco Tools SBJE1 quick start guide

Numatic
Numatic TGB1620T Owner's instructions