Artusi Alfresco ABS1 User manual

ALFRESCO KITCHEN
ABS1 &ABS2
ASSEMBLY MANUAL
APPLIANCES
FOR LIVING

2
IMPORTANT - PLEASE CHECK FOR ANY DAMAGED ASSEMBLY PARTS OR
COMPONENTS BEFORE ASSEMBLY AND CONTACT ARTUSI IMMEDIATELY.
ASSEMBLY REQUIRES 2 PEOPLE MINIMUM. !CONTENTS ARE HEAVY!
KNOWLEDGE OF TOOLS AND CORRECT USE IS REQUIRED FOR ASSEMBLY
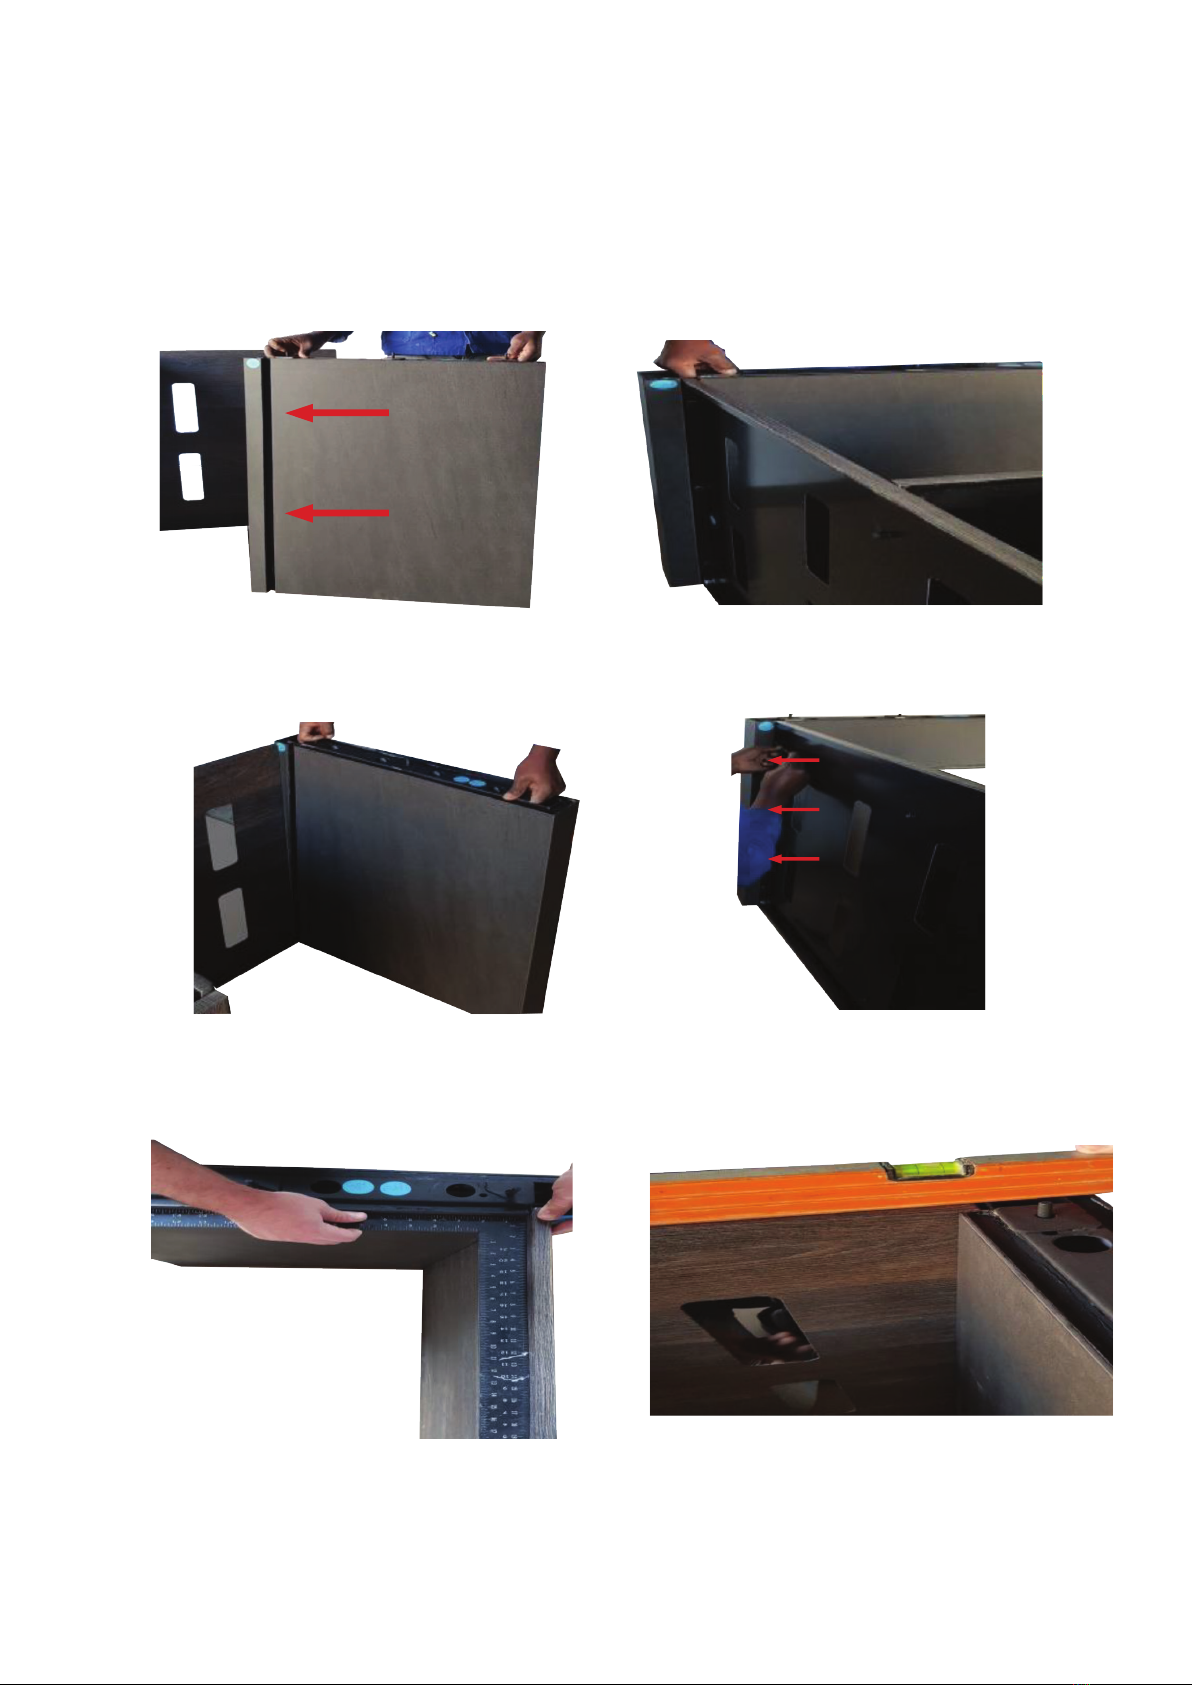
• RighthandsideCabinetPanel(1)
• LefthandsideCabinetPanel(1)
• CabinetDoor(1)
• CabinetBase(1)
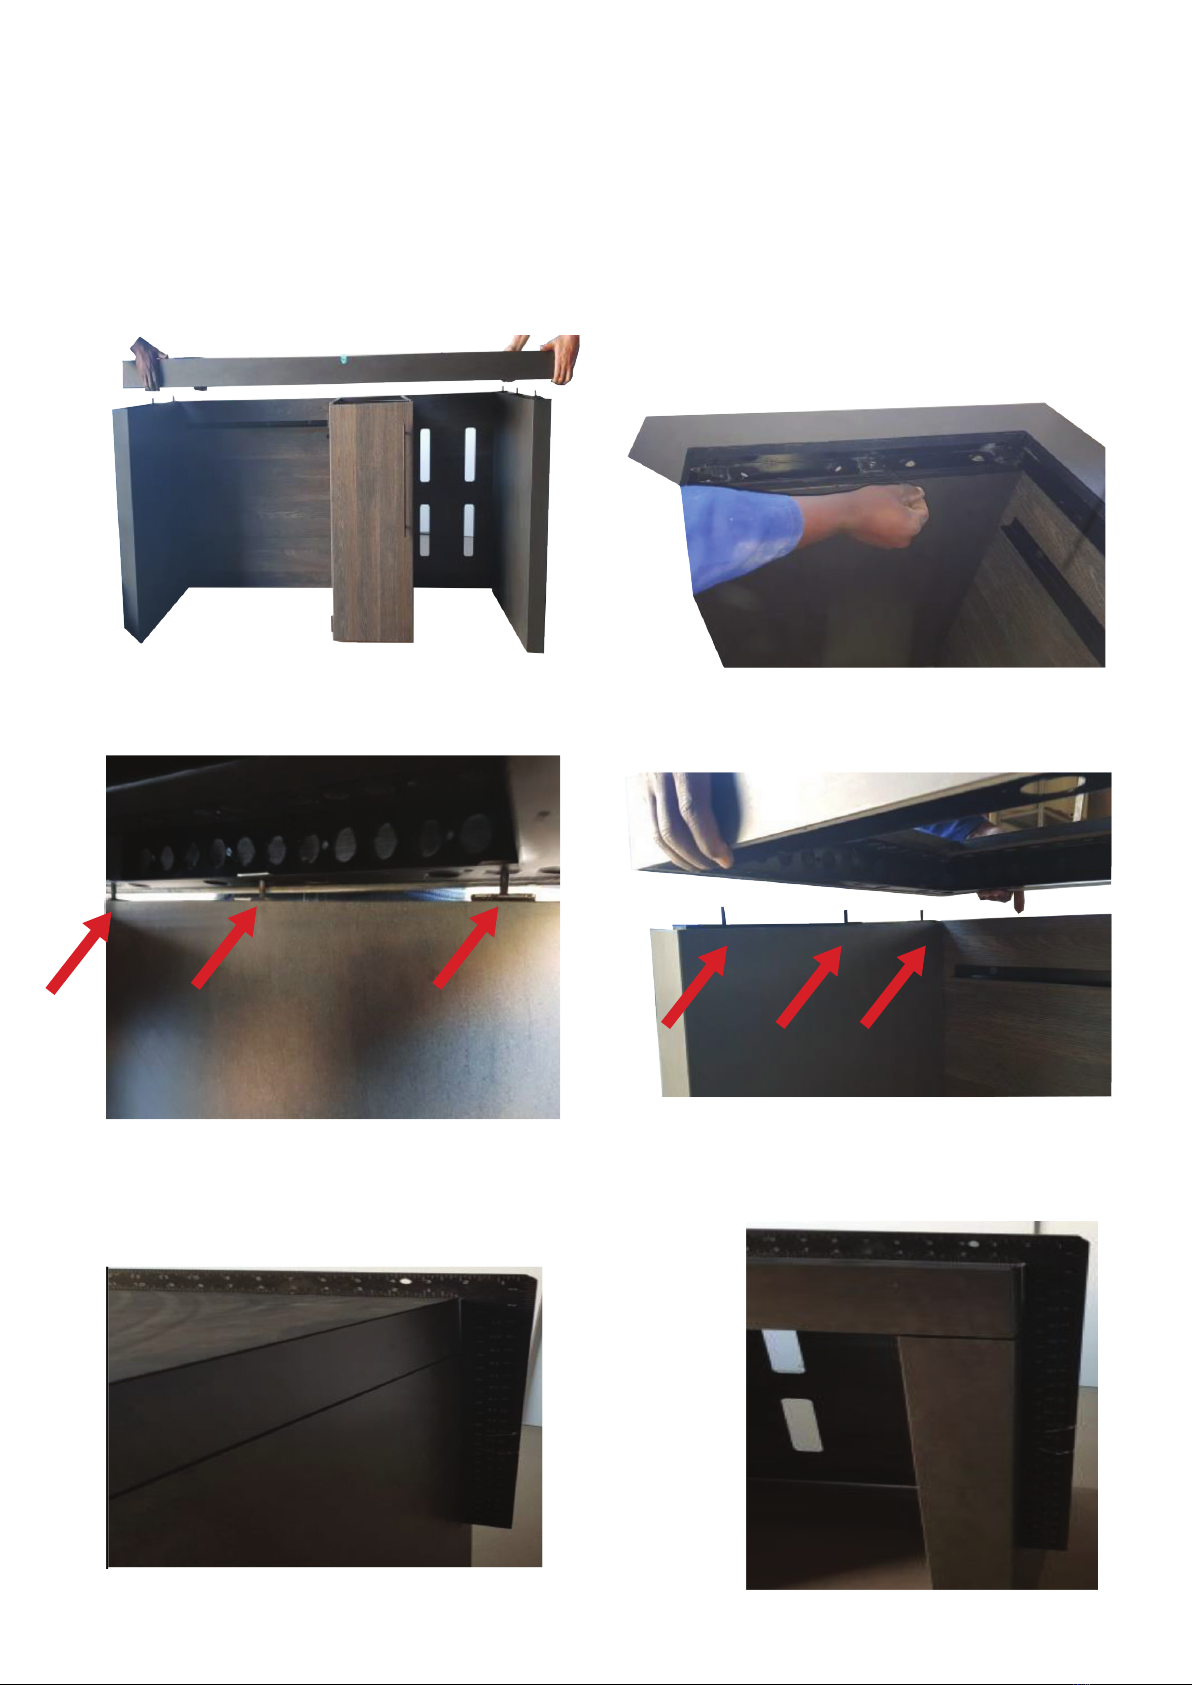
• Cabinettopsupportbrace(1)
• Righthandsidedriptrayslider(1)
• Lefthandsidedriptrayslider(1)
• Reardriptrayslider(1)
• Driptray(1)
• NeolinthStoneheatshield(1)
• RighthandbookendsideNeolinthStoneleg(1)
• LefthandbookendsideNeolinthStoneleg(1)
• NeolinthStonebenchtopwithBBQandsinkhole(1)orNeolinthStonebenchtopwithBBQhole(1)
• Rearvanitypanelwithbreathingslots(1)
• Assemblywashers,boltsandscrews
-M4Screws:2
-M6domecapbolts:7
-M8domecapbolts:20
-Washers:20
-SpringWashers:3
-DoorHinges:2
IF ANY OF THE ABOVE MENTIONED ARE NOT SUPPLIED, PLEASE CONTACT
ARTUSI IMMEDIATELY BEFORE ATTEMPTING INSTALLATION
WHAT TO EXPECT IN THE BOX
ABS1 ABS2

3
Righthandside
CabinetPanelref. #1
Lefthandside
CabinetPanelref. #2
CabinetDoor
ref. #3
Cabinettopsupport
braceref. #5
CabinetBase
ref. #4
NeolinthStonebenchtopwithBBQandsinkholeref. #13
orNeolinthStonebenchtopwithBBQhole(1)ref. #13
Rearvanitypanelwith
breathingslots(1)ref. #14
Righthandsidedrip
traysliderref. #6
Lefthandsidedriptray
sliderref. #7
Reardriptraysliderref. #8
Driptrayref. #9
NeolinthStone
heatshieldref. #10
Righthandbookendside
NeolinthStonelegref. #11
Lefthandbookendside
NeolinthStonelegref. #12

4
ASSEMBLY
Step 1
• CabinetTopSupportBrace#5.
• UsetwoxM8domecapboltswithflatwashers.
• Toattachthedoor,fitthehingesandthehandle(screwsnotsupplied).
• AttachtheRightHandSideCabinetPanel#1withtheholefacingtoptotheCabinetTop
SupportBrace#5
• UsetwoxM8domecapboltswithflatwashers.
ASSEMBLY
Step 2

5
ASSEMBLY
Step 3
• Ensurealledgesofabovecomponentsareflushwithcorrespondingedgesoncetightened.
• Turnthecabinetupsidedownandmountthebasecomponent#4totheleftandright
handsidepanels.
• UsefourxM6domecapboltswith1xflatwashereach.
ASSEMBLY
Step 4
Thisistheunderside
ofthecabinetbase
Bottomofdoor
Bottomofsidepanels

6
ASSEMBLY
Step 5
• Placevanitypanel#14upsidedownandattachtotheleftandrighthandsidecupboard
panelswhichmustalsobeupsidedown.
• UsefourxM8domecapboltswith1xflatwashereach.
Indicateswherebolts
arerequiredforfixing
KEY
Bottomofcabinet
Topofcabinet
Bottomofcabinet
Topofcabinet

7
ASSEMBLY
Step 6
• Rotateassembledcomponents,above,tillthey’reinthecorrectuprightposition.The
adjustablefeetofthebasepanelwillnotbeonthefloor.Adjustfeettotouchfloor.
Bottomofcabinet
Topofcabinet

8
ASSEMBLY
Step 7
• Lineupthevanitypanel#14withinthe‘U’channeloftherighthandsideleg#11
ensuringthetopofthevanitypanellinesupwiththetopoftheleg.
Vanitypanel#14toslide
intothegroovehereon
thebookendlegs
Tightenleg
topanel
usingM8
bolts
Vanitypaneland
legsmustbe
square.Raisefeet
tokeepinplace
• Repeatinstructions7&8usingthelefthandsideleg#12.
Ensurethatthetopofthevanitypanelis
inlinewiththetopgrooveontheleg
Step 8
Step 9

9
ASSEMBLY
Step 10
• Installreardriptrayslider#9tovanitypanelusingfourxcountersunkM8bolts-nowashers
• InstallRightHandSideDripTraySlider#6tolefthandsidecupboardpanelusingtwoxM6
countersunkbolts-nowashers
Step 11

10
ASSEMBLY
Step 12
• PlaceCeramicTopcomponent#13ontolocatingpinsoneachleg(3onthetopofeachleg).
• EnsuretopedgesarelinedupwiththelegsedgesandfastenthetopusingthreexM8dome
capboltsandonespringwasherforeachbolt.

11
ASSEMBLY
Step 13
• InstallLeftHandSideDripTraySlider#7totopoflefthandsidelegusingtwoxM8domecap
boltsand1xwashereach

12
ASSEMBLY
Step 14
• Fixventilationpanel/heatshield#10toundersideofthetoponthefrontusingthreexM8dome
capboltsandflatwashers

13
ASSEMBLY
Step 15
• FastensideofventilationpaneltolefthandsidecupboardpanelusingonexM6domecap
boltandflatwasher
Ensurethisboltis
fittedcorrectlyas
thiswillensurethe
structuralintegrity
ofthecabinet
Completethisstep
onbothsideofthe
ventilationpanel

14
ASSEMBLY
Step 16
• Slidedriptray#9intoposition

15
ASSEMBLY
Step 17
• InstallthedoorhandletothecupboarddoorusingtwoxdomecapM4screwsandflatwashers.

16
Warranty Card
Worldwide Appliances Pty Limited
A.B.N. 45868077422
Office:
48-50 Moore Street, Leichhardt N.S.W 2040
Post:
Locked Bag 3000, Annandale, N.S.W 2038
P: 1300 694 583
WARRANTY REGISTRATION
Yourongoingsatisfactionwithyourartusi
productisimportanttous.Weaskthatyou
completetheenclosedWarrantyRegistration
Cardandreturnittoussothatwehavearecord
oftheartusiproductpurchasedbyyou.
PRIVACY
WorldwideAppliancesrespectsyour
privacyandiscommittedtohandlingyour
personalinformationinaccordancewiththe
NationalPrivacyPrinciplesandthePrivacy
Act1988(Cth).AcopyoftheWorldwide
AppliancesPrivacyPolicyisavailableat
www.artusi.com.au.WorldwideApplianceswill
notdiscloseanypersonalinformationsetout
intheWarrantyRegistrationCard(“Personal
Information”)withoutyourconsentunless
requiredby:
1.law;
2.anyWorldwideAppliancesrelatedcompany;
3.anyserviceproviderwhichprovideservices
toartusiorassistartusiinprovidingservices
(includingrepairandwarrantyservices)to
customers.Ourpurposeincollectingthe
PersonalInformationis
tokeeparecordoftheartusiproductpurchased
byyou,inordertoprovideabetterwarranty
servicetoyouintheunlikelyeventthatthereis
aproblemwithyourartusiproduct.Worldwide
Appliancesmaycontactyouatanyoneormore
oftheaddress,emailaddressortelephone
numberssetoutintheWarrantyRegistration
Card.Pleasecontactartusion1300694
583shouldyounotwishtobecontactedby
WorldwideAppliances.
WARRANTY
Thebenetsprovidedbytheconsumer
guaranteesonthispageareinadditionto
otherrightsandremediesavailabletoyouasa
consumerundertheAustralianConsumerLaw
act.
Detailsofwhatiscoveredinyourwarranty:
EachofthecomponentsofyourABS1orABS2
Artusialfrescokitchencarriesspecicwarranty
conditionsdetailedbelow.
artusi.com.au
Thestonebenchcarriesawarrantyof25years,
underwrittenbyNeolith.
Allsteelelementscarryawarrantyof5years
againstmaterialfailure.
Whathappensifthereisaproblem?
If,whenyouun-boxyouritem/sthereisanissue
withanyofthepieces,pleasecontactArtusi
immediatelybeforeassemblingtheproductand
parts.
Artusiwillexaminetheproductanddecideifit’s
coveredunderthestandardproductwarranty.
Artusireservestherightto,eitherrepairthe
defectiveassemblycomponentorreplacethe
unitasatotal.Inthesecases,Artusiwillbe
responsibleforthecostsofthereplacement
oftheassemblycomponentsonly.Anyrepair
workormodicationtotheproductundertaken
independentlybytheconsumerorinstaller
withouttheconsultationornoticationtoArtusi
willresultinavoidofwarrantyfortheassembly
componentinquestion.Anydefectiveparts
removedinthecourseofrepairworkswill
becomethepropertyofArtusi.
Thisguaranteeappliestodomesticoutdoor
alfrescouseonlyandcoversallofthefollowing
partsoftheABS1andABS2alfrescokitchen:
•Cabinetframes
•Doorpanel
•Hinges
•Extendingdrawers
•Stonemoldings
•Bench-topandbookendlegs
•Vanitypanel
Notcovered:doorhandles,weatherdamage
resultinginirreparabledamageorrust.
Defects
Anypartofanartusiproductdeemedtobe
defectiveandreplacedbyWorldwideAppliances
isthepropertyofWorldwideAppliances.
WorldwideAppliancesreservestherightto
inspectandtestartusiproductsinorderto
determinetheextentofanydefectandthevalidity
ofaclaimundertheWarranty.
*Tolocateyourclosestartusiauthorisedservice
agentpleasecontactuson1300652100orvisit
www.artusi.com.au
ALL SERVICE CALLS MUST BE BOOKED
THROUGH AN AUTHORISED DEALER OR
WARRANTY DEPARTMENT ON 1300 694 583
121219

A
17
PleasecompleteandsendtoARTUSIat:REPLYPAID83617
LEICHHARDTNSW2040
LastName: FirstName:
Address:
State: Postcode: Email:
HomePhone: Mobile:
PurchaseDate://(Pleaseattachproofofpurchasetovalidatewarranty)
MODELNUMBER SERIALNUMBER
(ifyoucannotlocatetheserialnumberpleasecallARTUSIon1300694583)
1
2
3
4
WARRANTYREGISTRATIONCARD
121219
121219
Warranty Card continued artusi.com.au
Warranty Card tear off

A
ARTUSI.COM.AUP: 1300 649 583
NSW & ACT (HEAD OFFICE)
48-50 MOORE STREET
LEICHHARDT
F 02 8569 4699
QLD
1/42 CAVENDISH ROAD
COORPAROO
F 07 3397 0850
VIC, TAS & SA
1211 TOORAK ROAD
CAMBERWELL
F 03 9809 2155
WA & NT
UNIT 10/55 HOWE STREET
OSBORNE PARK
F 08 9201 9188
NZ
PO BOX 11.160
SOCKBURN CHRISTCHURCH
F 03 344 5906
ARTUSI OFFICES ARE OPEN DAILY FROM 9AM–5PM AND SATURDAYS 10AM–4PM
DISCLAIMER
Worldwide Appliances PTY LTD, trading as ARTUSI, is continually seeking ways to improve the design specifications, aesthetics and production
techniques of its products. As a result alterations to our products and designs take place continually. Whilst every effort is made to produce
information and literature that is up to date, this brochure should not be regarded as an infallible guide to the current specifications, nor does it
constitute an offer for the sale of any particular product. Product dimensions indicated in our literature is indicative only. Actual product only
should be used to define dimension cutouts. Distributors, and retailers are not agents of ARTUSI and are not authorised to bind ARTUSI by any
express or implied undertaking or representation.
This manual suits for next models
1
Table of contents
Popular Indoor Furnishing manuals by other brands

JWA
JWA ALAN 69641 Assembly instruction

Albini & Fontanot
Albini & Fontanot GENIUS 010T Assembly instructions

Baxton Studio
Baxton Studio Grover NAB-008-Cherry/White Assembly instructions

BLACK RED WHITE
BLACK RED WHITE Loft B156-RTV1D1S Assembly

OLG
OLG Ekosystem Meeting Table Assembly instructions

Emmezeta
Emmezeta TUZK221B Assembling Instruction

Hillsdale Furniture
Hillsdale Furniture MONTELLO 41544 quick start guide

Next
Next LARGE BARKLEY KING 655741 Assembly instructions

ME MARCKERIC
ME MARCKERIC ADAM 2P2C Assembly instructions

Gilis
Gilis Bebe Stars Moonlight Montessori 436-02 user manual

Mocka
Mocka Sadie Assembly instructions

glamour
glamour GHDSV-1402 Assembly instructions