manuals.online logo
Brands
  1. Home
  2. •
  3. Brands
  4. •
  5. ARX
  6. •
  7. Music Mixer
  8. •
  9. ARX MIX 8 User manual

ARX MIX 8 User manual

MIX 8 Owner's Manual v 2 CE ©2000 ARX® MIX 8 Owner's Manual v 2 CE ©2000 ARX®8
MIX 8
Multi-channel
stereo line mixer
OWNER’S
MANUAL
ARX Systems Pty Ltd, PO Box 15,
Cheltenham, Victoria 3192, Australia
Phone: 03 - 9555 7859 Fax: 03 - 9555 6747
InternationalFax:+61-3-95556747
On the Web:http://www.arx.com.au
Email:[email protected]
INTERNATIONAL LIMITED WARRANTY
ARX Systems (ARX) warrants to the first purchaser of any ARX equipment that it is
free from defects in materials and workmanship under normal use and service.
ARX’s sole obligation under this warranty shall be to provide, without charge, parts
and labour necessary to remedy defects, if any, which appear within twelve (12)
months from date of purchase, and for a further twelve (12) months supply parts only.
Thisis our onlywarranty. Itdoesnot coverfinishor appearanceitems, burnedvoice
coils, or if the equipment has been, in ARX’s sole judgement:
•Subjected to misuse, abuse, negligence or accident;
•Repaired, worked on, or altered by persons not authorized by ARX;
•Connected, installed, adjusted or used for a purpose other than that for which it was
designed. This includes running a speaker system with the ISC leads disconnected,
or with a non-ARX crossover, or with the wrong processor.
This warranty gives you and us specific legal rights and you may also have other
rights which may apply.
Warranty Service Procedure
Should it become necessary to have your equipment serviced under the
terms of the warranty, please follow these steps:
1. Call your ARX distributor for a Return Authorization (RA) number;
2. Carefully repack the unit, in its original packaging where possible,
including a note with a description of the problem, and a copy of
the receipt showing date of purchase. Attach these to the actual unit
itself. Don’t forget to write your name and address clearly, and
include a phone number where you can be contacted during normal
business hours. Make it easy for our service technicians to contact
you if they have a question. Also, use plenty of packing material -
better to be safe than sorry.
3. Send the unit freight prepaid to ARX Systems, at the address given
you with your RA number. We will pay the return freight when the
serviced unit is returned to you.
4. We strongly recommend you insure the package. We can’t fix it if it
gets lost! Send it by UPS, Fedex, or any similar service that can track
the package. Parcel Post is not recommended
If Warranty Registration Card is missing, please write to ARX in the country of
purchase, stating model and where purchased, or to ARX, PO Box 15, Cheltenham,
Victoria3192, Australia.
Or you can Email us at: [email protected]
MIX 8 Owner's Manual v 2 CE ©2000 ARX® MIX 8 Owner's Manual v 2 CE ©2000 ARX®
27
Mix 8 Specifications
Mode of operation 8:2 Stereo Line Mixer
Input Impedance
BalancedXLR/Jack 44 K Ohms
UnbalancedXLR/Jack 22 K Ohms
Phono (RCA) 10 K Ohms
Input Headroom +21dB
Output Level +27dB
Output Signal/Noise
(@ unity gain) -84dBunweighted
-89dB A weighted
Dynamic Range 111dB
Output Impedance 300 Ohms Balanced
150 Ohms Unbalanced
Frequency Response 20Hz-20 KHz ±0.5dB
Distortion (@ unity gain)100Hz.004%
1KHz .0042%
10KHz .006%
Input Connector Types Female XLR, Jack, RCA(phono)
Output Connector Type Male XLR
HeadphoneSection
Output Level (Max) 2 watts
Minimum Load 8 ohms
Level Control Pre Master Outputs, Pre Master Faders
Post Channel Faders
Connector Type Stereo Jack (Tip L, Ring R, Sleeve Gnd
PowerRequirements 100/120 V AC 50 - 60 Hz
220/240 V AC 50 - 60 Hz 8 Watts (8 VA)
Size 19”W x 6”D x 1¾”H, 482 x 155 x 44mm
Weight 2.2 Kg (5 lbs)
This symbol indicates that a Slow Blow fuse is used in this equip-
ment. Replace with same type and value only
This symbol is intended to alert you to the presence of uninsulated
dangerous voltage within the product's enclosure that may be of
sufficient magnitude to constitute a risk of electric shock.
This symbol is intended to alert you to the presence of important
operating instructions contained in this owner's manual
WARNING SYMBOLS USED ON THIS EQUIPMENT
IMPORTANT - PLEASE READ THIS FIRST
This is a dual voltage unit. It is essential that you check that the voltage on
the fuseholder cover below the AC connector on the rear of the chassis is
set correctly before connecting it to AC power.
To change, pull fuseholder out and rotate 180o, then push in again. Do not
insert power cable into unit until voltage has been correctly set. Do not plug
power cable into AC power until voltage has been correctly set
THIS IS SET FOR
100 V AC TO 120 V
AC OPERATION
THIS IS SET FOR
220 V AC TO 240 V
AC OPERATION
Complies with 89/336/EEC EMC Directive,
amended by 92/31/EEC and 93/68/EEC and
meets the following standards:EN 55013 :
1990, Sections 3.2 and 3.5 EN 55020 :
1988, Sections 4.3, 5.4, 6.2, 7.0, 8.0.
Complies with Australian Standard AS/N25
1053
MIX 8 Owner's Manual v 2 CE ©2000 ARX® MIX 8 Owner's Manual v 2 CE ©2000 ARX®45
Rear Panel Connectors
• Channels 1 - 8 Balanced combo XLR/Jack Input sockets.
Pin 2 HOT +, Pin 3 Cold –, Pin 1 GROUND: Tip +, Ring –, Sleeve Ground
• Channels 1 - 8 Unbalanced RCA (Phono) connectors
• RCA (Phono) connectors Enable switch
• Balanced XLR Output sockets, 2 per channel (same wiring as Input)
• IEC 3 pin AC connector and integral fuseholder. Replace fuse with
correct value only: 100 - 120 V AC 1 amp, 220-240 V AC 0.5 amp.
Please also refer to voltage details on Page 2
Front panel controls
• Input level controls for channels 1 through 8
• Pan controls for channels 1 through 8
• Numbered ‘scribble strip’ panels for labelling input assigns
• Master Left and Right Output controls
• Headphone level control and output socket
• AC mains power status LED
MIX 8 Owner's Manual v 2 CE ©2000 ARX® MIX 8 Owner's Manual v 2 CE ©2000 ARX®63
The MIX 8 from ARX is the ideal real-world interface for today’s 8 track
performance playback requirements, and the solution to all multi channel
line mixing needs. An 8 into 2 stereo line mixer with individual level con-
trols, pan controls, internal RF filters, and a stereo headphone output for
monitoring.
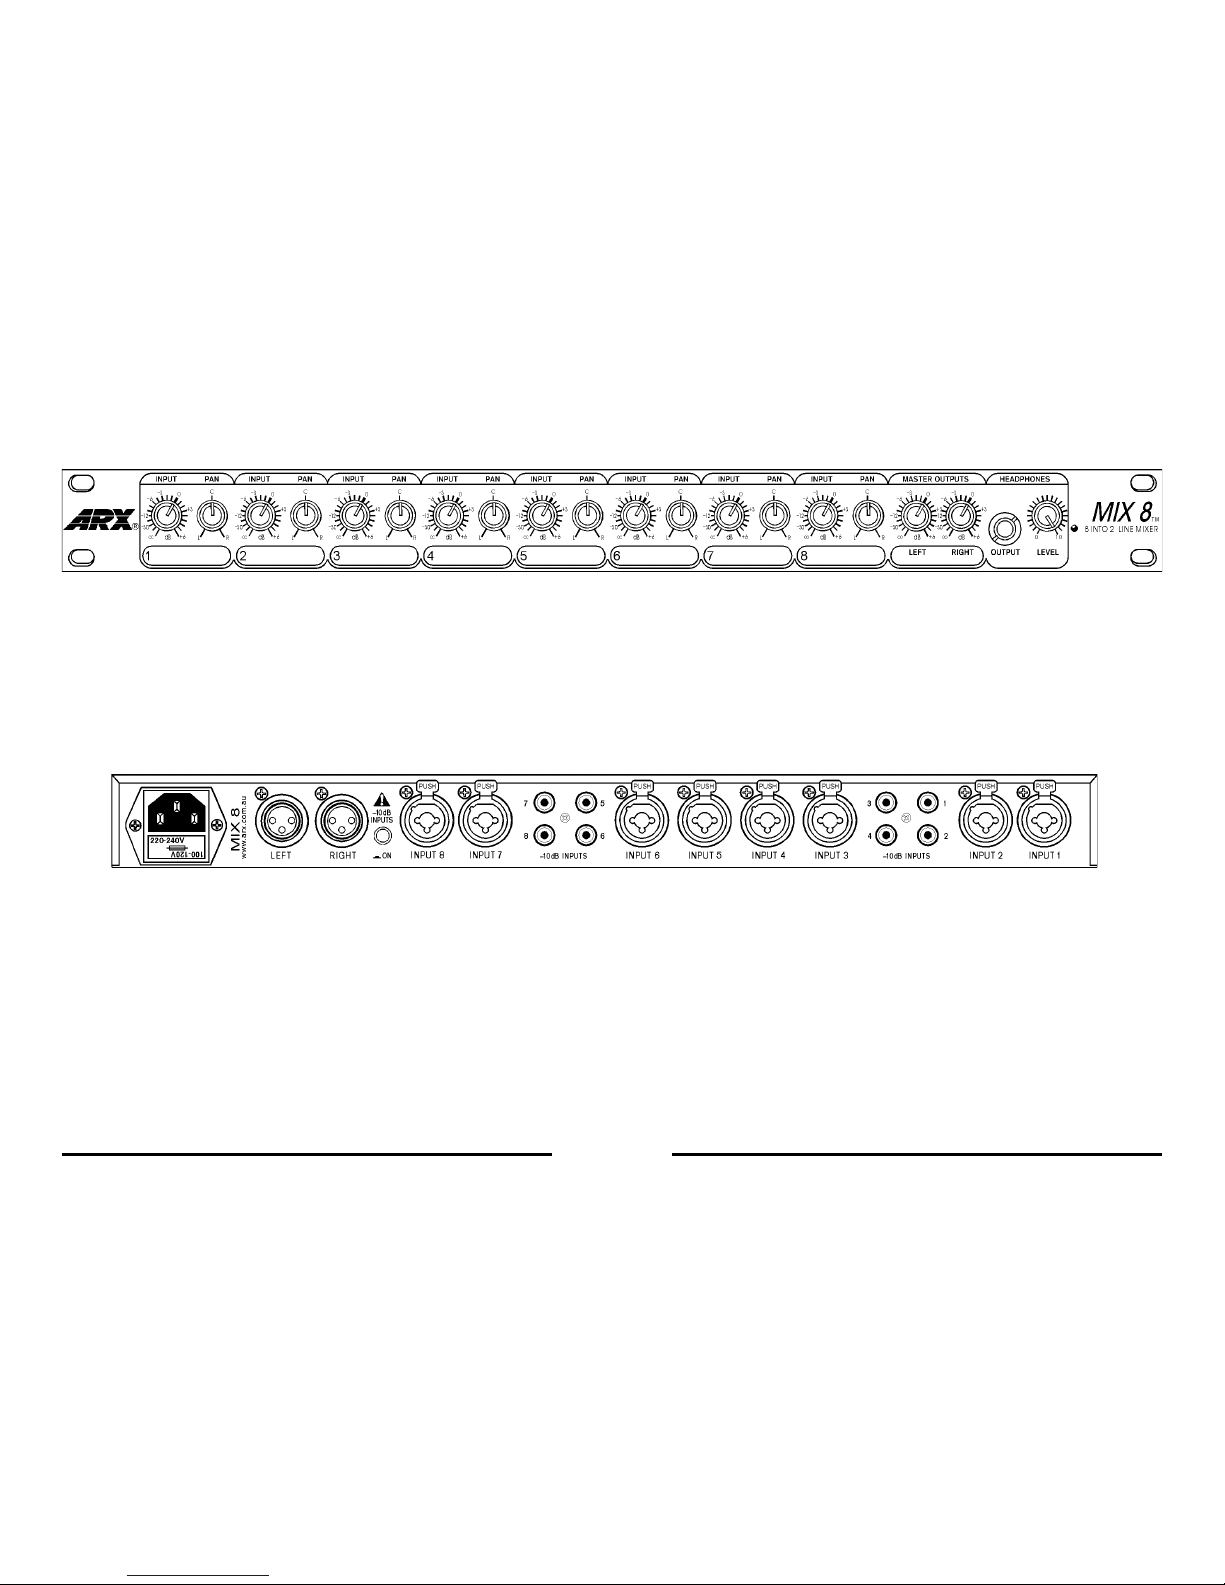
Balanced Inputs and Outputs
Total flexibilty is provided by the inclusion of balanced XLR, unbalanced jack
and phono (RCA) connectors. Each XLR and jack input has up to +6dB of
gain available, while the phono connectors have a nominal input of -10dB
with +16dB of gain available to allow matching of any line level signals.
Individual Pan controls allow accurate signal placement in the spatial field.
All inputs mix down to fully balanced Left and Right Master XLR outputs.
Wide Dynamic Range
Internally, careful attention to the signal path design has resulted in a unit
with wide dynamic range, enough headroom to cope with the hottest line
signal, and excellent noise specifications.
Universal AC Power
AC power range is a universal 100 to 120V or 220 to 240V AC, and is connect-
ed to the unit via a standard three pin IEC connector, with built-in fuse and
voltagechange switch.
Accurate and compact, the MIX 8’s unique combination of ultra low distor-
tion, low noise and high headroom makes it the ideal compact line mixer.
Introduction
Thank you for choosing this ARX MIX 8 Multi-Channel Stereo Line Mixer.
We hope you enjoy using it as much as we enjoyed creating it. As with all
ARX equipment, it has undergone extensive factory calibration and ‘burn in’
before shipping. To ensure continued trouble free use, please familiarise
yourself with the contents of this manual before using the MIX 8.
About the MIX 8
Applications
The MIX 8 has a wide range of applications: as a backing track mixer for live
digital 8 track playback, Broadcast applications, and as an Installation Master
Mixer, allowing all feeds to run independently of each other through the one
speaker system.
Other applications include using it as a line sub-mixer for external effects
units, an Electronic Instruments sub-mixer; in fact, anywhere that multiple
stereo line feeds need mixing, panning and monitoring.
Setting Up
Setting up your MIX 8 is very straightforward and intuitive.
Firstly, make sure all level controls are turned down, then connect the unit to
ACpower.
Please Note:
This is a dual voltage unit. It is essential that you check that the voltage on
the fuseholder cover below the AC connector on the rear of the chassis is set
correctly before connecting it to AC power. See Page 2 for more details on
this.
Connect the signals you wish to mix to the input connectors, and connect the
outputs to the next item in the signal chain; e.g. amplifier, mixer, comp-
ressor/ limiter, equalizer.
Set the Master level controls on the front panel to a low setting, say 7 or 8
o’clock position. Slowly turn up the levels of the individual channels as
required. You can check your signals in the headphones if you are in a low-
noise situation; in that case, leave the Master controls turned down until you
are ready to go.
Extra Note:
The unbalanced RCA (Phono) connectors will need switching on with the
switch on the left hand side of the rear panel if you will be connecting to
them. If you don’t push this switch in, they won’t work.
For the best signal to noise figures, keep the RCA connectors switched off
unless you are using them.
And finally, although you can connect just about any kind of line input to
the MIX 8, you can’t plug a microphone into it. If you need Microphone
inputs, we suggest using our MIXX or MIXXMaster units to plug into the
MIX 8.

Other ARX Music Mixer manuals

ARX MIXX User manual

ARX

ARX MIXX User manual

ARX MIXXMaster User manual

ARX

ARX MIXXMaster User manual

ARX MaxiMIX User manual

ARX

ARX MaxiMIX User manual

ARX AV stream User manual

ARX

ARX AV stream User manual

ARX Uni MIX User manual

ARX

ARX Uni MIX User manual

ARX MIXX User manual

ARX

ARX MIXX User manual

ARX MIXXMaster User manual

ARX

ARX MIXXMaster User manual

ARX MIXX User manual

ARX

ARX MIXX User manual

Popular Music Mixer manuals by other brands

Reloop rmx-80 instruction manual

Reloop

Reloop rmx-80 instruction manual

Tascam MM-1 owner's manual

Tascam

Tascam MM-1 owner's manual

Strand 500ML quick start guide

Strand

Strand 500ML quick start guide

Dateq MAC5 user manual

Dateq

Dateq MAC5 user manual

AUSTRALIAN MONITOR AMC+ MIX Installation and operation manual

AUSTRALIAN MONITOR

AUSTRALIAN MONITOR AMC+ MIX Installation and operation manual

CM Labs motor mix owner's manual

CM Labs

CM Labs motor mix owner's manual

SeaViewer Surface Console manual

SeaViewer

SeaViewer Surface Console manual

Peavey XR 500C user manual

Peavey

Peavey XR 500C user manual

SoundCraft MINI STAGEBOX 32 User and installation guide

SoundCraft

SoundCraft MINI STAGEBOX 32 User and installation guide

Yamaha 02R96 Version 2 owner's manual

Yamaha

Yamaha 02R96 Version 2 owner's manual

Midas VeniceU16 quick start guide

Midas

Midas VeniceU16 quick start guide

Devine MixDesk 802 user manual

Devine

Devine MixDesk 802 user manual

Yamaha AW2816 Operation manual

Yamaha

Yamaha AW2816 Operation manual

D&R Telephone Hybrid 1 How to connect

D&R

D&R Telephone Hybrid 1 How to connect

TW LP4 S user manual

TW

TW LP4 S user manual

Roland VR-5 Firmware update procedure

Roland

Roland VR-5 Firmware update procedure

Omnitronic EM-260B user manual

Omnitronic

Omnitronic EM-260B user manual

Greentek MEGA-MIX Operator's manual

Greentek

Greentek MEGA-MIX Operator's manual

manuals.online logo
manuals.online logoBrands
  • About & Mission
  • Contact us
  • Privacy Policy
  • Terms and Conditions

Copyright 2025 Manuals.Online. All Rights Reserved.