Ascend FD-23R User manual

COMMERCIAL REFRIGERATOR AND FREEZER
OWNER'S MANUAL
Models: JFD-23R, JFD-23F, JFD-48R,
JFD-48F, JFD-72R, JFD-72F
This manual contains important information regarding your
new A S C E ND unit. Please read the manual thoroughly prior
to equipment set-up, operation and maintenance.
Failure to comply with regular maintenance guidelines outlined
in this manual may void warranty. MUST READ!!!
1575 Zephyr Avenue
Hayward, CA 94544
(800) 314-4477 (510) 477-3400
f: (510) 477-3413
www.ASCENDmfg.com

TABLE OF CONTENTS
Page 2............................................................ASCEND® Limited Warranty
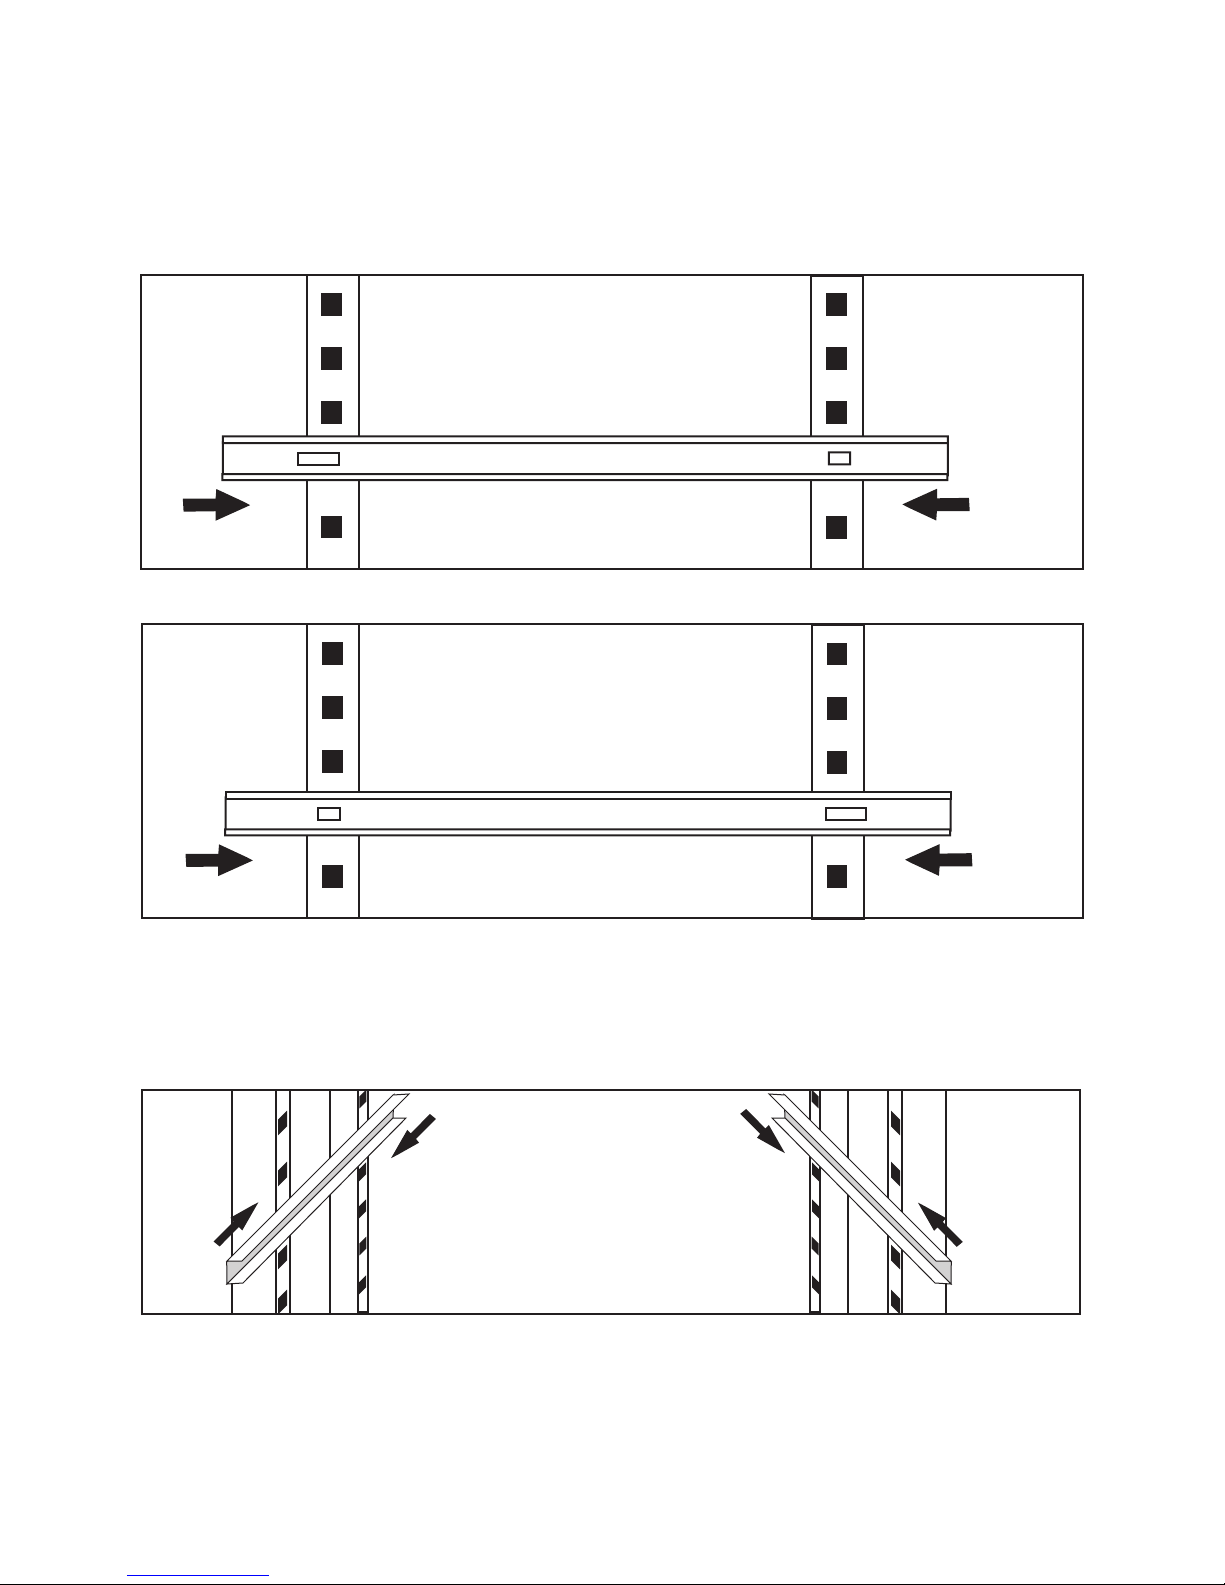
Page 3.........................................................................................Installation
Page 5.................................................................................Safety/ Warning
Page 6........................ ............................................................Maintenance
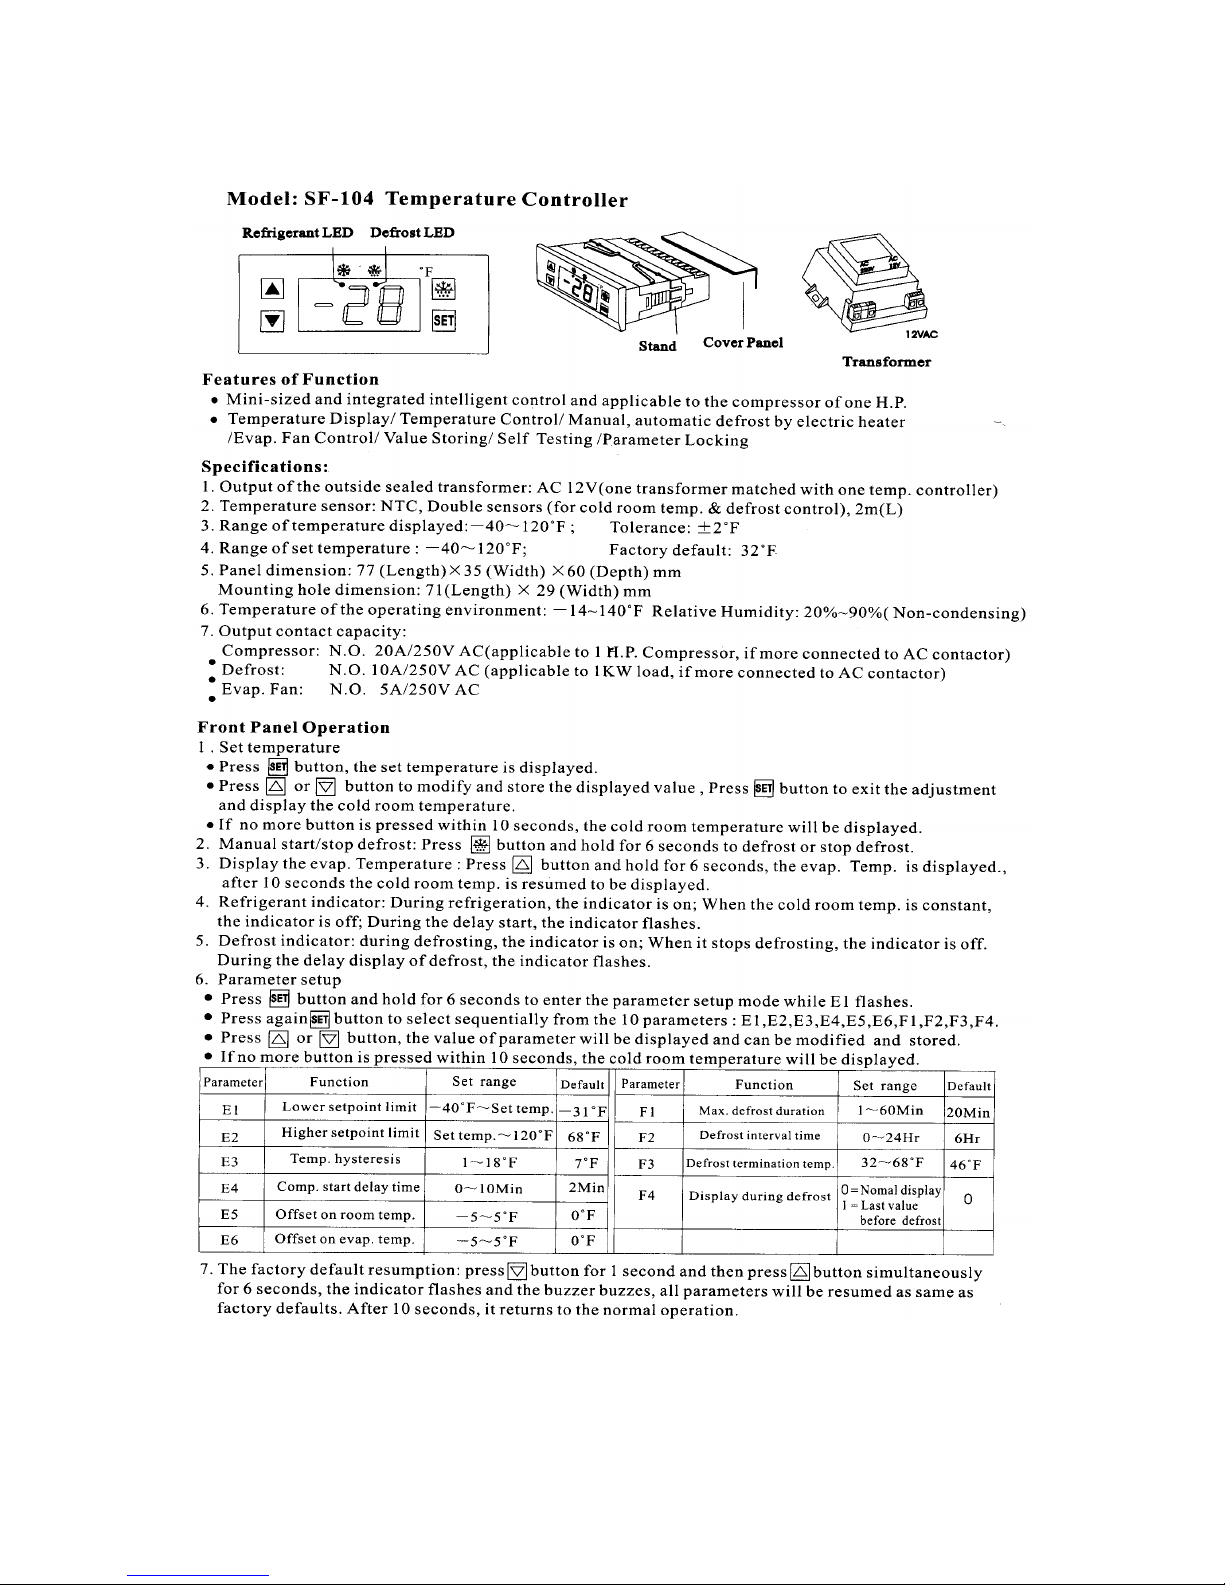
Page 7......................................................Temperature Control Instructions
Page 9.........................................................................Refrigerator Settings
Page 10..............................................................................Freezer Settings
Page 11...............................................................................Troubleshooting
LIMITED WARRANTY
Jimex Corp. warrants to the original purchaser the Ascend® unit sold and all parts thereof to be free from
defects in material or workmanship, under normal use and service for a period of one (1) year from the
date of purchase.
In addition to the warranty set forth above, Jimex Corp. warrants the hermetically-sealed compressor for
an additional four (4) years, not to exceed sixty (60) months from the date of shipment from the
corresponding distribution location.
Please read the attached Original Warranty Certificate for details.
EXCLUSION FROM WARRANTY
1. Normal start-up, maintenance, adjustments, and cleaning.
2. Damage caused by improper installation of the Ascend® unit as outlined in this manual.
3. Labor charges resulting from the inaccessibility of the Ascend® cabinet.
4. Damage to parts due to misuse, abuse, neglect, or accidents.
5. Premium labor rates due to holidays, overtime, travel time, mileage, etc., not specifically authorized by
Jimex Corp. prior to service.
6. Repairs due to modifications to the Ascend® unit or refrigeration system, including remoting location
of compressor(s), door hinge reversal, etc.
7. Claims for indirect or consequential damages, including food spoilage or product loss.
8. Damage due to faulty or incorrect power supply, floods, storms, or other acts of God.
WARRANTY SERVICE
To insure warranty coverage, a qualified service company, authorized by Jimex Corp., must perform the
warranty repair. Please contact the Ascend® Service Department for assistance. All service calls must
be authorized by a qualified Jimex Corp. employee.
-2-

INSTALLATION
IMPORTANT!!! PLEASE READ BEFORE INSTALLATION
1) If the unit has recently been transported please let unit stand still for a minimum of 24 hours before
plugging it in.
2) Make sure that the unit drops down to desired temperature before loading the unit with product.
3) Make sure that there is proper ventilation around the unit in the area where it will operate.
4) Make sure all accessories are installed (i.e. shelves, shelf clips, casters) before plugging the unit in.
5) Please read through the Operation / Owners Manual in its entirety. Lack of maintenance or misuse of
the unit will VOID warranty. Please fill out the registration card and send it to the factory.
CABINET LOCATION GUIDELINES
1) Install the unit on strong and leveled surfaces
-unit may make unpleasant noises if surface is uneven
-unit may malfunction if surface is uneven
2) Install the unit in an indoor, well-ventilated area
-unit performs more efficiently in a well-ventilated area
-for best performance, please maintain clearance of 4" on the back of the unit
-outdoor use may cause decreased efficiency and damage to the unit
3) Avoid installation in a high humidity and/or dusty area
-humidity could cause unit to rust and decrease effeciency of the unit
-dust collected on condenser coil will cause unit to malfunction. Clean the condenser at least
once a month with a brush or clean cloth
-malfunction due to dirty condenser will void warranty
4) Select a location away from heat and moisture-generating equipment
-high ambient temperatures will cause the compressor to overwork, leading to higher energy bills
and gradual breakdown of the unit
-malfuNction due to high ambient temperature will void warranty
ELECTRICAL
Please ensure that the required voltage of the compressor is being supplied at all times. Low or high
voltage can detrimentally affect the refrigeration unit and thereby void its warranty.
All units should be plugged into a grounded and properly-sized electrical outlet with appropriate
overcurrent protection. Please refer to the electrical requirements on the unit serial tag located inside the
unit. Please make sure that your unit has its own dedicated outlet. Do not use an extension cord.
-3-

SHELF BRACKET INSTALLATION Follow diagrams to properly install shelf brackets!!!
(picture of interior pilasters, right side)
(picture of interior pilasters, left side)
1) Attach the back of the bracket first by sliding the opening "a" (longer tab) into the back pilaster and pull
forward, far enough to fit opening "b" into the front pilaster
2) Attach the front of the bracket by inserting the opening "b" (shorter tab) into the front pilaster and push
back to secure (IMPORTANT!!!)
-4-
12
top
bottom
back front
a b
top
bottom
back
front
1
2
1
2
FRONT VIEW
left right
1
2
a
b

SAFETY / WARNING
Please pay close attention the the safety notices in this section. Disregarding
these notices may lead to serious injury and/or damage to the unit.
KEY
1) To minimize shock and fire hazards, be sure not to overload outlet. Please designate
one outlet for your unit.
2) Do not use extension cords.
3) Do not put your hands under the unit when the unit is required to be moved.
4) When the unit is not in use for a long period of time, please unplug the unit from the
outlet.
5) After unplugging the unit, wait at least 10 minutes before re-plugging it. Failure to do
so could cause damage to the compressor.
1) To minimize shock and fire hazards, please do not plug or unplug the cord with wet
hands.
2) During maintenance and cleaning, please unplug the unit.
1) To minimize shock and fire hazards, make sure that the unit is properly grounded.
1) Do not attempt to remove or repair any component unless instructed by factory.
2) Make sure that the unit is not resting on or against the electrical cord and plug.
3) To minimize personal injury, do not hang on the doors.
4) Do not store any flammable and explosive gas or liquids inside the unit.
5) Do not attempt to alter or tamper with the electrical cord.
6) Do not set the desired temperature out of the recommended temperature range:
(Ref: 32 F - 55 F Fre: -15 F - 20 F)
-5-
UNPLUG CORD PROPER GROUNDING REQUIRED

REGULAR MAINTENANCE
CLEANING THE CONDENSER COIL
For efficient operation, it is important that the condenser surface be kept free of dust, dirt, and lint.
ColdTech recommends cleaning the condenser coil and fins at least once per month. Clean with a
commercial condenser coil cleaner, available from any kitchen equipment retailer. Brush the condenser
fins from top to bottom, not side to side. After cleaning, straighten any bent condenser fins with a fin
comb.
CLEANING THE FAN BLADES AND MOTOR
If necessary, clean the fan blades and motor with a soft cloth. If it is necessary to wash the fan blades,
cover the fan motor to prevent moisture damage.
CLEANING THE INTERIOR OF UNIT
When cleaning the cabinet interior, use a solvent of warm water and mild soap. Do not use steel wool,
caustic soap, abrasive cleaners, or bleach that may damage the stainless steel surface.
Wash door gaskets on a regular basis, preferably weekly. Simply remove door gasket from the frame of
the door, soak in warm water and soap for thirty (30) minutes, dry with soft cloth, and replace. Check door
gaskets for proper seal after they are replaced.
Periodically remove the shelves and pilasters from the unit and clean them with mild soap and warm
water. To remove the pilasters, first remove the shelves and shelf brackets. Then, simply lift the pilaster
up and out.
W AR NING
Disconnect power cord before cleaning any parts of the unit.
TROUBLE SHOOTING
Before requesting any service on your Ascend® unit, please check the following points. Service calls
resulting from lack of maintenance or misuse is not covered under warranty and also may void warranty.
Please note that this guide serves only as a reference for solutions to common problems.
-6-

SEE PAGE 9
-7-

-8-

ASCEND® Refrigerator Settings
Temperature set to 37 F
Parameter Function Set Range Default
E1 Lower Setpoint Limit -40 F ~ set temp 36 F
E2 Higher Setpoint Limit set temp ~ 120 F 45 F
E3 Hysteresis, temp. variance 1 ~ 18 F 10 F
E4 Comp. start delay time 0 ~ 10 min. 2 min.
E5 Offset on room temp -5 ~ 5 F 0 F
E6 Offset on evap temp -5 ~ 5 F 0 F
F1 Max. defrost duration 1 ~ 60 min. N/A
F2 Defrost interval time 0 ~ 24 hr. 0
F3 Defrost termination temp 32 ~ 68 F N/A
Key
F = Farenheit (degrees) temp = temperature
min. = minutes max = maximum
hr. = hours N/A = not applicable
Warning:
Do not change the default settings of your Ascend® unit
without consulting a qualified service technician or the
Ascend® service department.
-9-
Applicable to Models: JFD-23R, JFD-48R,
JFD-72R

ASCEND® Freezer Settings
Temperature set to -4 F
Parameter Function Set Range Default
E1 Lower Setpoint Limit -40 F ~ set temp -10 F
E2 Higher Setpoint Limit set temp ~ 120 F 20 F
E3 Hysteresis, temp variance 1 ~ 18 F 10 F
E4 Comp. start delay time 0 ~ 10 min. 3 min.
E5 Offset on room temp -5 ~ 5 F 0 F
E6 Offset on evap temp -5 ~ 5 F 0 F
F1 Max. defrost duration 1 ~ 60 min. 30 min.
F2 Defrost interval time 0 ~ 24 hr. 6 hr.
F3 Defrost termination temp 32 ~ 68 F 68 F
Key
F = Farenheit (degrees) temp = temperature
min. = minutes max = maximum
hr. = hours N/A = not applicable
Warning:
Do not change the default settings of your Ascend® unit
without consulting a qualified service technician or the
Ascend® service department.
-10-
Applicable to Models: JFD-23F, JFD-48F, JFD-72F

SYMPTOM POSSIBLE CAUSE CORRECTIVE ACTION
Compressor not running. Fuse blown or circuit breaker tripped. Replace fuse or reset circuit
breaker.
Power cord unplugged. Plug in power cord.
Thermostat set too high. Set thermostat to lower
temperature.
Cabinet in defrost cycle. Wait for defrost cycle to finish.
Condensing unit runs for Excessive amount of warm product Allow adequate time for
long periods of time. placed in cabinet. product to cool down.
Prolonged door opening or door ajar. Ensure doors are closed when
not in use. Avoid opening
doors for long periods of time.
Door gasket(s) not sealing properly. Ensure gaskets are snapped in
completely. Remove gasket
and wash with soap and water.
Check condition of gasket and
replace if necessary.
Dirty condenser coil. Clean the condenser coil.
Evaporator coil iced over. Unplug unit and allow coil to
defrost. Make sure thermostat
is not set too cold. Ensure that
door gasket(s) are sealing
properly.
Cabinet temperature is Thermostat set too warm. Set thermostat to lower
too warm. temperature.
Blocking air flow. Re-arrange product to allow for
proper air flow. Make sure
there is at least four inches of
clearance from evaporator.
Excessive amount of warm product Allow adequate time for
placed in cabinet. product to cool down.
Fuse blown or circuit breaker tripped. Replace fuse or reset circuit
breaker.
Dirty condenser coil. Clean the condenser coil.
Prolonged door opening or door ajar. Ensure doors are closed when
not in use. Avoid opening
doors for long periods of time.
Evaporator coil iced over. (see above)
Cabinet is noisy. Loose part(s). Locate and tighten loose
part(s).
Tubing vibration. Ensure tubing is free from
contact with other tubing or
components.
-11-

Reaching New Heights™
MEMO
RETAIN THIS MANUAL FOR FUTURE REFERENCE
Please read the entire manual carefully before installation and operation. If certain recommended
procedures are not followed, warranty claims will be denied.
Notice: Jimex reserves the right to make changes in design and specifications without prior notice.
MODEL #: _______________________________
SERIAL #: _______________________________
PURCHASE DATE #: _______________________
This manual suits for next models
6
Table of contents
Popular Refrigerator manuals by other brands

SEVERIN
SEVERIN DOPPELTÜR-KÜHL-/GEFRIERSCHRANK KS... Dimensions

Frigidaire
Frigidaire FRT21P6A Factory parts catalog

Whirlpool
Whirlpool YET18RKXJW00 Use & care guide

Stirling
Stirling Vintage STR-H115VBF-BLU instruction manual

CONTINENTAL EDISON
CONTINENTAL EDISON CEF2D240BE user manual

Pkm
Pkm FD 399NF WDIXK instruction manual