Asema E User manual

English
Asema E
User Manual

Asema E: User Manual
Asema Electronics Ltd
Copyright © 2011-2012
No part of this publication may be reproduced, published, stored in an electronic database, or transmitted, in any form or by any means,
electronic, mechanical, recording, or otherwise, for any purpose, without the prior written permission from Asema Electronics Ltd.
Asema E is a registered trademark of Asema Electronics Ltd.

Asema E iii / 49
Table of Contents
Safety .................................................................................................................................. 1
1. Getting started ................................................................................................................ 2
1.1. Setting up the Asema E ........................................................................................ 2
1.1.1. Mounting the device on the table or the wall .............................................. 2
1.1.2. Connecting the power ................................................................................ 2
1.1.3. Running the Startup Wizard ........................................................................ 3
1.1.4. Using and switching between the E-view and Main Setup ............................ 4
1.2. Basic Settings ....................................................................................................... 5
1.2.1. Language ................................................................................................... 5
1.2.2. Date and Time ........................................................................................... 5
1.2.3. Connecting to the Internet ......................................................................... 5
1.2.4. Adding controllers and connecting to appliances .......................................... 6
1.2.5. Managing screenlets ................................................................................... 6
2. User interface .................................................................................................................. 8
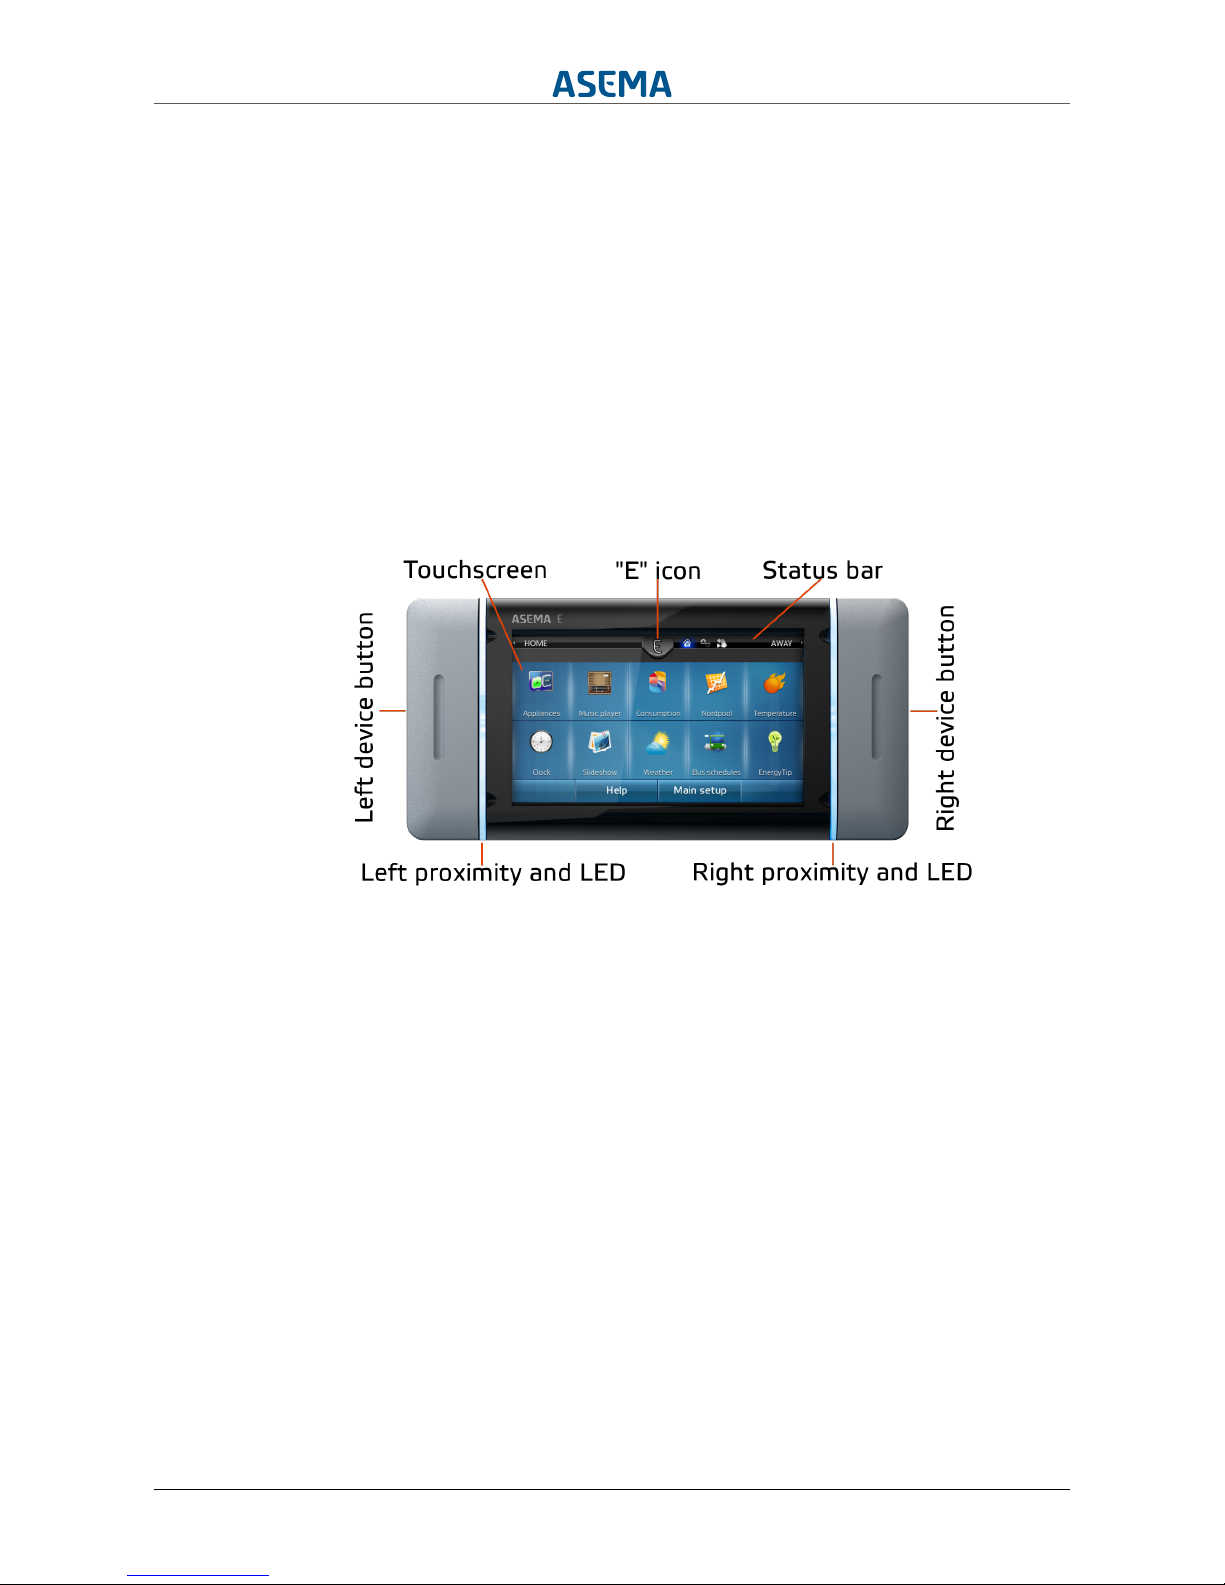
2.1. Device buttons ...................................................................................................... 8
2.2. Sensors ................................................................................................................ 8
2.2.1. Proximity ................................................................................................... 8
2.2.2. Gestures .................................................................................................... 9
2.3. LEDs ..................................................................................................................... 9
2.4. Touchscreen .......................................................................................................... 9
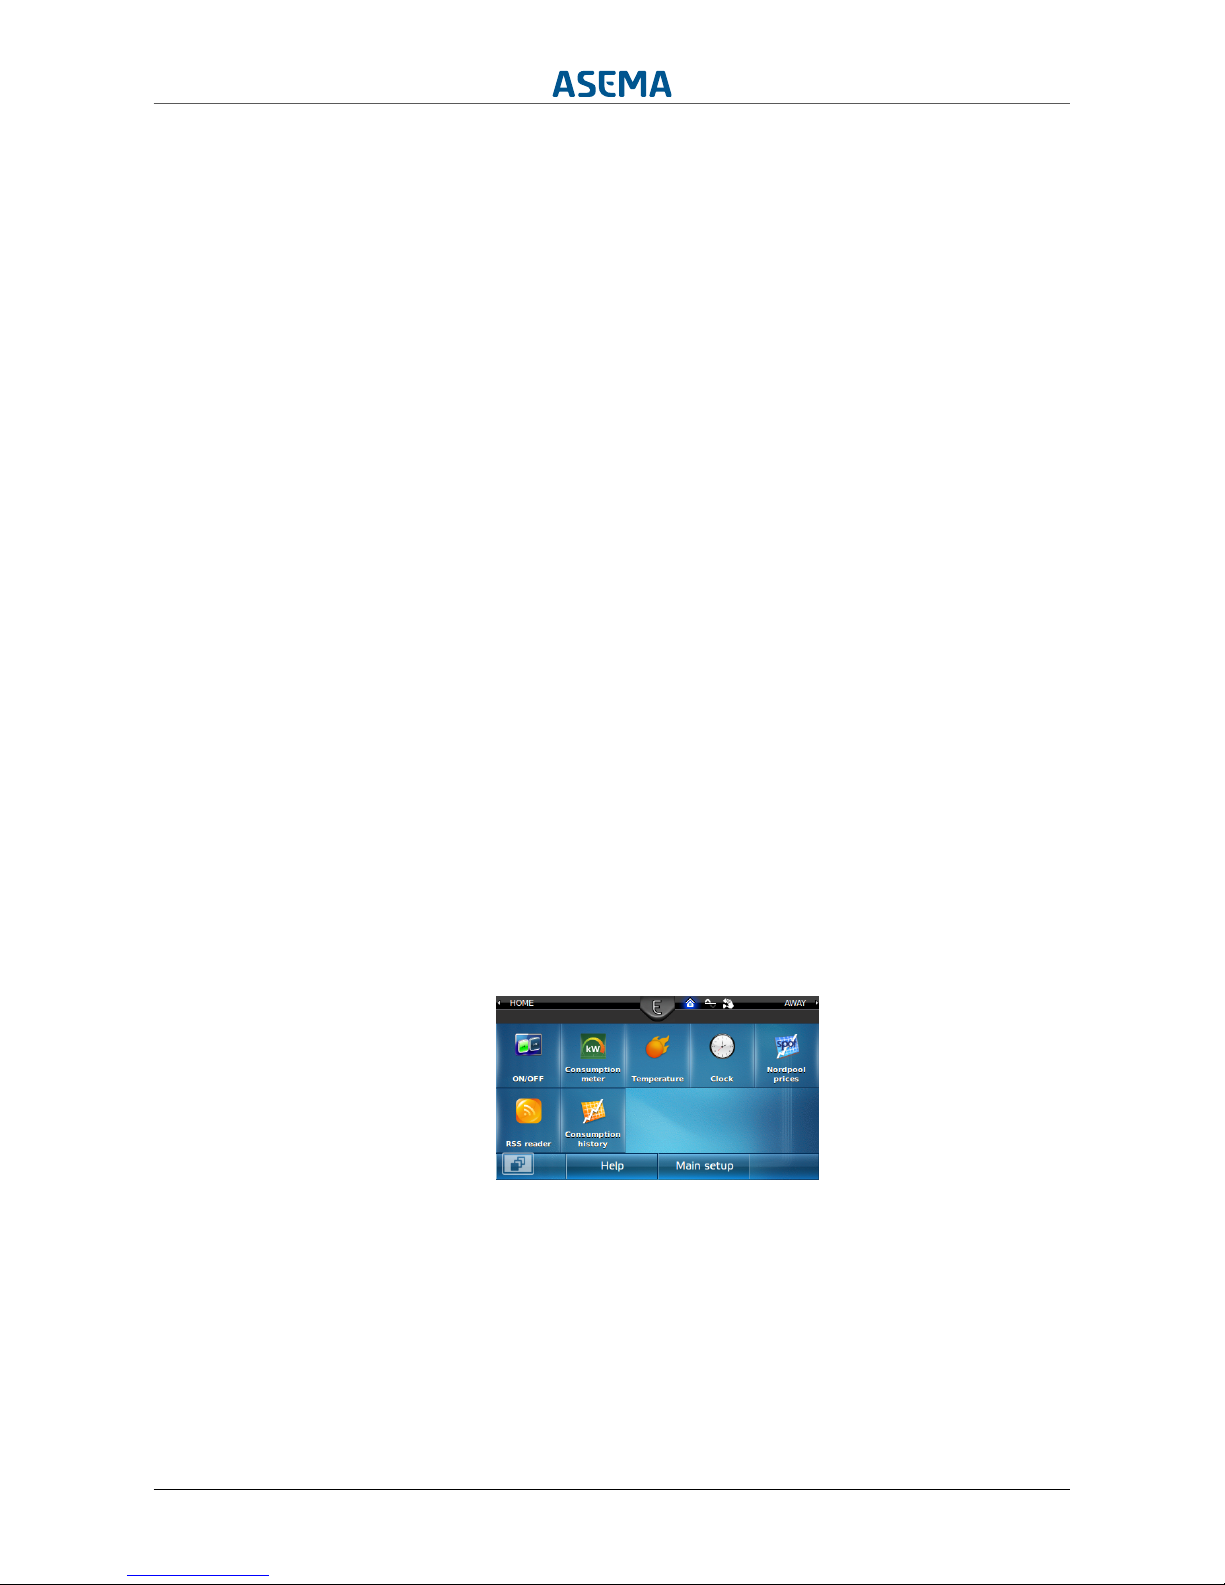
2.4.1. Interface elements ..................................................................................... 9
2.5. WebView ............................................................................................................ 11
2.5.1. Accessing the WebView ........................................................................... 11
2.5.2. Using the WebView .................................................................................. 11
2.5.3. Using the Mobile View ............................................................................. 12
2.6. Connectors ......................................................................................................... 12
3. Automating your home .................................................................................................. 14
3.1. Devices and appliances you can use for automation ............................................. 14
3.1.1. Appliance controllers ................................................................................ 14
3.1.2. Central electricity meters .......................................................................... 14
3.1.3. Remote controls and wireless buttons ...................................................... 15
3.1.4. Motion detectors and other sensors ......................................................... 15
3.1.5. Weather stations ...................................................................................... 15
3.2. Home and Away ................................................................................................. 15
3.3. Scheduling appliances ......................................................................................... 16
3.4. Tariff controls ..................................................................................................... 16
3.5. Standby power control ........................................................................................ 16
3.6. Advanced automation ......................................................................................... 17
3.6.1. Appliance Groups ..................................................................................... 17
3.6.2. Themes .................................................................................................... 17
3.6.3. Multi-step sequences ................................................................................ 17
4. Saving energy and optimizing electricity use ................................................................... 18
4.1. Your electricity contract ....................................................................................... 18
4.2. Price preferences ................................................................................................ 18
5. Remote controlling your home ....................................................................................... 19
5.1. Setting up a user account ................................................................................... 19
5.1.1. Setting up a user account on the device ................................................... 19
5.1.2. Setting up a user account in the WebView ................................................ 19
5.2. Home firewall ..................................................................................................... 20
5.3. Accessing your home remotely with a smartphone ............................................... 20
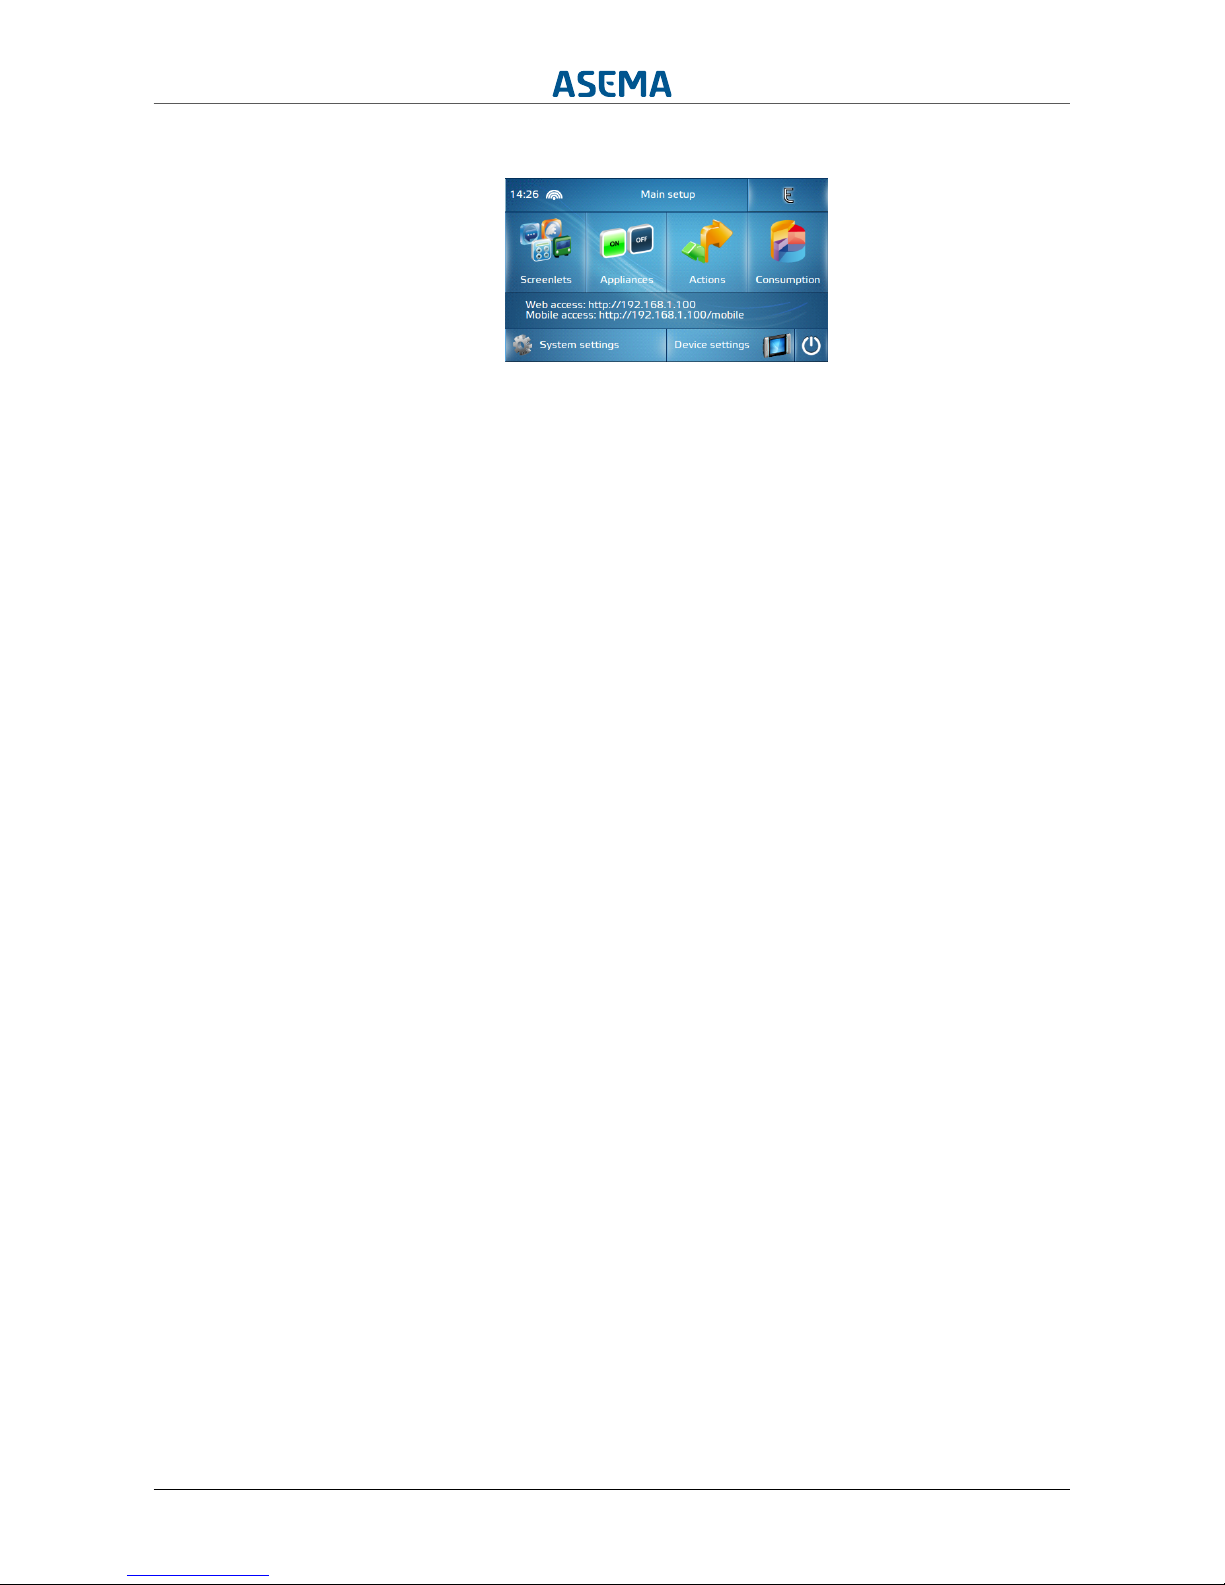
6. System setup ................................................................................................................ 22
6.1. Screenlets ........................................................................................................... 22
6.1.1. Settings ................................................................................................... 22
6.1.2. Installing Screenlets ................................................................................. 22
6.1.3. Updating Screenlets ................................................................................. 23

Asema E iv / 49
6.1.4. Removing/Uninstalling Screenlets ............................................................. 23
6.1.5. Reordering Screenlets .............................................................................. 24
6.2. Appliances .......................................................................................................... 24
6.2.1. Appliances ................................................................................................ 24
6.2.2. Appliance groups ...................................................................................... 26
6.2.3. Sensors ................................................................................................... 26
6.2.4. Remotes .................................................................................................. 27
6.2.5. Controllers ............................................................................................... 28
6.2.6. Special controllers .................................................................................... 29
6.2.7. Weather stations ...................................................................................... 29
6.2.8. Central meter ........................................................................................... 30
6.3. Actions ............................................................................................................... 31
6.3.1. Themes .................................................................................................... 31
6.3.2. Price triggers ........................................................................................... 32
6.3.3. Calendar ................................................................................................... 33
6.3.4. Restrictions .............................................................................................. 35
6.3.5. Theme Groups ......................................................................................... 36
6.4. Energy consumption ............................................................................................ 36
6.4.1. Grouping and targets ............................................................................... 36
6.4.2. Notifications ............................................................................................. 37
6.5. System settings .................................................................................................. 38
6.5.1. Home & Away ......................................................................................... 38
6.5.2. Energy Saving .......................................................................................... 38
6.5.3. Energy Contract ....................................................................................... 38
6.5.4. Price Limits .............................................................................................. 39
6.5.5. My Home ................................................................................................. 40
6.5.6. Rooms ..................................................................................................... 40
6.5.7. Users ....................................................................................................... 40
6.5.8. Locks ....................................................................................................... 40
6.5.9. Language ................................................................................................. 41
6.5.10. Startup (only appears on device) ............................................................. 41
6.5.11. System Information ................................................................................ 41
6.6. Device settings ( only on device) .......................................................................... 41
6.6.1. Date and Time ......................................................................................... 41
6.6.2. Network Connection ................................................................................. 41
6.6.3. E-view ...................................................................................................... 42
6.6.4. Device buttons ......................................................................................... 42
6.6.5. LEDs ........................................................................................................ 42
6.6.6. Gestures .................................................................................................. 43
6.6.7. Temperature Sensor ................................................................................. 44
6.6.8. Audio ....................................................................................................... 45
6.6.9. Secondary display .................................................................................... 45
6.6.10. Touchscreen ........................................................................................... 45
6.6.11. System info ........................................................................................... 45
6.6.12. System management ............................................................................. 46
6.6.13. Firewall .................................................................................................. 46
6.6.14. Privacy ................................................................................................... 46
6.6.15. Unlock devices ....................................................................................... 47
6.6.16. About .................................................................................................... 47
7. Troubleshooting ............................................................................................................. 48

Asema E v / 49
List of Examples
2.1. Device URL ................................................................................................................. 11

Safety
Please read this before proceeding and follow the safety precautions below when installing and operating
the system.
Retain and follow all product safety and operating instructions.
Observe all warnings in the operating instructions on the product.
Operate your appliances responsibly, especially when controlling them with remote controls or over the Inter-
net. Remote control of appliances in an Asema system is disabled by default to prevent accidental damage.
Enable remote control only on devices where you can be certain damage cannot occur due to for instance
heat, fire, smoke or water you do not notice while not present.
Always use an authorized and qualified electrician when installing products that involve rewiring electrical
connections, changes to the distribution box, or opening wall sockets or other components embedded into
walls, floors, or ceilings. Live cables can only be accessed by a qualified electrician.
Do not force or bend the cables at any point during installation. Do not drop, throw or try to bend the
product. If you are worried or have any concerns about the installation, please contact a qualified electrician
immediately.
Slots and openings in the product are provided for ventilation. These openings must not be blocked or covered.
Loss of ventilation may cause the product to overheat.
If you notice anything unusual about the product such as loose wires, exposed cabling, burn marks, holes in
the insulating materials or damage to the product, stop immediately.
When a power supply unit is included with the product only use the designated power supply unit. Other
usage may be dangerous and will invalidate any approval given to this product.
Unless specifically indicated otherwise, the product is designed to operate in room temperature under dry
conditions. Keep the device dry and away from excessive moisture, water or any liquid as it may cause a
short circuit. Keep the device away from extreme temperatures.
If this product is equipped with a USB port for connecting to a power or a computer, note that connecting
to improperly grounded equipment can result in an electric shock to your device. Be sure your computer is
properly grounded (earthed) before connecting this product to a computer.
Do not use this product in gas stations, fuel depots, chemical plants or where blasting operations are in
progress, or in potentially explosive atmospheres such as fueling areas, fuel storehouses, below deck on
boats, chemical plants, fuel or chemical transfer or storage facilities, and areas where the air contains chemi-
cals or particles, such as grain, dust, or metal powders. Please be aware that sparks in such areas could cause
an explosion or fire resulting in bodily injury or even death.
This product may cause medical equipment to malfunction. The use of this device is forbidden in most hos-
pitals and medical clinics.
There is no need to open the product. YOUR WARRANTY IS INVALIDATED IF YOU DISASSEMBLE OR AT-
TEMPT TO DISASSEMBLE THE DEVICE.

Getting started 2 / 49
1.Getting started
Thank you for choosing Asema E! You are now one step closer to creating a truly energy aware
home. This manual will tell you about all the features of your new system and will guide you through
the steps of installing and configuring it.
We've structured this manual so that those who just want to quickly get going can get the essential
information fast while those who want to tweak all details to fit their home perfectly can drill down
to all the nitty gritty. If you are in a hurry, this Chapter1, Getting started will teach you all the
essentials.
Note that your Asema E offers you two ways to configure the system: The touchscreen of the
device and the WebView. The WebView is a web-browser interface you can use comfortably with
your PC or tablet computer. To use the WebView in configuration, please first complete the Get-
ting Started steps, then refer to Section2.5, “WebView” for more information on how to use the
WebView.
1.1.Setting up the Asema E
1.1.1.Mounting the device on the table or the wall
Start of by unpacking the device and mounting it to the location of your choice. Locate the table
stand and the mounting rail in the box and decide where you want to put the Asema E in your
home. Depending on your choice, you have the option of wall mount or table stand.
Follow the instructions on the box on how to assemble the components. For table installation,
assemble the table stand (note: to attach the mounting rail to the bottom of the table stand, you
need to slide it in from the bottom). For wall installation, attach the mounting rail to a wall with
two screws. Then slide the Asema E to the mounting rail.
1.1.2.Connecting the power
Locate the USB power adapter in the box. Unwrap the while power cable and attach the USB-
A (large) connector to the adapter. Then insert the smaller micro-USB end of the cable to the
micro-USB socket on Asema E. Note that there are two micro-USB sockets on an Asema E; one

Getting started 3 / 49
for power and one for reprogramming the device (so called "firmware flashing"). Please use the
correct connector that is marked with "POWER" and indicated with green in the image below.
Now connect the USB power adapter to a power supply wall socket. Do not touch the Asema
E screen while connecting it to a power. Finger tap on the screen during startup will instruct the
device to go to factory mode and it will not start up. If you did have your fingers on screen, simply
unplug the power connector and try again.
The device will now start up. If this is the first time the device is powered up, startup might take a
few minutes as the software is initialized. Once done the device will take you to the Startup Wizard.
1.1.3.Running the Startup Wizard
The Asema E itself comes pre-installed with a basic firmware installation. The first time you start
the Asema E, it will take you through the Startup Wizard which will help you with setting up all
the basics. Click on the arrows in the top left and top right corner to navigate through the wizard.
Please note that all of these settings can be changed afterwards so you can safely skip steps if you
wish. Note also that settings are saved as you advance through the steps. There is no separate
"save" function you need to use.
1. Language
Choose your language.
2. Date and Time
Set date and time by clicking on the icons and then selecting the correct time using the scroll
lists..
3. Network Connection
Select your home network. We recommend you use a secured network. Type in the network
password when prompted.
4. Appliances
Add appliances to the Asema E by connecting them to the controllers you have installed. If
you have installed controllers from Asema in your home, tap on “Detect” to find the Asema
controllers. Once the Asema E has found a controller, tap the gear icon that appears to edit the
controller. Follow the on-screen instructions to add descriptive details that let you recognize the
appliance later on. Then click OK to save.
Repeat this step until all your controllers have been added. Note that if you use Asema con-
trollers, you can tap on the sound button to locate a controller. The controller will beep, which

Getting started 4 / 49
helps you in recognizing the appliance or wall socket you are editing. To add 3rd party controllers,
click Add and choose the controller from the list. Then follow the instructions. (To see a list of
all compatible 3rd party controllers, visit www.asema.com)
5. Remotes
If you have compatible remotes or remote switches, you can pair them with the Asema E. (see
www.asema.com for a list of compatible 3rd party components). Tap on “Detect” to scan them.
Then hold down a button on your remote to record the button press signal. The LEDs on your
Asema E will blink when it detects the signal from your remote. Follow the instructions on the
screen to confirm and save the remote. (for more extensive instructions, see: Section 6.2.4.
Remotes)
6. Screenlets
Screenlets are applications that help you operate the device. The screenlet “ON/OFF” for in-
stance will help you control your appliances, while “Power Meter” will show your real-time elec-
tricity consumption. Your Asema E already has a set of preinstalled screenlets and you can
download and install more. Install a screenlet by selecting it on the list and then tap “Install”. N.B.
if your device is not connected to the Internet (step 3), you cannot install additional screenlets.
7. Gestures
Gestures let you control the Asema E with hand movements. The way you use gestures depends
on how you install the Asema E. Select your installation type and the best fitting presets will
then be set up. You can change the settings afterwards.
8. Finish
Click Finish and you are done! The Asema E will now automatically continue to the E-View mode.
Time to save some energy!
1.1.4.Using and switching between the E-view and Main
Setup
The Asema E is divided into two interfaces: E-view and Main Setup. You will switch between them,
depending on what you want to do with the device.
• E-view: This is the default interface. Here you run the screenlets to control your appliances, see
your electricity consumption, check the temperature etc.
At first boot, it should open in the Home screenlet, which is a screenlet menu, displaying the cur-
rently installed screenlets. Start a screenlet by clicking on the icon. Return to the Home screenlet
by clicking on the E-con centered in the top. If you are in the E-view you will always have the
E-icon at the top.
You can go to the Main Setup by going to the Home screenlet (click on the E-icon) and then
click on Main Setup at the bottom. Alternatively, you can click on the black status bar, which
will then unfold and click on "Enter Main Setup".

Getting started 5 / 49
(For a more detailed description of the E-view, see Section 2.4.1.1 "E-view")
• Main Setup: This is the interface where you configure your system. You can find all the settings
for the different sections here: Screenlets, Appliances, Actions settings, Consumption, System
and Device.
Tap on the icon for any of these to open the list of options of that section, and then tap on
the option of your choice.
You can always go directly to the E-view by clicking on the E-icon in the top-right corner.
(For a more detailed description of the Main Setup, see Section 2.4.1.2 "Main Setup".)
1.2.Basic Settings
The Startup Wizard is the easiest way to input all the basic settings in one go. If you have however
skipped steps in the Startup Wizard and would like to edit those settings individually or change
the choices you made during the Wizard, here's how to do it. (You can also run the Startup Wizard
again, see Section 6.5.10)
1.2.1.Language
• Go to Main Setup > System Settings > Language
• Tap on the language of your choice. In the pop-up that appears, click OK. The device will now
automatically change the language and return to Main Setup screen.
1.2.2.Date and Time
Change the date and time in the device as follows:
• Go to Main Setup > Device Settings > Date and Time. This will take you to the Date and Time
settings.
• Click on the icons to change the date or time. Select the correct values from the scroll list and
click OK. Changes will be saved automatically.
1.2.3.Connecting to the Internet
To benefit from all the features of the Asema E, you should always connect it to the Internet. If
you haven't already done so during the Startup Wizard, you can create the connection as follows:
• Go to Main Setup > Device Settings > Network connection. The device will automatically start
scanning for available networks and display these in a list.

Getting started 6 / 49
• From the list, select the Network you would like to use. We recommend you use a secured
network. Type in the password if prompted. You will get a pop-up notification telling whether
the connection was successful.
• Once the pop-up is closed you will be returned to the networks list. The network you are con-
nected is marked with a check-mark. You can test your connection, by clicking on the "Test" but-
ton. You can return to Device Settings and Main Setup by clicking on the top left corner.
1.2.4.Adding controllers and connecting to appliances
If you have run the Startup Wizard but not added any controllers, or if you want to add additional
controllers, you can do this following these steps:
1. Go to Main Setup > Appliances > Appliances.
2. Click “Detect”. The Asema E will now scan all Asema controllers which are not yet paired, and
list them on the screen. This can take a few seconds.
3. The result will be list of controllers, looking like this:
The controllers don't have a name yet, just a code on the top, which corresponds with the sticker
that you received with your controller. To distinguish which controller is which, you can either
compare the displayed code to the sticker or click on the sound icon (top-button). The controller
will beep, which will help you in recognizing which controller you are currently adding.
4. Click on the gear icon
(middle button) to edit the controller. Fill in a name for the controller that will help you distinguish
it. We recommend naming it after the appliance you will connect to it. For type, choose the best
option from the drop-down menu.
5. Click OK. The controller will now be saved and you will be returned to the list of controllers,
including the unpaired ones. Repeat step 4-5 for all unpaired controllers until all controllers are
paired.
6. You're done! The controller will now also automatically be added to the ON/OFF, Power Con-
sumption History, and Power Meter screenlets and appear there when you run these.
1.2.5.Managing screenlets
Screenlets are applications that help you operate the device. They are the "screens" of the device
you're actually using whenever you are not making any configuration changes. The screenlet “ON/
OFF” for instance will help you control your appliances, while “Power Meter” will show your re-
al-time power consumption. Your Asema E has a set of preinstalled screenlets, but you can man-
age them as you want. You can do this on the device itself or in the WebView.
1.2.5.1.Installing Screenlets
On the Asema E

Getting started 7 / 49
1. Go to Main Setup > Screenlets > Install
2. Click on the screenlet you want to install. In the pop-up window, click Install. Press OK.
3. Wait a few seconds until the screenlet is installed and you will get a notification.
4. Click on the E-icon to return to the E-view and run the screenlet.
In the Webview
1. Click on the Tab "Screenlets". This will directly open up the Screenlets Install menu. This gives
you a list of all the screenlets that are available.
2. To install a screenlet, simply click on the "Install" button behind the screenlet of your choice. Then
wait a few seconds, and you will see a notification when the installation is done and successful.
(Please note: If the "Install button" is not clickable, it means that you already have the screenlet
installed.)
1.2.5.2.Uninstalling/removing screenlets
On the Asema E
1. Go to Main Setup > Screenlets > Uninstall
2. Click on the screenlet you want to uninstall. In the pop-up window, press OK.
3. Wait a few seconds until the screenlet is uninstalled and you will get a notification.
4. If you now return to the E-view the screenlet will no longer appear in the menu.
In the Webview
1. Go to webview. Then click on the Tab "Screenlets". This will directly open up the Screenlets
Install menu.
2. On the left-hand side, click on the tab "Uninstall." This will give you a list of all the screenlets
that are installed.
3. Simply click on the "Uninstall" button behind the screenlet of your choice and the screenlet will
be uninstalled. It will no longer appear in the E-view.

User interface 8 / 49
2.User interface
2.1.Device buttons
On the front of the device, on both sides of the touchscreen, there are two silver grey buttons,
called the device buttons. These can be used to switch between the Home and Away profiles.
These allow you to turn on and off multiple appliances/lights at once, according to your settings.
You can read more about the Home and Away settings in section 6.5.1 "Home and Away". ???.
Home and Away function is the default setting for device buttons. You can actually program the
device buttons to do much more, if you wish. See section Section6.6.4, “Device buttons” for details
2.2.Sensors
On the front of the device, on both left and right of the touchscreen, there are two small translucent
strips. Behind these strips there are sensors that can perform two functions:
• it can detect proximity
• it can detect movement through gestures
2.2.1.Proximity
By moving your hand close to a sensor, it will detect your hand, indicated by the light behind the
sensor. Proximity will wake up the screen (in default setting your screen will go into standby after
a while). In this way you can activate the screen without even having to touch it, allowing you to
perform an action immediately, or simply to see what is the current status even when you have
wet or dirty hands.
Also, in the E-view, holding your hand in front of the left sensor will open up the left side-menu,
unless you have specifically disabled this feature. The side-menu gives access to the screenlet
settings, and to your notifications and alarms.
Holding your hand in front of the right sensor opens up the navigation arrows (unless you have
disabled this feature). This will allow you to move to the next screen, or back to the previous screen.

User interface 9 / 49
2.2.2.Gestures
Working together, the proximity sensors support gesture control. By waving your hand once in
front of the sensors from left to right, or right to left, you can move to the next screen, or back
to the previous screen within screenlets.
The movement between screen is indicated by an arrow. A blocking arrow means that there are
no more screens in that direction.
For settings, see Section 6.6.6 Gestures.
2.3.LEDs
On the front of the device, on both sides of the touchscreen you find two translucent strips which
light up when the screen goes to sleep. These LEDs act as indications and notifications by from
the system and screenlets. You can set the preferred notification mode for the LEDs. In the default
setting, the LED colors display the electricity prices at the NordPool exchange. A red LED means
that the electricity price is currently high (above the average and close to daily peak-price), while
a green LED means that the electricity currently costs less than the average. Yellow and orange
lights state that the price is near average.
2.4.Touchscreen
2.4.1.Interface elements
2.4.1.1.E-view
This is the default interface. Here you can run the screenlets to control your appliances, see your
consumption, check the temperature etc. There are a few recurring interface elements that will
help you navigate and use the screenlets:
•E-icon
At the top of the screen in the middle you will see an "E" icon. Tapping this icon will always take
you to the screenlet you have designated as your "Home". If you have not removed screenlets
and changed this setting, your Home is the screenlet selection menu, the "Home Screenlet".

User interface 10 / 49
•Status Bar
If you click on the any side of the E on the black bar, the status bar will fold open. This will tell
you the status of a number of things:
• Home & Away mode
• Page indicator
• Tariff of the electricity price
• What time the next tariff change is
• The IP address of the device
You can also access the Main Setup from the Status Bar.You can close the status bar by clicking
on the round X icon
.
•Left side-menu icon
In the default setting, there will be a transparent icon in the lower left corner, which gives access
to the left side-menu. To open this menu, you can click on the icon, or keep your hand in front
of the left sensor.
•Page navigation icon
Depending on whether the current screenlet has multiple pages, there will be a page navigation
icon in the lower right corner. To open the page navigation, click on the icon, or keep your hand in
front of the right sensor. Simply click on the left arrow to move a page left, and the right arrow
to move a page to the right.
2.4.1.2.Main Setup
This is the interface where you configure your system. You can find all the settings and options for
the different sections here: Screenlets, Appliances, Actions settings, Consumption, System and
Device. Simply tap on the section that you would like to configure to open the list of settings and
options. Then tap on the setting or option and it will open the right page.
Slightly down the middle of the Main Setup you can see two URLs (if you have properly connected
the device to a network). These represent the Webview and the mobile view. Type the Web access
URL into a browser and you will access the Webview (see section 2.5).
In the top left corner you can see the time of your device. Next to the time you'll see the signal
strength of your network connection.
In the top right corner you can see the E-icon. Click on this to go to the E-view. This E-icon is always
present in the top right corner, throughout the Main Setup, allowing you to always have direct
access to the E-view.

User interface 11 / 49
In the bottom right corner you'll find the shutdown button. Click on the button to open the shut-
down options, and follow the steps.
2.5.WebView
If you have connected your Asema E to your home network, you can also access and configure
the Asema E through the Web View.
2.5.1.Accessing the WebView
In the Status Bar (and on the Main Setup page) you'll find an IP address:
Example2.1.Device URL
"Device URL: http://192.166.1.111"
Make sure your PC or tablet is connected to your home network. Then open a web browser and
type in that address. You will then enter the Asema E in the Web View.
2.5.2.Using the WebView
The Webview combines parts of the functionality of the E-view and the Main Setup to create a
dashboard for your PC or tablet.
Menu tabs
On the top of the screen there is a menu consisting of several tabs, giving access to the respective
settings. (In the device these are found in the Main Setup)
•Screenlets: Install, uninstall, update or configure screenlets.
•Appliances: Add, delete and configure Asema controllers and appliances.
•Actions: add, delete, or configure themes, set as schedules and tariff controls.
•Consumption: Add, delete or modify your electricity targets or target groups.

User interface 12 / 49
•System settings: configure miscellaneous settings such as Home & Away profiles, language and
rooms.
Dashboard
In the middle of the screen you will find the control dashboard. It has the appliance control buttons,
and theme buttons (provided you have added some). Use the buttons to switch appliances on or
off, or activate themes.
Historical consumption and price graphs
On the bottom of the screen you will see two graphs. On the left you can see the graphs for
the electricity price for your region, based on the Nordpool Spot price. Use the tabs to vary the
interval. On the right you will find the graphs displaying your historical consumption of either all
the appliances you have attached, or the information from your central meter. This depends on
your configuration. Use the tabs to vary the interval. You can also zoom the graphs with a mouse.
Real-time total consumption meter
Next to the graphs you can see a speedometer, which displays how much electricity is currently
being used. If you have connected the Asema E to a central meter in your home, the reading from
this meter is displayed. Otherwise the speedometer will show you the sum of measurements from
appliances.
The speedometer will also display an estimate of much electricity would cost if used at this rate for
a full day. Click on “Appliances” to see a pop-up window, which displays how much each connected
appliance is using individually.
Media player
On the bottom right, you will find the Media Player. This will play whichever media you are currently
playing, or have last played on your device. If you have listened to a radio-station, it will play that
radio-station. If you have played MP3s, it will play those.
2.5.3.Using the Mobile View
The Mobile View is a simplified version of the Web View tailored to be used with a mobile phone.
It offers a simple dashboard for switching appliances on and off and for monitoring consumption.
To access the Mobile View, add the word "/mobile" to the URL of the Web View. So for
example if Web View has the URL "http://192.168.1.10" the mobile view is accessible at
"http://192.168.1.10/mobile".
2.6.Connectors
Your Asema E has four connectors on the side of the device as shown on the picture below
•Audio connector (shown in red): This connector fits a standard 3mm male audio plug for con-
necting the Asema E to an external speaker system.
•Power connector (shown in green): Connect the power source to this micro USB connector.
•Programming connector (shown in yellow): This connector can be used to reprogram the device
to a new firmware.
•Memory card slot (shown in purple): Insert a micro SD card here to create a backup of your
Asema E or to view pictures or listen to MP3's.

User interface 13 / 49

Automating your home 14 / 49
3.Automating your home
Automating your home is the key to making it behave just the way you want, whether its energy
efficiency you are after or just plain living comfort. With Asema E you can automate your home in
many ways by adding not only controllers that do the hard work but also sensors that make the
system work more intelligently as the environment changes.
This chapter gives an overview of what kind of devices you can add to the system. Please refer
to the corresponding chapters in the System Setup section for information on how to actually
configure them.
The compatibility of your Asema E can also be expanded with radio expansion cards. These cards
are specifically programmed to support industry standards such as ZigBee to further expand the
number of devices you can control in your home. Visit www.asema.com for details.
3.1.Devices and appliances you can use for au-
tomation
3.1.1.Appliance controllers
Controllers are devices that do the actual work of automation, typically by switching electrical pow-
er ON and OFF from appliances and lights. Asema E is compatible with a range of controllers from
various manufacturers and Asema Electronics offers a family of energy aware wireless controllers,
the Asema S series, that are specifically made for an energy efficient house.
Asema S1 is the Swiss Army knife of automation. It is a very thin relay controller, specifically
designed to fit into tight spots like inside your wall socket or a crammed electrical distribution box.
Asema S2 is a DIN rail mountable group controller, ideal for controlling groups of appliances from
the distribution box. In a typical home many appliances are usually grouped into sets of appliances
that reside behind a circuit breaker. You don't need a separate controller for each and every one
of them (unless you absolutely insist, of course). Instead, attach an Asema S2 into the group and
control all of them at once.
Asema S3 is a very easy-to-install external controller with Schuko connectors. Just connect your
appliance into it like you would do with an extension cord and off you go. The Asema S3 has been
designed to be installed in a multitude of locations so you can wrap and unwrap the cables and
detach parts to make the controller fit tricky locations like behind a sofa.
All Asema S series controllers support both switching power and measuring consumption. Refer
to the installation manual of each controller for more info on how to make the physical installation.
Then refer to Section1.2.4, “Adding controllers and connecting to appliances” for info on how to
pair them with the system.
3.1.2.Central electricity meters
Central electricity meters are your primary tool when you want to know how much electricity your
home is actually consuming and want to get estimates of your electricity bill. Unlike controllers, a
central meter is designed to measure everything in the home. Note also that there is always only
one central meter in one Asema E installation.
If you live in a home with a modern electricity meter (the so called AMR meter), the meter from
your utility might actually already be compatible with Asema E. Check http://www.asema.com/

Automating your home 15 / 49
compatibility for information on compatible meters. If you have a compatible meter, your utility
will give you instructions on how to pair it with an Asema E.
If you don't have a compatible utility meter or don't want to use it, Asema Electronics manufactures
a line of metering tools to help you measure your consumption, the Asema M series.
Asema M1 is an optical reader for the utility meter. Each modern utility meter (whether its com-
patible with Asema E or not) has a blinking LED light that signals the readings of the meter. The
Asema M1 is a product that is attached on top of that LED light and it monitors your consumption
from there.
Asema M2 is an independent metering tool that uses current clamps for measuring the incoming
electrical current in your house. The Asema M2 is installed to the distribution box of your home
and it wirelessly transmits the measured electricity consumption.
For more information on how to physically install Asema M1 and Asema M2, please refer to the
user manuals of those products. Then read Section6.2.8, “Central meter” for details on how to
pair it to your system.
3.1.3.Remote controls and wireless buttons
Asema E is compatible with a range of inexpensive wireless remote controllers such as wireless
keyrings, wall switches and many more. These make it possible for you to control your home from
various locations of your choice without the need to always use the touchscreen or your phone.
For more information on compatible remote controls, visit http://www.asema.com/compatibility.
The read Section6.2.4, “Remotes” for more information on how to add them to the system.
3.1.4.Motion detectors and other sensors
As well as remotes, Asema E can also work with many third-party sensors like motion detectors
or ambient light sensors. These can be made to for instance trigger themes like "night mode" or
"day mode" you define in the system.
For a list of compatible devices visit http://www.asema.com/compatibility. For instructions on how
to add sensors to the system read Section6.2.3, “Sensors”.
3.1.5.Weather stations
Weather stations help in monitoring the weather conditions outside the house or temperature
inside the house. Asema E supports wireless, battery operated weather sensors that help you in
creating hourly time series of how the weather has changed. These are automatically transferred
to www.asema.com from where you can track them. Of course the corresponding screenlets help
you do that, too.
For a list of compatible weather stations, go to http://www.asema.com/compatibility. Instructions
on how to pair weather stations with Asema E can be found at Section6.2.7, “Weather stations”.
3.2.Home and Away
Home and Away are basic features of home automation that should form the core of energy saving.
In the simplest mode Home and Away allow you to turn on and off multiple appliances/lights at
once, but you can also expand them to activate custom Themes, depending on your settings.
Table of contents
Popular Touchscreen manuals by other brands

peoplenet
peoplenet eDriver Logs BLU Quick reference guide

Carrier
Carrier equipment touch Installation and setup guide

urmet domus
urmet domus 1068/027 manual

ViewSonic
ViewSonic IFP50-5 Series user guide

CIAT
CIAT DynaCIAT LG instruction manual

KMC Controls
KMC Controls BAC-19 FlexStat Series Sequence Of Operation