MBTelehealth DX80 User manual

Page 1 of 16
MBTelehealth - DX80 Touchscreen User Guide
DX80 Touchscreen
User Guide
07Mar2018

Page 2 of 16
MBTelehealth - DX80 Touchscreen User Guide
Table of Contents
Table of Contents
GENERAL USE ...................................................5
Site to Site Calls ..............................................................6
Connecting to an MBT Site............................................................ 6
Add a Site to Favorites ............................................................... 6
Connecting to a site outside the MBT Network ............................................ 7
Far End Camera Control .......................................................7
Sharing Presentation: Site to Site ...................................................... 8
Screen Layout: Presentation - Site to Site ............................................... 8
Recent Calls and Favourites ....................................................9
Multi-Site Event Calls (MCU) ....................................................10
Connecting to a Multi Site (MCU) Call ................................................... 10
Screen Layout/Far End: No Presentation - Multi-Site ....................................... 11
Sharing Presentation: Multi Site ....................................................... 11
Screen Layout: Presentation - Multi Site ................................................ 12
Receiving and Ending Video Calls ................................................13
DUAL VIDEO ENABLED EQUIPMENT..................................14
TROUBLESHOOTING ..............................................15
ADDITIONAL TRAINING INFORMATION ................................16
VIDEOCONFERENCING ETIQUETTE ..................................16

Page 3 of 16
MBTelehealth - DX80 Touchscreen User Guide
Back of DX80 unit
Power supply socket
USB computer connection
HDMI computer connection
HDMI external monitor connection (not in
use)
SD card slot and Kensington lock
USB ports
LAN expansion connection. Connect
your computer LAN here to let your Cisco
DX80 and computer share a common LAN
connection
LAN connection
1
2
3
4
5
Camera with privacy shutter, turn counter-
clockwise to shut and clockwise to open
Microphone mute button, loudspeaker volume
controls and USB socket on the right side of the
unit.
Power On/OFF
Loudspeaker
Microphone in each leg
1
2
3
4
5
6
7
8
Main Components of the DX80
The monitor of the DX80 is an all-in-one touchscreen unit and does not require a remote control. This unit is
available in the following congurations as shown on the next page: desktop unit, mobile unit, and xed unit
(mounted to the wall).
Note: other than in this section, the screenshots used in this guide are shown on a DX80 desktop unit.
Use as a PC monitor by using an HDMI cable to connect your computer to the HDMI socket PC (see below) .
Switch between PC monitor and Video screen by tapping the screen. If you do not see all of the menu items along
the bottom of the screen, this may indicate that the monitor is in sleep mode. Move the mouse or press a key on the
keyboard to wake it up. This only applies when using the unit as a PC monitor.
Incoming calls will appear as usual, irrespective of whether the screen is on PC or video.

Page 4 of 16
MBTelehealth - DX80 Touchscreen User Guide
DX80 Conguration Options
This unit is available in the congurations shown below: desktop unit, mobile unit, xed unit/mounted to the
wall.
Desktop
Mobile Fixed/wall mounted
The monitor
height can be
adjusted

Page 5 of 16
MBTelehealth - DX80 Touchscreen User Guide
GENERAL USE
The following sections will provide instructions for using your DX80 Touchscreen solution to place and
receive videoconference calls.
Selfview
Tap Selfview to turn it on and off.
Tap anywhere outside the menu to exit.
Selfview
Tap and hold the Selfview image.
When using a mobile cart, you will need to plug the unit in and turn on the power.
Before the meeting starts we recommend that you check the selfview. Selfview shows what others see from
your video system. You will normally use it to conrm that the other site/s see what you want them to see.
The selfview appears as a PIP (Picture-in-Picture).
You will see the alternate positions
available for the selfview image.
Keep holding the image and drag it
to the new position, lift your nger to
release it.

Page 6 of 16
MBTelehealth - DX80 Touchscreen User Guide
Connect to an MBT Site
Add a Site to Favorites
Site to Site Calls
Connecting to an MBT Site
Add a Site to Favorites
Key the 5 digit number into the search eld and tap the More (...)
icon.
Tap Mark as Favorite.
The next time you need to call the site, tap Call, tap the Favorites
tab and locate the site. Tap Call to connect.
If you call the same sites you can save the contact to the favourites list.
Tap Call. Tap in the search/dial eld to invoke
the keypad.
Type in the 5 digit number and
then tap Call to connect.
Tap End to disconnect.
Locate the 5 digit number on the Whiteboard,
Conrmation or Clinic List (beside the VCU#).
To switch between PC monitor and
video screen - tap the screen.
If the monitor is in sleep mode - move
the mouse or press a key on the
keyboard to wake it up.
5 digit number

Page 7 of 16
MBTelehealth - DX80 Touchscreen User Guide
Connect to a Site Outside the MBT Network
Connecting to a site outside the MBT Network
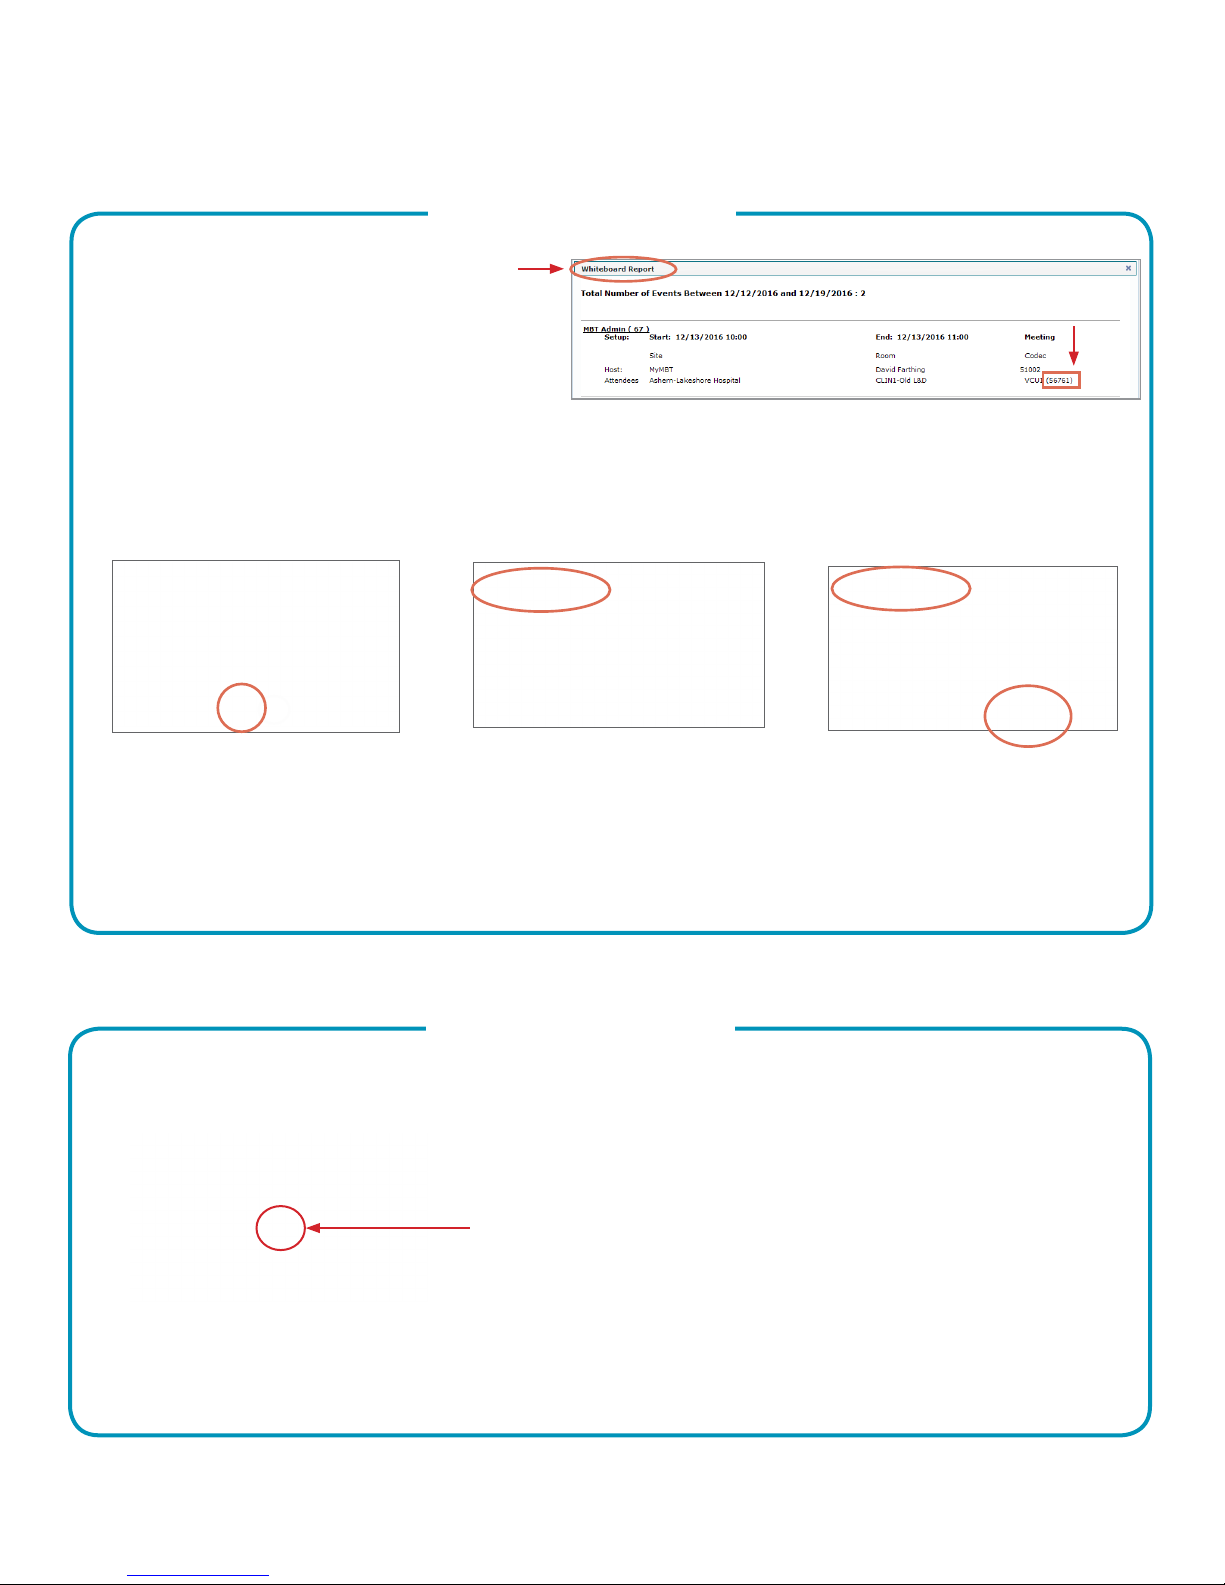
Tap Participants in the top
right corner to invoke the list of
participants.
Tap anywhere outside the camera control
buttons when you’re done to return to near
end to control of your own camera.
Tap Call. Type in the phone number that you have been provided.
Tap Call to connect.
Tap End to disconnect.
Taking far end camera control allows you to move the camera at the far end site. Before taking control,
always request permission rst. You may need to take far end camera control if the person on the other end
is unable to operate their own camera.
The camera controls allow you to manually control the zoom, pan and tilt of the other site’s camera - this only
applies if the other site has a remotely controllable camera and not a xed camera such as the one on the
DX80.
Far End Camera Control
Far End Control - Site to Site
Site to Site: Adjust the other site’s
camera using the pan/tilt arrows and
zoom +/-. (Note: This only applies
if the other site has a remotely
controllable camera - unlike the DX80
which has a xed camera.)
Multi-site: Use the Up/down
arrows to scroll through the layout
options.
Tap the site whose camera you
want to control and then tap
Camera.

Page 8 of 16
MBTelehealth - DX80 Touchscreen User Guide
Screen Layout: Presentation - Site to Site
Tap Layout to change the
layout. Tap the preferred layout (see options below).
Tap anywhere outside the menu when done.
Connect your source and make sure it is turned on.P
Share Presentation: Site to Site
Sharing Presentation: Site to Site
Equal Overlay
Prominent Single
Your Site Other Site
Selfview
Tap Stop sharing to stop
sharing your presentation.
Tap Show PC to
display your screen locally - it
will not be shown to other
participants. To hide, tap Hide
PC.
Tap Share and the content
will be shared with the other
participant/s.
An onscreen message will be
displayed when you are sharing.

Page 9 of 16
MBTelehealth - DX80 Touchscreen User Guide
TIP
When the presenting site exits the presentation, the menu options will default back to Far
End control.
Screen Layout: Presentation Options
Site to Site
• Minimize - allows you to view the speaker full screen and puts
the presentation over on the left hand side.
• Maximize - allows you to restore the presentation and toggle
between the presenter and presentation in case the presenter is
speaking between slides.
• Move presentation PIP- allows you to move your presentation
around the screen. Press and hold the presentation box on the
screen and when it turns blue, drag it to the desired location
and lift your nger to release it (location options are indicated by a
grey box).
• Presentation full screen - tap layout and then select single.
Recent Calls and Favourites
These options apply to both MBT sites and calls outside of the MBT network.
Some sites may like this option if they frequently call the same sites.
Tap to select the entry (a) and tap Call (b).
Using Recents and Favourites
Layout
Minimize/Maximize
ab
Tap Call (not shown) and then
tap Recents or Favorites.

Page 10 of 16
MBTelehealth - DX80 Touchscreen User Guide
You can add a site from the Directory or from the Recent Calls list to the Favorites list. This is helpful for
sites who would like to add their most frequently called sites.
Tap Recents or Directory or type in the 5
digit number and search for the entry you
would like to add to the Favorites.
Tap the site and then tap More (...).
Tap Mark as Favorite.
You can tap Call if you wish to connect.
Note: A Favorite is denoted by a gold star.
Adding Favourites
Connect to an MCU Call
Multi-Site Event Calls (MCU)
Connecting to a Multi Site (MCU) Call
• If you are participating in a multi-site event (3 or more participating sites) you will
be automatically connected by the MBTelehealth service desk at the scheduled start time.
• Do not attempt to connect to another location.
• You will be automatically disconnected at the scheduled end time. ***There will be a 10 minute
warning prior to the disconnection.
• Ensure your microphone is muted when the session starts (unless you are speaking).

Page 11 of 16
MBTelehealth - DX80 Touchscreen User Guide
Screen Layout: No Presentation
Multi Site
Screen Layout/Far End: No Presentation - Multi-Site
During Multi Site calls, you can control how the other sites are displayed on your screen.
Sharing Presentation: Multi Site
Focus speaker during multi-site (MCU): If you notice that the voice activation is no longer
working you may have accidentally overridden it. To reactivate it tap the participant box, tap
Camera and then use the left/right arrows. Keep scrolling until you see the presenter icon.
Voice activation is now in effect.
Tap the participant icon. Use the Up/Down arrows to scroll
through the layout options
Tap anywhere outside the participant
box to return to near end.
Connect your source and make sure it is turned on.P
Share Presentation: Multi Site
Tap Stop sharing to stop
sharing your presentation.
Tap Show PC to
display your screen locally - it
will not be shown to other
participants. To hide, tap Hide
PC.
Tap Share and the content
will be shared with the other
participant/s.
An onscreen message will be
displayed when you are sharing.
Tap the Multi Site MCU site
and then tap Camera.

Page 12 of 16
MBTelehealth - DX80 Touchscreen User Guide
Screen Layout: Presentation - Multi Site
Equal Overlay
Prominent Single
Your Site Other Site
Selfview
TIP Tap Layout to view your menu options. These options are only available while
sharing content. When the presenting site exits the presentation, the menu options
will default back to Far End control.
Screen Layout: Presentation Options
Multi Site
• Minimize - allows you to view the speaker full screen and puts
the presentation over on the left hand side.
• Maximize - allows you to restore the presentation and toggle
between the presenter and presentation in case the presenter is
speaking between slides.
• Move presentation PIP- allows you to move your presentation
around the screen. Press and hold the presentation box on the
screen and when it turns blue, drag it to the desired location
and lift your nger to release it (location options are indicated by a
grey box).
Layout
Minimize/Maximize
Tap Layout to change the
layout.
Tap the preferred layout (see options below).
Tap anywhere outside the menu when done.

Page 13 of 16
MBTelehealth - DX80 Touchscreen User Guide
Receiving and Ending Video Calls
Receiving Calls
You will hear a dial tone that indicates there is an incoming call,
press Answer to accept the call. Ensure your microphone
is not on mute after you answer to ensure the other site(s) can hear you.
Your Cisco DX80 may be congured to automatically accept all incoming connection
requests, then both site to site connections initiated by another site and multi-site connections
would be automatically connected. (Note: Contact your FES to conrm how your particular equipment
has been congured.)
Ending Calls
At the completion of every call, press End to disconnect.

Page 14 of 16
MBTelehealth - DX80 Touchscreen User Guide
Remote Layout
Note: This information is only applicable to point to point calls between a dual video enabled presenting
site and a non-dual video enabled receiving site.
If the presenter site changes the Remote Layout to Equal, the receiving site will see both the camera
and the presentation in equal size within the one video feed. They also have the ability to show their
own selfview in the corner of the screen.
The receiving site does not have the ability to change the layout back to see just the presentation full
screen as they do not have that functionality on their non-dual video enabled equipment. The presenting
site will need to change the Remote Layout back to Single under the layout options.
Dual Video Enabled Equipment
TIP
TIP
Note: This information is only applicable for point to point calls when both units are using dual video
enabled equipment.
The equipment listed below supports dual video which allows users to display and view two different
live video feeds simultaneously. For instance, you could view both the PC presentation as well as the
person who delivers the presentation. With two video streams, the receiving site is able to control the
layout of how they view each of the feeds.
If the connecting video system does not support dual video then no second video stream will be
established for this system and the camera or PC presentation will be shown as the main video feed.
If both pieces of equipment are dual video enabled then both sites are able to change their own
screen layout by pressing Layout and selecting the desired option.
Use caution when using layout options other than Single as the quality of the picture will be
reduced for the other site.
If the other site mentions that their layout has changed it’s possible that you have changed the Remote
layout option from single; to change it back, tap Layout and then tap Single.:
DUAL VIDEO ENABLED EQUIPMENT
• VX Clinical Assistant (mobile cart)
• Ergotron (clinical mobile cart )
• AVFI (non-clinical mobile cart)
• Cisco SX series equipment
• MX200/300 (touchscreen)
• DX80 Touchscreen

Page 15 of 16
MBTelehealth - DX80 Touchscreen User Guide
TROUBLESHOOTING
Audio Issues
Issue Possible Cause Resolution
Far end site unable to hear you • Your microphone is muted • Un-mute your microphone
Unable to hear far end site • Microphone is muted at far end site
• Near end monitor and/or codec volume is too
low
• Ask far end site to un-mute their microphone
• Increase the volume on the monitor and/or the codec
Audio distortion from far end site • Far end site monitor volume is too high • Ask far end site to turn down the volume on their monitor
Echo or distortion at near end when
people speaking
• Far end microphone is situated too close to the
monitor
• Speaker/volume is too high on far end monitor
• Ask to move microphone further away from monitor
• Ask far end site to turn volume down on their monitor
Video Issues
Issue Possible Cause Resolution
Picture is blank on the near end
monitor
• System has gone into “sleep” mode
• Monitor has been powered off
• Move the mouse or press a key on the keyboard to wake the
system up
• Turn the monitor on
Near-end site unable to hear or see
the picture from far-end peripheral
• Proper input has not been selected by far end
site
• Cables are not properly connected
• Far end site should correct input selection on remote control
• Check that output from laptop or patient camera are
connected properly
If you are experiencing any problems with the videoconferencing equipment or have any questions,
please contact the Service Desk for assistance:
Service Desk 204-940-8500 Option 4
or toll-free 1-866-999-9698 Option 4
NEED HELP?

Page 16 of 16
MBTelehealth - DX80 Touchscreen User Guide
ADDITIONAL TRAINING INFORMATION
VIDEOCONFERENCING ETIQUETTE
For additional information on videoconference equipment visit www.mbtelehealth.ca or contact your
Facilitator-eHealth Solutions.
The following tips on videoconferencing etiquette will help prepare you for a successful session:
9Assume that people can see and hear you as the camera and microphone are always “Live”.
9Always check your selfview so you are aware of what will be displaying at the far-end site.
9Conrm that the other site can see and hear you and identify yourself and anyone else in the room.
9Speak directly towards the microphone and use your normal speaking voice.
9Try to avoid a lot of movement or shufing of papers as this may affect the quality of the sound
transmission.
9Due to the audio delay, pause for clients to ask or answer questions or when they have comments.
9Always ensure there are no further questions and that the client is aware of follow-up instructions
before signing off.
Table of contents
Popular Touchscreen manuals by other brands

Fireye
Fireye Plant Master Guide

Elo Touch Solutions
Elo Touch Solutions i-Series user manual

Elo TouchSystems
Elo TouchSystems 2200L Specification sheet

SeaLevel
SeaLevel HazPAC 10-8.4 user manual

Johnson Controls
Johnson Controls Advanced Graphic Touchscreen Display Installation and operation manual

Tyco Electronics
Tyco Electronics B-Series user guide