Note: we suggest to use the alkaline batteries.
Using Headphones
Your d will run on either batteries or power adaptor. Follow the instructions below according to
source you intend to use.
igital drum the power
Using an AC- Adaptor
Using Batteries
Power will be automatically drawn from the AC adaptor
if an optional AC adaptor is connected while batteries are
installed in the instrument.
It is recommended that you replace worn batteries as soon
as possible. When battery voltage drops, the display will dim
and / or the sound will become distorted, when this occurs,
replace the batteries with a complete set of six new batteries
of the same type.
NEVER mix old and new batteries, different types of batteries
(alkaline, magnesium, etc.), Batteries by different makers,
or batteries from the same maker but of different types.
Misuse may cause the instrument to become hot, result in
fire, or battery leakage.
Also, to prevent damage due to battery leakage, remove
all the batteries from the instrument when it is not to be
used for an extended period of time.
Batteries left in an unused instrument will also loose their
power overtime.
Turn off the power on all equipment before making
any connections.
Do not use adaptors other than the one specified.
The technical specification of the adaptor is DC 12V
output, center positive type.
Auto Power Off
In order to save energy, we have designed the “Automatic
Shutdown” function. With this function, this product will
shutdown automatically when you have left it idle for more
than30 minutes.
If you don't need this function, just press and hold the
[PLAY/STOP] button then turn the drum on.
CAUTION
NOTES
Connect the power adaptor to the DC IN jack located
on the rear panel of the unit,and plug the AC power
adaptor into an AC power outlet.
Open the battery compartment conver on the
underside of the unit.
Insert six “C” size, R14, SUM-2 or equivalent
batteries.When inserting the batteries, be
care to follow the polarity markings in the
illustration.
Close the battery compartment securely.
An optional set of stereo headphones can be
connected to the PHONES/OUTPUT jack located
on the rear panel. when a pair of headphones is
connected to the jack, the internal speakers of the
unit will switch off automatically, perfect for private
practice or late night playing. if you want to use an
external sound system, the headphone jack can
also be used to connect the dightal drum to a stereo
system of mixing console.
SETTING UP
Power Supply
The EDP450 will run on either batteries or power adaptor. Follow the instructions below according to the power
source you intend to use.
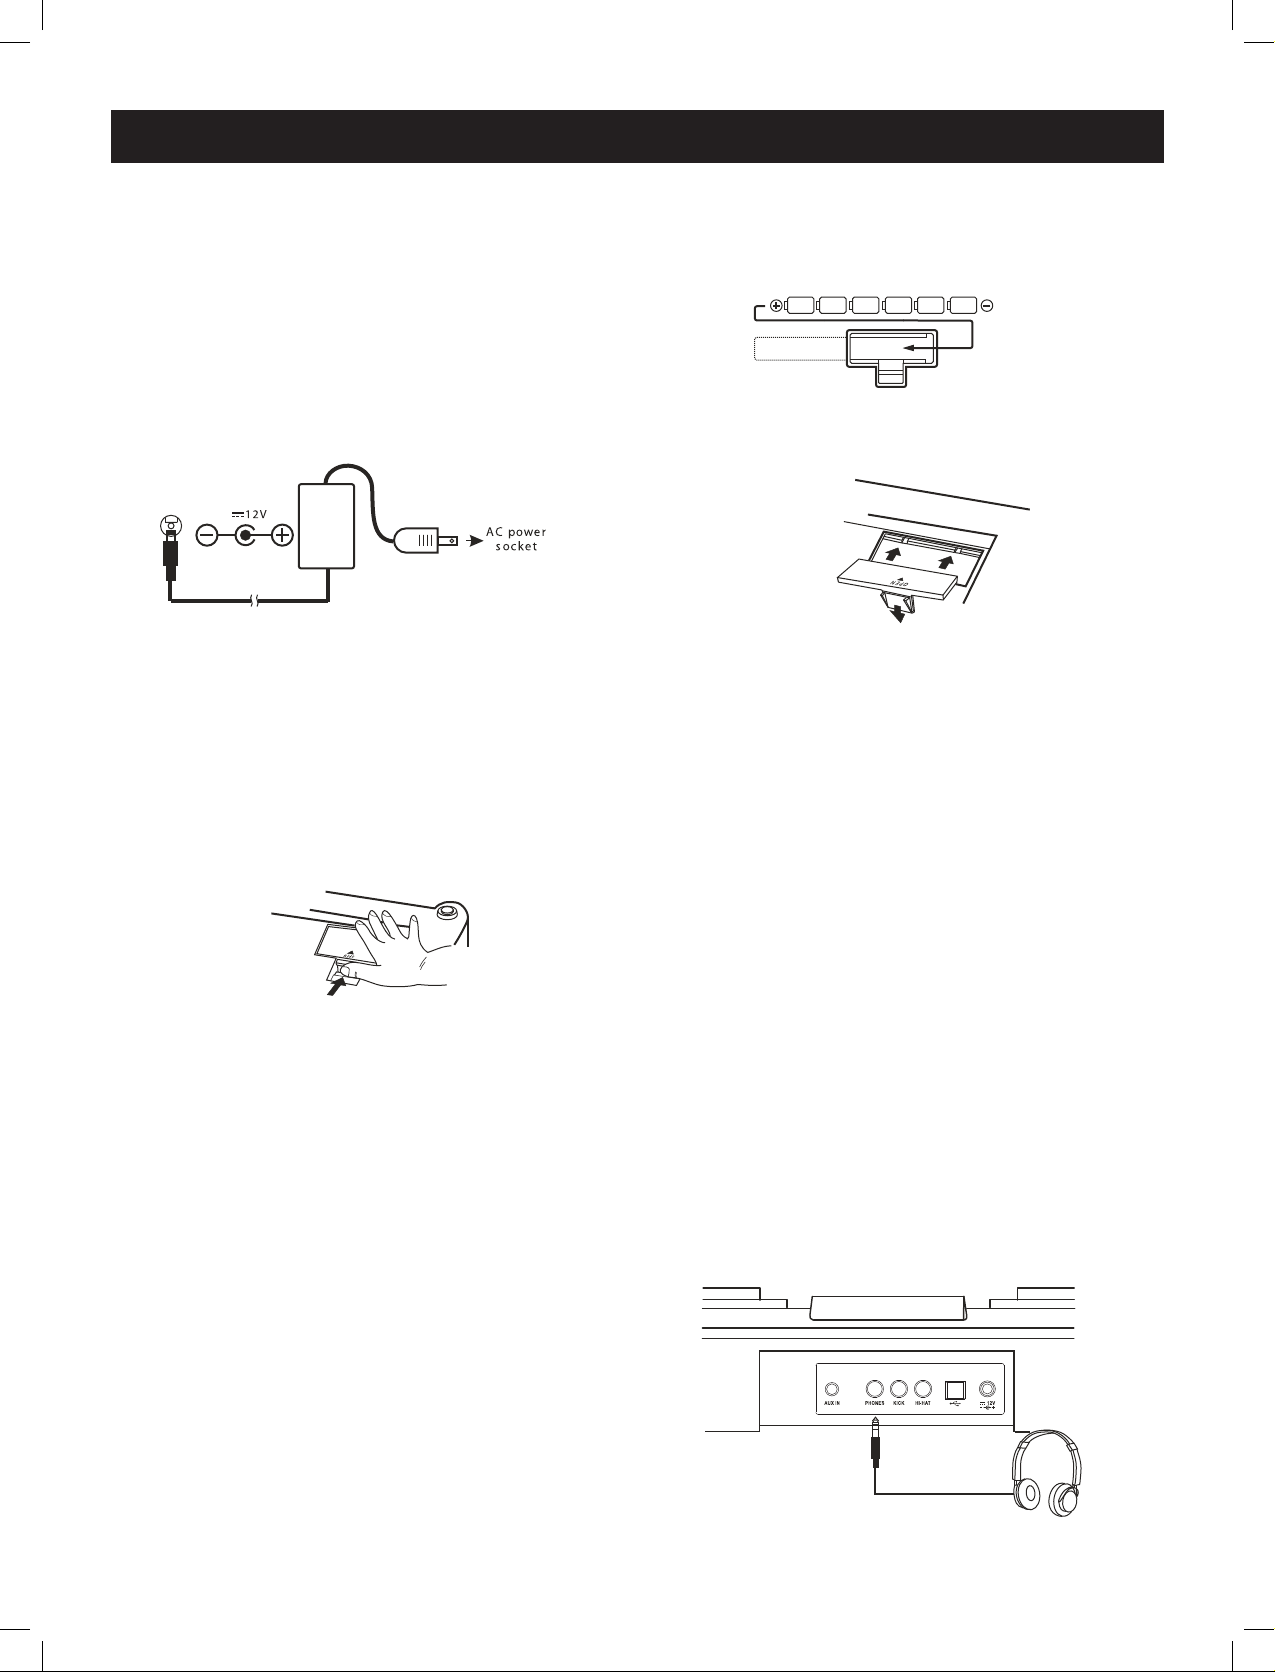
Using an AC- Adaptor
Connect the power adaptor to the DC IN Jack located on the
rear panel of the unit, and plug the AC power adaptor into an
AC power outlet.
Do not use adaptors other than the one specified.
The technical specification of the adaptor is DC12V
output, center positive type.
Using Batteries
1. Open the battery compartment cover on the
underside of the unit.
2. Insert six “C” size, R14, SUM-2 or equivalent
batteries. When inserting the batteries, be
sure to follow the polarity markings in the
illustration.
Note:We suggest using alkaline batteries.
NOTES
• Power will be automatically drawn from the AC adaptor
if an optional AC adaptor is connected while batteries are installed in the
instrument.
CAUTION
• It is recommended that you replace worn batteries as
soon as possible. When battery voltage drops, the display will dim and / or
the sound will become distorted, when this occurs, replace the batteries
with a complete set of six new batteries of the same type.
• NEVER mix old and new batteries, different types of batteries (alkaline,
magnesium, etc.), Batteries by different makers, or batteries from the same
maker but of different types. Misuse may cause the instrument to become
hot and possibly result in fire, or battery leakage.
• Also, to prevent damage due to battery leakage, remove
all the batteries from the instrument when it is not to be used for an
extended period of time. Batteries left in an unused instrument will also
loose their power overtime.
AUTO POWER OFF
In order to save energy, we have designed the “Automatic Shutdown”
function. With this function, the EDP450 will shutdown automatically when
you have left it idle for more than 30 minutes. If you don’t need this function,
just press and hold the [PLAY/STOP] button then turn the instrument on.
3. Close the battery compartment securely,
Using Headphones:
An optional set of stereo headphones can be
connected to the PHONES/OUTPUT jack located
on the rear panel. when a pair of headphones is
connected to the jack, the internal speakers of the
unit will switch off automatically, perfect for private
practice or late night playing. if you want to use an
external sound system, the headphone jack can
also be used to connect the EDP450 to a stereo
system or mixing console.
Turn off the power on all equipment before making
any connections.
4