ATV aDrums EXS-3 User manual

User’s Manual
EN
JA
aDrums EXS-3

2
Contents
Setup ............................................................3
Package Contents ................................................................... 3
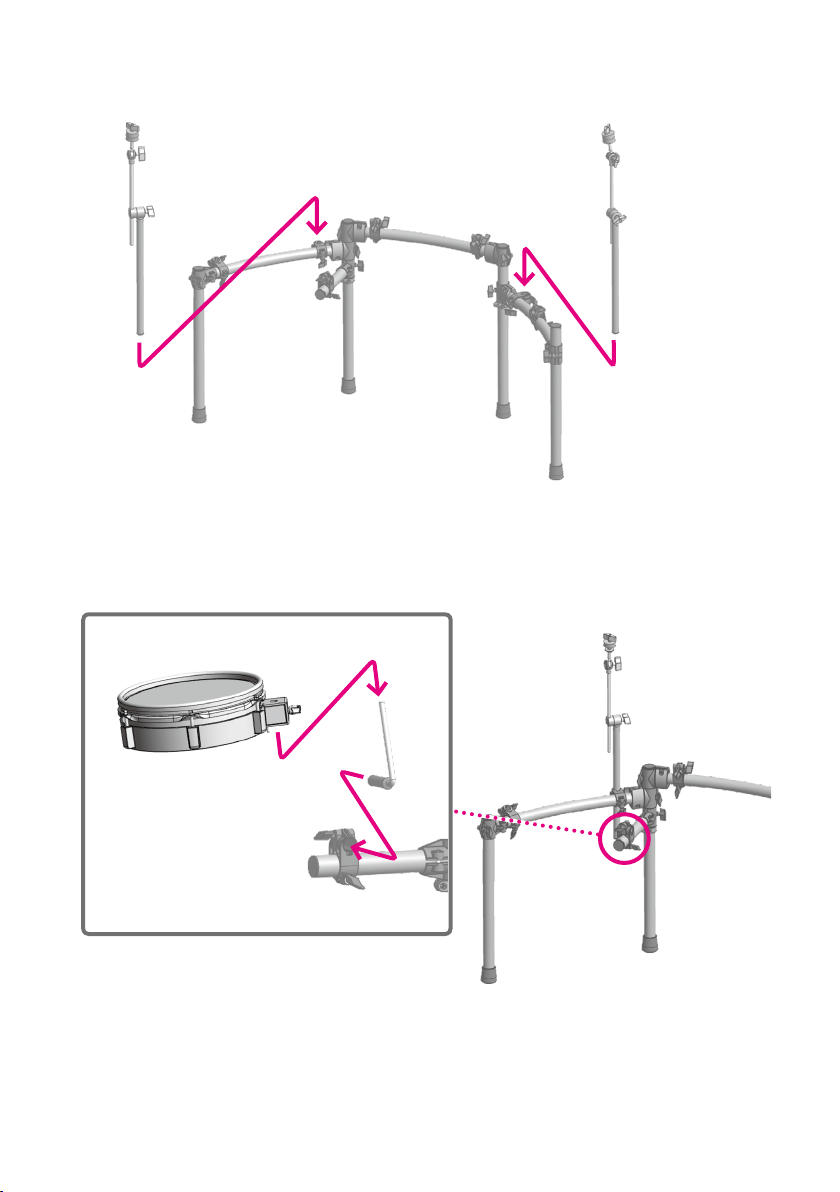
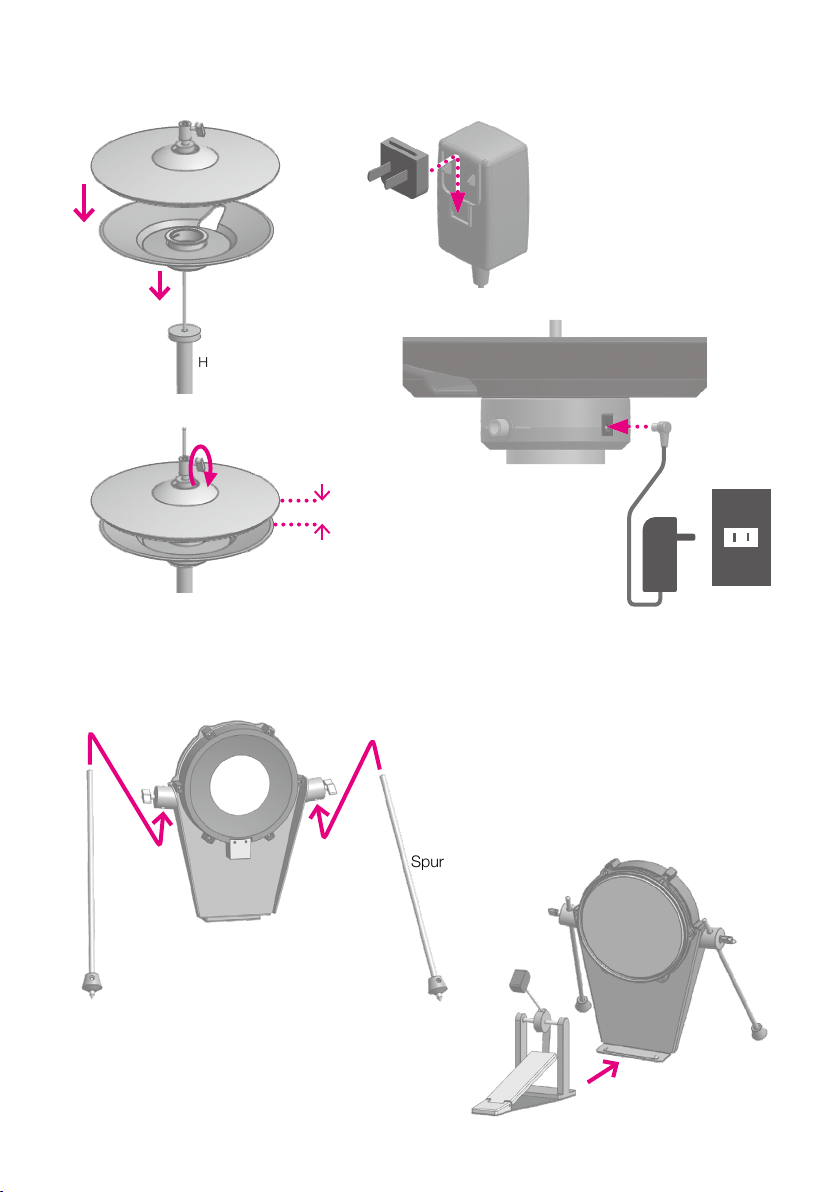
Assembly Guide ..................................................................... 4
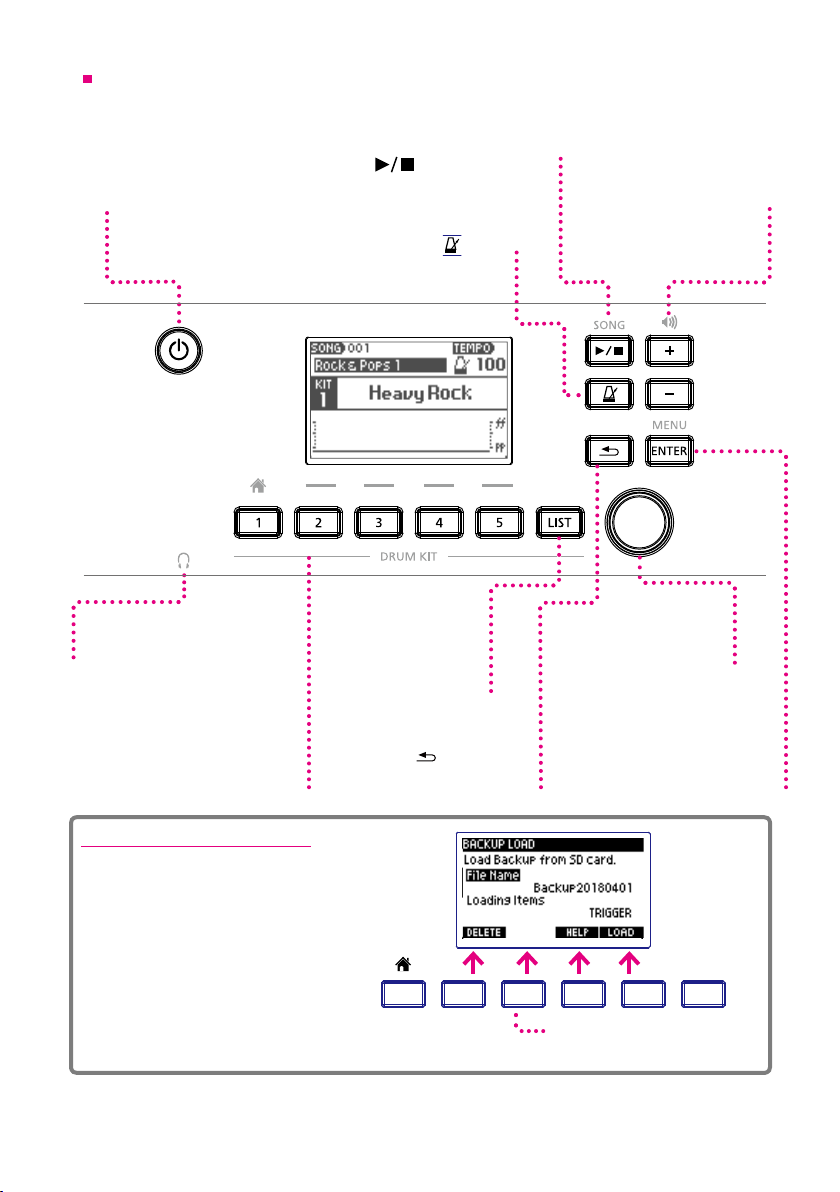
Top Panel ......................................................................... 10
Rear Panel ........................................................................ 11
1 Getting Ready...................................................12
Connecting Audio Equipment .......................................................... 12
Connecting the Pads................................................................. 12
Zones supported by the xD3's trigger inputs ............................................... 13
Power On / O ..................................................................... 13
SETUP - Trigger Settings.............................................................. 14
Cross-talk Cancel Wizard ............................................................. 15
SETUP - Utility Functions.............................................................. 16
2 Performing .....................................................22
Home Screen ...................................................................... 22
Performing ........................................................................ 22
Changing the Drum Kit ............................................................... 23
Selecting a drum kit from the list ........................................................ 23
Song Playback ..................................................................... 23
Using the Metronome ................................................................ 24
Using the Visualizer .................................................................. 24
3 Menu Functions and Settings .......................................25
SONG ............................................................................ 26
METRONOME...................................................................... 29
RECORDING....................................................................... 30
INST LEVEL (Adjusting the volume of each pad) ............................................ 31
SETUP - System Settings ............................................................. 31
4 Detailed Information ..............................................32
Specications ...................................................................... 32
Support........................................................................... 32
5 Important Notice.................................................33
Important Safety Information ........................................................... 33
Important Information about Use ........................................................ 34
Before using aDrums EXS-3 be sure to read ‘5 Important Notices’ p.33.
Welcome.

3
Setup
Package Contents
This product includes the following items.
xD3 drum sound
instrument Multi-trigger cable
Drum arms x4
Quick Start Guide
Drum key
Cable tie
SD memory card
Kick Pad
Tom Pads x3Snare Pad
Crash Cymbal Pad
Tube A x2 Tube B x2
Tube D
Tube E
Tube F
Tube C
Ride Cymbal Pad
Hi-hat pad
Spurs for Kick Pad x2
AC adapter
AC adapter for hi-hat pad
Drum Rack
Cymbal arms x2

4
Setup
Assembly Guide
Connect tubes A to F as the gure right shows.
*A corresponding label (A to F) is attached to each tube.
1 Insert tube A into the tube C clamp
2 Insert tube A and tube B into the clamps at the ends of tube D
Tube A
Tube A
Stand L
*Securely tighten the
clamp bolts
*Securely tighten the clamp bolt
Tube B
Tube D
Tube C
D
D
B
C
A
B
E
F
A

5
Setup
3 Insert tube A and tube B into the clamps at the ends of tube F
*Securely tighten the
clamp bolts
Stand L
Tube A
Tube B
70mm
Stand R
Stand R
4 Attach tube E clamps to stands L and R
Tube E
Tube F
E
F

6
Setup
5 Attach the cymbal boom arms
1
2
*Adjust the tension of the pad head using the included tuning key.
*Securely tighten all bolts
6 Attach the L-arm to the clamp (1) and the snare to the L-arm (2)

7
Setup
7 Attach the tom L-arms to the clamps (1)
and the toms to the L-arms (2) as shown
8 Attach the cymbal pads to the boom arms.
1
2
*Adjust the tension of the head using the tuning key
included in the package.
1
2
2
*Securely tighten all bolts
Crash cymbal
Ride cymbal
1
Do not over tighten the wing-nuts. For a natural
feel, cymbals should swing freely.

8
Setup
Hi-hat stand
2--3cm
Spur
9 Attach the hi-hat cymbals
10 Attach the spurs to the kick drum pad
1
3
2
4
5
6
*A hi-hat stand is not included.
*This AC adaptor can be used
worldwide. Please connect the
adaptor to a plug attachment (several
types included) that is correct for the
country of use.
12
3
*Tighten the knobs
*A kick pedal is not included.
*The tip of the spur can be adjusted so it protrudes from the rubber
stopper.
*Note that the spikes can damage oors.
*Note that the spikes can damage your body.
AC adapter for hi-hat optical
sensor (bottom cymbal). Switch
“On” (light is lit).

9
Setup
*After completing the assembly verify that all the bolts are securely tightened.
11 Attach the xD3 drum sound instrument

10
Setup
担当
生産図
葉数: 1 / 1
図面番号:
名称:
色調:
設計:承認:
1
2
3
4
5
6
発行:ATV株式会社
eD3 TOP PANEL
HR08-****
改定履歴
Mori
2017.3.27
承認日付
公差:±0.3
Gray (C0M0Y0K50)
担当
生産図
葉数: 1 / 1
図面番号:
名称:
色調:
設計:承認:
1
2
3
4
5
6
発行:ATV株式会社
eD3 TOP PANEL
HR08-****
改定履歴
Mori
2017.3.27
承認日付
公差:±0.3
Gray (C0M0Y0K50)
Power Button
Long-press this button to
turn the power on/o.
Value Knob
Use to select dierent
menu items and settings.
Use also to adjust values.
PHONES
Audio jack for headphones.
[ENTER/MENU] Button
From the home screen, press to
access the main menu. Use [ENTER]
to conrm menu and setting selection
and adjusted values.
Drum Kit Buttons[1]--[5]
[1]—[5] Use to select registered
drum kits.
Press button [1] to return to the Home
screen.
[
VOLUMESONG
HOME
HOME
TRACK
CLICK
HOME
HOME
CLICK
CLICK
CLICK
HOME
HOME
MENU
VARIATION
SONG
1 2 3 4 5
ENTER
MENU
–––––––––––––––––––––––––– DRUM KIT ––––––––––––––––––––––––––
1 2 3 4 5
ENTER
LIST
HOME
MENU
](BACK)Button
Return to the previous screen.
[LIST]Button
Press to display the list of
drum kits for selection.
VOLUME [+][–]Buttons
Use to adjust the
headphone and output volume.
SONG [ ](PLAY/STOP)Button
Use to start and stop the song.
An SD memory card is necessary
for song playback.
Only the buttons being operated light up.
Metronome[
VOLUMESONG
HOME
HOME
TRACK
CLICK
HOME
HOME
CLICK
CLICK
CLICK
HOME
HOME
MENU
VARIATION
SONG
1 2 3 4 5
ENTER
MENU
–––––––––––––––––––––––––– DRUM KIT ––––––––––––––––––––––––––
1 2 3 4 5
ENTER
LIST
HOME
MENU
]Button
Use to turn on / o the
built-in metronome.
VOLUMESONG
HOME
HOME
TRACK
CLICK
HOME
HOME
CLICK
CLICK
CLICK
HOME
HOME
MENU
VARIATION
SONG
1 2 3 4 5
ENTER
MENU
–––––––––––––––––––––––––– DRUM KIT ––––––––––––––––––––––––––
1 2 3 4 5
ENTER
LIST
HOME
MENU
Buttons for which there are no
corresponding menu items are unlit. .
About the Function Buttons
Aside from the "Home" screen, buttons
[2] [3] [4] [5] are used to select displayed
menu functions.
For example, as shown on the screen
(right):
[2] Button = DELETE
[4] Button = HELP
[5] Button = LOAD
xD3 Top Panel

11
Setup
担当
生産図
葉数: 1 / 1
図面番号:
名称:
色調:
設計:承認:
1
2
3
4
5
6
発行:ATV株式会社
eD3 BOTTOM CASE
HR08-****
改定履歴
Mori
2017.3.27
承認日付
公差:±0.3
Gray (C0M0Y0K50)
CRASH 2
Connect an additional
cymbal pad to
expand the drum set.
MIDI OUT
Connect MIDI devices
and send MIDI signals.
USB
The xD3 can be connected to a
Mac or Windows PC, allowing MIDI
messages to be transmitted and
received. Use a USB 2.0 cable.
OUTPUT
These jacks output the
audio signal. Connect
them to a powered
speaker, mixer or audio
interface.
SD CARD
Insert the included SD card that contains
song data. Additional songs can also be
stored and loaded. The SD card is also used
to back-up and import xD3 sound data. The
xD3 is only compatible with SD /SDHC cards
from 2 GB up to 32 GB.
DC IN
Connect the included
AC adapter here.
AUDIO IN
Connect a music player here
so you can play along with the
input audio. The AUDIO IN signal
is routed to main OUTPUT and
PHONES.
MULTI TRIGGER IN
Connect the included multi-trigger
cable here to input trigger signals
from the pads.
About the AC adapter
The AC adapter can be used worldwide.
Attach the included plug that is suitable for the type of outlet in your
country.
*You must use only the included AC adapter and plug.
xD3 Rear Panel

12
Connecting Audio Equipment
In order to use the xD3, you will need the following items.
• Headphones or powered speakers, etc.
You can play along with your own songs by connecting a music player’s stereo line output to the
xD3’s AUDIO IN jack.
Connecting the pads
First connect the multi-trigger cable to the xD3’s rear panel and then to each pad. Note the
connection destination labeled on each jack plug and connect them as shown in the illustration.
After completing all connections, x the cables onto the stands using the included cable ties.
SN
T1 T2
K
RDCUP
(BELL)
CR
CTL
HH
T3
1 Getting Ready
AUDIO IN
USB
SD CARD
DC IN
21
AUX
ATV LINK
MULTI TRIGGE R
TRIGGER INPUT
R OUTPUT L
L R
Stereo 1/4” jack
for headphones
Mono 1/4” jack outputs
Stereo 3.5mm
mini jack

13
1 Getting Ready
Zones supported by the xD3’s trigger inputs
xD3 trigger
input Supported zone Choke
method Notes
KICK Head N/A Input hardware is only single-trigger capable.
SNARE Head,Rim N/A Side stick sound function can be enabled, see the user’s manual.
(Only available on the snare input.)
TOM 1 Head N/A Input hardware is only single-trigger capable.
TOM 2 Head N/A Input hardware is only single-trigger capable.
TOM 3 Head N/A Input hardware is only single-trigger capable.
HI-HAT Bow,Edge YES
CRASH Bow,Edge YES
RIDE Bow,Edge,Cup YES Three-zone input requires two pad cables.
CRASH 2 Bow,Edge YES
Power On / O
Turning the power on
1 Lower the volume of the connected amp or speakers.
2 Tur n on the power of the hi-hat.
The indicator under the hi-hat turns on.
3 Long-press the power button of the xD3.
The power turns on.
Turning the power o
1 Lower the volume of the connected amp or speakers.
2 Long-press the power button of the xD3.
The power turns o.
All settings are saved.
*Disconnecting the AC adapter without turning o the power can cause malfunctions. Always turn o the power
by pressing the power button.
3 Tur n o the hi-hat power switch.
Turning the power o automatically (auto power-o)
If the xD3 has not been played or operated for 30 minutes, it automatically turns o the power in
order to conserve electricity. The auto power-o function can be disabled or adjusted via a setting
in the system tab of the setup menu (see p.31).
Note: The hi-hat's power is not automatically turned o.
Power switch of hi-hat
On< >O

14
1 Getting Ready
Trigger Settings
These settings are used to optimize the performance of the xD3 by calibrating the unit’s triggering
sensitivity in response to signals from the pad sensors.
Setting up the sensitivity of triggers is important when using the equipment for the rst time or
when changing the type of pad.
Help Screen Display
Target Pad Display
Utility Tab
Trigger Ta b
System Tab
1 From the home screen, press the ENTER/MENU button and select SETUP using the value
knob. Press ENTER again to access the screen shown above. Press the [3] (TRIGGER)
button to select the trigger menu tab.
2 Use the value knob to select a menu item and press the [ENTER] button. Tur n the value
knob to adjust the setting.
*These general settings are applied to all drum kits.
Total Pad Response
Increasing the sensitivity of all pads will produce a powerful sound even when playing with soft taps.
This may be suitable for younger children or players who have a softer playing style. The default
sensitivity is indicated by the setting 'NORMAL'. Pad sensitivity can be increased by turning the value
knob through the range +1 to +3.
Pad Model Use to set the type of pad connected to each trigger input.
*Please use the default setting.
Sensitivity Use to adjust the sensitivity of each pad. From the default value (0), the sensitivity can be increased
with positive value settings (+1 to +10) or decreased with negative value settings (-1 to -10).
Head-Rim Adjust
Use to adjust the balance sensitivity between the head sound and the rim-shot sound of the snare
drum pad.
If the rim-shot sound is triggered consistently when hitting the snare pad head, adjust the value in the
range H1–H10 to nd a balance that suits your playing style. If you nd it dicult to play the rim-shot,
try adjusting the value between R1–R10.
Pedal HH Sens Use to adjust the volume of the foot-close and foot-splash hi-hat sounds.
HH Close Adjust
Use to adjust the closed position of the hi-hat. If the hi-hat does not sound suciently 'closed' when
pressing on the pedal with normal pressure, adjust this setting to a positive value in the range 1–5. If
the hi-hat does not sound suciently 'open' when the pedal pressure is relaxed or released, adjust this
setting to a negative range value -1 to -5.
Cross-Talk Cancel
Wizard
Use to eliminate “cross-talk”, which is an unwanted signal transmission between pads.
Simply hit each pad according to the Cross-talk Cancel Wizard instructions and the appropriate
settings will be made automatically.
For detailed instructions, please refer to the section about using the "Cross-talk Cancel Wizard" (p.15).
*Execute this wizard when setting up the drum kit for the rst time.
*Cross-talk may reoccur if a pad or pad's mount position is changed. In such cases, please re-execute
the wizard.
3 To conrm a setting adjustment and exit editing, press either the [ENTER] button or [
VOLUMESONG
HOME
HOME
TRACK
CLICK
HOME
HOME
CLICK
CLICK
CLICK
HOME
HOME
MENU
VARIATION
SONG
1 2 3 4 5
ENTER
MENU
–––––––––––––––––––––––––– DRUM KIT ––––––––––––––––––––––––––
1 2 3 4 5
ENTER
LIST
HOME
MENU
]
(BACK) button. Repeat step 2 to select and edit dierent menu item settings.

15
1 Getting Ready
Cross-talk Cancel Wizard
1 Follow the onscreen instructions and strike the indicated pad 3 times with powerful hits.
Indicated Pad
OK Display
*If you press [RETRY], the strikes you made so far will be erased and you can start over.
2 When "OK" is displayed, press the [5] (NEXT) button to advance to the next pad.
3 Repeat step 1 and step 2 in the same way.
The xD3 calculates the state of cross-talk for all of the connected pads.
KICK > SNARE > TOM 1 > TOM 2 > TOM 3 > HI-HAT > CRASH 1 > RIDE > CRASH 2
*If the indicated pad is not connected, press [SKIP].
4 When the screen below is displayed, play the drum set and check if there are any remaining
cross-talk problems, then press the [5] (OK) button to exit the cross-talk cancel wizard.
*If you still detect a cross-talk problem, press the [2] (RETRY) button and repeat the wizard again.
*In some cases, it might not be possible to completely eliminate crosstalk. The following actions
might improve the situation.
*Increase the distance between the pads.
*Mount the pads on separate stands.
*Place the system on a stable oor.
*Adjust the tension of the mesh pads.

16
1 Getting Ready
UTILITY
Help Screen Display
Utility Tab
Trigger Ta b
System Tab
1 Press the [4] (UTILITY) button to select the Utility menu tab.
2 Select the menu item with the value knob and press the [ENTER] button.
Backup Save
The contents of the xD3's internal storage are backed up to an SD
card. Insert your SD card into the xD3.
*Making a periodic backup is recommended in order to prevent the
loss of important data.
p.17
Backup Load
Use to load a backup le from the SD card to the xD3.
*Depending on the backup type, all or selected data in the xD3 will
be deleted.
p.18
Import Kit
Use to import drum kit data downloaded from the ATV Sound
Store to the xD3. This enables you to expand the number of drum
kits.
p.20
SD Card Format
Use this function to format an SD card.
*When the card is formatted, all data stored on the SD card will be
deleted.
p.21
Factory Reset Use this function to restore the xD3 to its factory settings.
*Factory reset deletes and overwrites all data in the xD3. p.21

17
1 Getting Ready
Backup Save
Save
Help Screen
Display
1 Use the value knob to select "File Name" and press the [ENTER] button.
2 Enter the backup le name.
Move the le name cursor position left < or right > by pressing buttons [4] and [5] below. Tur n the
value knob to an select an alphanumeric character. Selected characters may also be deleted [2] or
inserted [3].
Move cursor right
Move cursor left
Insert character
Delete character
3 Press the [ENTER] button to conrm the le name.
4 Use the value knob to select "Saving Items" and press the [ENTER] button.
5 Select the backup type to be saved using the value knob and conrm by pressing the
[ENTER] button.
ALL Select to save all data stored in the xD3.
KIT+TRIG Select to save drum kit instrument volume settings and
all trigger settings.
KIT+INST Select to save all drum kit data.
KIT Select to save drum kit instrument volume settings.
TRIGGER Select to save all trigger settings.
6 Press the [5] (SAVE) button to conrm settings and save the backup.
A progress bar is shown while the data is being saved. When saving is complete, the screen
indicates "Completed".
*When ALL is selected, it will take about 10-15 minutes to save a backup. This will vary depending
on the amount of drum kit data.
*Do not turn o the power or remove the SD card while a backup is being saved.

18
1 Getting Ready
Backup Load
Load Backup
Help Screen Display
Delete Backup
CAUTION
When a backup is loaded, some or all of the data stored in the xD3 will be overwritten and
deleted. This depends on the backup type.
1 Use the value knob to select a backup le stored on the SD card. Below 'Loading Items'
the backup le type is displayed. The reference table below describes the backup types.
ALL Select to load a full backup of xD3 data.
*All data stored in the xD3 will be deleted.
KIT+TRIG
Select to load a backup of drum kit instrument volume settings and all
trigger settings.
*Drum kit instrument volume settings and trigger settings stored in the xD3
will be deleted.
KIT+INST Select to load all drum kit data.
*All drum kit data stored in the xD3 will be deleted.
KIT Select to load drum kit instrument volume settings.
*Drum kit instrument volume settings stored in the xD3 will be deleted.
TRIGGER Select to load trigger settings.
*Trigger settings stored in the xD3 will be deleted.
2 Press the [5] (LOAD) button to load the selected backup le.
3 A conrmation screen will display warning that selected data will be deleted. Press [2] (NO)
to exit the load backup procedure and return to the previous screen. Press [5] (YES) to
conrm and proceed with loading the backup.
*A progress bar will display during the backup load. When backup type ALL is selected, it takes
about 10 minutes to load. When loading is complete a 'Completed' message will display followed
by a prompt to power o / on the xD3.
4 Press the power button to turn o the xD3, and then turn on the power again. The backup
is now loaded.

19
1 Getting Ready
Deleting a Backup File
From the Utility tab of the Setup menu, use the backup load function to select and delete a
backup le stored on the SD card.
1 Use the value knob to select a backup le stored on the SD card. Below 'Loading Items'
the backup le type is displayed. The reference table on p.18 describes the backup types.
2 Press the [2] (DELETE) button.
3 A conrmation screen will display warning that the selected backup le will be deleted.
Press [2] (NO) to exit the delete backup procedure and return to the previous screen. Press
[5] (YES) to conrm the instruction to delete the backup.
*A progress bar will display to indicate the backup is being deleted. When the backup is deleted a
'Completed' message will briey display before returning the user to the backup load screen.

20
1 Getting Ready
Import Kit
1 Place the downloaded drum kit le (xxxx.xd3kit) in the Import folder of the SD card.
SD Card
ATV
Import
*If there is no "Import" folder, insert the SD card into the xD3 once, and the folders will be created.
2 Insert the SD card into the xD3 drum module.
Import
Help Screen Display
3 Select the drum kit le to import with the value knob.
4 Press the [5] (IMPORT) button to import.
A progress bar is shown during the import. When the import is completed, the screen indicates
"Completed".
*It takes about 5 minutes to complete the import.
*The downloaded drum kit le can be imported only into an xD3 with a matching product ID. If
the product ID does not match, the following message is displayed: "This xD3 doesn't have a
permission to import "xxxx"."
ATV SOUND STORE
This is a website where additional sounds for the xD3 can be purchased for download.
*To obtain a product ID required for account registration, see p.31 for instructions.
http://store.atvcorporation.com/
Other manuals for aDrums EXS-3
1
This manual suits for next models
3
Table of contents
Other ATV Drum manuals