Asko D5233 User manual

Use & Care Guide
Dishwasher
ASKO D5233

2
Dear ASKO customer,
Thank you for choosing this quality product from Scandinavia, which was made in Sweden.
We want you to feel assured that the inside of your new machine is just as good as the outside and that
the ethics and standards that went into the production of this machine are just as high as the quality
and performance that you will receive from it. We hope that this product will give you many years of
pleasure.
To ensure that you get the most from your new machine, we recommend that you read the operating in-
structions before using the machine. The operating instructions also contain information on how to avoid
damaging the environment.

3
Contents
Page
Before doing your first wash 4
Safety 5
Child safety 6
Parts of the dishwasher 7
Technical information 7
Baskets 8
Control panel 11
Dispenser 11
Basic Course 12
Programs 13
Options 14
Eco-dishwashing 16
Fragile dishes 17
Program description 18
Cleaning 19
Rinse aid 22
Settings 23
Fault indications 25
Troubleshooting 26
Performance information 29
Installation instructions 30
Service & guarantee 45
Own comments 46
Quick Guide 48

4
Before doing your first wash
Read the directions of use
Read the directions of use before starting
to use your machine, especially the Safety,
Child Safety and Basic Course sections.
Take care with certain materials
Read the section ‘Fragile dishes’ before
washing china with unglazed decoration
or other household goods made of plastic,
wood or crystal requiring careful treatment.
Check the door
Check that the door of the dishwasher fits
properly: open the door a little and let it go.
Does it stay exactly where you released
it? If not, you should check the installation
instructions or consult the installer.

5
Safety
General
Winter storage/Transport
• Read and keep the directions for use!
• Installation of water, drainage and electric-
ity must be carried out by a qualified pro-
fessional.
• Do not use the dishwasher for any pur-
poses other than those stated in this User
Guide.
• Do not load the dishwasher with anything
other than dishes.
• Only use dishwasher detergent!
• Place knives and other sharp objects so
that they cannot cause injury to people or
damage the dishwasher.
Never put dishes containing solvent residue
in the machine due to risk of explosion.
Neither may dishes containing ashes, wax
or lubricating grease be washed in the dish-
washer.
Winter storage/Transport
Store the machine away from frost.
Avoid long journeys in extreme cold. Trans-
port the machine in an upright position or
lying on its back.
Overfill protection
The overfill protector starts pumping out
water and closes off the water intake if the
machine’s water level exceeds the normal
level. If the overfill protector starts up, shut
off the water supply and phone for service.
See ‘Troubleshooting’.
Cleaning
Only use a slightly damp cloth for cleaning
around the edge of the door. Do not use a
spray bottle! Water can penetrate into the
lock and come into contact with the elec-
trical components.
Packaging materials
Sort at source in accordance with the re-
commendations of your local authority.
Scrapping
When the time comes for the machine to
be scrapped, it should immediately be ren-
dered unusable. Remove the plug and cut
off the lead as short as possible.
Contact your refuse collection department
or your local authority for information on the
correct way to dispose of the machine!
The machine is manufactured and labelled
for recycling.

6
Child Safety!
Child-safe button lock
To prevent children starting the machine,
you can activate a button lock.
Proceed as follows:
1. Switch off the dishwasher with the main
switch.
2. Hold in the Temperature and Drying but-
tons for 3 seconds, and at the same time
switch on the main switch.
The Temperature, Drying and start symbols
will then flash. Release the Temperature
and Drying buttons.
4. Press the Program selection button. Once
the symbol for Auto lights up, the button
lock has been activated.
5. Press the Start/Stop button to store the
setting.
Once the button lock has been activated,
the Temperature and Drying symbols will
flash when any of the buttons are pressed.
To deactivate the button lock temporarily
when you want to start the machine, press
the Temperature and Dry buttons simultane-
ously. The button lock will then automatically
switch on again after 3 minutes.
To deactivate the button lock altogether, use
the same procedure as for activation. When
the symbol for Auto goes out, the button lock
has been deactivated.
Advice!
You can read more about this in the Settings
chapter.
Child-safe dishwashing
• Use the knife basket, or knife holder, for all
long/sharp items.
• Always close the door and start the pro-
gram immediately once dishwasher deter-
gent has been added.
• Keep children away from the dishwasher
when it is open. There might be remains of
dishwasher detergent present!
• Do not allow children to use or play with
the dishwasher. Always take particular
care when the door is open.
Protect your children!
- Dishwasher detergent is corrosive!
WARNING: Dishwasher detergents are
strongly alkaline. They can be extremely
dangerous if swallowed. Avoid contact
with skin and eyes and keep children
away from the dishwasher when the door
is open.
Check that the detergent compartment
is empty after completion of the wash
cycle.
Store dishwasher detergent and rinse aid
out of the reach of children! Should dish-
washer detergent be swallowed, immediate-
ly drink one or two glasses of milk or water.
Do not attempt to induce vomiting. Contact a
doctor! Should dishwasher detergent come
into contact with the eyes, rinse (for at least
15 minutes) with copious amounts of water.
7
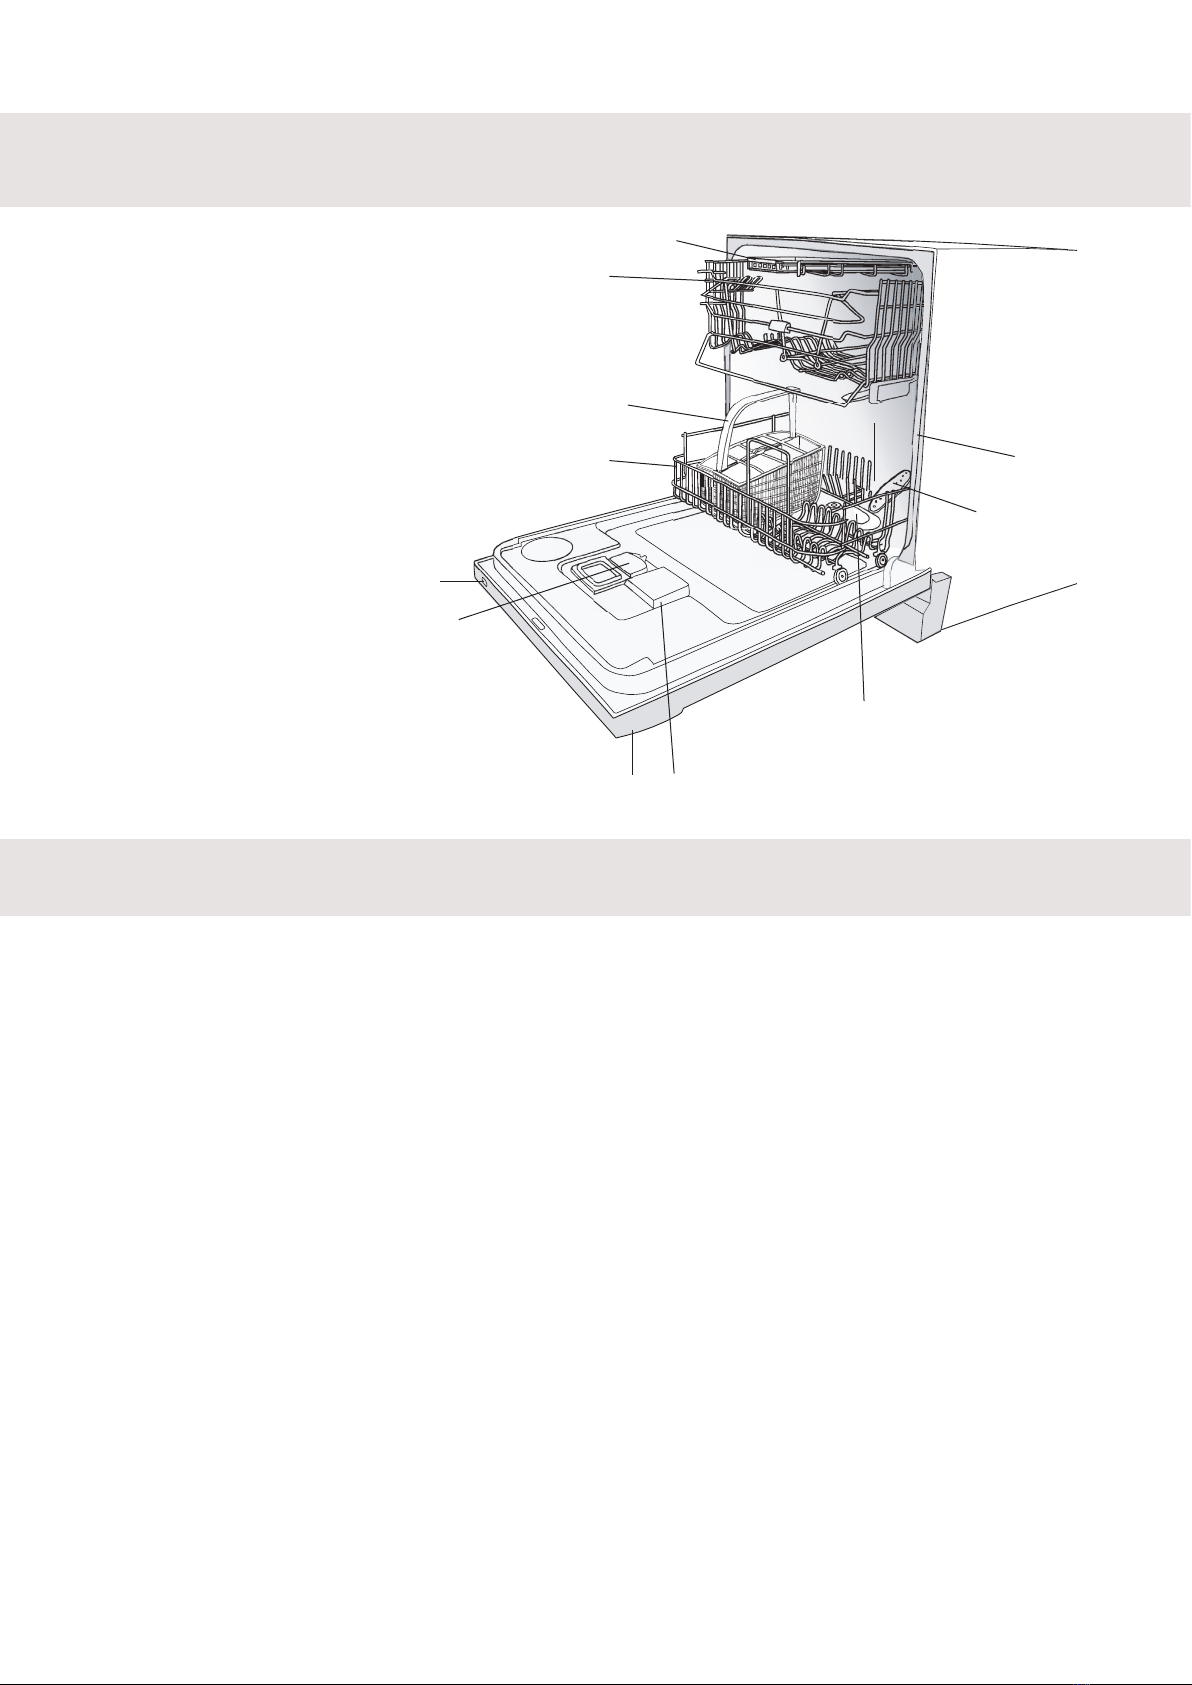
Parts of the dishwasher*
Technical information
Height
Width
Depth
Weight
Capacity*
Water pressure
Connection
Max
Accessories
*In accordance with standard, AS/NZS 2007
**See type plate.
820-860 mm
596 mm
550 mm
48 kg/51 kg
14 place settings
0.03-1.0 MPa (0.3–10 kp/cm2)
1-phase, 230 V, 50Hz 10/10A**
1600 W**
Work surface, Side panels, Anti-tilt
1. Knife basket
2. Upper basket
3. Spray arms
4. Cutlery basket
5. Lower basket
6. Rinse aid dispenser
7. Dishwasher detergent compartment
8. Main switch
9. Program panel
10. Filter
11. Type plate
* Details may differ
depending on model and market!
1
3
5
4
6
7
8
9
2
10
11
8
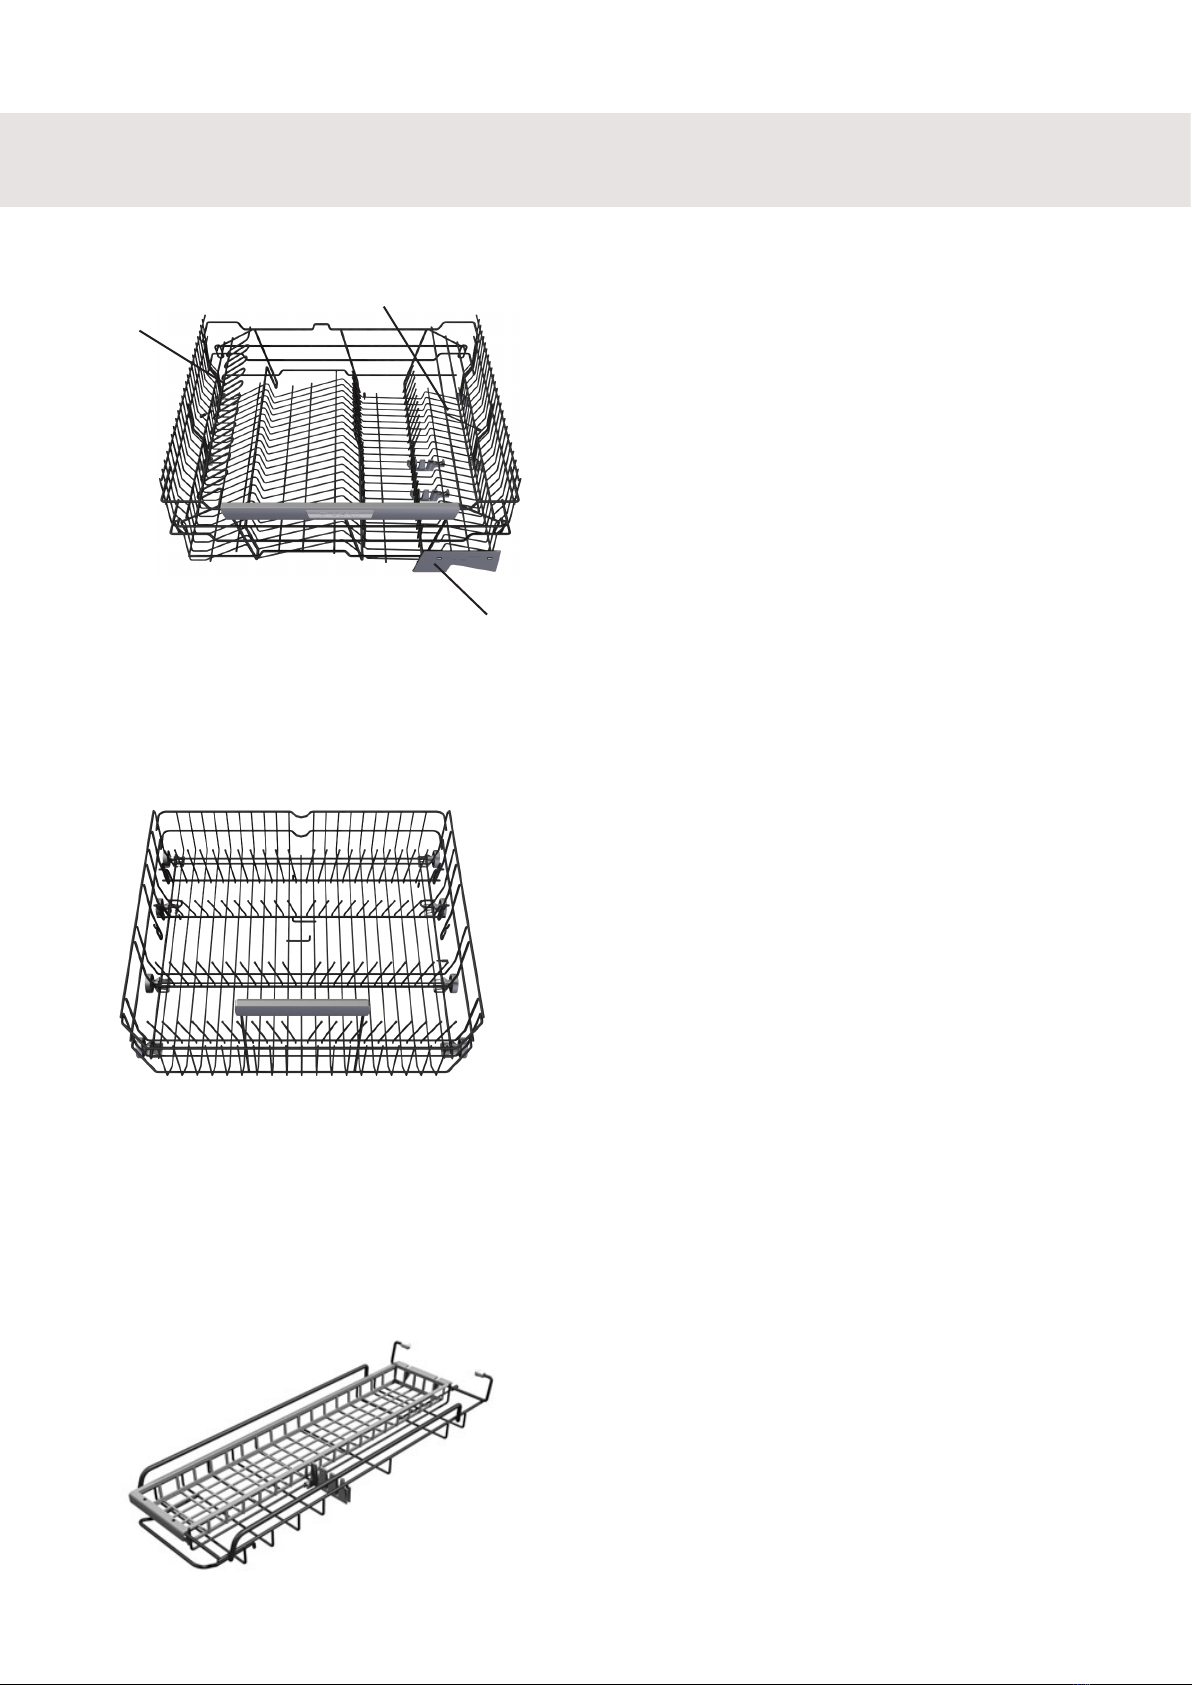
Baskets*
*Details may differ depending on the
model and market!
Upper basket
Lower basket
1. Wine glass shelf
2. Cup shelf
3. Knife stop
2
1
Knife basket
3

9
Cutlery basket
1a
1b
1c
Cutlery basket with cover
2b
2a
2c
*Details may differ depending on the
model and market!
Baskets*
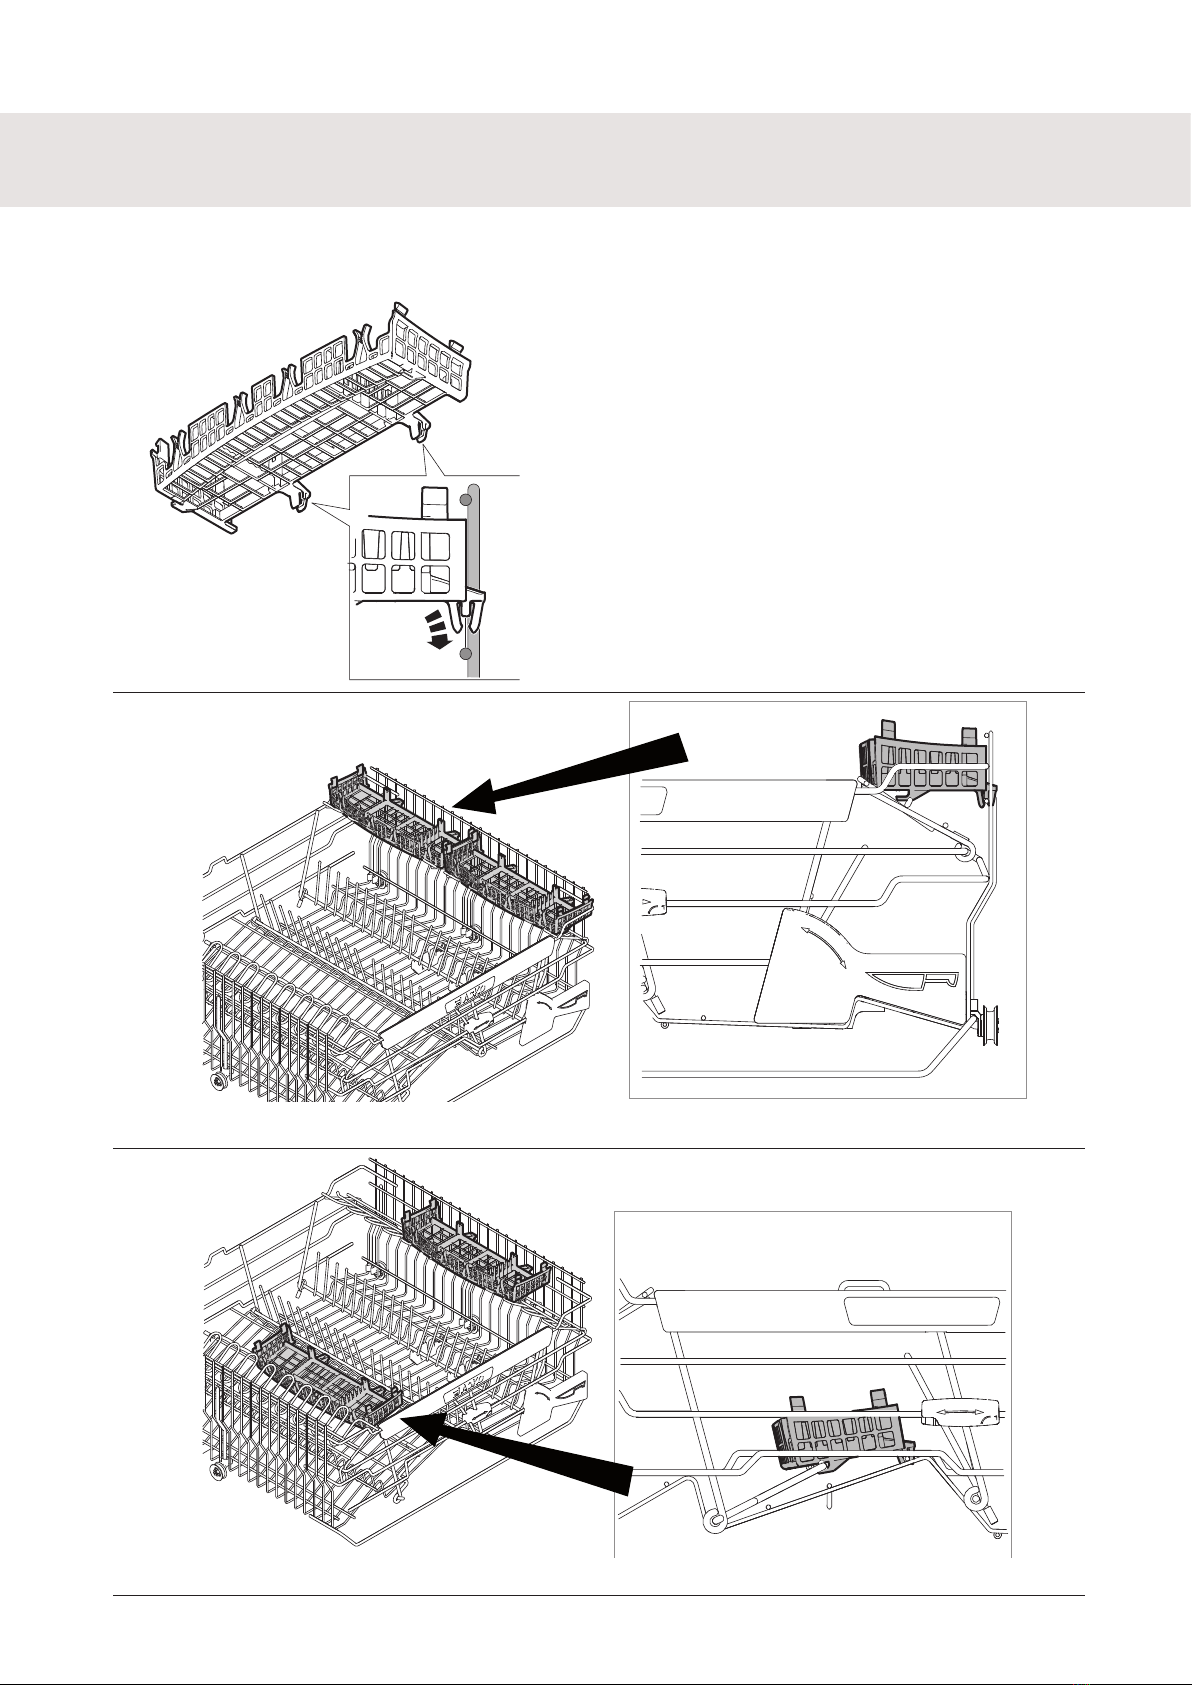
10
Baskets*
Placement of the cutlery basket cover (in Upper basket))
3a
3b
3c
Other manuals for D5233
5
Table of contents
Other Asko Dishwasher manuals


