ASP SSPC Guide

American Stainless Pumps
Stainless Steel Pumps for the Commercial Marketplace
www.aspumps.com 14032 S. Avalon Blvd. Los Angeles, CA 90061
Phone: (310) 630-8089 Fax: (310) 630-8095 Page 1
Installation Operation & Maintenance Instructions
Model SSP & SSPC
Description and Specifications: The Model SSP is a close coupled, end suction, single stage, open-impeller,
back-pulloutcentrifugalpump. ThemodelSSPC istheenclosedimpellerversionofthesamepump. Connectionsare
NPT threaded. All wetted metal pump parts are 18-8, 304SS, or better. Most parts are formed from stainless steel
sheet. O-rings and elastomeric seal parts are Buna (Viton, EPR are optional). Motors are NEMA 56J frame, with a C-
Facemountingflange and a threaded shaft. All pumps use a mechanical seal to prevent leakage around the motor
shaft.
Operating limits: The models SSP & SSPC are designed for 75-PSIG operating pressure at 212 deg. F., with the
standardType-6, carbon vs. ceramic withbuna-n elastomersmechanicalseal,andamaximumtemperaturelimitof250
deg. F., with a Type-21 mechanical seal with viton elastomers. The motor is limited to 20 starts per hour, evenly
distributed.
Notice: Upon receipt of this equipment, inspect the carton and the equipment for any dam-
ages that might have occurred during shipment and notify the carrier immediately. Damage
that occurs during shipment is not the responsibility of American Stainless Pumps. Failure to notify the carrier will place
responsibilityonthepurchaserforanyrepairsordamages occurring during shipment.
Safety Instructions: To avoid serious or fatal injury and/or property damage, read and follow
all instructions in this manual. Review all instructions and warnings included in this manual
before attempting any work on this pump or pump/motor assembly. Do not remove or alter
any decals.
The motor used to drive this pump is an electrical device connected to a potentially lethal
voltage power source. Take all precautions required when working with or on the motor
and its power source, including but not limited to:
1. Alwaysdisconnect and lockout the electrical power source before attempting any connection, maintenance or
repairs. Failure to do so can cause electrical shocks, burns and death.
2. Install, ground and wire motors in accordance with all local and national electrical codes.
3. Install an all leg disconnect switch near the motor for quick access.
4. The electrical supply must match the motor nameplate specifications and the motor must be wired per the
wiring diagram on the motor to match the selected voltage. Incorrect wiring can cause fire and motor
damage and will void the warranty.
5. Mostsingle-phase motors and some three phase motors will have automatic thermalprotectionswitches
wired in the motor. These switches will open and stop the motor if the motor overheats. As the motor
cools, these switches will close and start the motor automatically and unexpectedly.
6. Motorswhich do not have thermal overloads musthavea properly sized contractor or magnetic startersand
overloadswitches (or fuses) in the starter panel. Three phase motorsrequireall leg protection.
7. Use only stranded copper wire to motor and ground. Wire size must limit the maximum voltage drop to 10%
ofthe motor nameplate voltage at the motor terminals.
8. Threephase motors can rotate in either direction. The pump will operate properly only in onedirection
(clockwisewhen looking from the motor end, counterclockwise whenviewedfrom the pump end). Operat-
ing the pump in the reverse rotation may damage or destroy the pump and motor and voids the
warranty.
3/1/2001

American Stainless Pumps
Stainless Steel Pumps for the Commercial Marketplace
www.aspumps.com 14032 S. Avalon Blvd. Los Angeles, CA 90061
Phone: (310) 630-8089 Fax: (310) 630-8095 Page 2
Installation:
Unitsmay be installed horizontally,at an angle or vertically with the motor on top. Do not mount the motor below
the pump as leakage from the pump will damage the motor and can cause a shock, burns or
death.
)Locatethe pump as nearto the liquid source aspossible. The pump must be primedwith little or no airin the case
tobegin operation. The pump must belocatedbelow the liquid level whenstarting. Thispump is not self-priming.
)Protectthe pump and motor from freezing. Although the pump may survive a freezeup,themechanical seal and
O-Ringsmaynot.
)Allowadequate space aroundthe unit for serviceand ventilation.
)Unitsmountedhorizontallyshouldbelocatedonaflat,rigid surface. Unitmay befree standing,but somevibrations
may occur. If attached to a foundation, tighten hold down bolts before connecting the piping.
Piping:
)All piping must be independently supported. No piping loads may be carried by the pump.
)Piping should be the same size or larger than the pump connections.
)Proper Piping to the suction is critical for proper pump operation. Suction pipe should be short and direct, with a
minimum of fittings and turns.
)Suction pipe must continuously rise to the pump to avoid air pockets. All pipe connections must be airtight.
)If suction pipe is larger than the pump, an eccentric reducer must be used with the straight side on top to avoid
an air pocket.
)Ifsuction of pump is abovetheliquid source level, a foot valveor other isolation valve will beneededto prime the
pump. A continuous stream of liquid must be made available for the pump suction to hold its prime.
)Do not use any suction valve for throttling the pump. This will cause loss of prime and damage to the pump that
isnot covered by warranty.
)Besure that the source liquid level is sufficient to prevent vortices from drawing air into the pump.
)Installa valve on the discharge line forusein regulating the pump flow and forisolatingthe pump during
maintenanceand inspection.
Rotation:
The models SSP & SSPC will operate properly only in one direction (clockwise when looking from the motor end,
counterclockwise when viewed from the pump end). Operating the pump in the reverse rotation may
cause the impeller to unscrew, breaking the shaft, damaging the pump and/or the motor,
and voids the warranty.Three phase motors can rotate in either direction. Single phase motors normally only
rotatein the proper direction.
To check rotation, you must observe the motor shaft from the back of the motor.
1. Remove the end cover from the center of the back of the motor by prying off the cap. You do not need to
remove any screws on most motors.
2. Quickly switch on and off the motor and watch the shaft rotation as it slows down. Motor shaft should be
turningin the clockwise direction when viewed from the back of the motor.
3. If your three-phase motor is turning in the wrong direction, have a qualified electrician interchange
two of the three motor power wires. This should reverse the rotation. If a single-phase motor is
turningin the wrong direction, it has been wired wrong internally. Consultthe motor manufacturer or
American Stainless Pumps for instructions.
4. Check the rotation again, if it is correct, replace the end cover cap.
Operation:
)Pump must be completely primed before starting. Air in the suction lines or case must be vented.
)Model SSPC Only: Ifthepump case is rotatedsothat the dischargenozzleis not vertical, anair pocket may form
in the case that will prevent the pump from operating properly. Loosen the case bolts until this air is removed for
properoperation. Be sure to retighten the bolts before operating thepump.
)Do not operate the pump at or near zero flow. At zero flow, heat will build up in the pump and can cause
extreme damage to the pump, property damage and/or possible injury to operating personal. Minimum flows of
10% of the pumps best efficiency point are recommended unless otherwise authorized by ASP.
)Do not operate the pump beyond the flow rates shown on published curves. Noisy pumps or the sounds of
“pumping rocks” may be signs of cavitation or operation beyond the pumps capacity.

American Stainless Pumps
Stainless Steel Pumps for the Commercial Marketplace
www.aspumps.com 14032 S. Avalon Blvd. Los Angeles, CA 90061
Phone: (310) 630-8089 Fax: (310) 630-8095 Page 3
Operation Continued:
)Check pump and motor for vibration. Vibration may be a sign of pipe strain, insufficient mounting or operation
beyond the pumps capacity.
)The pump models SSP & SSPC are not designed for handling large amounts of solids. For the model SSP,
Spherical solids size should not exceed the vane height of the impeller, less 0.060”. For the model SSPC, solid
sizes must be smaller than the impeller vane family expressed in thousandths of an inch, less 0.140”.
Maintenance:
Thereis no scheduled maintenance required. Close-coupledpumpshave no bearings. Bearings in the motorsare
permanentlygrease lubricated and cannot be re-greased. Mechanical sealswillneed to be replaced when leaking.
O-Rings may harden with age and may need to be replaced when they leak.
Motor Bearings and Pump Thrust: Model SSP Only
Open impellers generate significantly more thrust than do enclosed impellers. The Model SSP with a 4.38” diameter
impeller operating at 20 psig generates about 150 pounds of thrust. This thrust load is carried by the motor bearing.
The standard jet pump motor and the standard SSP motor uses as a front and rear bearing a size 203 grease lubricated
bearing. Thisbearing has a B10 rated life of approximately 6,000 hourswhenoperated with a thrust load of 150 pounds
at 3500 RPM. This rating means that 10% of all bearings operated in this condition will fail within 6,000 hours of opera-
tion. The average bearing life will be 3 to 4 times this 6,000 hours.
Pumpsand motors which operate intermittently,oronly operate 40 hours per week, will usually have acceptable bearing
lives with the standard jet pump motor bearing. Pumps that operate continuously, 24 hours per day, will have about 10%
of their thrust bearings fail in the first year of operation.
For service applications that are critical, for installations that are difficult to access, or for pumps operating at
differential pressures above 25 psig, American Stainless Pumps recommends that motors with a larger thrust
bearings and higher load ratings be used. Consult factory for pricing and details.
Disassembly:
Disconnect and lockout the electrical power before attempting any disassembly. Casing
may contain hazardous fluids. Drain and flush and take necessary precautions.
It is not necessary to remove piping from the case to disassemble. Pump is a back pullout design and unless casing
needs to be repaired or replaced, it can stay in place during servicing.
)See page 7 for model SSP, and page 8 for model SSPC cross sectional drawings.
1. Closeall valves and drain pump andpipesand flush if necessary.
2. Removeany motor holddown bolts.
3. Removethe eight (8) case bolts (Item 7CS) with a 3/16”allenwrench.
4. Pull the motor and pump internals back out of the case. The baseplate (Item 800) will slip off when the bottom
two case bolts are removed and can be left with the pump case. Remove the case o-ring (item 500) and
inspectfor damage or hardness.
5. If the motor is a three phase motor, a locking mechanism (item 7SC) is used to prevent the impeller (item
200) from unthreading if started in the wrong direction. If motor horsepower is less than 1 HP, the starting
torque is relatively weak. ASP uses a locking compound to prevent the impeller from unthreading at start-
up. If the motor horsepower is equal to or greater than 1.0 HP, ASP will provide a left hand threaded, button
headlocking screw with an impeller washer to prevent unthreading. The locking screw (item 7SC) is
installedwith removable Loctite to prevent itfromcoming out when operating in the correctrotation. Remove
this locking screw by turning it clockwise while holding the impeller against rotation.
6. Remove theimpeller(item 200) by turning the impeller counterclockwise (when looking attheimpeller from
the pump end) while holding the motor shaft. It will be necessary to remove the motor shaft cover plate in the
center of the rear of the motor to get access to the shaft. Using a screwdriver, wrench or vise grips as
needed, hold the shaft tightly against rotation while turning the impeller. Do apply any heat to the
components. Ifyou are unable to hold the shaft in this manner, remove the rear motor housing and grip the
motorshaft with vise grips or other similar device (donotholdshaft where bearings will mount).
7. Model SSP Only: There should be several spacing washers behind the impeller. These spacers locate the
open impeller vanes close to the case for efficient operation. Measure the thickness of this stack of spacers
forfuture reference. Remove them from the shaft but do not lose these washers. You willneed them for
reassembly.

American Stainless Pumps
Stainless Steel Pumps for the Commercial Marketplace
www.aspumps.com 14032 S. Avalon Blvd. Los Angeles, CA 90061
Phone: (310) 630-8089 Fax: (310) 630-8095 Page 4
Disassembly continued...
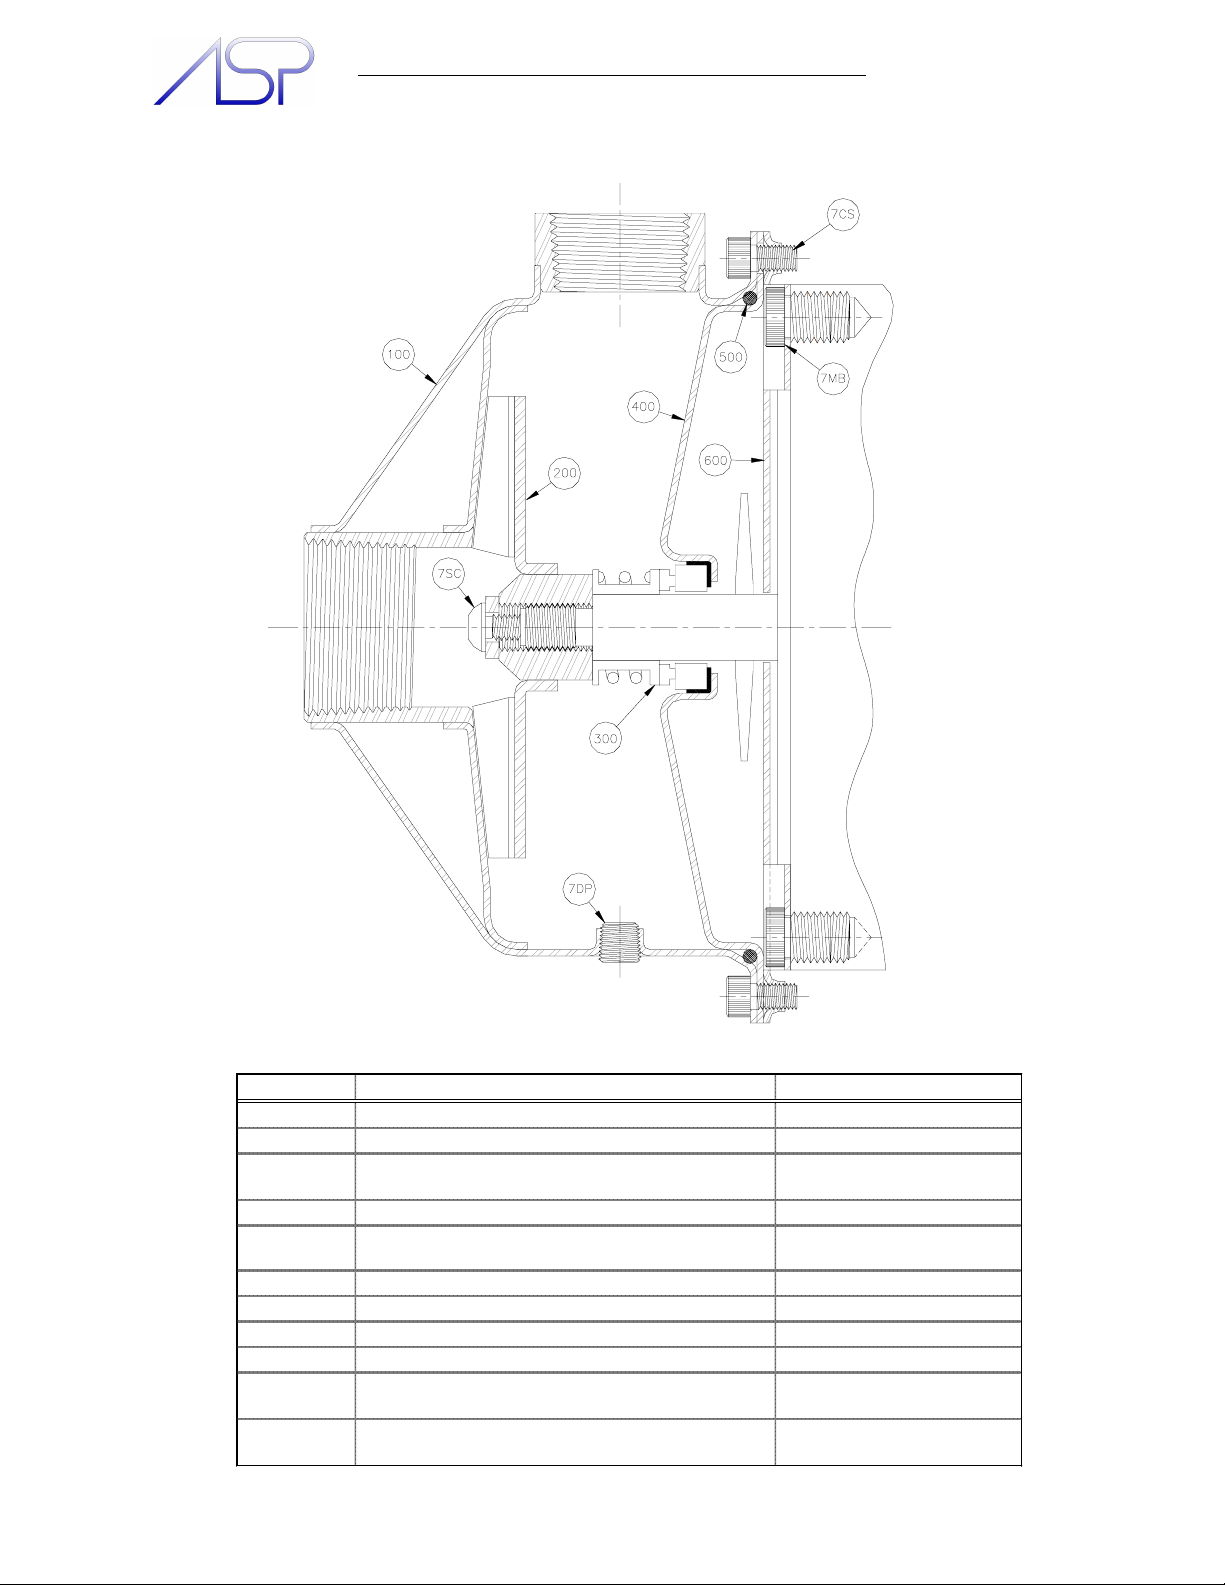
8. Remove the rotating element of the mechanical shaft seal (item 300). This element is held in place by the
impeller only. If the rotating element does not come off easily, it is stuck to the shaft. Pry up the seal plate
(Item 400) with screwdrivers or pry bars. The seal plate should compress the seal spring and force the seal
off the shaft. If seal is stuck, and you must pry with force, do not pry towards your face or body. The seal
and seal plate can come free unexpectedly and injure you.
9. If the seal plate (item 400) did not come off with the seal, remove it now. If you plan to replace the stationary
seat, you will need to press it out from the back. Do not push with your finger, as you will probably cut it on
the edges of the seal plate when the seal pushes out.
10. If you plan to replace the motor, remove the four motor adapter bolts (Item7MB)witha 7/32” allen wrench and
removethe motor adapter plate (Item 600). If youarenot replacing the motor,leave the adapter plate in
place.
11. If the motor comes with a deflector, the deflector should go outside of the motor adapter plate and must be
removedif the adapterplateis to be removed.
12. Check the suction o-ring (item 510) in the case suction nozzle. It may be difficult to remove. Use a sharp
pointedawl or similar device to pry the o-ring from the groove. Replace ifdamaged,swollen,fretted, or just
wornout.
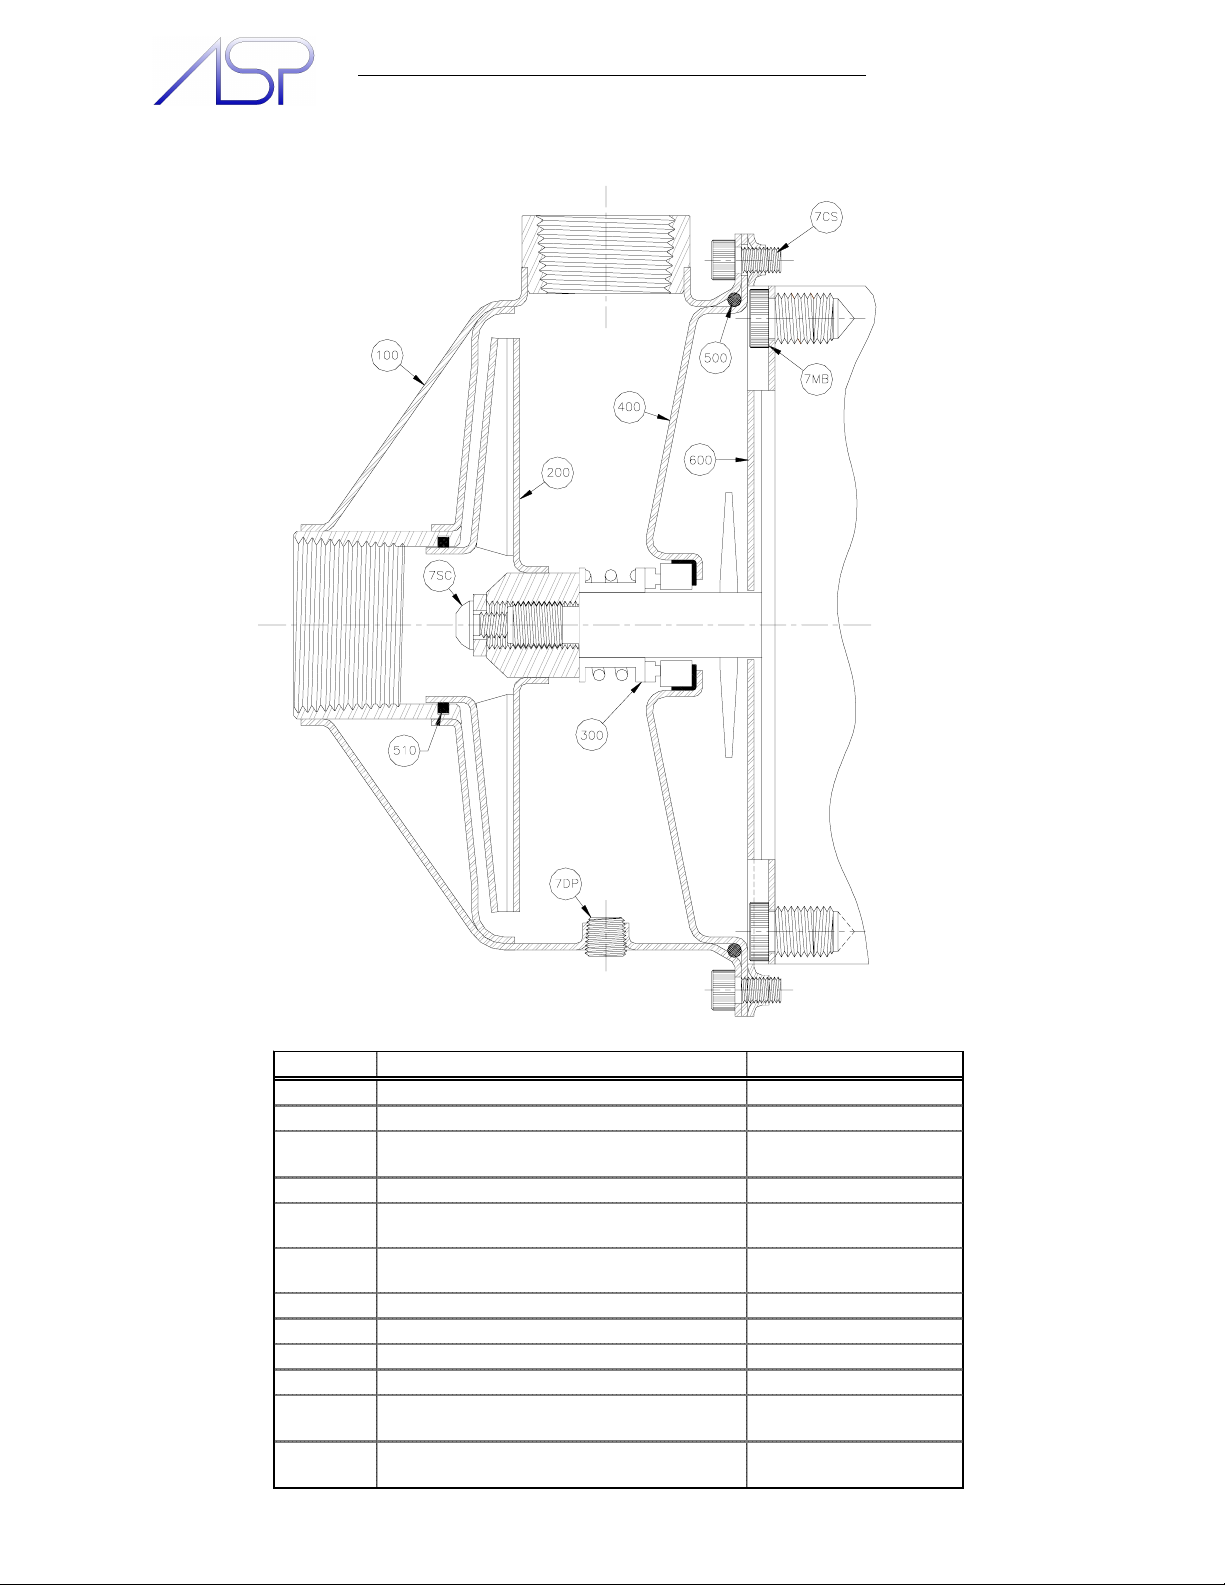
Assembly or Reassembly: SSP & SSPC
)See page xxx for model SSP, and page xxx for model SSPC cross sectional drawings.
)Assembly of the pump and motor is easier when the motor is standing face up so that parts do not fall off,
although access to the motor shaft at the rear of the motor will require a horizontal position.
)Itis considered good practice to replace the mechanical seal whenever you have todisassemblethe pump.
1. If replacingthemotor, remove the deflector from the motorshaft. Theremay not be enough room behind the
motoradapter plate for the deflector to spin freely.
2. Install the motor adapter plate (Item 600) with the four motor bolts (Item 7MB) using a 7/32” allen wrench. You
must use the low profile button head socket screws that came with the pump or other low profile head bolts.
There is not enough room for a standard cap head screw/bolt. Tighten the bolts. Install the deflector now.
3. Install the mechanical seal stationary seat into the Seal Plate (Item 400) by putting a suitable lubricant on the
cup seat and gently pressing into the seal plate bore. Do not get any lubricant on the seal faces. Use
the foam sheet from the seal box to protect the seal face from dirt and scratches while pressing into the
seal plate. Place the seal plate onto the motor adapter plate.
4. Lubricate the sealing elastomers on the rotating assembly of the mechanical seal and press gently onto the
shaft. You may have to hold the seal in place until the impeller is installed.
5. Model SSP Only: Place the necessary number and thickness of impeller spacer/washers onto the threaded
portion of the shaft. If you are not changing the impeller or the motor, use the same batch of spacer/
washersyou removed. See the section on
Setting Impeller Clearance
for procedures if you havechanged
the impeller to case setting.
6. (If motoristhree-phase, read section 7 below for Loctite instructions, thencontinuereading here) Thread the
impeller onto the pump shaft. Be sure the impeller hub is tight against the spacer/washers that are tight
against the shoulder of the motor shaft. If you leave the impeller loose, when the motor starts up, the
impeller will tighten up on the shaft so tightly that you may not be able to remove it later. You will need to
holdthe motor shaft from the rear ofthemotor with a large screwdriver, wrench or vise grips while tightening
theimpeller.
7. If motoris three-phase,and wiringhas beenreconnected, rotationmayhavechanged. Toprotectagainstrotation
inthe wrongdirection atstart up,reinstallthe lefthand threadedimpellerlocking screwand washer(item 7SC),
or for motor horsepowers less than 1 HP, install the impeller with a locking compound such as Loctite.
8. Install the case o-ring (item 500). Replace if brittle, damaged or misshapen.
9. Model SSPC Only: Install the suction o-ring (item 510). Replace if brittle, damaged or misshapen.
10. Model SSPC Only: Join up the back pull out assembly with the case. Do not force the pump into the case.
The suction O-ring (item 510) can be pinched when installing. You may have to back out the pump from the
case, center up the O-ring with your finger and slip in the pump assembly again. Before installing the case
bolts, check to be sure the impeller is spinning freely.
11. Model SSP Only: Join up the back pull out assembly with the case. Install the (8) case bolts (item 7CS),
leaving the bottom two bolts loose for attaching the base (not necessary with footed motors). Slip the
baseplate under the bottom two bolts. Tighten the case bolts while holding the baseplate in place.
12. Model SSP Only: Check the impeller to case clearance per the following instructions and adjust as needed.
13. Install and tighten the motor base hold down bolts.

American Stainless Pumps
Stainless Steel Pumps for the Commercial Marketplace
www.aspumps.com 14032 S. Avalon Blvd. Los Angeles, CA 90061
Phone: (310) 630-8089 Fax: (310) 630-8095 Page 5
Setting Impeller Clearance: Model SSP Only
)See
SSP Performance Notes
for impeller shimming discussion.
)Properly setting the impeller to case clearance is the most critical factor in determining the SSP’s perfor-
mance. You will get maximum performance and efficiency (and maximum amp draw) with near to zero clearance.
Factory standard clearance is 8 to 12 mil. Spacer/Washers to adjust clearances are available in 10 mil and 15-mil
thickness.
)You can have more or less than normal flow and head by changing the clearance. To increase clearance, remove
impeller spacer/washers. To decrease clearance, add impeller spacer/washers. Be aware that if you set the
impeller at near to zero clearance, and operate near maximum flow rates, you may overload the standard
motor. Also be aware that impeller clearances near zero greatly increase the risk of the impeller grinding
against the casing.
)Standard factory settings for spacers are 30 to 90 mils of spacer/washers to obtain 10-mil clearance. Since the
tolerancesof the motor shaft and pump parts canstackup, some pumps may need more or less thanthisstandard.
Somespecial OEM assemblies willnot have any spacers whenthe customer elects to acceptreduced performance
inreturn for ease of assembly.
)AmericanStainlessPumps providesspecial feelergauges forimpeller shimming. Calland orderourfeelergaugeset,
partnumber K200. Ourstandard shimpackset isalso available. Itcontainsten eachof the 0.010”and 0.015”shims.
Use the following impeller shimming method when building a new pump:
)AmericanStainlessPumps providesspecial feelergauges forimpeller shimming. Calland orderourfeelergaugeset,
partnumber K200. Ourstandard shimpackset isalso available. Itcontainsten eachof the 0.010”and 0.015”shims.
Usepart number200115.
1. Place the pump (as assembled through step 4 on page 47) on the workbench, positioned vertically.
2. Place 0.050” shims onto the motor shaft (two 0.015” shims and two 0.010” shims).
3. Thread theimpeller onto the shaft,compressing the sealandshims. Youwillneedto hold themotorshaft from the
rearof the motor with alarge screwdriver, wrench or vise gripswhile tightening the impeller.
4. Place case o-ring (item 500) onto seal plate. Make sure o-ring is laying flat against the seal plate flange.
5. Place case onto pump assembly, and install case screws (item 7CS). Tighten case screws in a cross-bolting
fashion.
6. Rotate theimpeller from the backof the motor, or withyour finger through thesuctionor discharge nozzles. Listen
and feel for any scraping noises from the impeller hitting the casing. If a scraping noise is heard, remove the
caseand impeller,and then remove either one 10orone 15 mil shim. Repeat step 5&6. If no noise is heard,
proceed to step 7.
7. Usethe pinkfeeler gauge(0.015”), andslide itin betweenthe impellerand thecasingthroughthedischargenozzle.
If the pink feeler gauge does not fit, go back to step 6 and remove shims as necessary to make pink gauge
slide in between impeller and casing. When done correctly, the feeler gauge will become visible through the
suctionnozzle. Continue pushing thefeelergauge into thecasinguntil it isallthe way in,andcentered across
the face of the impeller. Rotate the feeler gauge using a pair of needle nose pliers, and feel for tight spots. If
gaugeencountersonlyaslightpinchingresistance,youprobablyhave agood impellerclearance. Remove the
pinkfeeler gauge,andcheck to seethat the brownfeeler gauge (0.010”)doesnot bind whenused in thesame
way. Ifit does not,goto step 9. If it does, remove0.010mils of shims from behind impeller andrepeat step 7.
If the pink feeler gauge is free to rotate 360 degrees across the face of the impeller without binding or resis-
tance, go to step 8.
8. If the pink gauge is capable of rotating 360 degrees without binding, then there is a greater impeller/casing clear-
ance than 0.015”. Determine this clearance by repeating step 7 with the thicker gauges. Yellow=0.020”,
White=0.025”,Orange=0.030”. Ifclearance islarger than0.030”, stackthe variousgauge thicknessand repeat
procedure until clearance is known. When clearance is determined, add shims behind the impeller to close
clearance as desired. Repeat step 7.
9. Properclearance has been established. Return to step 5 on the previous page.

American Stainless Pumps
Stainless Steel Pumps for the Commercial Marketplace
www.aspumps.com 14032 S. Avalon Blvd. Los Angeles, CA 90061
Phone: (310) 630-8089 Fax: (310) 630-8095 Page 6
Model SSP Impeller Shimming Method for Replacement Impellers
Whenreplacing impellersin amodel SSPopen impellerpump, thefollowing worksheetwill providea
relativelyquickmethod formaintaining the properimpeller/casing clearance. You mayalsowant toread
theprevious page foran overviewof the impellershimming procedure.

American Stainless Pumps
Stainless Steel Pumps for the Commercial Marketplace
www.aspumps.com 14032 S. Avalon Blvd. Los Angeles, CA 90061
Phone: (310) 630-8089 Fax: (310) 630-8095 Page 7
SSP (Open Impeller) Cross Sectional Drawing
Item No. Part Description Standard Materials
100 Casing 304 SS
200 Impeller (Open) 304 SS
Mechanical Seal - Type 6 (std.) Car/Cer/Buna N/316 SS
(Other seal types available) (Other materials available)
400 Seal Plate 304 SS
Buna N
(O
ther materials available
)
600 Motor Adapter Plate 304 SS
7CS Casing Screw - 1/4-20 (3/16 Allen) Nickle Plated Steel
7DP Drain Plug - 1/8" NPT 304 SS
7MB Motor Bolt - 3/8-16 (7/32 Allen) 304 SS
Impeller Screw - 10-32LH (1/8 Allen)
(Standard on 3-Ph motors 1-hp or larger)
800
(not show n)
300
Pump Base (not supplied with footed motors) 304 SS
304 SS
Casing O-Ring500
7SC
3/1/2001

American Stainless Pumps
Stainless Steel Pumps for the Commercial Marketplace
www.aspumps.com 14032 S. Avalon Blvd. Los Angeles, CA 90061
Phone: (310) 630-8089 Fax: (310) 630-8095 Page 8
Item No. Part Description Standard Materials
100 Casing 304 SS
200 Impeller (Enclosed) 304 SS
Mechanical Seal - Type 6 (std.) Car/Cer/Buna N/316 SS
(Other seal types available) (Other materials available)
400 Seal Plate 304 SS
Buna N
(O
ther materials available
)
Buna N
(
O
ther materials available)
600 Motor Adapter Plate 304 SS
7CS Casing Screw - 1/4-20 (3/16 Allen) Nickle Plated Steel
7DP Drain Plug - 1/8" NPT 304 SS
7MB Motor Bolt - 3/8-16 (7/32 Allen) 304 SS
Impeller Screw - 10-32LH (1/8 Allen)
(Standard on 3-Ph motors 1-hp or larger)
800
(not shown)
300
Pump Base (not supplied with footed motors) 304 SS
304 SS
Casing O-Ring500
510 Impeller O-Ring
7SC
SSPC (Enclosed Impeller) Cross Sectional Drawing
3/1/2001
Other manuals for SSPC
2
This manual suits for next models
1
Table of contents
Other ASP Water Pump manuals
Popular Water Pump manuals by other brands

Dosapro Milton Roy
Dosapro Milton Roy GM Series instruction manual

BVA Hydraulics
BVA Hydraulics P4301M instruction manual

Pramac
Pramac MP 34-2 Use and maintenance manual

Pentair
Pentair Myers MES100 Installation and operator's manual

Grindex
Grindex Maxi 8107.011 Installation, operation and maintenance manual

Ulvac
Ulvac DTC-22 user manual