Astin Trew AT1000 User manual

ASTINtrew
6 Varnell Terrace
Hambleden Oxfordshire RG9 6SA
Telephone: +44 [0]1491 414494
Facsimile: +44 [0]1491 413303
Email: sales@astintrew.co.uk
Website: www.astintrew.co.uk

Operating information for the ASTINtrew AT 1000
stereo valve pre-amplifier
1. Introduction
2. Unpacking
3. AC mains supply
4. Safe use
5. Set up
6. Operation and remote control
7. Valve and fuse replacement
8. Troubleshooting
9. Specifications
10. Guarantee
11. CE, RoHS and WEEE
Operating information for the ASTINtrew AT 1000
stereo valve pre-amplifier
1. Introduction
2. Unpacking
3. AC mains supply
4. Safe use
5. Set up
6. Operation and remote control
7. Valve and fuse replacement
8. Troubleshooting
9. Specifications
10. Guarantee
11. CE, RoHS and WEEE
1
SECTION PAGE
Operating infomation for the ASTINtrew AT 1000
stereo valve pre-amplifier
2
2
2
2
3
3
7
9
9
10
10

1. Introduction
Congratulations on your purchase of
the ASTINtrew stereo pre-amplifier.
The AT1000 pre-amplifier has been
designed and manufactured to a very
high specification making it a true
audiophile product. It will give you
many years of listening pleasure. The
following notes explain all aspects of
its function and use, to help you get
the very best from it.
The ASTINtrew line-stage pre-amplifier
uses valve amplification devices to
offer an involving musical experience.
The headphone output uses a high
quality single ended ‘class A’ amplifier.
The other components you use within
the chain will also affect the fidelity of
the sound you experience. This pre-
amplifier deserves to be used with
high quality ancillary components to
give its best and works particularly
well with other AT range products.
2. Unpacking
Included with your AT1000 stereo pre-
amplifier:
One mains lead with plug fitted
One remote control with batteries
One Alan key
One Operation Manual.
One spare fuse, located within fuse
holder, see section 7
Please retain all packing materials.
Re-packing may be necessary to trans-
port your pre-amplifier in the future
without risk of damage to the equip-
ment.
3. AC mains supply
This pre-amplifier is designed to work
on a 220-240VAC supply only.
4. Safe use
This pre-amplifier generates some
heat when switched on. Do not place
on a carpet or any material where the
feet and may sink into the surface
obstructing the ventilation slots on the
underside.
Do not place anything on the top of
the amplifier which may obstruct the
ventilation slots. Do not allow liquids or
objects to fall into the ventilation slots.
The pre-amplifier should be located in
a well ventilated area and kept away
from sources of heat, dust, humidity
and direct sunlight.
Do not open the equipment at any
time with the mains cable attached to
the amplifier. See section 7 for full
details on opening.
Do not attempt to change or alter any
component or part of this pre-amplifier
2

except for those which are user
replaceable (see sections 6 and 7).
Unauthorised adaptations will void the
warranty and may cause damage.
5. Set up
The mains lead supplied with this prod-
uct has an IEC mains plug end which
fits into the IEC socket located on the
rear panel. The other end is fitted
with an appropriate mains plug of your
country. In the UK this is the stan-
dard UK13A plug.
The performance of this pre-amplifier
will be impaired if the electrical supply
is in poor condition. We recommend
that you use a high quality wall socket
directly, or a multi-way socket unit
designed for audio use. You may also
wish to try a combined multi-socket
and power supply conditioner designed
for audio to optimize fidelity.
We recommend that you place the
pre-amplifier on a suitable rack, table
or platform support, offering maxi-
mum isolation from mechanical vibra-
tion.
We recommend that the pre-amplifier
is turned on half an hour or more
before use. Most audio electronics
sound better once they have ‘warmed
up’. We do not recommend that you
leave it on all the time but it will come
to no harm if you do. From new, you
will find that the pre-amplifier will need
about 100 initial hours use to achieve
its optimum audiophile sound.
All RCA (phono) input and output sock-
ets are mounted on the rear panel
and are of quality construction. We
recommend that you use high-quality
signal cables for optimum perform-
ance. The MP3 input and headphone
outputs are described in Section 6.
Two pairs of RCA output sockets allow
you to bi-amp from the pre-amplifier if
you wish.
Refer to the illustration on page 4.
6. Operation and remote
control.
Controls and input/output sockets
on facia.
Refer to the illustration on page 5.
The power on-off switch illuminates a
blue LED when on. The LED flashes
for about 2 seconds when first turned
on.
The rotary volume control is used in
conjunction with display to show vol-
ume level.
The six push buttons to the right of
the volume control switch inputs. The
display above the switches indicates
which one is in use – cd tuner tape
aux1 aux2 MP3 and MP3 signal
input.
3

4
AT 1000 rear view

5
AT 1000 front view

6
AT 1000 remote control function

The switched MP3 dedicated input
(3.5mm jack socket) allows quick con-
nection to your iPod™ (or similar
device with an analogue output) using
a suitable interlink cable.
When the 6.4mm or 3.5mm head-
phone / earphone sockets are used,
other signal outputs are automatically
switched off.
Remote control.
The remote control allows you to
adjust the volume, mute the sound,
dim or turn off the visual display; and
change from one RCA Phono (or MP3)
input source to another. Point the
remote at the facia panel when using.
It will work up to 10Mtrs. from the
pre-amplifier up to a 30 degree angle
either side of front.
The remote will also operate the
AT3000 CD Player but no other equip-
ment. If you are also using the
ASTINtrew CD Player, the mute func-
tion will mute both.
Refer to the illustration on page 6.
In the unlikely event of the pre-amplifi-
er failing to work properly when first
switched on please refer to trou-
bleshooting in section 8.
7. Valve and fuse replace-
ment.
The valves supplied and fitted in this
pre-amplifier have been selected to
offer a high quality neutral sound. If
you wish to experiment with alternative
manufacturers’ valves after the war-
rantee period has expired, ensure that
the factory fitted valves are replaced
with ECC82 (12AU7) types only.
Other valve types may damage the
pre-amplifier and also void the warran-
tee.
Replacing or substituting the valves
can be carried out by your dealer or
distributor, or you can replace them
yourself, with care. If you attempt to
replace the valves yourself, the follow-
ing instructions must be adhered to
exactly.
Note: Dangerously high voltages
are present inside the unit when
powered from the mains
that can KILL.
NEVER open the pre-amplifier when
attached to the mains supply.
A. Disconnect the pre-amplifier from
all equipment and the mains supply.
Place on a table or work bench
with plenty of space around.
Note: Wait at least 1 hour before
opening the top cover to allow the
valves time to cool down and the
capacitors to dissipate
their charge.
B. Undo the 10 x M3 Alan screws
holding the top plate in position
with the Alan key supplied. Put the
screws somewhere safe.
7

C. Remove the top plate, place on a
non-scratch surface to
prevent marking.
You are now ready to change the
valves.
Valve life.
We recommend the valves are
replaced every 20,000 hours. At end
of life, valves start to make the sound
‘soft’ or ‘out of focus’. Valves rarely
just stop working. Occasionally they
will start to audibly buzz before end of
life and it is necessary to change
them.
As a guide, using this amplifier four
times a week for an average four
hours a session for 48 weeks a year;
we would be recommended to change
the valves once every 15 - 20 years.
If you leave your equipment on all the
time, we recommend changing them
every two years.
This pre-amplifier is designed to use
the ECC82 (12AU7) valve.
There are a number of manufacturers
of this valve and a large quantity of
‘new old stock’ (NOS) types also avail-
able. Spare ASTINtrew valves can be
purchased through your dealer or dis-
tributor.
Changing valves: Remember, valves
run hot when in use. Wait an hour
after switching the amplifier off and
removing the mains / signal cables
before changing valves.
The valve holders are attached to the
printed circuit board, and the spring
terminals that hold the valve pins are
strong, so care has to be taken not to
damage the board or valve when
removing or replacing them.
Do not force the valve into / out of
the holder. This could bend the cir-
cuit board and may result in damage.
The correct way to remove / insert a
valve is to pull / push gently whilst
rocking slightly in a circular way, so as
each of the nine valve pins is pulled
/pushed in turn (gently).
When inserting a valve, first ensure
the pins are not bent on the valve,
then locate the pins onto the valve
holder correctly, by aligning the ‘spac-
ing position’ on both valve and holder.
Remove white teflon valve damper and
replace on new valve in same position.
Ensure no items such as tools or
spare parts are left inside, replace the
top plate, noting the front and back
screw positions are different, re-fit all
10 Alan screws. Do not to over tight-
en and damage the screws or key.
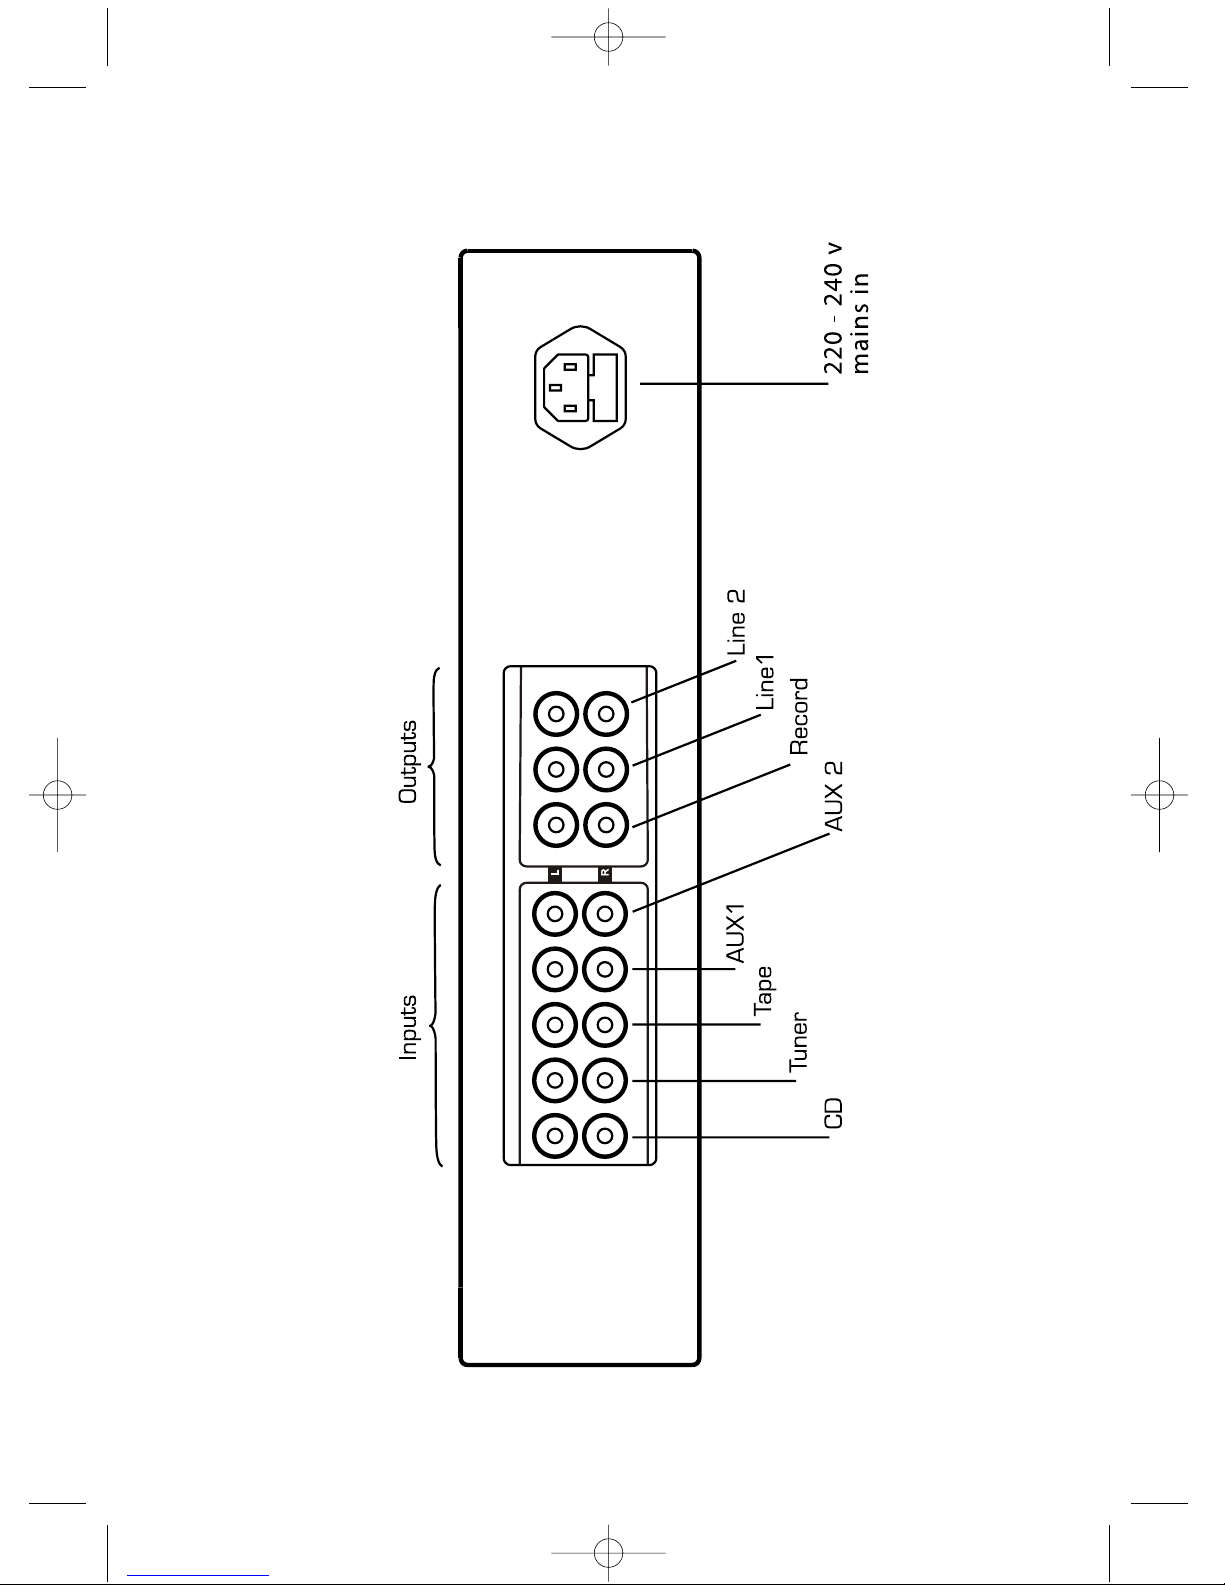
Changing the fuse:
The fuse holder is located on the back
plate within the IEC mains socket cas-
ing. A spare 20mm glass 500mA
fuse is located within the fuse carrier.
The UK 13A plug is also fused.
8

Output distortion:
Check input compatibility with source
equipment; signal may be set too high.
Mains voltage may be unstable or
‘dirty’.
9. Specifications
Gain: +18db.
Maximum output: 20V (RMS)
Frequency response:
+0 / - 3 db 10-20,000 Hz
Total Harmonic Distortion:
0.3% at 5v (RMS) 20-20,000 Hz
Input impedance: 47K ohm
Output impedance: 600 ohm
Signal to noise ratio:
95 db A weighted
Valve
1 x ECC82 (12AU7) Electro-Harmonix make,
per channel
(20,000 hrs recommended replacement period)
Mains voltage:
220-240V at 50Hz.
Power consumption: 50W
Dimensions:
W 430mm D 340mm Ht 110mm inc. feet.
Boxed Weight: 9.1 Kg.
ASTINtrew reserves the right to make
improvements or changes which may result in
specification or feature changes
without notice.
8. Troubleshooting
If the pre-amplifier fails to work or you
suspect it is not working properly, first
check all connections to and from the
other equipment. Check all the simple
and obvious things first: power supply
on at wall, power amplifier and source
components are switched on, loud-
speaker cables are secured at both
ends.
Below are some common problems
with suggestions for the possible cure.
The list is not exhaustive; if you cannot
resolve the problem yourself, please
consult your appointed ASTINtrew
dealer or distributor.
No power, LED fails to illuminate:
Check the wall and pre-amplifier power
switches are on; and that the power
cable is secure in the back of the
amplifier. Check fuses.
No output, no sound from loud-
speakers:
Check there is a source signal and you
are switched to the correct input.
Check the power amplifier and speak-
ers are working correctly.
Loud audible hum:
Check all component earthing in your
hi-fi system.
Low volume:
Check volume control setting. Check
input compatibility with source
equipment.
9

This guarantee does not affect your con-
sumer rights under English law.
11. CE, RoHS and WEEE
All ASTINtrew products comply with CE
regulations.
When implemented into
UK Legislation, all
ASTINtrew products will
comply with the European
RoHS Directive.
When implemented into UK legislation, all
ASTINtrew products can be returned
after use in accordance with the WEEE
Directive. Contact your Dealer for fur-
ther information.
10. Guarantee
A two year guarantee is given and is
valid from the date purchase, against
any defect in materials or workman-
ship. Retain your receipt as proof of
purchase. All claims should be made
through your dealer or distributor
under this guarantee.
The two year guarantee excludes:
A. All damage caused by accident,
misuse, neglect, incorrect
installation, adjustment, non-
authorised repair, servicing or valve
replacement
B. The valves.
C. Liability for damage or loss during
transit from the retailer or
purchaser back to ASTINtrew or its
authorised agent for the purposes
of repair or inspection.
Carriage costs to ASTINtrew shall be
borne by the consignor.
If the returned equipment is found not
to be faulty, ASTINtrew reserves the
right to make a charge for both the
examination and return carriage.
In the event of a failure, neither Air
Audio Ltd. t/a ASTINtrew or its dis-
tributor or dealer shall be liable for any
injury, loss or damage caused to prop-
erty or products other than the prod-
uct under warrantee.
10
Table of contents
Other Astin Trew Amplifier manuals
Popular Amplifier manuals by other brands

axing
axing BVS 12-66 Operation instructions

Hughes & Kettner
Hughes & Kettner RED BOX Classic operating instructions

Crescend
Crescend P25 Series Installation and operating manual

Better Music Builder
Better Music Builder DX-211 owner's manual

Focal
Focal FPD 600.4 Operation configuration

Tektronix
Tektronix 7A16P instruction manual