Astivita ASTDISH45FS User manual

WQP8-7636B-AU
(MIDEA)( )
用户手册
标准版
80G双胶
2016.7.19
技术要求:
所有印刷颜色均为黑色
该用户手册里的彩色图片也按黑 白色 制作
纸张规格为
如果供应商的排版需要加空白页 ,请加在最后
本说明书参考的电控洗涤时序表 版本 号为:
1. :PANTONE BLACK C
2.
3. A4
4.
5.
DKGF-SX523-2016
袁 波
许平平
雷振 雄
蔡延涛
赵祎楠
邹京津
熊好 平

ASTDISH45FS
Company Name: Foshan Shunde Midea Washing Appliances Mfg. Co., Ltd
Address: No.20, Gangqian Road, Beijiao,Shunde, Foshan, Guangdong, 528311 P.R.China
9 place settings
10 place settings
9 place settings
10 place settings

To review the section on troubleshooting Tips
will help you to solve some common problems
by yourself .
Dear Customer,
Please carefully read this manual before using the
dishwasher, it will help you to use and maintain the
dishwasher properly.
Pass it on to any subsequent owner of the appliance.
This manual contains sections on safety Instructions,
Operating Instructions, Installation Instructions and
Troubleshooting Tips, etc.
The manufacturer, following a policy of constant
development and updating of the product, may
make modifications without giving prior notice.
This user manual shall also be got from the
manufacturer or responsible vendor.
Keep it to refer to it at a later date.
If you can not solve the problems by yourself ,
please ask for the help of professional technicians.
Dishwasher Features...........................................3
Filtering System.................................................11
Caring for the Dishwasher...................................12
Wash Cycle Table................................................9
Turning on the Appliance.....................................9
Change the Programme......................................10
At the end of the Wash Cycle...............................10
Positioning the Appliance...................................13
Water Connection..............................................14
About Power Connection....................................13
Start of dishwasher............................................15
Before calling for service.....................................16
Error codes.......................................................17
Technical information.........................................18
Control Panel......................................................3
Recommengation...............................................7
For washing in the dishwasher the
folliwing cutlery/dishes......................................7
Attention before or after loading the
Dishwasher Baskets...........................................7
Removing the Dishes.......................................... 7
The Method Loading Normal Dishware..................8
A Fill the Rinse Aid Dispenser............................3、
B Function of Detergent ....................................4、

This appliance is intended to be used in household and similar
applications such as:
-staff kitchen areas in shops, offices and other working environments;
-farm houses;
-by clients in hotels, motels and other residential type environments;
-bed and breakfast type environments.
This appliance can be used by children aged from 8 years and above and
persons with reduced physical, sensory or mental capabilities or lack of
experience and knowledge if they have been given supervision or
instruction concerning use of the appliance in a safe way and understand
the hazards involved. Children shall not play with the appliance. Cleaning
and user maintenance shall not be made by children without supervision.
For EN60335-1
This appliance is not intended for use by persons(including children )with
reduced physical, sensory or mental capabilities, or lack of experience and
knowledge ,unless they have been given supervision or instruction
concerning use of the appliance by a person responsible for their safety.
For IEC60335-1
This appliance is for indoor use only, for household use only. To protect
against the risk of electrical shock, do not immerse the unit, cord or plug in
water or other liquid.
Please unplug before cleaning and maintenance the appliance .Use a soft
cloth moisten with mild soap, and then use a dry cloth to wipe it again .
( )
( )
When using your dishwasher,
follow the precautions listed below:
This appliance must be earthed. In the event of a malfunction or breakdown,
earthing will reduce the risk of anelectric shock by providing a path of least
resistance of electric current. This appliance is equipped with a cord having
an equipment-earthing conductor and a earthing plug.
The plug must be plugged into an appropriate outlet that is installed and
earthed in accordance with all local codes and ordinances.
Improper connection of the equipment-earthing conductor can result
in the risk of an electric shock. Check with a qualified electrician or service
representative if you are in doubt whether the appliance is properly earthed.
Do not modify the plug provided with the appliance; If it does not fit the outlet.
Have a proper outlet installed by a qualified electrician.

Do not abuse, sit on, or stand on the door or dish rack of the dishwasher.
Do not operate your dishwasher unless all enclosure panels are properly in place.
Open the door very carefully if the dishwasher is operating, there is a risk of water
squirting out.
Do not place any heavy objects on or stand on the door when it is open. The
appliance could tip forward.
When loading items to be washed:
1) Locate sharp items so that they are not likely to damage the door seal;
2) Warning: Knives and other utensils with sharp points must be loaded in the
basket with their points down or placed in a horizontal position.
Check that the detergent powder is empty after completion of the wash cycle.
Do not wash plastic items unless they are marked dishwasher safe or the
equivalent. For plastic items not so marked, check the manufacturer's
recommendations.
Use only detergent and rinse additives designed for an automatic dishwasher.
Never use soap, laundry detergent, or hand washing detergent in your dishwasher.
Children should be supervised to ensure that they do not play with the appliance.
The door should not be left open, since this could increase the risk of tripping.
Do not tamper with controls.
The appliance is to be connected to the water mains using new hose sets and
that old hose-sets should not be reused.
The maximum number of place settings to be washed is 9.
The maximum permissible inlet water pressure is 1MPa.
The minimum permissible inlet water pressure is 0.04MPa.
If the supply cord is damaged, it must be replaced by the manufacturer or
its service agent or a similarly qualified person in order to avoid a hazard.
During installation, the power supply must not be excessively or dangerously
bent or flattened.

Dispose of the dishwasher packaging material correctly.
All packaging materials can be recycled.
Plastic parts are marked with the standard international
abbreviations:
PE for polyethylene, e.g. sheet wrapping material
PS for polystyrene, e.g. padding material
POM polyoxymethylene, e.g. plastic clips
PP polypropylene, e.g. Salt filler
ABS Acrylonitrile Butadiene Styrene, e.g. Control Panel .
Packaging material could be dangerous for children!
For disposing of package and the appliance please go to a
recycling centre. Therefore cut off the power supply cable
and make the door closing device unusable.
Cardboard packaging is manufactured from recycled paper
and should be disposed in the waste paper collection for
recycling.
By ensuring this product is disposed of correctly, you will
help prevent potential negative consequences for the
environment and human health, which could otherwise be
caused by inappropriate waste handling of this product.
For more detailed information about recycling of this
product, please contact your local city office and your
household waste disposal service.
DISPOSAL: Do not dispose this product as unsorted
municipal waste. Collection of such waste separately for
special treatment is necessary.

For each wash cycle.
Compartment
For programs with pre-wash only.
(Follow the user instructions)
Electric indicator on control panel (if provided).
Check the rinse aid level
Load the baskets
Select a program
Running the dishwasher
Switch off the appliance
Turn off the water tap,
unload the baskets
Fill the detergent dispenser
Warning: wait a few minutes (about 15 minutes) before unloading the dishwasher to avoid scald,as
the dishes and utensils are still hot and more susceptible to break.
They could also dry better.Unload the appliance, starting from the lower basket.
Changing the program
Add forgotten dishes in the
dishwasher.
Scrape off any large food particles. Soften remnants of burnt food in pans,
then load the baskets. Refer to the dishwasher loading instructions.
When the working cycle is finished, the buzzer of the
dishwasher will sound 8 times, then stop.
Turn off the appliance using the On/Off Button.
If the appiance was under standby mode, it will be power off automaticly after 30 minutes without any operation.
If the appliance is switched
off during a wash cycle.
Open the door carefully.
Hot steam may escape
when the door is opened!
If the appliance is switched off during a wash cycle, when switched
on again, please re-select the washing cycle and operate the dishwasher
according to the original Power-on state ).
Switch on the appliance
For detailed operating method read the corresponding content on the instruction manual.
Open the door, press the On/Off button to switch on the appliance.
Turn on the water tap and press the . The machine will start working
after about 10 seconds.
Start/Pause Button
Close the door,press the Program Button until the selected program lights up.
( See the section entitled Operation instruction )“ ”
1. A running cycle can only be modified if it has been running for a short time. Otherwise the detergent
may have already been released and the water already drained. If in this case, the detergent
dispenser must be refilled.
2. Press the Start/Pause button, the machine will be in standby state, press the program
button more than 3 seconds then you can change the program to the desired cycle setting.
3. Press the Start/Pause Button, the dishwasher will run after 10 seconds.
1.Press the Start/Pause Button to stop the washing.
2.Open the door a little.
3.After the spray arms stop working, you can open the door
completely.
4.Add forgotten dishes.
5.Close the door.
6.Press the Start/Pause Button, the dishwasher will run
after 10 seconds.
AB
C

before using it for the first time.
To get the best performance from your dishwasher, read all operating instructions
1---On/Off Button
8---Program indicators
3---Delay Button: To press the button to change the
delay time.
9---Delay indicators: to show the delay time
(3h/6h/9h )
5 Start /Pause Button: To start the selected
washing program or pause the washing program
when the machine is working.
---
2---Extra dry function Button: Press the button to select
the Extra dry function. Meanwhile, the indicator light
be brighten.The rapid can not select the extra dry
function at the same time.
10---Program ending function :To show when the
wash program is ended.
Rinse aid warning lights : To show when dispenser
need to be refilled.
Child lock function :press delay button and program
button simultaneously to lock the program.
7---Extra dry indicator
4---Program Button: To press the button to selcet a
wash program.
6---Power indicator
Back View
1
2
3
4
5
7
8
910
Front view
Lower basket
Salt container
Dispenser
Cup shelf
Spray arms
Filter assembly
Inlet pipe connector
Drain pipe
Upper basket
Cutlery rack
Top spray arm
1Inner pipe
5
6
7
8
9
10
12
11
3
2
4
6
Adjuster
13
13
11
12

Before using your dishwasher for the first time:
A. Fill the rinse aid dispenser
B. Fill in detergent
The rinse aid is released during the final rinse to prevent water from forming droplets on your dishes, which can
leave spots and streaks. It also improves drying by allowing water to roll off the dishes. Your dishwasher is
designed to use liquid rinse aids. The rinse aid dispenser is located inside the door next to the detergent dispenser.
To fill the dispenser, open the cap and pour the rinse aid into the dispenser until the level indicator turns completely
black. The volume of the rinse aid container is about 110ml.
Rinse Aid Dispenser
Function of Rinse Aid
Rinse aid is automatically added during the last rinse, ensuring thorough rinsing, and spot and streak free drying.
Attention!
Only use branded rinse aid for dishwasher. Never fill the rinse aid dispenser with any other substances
(e.g. Dishwasher cleaning agent, liquid detergent). This would damage the appliance.
As the rinse aid diminishes, the size of the black dot
on the rinse aid level indicator changes, as illustrated below.
Full
3 / 4 full
1 / 2 full
1 / 4 full - Should refill to eliminate spotting
Empty
If there is no rinse-aid warning light in the control panel, you can judge the amount of rinse-aid by the color of the
optical level
indicator "C" located next to the cap. When the rinse-aid container is full, the whole indicator will be dark .As the
rinse-aid
diminishes, the size of the dark dot decreases. You should never let the rinse aid get below 1 / 4 full.
When to Refill the Rinse Aid Dispenser
How to fill the Rinse Aid Dispenser
To open the dispenser, turn the cap to the "open" (left) arrow and lift it out.
Pour the rinse aid into the dispenser, being careful not to overfill.
Replace the cap by inserting it aligned with "open" arrow and turning it to the closed (right) arrow.
Be careful not to overfill the dispenser, because this could cause over sudsing. Wipe away any spills
with a damp cloth. Don't forget to replace the cap before you close dishwasher door.
Attention!
Clean up any rinse aid spill during filling with an absorbent cloth to avoid excess foaming during the next wash.
1
2
3

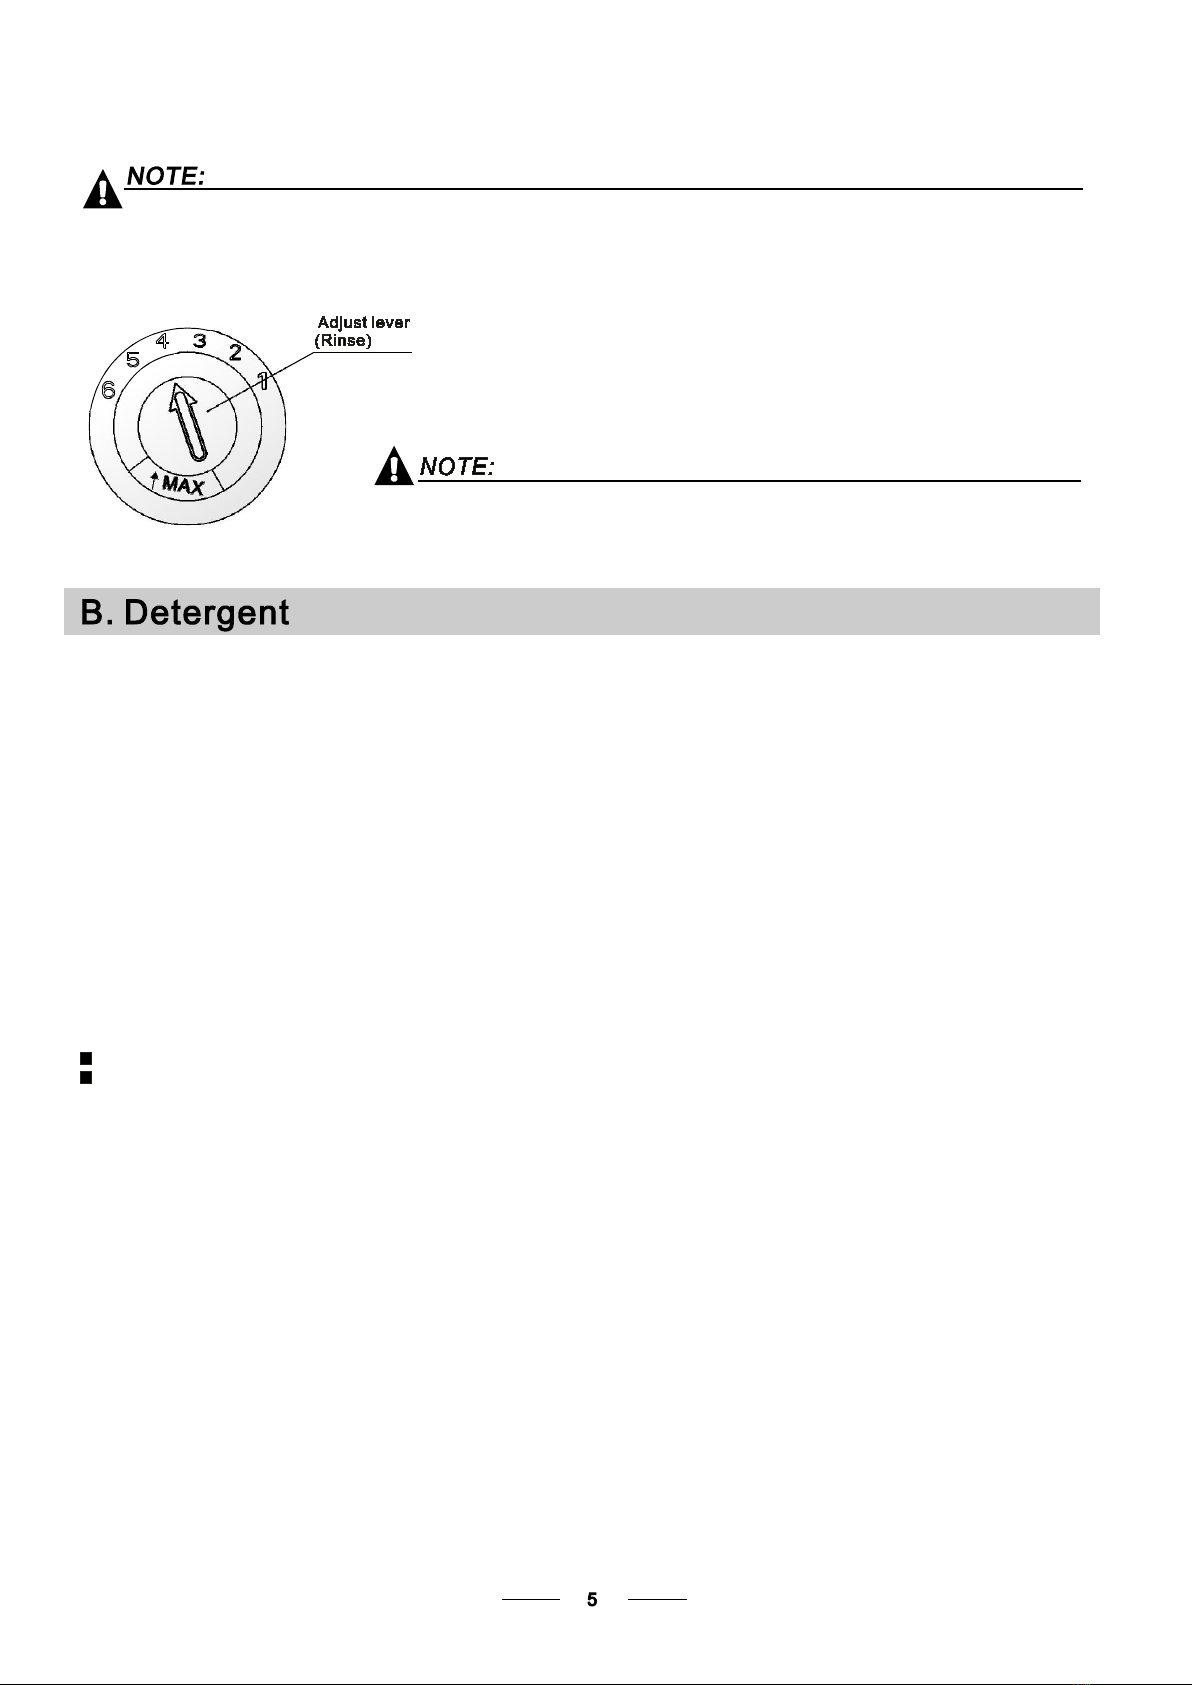
Adjusting Rinse Aid Dispenser
The rinse aid dispenser has six or four settings. Always start with the dispenser
set on "4". If spots and poor drying are a problem, increase the amount of rinse
aid dispensed by removing the dispenser lid and rotating the dial to "5". If the
dishes still are not drying properly or are show spots, adjust the dial to the next
higher lever until your dishes are spot-free. The recommended setting is "4".
(Factory value is "4".)
Increase the dose if there are drops of water or lime spots on the dishes after washing.
Reduce it if there are sticky whitish stains on your dishes or a bluish film on glassware or
knife blades.
during the next wash. Don't forget to replace the cap before you close dishwasher door.
Clean up any rinse aid spilled while during filling with an absorbent cloth to avoid excessive foaming
Detergents have chemical ingredients that are necessary to remove dirt, crush dirt and transport it out of the dishwasher.
Most of the commercial quality detergents are suitable for this purpose.
Detergents
There are 3 sorts of detergents
1.With phosphate and with chlorine
2.With phosphate and without chlorine
3.Without phosphate and without chlorine
Based on their chemical composition, detergents can be split in two basic types:
The use of normal washing programs in combination with concentrated detergents
reduces pollution and is good for your dishes; these wash programs are specifically matched
to the dirt-dissolving properties of the enzymes of the concentrated detergent. For this reason
normal wash programs in which concentrated detergents are used can achieve the same
results that can otherwise only be achieved using intensive programs.
“ ”
“ ”
“ ”
Detergent tablets of different brands dissolve at different speeds. For this reason some
detergent tablets cannot dissolve and develop their full cleaning power during short
programs. Therefore please use long programs when using detergent tablets, to
ensure the complete removal of detergent residuals.
The dispenser must be refilled before the start of each wash cycle following the instructions
provided in the wash cycle table . Your dishwasher uses less detergent and rinse aid than
Conventional dishwasher. Generally, only one tablespoon of detergent is needed for
a normal wash load. More heavily soiled items need more detergent. Always add the
detergent just before starting the dishwasher, otherwise it could get damp and will not
dissolve properly.
Concentrated Detergent
Detergent Tablets
Detergent Dispenser
Conventional, alkaline detergents with caustic components
Low alkaline concentrated detergents with natural enzymes
Normally new pulverised detergent is without phosphate. Thus the water softener function of
phosphate is not given. If detergents without phosphate are used in the case of hard water
often white spots appear on dishes and glasses. In this case please add more detergent to reach
better results. Detergents without chlorine do only bleach a little. Strong and coloured spots will not
be removed completely. In this case please choose a program with a higher temperature.

Adding detergent to dispenser
Proper Use of Detergent
Use only detergent specifically made for the use in dishwashers. Keep your detergent fresh and dry.
Don't put powdered detergent into the dispenser until you're ready to wash dishes.
Some dishwasher detergents are strongly alkaline. They can be extremely dangerous if
swallowed. Avoid contact with the skin and eyes and keep children away from the
dishwasher when the door is open. Check that the detergent receptacle is empty after
completion of the wash cycle.
Always add the detergent just before starting each wash cycle.
Only use branded detergent and rinse aid for dishwasher.
If the lid is closed: push the latch to open.
Fill the detergent dispenser with detergent.
The marking indicates the dosing levels , as
illustrated on the right:
For main wash detergent.
For pre-wash detergent.
Please observe the manufacturers dosing and storage
Recommendations as stated on the detergent packaging.
Close the lid and press until it locks in place.
If the dishes are heavily soiled, place an additional
detergent dose in the pre-wash detergent chamber. This detergent will take effect during the pre-wash phase.
A
B
Fill in Detergent
You see information about the amount of detergent for the single programme on the last page.
Please be aware that soiling levels and water hardness can effect wash results.
Please observe the manufacturer's recommendations on the detergent packaging.

Cutlery with wooden, horn china or
mother-of-pearl handles
Plastic items that are not heat resistant
Older cutlery with glued parts that are not
temperature resistant
Bonded cutlery items or dishes
Pewter or copper items
Crystal glass
Steel items subject to rusting
Wooden platters
Items made from synthetic fibres
Some types of glasses can become
dull after a large number of washes
Silver and aluminum parts have a
tendency to discolour during washing
Glazed patterns may fade if machine
washed frequently
Are not suitable Are of limited suitability
Dishes and items of cutlery must not lie inside one another, or cover each other.
To avoid damage to glasses, they must not touch.
Load large items which are most difficult to clean into the lower basket.
The upper basket is designed to hold more delicate and lighter dishware such as glasses, coffee
and tea cups
Long bladed knives stored in an upright position are a potential hazard!
Long and/or sharp items of cutlery such as carving knives must be positioned
horizontally in the upper basket.
Please do not overload your dishwasher. This is important for good results and for
reasonable consumption of energy.
Load hollow items such as cups, glasses, pans etc. With the opening facing downwards so that
water cannot collect in the container or a deep base.
Consider buying utensils which are identified as dishwasher-proof.
Use a mild detergent that is described as 'kind to dishes'. If necessary, seek further
information from the detergent manufacturers.
For particular items, select a program with as low a temperature as possible.
To prevent damage, do not take glass and cutlery out of the dishwasher immediately
after the programme has ended.
(For best performance of the dishwasher, follow these loading guidelines.
Features and appearance of baskets and cutlery baskets may vary from your model.)
Scrape off any large amounts of leftover food. Soften remnants of burnt food in pans.
It is not necessary to rinse the dishes under running water.
Place objects in the dishwasher in following way:
1.Items such as cups, glasses, pots/pans, etc. are faced downwards.
2.Curved items, or ones with recesses, should be loaded aslant so that water can run off.
3.All utensils are stacked securely and can not tip over.
4.All utensils are placed in the way that the spray arms can rotate freely during washing.
Very small items should not be washed in the dishwasher as they could easily fall out of the basket.
To prevent water dripping from the upper basket into the lower basket, we recommend that you
empty the lower basket first and then the upper basket.

For better stacking of pots and pans,
the spikes can be folded down as
show in the picture right.
For better stacking of pots and pans,
the spikes can be folded down as
show in the picture right.
Cutlery should be placed in the cutlery basket with the handles at the bottom. If the rack has side baskets, the
spoons should be loaded separately into the appropriate slots, especially long utensils should be placed in the
horizontal position at the front of the upper basket as shown in the picture.
Do not let any item extend through the bottom.
Always load sharp utensils with the sharp
point down!
The upper basket is designed to hold more delicate
and lighter dishware such as glasses, coffee and
tea cups and saucers, as well as plates, small bowls
and shallow pans (as long as they are not too dirty).
Position the dishes and cookware so that they will
not get moved by the spray of water.
We suggest that you place large items and the most
difficult to clean items are to be placed into the lower
basket: such as pots, pans, lids, serving dishes and
bowls, as shown in the figure below. It is preferable to
place serving dishes and lids on the side of the racks
in order to avoid blocking the rotation of the top spray
arm.
Pots, serving bowls, etc, must always be placed top down.
Deep pots should be slanted to allow water to flow out.
Please be reminded that:
The Bottom Basket features folding spikes so that larger or more pots and pans can be loaded.
Folding back the cup shelives
Folding Spikes of Lower Basket

* : This program is the test cycle. The information for comparability test
in accordance with ,as follows:
AS/NZS 2007.1
AS/NZS 2007.1
Capacity: 9 setting
Position Upper basket: upper wheels on rails
Rinse aid setting: 6
PI:0.49w;Po:0.45w
Means: need to fill rinse into the Rinse-Aid Dispenser.
( )
Intensive
Heavy
90 min
Glass
For the heaviest soiled
loads, such as pots, pans,
casserole dishes and dishes
that have been sitting with
dried food on them for a while.
For heavily soiled loads,
such as , plates,glasses
and lightly soiled pans.
pots
For lightly soiled crockery
and glass
For lightly soiled loads that
do not need excellent drying
efficiency.
Prewash(45 )
Wash (55 )
Rinse
Rinse (65 )
Drying
℃
℃
℃
165
1.4 16.5
Prewash 50
Wash 60
Rinse
Rinse
Rinse 70
Drying
( ℃ )
( ℃)
( ℃)
175
1.1
Prewash
Wash (45 )
Rinse(45 )
Drying
℃
℃
175
0.55 11.2
Wash(65 )
Rinse
Rinse (65 )
Drying
℃
℃
90 11.5
1.15
Pre-wash
wash(40 )
Rinse
Rinse(60 )
Dry
℃
℃
125
0.75
13.5
(*AS/NZS 2007.1)
For normally soiled loads,
such as pots, plates, glasses
and lightly soiled pans.
standard daily cycle.
Starting a cycle wash
Draw out the lower and upper basket, load the dishes and push them back.
It is commended to load the lower basket first, then the upper one (see the section entitled
Loading the Dishwasher ).
Pour in the detergent (see the section entitled Detergent and Rinse Aid ).
Insert the plug into the socket. The power supply is 220-240 VAC /50 HZ, the specification
of the socket is 10A 250VAC. Make sure that the water supply is turned on to full pressure.
Close the door, press the On/Off button, and the light will turn on.
Turn the program button , the wash program will be changed as follows direction:
“ ”
“ ”
On/Off
If a program is selected, the response light will light. Then press the Start/Pause button, the
dishwasher begins to start.
Intensive->Heavy>ECO->Glass->90 min->Rapid;
1
2
3
4
5
Rapid
A shorter wash for lightly soiled
loads and quick wash.
Wash (45 )
Rinse (50 )
Rinse (55 )
℃
℃
℃
30
0.7
10
20g
(1 piece)
5/21.25g
(1 piece)
5/21.25g
(1 piece)
5/21.25g
(1 piece)
5/21.25g
(1 piece)
26.25g
13

When the working cycle has finished, the buzzer of the dishwasher will sound for 8 seconds, then stop. Turn off
the appliance using the Power switch button, shut off the water supply and open the door of the dishwasher.
Wait for a few minutes before unloading the dishwasher to avoid handling the dishes and utensils while they
are still hot and more susceptible to breakage. They will also dry better.
Switch Off the Dishwasher
The program light is on but is not blinking, only in this case the programme has ended.
1.Switch off the dishwasher by pressing the On/Off button.
2.Turn off the water tap!
Open the door carefully.
Hot dishes are sensitive to knocks. The dishes should therefore be allowed to cool down around 15 minutes
before removing from the appliance.
Open the dishwasher's door, leave it ajar and wait a few minutes before removing the dishes. In this way they
will be cooler and the drying will be improved.
Unloading the dishwasher
It is normal that the dishwasher is wet inside.
Empty the lower basket first and then the upper one. This will avoid water dripping from the upper Basket onto
the dishes in the lower one.
If you open the door , the machine will pause. The program light will
stop blinking and the buzzer will mooing every minute unless you close the door . After
you close the door ,the machine will keep on working after 10 seconds.
during a wash cycle
Premise:
A cycle that is underway can only be modified if it has only been running for a short time. Otherwise, the
detergent may have already been released, and the appliance may have already drained the wash water.
If this is the case, the detergent dispenser must be refilled (see the section entitled " Loading the
Detergent " ).
, the machine will be in standby state, press the program button more than
3s then you can change the program to the desired cycle setting (see the section entitled " Starting a wash
cycle ).
Press the Start/Pause button
"
1
It is dangerous to open the door when washing,
because the hot water may scald you.
A forgotten dish can be added any time before the detergent cup opens.
Add forgotten dishes.
Close the door
After the spray arms stop working, you can open the door
completely.
2
3
Open the door a little .
1 4
5
6
Press the Start/Pause Button to stop the washing.
Press the , the dishwasher will run
after 10 seconds.
Start/Pause Button

The filter prevents larger remnants of food or other objects from getting inside the pump.
The residues may block the filter, in this case they must be removed.
The filter system consists of a coarse filter,a flat (Main filter)
And a microfilter(Fine filter).
Food and soil particles trapped in this filter are pulverized by a
special jet on the lower spray arm and washed down to drain.
Larger items, such as pieces of bones or glass, that could block
the drain are trapped in the coarse filter. To remove the items
caught by the filter, gently squeeze the tap on the top of this
filter and lift out.
This filter holds soil and food residues in the sump area and
prevents it from being deposited on the dishes during wash cycle.
Main filter
1
Coarse filter
2
Fine filter
3
2
3
1
Filter assembly
The filter efficiently
For best performance and results, the filter must be cleaned regularly. this reason, it is a good idea to
remove the larger food particles trapped in the filter after each wash cycle by rinsing the semicircular filter and
cup under running water. To remove the filter device, pull the cup handle in the upward direction.
removes food particles from the wash water, allowing it to be recycled during the cycle.
For
The dishwasher must never be used without the filters.
Improper replacement of the filter may reduce the performance level of the appliance
and damage dishes and utensils.
1
2
Step 1 Turn the filter in anti-clockwise direction,:
Step 2 lift the filter assy up:
When following this procedure from step1 to step 2, the filter system will be removed;
when following it from Step 2 to Step 1, the filter system will be installed.

The control panel can be cleaned by using a lightly dampened cloth.
After cleaning, make sure to dry it thoroughly.
For the exterior, use a good appliance polish wax.
Never use sharp objects, scouring pads or harsh cleaners on any part of the dishwasher.
Protect Against Freezing
1.Cut off the electrical power to the dishwasher.
2.Turn off the water supply and disconnect the water inlet pipe from the water valve.
3.Drain the water from the inlet pipe and water valve. (Use a pan to gather the water)
4.Reconnect the water inlet pipe to the water valve.
5.Remove the filter at the bottom of the tub and use a sponge to soak up water in the sump.
please take frost protection measures on the dishwasher in winter. Every fter washing cycles,
please operate as follows
time a
:
Cleaning the Filter
Cleaning the Door
To clean the coarse filter and the fine filter, use a cleaning brush. Reassemble the filter parts as shown in the figures
on the last page and reinsert the entire assembly in the dishwasher, positioning it in its seat and pressing downwards.
When cleaning the filters, don't knock on them. Otherwise, the filters could be
contorted and the performance of the dishwasher could be decreased.
To clean the edge around the door, you should use only a soft warm, damp cloth.
To avoid penetration of water into the door lock and electrical components, do not
use a spray cleaner of any kind.
Never use a spray cleaner to clean the door panel as it may damage the door lock
and electrical components.
Abrasive agents or some paper towels should not be used because of the risk of
scratching or leaving spots on the stainless steel surface.
Cleaning the Spray Arms
If your dishwasher cannot work because of the ice,
please contact professional service persons.
It is necessary to clean the spray arms regularly for hard
water chemicals will clog the spray arm jets and bearings.
- Inspect the filters for blocking after every time the dishwasher has been used.
- By unscrewing the coarse filter, you can remove the filter system. Remove any food remnants and
clean the filters under running water.
Remarks:
The entire filter assembly should be cleaned once a week.
To remove the lower spray arm, pull out the spray arm upward.
To remove the upper spray arm, hold the nut, rotate the arm
clockwise to remove it.
Wash the arms in soapy and warm water and use a soft brush to
clean the jets. Replace them after rinsing them thoroughly.

It is recommend that you run a wash cycle with the
dishwasher empty and then remove the plug from the
socket, turn off the water supply and leave the door of
the appliance slightly open. This will help the door
seals to last longer and prevent odours from forming
within the appliance.
If the appliance must be moved, try to keep it in the
vertical position. If absolutely necessary, it can be
positioned on its back.
One of the factors that cause odours to form in the
dishwasher is food that remains trapped in the seals.
Periodic cleaning with a damp sponge will prevent this
from occurring.
Before cleaning or performing maintenance, always
remove the plug from the socket.
To clean the exterior and rubber parts of the dishwasher,
do not use solvents or abrasive cleaning products.
Only use a cloth with warm soapy water.
To remove spots or stains from the surface of the
interior, use a cloth dampened with water an a little
vinegar, or a cleaning product made specifically for
dishwashers.
Remove the Plug
No Solvents or Abrasive Cleaning
Moving the Appliance
Seals
After every wash, turn off the water supply to the
appliance and leave the door slightly open so that
moisture and odours are not trapped inside.
After Every Wash
When not in Use for a LongTime
Ensure the voltage and frequency of the power being corresponds to
those on the rating plate. Only insert the plug into an electrical socket which is earthed
properly. If the electrical socket to which the appliance must be connected is not
appropriate for the plug , replace the socket, rather than using a adaptors or the like as
they could cause overheating and burns.
Please look at the rating label to know the rating voltage and connect the dishwasher to the appropriate power supply.
Use the required fuse 10 amp, time delay fuse or circuit breaker recommended and provide separate circuit serving
only this appliance.
Position the appliance in the desired location. The back should rest against the wall behind it, and the sides,
along the adjacent cabinets or walls. The dishwasher is equipped with water supply and drain hoses that can
be positioned either to the right or the left sides to facilitate proper installation.
Once the appliance is positioned for levelling, the height of the dishwasher
may be altered via adjustment of the screwing level of the feet. In any case,
the appliance should not be inclined more than 2 .
For personal safety:
Do not use an extension cord or an adapter plug
with this appliance.
Do not, under any circumstances, cut or remove the
earthing
Connection from the power cord.

14
Insert the drain hose into a drain pipe with a minimum diameter of 40mm, or let it run into the sink, making sure to
avoid bending or crimping it. The top of the hose must be less than 1000mm.
A
Counter
Front
Drain pipe
NOTE
The top of the hose
must be less than
1000mm.
40mm
B
A hose that attaches to a sink spray can burst if it is installed on the same water line as the dishwasher. If your sink
has one, it is recommended that the hose be disconnected and the hole plugged.
Pull The safety supply hoses completely out from storage compartment located at rear of dishwasher.
Turn water fully on before starting the dishwasher.
1
Tighter the screws of the safety supply hose to the faucet with thread 3/4inch.
The safety supply hose consists of the double walls. The hose's system guarantees its intervention by blocking the
flow of water in case of the supply hose breaking and when the air space between the supply hose itself and the outer
corrugated hose is full of water.
Turn off the water.
Release the water pressure by depressing the pressure release button. This relieves water pressure and protects you, and the
room, from severe splashing.
Unscrew the safety supply hose from the faucet.
3
2
1
2
3
The appliance must be connected to the water mains using new hose-sets.
The old hose-sets should not be reused.
Water pressure must be between 0,04 MPa and 1 MPa. If the pressure is below the
minimum consult our Service Department for advice.
Connect the cold water supply hose to a threaded 3/4(inch) connector and make sure that it is fastened tightly in place.
If the water pipes are new or have not been used for an extended period of time, let the water run to make sure that the
water is clear and free of impurities. If this precaution is not taken, there is a risk that the water inlet can get blocked
and damage the appliance.

The following things should be checked before starting the dishwasher.
The content of this manual is very helpful to the users.
After installation, please make sure to keep this manual.
1The dishwasher is level and fixed properly
2The inlet valve is open
3Inlet hose connections are fully tightened and not leaking
4The wires are tightly connected
5The power is switched on
6The inlet and drain hoses are knotted
7All packing materials and printings should be taken out from the dishwasher
Extension Hose
If you need a drain hose extension, make sure to use a similar drain hose.
It must be no longer than 4 metres; otherwise the cleaning effect of the dishwasher could be reduced.
Water Outlet
Connect the water drain hose. The drain hose must be correctly fitted to avoid water leaks.
Ensure that the water drain hose is not kinked or squashed.
If the sink is 1000 higher from the floor, the excess water in hoses cannot be drained directly
into the sink. It will be necessary to drain excess water from hoses into a bowl or suitable
container that is held outside and lower than the sink.
How to Drain Excess Water From Hoses
Syphon Connection
The waste connection must be at a height less than 1000 mm (maximum) from the bottom of the dish.
The water drain hose should be fixed .
Table of contents
Other Astivita Dishwasher manuals