GE GSD2600D Installation instructions

r
UseandCareof
Mi)delGSD2600D
Yourelectronic
touch-controls p2
Opemtinginstructions p2
Dishwashingshort-cut p4
Loadedright,
dishesgetcleaner p12
Whatisdishwashersafe? p15
Savetimeandmoney
Beforeyoucallforservice,
usetheProblemSolver p17
Your Direct Line to General Electric
The GE Answer CenteF800.626.2000
GENE RAL@EIECTRIC
... ....————.—....— ~-–---–-–’–---”--- “-

What can youwash safely .....15 ‘
Careofyourdishw’ksher .......16 ~
Problemsolving ..........17-19 :
Consumerservices ..........21
“Warranty...........BackCover
Help us
help you...
Read this book carefully
It is designed to help you operate
and maintain your new dishwasher
properly.
Keep it handy for answers to your
questions.
If you don’t understand something
or need more help... Call, toll free:
The GE Answer CenterTM
800.626.2000
consumer information service
or write (include your phone
number]
Consumer Affairs
General Electric Company
Appliance Park
Louisville, KY 40225
Write down the model and
serial numbers.
You’ll find them on a label on the
left side of the dishwasher just
inside the door.
These numbers are also on the
Consumer Product Ownership
Registration card that came with
your dishwasher. Before sending in
this card, please write these
numbers here:
Model No.
Serial No.
Use these numbers in any
correspondence or service calls
concerning your dishwasher.
If you receive adamaged
dishwasher, immediately contact
the dealer (or builder) that sold you
the dishwasher.
Save time and money...
before you call for service
Check the Problem Solver (pages c:
17-19).It lists minor causes of
operating problems that you can
correct yourself. It could save you
an unnecessary service call.
Convenience Features
This is avery advanced, automatic
and versatile dishwasher. It’s very
easy to understand and use, but it
is different. Before using your
dishwasher the first time, read and
follow these instructions.
This dishwasher has many con-
venient features. Among them are:
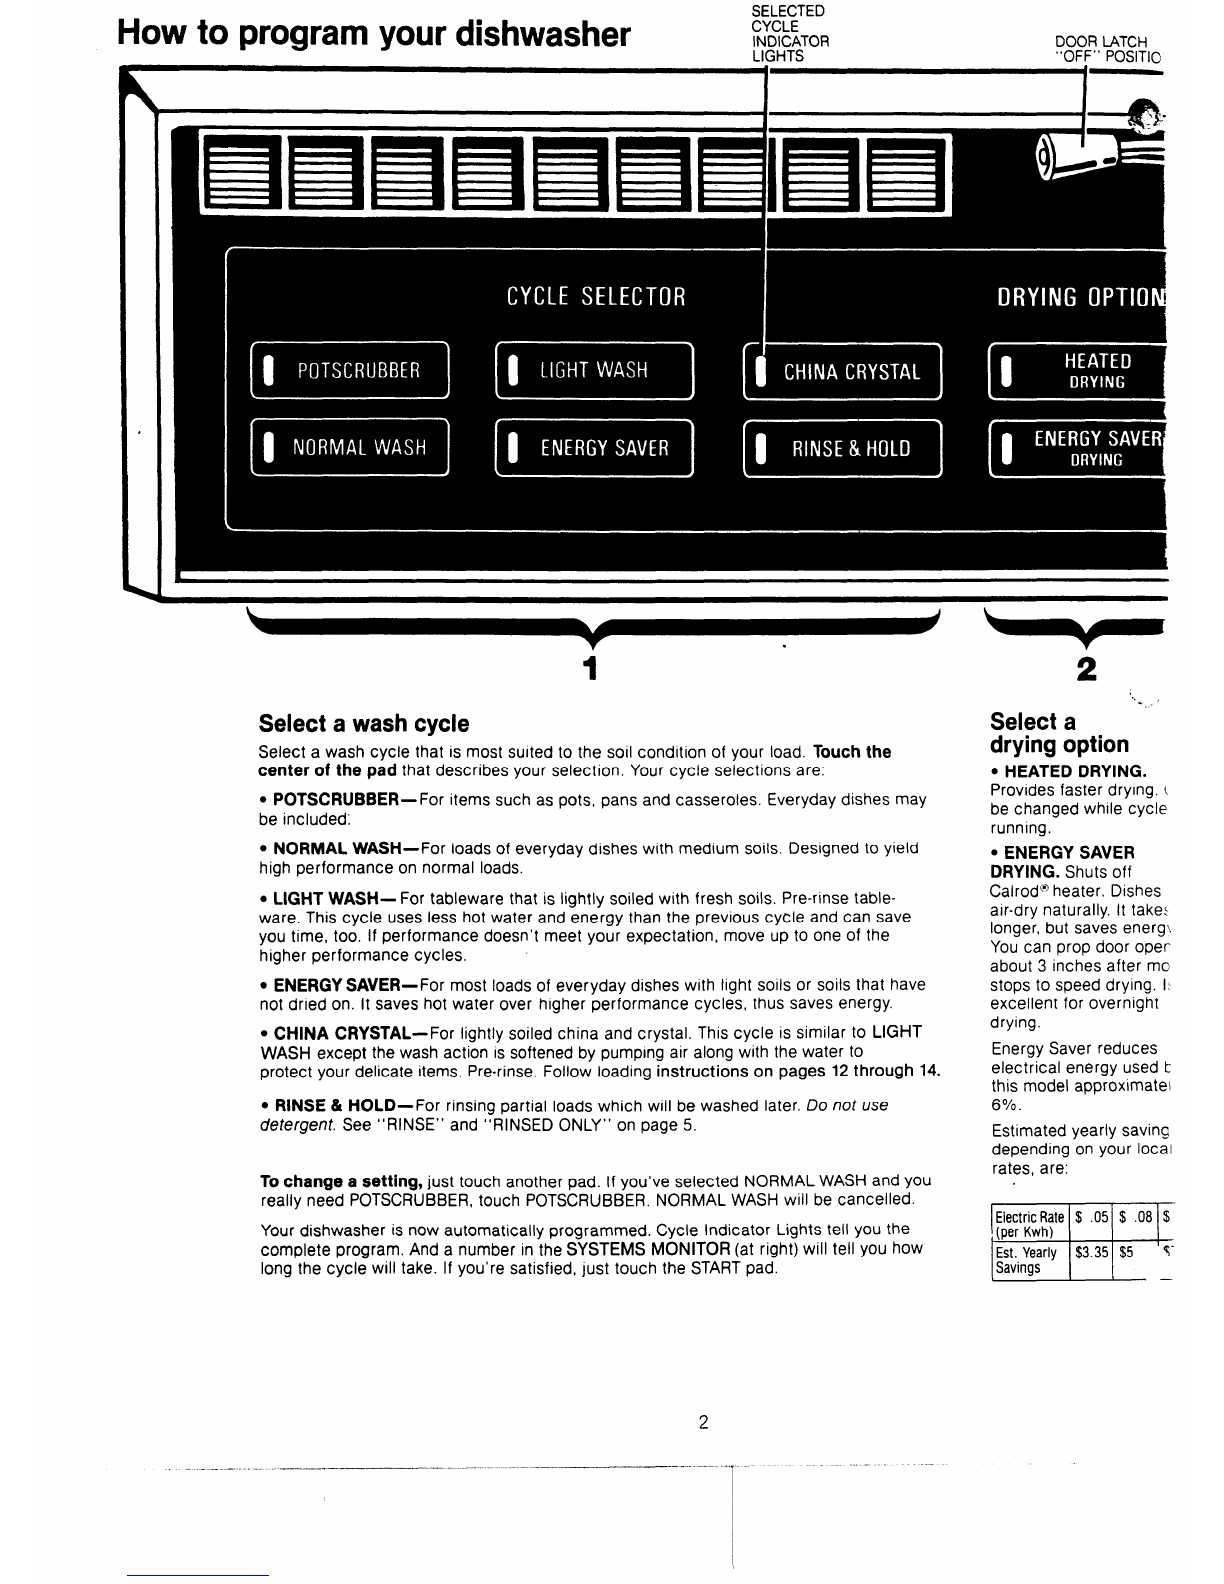
.Controls are arranged left to
right as you use them.
.Automatic responses to instruc-
tions let you know the desired
function has been selected.
cLets you select fast, heated
drying or energy-saving no-heat
drying.
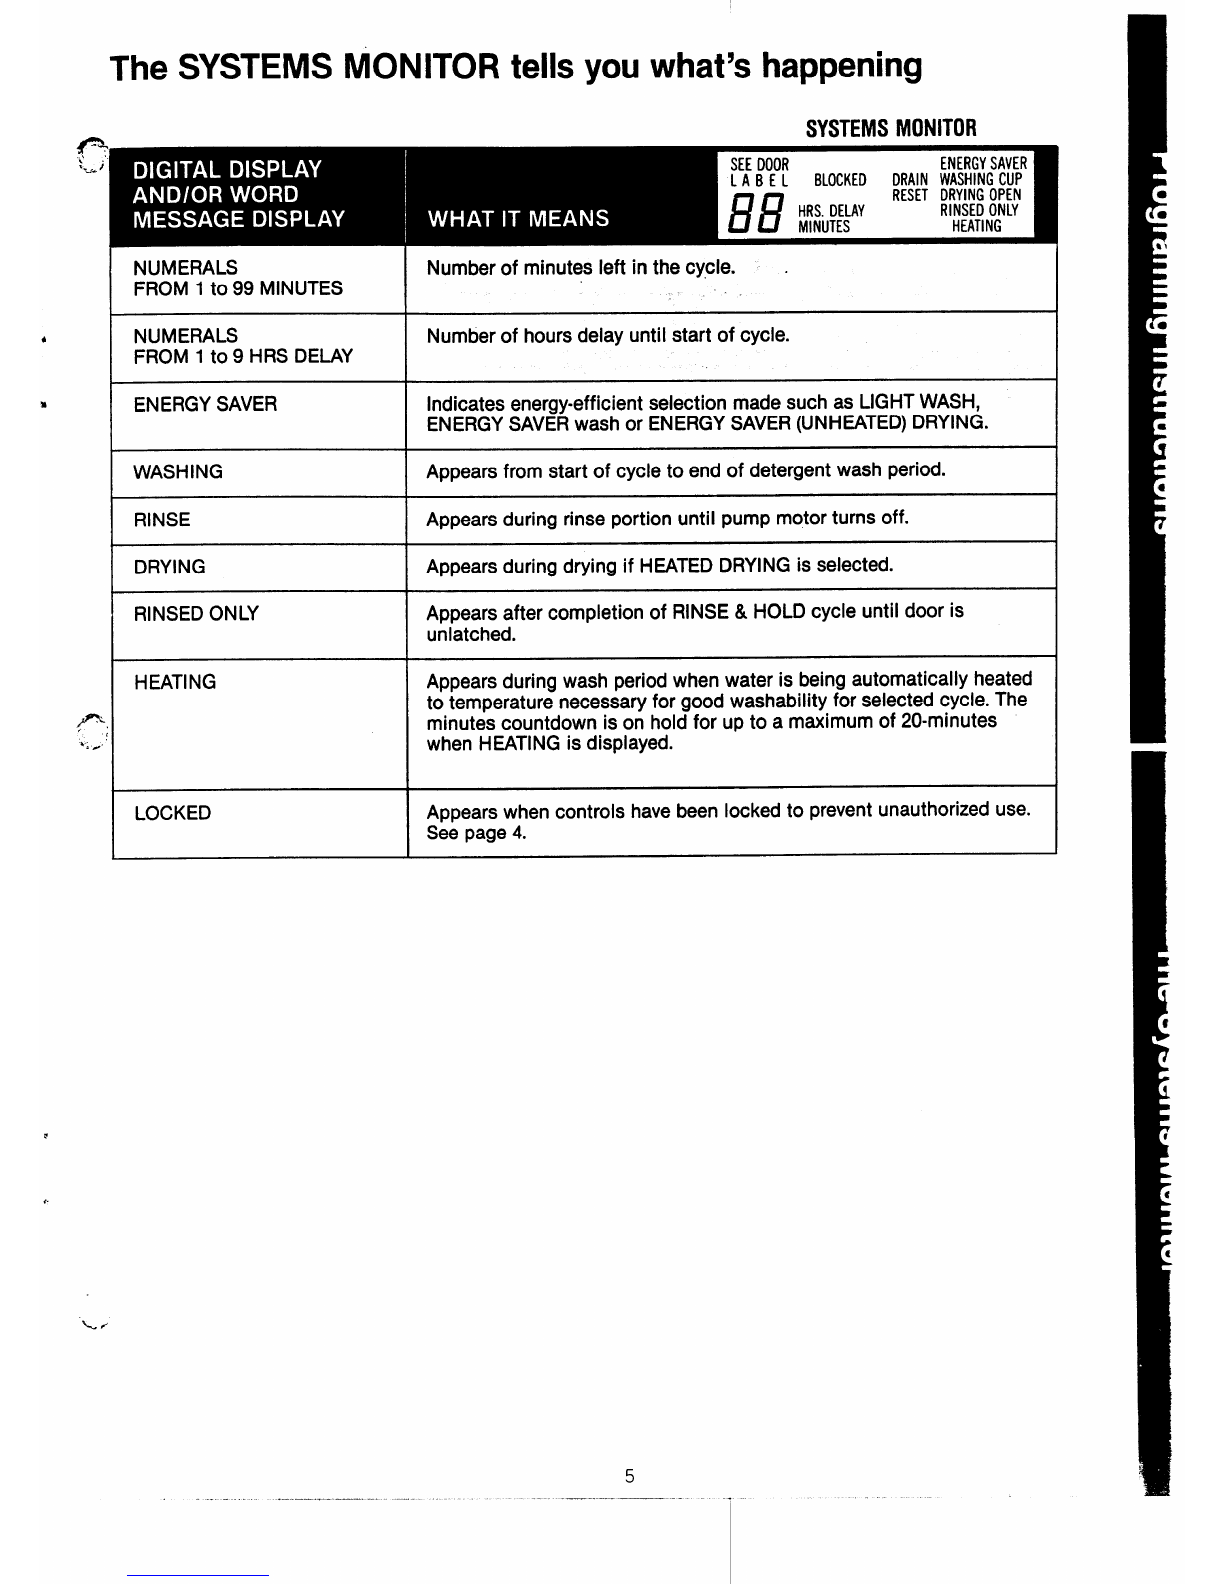
.ASYSTEMS MONITOR that tells
you what’s happening in the
dishwasher and if something’s
wrong.
.Lets you LOCK the controls to
prevent accidental tampering.
.Remembers your last cycle so
you don’t have to re-program each
time. See SHORTCUT on page 4.

-. .,’
.&.G&#.@,.g:*;+-** +: - ‘;
IMPORTANT SAFETY iNSTRUCTIOB& @%=
Read all instructions before using this appliance~~?x:,
,.
~.“..~‘+-
‘2.’.”.
. .
contacting the service location
nearest you. ..“
—This appliance must be “ - “‘~
connected to agrounded metal,
permanent, wiring system; or an
equipmentgrounding conductor “
must be run with the circuit
conductors and connected to the
equipment-grounding terminal or
lead of the appliance. ~
G~‘~ Connect to aproperly rated,’
“protected and sized power-supply
circuit to avoid electrical overload.
●Use only detergents or wetting
agents recommended for use in a
dishwasher.
.Do not wash plastic items unless
marked “dishwasher safe” or the
equivalent. For plastic items not so
●This dishwashermustbe .~-”-;,’ ~%”,aT~~ge
properlyinstalledand locatedin +-.~$*~$*;g;:~:-” “‘“, o;:“”:
accordancewith the installation 4-T0 minimizmti”sw!lf~?ig%
Instructionsbeforeit is used.If ~‘i;.of injury. :$
you did not receive an Installation
Instructions sheet with your
dishwasher you can obtain one by’ ;.*-?~:
~.they are not Ii
after use.
QDo not operate your dishwasher
unless all enclosure panels are
properly in place. “
●Do not tamper with controls. “” -
-......
●Do not ‘abuse, sit on, or stand -
on the door or dish rack of the
dishwasher.
●Close supervision is necessary if
this appliance is used by or near
children. Do not allow children to ,.
Things to do before you
program your dishwasher
IQLoad your dishwasher and add
detergent. See pages 10through
14 for complete instructions on
4loading.
.Close the dishwasher door and
move the latch to the right to the
“ON” Dosition.
TURN THE PAGE “.. -%
. .
for Programing Instructions ‘:*“/’
.“-”
.
1
,.

SELECTED
How to program vour dishwasher CYCLE
INDICATOR DOORIATCH
mw w LIGHTS ‘“OFF” POSITIC
.
1
Select awash cycle
Select awash cycle that is most suited to the soil condltlon of your load. Touchthe
center of the pad that describes your selection. Your cycle selections are:
.POTSCRUBBER— For items such as pots, pans and casseroles. Everyday dishes may
be included:
●NORMAL WASH-For loads of everyday dishes with medium SOIIS.Designed to yield
high performance on normal loads.
.LIGHT WASH— For tableware that is lightly soiled with fresh soils. Pre-rinse table-
ware. This cycle uses less hot water and energy than the previous cycle and can save
you time, too. If performance doesn’t meet your expectation, move up to one of the
higher performance cycles.
●ENERGY SAVER—For most loads of everyday dishes with light soIls or soils that have
not dried on. It saves hot water over higher performance cycles, thus saves energy.
●CHINA CRYSTAL—For lightly soiled china and crystal. This cycle is similar to LIGHT
WASH except the wash action ISsoftened by pumpmg air along with the water to
protect your delicate items. Pre-rinse. Follow Ioadmg instructions on pages 12 through 14.
●RINSE &HOLD—For rinsing partial loads which will be washed later, Do not use
detergent. See “RINSE” and “RINSED ONLY” on page 5.
To change asetting, just touch another pad. If you’ve selected NORMAL WASH and you
really need POTSCRUBBER, touch POTSCRUBBER. NORMAL WASH will be cancelled.
Your dishwasher is now automatically programmed. Cycle Indicator Lights tell you the
complete program. And anumber in the SYSTEMS MONITOR (at right) will tell you how
long the cycle will take. If you’re satisfied, just touch the START pad.
2-.
Select a-
drying option
cHEATED DRYING.
Provides faster drying. t
be changed while cycle
running.
●ENERGY SAVER
DRYING. Shuts off
Calrod(O heater. Dishes
air-dry naturally. It takes
longer, but saves energ’.
You can prop door oper
about 3inches after mo
stops to speed drying. 1:
excellent for overnight
drying.
Energy Saver reduces
electrical energy used b
this model approxlmatel
60/0.
Estimated yearly saving
depending on your local
rates, are:
\Savings I—

DELAY DISPLAY OF CYCLE
START START OFTIME PHASEAND
TOUCH PAD TOUCH TOUCH TO END OTHERUSER
CLEAROR RESET PAD PAD OFCYCLE INFORMATION
3
\‘%.. -Start your
dishwasher’s cycle.
●When you’re ready to
wash dishes, touch the
START pad. Dishwasher will
proceed through your entire
program and turn off
automatically.
To delay the start, touch
DELAY START pad. The
SYSTEMS MONITOR will
read “1 hrs delay.” Touch
pad once again for each
hour desired up to 9hours.
The machine will count
down and start automati-
cally at the correct time.
Note: Don’t forget to put
detergent in cup.
To change acycle after
washing starts, touch the
CLEAR/RESET pad to
cancel cycle. “RESET” will
appear while water is being
pumped out and you’ll hear
the normal sound of water
draining. “RESET” will go
out after less than aminute
“- and you can reprogram and
restart the dishwasher.
4
Check your dishwasher’s
SYSTEMS MONITOR.
This is one of the most important parts of your new
dishwasher. It tells you what is going on in the dishwasher at
any time and it can alert you to possible problems. Here are
some of the specific benefits of the SYSTEMS MONITOR:
●Gives you the number of minutes to the end of the cycle.
●Tells you the specific phase of any cycle ...’’ Washing.”
“RINSE” or “DRYING” for examples.
●Alerts you to problems such as “CUP OPEN. ”
Details on all SYSTEMS MONITOR functions appear on pages
5, 6 and 7.
3

Dishwashing short-cut
%/MINUTES
WASHING
Once you have become familiar with in that case you will discover that
your dishwasher you may discover your dishwasher stays programmed
that you use the same dishwashing to meet your needs. When the dish-
program most of the time. Your next washer is loaded and the cbor latch
load will probably be the same as moved to ON position, your control
your last load. panel lights will come on to show
the last settings you selected. All
you’ll need to do is touch the START
pad for acomplete dishwashing
cycle. You’ll soon learn to identify
your “favorite” cycle by the number
of minutes shown. Each combina
tion of wash selection and option
has its own unique cycle time. See
page 8.
There is one exception. If there has
been apower failure, the control
will automatically program
NORMAL WASH, and HEATED
DRYING. If this happens then reset
the touch pads for the cycle
you normally use.
How to lock dishwasher controls
to prevent use bv children
Your dishwasher has a“hidden”
control pad. When this pad is
touched twice within 3-seconds, all
pads become inoperative and no
hew selections can be made until
the lock is released. The word
LOCKED appears in the SYSTEMS
TISYSTEMS MONITOR
MONITOR. Children cannot
accidentally start dishwasher by
touching pads. The only control
unaffected is the DELAYSTART.If
this selection has been made,
dishwasher will start automatically
after whatever delay you have
selected. Touch here twice within 3-seconds
to lock or unlock the control panel.
/
i
bl.OCKED
---

The SYSTEMS MONITOR tells you what’s happening
4NUMERALS
FROM 1to 9HRS DELAY
BENERGY SAVER
IWASHING
RINSE
IDRYING
IRINSED ONLY
HEATING
+=.
b,”.’
LOCKED
SYSTEMS MONITOR
LABELBLOCKED DRAINWASHINGCUP
Number of minutes left in the cycle. .
,“
Number of hours delay until start of cycle.
Indicates energy-efficient selection made such as LIGHT WASH,
ENERGY SAVERwash or ENERGY SAVER (UNHEATED) DRYING.
Appears from start of cycle to end of detergent wash period.
Appears during rinse portion until pump motor turns off.
Appears during drying if HEATED DRYING is selected.
Appears after completion of RINSE& HOLD cycle until door is
unlatched.
Appears during wash period when water is being automatically heated
to temperature necessary for good washability for selected cycle. The
minutes countdown is on hold for up to amaximum of 20-minutes
when HEATING is displayed.
Appears when controls have been locked to prevent unauthorized use.
See page 4.
5

The SYSTEMS MONITOR tells you if something’s wrong
,CUP OPEN
BLOCKED DRAIN
BLOCKED DRAIN and C2
SEE DOOR LABEL
Appears when power to dishwasher is interrupted. See if dishes are
dirty or if water is standing in tub. To pump water out of tub, push
START then CLEAR/RESET or overfill can occur. Replace detergent, if
missing. Reset controls and repeat cycle, if necessary. If there has
been a POWER FAILURE, your last settings will be erased and your
dishwasher will automatically program NORMAL WASH and
HEATED DRYING.
Appears after START pad is touched if detergent cup is not closed
properly. Unlatch doo~ add detergent to cup if it has been spilled,
close cup and relatch door. If cup is latched properly and CUP OPEN
display still appears, you may start wash cycle by pressing START
pad a second time. CALL FOR SERVICE, but dishwasher may
continue in use.
When BLOCKED DRAIN appears after cycle is completed, dishwasher
has apartial restriction and is taking too long to drain. Clean the air
gap. (See page 16.)If BLOCKED DRAIN still appears, try another
cycle. If situation is not corrected CALL FOR SERVICE.
When BLOCKED DRAIN appears and dishwasher is stopped and will
not drain; drain line is completely clogged. Clean the air gap. To get
dishwasher to pump out, start any cycle and then push CLEAR/
RESET If air gap is not at fault, CALL FOR SERVICE.
Appears in the SYSTEMS MONITOR with any of the above word
signals or any of the following fault codes. Door label gives brief
summary of instructions shown here.
(“’
“w
r,+-

C2 Appears in combination with BLOCKED DRAIN and indicates drain-
Iine is completely clogged. See page 6, BLOCKED DRAIN and C2.
C3 Appears when the dishwasher will not go into adrain-out period. .
Dishwasher will not operate. CALL FOR SERVICE.
C4 Appears when there is too much water in the dishwasher. Turn off
water line to dishwasher before unlatching doo~ CALL FOR SERVICE.
Unless water is in tub after P~ then push START and CLEAR/RESET.
C6
C7
If there is no water in the dishwasher at the time of adrain out period,
the cycle stops and C5 is displayed. Check that water line to
dishwasher is not turned off. If water line is not at fault CALL FOR
SERVICE.
Amears if water does not reach desired temperature for good
washability within the 20-minutes extended heating period. Water
heater may be out; or dishwasher may have been used too soon after
laundry or family baths.
Water heater thermostat may be set too low. Check water temperature
according to instructions on page 10.Reset water heater and try
another dishwashing cycle. If water temperature is correctly set at
water heater and C6 appears consistently CALL FOR SERVICE. There
may be a fault in the dishwasher’s heater.
Indicates that temperature sensing device is defective. Dishwasher
will not heat water. CALL FOR SERVICE.
NOTE: If control panel doesn’t respond to inputs, shut off power from dishwasher at fuse or circuit
breaker. Wait 5seconds and restore power. Try inputs again.
.-4

What Happens
in Each Cycle
●You’ll hear occasional clicking .The motor stops during drying.
sounds;
—Soft food disposer shredding ●Water vapor comes through the
action. vent by the door latch during
—Drain valve opening to pump drying and when water is being
water out. pumped out.
—Detergent cup opening.
Wash Water Use Cycle Sequence Wash Cycle Time
Cycles (Approx.) (Approx.)
POTSCRUBBER 10.3
gal.
NORMALWASH 10.3
gal.
LIGHTWASH 8.9
gal.
ENERGYSAVER 8.9
gal.
CHINA-CRYSTAL 6.4
gal.
RINSE&HOLD 3.4
gal.
Wash/
Rinse
Wash/
Rinse
Wash/
Rinse
Rinse
Rinse
Rinse
Rinse Rinse Wash Rinse Rinse 61*
min.
Rinse Rinse Wash Rinse Rinse 46*
min.
Rinse Wash Rinse Rinse 41*
min.
Rinse Wash Rinse Rinse 33
min.
Rinse Wash Rinse Rinse 40
min.
Rinse 12
min. .
*Unextended times. These cycle times may be increased up to 20-minutes if necessary for your
dishwasher to heat the water to proper temperature for good washability.
Drying Cycle Options:
HEATED DRYING. Available on all wash cycles except Rinse &Hold. Add 34-minutes to cycle time.
ENERGY SAVER DRYING. Calrod@heater is turned off. Dishes dry naturally.
.... ,
w:

Energy=saving tips
The power consumption of your
dishwasher can be minimized if
*OU follow these suggestions:
.Operate the dishwasher only
when it’s full. Let the dishes accu-
mulate in the dishwasher. When
you put in only apartial load, use
the Rinse &Hold Cycle to rinse off
heavy soils.
. Always select the cycle that
uses the least amount of water
that will remove the soil from the
load. See page 8.
. If you don’t need your dishes
right away, use your ENERGY
SAVER DRYING that turns the
drying heater off automatically.
Dishes dry naturally over alonger
period such as overnight.
“,-&
9

Good dishwashing
starts with HOT water.
To get dishes clean and dry you
need hot water. To help you get
water of the proper temperature,
your General Electric dishwasher
automatically senses the tempera-
ture of the water in the wash cycle
and heats it, if necessary, to the
proper temperature. You can help
your dishwasher provide good
washing and drying if you make
sure the entering water is at least
120°E To prevent dish damage, in-
let water should not exceed 150°E
Check your water temperature
with acandy or meat thermome=
tet! Turn on the hot water faucet
nearest the dishwasher. Put the
thermometer in aglass and let the
water fill the glass until the tem-
perature stops rising. If the water
temperature is below 120*E adjust
your water heater.
Helpful hints: If outside tempera-
tures are unusually low or if your
water travels along distance from
heater to dishwasher you may
need to set your heater’s thermo-
stat up. If you have not used hot
water for some time, the water in
the pipes will be cold. Turn on the
hot water faucet at the sink and
allow it to run until the water is
hot. Then start the dishwasher. If
you’ve recently done laundry or run
hot water for showers, give your
water heater time to recover before
operating the dishwasher.
You can help prevent
spotting with arinse
agent.
Arinse agent makes water flow off
dishes quicker than usual. This
lessens water spotting. Makes
drying faster, too.
Rinse agents come in either liquid
or solid form. Your dishwasher’s
dispenser uses the liquid form.
Here’s how to fill the rinse agent”
dispenser. Unscrew the cap.
Add the liquid rinse agent until
it just reaches the bottom of the
lip inside the dispenser opening.
Replace the cap. The dispenser
automatically releases the rinse
agent into the final rinse water.
If you accidentally spill: Wipe up
the rinse agent with adamp cloth.
Don’t leave the spill in the dish-
washer. It can keep your detergent
from working.
If you can’t find any rinse agent,
write:
ECONOMICS LABORATORY INC.
(“JET DRY”)
Osborn Building
St. Paul, Minnesota 55102
Your dishwasher’s rinse agent
container holds 4% ounces. This
should last about 3months. Fill as
needed.
How to choose and use
detergent.
First, use only detergent
specifically made for use in
dishwashers. Other types will
cause oversudsing.
Second, check the phosphate
content. Phosphate helps prevent
hard-water materials from forming
spots or film on your dishes. If
your water is hard (10 grains or
more), your detergent has to work
harder. Detergents with ahigher
phosphate level will probably work
better. If the phosphate content is
low (8.7V0or less), you’ll have to
use extra detergent with hard
water.
If your water company says your
water is hard, try detergent with a
higher phosphate content.
Your water department can tell
you how hard your water is. So
can your rural county agent. Or
your area’s water softener com-
pany. Just call and ask them how
many “grains” of hardness is in
your water.
How much detergent should you
use?That depends. Is your water
“hard” or “soft?” With hard water,
you need extra detergent to get
dishes clean. With soft water, you
need less detergent.
Too much detergent with soft
water not only wastes money, it
can be harmful. It can cause a
permanent cloudiness of glass-
ware, caiied “etching.” An outside
iayer of giass is etched away! Of
course, this takes some time. But
why take achance when it’s easy
to find out the hardness of youi
water.
Keep your detergent fresh and
dry. Under the sink isn’t a good
pi~ce to store detergent. Too much
moisture. Don’t put detergent into
the dispenser untii you’re ready to
wash dishes, either. (it won’t be
fresh OR dry.)
~,
..-.

What you can
leave on dishes.
And what you shouldn’t.
f.
L>;)If your detergent gets old or
lumpy, throw it away. It
won’t
wash well. Old detergent loses its
power. Lumpy detergent often
won’t dissolve.
You’ll find two detergent
dispensers on the inside door of
your dishwasher. Two, because
some cycles use two washes.
See “Detergent Usage Guide”
~below.
,=r
ROTATE /
/’-
AND CLOSE
TIGHTLY
c!!
-“
/,1
1t
I!&ii
If this is your first dishwasher, or if
you’re replacing amuch older
model, you may wonder how much
pre-preparation your dishes need.
Actually very little. Pre-rinsing of
normal food soils is not necessary.
With common sense and a little
practice you’ll soon know what
foods to remove. Here are some
guidelines:
1. Scrape off bones, seeds, skins,
toothpicks and other hard solids. It
is also best to remove hard shelled
vegetables, meat trimmings, leafy
vegetables and crusts. Remove
excessive quantities of oil or
grease.
2. Remove large quantities of any
food. Your dishwasher has abuilt-
in soft food disposer that pulver-
izes soft food bits and flushes
them away. It can handle sma//
amounts of soft foods, but cannot
handle large amounts of food as
soft as mashed potatoes or
applesauce.
3. Try to remove food scraps and
place dishes in dishwasher before
soil has achance to dry and
become hard. Dishes with dried-on
soil are more difficult to wash and
may not come clean in the
NORMAL WASH cycle. Remember
to use your RINSE &HOLD cycle
for small “holding” loads.
Note: The foods mentioned above
are for examples only. Other foods
not mentioned may also need to
be removed from your dishes. You
may also want to consider
removing foods such as mustard,
mayonnaise, vinegar, lemon juice
and other foods that can cause
discoloration of stainless steel if
allowed to remain on dishes for a
long period of time.
When using the POTSCRUBBER
cycle less preparation is required
before loading. The Potscrubber
cycle can wash heavily-soiled
dishes and remove dried-on and
baked-on soils from pots, pans and
casseroles. Items with burned-on
soils will not come clean. And the
dishwasher cannot remove burn
marks or restore fading caused by
overheating during cooking.
Always close the main cup tightly.
bDetergent Usage Guide
SOFT WATER IMEDIUM WATER HARD WATER
(O-3grains hardness) (4-9 grains) (10-15grains*)
CYCLES Main Cup IOpen Cup Main Cup IOpen Cup Main Cup~ IOpen Cup*
POTSCRUBBERand 1Tablespoon ~1Tablespoon Half Full +Completely +Co~pletely
NORMALWASHcycles minimum minimum Half Full Full
CHINA-CRYSTAL
LIGHTWASHand 1Tablespoon None Half Full None Completely
.. minimum None
“ENERGYSAVERcycles Full
‘-~ RINSE&HOLDcycle Usenodetergent Usenodetergent Usenodetergent
*15 grains and up is extremely hard watez Awater softener is recommended. Without it, lime can build
up in the water valve. The water valve may stick while open and cause flooding.
+Filled Main Cup holds 3tablespoons; Filled Open Cup holds 2tablespoons.
11

Loaded right, dishes get cleaner.
1
This is arandom mixed load, the most common
type you will have.
Make sure dishes are properly loaded to insure
that water can reach the soiled surfaces. The
wash arm in the bottom sprays water up. The
tower that rises in the center sends water out
over the dishes to wash the items in the upper
rack. And the wash arm in the top sprays water
down over the dishes.
How to load the TOP RACK.
,.
-——— ... -. .
II
DO NOT BLOCK THIS AREA OR
LOAD TALL THINGS NEXTTO IT.
WATCH OUT FOR THIS.
The wash tower rises through the center of the
bottom rack during the wash and rinse portions
of the cycle. Don’t block it or load tall things
next to it. Also, be careful not to let aportion of
an item extend through the bottom rack or the
silverware basket, such as knives, skewers or
pot handles.
The top rack is best for glasses, cups and
saucers. Cups and glasses fit best along the
sides. This is the place for dishwasher-safe
plastics, too. Make sure small plastic items are
lodged in tightly so they can’t fall onto the
Calrod@heating unit.
To provide best possible washing all items in
top rack should be loaded so that the force of
the water and detergent reaches soiled
surfaces.

How to load the TOP RACK (continued)
+:.
Arrange stemware so that it cannot move easily.
Don’t let the glasses touch each other.
.4
-JL. –- --- --- - ---
‘‘-“–~&-=—--””--.+
--—_ ._,
I. .
Sauce pans, mixing bowls and other small
items may be placed—face down—in the top
rack. The top rack is handy for all kinds of
odd shapes.
SHELF
UP
Fold the folding shelf up for glasses and tall
things.
SHELF
DOWN
The folding shelf gives you extra space for cups
and long utensils on two levels. Load the lower
level first, then fold the shelf down.

How to load the BOTTOM RACK.
Fit plates and saucers between the pins.
—.
47
:pmm-mm-~
.................
-~~;:;;tiiiw=rn
------------..... .
/
I
)“
-/.#
Load platters, pots, pans and bowls along the
sides, in corners or in the back.
Put flatware in the removable silverware basket.
Load with handles up, to protect your hands.
Mix knives, forks and spoons so they don’t nest
together, Distribute evenly. Take out anything
that may fall or extend through the bottom of
the basket.
As shown here this plate is being placed so
that water and detergent from wash arm can
reach soiled surfaces.
Heavily soiled pots, pans and casseroles MUST
be loaded in the bottom rack, facing down. Prot)
the broiler pan and rack along the {dge, tilted ‘
toward the center.
The security cell cover, hinged in the handle,
can be lowered to either side to secure light-
weight items from the effects of the vigorous
wash action. When it is not needed, this cover
can remain upright.

What you can usually wash safely in your
dishwasher. And what you can’t.
YES Some darkening or spotting possible. Remove by
scouring with soap-filled steel wool pads.
China/
Stoneware YES Antique, metal trimmed,
hand-painted or over-the-
glaze patterns fade.
Gold-leaf will discolor.
If in doubt, check with the manufacturer. Or test wash
one piece daily for at least amonth. Compare with the
rest of the set.
Crystal YES Antique, metal-trimmed, or
hand-painted patterns fade.
Gold-1eaf will discolor.
Load securely to prevent movement. In China-Crystal
Cycle aeration —air bubbles in the water— helps
wash crystal gently.
Non-dishware
items—such
as electronic
air cleaner
filters, furnace
filters, paint
brushes, etc.
NO Do not wash in dishwasher. Damage to dishwasher and
discoloration or staining of dishwasher may result.
Milk glass may yellow.
Iron will rust.
Pewter tarnishes.
Glass YES
Iron
Pewter
NO
NO
Plastics YES If it doesn’t say DISHWASHER SAFE, test one piece
before dishwashing an entire set.
Stainless
steel YES Rinse if not washing immediately. Salty or acid foods
can stain if left on.
Rinse if not washing immediately, Salty or acid foodsSterling
Silver and
Silver-plate
YES Don’t put in same silverware
basket with stainless steel.
Contact between metals can
damage silver.
Don’t use copper utensils in
the same load. Silver may
get abrown film.
Adhesive used to attach
some hollow-handle knives
can loosen.
can stain if left on. Dry
to-remove black spots.
detergent cup.
detergent can cause difficult-
Avoid placing under the
Non-stick
coatings YES After washing, wipe the non-stick coating area with
vegetable oil to keep it from losing its non-stick
quality.
Tin NO Tin can rust.
Wood NO Wood can warp, crack or
lose its finish with any type
washing.
Forget adish? Here’s However, opening the door during 2. Wait afew seconds until the
water calms. Then open the door.
3. Add dishes you’ve forgotten.
4. Close the door and push the
latch to the far right. When the
door is locked, washing will
continue.
when you can add it. any cycle lessens cleaning power.
Add dishes any time during aSo try to load everything at the
RINSE &HOLD Cycle. beginning.
With other wash cycles, you can Here’s how to add a forgotten
dish:
add dishes at any time BEFORE
the WASHING signal light goes 1. Push the door latch to the left.
off. Washing will stop.
15
., .,

How to Give Your Dishwasher aNew Look— Change
Two panels are held in place by
the door trim and the trim on the
panel below the door. Each side of
each panel is adifferent color. Or
you can paint apanel with the
color of your own choice.
How To Change Door Panel
Inserts:
1.
2.
3.
4.
Take out the three screws on
either side of the dishwasher
door. Remove the side trim.
Slide out both insert panels at
once.
Put the panel with the color
you want in front. (Handle the
panels carefully. The edges may
be sharp.)
Replace side trim and screws.
How To Change Panel-Below-Door
Inserts:
1.
2.
3.
4.
5.
6.
7.
Remove two screws in the black
toe-kick area.
Remove entire panel.
Take out three screws and
remove top trim.
Slide out both insert panels at
once.
Replace panels with color you
want in front.
Replace top trim and screws.
Replace entire panel and the
screws under the toe-kick area.
Color insert paneIs for both the
door and the panel can be
replaced by l/d-inch thick wood
inserts to match your kitchen
cabinets. Get them from your
nearest cabinet or lumber dealer.
Its Color!
Dimensions for ‘4” wood inser{s:
Door Panel: 191J8°high x23’,,” wide,
Lower Panel: 4~4°high ~239,6” wide.
Note: Do not operate dishwasher
while changing panels or when
lower access panel is removed.
Change color in minutes. Just
remove trim and change. You have
achoice of four colors. One panel
is White on one side, Almond on
the other Second panel is Black
or Harvest.
User Maintenance Instructions
To keep your dishwasher
at its best...
Clean the control panel with a
lightly dampened cloth. Dry
thoroughly. Do not use abrasives
or sharp objects on the panel.
They can damage it.
Clean the outside with a good
appliance polish wax. The outside
cabinet finish is durable, but it can
scratch. So use no scouring pads.
harsh or gritty cleaners.
Appliance Polish Wax &Cleaner
(Cat. No. WR97X216) is available
from GE Appliance Parts Marts.
The inside usually takes care of
itself. If it should ever need
cleaning, use amild cleansing
powder. Scouring pads and harsh
cleansers can mar the finish.
Not using the
dishwasher in winter?
Protect against freezing.
If your dishwasher is left in an
unheated place during the winter,
ask aservice technician to:
●Cut off electric power to dish-
washer. Remove fuses or trip
circuit breaker.
.Turn off water supply.
●Disconnect water inlet line from
water valve.
.Drain water from inlet line and
water valve. (Use a pan to catch
the water.)
sReconnect water inlet line to
water valve.
●Remove the plug in the bottom
of the rubber boot. Drain
completely, then reinstall plug
and clamp,
.Drain the collection chamber
rear of unit below filter by
disconnecting hose to pump.
Reconnect after draining.
at
Built-in dishwashers
often use an air gap.
Keep it clean.
An air gap is aplumbing device.
protects your dishwasher against
water backing up into it if adrain
clogs. The air gap is not apart of
the dishwasher. And you may not
even have one. Not all plumbing
codes require air gaps.
It
TWO TYPES I- ““
If you have an air gap, check it at
least once amonth. THE AIR GAP
IS NOT PART OF YOUR DISH-
WASHER. IT IS NOT COVERED IN
YOUR WARRANTY.
The air gap is easy to clean. With
most types, first turn off the dish-
washer, then lift off the chrome
cover. Then unscrew the plastic
cap and check for any build-up of
grit. Atoothpick makes cleaning
easy.
Check the air gap any time your
dishwasher isn’t draining well.

~...ToSave Time and Money—
Jefore you call for service,
check the Problem Solver
If you have aproblem, it may be
minor. You may be able to correct
it yourself. Just use this Problem
Solver to locate your problem and
then follow the suggested
recommendations.
The Problem Solver
PROBLEM
CONTROL PANEL
LIGHTS GO OFF WHEN
YOU’RE SETTING
CONTROLS
DISHWASHER WON’T
RUN
UNUSUAL NOISE
DISHES DON’T DRY
UNCLEAN DISHES
AND FLATWARE
IBLACK OR GRAY
MARKS ON DISHES
POSSIBLE CAUSE AND REMEDY
Time too long between touching of selected pads. Each pad must be
touched within 30 seconds of the others. To relight, touch any pad
again. Or unlock and relatch door.
Afuse in your home may be blown, or the circuit breaker tripped.
Replace fuse or reset circuit breaker. Remove any other appliances
from the circuit.
Utensils may not be secure on rack pins. Or something small may
have dropped from the rack. Water is causing utensils to rattle. Make
sure everything is securely placed in dishwasher.
Water draining out of tub immediately after you touch CLEAR RESET
pad. The sounds you hear are normal ones.
Make sure water temperature is correct. (See page 10.)
Unload the bottom rack first. Water from dishes in the top rack may
be spilling into the bottom rack.
Check for improper loading. Dishes shouldn’t nest together. Avoid
overloading.
Check the rinse agent dispenser to see that it’s not empty.
Check water temperature. It should be at least 120”E (To test, see
page 10.)
Water pressure may be temporarily low. Turn on a faucet. Is water
coming out slower than usual? If so, wait until pressure is normal
before using your dishwasher.
Plugged air gap. (See page 16.)
Improper rack loading. (See pages 12-14.)
Aluminum deposits often leave marks when they rub against other
things. Remove marks with amild abrasive cleanser.
The Problem Solver (continued)

The Problem Solver(continued)
*
PROBLEM POSSIBLE CAUSE AND REMEDY
DETERGENT LEFT IN Water may not be reaching the detergent cups. Move dishes that may
DISPENSER CUPS be blocking detergent cup.
The dispenser cover may not be opening or may be blocked by
improperly loaded items. Open the cup and remove any caked-on
detergent. If the cup still doesn’t open automatically, call for service.
Detergent may be old. If it’s hard or caked in the box, throw it away.
The detergent may not be working well. Try another brand.
SPOTS AND FILMING Spotting can be caused by all these things:
ON GLASSES AND
FLATWARE ●Extremely hard water (See page 10.)
cLow water temperature (To test, see page 10.)
.Overloading the dishwasher.
,●Improper loading (See pages 12-14.)
cOld or damp detergent
●Phosphate level in detergent too low (See page 10.)
●Rinse agent dispenser empty (See page 10.)
.Too little detergent (See page 11.)
Due to varying local water conditions and personal preferences, try
several brands of detergents to find one that gives the best results for
you.
To remove spots and film from glassware:
1. Remove all metal utensils from the dishwasher.
2. DO NOT ADD DETERGENT.
3. Select POTSCRUBBER cycle, and ENERGY SAVER DRYING.
4. Start the dishwasher and allow to run until “57” minutes to end of
cycle is displayed.
5. Then open the door and pour 2cups (500ml) of white vinegar into
the bottom of the dishwasher.
6. Close the door and allow to complete the cycle.
If vinegar rinse doesn’t work: Repeat as above, except use Mcup
(60 ml) of citric acid crystals instead of vinegar. (Most drug stores
carry citric acid crystals. If yours doesn’t, call GE Factory Service.)
Using avinegar or citric acid crystal rinse more than twice amonth?
Consider ahome water-softener.
CLOUDINESS ON If vinegar or citric acid crystal rinse doesn’t work, the cloudiness is
GLASSWARE “etching.” The film cannot be removed.
Itcan be prevented: Use less detergent if y,ou have soft water. Wash
glassware in the shortest cycle that will get them clean.
Water temperature entering dishwasher exceeds 150”E
.-
18
-,
Other manuals for GSD2600D
1
Table of contents
Other GE Dishwasher manuals

GE
GE GLD5606V Manual

GE
GE GLD5808V Manual

GE
GE Triton XL GSD6900 Series User manual

GE
GE GSD2100V65BB User manual

GE
GE CleanSteel GLD4458RCS Manual

GE
GE 49-5215 Installation instructions

GE
GE PDT760SSFSS User manual

GE
GE GPT225SGLWW User manual

GE
GE gdf520pgjbb User manual

GE
GE GSD580G Installation instructions