Asus Q10364 User manual

Quick Start Guide
Car Camcorder
Q10364 / First Edition / May 2015
¨

Table of contents
English�������������������������������������������������������������������������������������������������������������������������������������������4
Français �������������������������������������������������������������������������������������������������������������������������������������� 19
Deutsch�������������������������������������������������������������������������������������������������������������������������������������� 34
Italiano ��������������������������������������������������������������������������������������������������������������������������������������� 49
Čeština���������������������������������������������������������������������������������������������������������������������������������������� 64
Русский��������������������������������������������������������������������������������������������������������������������������������������79
Magyar ���������������������������������������������������������������������������������������������������������������������������������������94
Português��������������������������������������������������������������������������������������������������������������������������������109
Polski�����������������������������������������������������������������������������������������������������������������������������������������124
Română������������������������������������������������������������������������������������������������������������������������������������139
Español�������������������������������������������������������������������������������������������������������������������������������������154
Slovensky���������������������������������������������������������������������������������������������������������������������������������169
Svenska ������������������������������������������������������������������������������������������������������������������������������������184
Türkçe ���������������������������������������������������������������������������������������������������������������������������������������199
������������������������������������������������������������������������������������������������������������������������������������������214

NOTE / NOTE/
HINWEIS/
NOTA
/
ПРИМЕЧАНИЕ/ /
POZNÁMKA/ POZNÁMKAB
/
MEGJEGYZÉS / NOTA / NOTATKA / NOTA/ NOTĂ /
/NOTERA / NOT / تاظحلام:
• ThescreenshotsinthisQuickStartGuideareforreferenceonly.
• Lescapturesd'écrandeceguidenesontdonnéesqu'àtitreidicatif.
• DieBildschirmaufnahmenindieserSchnellstartanleitungdienenlediglichder
Veranschaulichung�
• Gliscreenshotpresentiinquestaguidarapidahannopuroscopoillustrativo.
• Иллюстрациивэтомруководствеприведенывознакомительныхцелях.
• KopieobrazovekvtétoStručnépříručcejsoupouzeinformativní.
• AGyorsüzembehelyezésiútmutatóképernyőképeikizárólaghivatkozásicélt
szolgálnak.
• AscapturasdeecrãnesteGuiadeconsultarápidaservemapenascomo
referência.
• Zrzutyekranuzamieszczonewskróconejinstrukcjiobsługisłużąwyłączniejako
odniesienie�
• CapturiledeecrandinacestGhiddepornirerapidăsuntdoarpentruconsultare.
• Lascapturasdepantallaqueaparecenenestaguíadeiniciorápidodeben
utilizarseúnicamentecomoreferencia.
• Snímkyobrazovkyvpríručkesostručnýmnávodommajúibainformačnýcharak-
ter�
• Skärmbilderidenhärsnabbstartsguidenärendastförreferens.
• BuHızlıBaşlatmaKılavuzundakiekrangörüntüleriyalnızcabaşvuruamaçlıdır.

4
English
Hardware layout
1� Bracketslot 6� LEDindicator 11� Speaker
2� MiniUSBport 7� Microphone 12� Up button
3� MiniHDMIport 8� Micro SD card slot 13� Downbutton
4� GPS port 9� Emergency button 14� Powerbutton
5� Lens 10� Enter button (OK)
Package contents
Carcamcorder Warranty card
Carcharger Quick Start Guide
GPS Mount holder Self-adhesivecableclips

5
English
Installing / removing the micro SD card
To install the micro SD card:
1. InsertthemicroSDcardintothecardslotwithits
gold-platedcontactsfacingtowardsthefrontof
your car camcorder�
2� Push the micro SD card into the slot until it clicks
in place�
To remove the micro SD card:
PressthemicroSDcardtoeject,thenpullitout.
Micro
SD card
capacity
Video Resolution
1080P/30FPS
(in minutes) 1080P_
HDR/30FPS
(in minutes)
720P/60FPS
(in minutes) 720P/30FPS
(in minutes)
8GB 105 - 158 94 - 142 126 - 189 189 - 284
16GB 210 -316 188 - 284 252 - 378 378 - 568
32GB 420 - 632 376 - 568 504 - 756 756 - 1136
64GB 840 - 1264 752 - 1136 1008 - 1512 1512 - 2272
IMPORTANT!Toensurethebestvideosavingquality,formataClass10micro
SDcard(8GB~64GB)inyourcarcamcorderwhenusingitforthersttime.

6
English
Mounting your car camcorder to your vehicle
1� Slide the GPS mount holder into the
bracket slot until you hear a click�
2. Pushthesuctioncupfirmlyto
thevehiclewindshield(1),and
pressdowntheGPSsensor(2)
to mount your car camcorder in
place�
3. InserttheminiUSBcabletotheGPS
port on your car camcorder�
4. Rotateyourcarcamcorder,ensuring
thattheGPSsensorisfacingyour
vehicle'swindshield.Tightentheknob
to securely lock your car camcorder to
yourpreferredangle.
Knob

7
English
Connecting your car camcorder
1. ConnecttheminiUSBconnector
ofyourcarchargertotheminiUSB
portofyourcarcamcorder.
2. Plugtheotherendofyourcar
chargertothe12Vauxiliarypower
outlet (cigarette lighter socket)
ofyourvehicle.Whenyoustart
yourvehicle,yourcarcamcorder
automatically turns on�
3. Placethepowercordalongthe
windshieldceilingandfrontpillar
ofyourvehicle,thensecureitin
placewiththeself-adhesiveclips.
NOTES:
• Werecommendthatyoudisconnectyourcarchargerwhentheengineisoff.
• Useonlythecarchargerthatcamewithyourcarcamcorder.Usingadifferent
car charger may damage your car camcorder�
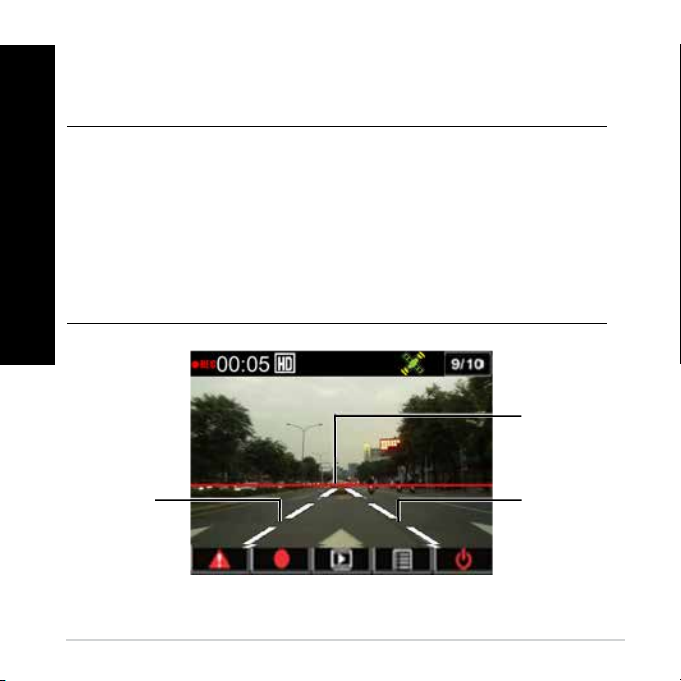
Turning your car camcorder on/off
• Yourcarcamcorderautomaticallyturnsonwhenyoustartyourvehicle.It
automaticallyturnsoffwhenyouswitchoffyourvehicle.
• Tomanuallyturnyourcarcamcorderon,press �
• Tomanuallyturnyourcarcamcorderoff,press forabouttwoseconds.

8
English
Using the warning system functions (LDWS and FCWS)
WithitsGPSfunction,yourcarcamcorderlogstheGPSpositionduringrecordingandthe
locationinformationisstoredwiththerecordedvideos.
IMPORTANT!
• EnsurethattheGPSsensorissecurelyattachedtoyourcamcorder.For more
details,refertothesectionMounting your car camcorder to your vehicle�
• ActivatetheLDWSandFCWSfunctionsfromtheSettings menu�
• ForaccurateLDWSandFCWSdetection,ensurethefollowing:
•TheGPSsensorisfacingyourvehicle'sfrontwindshield.
•Installyourcarcamcorderatthecenterofthefrontwindshieldandalignthe
redlinewiththehorizonoftheroadsurfaceasshownbelow.
Red guide line
Linemarkingfor
roadsurface
Linemarkingfor
roadsurface

9
English
Lane Departure Warning System (LDWS)
Whenyourvehicletravelsataspeedabove60km/handveersoofitslane,analarmis
automaticallyactivated.Awarningscreenalsoappearsonyourcarcamcorder.
Forward Collision Warning System (FCWS)
Whenyourvehicletravelsataspeedof60km/handclosesintothevehicleinfrontata
distanceoflessthan5~7meters,analarmisautomaticallyactivated.Awarningscreen
also appears on your car camcorder�

10
English
Setting the date and time
1� Press to open the OSD menu�
2� Press / to select Time/Date
and press OK to enter the Time/Date
menu�
Setting 02/05
LDWS >
GPS Status >
Time/Date >
Date Stamp >
3. Toadjustthefielditem,pressOK to
selectthefield.
4� Press / toadjustthevalue.
5. Repeatsteps3-4toadjustthefields.
6� Press to save your changes�
NOTE: TheGPSsignalstatusiconattheupperrightcornerofyourscreen
changesfrom to indicatingthatsatellitepositionisxed.Anexternal
GPS sensor is attached�
Time/Date
2014 / 12 / 31
03:41:46

11
English
NOTES:
• Thecardsymbol appearsfortwotothreeminutesduringtheemergency
recordingandautomaticfilesaving.Otherfunctionsarenotavailableatthis
time�
• Whenyouturnonthemonitoringmodeormotiondetection,theemergency
recordingandG-Sensorareturnedoffautomatically.
Recording Videos
Normal Recording
Whenyoustartyourvehicle,yourcar
camcorder automatically turns on and
startsrecording.IftheAutomaticRecording
isdisabled,press
OK
to start recording
manually�
Recordingautomaticallystopswhenyou
switchoyourvehicle.Youcanpress
OK
to
stop recording manually�
Emergency Recording
Inanemergency,press
to record the
event immediately� The icon appears
ontheupperrightcornerofthescreen.To
stoptherecording,pressOK� The system
automatically saves the event data�

12
English
Function settings
FUNCTION DESCRIPTION
Resolution 1080P_HDR/30FPS,1080P/30FPS,720P/60FPS,720P/30FPS
AutoRecord Automaticallystartsrecordingwhenyoustartyourvehicle.
Voice Record Turnsthemicrophoneon/off.
G-sensor sensitivity SensitivityHigh/Mid/Low/Off:Thisfunctionallowsyouto
set the collision intensity level that triggers an emergency
recording.Oncethespecifiedintensitylevelisreached,your
car camcorder automatically records the emergency event
andsavedittotheEmgRecfolder.Youcansaveuptoten
(10)emergencyrecordingfilesthatnormalrecordingcannot
overwrite.
GPS status IndicatestheGPSsignalstatus.AnexternalGPSsensoris
attached�
Time/Date Sets the date and time setting�
Date Stamp Sets the date and time that the video is taken�
LoopPlaying Turnstheloopplaybackon/off.
Monitor Mode Whenthescenedoesnotchangein60seconds,yourcar
camcorderautomaticallygoesintopowersavingmodeand
beginsrecordingat1fps.Whenthescenechanges,recording
resumesat30fpsandissavedasanewfile.Whenthisfunction
isenabled,manualemergencyrecordingisdisabled.Available
options:Off/On

13
English
FUNCTION DESCRIPTION
Motion Detection Enables/disablesthemotiondetectionfunction.Whenthis
functionisenabledandmovementisdetected,yourcamcorder
automaticallystartsrecording.Availableoptions:Off/On
EV Adjuststheexposurelevel.
Language Sets the display language�
Format AllowsyoutoformatamicroSDcardonyourcarcamcorder.
Formatnotification NotifiesyoutoformatthemicroSDcardregularly.
LCDAutoOff Setsthetimetoturnthedisplayoffautomaticallyoralwayson.
Frequency Setsthelightingflickerfrequency.
Default Resetsyourcarcamcordertoitsfactorydefaultsettings.
FirmwareVersion Indicatesthesoftwareversionoftheproduct.

14
English
Deleting Videos
1� Press OK to pause the video playback�
2� Press to enter the Delete screen�
3� Press and select to delete the
selectedfile.
Press and select to delete all
files.
4� Press / to select Yes on the
confirmationmessage.
5� Press OKtoconfirmthedeletion.
Playback Videos
Playing Videos
1� Press to enter the playback mode�
2� Press / to select Emergency
Record or Last Record and press OK�
3� Press / toselectavideofile.
4� Press OK to play the selected video
file.

15
English
Protecting Videos
1� Press OK to pause the video playback�
2� Press to enter the Protect screen�
3� Press and select to lock the
file.Alockicon is displayed on
thescreentoindicatethatthefileis
protected� To unlock the protected
file,press �
Installing the Media Player
1. Forfirst-timeuseofyourcarcamcorder,formatamicroSDcardonitfrom
Settings > Format > Confirm�
2. RemovetheformattedmicroSDcardfromyourcarcamcorder.
3. InserttheformattedmicroSDcardintoacardreader,thenconnectthecard
reader to your computer�
4. ClicktheRemovable Diskicononyourcomputer,thendouble-clickthe
MediaPlayer'sinstallationfile(installation.exe)�
5. Followtheonscreeninstructionstocompletetheinstallation.
NOTE: Fornormalvideoplayback,ensurethatK-Lite Codec (�mov codec) is
installed on your computer�

16
English
Reviewing the GPS log
NOTE: * Ensure that your computer is connected to the Internet to be able to
reviewthedrivingrouteonthemap.
1. UsingaUSBcable,connectyourcarcamcordertoyourcomputer.
2. Onyourcomputer,launchtheMediaPlayer.
3. Clicktheremovablediskicontoaccessyourfilesfromyourcarcamcorder.
4. OntheMediaPlayer,clickthecorrespondingicontoimportafolder/file,and
removeafilefromyourplaylist.
Clicktoimportafolder
Clicktoremoveale
Clicktoimportale
Clicktoviewthedriving
route map*
Clicktosharevideosto
YouTube
Clicktostopvideoplayback
Clicktopause/resumevideo
playback
Clicktoplaybackinfull/
normal screen

17
English
Connecting to your computer
Youcanconnectyourcarcamcordertoyourcomputerforletransfer,videoplayback,and
powercharge.
1. ConnectaminiUSBcabletoyourcarcamcorder.
2. ConnecttheUSBconnectoroftheminiUSBcabletoyourcomputer'sUSB
port�
3. Youcannowtransfer/viewfilesonyourcomputer.
NOTE: TheminiUSBcableispurchasedseparately.

18
English
Connecting to your HDMI TV
YoucanconnectyourcarcamcordertoyourHDMITVforvideoplayback.
1. Plugyourcarcamcordertoapowersource.
2. ConnectaminiHDMIcabletoyourcarcamcorder.
3. ConnecttheHDMIconnectoroftheminiHDMIcabletoyourTV'sHDMIport.
4. TurnonyourHDMITV,andchangeitsinputsourcetoHDMI�
5. FollowtheonscreeninstructionstooperateyourcarcamcorderviayourTV.
NOTE: TheminiHDMIcableispurchasedseparately.

19
Français
Présentation
1. Ouverture de fixation 6. Témoin lumineux 11. Haut-parleur
2. Port mini USB 7. Microphone 12. Bouton de navigation haut
3. Port mini HDMI 8. Fente pour carte micro SD 13. Bouton de navigation bas
4. Port GPS 9. Bouton d’urgence 14. Bouton d’alimentation
5. Lentille 10. Bouton OK
Contenu de la boîte
Caméra embarquée pour voiture Carte de garantie
Chargeur allume-cigare Guide de démarrage rapide
Support de fixation GPS Serre-câbles auto-adhésifs

20
Français
Installer et retirer la carte micro SD
Pour installer une carte micro SD :
1. Placez la carte micro SD dans la fente dédiée à cet
effet en orientant les broches dorées vers l'avant
de la caméra.
2. Insérez la carte micro SD dans sa fente jusqu'à ce
qu'elle soit bien en place.
Pour retirer une carte micro SD :
Appuyez sur la carte micro SD pour l’éjecter.
Taille
de carte
micro SD
Résolution vidéo
1080P / 30FPS
(en minutes) 1080P_
HDR/30FPS
(en minutes)
720P/60FPS
(en minutes) 720P/30FPS
(en minutes)
8 Go 105 - 158 94 - 142 126 - 189 189 - 284
16 Go 210 -316 188 - 284 252 - 378 378 - 568
32 Go 420 - 632 376 - 568 504 - 756 756 - 1136
64 Go 840 - 1264 752 - 1136 1008 - 1512 1512 - 2272
IMPORTANT ! Pour garantir un enregistrement vidéo de grande qualité,
formatez une carte micro SD de classe 10 (d’une taille comprise entre 8 Go et 64
Go) avant de l’utiliser pour la première fois.
Table of contents
Languages:
Other Asus Dashcam manuals