ATELERIX ATX1001 User manual

2101 Gaither Road, Suite 125, Rockville, MD 20850
143-2103
www.atelerix.gg
VENTRIS EQUINOX
BLACK/GRAY/BLUE
NEGRO / GRIS / AZUL
NOIR / GRIS / BLEU
ATX1001
VENTRIS PULSE
GREEN/WHITE/BLACK
VERDE/BLANCO/NEGRO
VERT/BLANC/NOIR
ATX1002
VENTRIS NOIR
BLACK
NEGRO
NOIR
ATX1003
CHAIR/SILLA/CHAISE

Remove all content in the box and ensure that there are no missing parts. Please contact us (see Warranty page) if
something is not included.
Saque todo el contenido de la caja y asegúrese de que no faltan piezas. Por favor contáctenos (vea la página de Garantía)
si algo no está incluido.
Supprimez tout le contenu de la boîte et veiller à ce qu’il n’y a pas de pièces manquantes. Veuillez nous contacter (voir la
page de garantie) s’il en manque quelques choses.
1
ATX1001 PARTS LIST / LISTA DE PARTES / LISTES DES PIÈCES
Chair Backrest
Silla respaldo silla
Dossier de chaise
Chair Seatbase
Base del asiento
Siège de la chaise
4D Armrests
Apoyabrazos 4D
Accoudoirs 4D
Hydraulic Piston
Pistón hidráulico
Piston hydraulique
Tilt Mechanism
Mecanismo de inclinación
Mécanisme d'inclinaison
Wheelbase
Base para ruedas
Empattement
Casters
Ruedas giratorias
Roulettes
M8 Bolts
Pernos M8
Boulons M8
Side Covers
Cubiertas laterales
Couvercles latéraux
Lumbar Support Pillow
Almohada de soporte lumbar
Coussin de soutien lombaire
Black/Gray/Blue
R-0-ATX1001-01-143 R-0-ATX1001-02-143 R-0-ATX1001-03-143 R-0-ATX1001-04-143 R-0-ATX1001-05-143
Black/Gray/Blue Black
Black
BlackBlack
Black Black
Black
Black/Gray Black/Gray
Black/Blue
1
x1
2
x1
3
Lx1 Rx1
4
x1
6
x1
7
x1
8
x5
9
x12
11 12
x2 x1
13
Lx1 Rx1
5
10
Piston Cover
Cubierta del pistón
Couvercle de piston
Phillip Screws
Tornillos Phillip
Vis Phillip
x1
x2
8x20mm 5x8mm
Allen Key
Llave Allen
Clé Allen
Armrest Covers
Fundas para reposabrazos
Couvre accoudoirs
Head Pillow
Almohada para la cabeza
Coussin de soutien de la tête
14
x1 x1
15
R-0-ATX1001-06-143 R-0-ATX1001-07-143 R-0-ATX1001-08-143 R-0-ATX1001-09-143 R-0-ATX1001-10-143
R-0-ATX1001-11-143 R-0-ATX1001-12-143 R-0-ATX1001-13-143 R-0-ATX1001-14-143 R-0-ATX1001-15-143
ATX1002 PARTS LIST / LISTA DE PARTES / LISTES DES PIÈCES
Chair Backrest
Silla respaldo silla
Dossier de chaise
Chair Seatbase
Base del asiento
Siège de la chaise
4D Armrests
Apoyabrazos 4D
Accoudoirs 4D
Hydraulic Piston
Pistón hidráulico
Piston hydraulique
Tilt Mechanism
Mecanismo de inclinación
Mécanisme d'inclinaison
Wheelbase
Base para ruedas
Empattement
Casters
Ruedas giratorias
Roulettes
M8 Bolts
Pernos M8
Boulons M8
Side Covers
Cubiertas laterales
Couvercles latéraux
Lumbar Support Pillow
Almohada de soporte lumbar
Coussin de soutien lombaire
Black/Green/White
R-0-ATX1002-01-143 R-0-ATX1002-02-143 R-0-ATX1001-03-143 R-0-ATX1001-04-143 R-0-ATX1001-05-143
Black/Green/White Black
Black
BlackBlack
Black Black
Black/Green
Black/Green/White Black/Green/White
Black/White
1
x1
2
x1
3
Lx1 Rx1
4
x1
6
x1
7
x1
8
x5
9
x12
11 12
x2 x1
13
Lx1 Rx1
5
10
Piston Cover
Cubierta del pistón
Couvercle de piston
Phillip Screws
Tornillos Phillip
Vis Phillip
x1
x2
8x20mm 5x8mm
Allen Key
Llave Allen
Clé Allen
Armrest Covers
Fundas para reposabrazos
Couvre accoudoirs
Head Pillow
Almohada para la cabeza
Coussin de soutien de la tête
14
x1 x1
15
R-0-ATX1001-06-143 R-0-ATX1002-03-143 R-0-ATX1002-06-143 R-0-ATX1001-09-143 R-0-ATX1001-10-143
R-0-ATX1001-11-143 R-0-ATX1001-12-143 R-0-ATX1002-04-143 R-0-ATX1002-05-143 R-0-ATX1001-15-143

Place the wheelbase on the oor
upside down and attach the 5
casters.
Coloque la base para ruedas en el
piso boca abajo y coloque las 5
ruedas.
Placez l’empattement en mettant
la face supérieure contre le sol et
xez les 5 roulettes.
2
Flip the wheelbase right-side up
and install the hydraulic piston
and the hydraulic cover.
Gire la base para ruedas hacia
arriba e instale el pistón hidráulico
y la cubierta hidráulica.
Retournez la partie supérieure de
l’empattement vers le haut et
installez le piston hydraulique et le
couvercle du piston hydraulique.
3
(8)
(7)
(5)
(4)
(7)
ATX1003 PARTS LIST / LISTA DE PARTES / LISTES DES PIÈCES
Chair Backrest
Silla respaldo silla
Dossier de chaise
Chair Seatbase
Base del asiento
Siège de la chaise
4D Armrests
Apoyabrazos 4D
Accoudoirs 4D
Hydraulic Piston
Pistón hidráulico
Piston hydraulique
Tilt Mechanism
Mecanismo de inclinación
Mécanisme d'inclinaison
Wheelbase
Base para ruedas
Empattement
Casters
Ruedas giratorias
Roulettes
M8 Bolts
Pernos M8
Boulons M8
Side Covers
Cubiertas laterales
Couvercles latéraux
Lumbar Support Pillow
Almohada de soporte lumbar
Coussin de soutien lombaire
Black
R-0-ATX1003-01-143 R-0-ATX1003-02-143 R-0-ATX1001-03-143 R-0-ATX1001-04-143 R-0-ATX1001-05-143
Black Black
Black
BlackBlack
Black Black
Black
Black Black
Black
1
x1
2
x1
3
Lx1 Rx1
4
x1
6
x1
7
x1
8
x5
9
x12
11 12
x2 x1
13
Lx1 Rx1
5
10
Piston Cover
Cubierta del pistón
Couvercle de piston
Phillip Screws
Tornillos Phillip
Vis Phillip
x1
x2
8x20mm 5x8mm
Allen Key
Llave Allen
Clé Allen
Armrest Covers
Fundas para reposabrazos
Couvre accoudoirs
Head Pillow
Almohada para la cabeza
Coussin de soutien de la tête
14
x1 x1
15
R-0-ATX1001-06-143 R-0-ATX1001-07-143 R-0-ATX1003-05-143 R-0-ATX1001-09-143 R-0-ATX1001-10-143
R-0-ATX1001-11-143 R-0-ATX1001-12-143 R-0-ATX1003-03-143 R-0-ATX1003-04-143 R-0-ATX1001-15-143

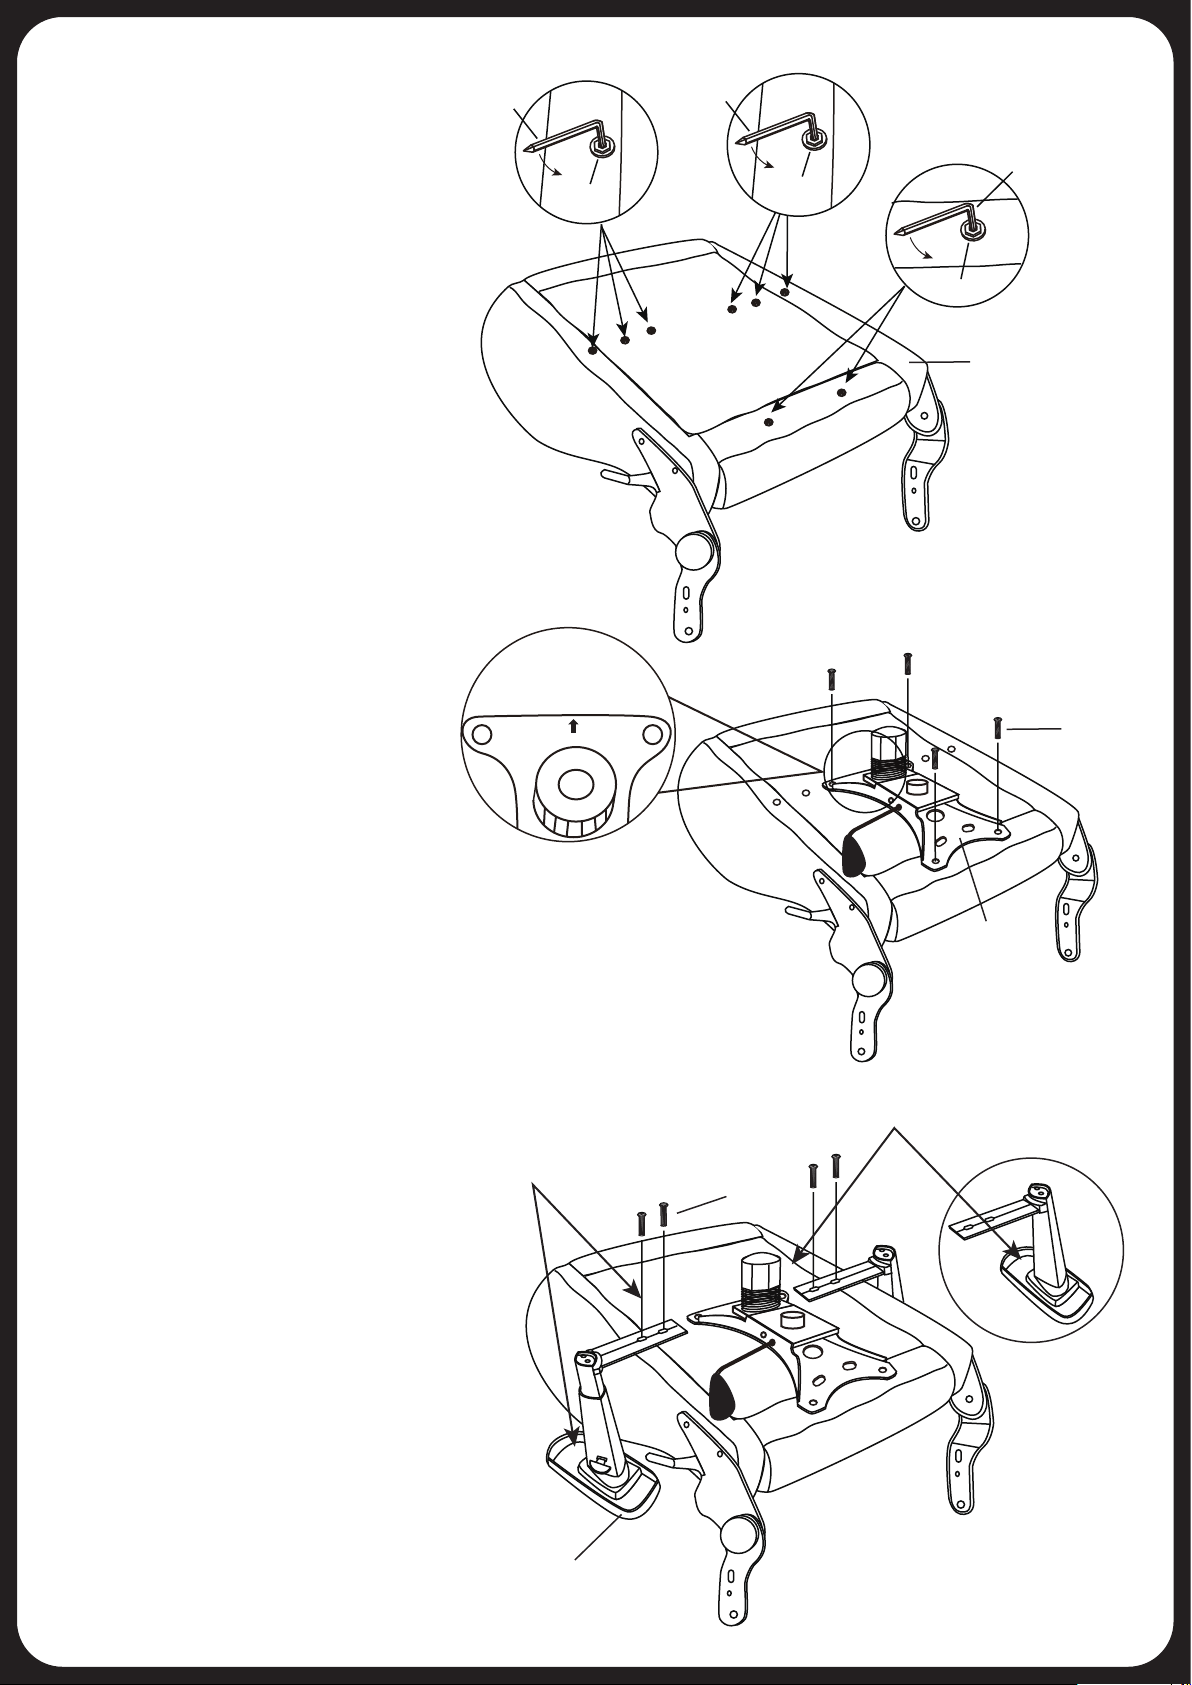
Check under the seat and remove
the 8 screws preinstalled in the
seat with the Allen wrench. Note:
The screws are pre-installed to
ensure that the thread and screws
t together and provide a strong
grip.
Verique debajo del asiento y
retire los 8 tornillos preinstalados
en el asiento con la llave Allen.
Nota: Los tornillos están
preinstalados para garantizar que
la rosca y los tornillos encajen
entre sí y proporcionen un agarre
fuerte.
Vériez sous le siège et retirez les
8 vis préinstallées dans le siège
avec la clé Allen. Remarque: les vis
sont préinstallées pour vous
assurer que le letage et les vis
sont vissés ensembles pour
fournir une forte adhérence.
4
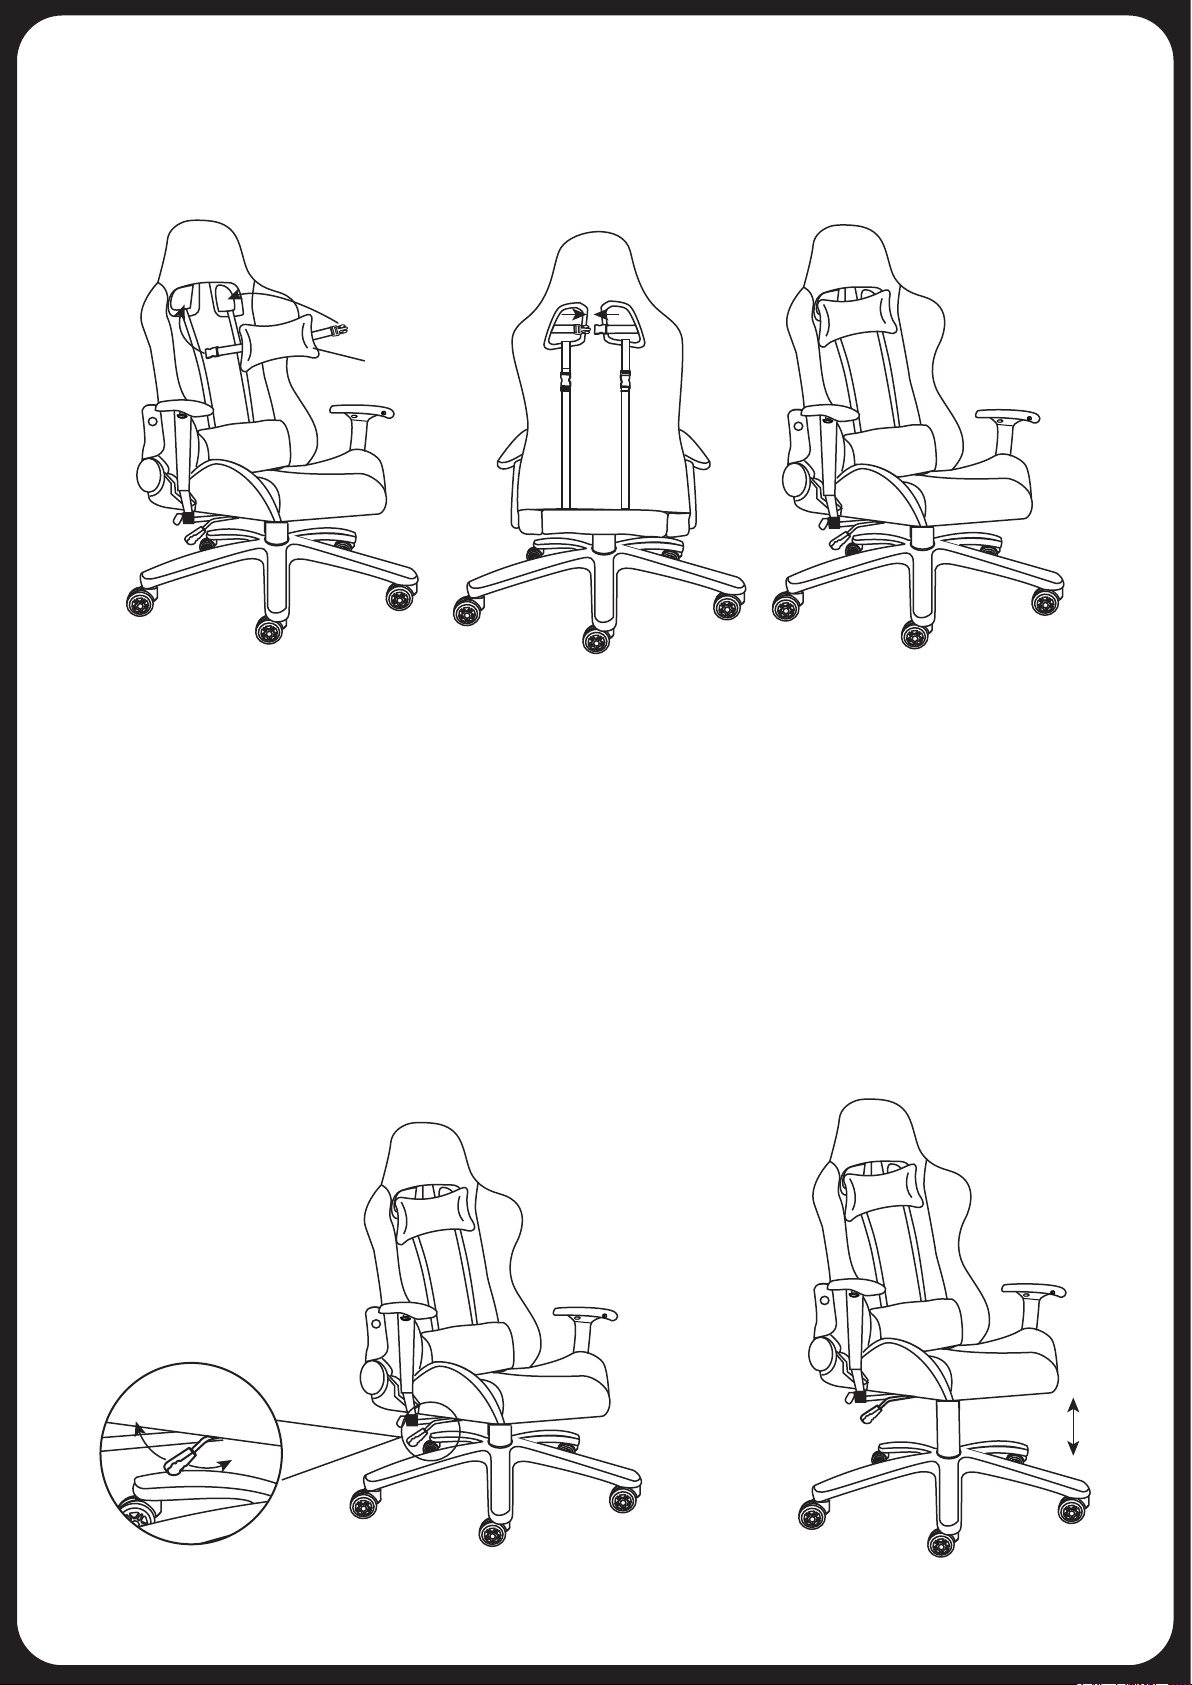
Attach the tilt mechanism to the
bottom of the seat base using 4
screws. Ensure that the tilt
mechanism is in the correct
position.
Fije el mecanismo de
inclinación a la parte inferior de
la base del asiento con 4
tornillos. Asegúrese de que el
mecanismo de inclinación esté
en la posición correcta.
Fixez le mécanisme d’inclinaison
au bas du siège de l’assise à
l'aide de 4 vis. Assurez-vous que
le mécanisme d'inclinaison soit
dans la bonne position.
5
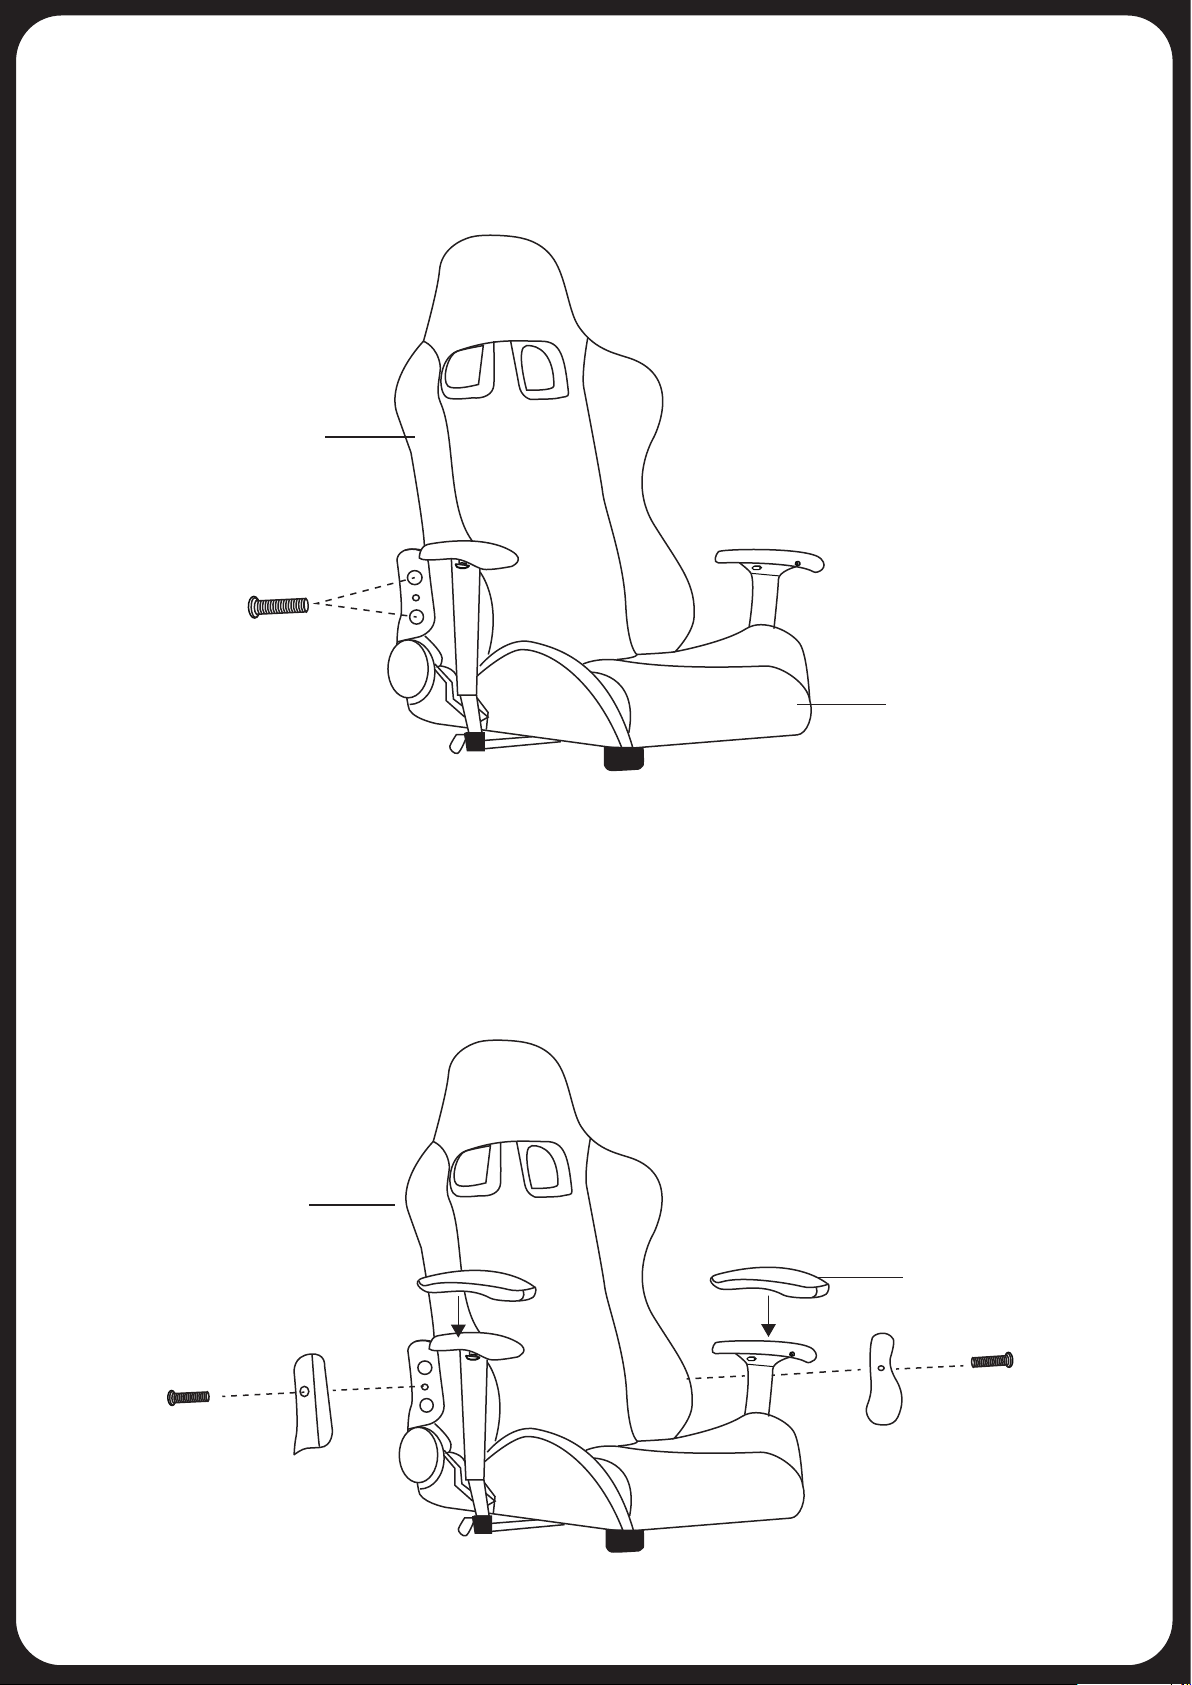
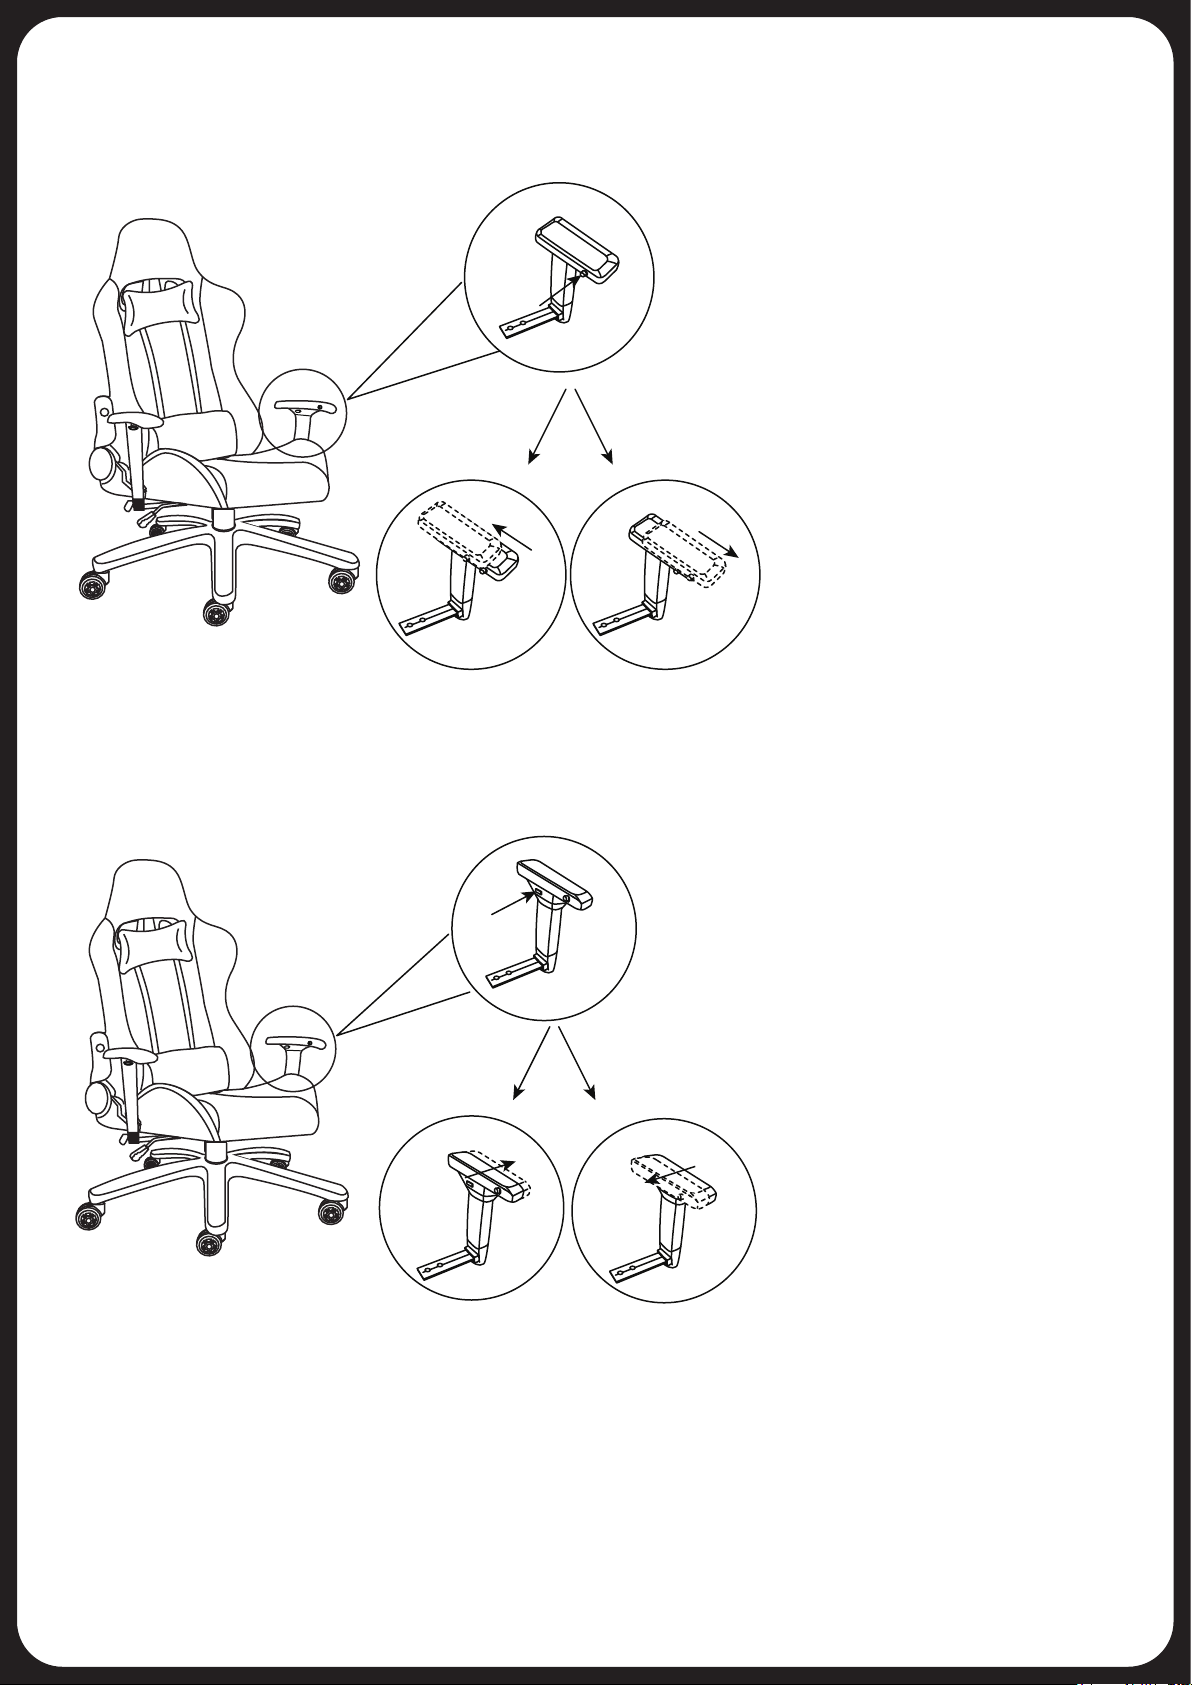
Attach both arm rests to the
bottom of the seat base using the
4 remaining screws. Ensure that
the arm rests are in the correct
position.
Fije ambos reposabrazos a la
parte inferior de la base del
asiento con los 4 tornillos
restantes. Asegúrese de que los
reposabrazos estén en la posición
correcta.
Fixez les deux accoudoirs au bas
du siège de la chaise avec les 4 vis
restantes. Assurez-vous que les
accoudoirs sont dans la bonne
position.
6
(12)
(9)
(2)
(9)
(6)
(3)
(9)
(12)
(9)
(12)
(9)
R
R
L
Please match the letter R
Por favor, haga coincidir la letra R
S'il vous plaît correspondre à la lettre R
Please match the letter L
Por favor, haga coincidir la letra L
S'il vous plaît correspondre à la lettre L
L
FRONT
FRONT

Attach the backrest of the chair to the seat by aligning the brackets and using the Allen key to tighten all 4
screws.
Fije el respaldo de la silla al asiento alineando los soportes y utilizando la llave Allen para apretar los 4 tornillos.
Fixez le dossier de la chaise au siège en alignant les supports et en utilisant la clé Allen pour serrer les 4 vis.
7
Attach the side covers onto the backrest over the brackets. Put the armrest covers on the armrests.
Coloque las cubiertas laterales en el respaldo sobre los soportes. Coloque la funda del reposabrazos en los
reposabrazos.
Fixez les caches latéraux sur le dossier par-dessus les crochets. Placez le couvre accoudoir sur l’accoudoir.
8
(1)
(2)
(9)
(1)
(10)
(10)
(12)
(11)
(11)

Insert the hydraulic piston into the opening of the tilt mechanism.
Inserte el pistón hidráulico en la abertura del mecanismo de inclinación.
Insérer le piston hydraulique dans l'ouverture du mécanisme d'inclinaison.
9
Attach the lumbar support pillow to the chair.
Coloque la almohada de soporte lumbar en la silla.
Attachez le coussin de soutien lombaire à la chaise.
10
(13)

Congratulations on your newly assembled Atelerix Chair.
Felicitaciones por su nueva silla Atelerix ensamblada.
Félicitations pour votre nouveau fauteuil Atelerix.
Attach the head support pillow to the chair.
Coloque la almohada de apoyo para la cabeza en la silla.
Attachez le coussin de soutien de la tête à la chaise.
11
Adjust the height of the chair / Ajuste la altura de la silla.
Ajustez la hauteur de la chaise.
(14)
FREE
LOGK

Move Armrest Backwards and Forwards.
Mover el apoyabrazos hacia atrás y hacia adelante.
Déplacer l'accoudoir vers l'arrière et l'avant.
Move Armrest Side to Side / Mover el reposabrazos de lado a lado
Déplacer l'accoudoir d'un côté à l'autre
Note: Always push and hold the button located on the inside of the armrest before moving the armrest in any direction.
Failure to do so may cause product damage. Armrest covers do not need to be removed during this process.
Nota: Siempre presione y mantenga presionado el botón ubicado en el interior del apoyabrazos antes de mover el
apoyabrazos en cualquier dirección. Si no lo hace, puede dañar el producto. No es necesario quitar las cubiertas de los
apoyabrazos durante este proceso.
Remarque: appuyez et maintenez toujours le bouton situé à l'intérieur de l'accoudoir avant de déplacer l'accoudoir
dans n'importe quelle direction. Le non-respect de cette consigne peut endommager le produit. Il n'est pas nécessaire
de retirer la housse de l'accoudoir pendant cette opération.
Proper Way to Move Armrest
Side to Side
Once the armrest button is pressed in,
rotate the armrest to the left or right
until the armrest feels comfortable.
Manera correcta de mover el
reposabrazos de lado a lado
Una vez presionado el botón del
reposabrazos, gírelo hacia la
izquierda o hacia la derecha hasta
que se sienta cómodo.
Manière correcte de déplacer
l'accoudoir d'un côté à l'autre
Une fois le bouton de l'accoudoir
enfoncé, tournez l'accoudoir vers la
gauche ou la droite jusqu'à ce que
l'accoudoir soit confortable.
Proper Way to Move Armrest
Backwards and Forwards
Once the armrest button is pressed in,
push the armrest forward or pull back
until the armrest feels comfortable.
Manera correcta de mover el
apoyabrazos hacia atrás y hacia
adelante
Una vez presionado el botón del
apoyabrazos, empújelo hacia adelante o
hacia atrás hasta que se sienta cómodo.
Manière correcte de déplacer
l'accoudoir vers l'arrière et l'avant
Une fois le bouton de l'accoudoir
enfoncé, poussez l'accoudoir vers
l'avant ou vers l'arrière jusqu'à ce que
l'accoudoir soit confortable.
To the left
To the right
ForwardBackwards

Adjust the angle of the chair backrest. / Ajuste el ángulo del respaldo de la silla.
Régler l'angle du dossier de la chaise.
Adjust the height of the armrest and the angle of the armrest.
Ajuste la altura del y el ángulo del reposabrazos.
Ajustez la hauteur de l'accoudoir et son angle.
Height
Altura
Hauteur
Angle
Ángulo
Angle

SAFETY INFORMATION
INFORMACIÓN DE SEGURIDAD / INFORMATION POUR LA SÉCURITÉ
The recommended weight load for this chair is 260lb (118kg). The chair should only be used normally and in a
non-abusive manner. For warranty information, please visit the Warranty section on our website.
El peso recomendado para esta silla es de 260 lb (118 kg). La silla solo debe usarse normalmente y de forma no abusiva.
Para obtener información sobre la garantía, visite la sección de Garantía en nuestro sitio web.
Le poids recommandé pour cette chaise est de 260 lb (118 kg). La chaise devrait être utilisée normalement et de manière
non abusive. Pour des informations sur la garantie, veuillez visiter le section garantie sur notre site Web.
Adjust the position of the lumbar support pillow.
Ajuste la posición de la almohada de soporte lumbar.
Ajustez la position de la coussin de soutien lombaire.

LIMITED WARRANTY
Atelerix (the “Company”) warrants the Product to be free from defects in workmanship and materials under normal use and
conditions FOR A PERIOD OF 1 YEAR FROM THE DATE OF ORIGINAL PURCHASE in the United States and Canada.
What Is Covered
Except as provided below, this Limited Warranty covers all defects in materials and workmanship. This Limited Warranty is void
if the Product is:
• Damaged through improper usage, negligence, misuse, abuse, transportation damage, acts of nature, or accident
(including failure to follow the instructions supplied with the Product)
• Used in commercial applications or rentals
• Modified or repaired by anyone not authorized by the Company.
What Is Not Covered
This Limited Warranty does not cover:
• Any expendable items such as batteries, light bulbs, fuses, accessories, cosmetic parts, tools and other items that wear out
due to normal usage.
• Any costs you may incur for delivery, installation, assembly or transport of your product.
What The Company Will Pay For
If during the Limited Warranty period, any part or component of the Product is found by the Company to be defective, the
Company will, at its option, repair the Product, replace the Product with a new Product (either the same or an equivalent
model) or cause the original retailer of the Product to exchange the Product with a new Product (either the same or an
equivalent model). The Company’s obligation to repair, replace or exchange the Product, however, shall be limited to the
amount of the original purchase price of the Product.
How To Obtain Warranty Service
In order to enforce your rights under this Limited Warranty, you must follow these procedures:
• You must include THE ORIGINAL COPY OF YOUR SALES RECEIPT.
• You must contact the Company's Customer Service Department at www.aterlerix.gg to notify the Company of the nature of
the problem.
• If you are instructed to return the Product to the Company for servicing, you are responsible for shipping the Product, at your
expense, to the address designated by the Company in packaging that will protect against further damage.
• You must also include your name, address, daytime telephone number, model number of the Product and a description of
the problem.
THIS LIMITED WARRANTY IS AVAILABLE ONLY TO THE ORIGINAL PURCHASER OF THE PRODUCT AND IS VALID
IN THE UNITED STATES AND CANADA.
THE COMPANY’S LIABILITY IS LIMITED TO THE REPAIR OR REPLACEMENT, AT ITS OPTION, OF ANY
DEFECTIVE PRODUCT AND SHALL NOT INCLUDE ANY LIABILITY FOR INDIRECT, INCIDENTAL OR
CONSEQUENTIAL DAMAGES OF ANY KIND.
THIS WARRANTY IS EXPRESSLY MADE IN LIEU OF ALL OTHER WARRANTIES, EXPRESSED OR IMPLIED.
SOME STATES DO NOT ALLOW LIMITATIONS ON HOW LONG AN IMPLIED WARRANTY LASTS OR DO NOT
ALLOW FOR EXCLUSION OF INCIDENTAL OR CONSEQUENTIAL DAMAGES. TO THAT EXTENT, THE ABOVE
LIMITATIONS MAY NOT APPLY TO YOU.
This Limited Warranty gives you specific legal rights, but you may also have other rights that vary from state to state.
If you have questions regarding this Limited Warranty or the operation of the Product, you may contact us:
Customer Service Department
2101 Gaither Road, Suite 125
Rockville, MD 20850
www.atelerix.gg

GARANTÍA LIMITADA
Atelerix (la "Compañía") garantiza que el Producto está libre de defectos
de mano de obra y materiales en condiciones de uso y uso normales POR
UN PERÍODO DE 1 AÑO DESDE LA FECHA DE COMPRA ORIGINAL en
los Estados Unidos y Canadá.
Lo que está cubierto
Excepto por lo dispuesto a continuación, esta Garantía Limitada cubre
todos los defectos en materiales y mano de obra. Esta garantía limitada es
nula si el producto es:
• Dañado por uso inapropiado, negligencia, mal uso, abuso, daños en el
transporte, actos de la naturaleza o accidentes (incluido el
incumplimiento de las instrucciones suministradas con el Producto)
• Utilizado en aplicaciones comerciales o alquileres.
• Modificado o reparado por cualquier persona no autorizada por la
Compañía.
Lo que no está cubierto
Esta garantía limitada no cubre:
• Cualquier artículo fungible, como baterías, bombillas, fusibles,
accesorios, piezas cosméticas, herramientas y otros artículos que se
desgasten debido al uso normal.
• Cualquier costo en el que pueda incurrir para la entrega, instalación,
montaje o transporte de su producto.
Lo que pagará la compañía
Si durante la vigencia de la Garantía Limitada, la Compañía considera que
alguna parte o componente del Producto está defectuoso, la Compañía, a
su opción, reparará el Producto y lo reemplazará por un nuevo Producto
(ya sea el mismo o un modelo equivalente) o hacer que el minorista
original del Producto intercambie el Producto con un nuevo Producto (ya
sea el mismo o un modelo equivalente). La obligación de la Compañía de
reparar, reemplazar o intercambiar el Producto, sin embargo, se limitará al
monto de la compra original. Precio del producto.
Cómo obtener servicio de garantía
Para hacer valer sus derechos en virtud de esta Garantía Limitada, debe
seguir estos procedimientos:
• Debe incluir LA COPIA ORIGINAL DE SU RECIBO DE VENTA.
• Debe comunicarse con el Departamento de Servicio al Cliente de la
Compañía en www.aterlerix.gg para notificar a la Compañía la
naturaleza del problema.
• Si se le indica que devuelva el Producto a la Compañía para su
reparación, usted es responsable de enviar el Producto, a su cargo, a
la dirección designada por la Compañía en el empaque que lo
protegerá contra daños mayores.
• También debe incluir su nombre, dirección, número de teléfono durante
el día, número de modelo del Producto y una descripción del
problema.
ESTA GARANTÍA LIMITADA ESTÁ DISPONIBLE SOLAMENTE PARA
EL COMPRADOR ORIGINAL DEL PRODUCTO Y ESTÁ VÁLIDA EN
LOS ESTADOS UNIDOS Y CANADÁ.
LA RESPONSABILIDAD DE LA COMPAÑÍA SE LIMITA A LA
REPARACIÓN O REEMPLAZO, A SU OPCIÓN, DE CUALQUIER
PRODUCTO DEFECTUOSO, Y NO INCLUIRÁ NINGUNA
RESPONSABILIDAD POR DAÑOS INDIRECTOS, INCIDENTALES O
CONSECUENTES DE NINGÚN TIPO.
ESTA GARANTÍA SE HACE EXPRESAMENTE EN LUGAR DE TODAS
LAS OTRAS GARANTÍAS, EXPRESAS O IMPLÍCITAS.
ALGUNOS ESTADOS NO PERMITEN LIMITACIONES EN EL PLAZO
DE UNA GARANTÍA IMPLÍCITA O NO PERMITEN LA EXCLUSIÓN DE
DAÑOS INCIDENTALES O CONSECUENTES. EN ESA EXTENSIÓN,
LAS LIMITACIONES ANTERIORES PUEDEN NO APLICARSE A
USTED.
Esta garantía limitada le otorga derechos legales específicos, pero
también puede tener otros derechos que varían de un estado a otro.
Si tiene preguntas sobre esta Garantía Limitada o sobre la operación del
Producto, puede contactarnos:
Departamento de servicio al cliente
2101 Gaither Road, Suite 125
Rockville, MD 20850
www.atelerix.gg
GARANTIE LIMITÉE
Atelerix (la «Société») garantit que le produit est exempt de vices de
fabrication et de matériaux dans des conditions normales d'utilisation et les
conditions POUR UNE PERIODE D'UN AN À PARTIR DE LA DATE DE
L'ACHAT INITIAL aux États-Unis et au Canada.
Ce qui est couvert
Excepté une contre-indication citée ci-dessous, cette garantie limitée
couvre tous les défauts de matériaux et de fabrication. Cette garantie
limitée est nulle si le produit est:
• Endommagé par un usage impropre, une négligence, une utilisation
abusive, un abus, des dommages dus au transport, des actes naturels
ou un accident (y compris le non-respect des instructions fournies avec
le produit)
• Utilisé dans les applications commerciales ou les locations
• Modifié ou réparé par une personne non autorisée par la société.
Ce qui n'est pas couvert
Cette garantie limitée ne couvre pas:
• Tous les articles consomptibles tels que les piles, les ampoules, les
fusibles, les accessoires, les composants cosmétiques, les outils et
autres objets usés en raison d'une utilisation normale.
• Tous les coûts que vous pouvez encourir pour la livraison, l’installation,
le montage ou le transport de votre produit.
Ce que l'entreprise va payer pour
Si, au cours de la période de garantie limitée, une pièce ou un composant
du produit est jugé défectueux par la Société, la compagnie, à sa
discrétion, réparera le produit, remplacera le produit par un nouveau
produit (modèle identique ou équivalent) ou obliger le détaillant initial du
produit à échanger le produit contre un nouveau produit (le même ou un
modèle équivalent). L’obligation de la société de réparer, de remplacer ou
d’échanger le produit est toutefois limitée au montant du prix d’achat initial
du produit.
Comment obtenir un service de garantie
Afin de faire valoir vos droits en vertu de cette garantie limitée, vous devez
suivre les procédures suivantes:
• Vous deviez inclure LA COPIE ORIGINALE DE VOTRE REÇU DE VENTE.
• Vous deviez contacter le service clientèle de la société à l'adresse
www.aterlerix.gg pour informer la société de la nature du problème.
• Si vous êtes invités à renvoyer le produit à la société pour réparation,
vous êtes responsables de l'expédition du produit, à votre frais, à
l’adresse indiquée par la Société dans un emballage qui le protégera
de tout dommage supplémentaire.
• Vous deviez également inclure votre nom, votre adresse, votre numéro
de téléphone mis à jour, le numéro de modèle du produit et une
description du problème.
CETTE GARANTIE LIMITEE N'EST DISPONIBLE QUE POUR
L'ACHETEUR INITIAL DU PRODUIT ET EST VALABLE AUX
ÉTATS-UNIS ET AU CANADA.
LA RESPONSABILITE DE LA SOCIETE SE LIMITE A LA REPARATION
OU AU REMPLACEMENT, A SON CHOIX, DE TOUT PRODUIT
DÉFECTUEUX ET NE COMPRENDRA AUCUNE RESPONSABILITÉ
POUR LES ACCIDENTS INDIRECTS OU DOMMAGES INDIRECTS DE
TOUT GENRE.
CETTE GARANTIE EST EXPRESSÉMENT REMPLACÉE AU LIEU DE
TOUTES LES AUTRES GARANTIES, EXPLICITES OU IMPLICITES.
CERTAINS ÉTATS NE PERMETTENT PAS DE LIMITER LA DURÉE OU
NON D'UNE GARANTIE IMPLICITE OU N’AUTORISENT PAS À
EXCLURE LES DOMMAGES INCIDENTS OU CONSEQUENCIELS. À
CET ÉGARD, LES LIMITATIONS CI-DESSUS PEUVENT NE PAS
S'APPLIQUER À VOUS.
Cette garantie limitée vous confère des droits légaux spécifiques, mais
vous pouvez également disposer d’autres droits qui varient d’un État à
l’autre.
Si vous avez des questions concernant cette garantie limitée ou le
fonctionnement du produit, vous pouvez nous contacter:
Service à la clientèle
2101 Gaither Road, Suite 125
Rockville, MD 20850
www.atelerix.gg
This manual suits for next models
2
Table of contents
Popular Indoor Furnishing manuals by other brands

BLACK RED WHITE
BLACK RED WHITE STYLIUS B169-LOZ160 Assembly

Hillsdale Furniture
Hillsdale Furniture Jennings 4022-838 quick start guide

Southern Enterprises
Southern Enterprises HZ5925 Assembly instructions

Coopers
Coopers 10332 instructions

ZebraBlinds
ZebraBlinds Crown Premium INSTALLATION & CARE INSTRUCTIONS

JWA
JWA Cara 71525 Assembly instruction

Vela
Vela Samba 926645 Mounting instructions

Active Era
Active Era LUXURY AIR BED instruction manual

Classic Exhibits
Classic Exhibits Visionary Designs MOD-1243 Assembly instructions

Costway
Costway GIANTEX JV10120 user manual

Confer Plastics
Confer Plastics Leisure Accents Barstool Assembly manual

OFM
OFM 5100 Installation instructions manual