Atlantic 074208 User manual

Reference guide
for professionals
and the user
to be kept by the user
for future reference
atlantic-comfort.com
code 074208
Document N° 1846-4
03/07/2017
Navilink A59
Intelligent Room
Temperature Controller
EN
ES

Reference guide "1846- EN"
Navilink A59 Intelligent Room Temperature Controller
- 2 -
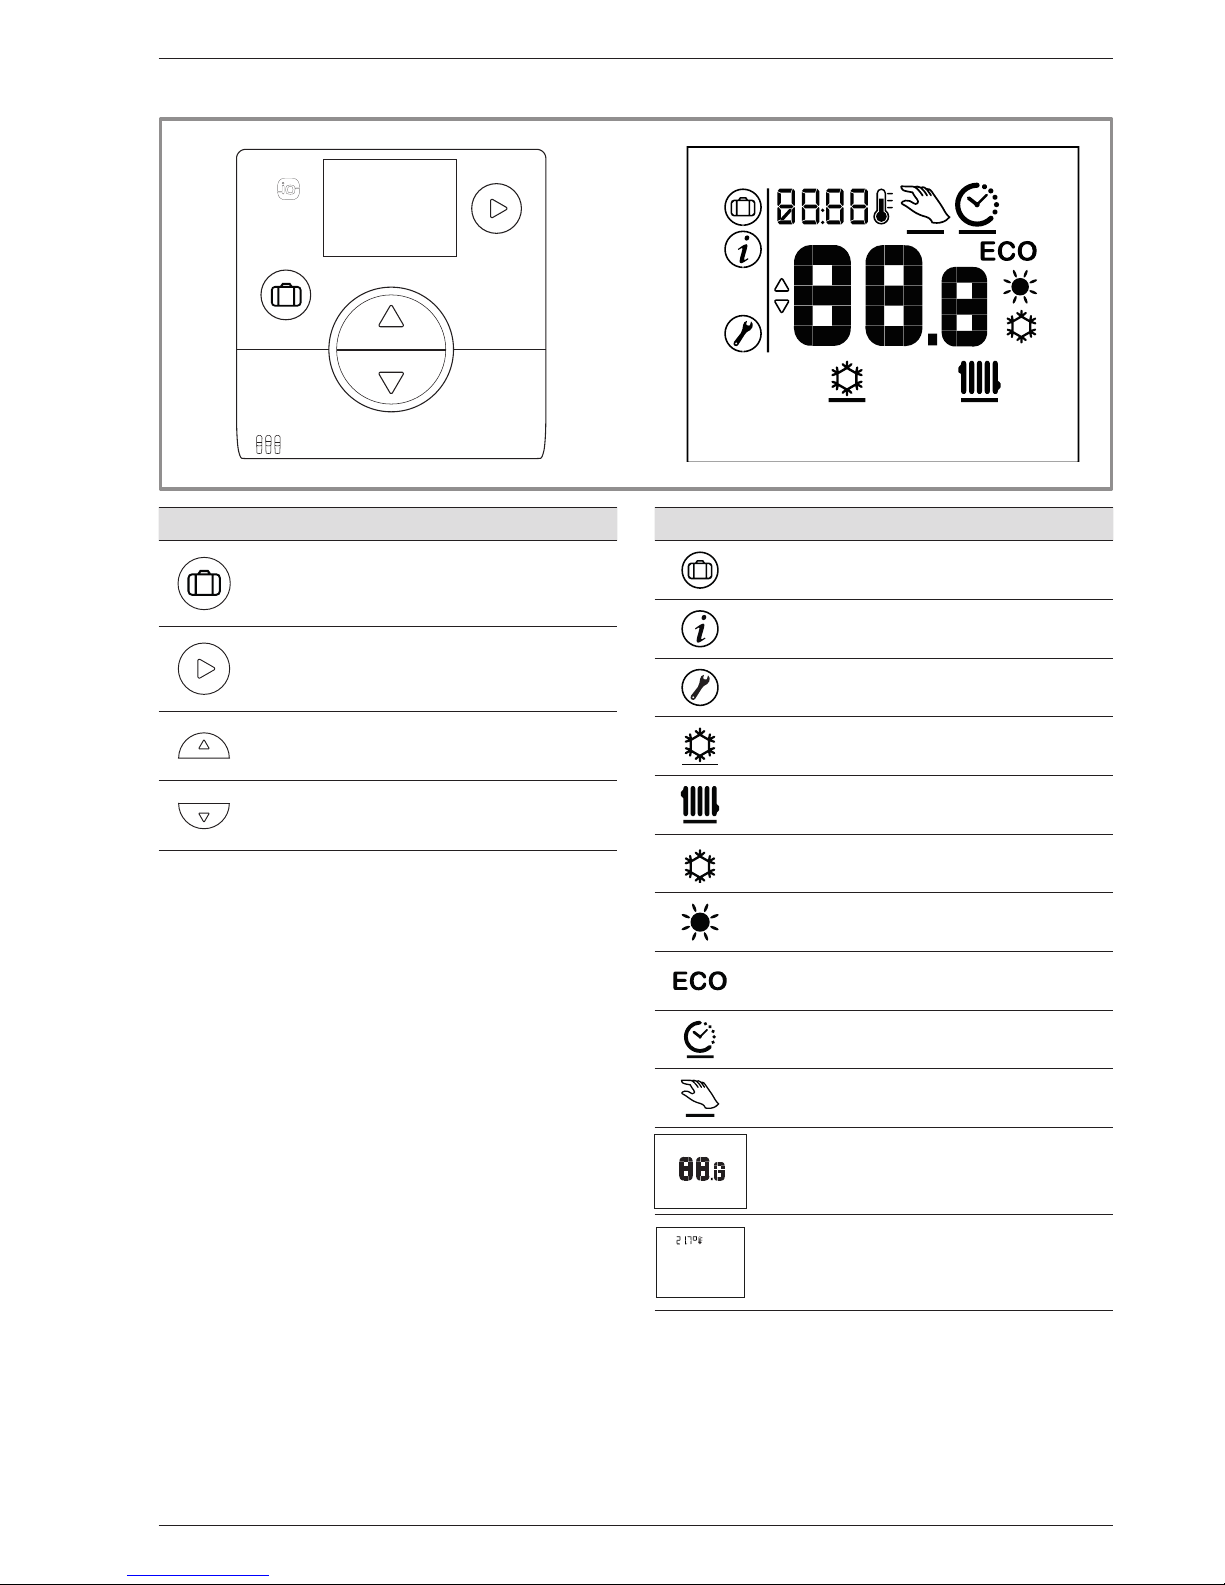
1 Description of the equipment
1.1 General characteristics
Frequency: 868 MHz. Radiofrequency output: 5 mW maximum.
gure 1 - Dimensions in mm
102
102
22
(51)
Trou de
fixation vis
()3.1
( )60
( )3.1
Trou de fixation
vis
Contents
Description of the equipment . . . . . . . . . . . . . . . . . . . . . . . . . . 2
General characteristics . . . . . . . . . . . . . . . .2 Display Description . . . . . . . . . . . . . . . . . .3
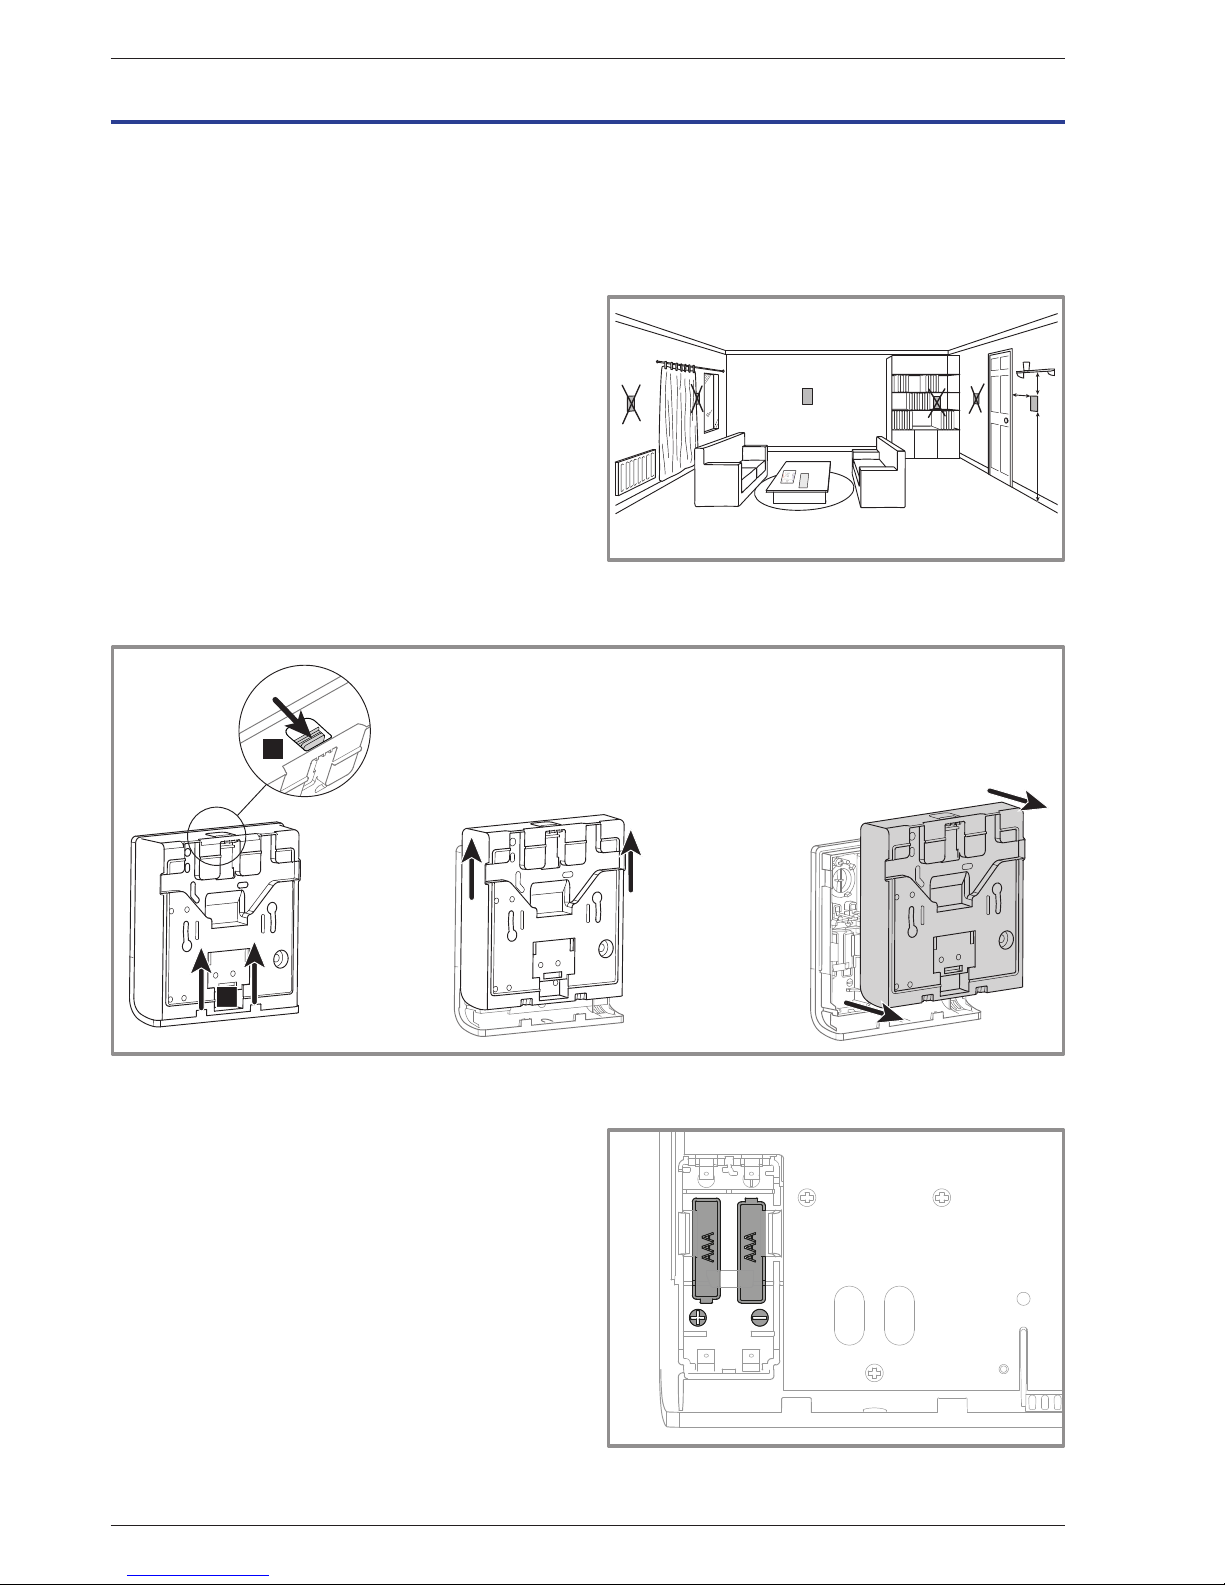
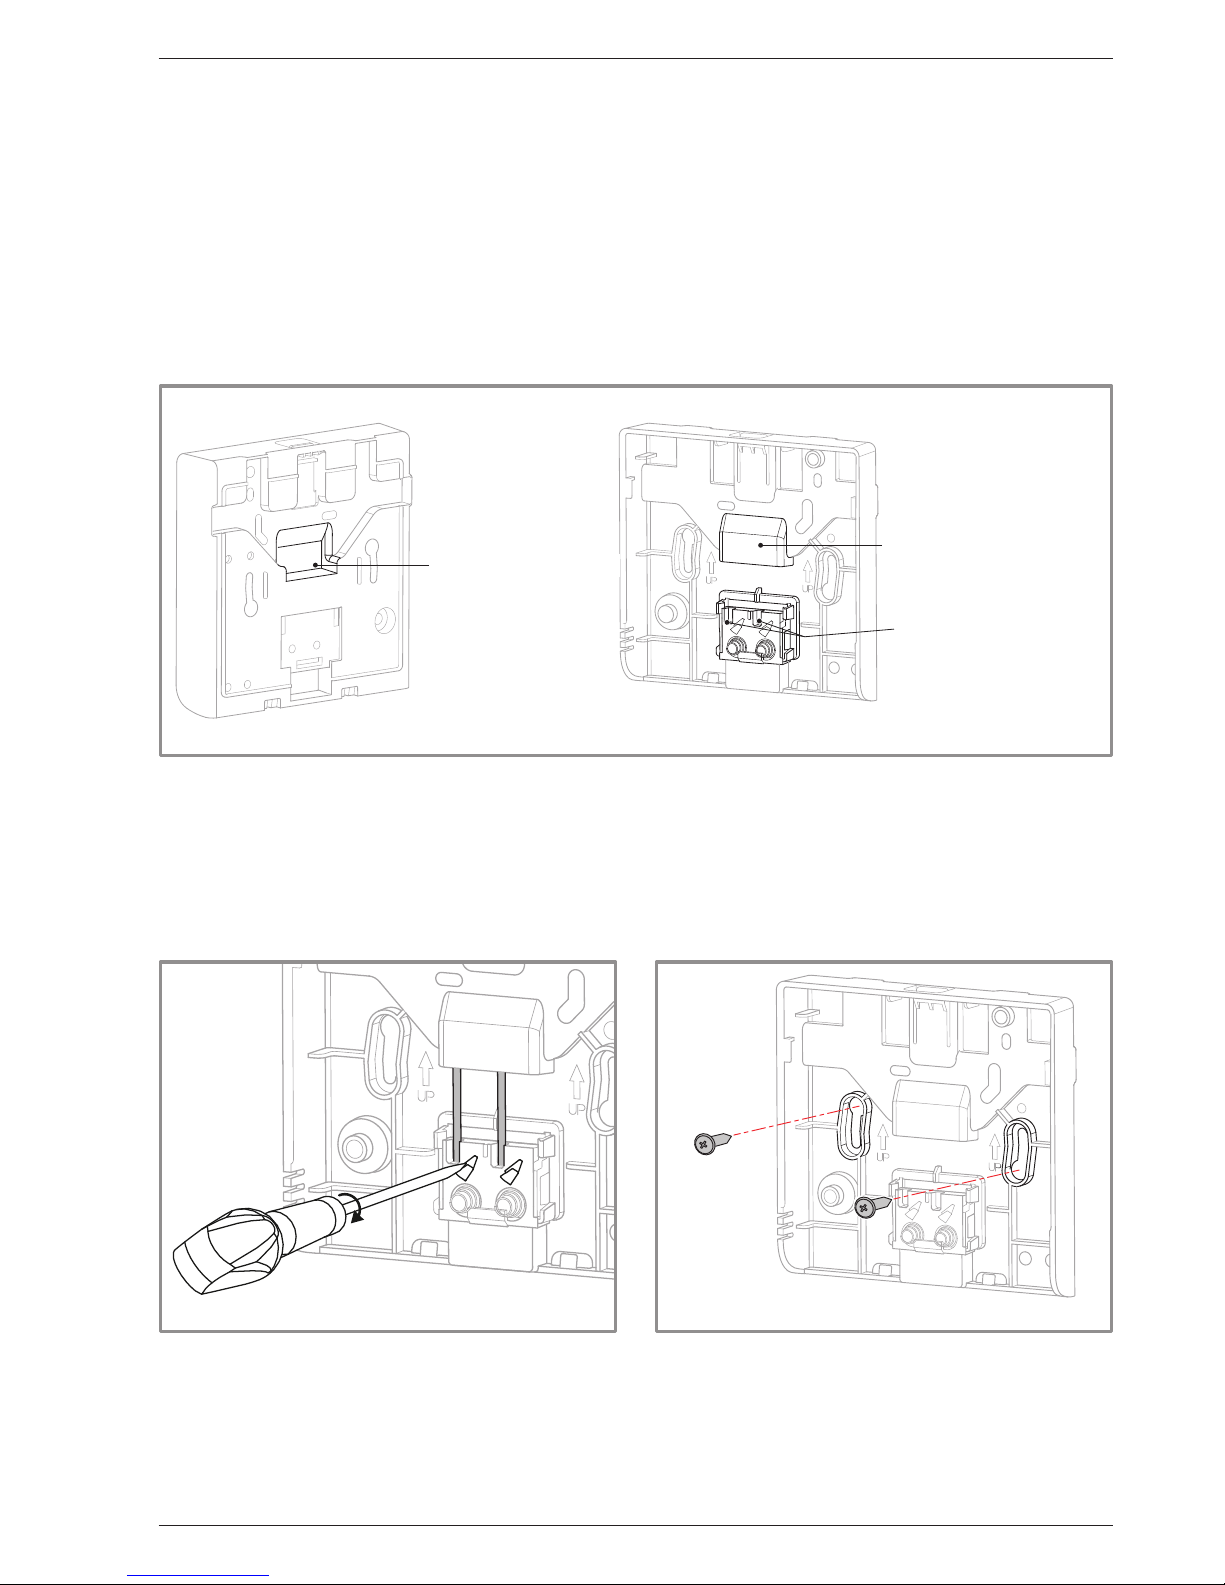
Assembly and connections . . . . . . . . . . . . . . . . . . . . . . . . . . . 4
Installation . . . . . . . . . . . . . . . . . . . . . . . 4
Opening the sensor . . . . . . . . . . . . . . . . . . 4
Using the sensor with batteries . . . . . . . . . . . . 4
Using the sensor with mains power . . . . . . . . . . 5
Attaching to a wall . . . . . . . . . . . . . . . . . . . 5
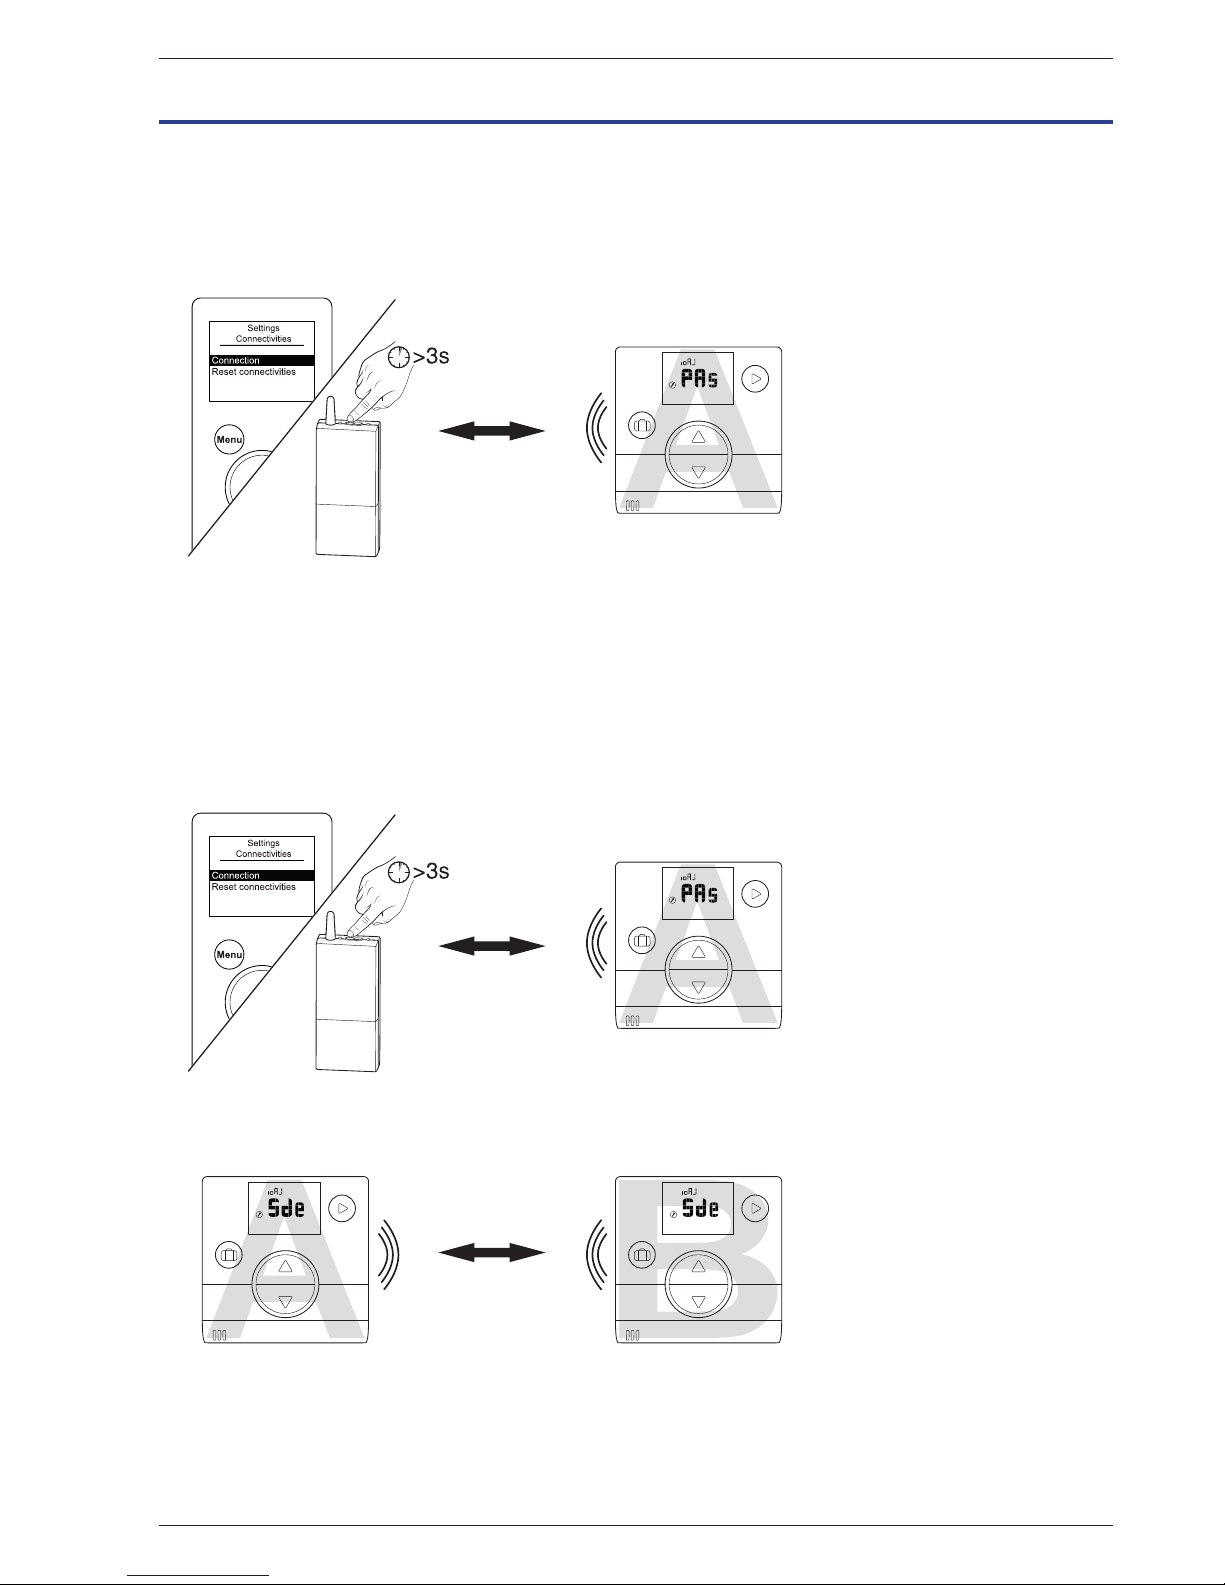
WiFi connection . . . . . . . . . . . . . . . . . . . . . . . . . . . . . . . . .7
Room sensor pairing basics . . . . . . . . . . . . . . 7
Pairing a sensor with a HP / Boiler . . . . . . . . . .8
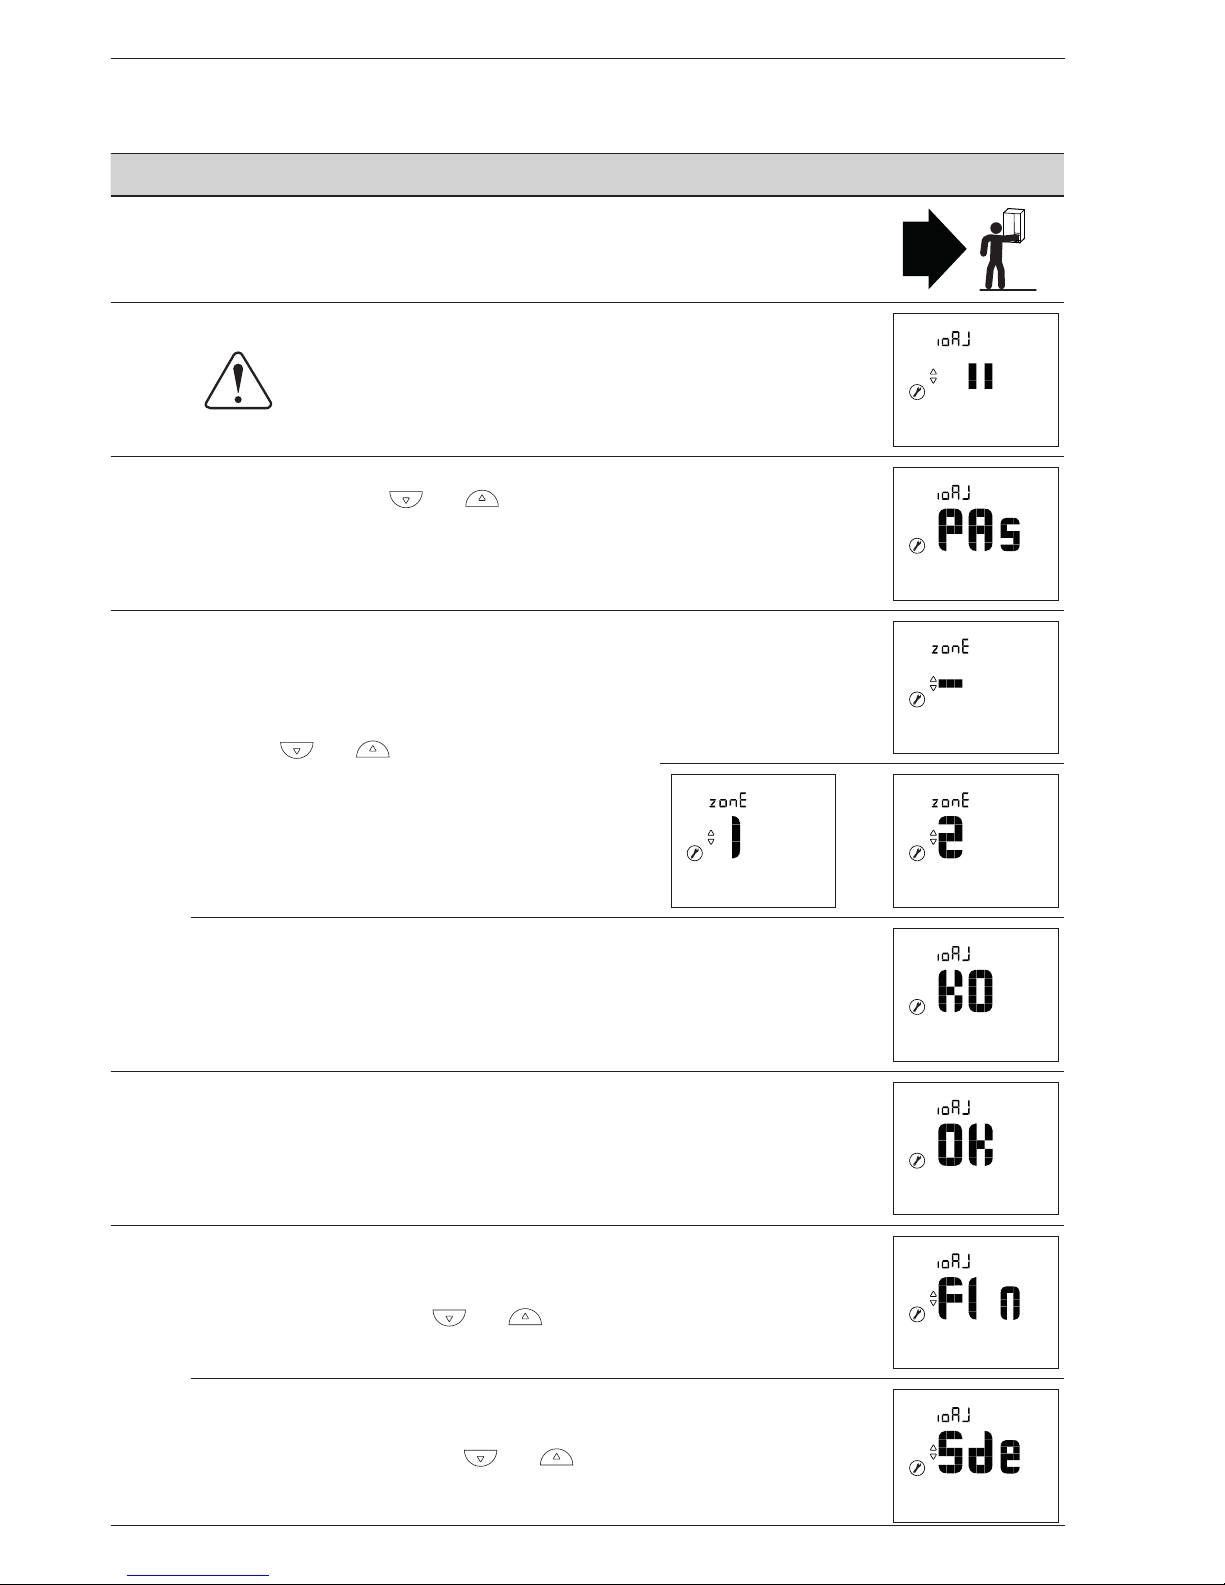
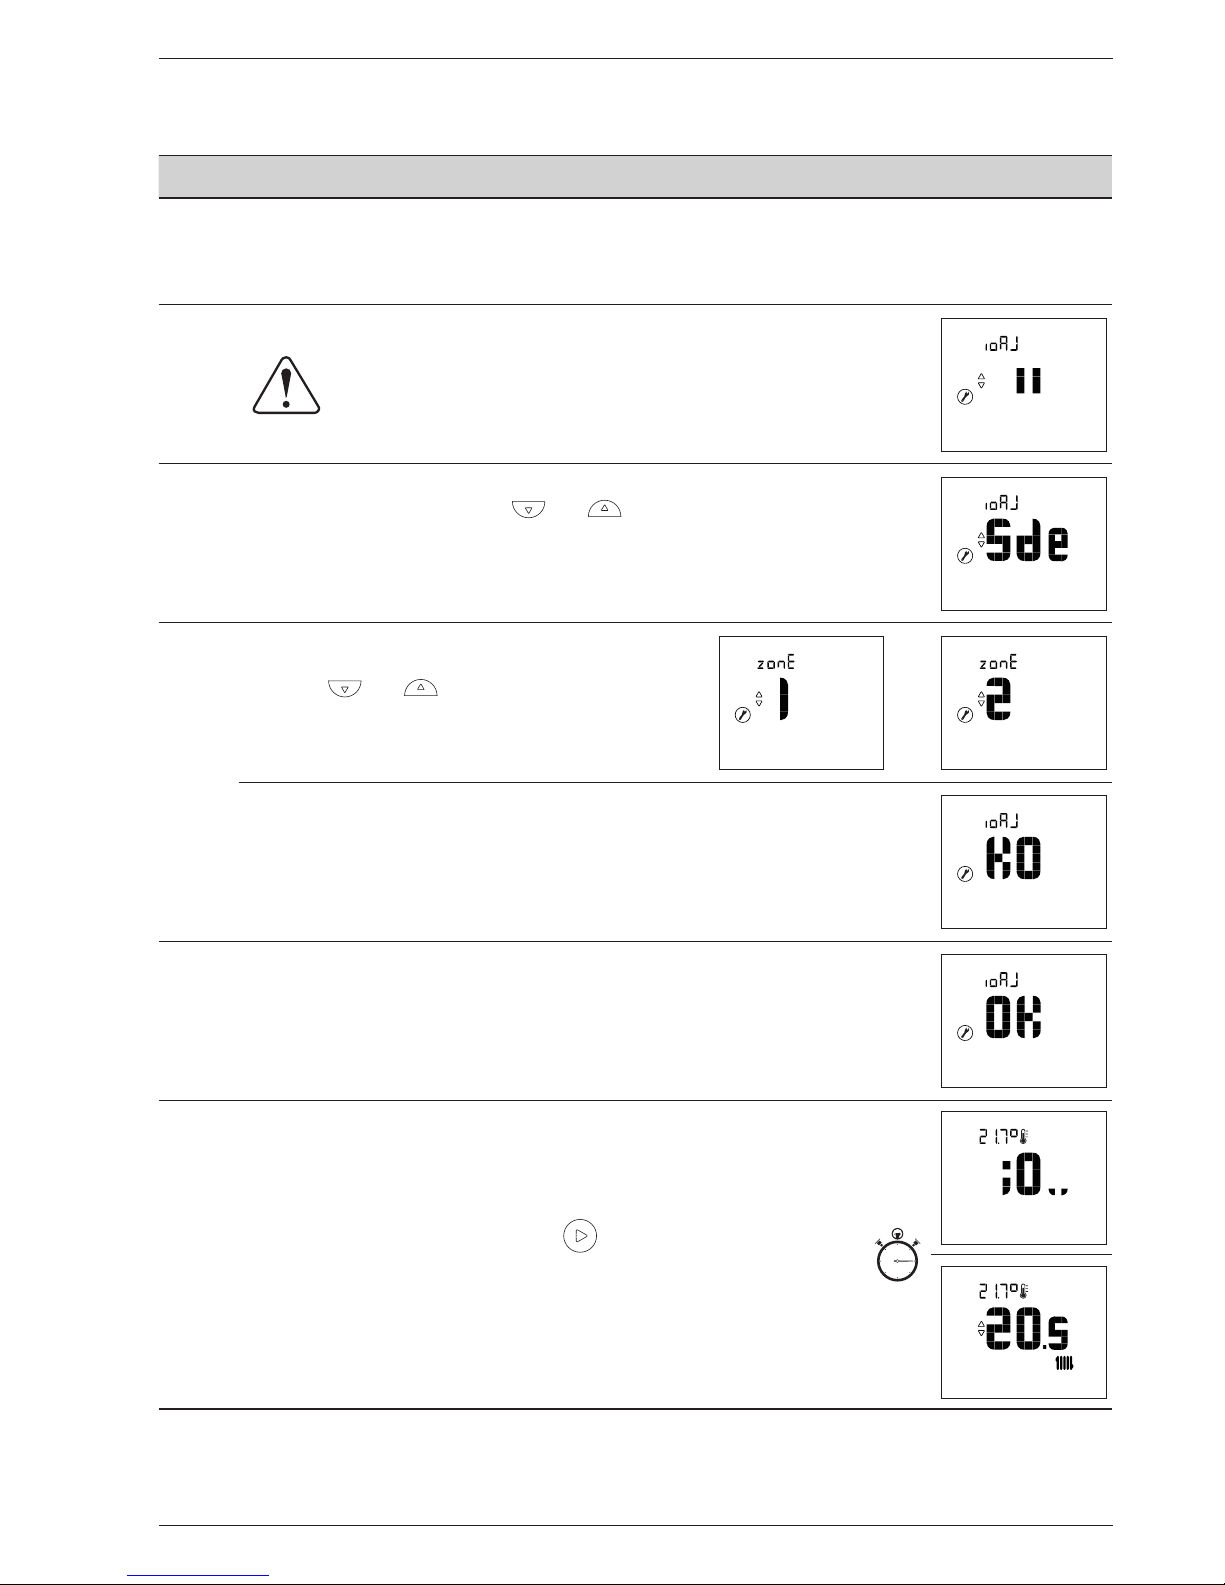
Pairing a 2nd sensor . . . . . . . . . . . . . . . . . 10
Installer Menu . . . . . . . . . . . . . . . . . . . . . . . . . . . . . . . . . 12
Calibration . . . . . . . . . . . . . . . . . . . . . . 13
Pairing a sensor . . . . . . . . . . . . . . . . . . . 14
Resetting . . . . . . . . . . . . . . . . . . . . . . 15
Sending an io-homecontrol® key . . . . . . . . . . 16
Receiving an io-homecontrol® key . . . . . . . . . 17
Version. . . . . . . . . . . . . . . . . . . . . . . . 18
How to Use . . . . . . . . . . . . . . . . . . . . . . . . . . . . . . . . . . . 20
screw hole
Mounting Mounting
screw hole
Adjusting the setpoint via the Advanced Menu:
Manual mode . . . . . . . . . . . . . . . . . . . . 20
Adjusting the setpoint via the Simplied Menu:
Direct setpoint . . . . . . . . . . . . . . . . . . . . 20
Holiday mode . . . . . . . . . . . . . . . . . . . . 21
Error List . . . . . . . . . . . . . . . . . . . . . . . . . . . . . . . . . . . . 22

Reference guide "1846- EN" - 3 -
Navilink A59 Intelligent Room Temperature Controller
Features
• Holiday mode
• Navigation
• Changing mode
(OFF, Heating, Cooling)
• Increase the setpoint
• Go to next screen
• Reduce the setpoint
• Back to previous screen
1.2 Display Description
Symbols Denitions
• Holiday mode activated
• Information
• Installer menu
• Cooling mode*
• Heating mode
• Comfort mode Cooling activated*
• Comfort mode Heating activated
• ECO mode Heating/Cooling activated
• Timer programming mode
• Manual mode
• Setpoint value
• Screensaver / Ambient temperature
* If installation allows

Reference guide "1846- EN"
Navilink A59 Intelligent Room Temperature Controller
- 4 -
2.1 Installation
The sensor must be installed in the living room area
on an unobstructed wall. It must be installed so as to
be easily accessible. Choose a location with the fewest
possible obstacles to good transmission. Comply with
the following points:
• Avoid proximity to electrical cables, strong magnetic
elds or devices such as computers, televisions or
microwave ovens, etc.
• Avoid any zones of interference caused by large
metallic objects or buildings containing ne metallic
mesh or reinforcing (e.g. glass or special concrete).
• The distance between the transmitter and the receiver
must not exceed 30 m or 2 storeys.
• Do not install the appliance inside a metal casing
(e.g. heat pump).
2.2 Opening the sensor
2 Assembly and connections
ClémentTAVERNIER
NoticesAtlantic
B : 20 cm miniA : 10 cm C : 150 cm
C
B
A
• Avoid direct sources of heat (chimney, television,
cooking surfaces, sun) and draughty areas (ventilation,
door, etc.).
gure 2 - Opening the sensor
A
B
2.3 Using the sensor with batteries
2 AAA LR03 batteries (supplied).
Maintain polarity.
"Do not connect the wires.
gure 3 - Battery-operated sensor
min.

Reference guide "1846- EN" - 5 -
Navilink A59 Intelligent Room Temperature Controller
2.4 Using the sensor with mains power
Power rating 12-24V DC.
Type of cable to be used: 0.5 to 1.5 mm2 rigid or 0.5 to 0.75 mm2 exible with rigid end.
"Do not use batteries.
2.4.1 Cable connection
1. Bare the end of the wires to around 10 mm.
2. Insert the cable ends into the connection terminals ("Push-in" connectors).
gure 4 - Cable connection
Passage des fils
Bornes de connexion
Passage des fils
gure 5 - Cable disconnection gure 6 - Attaching to a wall
2.4.2 Cable disconnection
Use a at-blade screwdriver.
Rotate the small metal plate while pulling on the cable.
2.5 Attaching to a wall
Attach the sensor's rear plate using the screws
(not supplied).
Connection terminals
Cable route
Cable route

Reference guide "1846- EN"
Navilink A59 Intelligent Room Temperature Controller
- 6 -

Reference guide "1846- EN" - 7 -
Navilink A59 Intelligent Room Temperature Controller
3 WiFi connection
3.1 Room sensor pairing basics
• HP / Boiler --> 1 room sensor
Pair the sensor with the HP / Boiler.
U0601155-A
ALFEA
NAIA / NAEMA
• HP / Boiler --> 2 room sensors
Pair the 1st sensor with the HP / Boiler.
U0601155-A
ALFEA
NAIA / NAEMA
Pair the 2nd sensor with the 1st sensor.
U0601155-A
ALFEA
NAIA / NAEMA
"To pair two devices (HP / Boiler - Sensor or Sensor - Sensor), both devices must be in pairing mode.

Reference guide "1846- EN"
Navilink A59 Intelligent Room Temperature Controller
- 8 -
A
A
A
A
A
A
A
A
A
3.2 Pairing a sensor with a HP / Boiler
3.2.1 Pairing a 1st sensor with a HP / Boiler
Action Description Display
1On the boiler or heat pump, start the pairing procedure.
Please refer to the instructions supplied with the product.
2Default display when sensor is rst commissioned.
3
Select "PAs" using the and buttons.
Wait 5 seconds.
"PAs" ashes. The sensor waits for pairing for 10 minutes.
4
Select the sensor's zone number
using the and buttons.
Wait 5 seconds.
or
Pairing failed.
Restart the procedure from step 2.
5Pairing was successful.
6
If only one sensor is to be paired
Select "FIn" (end) using the and buttons.
If a 2nd sensor is to be paired
Select "Sde" (sensor) using the and buttons.
"Sde" ashes. The sensor waits for pairing for 10 minutes.

Reference guide "1846- EN" - 9 -
Navilink A59 Intelligent Room Temperature Controller
B
B
B
B
B
B
B
B
3.2.2 Pairing a 2nd sensor
Action Description Display
1Start the pairing procedure on the 1st sensor.
Use the following procedure to pair the 2nd sensor.
2Default display when sensor is rst commissioned.
3
Select "Sde" (sensor) using the and buttons.
Wait 5 seconds.
"Sde" ashes. The sensor waits for pairing for 10 minutes.
4
Select the sensor's zone number
using the and buttons.
Wait 5 seconds.
or
Pairing failed.
Restart the procedure from step 2.
5Pairing was successful.
6
Go back to the main screen using the button.
In the event of a failure, restart the procedure from the
beginning.

Reference guide "1846- EN"
Navilink A59 Intelligent Room Temperature Controller
- 10 -
A
A
A
A
A
A
A
B
3.3 Pairing a 2nd sensor
The installation includes a 1st working sensor.
3.3.1 Procedure for pairing with a 1st sensor
Action Description Display
1Access the Installer Menu by pressing and simultaneously.
2Select "ioAJ" using the button.
3
Select "oui" (Yes) using the and buttons.
Wait 5 seconds.
4"Sde" (sensor) ashes. The sensor waits for pairing for 10 minutes.
5Start the pairing procedure on the 2nd sensor ("Pairing a 2nd sensor", page 11).
6
Pairing was successful.
Pairing failed.
7Select "FIn" (end) using the and buttons.

Reference guide "1846- EN" - 11 -
Navilink A59 Intelligent Room Temperature Controller
B
B
B
B
B
B
B
B
3.3.2 Pairing a 2nd sensor
Action Description Display
1Start the pairing procedure on the 1st sensor.
Use the following procedure to pair the 2nd sensor.
2Default display when sensor is rst commissioned.
3
Select "Sde" (sensor) using the and buttons.
Wait 5 seconds.
"Sde" ashes. The sensor waits for pairing for 10 minutes.
4
Select the sensor's zone number
using the and buttons.
Wait 5 seconds.
or
Pairing failed.
Restart the procedure from step 2.
5Pairing was successful.
6
Go back to the main screen using the button.
In the event of a failure, restart the procedure from the
beginning.

Reference guide "1846- EN"
Navilink A59 Intelligent Room Temperature Controller
- 12 -
4 Installer Menu
Access the Installer Menu by pressing and simultaneously.
When the Installer Menu is active, the symbol appears.
Quit the Installer Menu by pressing and simultaneously.
+
+
+
page 13 page 14 page 15 page 16 page 17 page 18
Calibration Pairing Resetting Send key Receive key Version
5 secs. 5 secs. 5 secs. 5 secs. 5 secs.
failed
failed
failed
10 mins.
max.
10 mins.
max.
10 mins.
max.

Reference guide "1846- EN" - 13 -
Navilink A59 Intelligent Room Temperature Controller
4.1 Calibration
Action Description Display
1Access the Installer Menu by pressing and simultaneously.
2Select "EtAI" (calibration) using the button.
3
Adjust the temperature using the and buttons.
Wait 5 seconds.
4The sensor is calibrated.
5Quit the Installer Menu by pressing and simultaneously.

Reference guide "1846- EN"
Navilink A59 Intelligent Room Temperature Controller
- 14 -
4.2 Pairing a sensor
Action Description Display
1Access the Installer Menu by pressing and simultaneously.
2Select "ioAJ" using the button.
3
Select "oui" (yes) using the and buttons.
Wait 5 seconds.
4"Sde" (sensor) ashes. The sensor waits for pairing for 10 minutes.
5
Pairing was successful.
Pairing failed.
6Go back to the main screen using the button.
In the event of a failure, restart the procedure from the beginning.

Reference guide "1846- EN" - 15 -
Navilink A59 Intelligent Room Temperature Controller
4.3 Resetting
Action Description Display
1Access the Installer Menu by pressing and simultaneously.
2Select "init" (reset) using the button.
3
Select "oui" (yes) using the and buttons.
Wait 5 seconds.
5The sensor is reset.

Reference guide "1846- EN"
Navilink A59 Intelligent Room Temperature Controller
- 16 -
• ADVANCED PARAMETERS - HOME AUTOMATION OPTIONS
Security key:
The io-homecontrol® WiFi protocol has built-in security to avoid interfering with nearby equipment.
Where various io-homecontrol® devices are used, the rst installed device will generate a
unique "security key" for all devices in the house. Existing equipment must share this security key with the
equipment to be added.
This section is reserved for competent users of io-homecontrol® technology and oers various services
covered by this key.
Please refer to the section on pairing io-homecontrol® devices.
4.4 Sending an io-homecontrol® key
Action Description Display
1Access the Installer Menu by pressing and simultaneously.
2Select "ioEn" using the button.
3
Select "oui" (yes) using the and buttons.
Wait 5 seconds.
4The io-homecontrol® key send sequence starts.
5
The io-homecontrol® key was sent successfully.
The io-homecontrol® key was not sent.
6Go back to the main screen using the button.
In the event of a failure, restart the procedure from the beginning.

Reference guide "1846- EN" - 17 -
Navilink A59 Intelligent Room Temperature Controller
4.5 Receiving an io-homecontrol® key
Action Description Display
1Access the Installer Menu by pressing and simultaneously.
2Select "iorE" using the button.
3
Select "oui" (yes) using the and buttons.
Wait 5 seconds.
4The io-homecontrol® key receive sequence starts.
5
The io-homecontrol® key was received successfully.
The io-homecontrol® key was not received.
6Go back to the main screen using the button.
In the event of a failure, restart the procedure from the beginning.

Reference guide "1846- EN"
Navilink A59 Intelligent Room Temperature Controller
- 18 -
4.6 Version
Action Description Display
1Access the Installer Menu by pressing and simultaneously.
2Access the "Version" screen using the button.
3Quit the Installer Menu by pressing and simultaneously.

Reference guide "1846- EN" - 19 -
Navilink A59 Intelligent Room Temperature Controller

Reference guide "1846- EN"
Navilink A59 Intelligent Room Temperature Controller
- 20 -
5 How to Use
5.1 Adjusting the setpoint via the Advanced Menu: Manual mode
"The exemption allows you to change the setpoint for a period of 24 hours.
Action Description Display
1Press or .
2The setpoint ashes.
Adjust the setpoint using the and buttons.
3
Once the setpoint has been selected, wait 5 seconds.
It stops ashing.
The setpoint is changed for a period of 24 hours.
At the end of the exemption period, it returns to the original state and the "hand"
symbol disappears.
5.2 Adjusting the setpoint via the Simplied Menu: Direct setpoint
Action Description Display
1Press or .
2The setpoint ashes.
Adjust the setpoint using the and buttons.
3
Once the setpoint has been selected, wait 5 seconds.
It stops ashing.
The setpoint was changed.
This manual suits for next models
1
Table of contents
Other Atlantic Thermostat manuals