ATOL MKB-50 User manual

DM doc. V.0_Z2913 |
1
PKB
-
50
Programming Software
M
KB-50
Programming Keyboard
User’s Manual

DM doc. V.0_Z2913 |
2
PKB
-
50
Programming Software
Table of Contents
Introduction
............
.......................
.................................................................
3
Specification
............
.......................
.................................................................
3
Chapter 1 Programming tool installation
.........................................................
4
Chapter 2 Programming software introduction
................................................
6
2.1 The Main interface of programming software
.............................................. 6
2.1.1 Toolbar ..........................................................................................
6
2.1.2 4 sections of the Electronically lock key and Layer Selection
......................
7
2.1.3 Programming key and text box .........................................................
7
2.2 Virtual keyboard interface .........................................................................
8
Chapter 3 The use of programming software
.....................................................
9
3.1 Programming F1 key as 'a' ...................................................................
9
3.2 Set
F
2
key
as Company Slogan
..
.................................................................
11
3.3
Layer Switch Setting
..........................................................
.....
.................
1
3
3.4
Setting Parameter of Magnetic Stripe Card Reader
......................
..............
.....
1
3
3.5
Setting Property of Keyboard
..
...............................................................
.
..
1
4
3.6
Save/ Open/ Write
Programmed data as dat. File Format
...................
.
.....
1
4

DM doc. V.0_Z2913 |
3
PKB
-
50
Programming Software
Introduction
Thank you for purchasing the programmable POS keyboard. PKB-50 POS Keyboard with MSR, a compact
design, offers maximum space efficiency in retail environments with limited counter space. It incorporates a
built-in programming magnetic stripe card reader and 38 configurable keys with relegendable key caps to
reduce or eliminate repetitive data input and keystrokes. It also supports multi-level configuration on each
key. The MSR swipes with an LED and beeper to indicate a successful swipe.
Specification
Keyboard Specification
Key Number 50 keys with 38 relegendable keys
Key Switch Mechanism Membrane-type Key Switch with 10 million life cycle time
Total Travel Distance / 4 + 0.4mm / 2 + 0.6mm
Key Force (Peak Load ) 60 + 20cN
Interface / Power USB / +5VDC + 10% / < 100mA
Cable Storage USB cable stored on the back
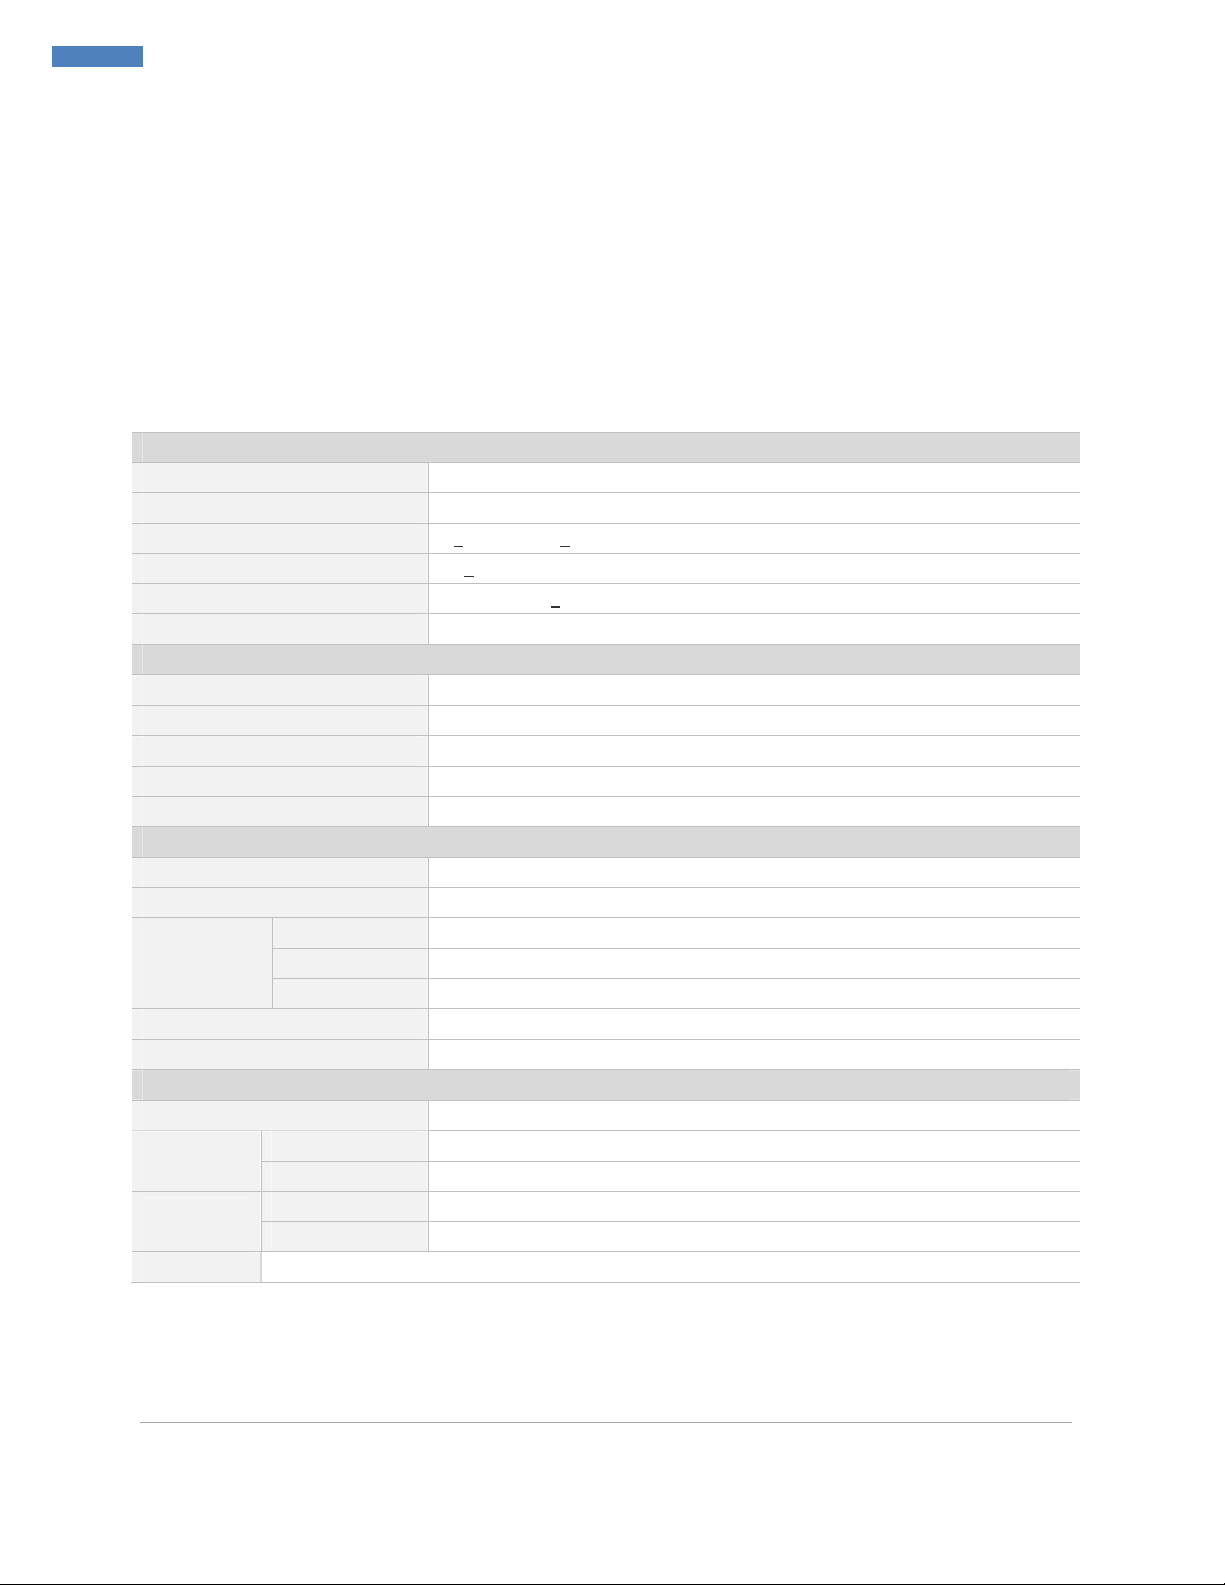
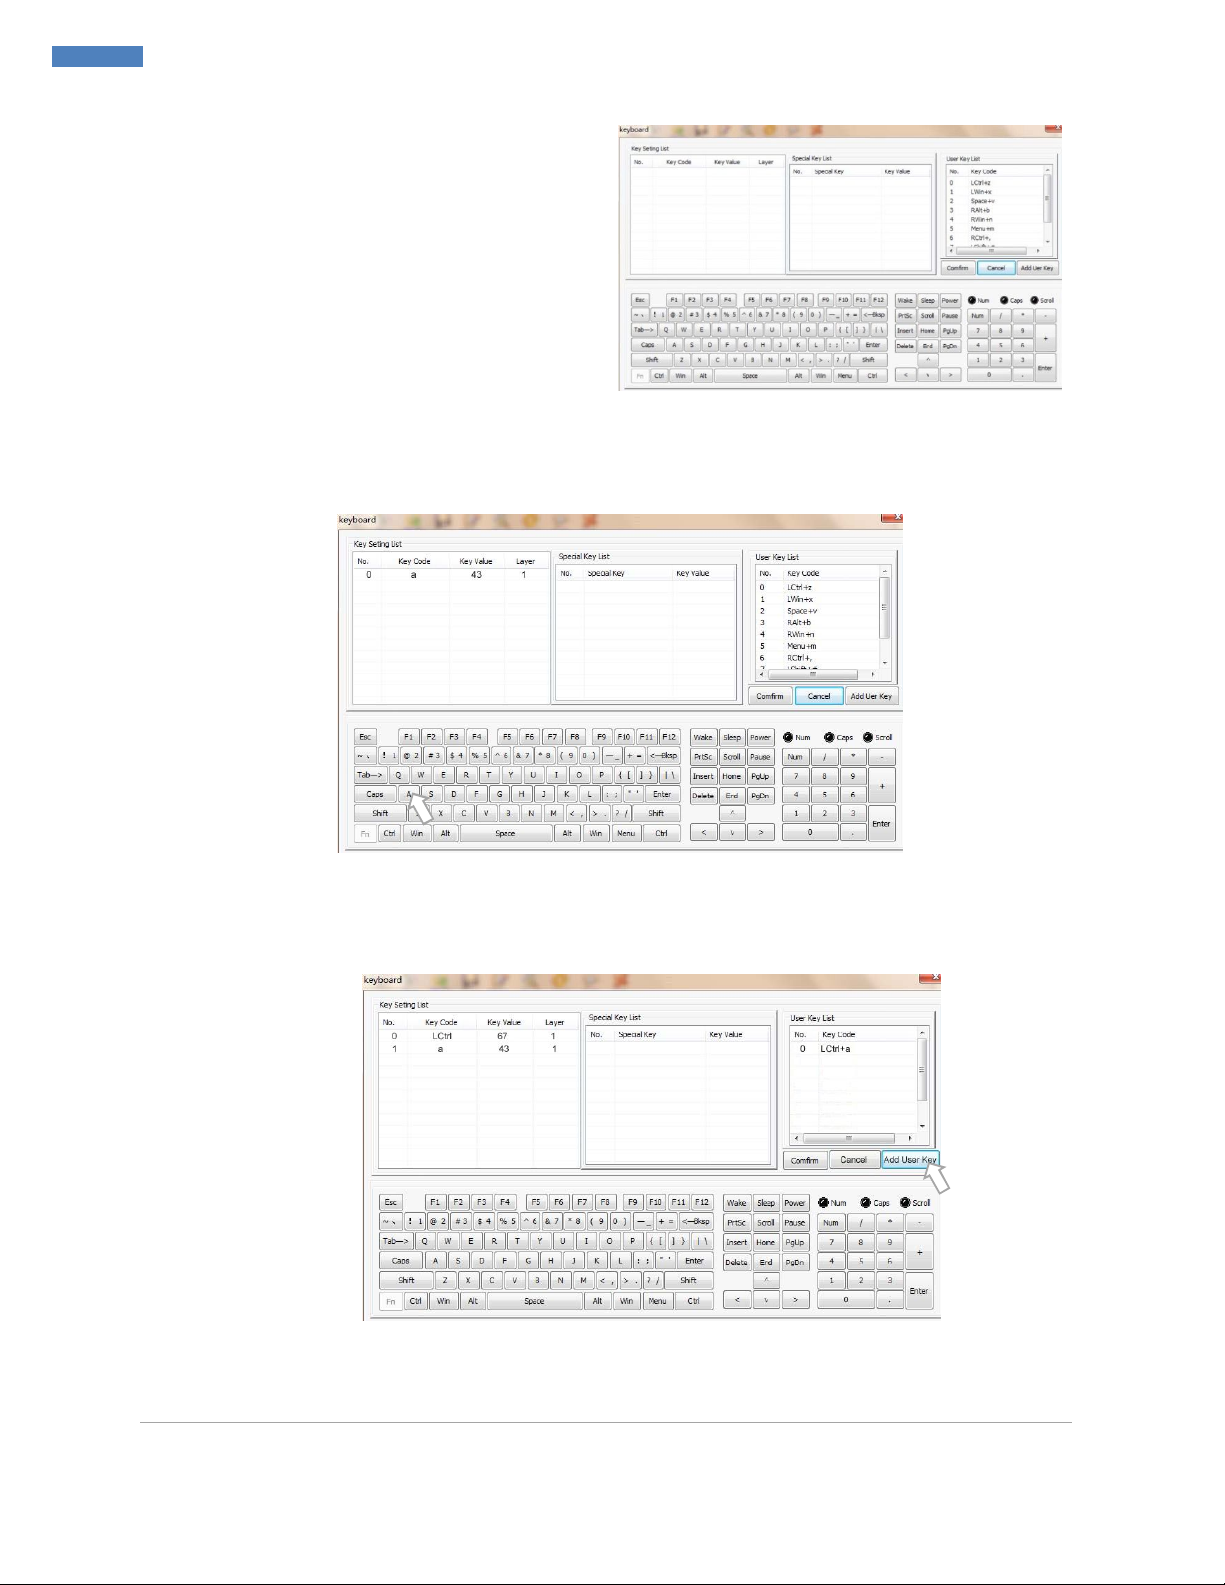
Programmable Features
Programmable Keys 50 keys can be programmable including 38 relegendable keys,
Multi-Level Programming Yes, support max 5 levels
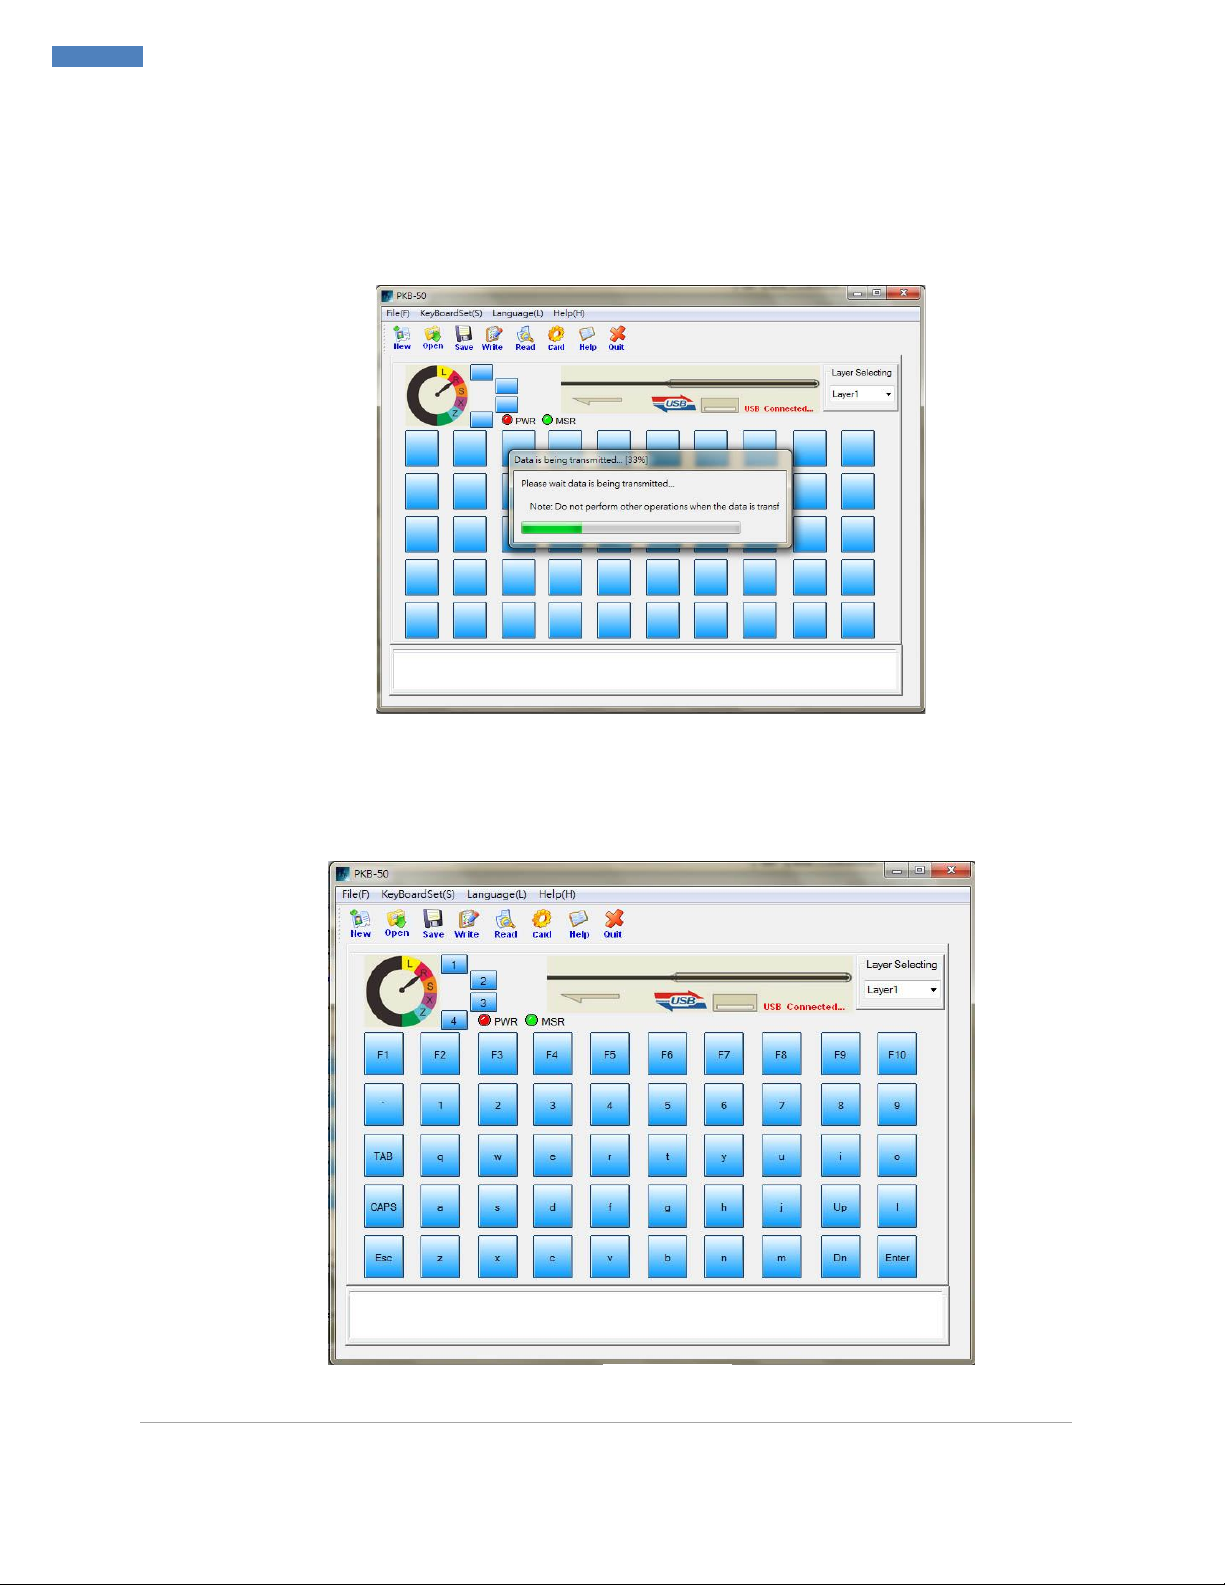
Time Delay Support Provide a variable time delay, 0.5 sec per interval
Software Compatibility Support USB programming in Window ME/ 9X/2K/ XP/ 7, DOS and Linux
Memory All programmed data are stored in EEPROM, without battery
Magnetic Stripe Card Reader Specification
Card Standard Comply with ISO 7812, IBM standards, AAMVA, JIS-2
Programmable Support Yes, programmable MSR setting for Header, Tailor, Separator, Suffix and
Prefix
ISO Card
Track
Track 1 210BPI with max 76 characters
Track 2 210BPI with max 107 characters or 75BPI with max 37 characters
Track 3 210BPI with max 107 characters
LEDs Indicator Power, MSR and buzzer
Swipe Speed / Head Life-Cycle 10 ~ 180 cm/sec. / 500, 000 swipes
Others
Electronics Locks 5 section of electronic locks for different level users
Environment
Operating 0
o
C ~ 50
o
C (32
o
F ~ 122
o
F) , 10% ~ 90% (no condensation)
Storage -20
o
C ~ 55
o
C (-4
o
F ~ 131
o
F) , 10% ~ 90% (no condensation)
Physical Dimension
/Weight
220 (L) x 151 (D) x 40 (H) mm, including MSR / 0.72 kg (NW)
Box / Weight 330 (L) x 169 (D) x 50 (H) mm/ 1.0 kg (GW)
Accessories Keycap Puller, 1x & 2x Transparent Caps

DM doc. V.0_Z2913 |
4
PKB
-
50
Programming Software
Chapter 1. Programming Tool Installation
Once download the software, PKB-50_V1.x.msi, please double click it to start installing the programming tool.
It will pop up welcome wizard and click “Next” to
proceed.
Click “ Next” to accept the default installation folder.
And click “Next” again to start the installation.

DM doc. V.0_Z2913 |
5
PKB
-
50
Programming Software
Click “Close” to complete the installation.

DM doc. V.0_Z2913 |
6
PKB
-
50
Programming Software
Chapter 2. Programming Software Introduction
1.
This programming tool works only
under
USB interface of PKB
-
5
0
POS keyboard. Please make sure if your USB jack is well connected
to PC’s USB port, please refer (Figure 1.0.)
2. Please disable power saving in your system while using
programming tool. Or close programming tool if you will leave for a
while.
2.1 The Main Interface of Programming Software
2.1.1 Toolbar
New
: Create a new programming table
Open
: Open the saved programming table document. (dat document format)
Save
: Save the programming table, the format is dat
Read
: Reade the programming table from the keyboard
Write
: Write the programming able to the keyboard (Note! Before reading the key
value from keyboard, please do not press this button.)
Card
: Set some parameter about the magnetic stripe card reader
Help
: Open the user manual
Exit
: Exit the software
Figure 2.1
Figure 2.1
.1

DM doc. V.0_Z2913 |
7
PKB
-
50
Programming Software
2.1.2 4 Sections of Electronically lock key and Layer Selection
It indicates 4 section of the electronically lock key, it can be used for layer key as well as
ordinary key, Figure 2.1.2
The figure of electronically lock is to indicate the layer, R (Layer 1), S (Layer 2), X (Layer 3), Z
(Layer 4)
It is a layer select drop-down menu. Selected Layer1 indicates the Programming table is in
layer1. If selecting Layer2, the programming table is in Layer 2.
2.1.3 Programming Key and Text Box
The blue keys are programming keys. After this key, “0” key for example, is programmed as
“a”, the text box will show the key value when your mouse cursor move on this key, please see
Figure 2.1.3
Figure 2.1
.2
Figure 2.1
.3
Text Box
Blue Key
a
Layer 1: a

DM doc. V.0_Z2913 |
8
PKB
-
50
Programming Software
2.2 Virtual Keyboard Interface
When you click the one of the blue keys in
main interface (Figure 2.1.3), it will pop up the
virtual keyboard interface shown as (Figure 2.2.1).
In the virtual keyboard interface, you can define any key value when clicking the virtual key in the
virtual keyboard. For example, you click “A” in the virtual keyboard, the key Setting List will be shown as
(Figure 2.2.2 ).
If this key setting is often to be used, you can click [Add User Key], the Key Code “LCtrl+a” will be
shown in the field of the User Key List, Figure 2.2.3
For [Special Key] function, this field is not available for users.
Figure 2.
2.2
Figure 2.
2.1
Figure 2.
2.3

DM doc. V.0_Z2913 |
9
PKB
-
50
Programming Software
Chapter 3. Using Programming Software
3.1 Programming F1 key as “ a “
Step 1. Before programming any key, please read the default key value from your PKB-50 keyboard
first by pressing [Read] button. It will pop up the dialogue that data is transferring, see Figure 3.1.1
After finishing the reading (please save this default key value as default in other folder), the default
of all key value will be shown on each blue key, please see Figure 3.1.2
Figure
3
.
1.1
Figure
3
.
1.2

DM doc. V.0_Z2913 |
10
PKB
-
50
Programming Software
Step 2. Select layer you want to program, please select “Layer 1” for example and click F1 on blue
key. It will pop up the virtual keyboard interface, Figure 3.1.3. In key Setting List, the Key Code still
show F1.
Step 3. Move your mouse cursor on F1 of Key Code field and right-click your mouse. It will show
drop-down menu as Figure 3.1.4 and select “Delete”.
Step 4. Click “a” in the virtual keyboard and click the [Confirm] button to finish the operation.
Figure
3
.
1.5
Figure
3
.
1.4
Figure
3
.
1.3

DM doc. V.0_Z2913 |
11
PKB
-
50
Programming Software
Step 5. Return to main interface, please click [ Write ] to send the key value to keyboard. It will
inform you : keyboard data is successfully written!!, see Figure 3.1.6 and click “OK”
How to check if the “F1” key is programmed as “a”?
-You can move your cursor on the programmed key and the text box will be shown “ Layer 1: a
“ in the main interface, please refer to (Figure 3.1.7)
- Or you can use MS Notepad and press “F1” key, the screen
will show “a” in edit area.
3.2 Set F2 key as Your Company Slogan
Each programming key can support up to 255 characters. You can define F2 key as company slogan
“Digimore Your Business !”, for example.
Step 1. Select Layer1 and Click blue key, same position of F2 key on PKB-50 POS keyboard. The
screen will pop up the virtual keyboard interface.
Step 2. Click “LShift” and “d”. You will see the key code will be capital “ D “ not “ d ”, please refer to
Figure 3.2.1
Figure
3
.
1.7
Figure
3
.
1.6

DM doc. V.0_Z2913 |
12
PKB
-
50
Programming Software
Step 3. Then click “LShif” key in the virtual keyboard again. Then click “ i ” key. You will see the “ i ”
is not capital letter. Hereafter is the key Setting List for programming F1 key as “ Digimore Your
Business!”
Step 4. After input all key codes, click the [Confirm] to finish the operation.
Step 5. Return to main interface, please click [ Write ] to send the key value to keyboard.
Step 6. You can save the programmed key value in dat. File. Just click [Save] on toolbar of main
interface.
Key Setting List
Key Setting List
No.
Key Code
Key Value
Layer
No.
Key Code
Key Value
Layer
0
LShift
55
1
15
u
35
1
1
D
45
1
16
r
32
1
2
LShfit
55
1
17
Space
70
1
3
i
36
1
18
LShift
55
1
4
g
47
1
19
B
60
1
5
i
36
1
20
LShift
55
1
6
m
62
1
21
u
35
1
7
o
37
1
22
s
44
1
8
r
32
1
23
i
36
1
9
e
31
1
24
n
61
1
10
Space
70
1
25
e
31
1
11
LShift
55
1
26
s
44
1
12
Y
34
1
27
s
44
1
13
LShift
55
1
28
LShift
55
1
14
o
37
1
29
!
15
1
Figure
3
.
2.1

DM doc. V.0_Z2913 |
13
PKB
-
50
Programming Software
3.3 Layer Switch Setting
In the main interface, you can manage layer setting by right-click your mouse, please refer to Figure 3.3.1
When you right-click your mouse on programmed key, you can see the menu shown, Delete the current
layer data, Delete all layer data and Button layer set (please refer to Figure 3.3.2) .
3.4 Setting Parameter of Magnetic Stripe Card Reader
Click the [Card] button of Toolbar into the setting screen of magnetic stripe card reader, see Figure 3.4.1.
Set Enable Track – Click check box First, Second or third to enable any of tracks
Set Prefix Character -Double click the text box, it will pop up the virtual keyboard interface and
select character you need.
Set Suffix Character – the procedure is same as set prefix character.
Figure
3
.
3.1
Figure
3
.
3.2
Figure
3
.
4.1

DM doc. V.0_Z2913 |
14
PKB
-
50
Programming Software
Enable Enter Key – When click check box of Enter Key, end of track dat will add the “Enter”
key value.
3.5 Setting Property of Keyboard
You can set your keystroke with sound or only programmed key with sound by selecting [KeyBoardSet]/
[Keyboard Setting] into keyboard setting screen (Figure 3.5.1). In keyboard setting screen, you can select
keystroke sounding with either for all key or for specified key.
3.6 Save/ Open/ Copy Programmed data as dat. File Format
When all programming and setting are done, you can save the current programming data as a dat
document by clicking [Save] into your selected folder and enter file name, PKB-50 for example.
You can also open file by clicking [Open] and select PKB-50.dat. In the main interface, you can see key
value on blue key.
If you want to copy this programming data into other keyboard, just open the file and click [Write]. The
key value of the new keyboard will be same as your pre-programming keyboard.
Figure
3
.
5.1
Table of contents
Other ATOL Keyboard manuals