Audio Analogue ENIGMA User manual
AUDIO ANALOGUE
REV2.0
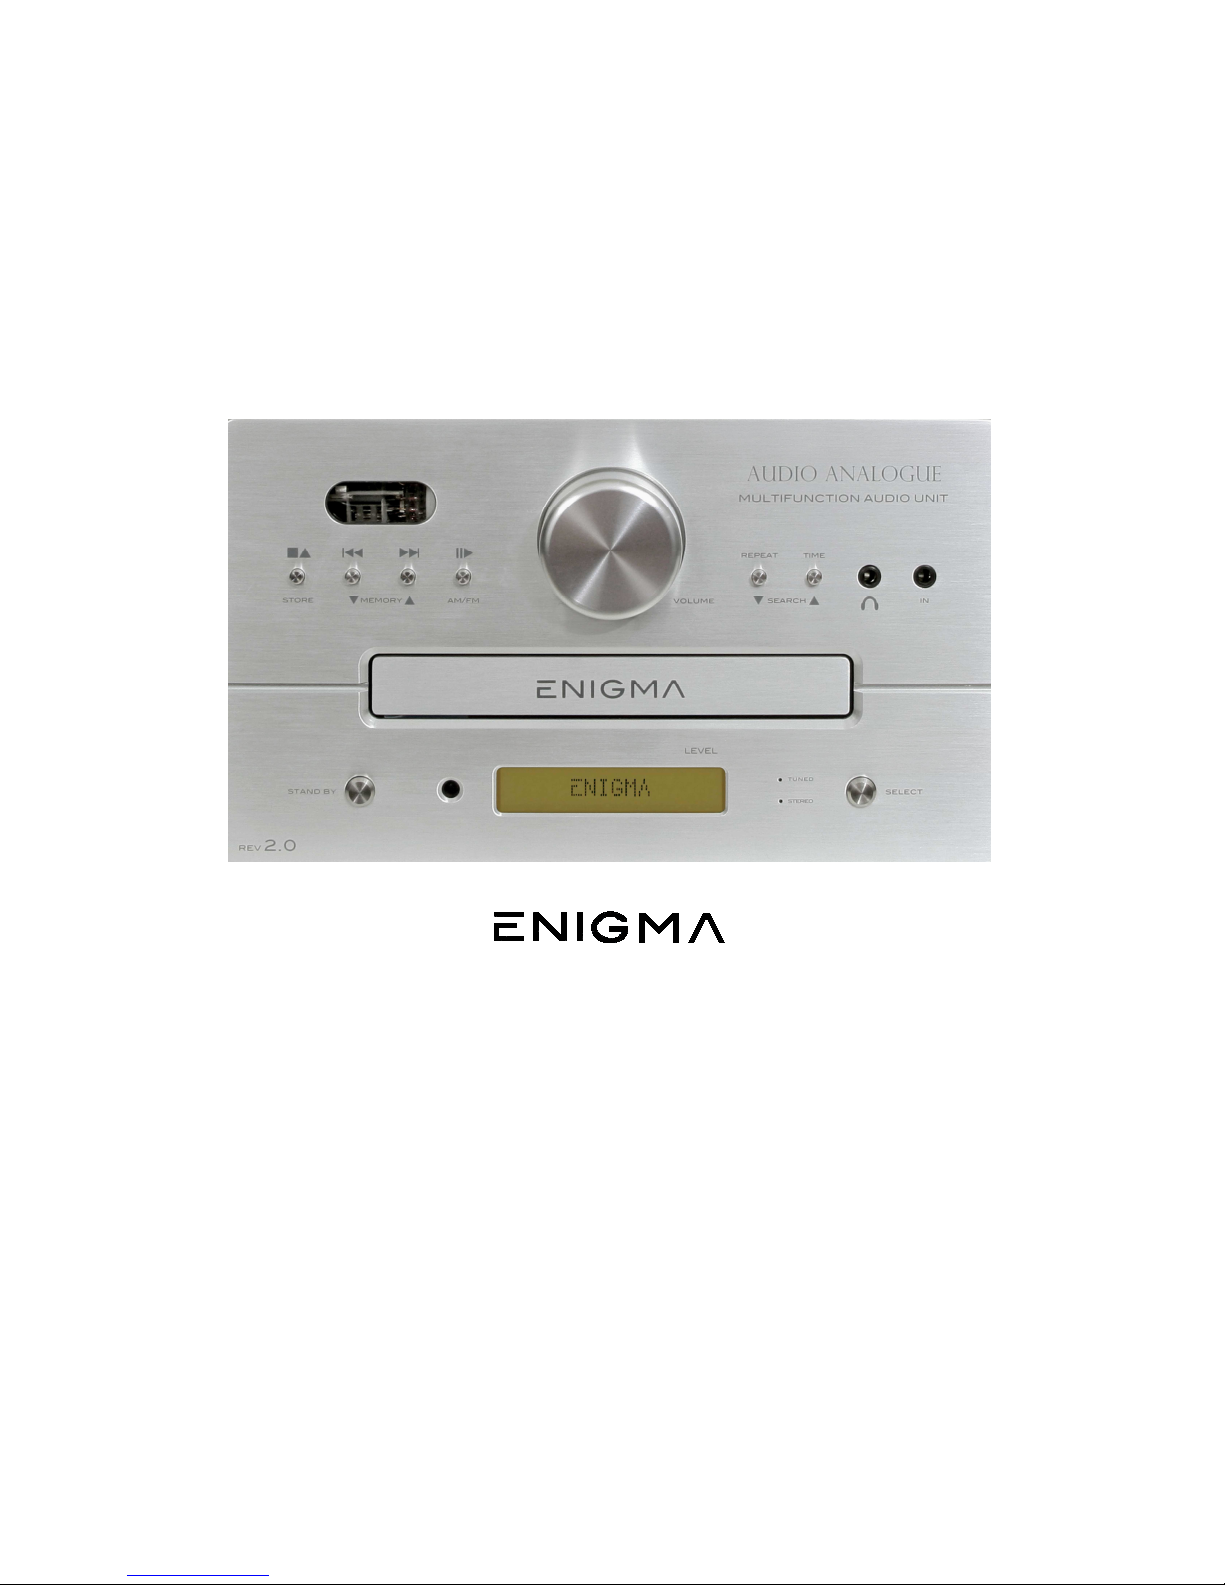
MULTIFUNCTION AUDIO UNIT
OWNER’S MANUAL
MANUALE D’ISTRUZIONI
Manual rev.1.1

2

3
Audio Analogue goe on in it re earch to olve the enigma:
“Is it possible to create a multifunction audio unit, also known as an “all in one system”, with such high sound quality that makes it
comparable to the best audiophile systems?”
With Enigma Rev2.0 the an wer i ye !
The audio chain de ign wa cho en tarting from the election of a new Vacuum Tube Preamplifier ection ba ed on the Ro ini CD
Player REV2.0 output tage that gave u urpri ing re ult . The other part were then matched to the preamplifier tage. Important
change have been implemented in every part, but e pecially in the power tage and DAC ection. The re ulting audio quality i
a toni hing!
The Enigma Rev2.0 ha a new more e ential de ign with a line input on the front to be connected to a line output of an MP3 Player
uch a the iPod
®
to meet the growing intere t in that kind of audio ource, even in the audiophile field. Al o a Mono-Out ha been
added to connect a pa ive ubwoofer along with the implementation of ome extremely efficient new oftware.
Enigma Rev 2 0 solve the enigma. It i a unique product becau e there are certainly no other “all-in-one” y tem on the market with
imilar audio quality. We can a ert with ab olute certainty that The Enigma Rev2.0 can be favourably compared in term of it
warm oft ound with even higher more expen ive true audiophile y tem .
Vi it: www.audioanalogue.com for further technical information about the product.
iPod i a trademark of Apple Computer Inc.
Audio Analogue continua la sua ricerca per risolvere l’enigma:
“E’ po ibile creare un apparecchio multifunzione, indicato anche come i tema “all in one”, avente qualità audio co ì elevate da
poter i paragonare con i migliori impianti Hi-Fi?”
Con Enigma Rev2 0 la risposta è si!
La catena di elaborazione del segnale audio è stata disegnata a partire dalla scelta di una nuova sezione di preamplificazione
valvolare basata sullo stadio di uscita del Rossini CD Player Rev2 0 Le altri parti sono state quindi accordate con il nuovo pre
Modifiche importanti sono state apportate in tutte le sezioni, in particolare nei finali di potenza e nella sezione DAC La qualità audio
risultante è strabiliante!
L’Enigma Rev2 0 è caratterizzato da un design essenziale, con un ingresso linea sul frontale da connettere all’uscita linea di un
lettore MP3 quale ad esempio l’iPod
®
, così da incontrare il crescente interesse che si è creato per questo tipo di sorgenti audio
anche nel campo degli audiophili Inoltre è stata aggiunta una uscita MonoOut per pilotare direttamente un subwoofer attivo
L’Enigma Rev2.0 ri olve l’enigma. E’ un prodotto unico! Sul mercato non esistono sistemi “all in one” con simile qualità audio
Possiamo affermare con certezza che l’Enigma Rev2 0 con il suo suono caldo e morbido può essere a ragione comparato con
sistemi Hi-Fi anche molto più costosi
Visitate: www audioanalogue com per ulteriori informazioni sul prodotto
iPod è un marchio registrato di Apple Computer Inc

4

5
INTRODUCTION
AUDIO FUTURA spa, AUDIO ANALOGUE producer and distributor, does not take any responsibility in t e following cases:
W enever t e operational procedures related to t e use and t e maintenance of t e equipment as described in t is manual are not
respected.
W enever damage to t e equipment occurs because of repairs and modifications made form non-aut orized staff or because of
normal deterioration of t e system.
No part of t is manual can be reproduced by any means, transmitted or copied for private or public use wit out private aut orization
from AUDIO FUTURA spa.
T e information contained in t is manual is related to t e data kept by AUDIO FUTURA spa at t e moment of t e issue of t is
publication; AUDIO FUTURA spa as t e rig t to make c anges to t is document wit out prior notice.
T e equipment as been projected and manufactured according to t e Regulations of t e Community 89/336/CEE and is marked CE.
T is equipment cannot be used for different purposes ot er t an t ose for w ic it as been manufactured.
AUDIO FUTURA spa does not take any responsibility for accidents or damage due to improper use of t e equipment.
WARNING
Please respect t e safety standards contained in t is manual before starting to operate t e equipment.
Do not open t e equipment. No furt er interventions t an t ose described in t is manual s ould be made. For tec nical assistance,
please consult a qualified tec nician or an AUDIO ANALOGUE dealer.
Not respecting t e instructions contained in t is manual will invalidate t e terms and conditions of t e guarantee.
NECESSARY PRECAUTIONS FOR SAFETY AND MAINTENANCE
ATTENTION: before starting any operation, using or maintaining t e equipment, it is strictly necessary to understand t e following
manual.
To avoid any accidents or azards it is necessary to follow t e following regulations.
Activate t e equipment only prior to c ecking t at t e installation as been done properly, and conforms to t e instructions contained
in t is manual.
Avoid installing t e equipment in places subjected to extremely ig temperatures or umidity.
C eck t at t e labels containing information about safety are always visible and in good condition.
Ensure not to obstruct ventilation and to avoid excessive over eating. T e equipment s ould be kept to a minimal distance of 15 cm
from any object and not to be placed on carpet or ot er soft surfaces. Also installation close to radiators or in closed spaces wit out
ventilation s ould be avoided.
Do not switc on t e equipment until it as been correctly and completely installed.
Only supply t e equipment wit t e kind of t e electric supply as stated on t e appropriate label. If in doubt about t e kind of supply
available, please consult an expert tec nician for tec nical assistance.
T e equipment needs to be wired to an eart terminal. T e external case is made of metal; a defective connection wit t e eart
may be dangerous.
In case damage occurs to t e supply cable, it s ould be replaced immediately wit t e same kind of cable. T is operation s ould be
only made prior to disconnecting t e mains supply.
Do not place objects on t e supply cable and c eck t at t is is not positioned lying across a walk way. T e cable s ould not be
knotted or curly.
Always replace t e fuses wit ot ers of t e same type.
Do not use t e equipment close to water or ot er liquids. If liquid enters t e equipment, t e plug s ould be disconnected from t e
socket avoiding any contact wit t e metal parts. Competent tec nical staff s ould be asked to c eck t e equipment before
operating it again.
Do not place receptacles containing liquid on t e equipment, even w en it is switc ed off.
Keep t e equipment far from sources of eat suc as solar lig t, kitc ens, radiators etc…
Always unplug t e supply cable during rainy weat er.
Always switc off and unplug t e supply cable before cleaning t e equipment externally: t is operation s ould be made using a dry
and soft clot . Never use alco ol based cleaning material.
If t e amplifier was carried from an extremely cold environment to and extremely ot one, it could create internal condensation,
causing possible malfunction.
If t is occurs, please wait for at least an our before using it again, to allow it to gradually reac room temperature.
W en not used for long periods, please unplug t e equipment.
INSTRUCTIONS TO PUT IT OUT OF SERVICE
Consult qualified staff
Follow t e regulations of t e current legislation regarding recycling and waste disposal.

6
PREMESSA
AUDIO FUTURA spa azienda produttrice del marchio AUDIO ANALOGUE non accetta responsabilità nei casi in cui:
Le procedure operative di utilizzo e manutenzione dell’apparato descritte nel manuale non siano rispettate
I danni si verifichino in seguito a riparazioni o modifiche dell’apparato eseguite da personale non autorizzato o a seguito di normale
deterioramento dell’apparato
Nessuna parte del presente manuale può essere riprodotta con alcun mezzo, trasmessa o copiata per usi pubblici e/o privati senza
la previa autorizzazione di AUDIO ANALOGUE Le informazioni contenute nel presente manuale sono relative ai dati in possesso di
AUDIO ANALOGUE al momento della pubblicazione; AUDIO ANALOGUE si riserva il diritto di apportare cambiamenti al presente
documento senza alcun preavviso
L’apparato è progettato e realizzato in conformità alle Direttive Comunitarie 89/336/CEE e 72/23/CEE e risulta marcato CE
L’apparato non può essere utilizzato per scopi diversi da quelli per cui è stato progettato
AUDIO ANALOGUE non si assume alcuna responsabilità per incidenti o danni causati da un utilizzo improprio dell’apparato
AVVERTENZA
Prima di compiere qualunque operazione attenersi alle norme di sicurezza contenute all’interno del manuale
Non aprire l’apparecchio Nessun ulteriore intervento oltre a quelli descritti in questo manuale dovrebbe essere effettuato Per
l’assistenza tecnica, rivolgersi a un tecnico qualificato o a un rivenditore AUDIO ANALOGUE
Il mancato rispetto delle prescrizioni del seguente manuale implica il decadimento della garanzia
PRECAUZIONI PER LA SICUREZZA E MANUTENZIONE
ATTENZIONE: prima dell’utilizzo o manutenzione dell’apparato o di qualsiasi operazione sullo stesso è necessario prendere visione
del seguente manuale
Al fine di prevenire ogni pericolo di incidente si impongono le seguenti prescrizioni:
Attivare l’apparato solo dopo aver verificato l’adeguatezza dell’installazione e la conformità alle indicazioni contenute nel presente
manuale
Non installare l’apparecchiatura in luoghi soggetti a sbalzi eccessivi di temperatura e umidità
Verificare che le etichette contenenti informazioni sulla sicurezza siano sempre ben visibili ed in buono stato
Le fessure di ventilazione non devono assolutamente essere ostruite per evitare surriscaldamento dell’apparato A tal fine,
posizionare l’unità ad una distanza minima di 15 cm da ogni altro ostacolo e non su tappeti, moquette o altre superfici morbide
Evitare inoltre di installarlo nei pressi di caloriferi o in ambienti chiusi, privi di una appropriata ventilazione
Non accendere l’apparato finché non è completamente installato in maniera corretta
Alimentare l’apparato con il tipo di alimentazione elettrica riportato sull’apposita targhetta In caso di dubbi sul tipo di alimentazione
disponibile, consultare il servizio di assistenza tecnica
L’apparecchio deve essere sempre collegato a terra Poiché l’involucro è costituito in metallo, una connessione di terra difettosa o
mancante potrebbe essere pericolosa
In caso di danneggiamenti al cavo di alimentazione, provvedere immediatamente alla sostituzione con un altro dello stesso tipo
Questa operazione deve essere effettuata dopo aver disconnesso l’alimentazione primaria
Non posizionare oggetti sul cavo di alimentazione e verificare che questo non si trovi in una zona di passaggio Il cavo non deve
essere arrotolato o annodato
Sostituire i fusibili sempre con altri dello stesso tipo
Non usare l’apparato in prossimità di acqua o altri tipi di liquidi Se nell’unità dovesse entrare del liquido, scollegare immediatamente
il cavo di rete dalla presa a muro evitando di toccare le parti metalliche dell’apparecchiatura e rivolgersi al personale tecnico per un
controllo prima del riutilizzo
Non appoggiare recipienti contenenti liquidi di qualsivoglia natura sopra l’apparato Anche quando questo è spento
Tenete l’apparecchio lontano da fonti di calore come la luce solare, cucine, radiatori, etc…
Scollegare sempre il cavo di alimentazione dalla presa durante i temporali
Spegnere e scollegare sempre l’alimentazione prima di effettuare la pulizia esterna dell’apparato: questa operazione deve essere
effettuata utilizzando un panno asciutto e morbido Non usare mai solventi o detergenti a base di alcool
Se l’apparecchio viene trasportato da un ambiente freddo ad un altro caldo, si potrebbe formare condensa al suo interno, causando
possibili malfunzionamenti Se ciò si dovesse verificare, si prega di attendere almeno un’ora prima dell’uso in modo da permettergli
di raggiungere la temperatura ambiente gradualmente
In caso di lunghi periodi di inutilizzo, staccare la spina dalla presa di rete
ISTRUZIONI PER LA MESSA FUORI SERVIZIO
Rivolgersi a personale specializzato
Seguire le prescrizioni della corrente legislazione in materia di riciclaggio e smaltimento dei rifiuti
7
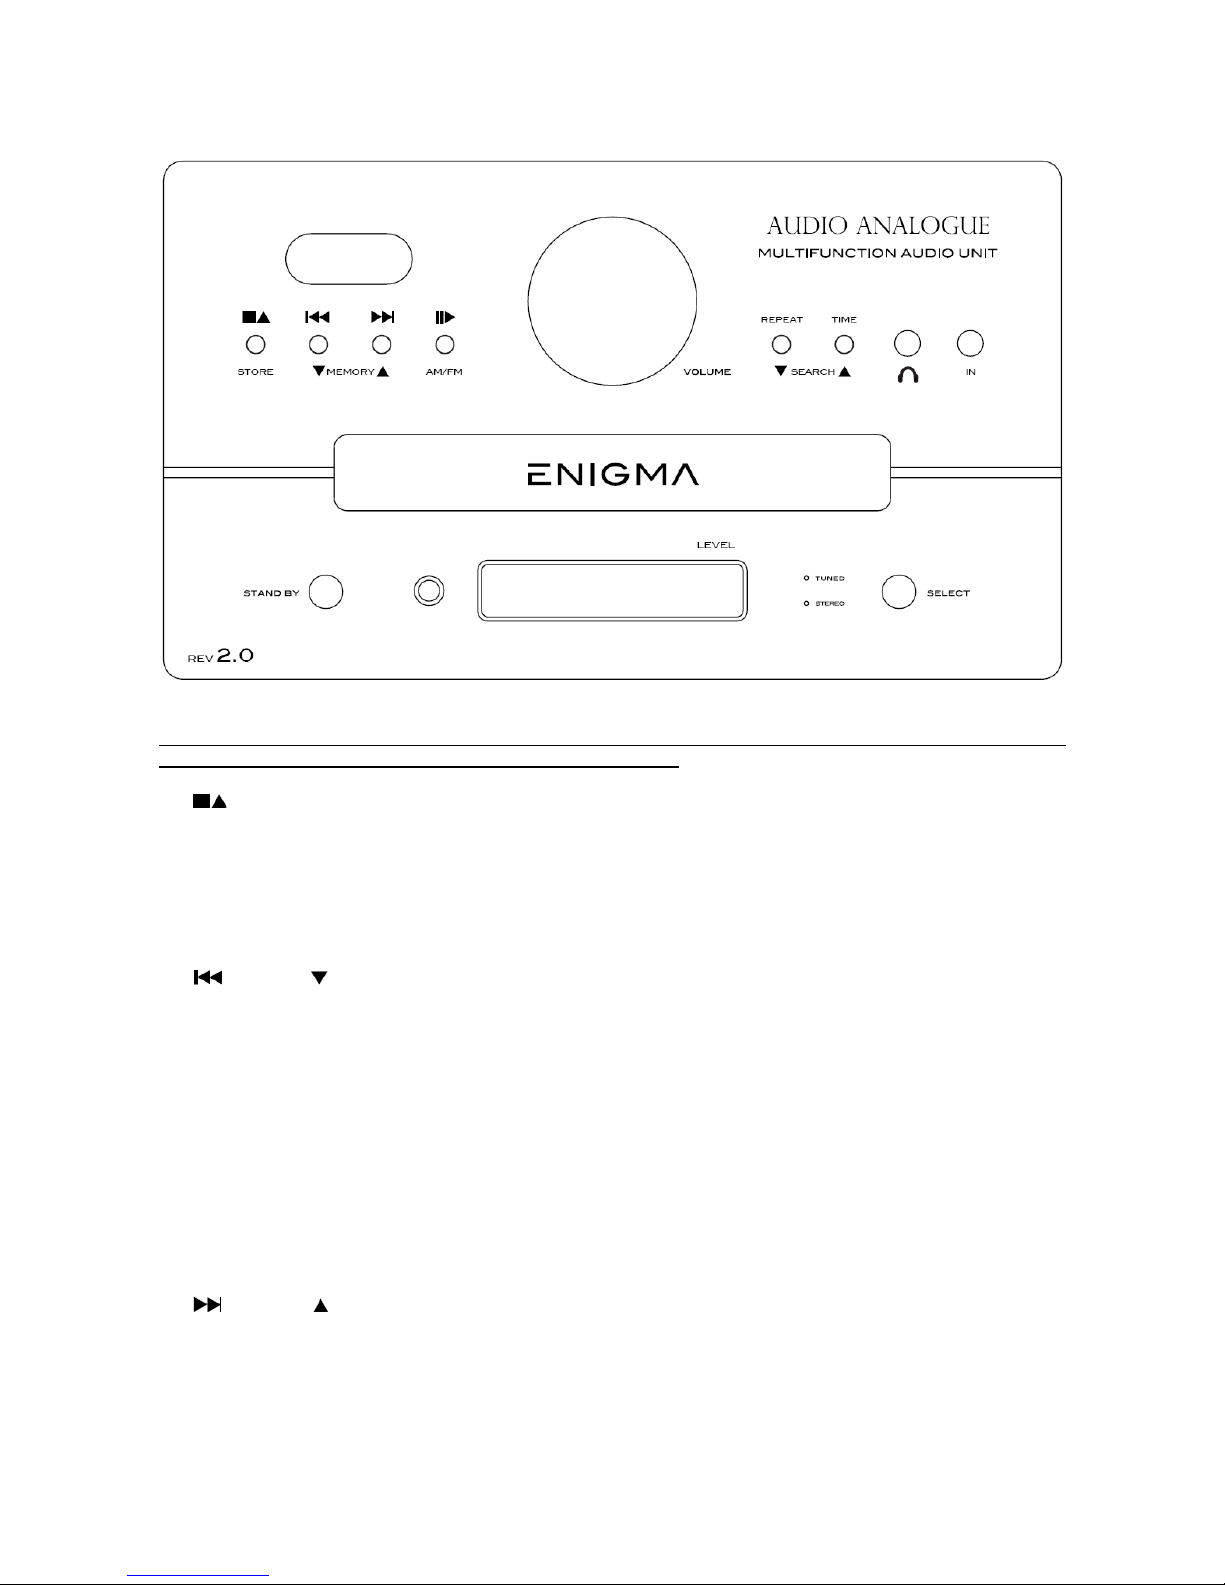
Front panel
(All the witche in the top part of the front panel perform different function depending on whether the Cd Player ource or Tuner
ource i elected, wherea they are inactive when a Line Input i elected):
1) / STORE:
•Source elected: CD Player → STOP/OPEN. Multifunctional button. When in play mode, by pre ing thi button di c
playback i topped; when in top mode, by pre ing thi button di c tray i opened/clo ed.
•Source elected: Tuner → STORE. Pre ing thi button put the unit in “Storage” mode and it i po ible to tore the
current radio tation in the unit’ memory permanently. It i po ible to tore up to 18 AM and 18 FM tation . Plea e
refer to “Radio tation torage” paragraph for further detail about torage procedure.
•Source elected: Line Input → inactive.
2) / MEMORY (-):
•Source elected: CD Player → PREV/REW. By pre ing thi button during playback, you move to the previou CD
track or, holding it down for a few econd , activate fa t rewind earch. When playback i topped, you may choo e
the CD track to re ume playback from or earch CD track backward.
•Source elected: Tuner → MEMORY-. By pre ing thi button when the unit i in normal mode, the radio tuner i
tuned on the tation tored in the memory allocation that precede the la t elected allocation. When the unit exit the
Standby mode and when changing modulation type, pre ing thi button tune the radio tuner on the tation tored in
the 18th memory allocation. Pre ing the button again tune the radio tuner on the tation n° 17, 16,…, 1 then back to
n° 18. If no radio tation i tored into the elected allocation, an EMPTY indication how on the di play and the
radio tuner witche back to the previou tation. When in “Storage” mode, pre ing thi button allow you to choo e
a memory allocation where the elected radio tation i to be tored. Plea e refer to the “Radio tation torage”
paragraph for further detail about torage procedure and refer to the “tuning Stored Radio tation ” paragraph for
further detail about memorized radio tation tuning.
•Source elected: Line Input → inactive.
3) / MEMORY (+):
•Source elected: CD Player → NEXT/FFW. By pre ing thi button during playback, you move to the next CD track
or, holding it down for a few econd , activate fa t forward earch. When playback i topped, you may choo e the
CD track from which re uming playback or earch CD track forward.
•Source elected: Tuner → MEMORY+. By pre ing thi button when the unit i in normal mode, the radio i tuned on the
tation tored in the memory allocation that follow the la t elected one. When the unit exit the Standby mode and when
changing modulation type, pre ing thi button tune the radio on the tation tored in the 1 t memory allocation. Pre ing
the button again tune the radio on the tation n° 2, 3,…, 18 then back to n° 1. If no radio tation i tored into the elected
2
2
1
1
3
3
4
4
7
7
6
6
8
8
9
9
5
5
1
1
0
0
1
1
1
1
1
1
2
2
1
1
3
3

8
allocation, an EMPTY ignal how on the di play and the radio witche back to the previou tation. When in “Storage”
mode, pre ing thi button allow you to choo e a memory allocation where the elected radio tation i to be tored.
Plea e refer to the “Radio tation torage” paragraph for further detail about torage procedure and refer to the “tuning
Stored Radio tation ” paragraph for further detail about memorized radio tation tuning.
•Source elected: Line Input → Inactive.
4) / AM/FM:
•Source elected: CD Player → PLAY/PAUSE. By pre ing thi button, you tart CD playback or pau e/re ume CD
playback.
•Source elected: Tuner → FM/AM. Pre ing thi button change modulation type. It i po ible to witch between AM
and FM.
•Source elected: Line Input → inactive.
5) VOLUME KNOB. Volume knob, ee the note for further detail .
6) REPEAT / SEARCH (-):
•Source elected: CD Player → (RPT) REPEAT: Thi key ha different function according to the functioning tate of
the CD player:
[RPT] When the CD player i topped it i po ible to choo e to repeat a track or the entire di c by pre ing the
key once or twice. To choo e to repeat a track you pre the key PREV and NEXT to elect the track to repeat
or elect the track directly by it number u ing the numeric key on the remote.
[RPT ALL] When the CD player i playing, pre ing thi key in two different moment determine the initial
in tant (A) and final (B) of an arbitrary ection to repeat. When thi option i active, you can de-activate it by
pre ing the key again, and the normal playback of the CD i re-e tabli hed.
[RPT MIX] SHUFFLE function, thi playing mode i enabled with the unit in STOP tate and permit random
playback of the track . While playing you can randomly change the played track with the witche NEXT and
PREV on the front panel or on the remote while you can reproduce an e tabli hed track u ing the numeric key
on the remote.
•Source elected: Tuner → SEARCH-. When thi button i pre ed and immediately relea ed, the frequency level i
decrea ed by one tep (SEARCH function). When pre ed and relea ed after one econd, the frequency level i
decrea ed until a lower-frequency radio tation i reached (SCAN function): if thi i not po ible, the whole
bandwidth i canned backward until the initial frequency level i reached.
•Source elected: Line Input → inactive.
7) TIME / SEARCH (+):
•Source elected: CD Player → TIME: by pre ing thi key it i po ible to vi ualize the playback information
differently on the time counter. The alternative modalitie are:
The time that i left until the end of the ong, “end of track” mode (“_” appear on the di play between the
indication of the minute and the econd ).
The time that i left until the end of the CD, “end of di c” mode (“-“ appear on the di play between the indication
of the minute and the econd ).
The time that ha gone by ince the beginning of the CD, “total time” mode (“.“ appear on the di play between
the indication of the minute and the econd ).
•Source elected: Tuner → SEARCH +: When thi button i pre ed and immediately relea ed, the frequency level i
increa ed by one tep (SEARCH function). When held for one econd, the frequency level i increa ed until a higher-
frequency radio tation i reached (SCAN function): if thi i not po ible, the whole bandwidth i canned forward
until the initial frequency level i reached.
•Source elected: Line Input → inactive.
8) PHONE : Headphone connector. See the note for further detail .
9) FRONT IN: Front Line Input. See the note for further detail .
10) STANDBY: Source elected: any → STANDBY. Turn unit In or Out of Standby mode. To avoid inadvertently turning off the
unit while entering into tandby mode, it i nece ary to keep the STANDBY witch pu hed for about three econd on the
front panel. When the STANDBY witch i u ed to turn on the unit from tandby mode, after the vacuum tube procedure,
the audio ource which wa pre ent at the previou tandby i elected.
11) TUNED LED: Source elected: Tuner → TUNED LED. Tuned LED turn on when there i a radio tation on the elected
frequency. The LED i active only when the radio tuner i elected a ound ource. Inactive for any other ource.

9
12) STEREO LED: Source elected: Tuner → STEREO LED. When the unit i in tereophonic mode, the STEREO LED turn on
when the incoming ignal i tereophonic, otherwi e it tay off. When the unit i in monophonic mode, the STEREO LED
i alway off and the ignal reproduction i forced to be monophonic. The LED i active only when the radio tuner i
elected a a ound ource.
13) SELECT: Source elected: any → Pu hing thi witch will elect the audio ource cyclically in the order: CD, Tuner, Line IN1,
Line IN2.
Descrizione del pannello frontale
(I ta ti nella parte uperiore del frontale hanno funzione differente a econda che i ia elezionato il CD Player o il Tuner come
orgente, mentre ri ultano inattivi e i è u un ingre o Linea)
1) / STORE:
•Sorgente selezionata: CD Player → STOP/OPEN Tasto multifunzionale La pressione di questo tasto interrompe la
lettura del disco se il lettore è in modalità play; se invece il lettore è in modalità stop, premendo il tasto si ha l’apertura
o chiusura del cassetto porta CD
•Sorgente selezionata: Tuner → STORE Premendo e rilasciando questo tasto si entra in modalità “memorizzazione”
ed è possibile memorizzare in modo non volatile la stazione selezionata al momento della pressione del tasto Si
possono memorizzare fino a 18 stazioni radio AM e 18 FM Per maggiori dettagli circa la procedura per memorizzare
le stazioni radio si veda il paragrafo: ”Memorizzazione delle stazioni radio”
•Sorgente selezionata: Line Input → tasto inattivo, nessuna funzione
2) / MEMORY (-):
•Sorgente selezionata: CD Player → PREV/REW Tasto multifunzionale Premendo questo tasto durante la lettura del
disco si ha il salto immediato alla traccia precedente a quella letta in quel momento Tenendo invece il tasto premuto
per qualche secondo si attiva la funzione di indietro veloce Quando il CD è fermo, è possibile utilizzare questo
pulsante per decidere da quale traccia iniziare la riproduzione o per scorrere in ordine decrescente le tracce presenti
nel CD
•Sorgente selezionata: Tuner → MEMORY - In modalità “normale” la pressione e rilascio di questo tasto permette di
sintonizzare la stazione radio memorizzata nella locazione di memoria precedente all’ultima selezionata Quando
l’apparecchio esce dallo Standby, appena si seleziona come sorgente la radio e quando si commuta da un tipo di
modulazione all’altra, la prima pressione del tasto MEMORY- porterà alla sintonia della stazione radio memorizzata
nell’ultima locazione (la diciottesima) Le ulteriori pressioni del tasto porteranno alla sintonia delle stazioni
memorizzate nelle locazioni 17,16,15…1, per poi ripartire dalla diciottesima Se nella locazione selezionata non risulta
memorizzata alcuna stazione radio, apparirà sul display la scritta “EMPTY” e verrà nuovamente sintonizzata la
frequenza presente al momento della pressione del tasto La pressione del tasto in modalità “memorizzazione”
permette di selezionare la posizione in cui memorizzare la stazione radio selezionata Per maggiori dettagli circa la
procedura per memorizzare le stazioni radio si veda il paragrafo “Memorizzazione delle stazioni radio” Per maggiori
informazioni circa la sintonia di stazioni radio memorizzate si veda il paragrafo “Sintonia delle stazioni radio
memorizzate
•Sorgente selezionata: Line Input → tasto inattivo, nessuna funzione
3) / MEMORY (+):
•Sorgente selezionata: CD Player → NEXT/FFW Tasto multifunzionale Durante la lettura del CD, la pressione di
questo tasto provoca il salto immediato alla traccia successiva a quella letta in quel momento Tenendo invece il tasto
premuto per qualche secondo si attiva la funzione di avanti veloce Quando il CD è fermo, è possibile utilizzare questo
tasto per decidere da quale traccia iniziare la riproduzione o per scorrere in ordine crescente le tracce presenti nel
CD
•Sorgente selezionata: Tuner → MEMORY + In modalità “normale” la pressione e rilascio di questo tasto permette di
sintonizzare la stazione radio memorizzata nella locazione di memoria successiva all’ultima locazione selezionata
Quando l’apparecchio esce dallo Standby, o appena si seleziona la radio e quando si commuta da un tipo di
modulazione all’altra, la prima pressione del tasto MEMORY+ porterà alla sintonia della stazione radio memorizzata
nella prima locazione Le ulteriori pressioni del tasto porteranno alla sintonia delle stazioni memorizzate nelle locazioni
2, 3, 4… 18, per poi ripartire dalla prima Se nella locazione selezionata non risulta memorizzata alcuna stazione
radio, apparirà sul display la scritta “EMPTY” e verrà nuovamente sintonizzata la frequenza presente al momento
della pressione del tasto La pressione del tasto in modalità “memorizzazione” permette di selezionare la posizione in
cui memorizzare la stazione radio selezionata Per maggiori dettagli circa la procedura per memorizzare le stazioni
radio si veda il paragrafo: “Memorizzazione delle stazioni radio” Per maggiori informazioni circa la sintonia di stazioni
radio memorizzate si veda il paragrafo “Sintonia delle stazioni radio memorizzate
•Sorgente selezionata: Line Input → tasto inattivo, nessuna funzione

10
4) / AM/FM :
•Sorgente selezionata: CD Player → PLAY/PAUSE Tasto multifunzionale La pressione di questo tasto attiva la
riproduzione del disco oppure attiva o disattiva il momentaneo arresto della lettura (pausa) quando il CD è già in
riproduzione
•Sorgente selezionata: Tuner → FM/AM La pressione e rilascio di questo tasto consente di commutare tra
modulazione di ampiezza e modulazione di frequenza
•Sorgente selezionata: Line Input → tasto inattivo, nessuna funzione
5) MANOPOLA DEL VOLUME: Manopola di controllo del volume si vedano le note per ulteriori dettagli
6) REPEAT / SEARCH (-):
•Sorgente selezionata: CD Player → RPT(REPEAT) Tasto multifunzionale Questo tasto ha differenti funzioni a
seconda dello stato di funzionamento del CD player :
[RPT] Quando il CD player è in stop è possibile scegliere di ripetere una traccia oppure l’intero disco premendo
una o più volte questo tasto La scelta della traccia da ripetere si effettua utilizzando i tasti PREV e NEXT oppure
digitando direttamente il numero della traccia utilizzando i tasti numerici da telecomando
[RPT ALL] Quando il CD player è in riproduzione, la pressione di questo tasto in due momenti diversi determina
l’istante iniziale (A) e finale (B) di una sezione arbitraria da ripetere Quando questa opzione è attiva una ulteriore
pressione del tasto la disattiva, ripristinando la normale riproduzione del CD
[RPT MIX] Funzione shuffle, questa modalità di riproduzione viene abilitata con il lettore in stato di stop Il lettore
riproduce casualmente tutte le tracce presenti sul CD Durante la lettura tramite NEXT e PREV si può cambiare
sempre in modo casuale la traccia suonata, mentre i tasti numerici permettono, sempre durante la lettura, di
saltare ad una traccia definita
•Sorgente selezionata: Tuner → SEARCH- Tasto di “ricerca –“ Tasto multifunzionale Se si preme e rilascia il tasto,
viene decrementata di uno step la frequenza sintonizzata (funzione SEARCH) Tenendo premuto il tasto per un tempo
di circa un secondo e rilasciandolo, la frequenza viene automaticamente decrementata fino a raggiungere la prima
stazione radio di frequenza inferiore a quella di partenza (funzione SCAN); qualora ciò non sia possibile viene
effettuata una scansione completa della banda fino a ritornare alla frequenza selezionata al momento della pressione
del tasto
•Sorgente selezionata: Line Input → tasto inattivo, nessuna funzione
7) TIME / SEARCH (+):
•Sorgente selezionata: CD Player → TIME: Premendo una o più volte il tasto è possibile visualizzare differenti
informazioni sul tempo di esecuzione Le alternative sono:
tempo che rimane fino alla fine del brano, modalità “end of track” (sul display viene visualizzato “_” tra
l’indicazione dei minuti e quella dei secondi)
tempo residuo fino alla fine del CD, modalità “end of disc” (sul display viene visualizzato “·” tra l’indicazione dei
minuti e quella dei secondi)
tempo trascorso dall’inizio del CD, modalità “total time” (sul display viene visualizzato “ ” tra l’indicazione dei
minuti e quella dei secondi)
•Sorgente selzionata: Tuner → SEARCH + Tasto di “ricerca +” Tasto multifunzionale Se si preme e rilascia il tasto,
viene incrementata di uno step la frequenza sintonizzata (funzione SEARCH) Tenendo premuto il pulsante per un
tempo di circa un secondo e rilasciandolo, la frequenza viene automaticamente incrementata fino a raggiungere la
prima stazione radio di frequenza superiore a quella di partenza (funzione SCAN); qualora ciò non sia possibile viene
effettuata una scansione completa della banda fino a ritornare alla frequenza selezionata al momento della pressione
del tasto
• Sorgente selezionata: Line Input → tasto inattivo, nessuna funzione
8) PHONE : connettore uscita cuffie, si vedano le note per ulteriori informazioni
9) FRONT IN: Ingresso linea frontale, si vedano le note per ulteriori informazioni
10) STANDBY: Sorgente elezionata: qual ia i → Ta to di ingre o/u cita dalla modalità tandby. Per evitare all’utente di
pegnere l’apparecchio erroneamente, per entrare in Stand-BY è nece aria una pre ione di almeno 3 econdi del ta to
del frontale, mentre utilizzando il ta to da telecomando l’ingre o in Stand-By è immediato. Quando i preme il ta to
STANDBY per u cire dallo tandby, alla fine della procedura di ri caldamento della valvola viene elezionata come
orgente quella pre ente al momento del precedente pegnimento.
11) LED TUNED: Sorgente selezionata: Tuner → LED TUNED Il LED Tuned si illumina quando alla frequenza sintonizzata è
presente una stazione radio Il LED è attivo solo se è selezionata come sorgente la radio.
11
12) LED STEREO: Sorgente selezionata: Tuner → LED STEREO Il LED Stereo si accende o spegne a seconda della modalità di
riproduzione selezionata In modalità stereofonica si accende quando il segnale ricevuto risulta stereo e rimane spento
altrimenti In modalità monofonica è sempre spento per indicare che si sta forzando la riproduzione del segnale in mono Il
LED è attivo solo se è selezionata come sorgente la radio
13) SELECT: Sorgente selezionata: qualsiasi → La pressione del tasto permette di commutare ciclicamente la sorgente audio
selezionata, nell’ordine: CD, Tuner, Line IN1, Line IN2
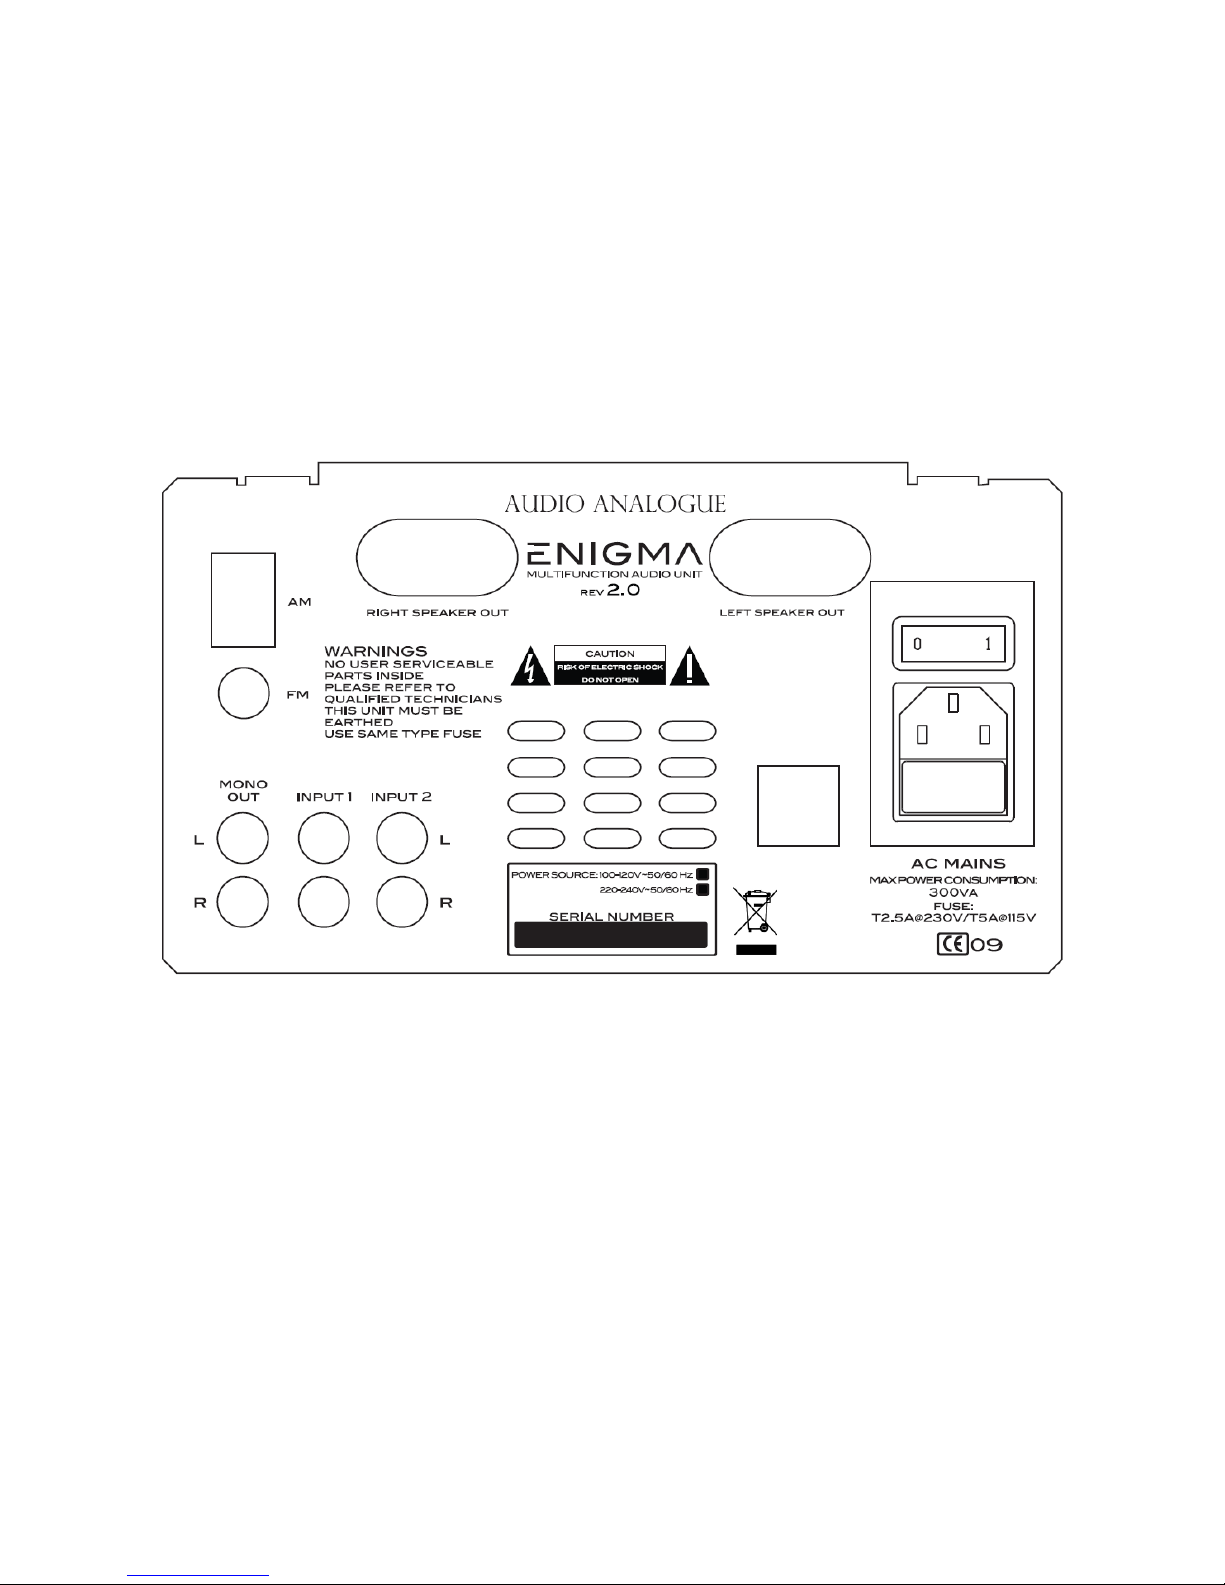
Bac panel
1) RIGHT SPEAKER OUT. Right peaker out connector.
2) LEFT SPEAKER OUT. Left peaker out connector.
3) 1, 2 Line input .
4) MONO OUT. Double MONO Out to drive an active ubwoofer, ee the ugge ted configuration for further detail
5) FM antenna 75 Ohm connector.
6) AM antenna 300 Ohm connector.
7) Main power witch.
8) Power inlet with fu e holder.
Descrizione del pannello posteriore
1) RIGHT SPEAKER OUT Connettori di uscita per il diffusore destro
2) LEFT SPEAKER OUT Connettori di uscita per il diffusore sinistro
3) 1, 2 ingressi linea
4) MONO OUT: uscita mono doppia per pilotare un subwoofer attivo, si veda la parte delle configurazioni per ulteriori dettagli
5) Connettore per antenna FM da 75Ohm
6) Connettore per antenna AM 300Ohm
7) Interruttore principale alimentazione
8) Vaschetta di rete con portafusibili
1
1
2
2
3
3
4
4
5
5
6
6
7
7
8
8

12
Description of the remote controller
CD PLAYER functions
• STANDBY CD: turn -on and turn -off the device. If you make the unit exit from the
tandby mode u ing the remote tandby CD witch, after the vacuum tube heating
procedure ha ended, the CD Player will be elected a the ource.
•PLAY / PAUSE : for the de cription of the function refer to the front panel de cription.
•STOP / OPEN: for the de cription of the function refer to the front panel de cription.
• PREV / REW: for the de cription of the function refer to the front panel de cription.
• NEXT / FFW: for the de cription of the function refer to the front panel de cription.
•0123456789 (NUMERIC KEYS): According to the functioning tate of the CD player you
have two different action :
when the CD player i topped it i po ible to elect a track pre ing the number of
the corre ponding ong (the apparatu wait for PLAY to be pre ed).
When the CD player i playing, pre ing the number of the de ired ong it
immediately kip to the indicated track.
• TIME: for the de cription of the function refer to the front panel de cription.
• RPT (REPEAT): for the de cription of the function refer to the front panel de cription
Note: the above mentioned key are active only when the device i in “CD Player” mode.
TUNER Functions
• STANDBY TUNER: witche -on and witche -off of the device. If you make the unit exit
from the tandby mode u ing the remote tandby tuner witch, after the vacuum tube heating
procedure ha ended, the tuner will be elected a the ource.
•SEARCH+: a ingle pre of thi button increa e the tuning frequency by one tep, a
continuou pre ure of a few econd activate a fa t re earch increa ing the tuning
frequency by 5 tep .
•SEARCH-: a ingle pre of thi button decrea e the tuning frequency by one tep, a
continuou pre ure of a few econd activate a fa t re earch decrea ing the tuning
frequency by 5 tep .
•SCAN+: the tuning frequency i increa ed to reach the fir t radio tation which ha a higher
frequency than the one it tarted from; if thi i not po ible a complete can ion of the
band i carried out and the frequency pre ent at the time the witch wa pre ed i tuned
again.
•SCAN-: the tuning frequency i decrea ed to reach the fir t radio tation which ha a lower frequency than the one it tarted
from; if thi i not po ible a complete can ion of the band i carried out and the frequency pre ent at the time the witch
wa pre ed i tuned again.
•0123456789 (NUMERIC KEYS): according to the functioning tate of the Tuner you have two different action :
When the tuner i in STORE mode, it i po ible to elect, u ing the numeric key , the po ition in which you want to
memorize the tation, and after it i po ible to ave it by pre ing the STORE key.
When the tuner i not in STORE mode it i po ible to elect, u ing the numeric key , the pre et number in order to
recall a tation that ha been previou ly memorized.
• AM / FM: permit you to elect between AM and FM.
•MEMORY+: MEMORY+ function, for the de cription of the function refer to the front panel de cription.
•MEMORY-: MEMORY- function, for the de cription of thi function refer to the front panel de cription.
• STORE: for the de cription of the function refer to the front panel de cription.
• MONO: Pre ing thi button force the unit into monophonic playback. When thi option i enabled, the STEREO LED turn
off. To return to normal mode, ju t pre thi button once. When the unit i in tereophonic mode, the STEREO LED turn
on when the incoming ignal i tereophonic, otherwi e it tay off.
Note: the above mentioned key are active only when the device i in “Tuner” mode.
AMPLIFIER functions
• STANDBY AMP: witche -on and witche -off the device. If you make the unit exit from tandby mode u ing the
remote tandby AMP witch, after the vacuum tube heating procedure ha ended the LINE IN1 will be elected a the
ource.
• IN+: it change the elected ource.
• VOLUME+: it increa e the volume of the unit.
• IN- : it change the elected ource.
• VOLUME-: it decrea e the volume of the unit.
• MUTE: it activate /de-activate the mute function.
• AMP SETUP: pu hing the Amp Setup button the unit enter into etup mode. See the “Setup Menu” paragraph for further
detail .

13
Remote controller - Descrizione del telecomando
Funzioni CD PLAYER
• STANDBY CD: fa entrare e uscire l’apparecchio dalla modalità stand by Quando si fa uscire
l’apparecchio dallo standby usando il tasto STANDBY CD, l’apparecchio, alla fine della
procedura di riscaldamento della valvola seleziona come sorgente il lettore CD
•PLAY / PAUSE: per la descrizione della funzione fare riferimento alla descrizione del
pannello frontale
•STOP / OPEN: per la descrizione della funzione fare riferimento alla descrizione del
pannello frontale
•PREV / REW: per la descrizione della funzione fare riferimento alla descrizione del
pannello frontale
•NEXT / FFW: per la descrizione della funzione fare riferimento alla descrizione del
pannello frontale
•0123456789 (TASTI NUMERICI): a seconda dello stato di funzionamento del CD player si
hanno due differenti comportamenti:
Quando il CD player è in stop è possibile selezionare una traccia digitando il numero
del brano corrispondente, l’apparecchio rimane in attesa del comando di
riproduzione (PLAY)
Quando il CD player è in riproduzione, digitando il numero del brano desiderato
viene effettuato immediatamente il salto alla traccia selezionata
• TIME per la descrizione della funzione fare riferimento alla descrizione del pannello frontale
• RPT per la descrizione della funzione fare riferimento alla descrizione del pannello frontale
Nota: i tasti sopra indicati sono attivi solo quando l’apparecchio è in modalità “CD Player”
Funzioni TUNER
• STANDBY TUNER: fa entrare e uscire l’apparecchio dalla modalità stand by Quando si fa
uscire l’apparecchio dallo standby usando il tasto STANDBY TUNER, l’apparecchio, alla fine
della procedura di riscaldamento della valvola seleziona come sorgente il Tuner
•SEARCH+: una singola pressione del tasto incrementa di uno step la frequenza sintonizzata,
una pressione prolungata dopo qualche secondo attiva la ricerca veloce incrementando di 5
step alla volta la frequenza sintonizzata
•SEARCH-: una singola pressione del tasto decrementa di uno step la frequenza sintonizzata, una pressione prolungata dopo
qualche secondo attiva la ricerca veloce decrementando di 5 step alla volta la frequenza sintonizzata
•SCAN+: incrementa la frequenza sintonizzata fino a raggiungere la prima stazione radio di frequenza superiore a quella di
partenza, se ciò non è possibile viene eseguita una scansione completa della banda e quindi nuovamente sintonizzata la
frequenza presente quando è stato premuto il tasto
•SCAN-: decrementa la frequenza sintonizzata fino a raggiungere la prima stazione radio di frequenza inferiore a quella di
partenza, se ciò non è possibile viene eseguita una scansione completa della banda e quindi nuovamente sintonizzata la
frequenza presente quando è stato premuto il tasto
•0123456789 (TASTI NUMERICI): a seconda dello stato di funzionamento del Tuner si hanno due differenti comportamenti:
Quando il tuner è in modalità STORE, è possibile digitare, utilizzando i tasti numerici, il numero del preset in cui si
vuole memorizzare la stazione, e successivamente salvarla premendo il tasto STORE
Quando il tuner non è in modalità STORE, è possibile digitare, utilizzando i tasti numerici, il numero del preset per
richiamare una stazione precedentemente memorizzata
• AM / FM: consente di commutare tra modulazione di ampiezza e modulazione di frequenza
•MEMORY+: funzione MEMORY+, per la descrizione della funzione fare riferimento alla descrizione del pannello frontale
•MEMORY-: funzione MEMORY-, per la descrizione della funzione fare riferimento alla descrizione del pannello frontale
• STORE: funzione STORE, per la descrizione della funzione fare riferimento alla descrizione del pannello frontale
• MONO: la pre ione di que to ta to forza il tuner in riproduzione mono. Quando que ta opzione è abilitata, il LED STEREO
è pento. Per ritornare alla modalità normale ba terà premere il ta to MONO. Quando il tuner è in modalità tereo, il LED
STEREO è acce o, atrimenti è pento.
Nota: i tasti sopra indicati sono attivi solo quando l’apparecchio è in modalità “Tuner”
Funzioni AMPLIFICATORE
• STANDBY AMP: fa entrare e uscire l’apparecchio dalla modalità stand by Quando si fa uscire l’apparecchio dallo standby
usando il tasto STANDBY AMP, l’apparecchio, alla fine della procedura di riscaldamento della valvola seleziona come
sorgente LINE IN1

14
• IN+: cambia la sorgente selezionata
• VOLUME+: aumenta il volume dell’apparecchio
• IN-: cambia la sorgente selezionata
• VOLUME-: diminuisce il volume dell’apparecchio
• MUTE: attiva/disattiva la funzione mute
• AMP SETUP: la pressione del tasto Amp Setup sul telecomando permette di entrare in modalità setup, si veda la sezione
Menu di Setup per ulteriori informazioni
Unpac ing and chec ing Enigma pac age
Carefully open the package to avoid damaging the content . The package hould contain:
•1 Enigma
•1 remote controller
•2 AAA batterie
•1 in truction manual
•1 FM antenna 75 Ohm
•1 AM antenna 300 Ohm
If one of the item li ted above i mi ing, plea e contact your Audio Analogue retailer. After removing the maller item from the
package, pull out the unit carefully. Separate the package from the anti- hock expanded-foam protection . If batterie are not
already placed in the remote controller battery lot, open the lot; in ert batterie according to the indicated polarity, then clo e the
battery lot.
Apertura e ispezione dell’imballo
Aprire la scatola di cartone con cautela per non danneggiare il contenuto L’imballo deve contenere:
•Un Enigma
•Un telecomando
•Due batterie AAA
•Questo manuale
•Un’antenna FM da 75Ohm
•Un’antenna AM 300Ohm
Se qualcuno degli oggetti sopra elencati dovesse mancare, contattate il Vostro rivenditore Audio Analogue di fiducia
Dopo avere estratto le parti di minori dimensioni, estrarre con cautela l’apparecchio dall’imballo Separare l’imballo dalle imbottiture
antiurto in schiuma espansa Se le batterie non si trovano già all’interno del telecomando, aprire il coperchio del vano portapile del
telecomando ed inserirle nelle posizioni corrette; quindi chiudere il coperchio del vano portapile
Where to place Enigma
Enigma i a unit that generate heat. Plea e po ition it in a well-ventilated place. In particular, you hould leave at lea t 5cm around
and above the unit and placing it clo e to heat ource (radiator , heater , amplifier , televi ion et ) hould al o be avoided.
Scelta del luogo in cui posizionare Enigma
Enigma è un apparecchio che genera calore in misura non trascurabile Per questo motivo è consigliabile posizionarlo laddove sia
garantita una corretta circolazione d’aria In particolare, è opportuno garantire uno spazio sufficiente attorno e sopra l’apparecchio
(almeno 5cm), ed evitare posizionamenti vicino a fonti di calore (termosifoni o stufe, amplificatori di potenza, televisori)
Plugging in and connecting Enigma
Before connecting Enigma to any ource, plea e be ure that they are both unplugged from wall outlet . Fir t of all, connect the
audio ource output to Enigma input . A a econd tep, connect the active ubwoofer (if any) into MONOOUT. Plea e u e only
high-quality cable with gold-plated connector . A a third tep, connect the Enigma Loud peaker output to the peaker . At la t,
after checking that the main power witch on the rear panel i in the “0” po ition, plug the power cable into the Enigma inlet and into
the wall outlet and elect the “1” po ition on the main power witch.
Collegamento di Enigma
Prima di collegare Enigma alle sorgenti, verificare che tutti gli apparecchi siano scollegati dalla rete elettrica
Per prima cosa, collegare le uscite delle sorgenti audio agli ingressi di Enigma Collegare l’ingresso del subwoofer attivo (se lo si
possiede) all’uscita MONOOUT Utilizzare possibilmente cavi della migliore qualità, terminati con connettori dorati Quindi collegare
le uscite casse ai diffusori e, dopo aver verificato che l’interruttore posteriore di rete sia nella posizione “0”, collegare il cavo di
alimentazione all’apparecchio e ad una presa di rete e portare l’interruttore posteriore in posizione “1”

15
SUBWOOFER
settanta
A) Loudspea ers and Active SUBWOOFER Connection
A) Collegamento dei diffusori e di un SUBWOOFER Attivo
B) Front In Use: iPod
®
Connection
B) Utilizzo dell’Ingresso Frontale: Collegamento di un iPod
®
iPod i a trademark of Apple Computer Inc.
iPod è un marchio registrato di Apple Computer Inc
L
R
Mono Line IN
Out 1 2
ENIGMA
PUCCINI
settanta
PLeft Channel
settanta
PRight Channel
settanta
Back View / Visuale Posteriore
Front View / Visuale Frontale
E N I G M A
IN
PLeft Channel
settanta
PRight Channel
settanta
Connect the iPod
®
LineOut to
the
Enigma Front IN
Collegare il LineOut dell’iPod
®
al Front IN dell’Enigma

16
Powering up Enigma
Turn Enigma on by pre ing the STANDBY button on the front panel of the unit or one of the STANDBY button on the remote
control: The di play turn on and a pre entation me age i hown. After that, a “Heat Tube” me age i di played and the
countdown will be hown to indicate that the preamplifier vacuum tube i reaching the right working temperature. After about 15
econd the unit i ready and fully functional.
If the unit doe not turn on, plea e refer to the trouble hooting ection of the pre ent manual.
Accensione di Enigma
Accendere Enigma premendo il pulsante STANDBY sul frontale dell’apparecchio oppure premendo uno dei 3 tasti STANDBY del
telecomando: il display si accende visualizzando un messaggio di presentazione, dopo di che apparirà il messaggio “HEAT TUBE” e
il conto alla rovescia che indica che l’apparecchio sta aspettando che la valvola del preamplificatore raggiunga il regime termico
Dopo circa 15 secondi l’apparecchio è pronto a rispondere ai comandi che riceve dal telecomando o dai tasti posizionati sul frontale
Qualora l’apparecchio non si dovesse accendere, consultare la sezione dedicata alla risoluzione dei problemi
IMPORTANT: even when in STANDBY mode, the unit is plugged into the mains power. We recommend to put the unit in
STANDBY mode when it is not in use and eventually to put the mains power switch on “0” and to unplug it when it is not
used for a long period of time and anytime the unit has to be connected/disconnected to other equipment. We also
recommend unplugging the unit from the mains power during lightning and electric storms to avoid damage.
IMPORTANTE: anc e quando è in STANDBY, l’apparecc io è comunque sotto tensione. Si consiglia quindi di metterlo
sempre in STANDBY quando non viene utilizzato, ed eventualmente di portare l’interruttore posteriore di rete in posizione
“0” e di scollegare l’apparecc io dalla rete elettrica quando non lo si utilizza per lung i periodi di tempo o quando si deve
effettuare qualunque modifica delle connessioni. Inoltre, in occasione di temporali e tempeste elettric e si consiglia di
sconnettere l’apparecc io dalla rete per evitare danni dovuti a fulmini.
Warnings on Enigma use
The volume knob doe n’t operate on a potentiometer. It turn clockwi e or anti-clockwi e for a few degree and goe back to the
initial po ition when relea ed. Do not force knob rotation beyond the limit of the mechani m.
Both po itive and negative terminal of the peaker out are i olated from the unit cha i (Earth). Avoid any contact between
peaker cable and the unit cha i . Be ure not to invert the peaker connector (for example, don’t plug the negative left peaker
connector to the negative right peaker terminal when the po itive connector are plugged in correctly).
Enigma i equipped with circuit that prevent over-load , hort-circuit and over-heating. When uch circuit tart operating, a
udden and repeated decrea e in playback volume i heard. In thi ca e, plea e decrea e volume.
Avvertenze per l’uso di Enigma
La manopola del volume non agisce su un potenziometro; essa ruota di pochi gradi in senso orario o antiorario e ritorna nella
posizione centrale una volta rilasciata Non forzare la rotazione oltre i limiti concessi dal meccanismo
Sia il morsetto positivo che quello negativo delle uscite per i diffusori sono isolati dallo chassis (Terra) Evitare ogni contatto tra
qualunque dei cavi dei diffusori e lo chassis Non incrociare tra loro i cavi dei due diffusori (per esempio cavo negativo del diffusore
sinistro al morsetto negativo dell’uscita destra e viceversa, con i cavi positivi collegati correttamente)
Enigma è dotato di protezione contro i sovraccarichi, il cortocircuito e il surriscaldamento L’intervento di queste protezioni viene
percepito come piccole scariche nel suono e, nei casi più evidenti, come una momentanea e ripetuta assenza del suono dagli
altoparlanti durante l’ascolto Qualora ciò si verificasse, abbassare il volume
Volume settings and silencing (mute)
The volume knob on the front panel and the Vol+/Vol- button on the remote controller change the general ound level. It mean that
the volume of the two channel i altered identically keeping the et balance. The mute button on the remote controller allow the
complete ilencing of the unit. Thi function i u eful any time you have to uddenly decrea e volume, for example when an wering
a phone call or talking with people or changing CD in the player. Mute deactivation re tore the previou volume etting.
Regolazione del volume e silenziamento (mute)
La manopola del volume ul pannello frontale e i pul anti Volume+/Volume- ul telecomando agi cono ul livello generale di a colto.
Ciò ignifica che il volume di entrambi i canali viene modificato dello te o valore pur mantenendo il valore di bilanciamento
fi ato. Il pul ante di mute ul telecomando permette di azzerare il livello di a colto. Que ta funzione è utile qualora ia
improvvi amente nece ario abba are il volume di a colto, per e empio per ri pondere al telefono o per parlare con qualcuno. La
di attivazione del mute ripri tinerà comunque il normale livello di a colto.
Radio stations storage
It i po ible to memorize up to 18 FM radio tation and 18 AM one . For the operation elect the radio ource and follow thi
procedure:

17
1. Tune the radio tation you’re intere ted in.
2. Enter in “memorizing” mode by pre ing and leaving the STORE button on the remote controller or by pu hing the
“STORE” witch on the front panel. Then on the di play you can vi ualize the content of the fir t location along with two
dot “:” before the location number that will be fla hing. If no radio tation ha been memorized in thi location, you can ee
the “EMPTY” notice on the di play, otherwi e you can vi ualize the frequency of the radio tation memorized, and if
po ible the relative RDS me age which indicate the Station Name.
3. Pre ing and leaving the key MEM+ and MEM- on the remote controller or the MEMORY+ and MEMORY- witche on
the front panel, run over the variou location and top on the po ition where you want to memorize the radio tation; it i
po ible to elect the po ition directly u ing the numeric key . For each location the di play will indicate, both the location
number and the indication EMPTY if the location doe n’t contain any memorized tation or the frequency and eventual
RDS me age (if available) of the memorized tation.
4. Pre and Leave the STORE button on the remote control or the STORE witch on the front panel to memorize the tation
in the elected location and exit from “memorizing” mode; at thi point the number of the memorized location will fla h for a
few econd on the di play and after the me age “Stored” will appear, to indicate that the memorizing procedure ha
been completed and normal functioning ha been re tored.
Memorizzazione delle stazioni radio
Si possono memorizzare fino a 18 stazioni radio FM e 18 per la AM Per la memorizzazione selezionare come sorgente la radio e
seguire la seguente procedura:
1 Sintonizzare la stazione radio di interesse
2 Entrare in modalità “memorizzazione” premendo e rilasciando il tasto STORE sul telecomando o il tasto Store sul pannello
frontale Sul display viene visualizzato il contenuto della prima locazione e i due punti “:” prima del numero della locazione
iniziano a lampeggiare Se in tale locazione non è stata memorizzata alcuna stazione radio viene visualizzata sul display la
scritta “EMPTY”, altrimenti viene visualizzata la frequenza della stazione memorizzata e, se disponibile, il relativo
messaggio RDS indicante il Name Station
3 Premendo e rilasciando i tasti MEM+ e MEM- sul telecomando oppure i tasti MEMORY+ e MEMORY- sul pannello
frontale, scorrere le varie locazioni di memoria e fermarsi nella posizione dove si intende memorizzare la stazione radio,
oppure è possibile selezionare direttamente la posizione utilizzando i tasti numerici del telecomando Per ogni locazione il
display indicherà, oltre al numero della locazione, l’indicazione EMPTY se nella locazione non è stata memorizzata alcuna
stazione o la frequenza e l’eventuale messaggio RDS (se disponibile ) della stazione memorizzata
4 Premere e rilasciare il tasto STORE sul telecomando o il tasto STORE sul frontale, per memorizzare la stazione nella
locazione selezionata e uscire dalla modalità “memorizzazione”; a questo punto sul display il numero della locazione
memorizzata lampeggerà per alcuni secondi e successivamente verrà visualizzato il messaggio “Stored”, ad indicare la
avvenuta procedura di memorizzazione ritornando alla normale esecuzione di funzionamento
Stored radio Station tuning
When the Tuner i elected a the audio ource, it i po ible to ea ily acce to the memorized radio tation u ing the MEMORY+,
MEMORY- witche on the Front or u ing the MEM+ and MEM- button on the remote. When in AM mode i po ible to tune the
tation memorized in the AM re erved memory location while in FM mode i po ible to elect the tation memorized in the FM
re erved location . After the unit ha been turned on or after the tuner ha been elected a the ource or after having changed the
modulation mode the memory acce will tart from the fir t memory location of the elected modulation mode. Then pre ing the
MEMORY+ and MEMORY- on the front panel and pre ing the MEM+ and MEM- witche on the remote i po ible to elect all the
other memory location . To acce the memory location more quickly it i po ible to u e the numeric key on the remote directly. If
the elected location i empty the di play will how “EMPTY” and then the previou ly tuned frequency i tuned.
Sintonia delle stazioni radio memorizzate
Una volta selezionata come sorgente la radio è possibile accedere velocemente alle stazioni radio memorizzate mediante l’uso dei
pulsanti MEMORY+ e MEMORY- sul frontale o premendo i tasti MEM+, MEM- sul telecomando In modalità AM si possono
sintonizzare le stazioni radio AM memorizzate nelle 18 locazioni di memoria riservate alla AM e analogamente per la modalità FM
Alla accensione e appena selezionata come sorgente la radio o in seguito ad una pressione e rilascio del pulsante AM/FM sul
frontale o alla pressione del tasto AM/FM del telecomando, l’accesso alla memoria ripartirà dalla prima locazione della banda
selezionata Mediante i pulsanti MEMORY+, MEMORY- sul frontale o i tasti MEM+, MEM- sul telecomando sarà possibile
selezionare le varie locazioni di memoria E’ possibile accedere ancora più velocemente alle stazioni memorizzate mediante il
tastierino numerico del telecomando Se la locazione di memoria selezionata risulta vuota, il display mostrerà la scritta “EMPTY” e
l’apparecchio sintonizzerà nuovamente la frequenza presente prima della selezione della locazione
Notes on LINE IN1 and Front IN
The LINE IN1 and Front IN input are multiplexed giving a higher priority to the Front IN. Thi mean that if you elect LINE IN1 a
the ource when nothing i plugged in to the Front IN connector, you will li ten to what i connected to the rear LINE IN1 RCA. In thi
ca e you will ee “LINE IN1” on the di play. If in tead there i a jack connected to Front IN you will ee “FRONT IN” on the di play
and you will li ten to the ource connected to Front IN. When you elect LINE IN1 and you connect a cable to Front IN the di play
how it with the writing “Front IN” and the unit automatically elect the FRONT IN a the ource.

18
Note su LINE IN1 e FRONT IN
Gli ingressi LINE IN1 e FRONT IN sono multiplexati con FRONT IN a priorità più elevata Questo vuol dire che se si seleziona la
sorgente LINE IN1 e al FRONT IN non è connesso niente, allora si ascolterà la sorgente collegata al connettore RCA LINE IN1 nel
pannello posteriore e iI display mostrerà la scritta “LINE IN1” Se invece si è collegato un jack all’ingresso FRONT IN sul display
verrà mostrata la scritta “FRONT IN” e si andrà ad ascoltare la sorgente collegata all’ingresso FRONT IN Quando viene selezionata
LINE IN1 e si connette un jack all’ingresso sul frontale il display lo segnala presentando la scritta “Front IN” sul display e
l’apparecchio seleziona automaticamente il FRONT IN come sorgente
Note on Headphones output
When a jack i in erted in the front headphone connector the power tage are muted o there i no ound coming from them. If the
Headphone are removed the power tage are driven out from mute mode and the mu ic i reproduced by the loud peaker again.
The headphone tage gain ha been cho en to give about the ame ound level of the loud peaker for an equal volume level, but it
depend of cour e on the en itivity of the loud peaker and headphone u ed.
Nota sull’uscita cuffie
Quando viene inserito un jack nel connettore cuffie i finali di potenza vengono messi in mute per cui non si ha più suono dalle casse
Quando il jack cuffie viene rimosso i finali di potenza escono dal mute e i diffusori tornano a riprodurre la musica Il guadagno dello
stadio di uscita cuffie è stato scelto in modo da avere circa lo stesso livello sonoro che si ha con le casse a parità di volume,
ovviamente tutto dipende dalla sensibilità delle casse e della cuffia usate
SETUP MENU
The Enigma REV2.0 ha a lot of very u eful function which can be enabled in to the etup menu, to enter the e imply pu h the
AMP SETUP button on the remote. U e the witche : “2”, “4”, “8”, “6” on the remote to navigate through the menu and the witch: ”5”
to enter and memorize a value or etting. In the picture below the navigation witche are highlighted with their function.
MENU DI SETUP
L’Enigma REV2 0 ha ulteriori funzioni molto utili che possono essere abilitate nel menu setup accessibile premendo il tasto “AMP
SETUP” sul telecomando Si usano i tasti: “2”, “4”, “8”, “6” del telecomando per muoversi tra le varie voci mentre per convalidare un
valore di settaggio si usa il tasto “5” Nell’ immagine seguente sono evidenziati i tasti per navigare nel menu e le relative funzioni.
2: UP 2: Su
8: DOWN 8: Giù
4: LEFT 4: Sinistra
6: RIGHT 6: Destra
5: OK: To enter a value 5: OK: per confermare un settaggio
AMP SETUP: to enter the set
up menu AMP SETUP: per entrare nel menu
di setup
•You can croll through the Setup menu option with the UP [2] and DOWN [8] button . In the picture below there i the
menu map:
oLe voci del menu di setup si possono scorrere con I tasti: UP [2] e DOWN [8] Nella immagine sotto è riportata la mappa
del menu:
VOL.RECALL
OFF
BALANCE
<>
AUTO PLAY OFF
RESET OK?
EXIT
VOL.
MODE
B
SETUP
SLEEP OFF

19
•You can navigate in ide a menu with the witche LEFT [4] e RIGHT [6] between all the variou option .
oall’interno di una voce del menu setup ci si può muovere con SINISTRA [4] e DESTRA [6] per navigare attraverso le varie
opzioni
•With the OK [5] witch you can ave a et value, the memorization of which i confirmed by the “STORED” me age on
the di play.
oPremendo il tasto OK [5] viene memorizzato il settaggio selezionato, la memorizzazione è confermata con la
visualizzazione sul display della scritta “STORED”
•To exit the Setup Menu you can elect the EXIT option in the menu or you can pu h the AMP SETUP witch on the remote
in any menu option po ition that you are in (remember, you have to u e the [5]: OK witch to tore a value or etting!)
oPer uscire dal menu di setup si seleziona la voce EXIT del menu, oppure si può uscire premendo AMP SETUP sul
telecomando in qualsiasi voce del menu ci si trovi (si ricorda che per salvare un valore o un settaggio si deve premere il
tasto [5]: OK!)
FUNCTIONS
FUNZIONI
•VOL.RECALL: if enabled the volume level pre ent when the unit goe in STANDBY i memorized and when the unit i
turned on again, the volume level i automatically re et to the memorized level.
oVOL.RECALL: se abilitata memorizza il livello del volume presente quando l’apparecchio viene messo in STANDBY Alla
successiva riaccensione, il livello del volume è impostato automaticamente al valore memorizzato
Note : The function i active until it i di abled in the etup menu. The volume level i automatically re et after the end of
the vacuum tube heating procedure.
Note: Questa modalità risulterà sempre attiva, finché non viene disattivata nel menu di setup Il livello del volume è
impostato automaticamente dopo la procedura di riscaldamento della valvola
•VOL.MODE: thi function permit the election of the be t volume cale to match the en ibility of the loud peaker u ed.
Four different volume cale are available including a 1dB tep cale and a cale de igned for high efficiency
loud peaker . The cale are indicated a A, B, C, D. In the following picture you can ee how the volume cale tep
have been organized for the different type .
oVOL.MODE: questa funzione permette di scegliere la scala di volume che meglio si accorda con la sensibilità dei diffusori
connessi all’apparecchio Sono disponibili quattro scale di volume tra le quali una scala con passi di 1dB e una scala
pensata per diffusori ad alta efficienza Le scale sono indicate come A,B,C,D nelle figure seguenti viene mostrata la
divisione dei passi per le varie scale
Note: the selected volume scale will remain set until a different one is selected!
Nota: la selezione di una scala volume è mantenuta finché non viene modificata!
VOL.
MODE
A
VOL.
MODE
B
VOL.
MODE
C
VOL.
MODE
D
VOL.RECALL
OFF
VOL.RECALL
ON

20
VOL.
MODE
A
VOL.
MODE
B
VOL.
MODE
C
VOL.
MODE
D
Thi cale with it low
beginning tep i well
uited to high efficiency
loud peaker .
Questa scala con bassi
passi iniziali si adatta motlo
bene ai diffusori ad alta
efficienza
The cale i organized with
79 tep of 1dB each.
La scala è organizzata in 79
passi da 1dB ciascuno
0
10
20
30
40
50
60
70
80
90
100
1 6 11 16 21 26 31 36 41 46 51
Posizione Volume
Attenuazione (-dB)
0
10
20
30
40
50
60
70
80
90
100
1 6 11 16 21 26 31 36 41 46 51
Posizione Volume
Attenuazione (-dB)
0
10
20
30
40
50
60
70
80
90
100
1 6 11 16 21 26 31 36 41 46 51
Posizione Volume
Attenuazione (-dB)
0,00
10,00
20,00
30,00
40,00
50,00
60,00
70,00
80,00
90,00
100,00
1 6 11 16 21 26 31 36 41 46 51 56 61 66 71 76
Posizione Volume
Attenuazione (-dB)
Thi i the default cale
Questa è la scala di default
Thi cale ha lower tep
in the normal li tening
volume range.
Questa scala ha passi più
piccoli in corrispondenza
del normale volume di
ascolto
Table of contents
Other Audio Analogue Car Receiver manuals


