Audio Hungary Qualiton A50i User manual

CONTENTS
IMPORTANT SAFETY INSTRUCTIONS.................................................................................................................................................... 2
MARKINGS....................................................................................................................................................................................................... 5
PREFACE........................................................................................................................................................................................................... 6
CONTENTS OF PACKAGE............................................................................................................................................................................ 7
TECHNICAL SPECIFICATION...................................................................................................................................................................... 8
FRONT PANEL................................................................................................................................................................................................. 9
REAR PANEL..................................................................................................................................................................................................10
REMOTE CONTROL.....................................................................................................................................................................................11
INSERTING / REPLACING BATTERY......................................................................................................................................................11
BEFORE FIRST USE .....................................................................................................................................................................................12
VACUUM TUBES LAYOUT..........................................................................................................................................................................14
PLACEMENT..................................................................................................................................................................................................15
INSTALLATION / CONNECTIONS............................................................................................................................................................17
CONNECTION DIAGRAM...........................................................................................................................................................................18
OPERATION - SAFETY RECOMMENDATIONS ....................................................................................................................................19
STATUS INDICATION...................................................................................................................................................................................21
REMOTE CONTROL STATUS INDICATION...........................................................................................................................................21
INSTALLING A NEW REMOTE CONTROL.............................................................................................................................................22
TROUBLESHOOTING ..................................................................................................................................................................................23
REPLACEMENT OF FUSE .........................................................................................................................................................................26
WASTE MANAGEMENT.............................................................................................................................................................................27
WARRANTY....................................................................................................................................................................................................28

- 2 -
IMPORTANT SAFETY INSTRUCTIONS
PLEASE READ THEM BEFORE OPERATING THIS EQUIPMENT!
1. Read these instructions.
2. Keep these instructions.
3. Heed all warnings.
4. Follow all instructions.
5. Do not use this apparatus near water.
6. Clean only with a dry cloth.
7. Do not block any ventilation openings. Install in
accordance with the manufacturer’s instructions.
8. Do not install near any heat sources such as
radiators, heat registers, stoves, or other apparatus
(including ampliers) that produce heat.
9. Do not defeat the safety purpose of the polarized
or grounding-type plug. A polarized plug has two
blades with one wider than the other. A grounding
type plug has two blades and a third grounding
prong. The wide blade or the third prong are
provided for your safety. If the provided plug does
not t into your outlet, consult an electrician for
replacment of the obsolete outlet.
10. Protect the power cord from being walked on or
pinched particularly at plugs, convenience
receptacles, and the point where they exit from the
apparatus.

- 3 -
IMPORTANT SAFETY INSTRUCTIONS
PLEASE READ THEM BEFORE OPERATING THIS EQUIPMENT!
11. Only use attachments/accessories specied by
the manufacturer.
12. Use only with the cart, stand, tripod, bracket, or
table specied by the manufacturer, or sold with the
apparatus. When a cart is used, use caution when
moving the cart/apparatus combination to avoid
injury from tip-over.
13. Unplug this apparatus during lightning storms
or when unused for long periods of time.
14. Refer all servicing to qualied service personnel
Servicing is required when the apparatus has been
damaged in any way, such as power supply cord or
plug is damaged, liquid has been spilled or objects
have fallen into the apparatus, the apparatus has
been exposed to rain or moisture, does not operate
normally, or has been dropped.
15. Do not expose this equipment to dripping or
splashing and ensure that no objects lled with
liquids, such as vases, are placed on the
equipment.
16. To completely disconnect this equipment from
the AC mains, disconnect the power supply cord
plug from the AC receptacle.

- 4 -
17. The mains plug of the power supply cord shall
remain readily operable.
18. Do not expose batteries to excessive heat such
as sunshine, re or the like!
19. Connect mains power supply cord only to a
mains socket outlet with a protective earthing
connection.
20. WARNING! To reduce risk of re or electrical
shock, do not expose this equipment to rain or
moisture!
21. CAUTION! To reduce the risk of electric shock,
do not remove cover!
22. No user-serviceable parts inside. Refer servicing
to qualied service personnel.
IMPORTANT SAFETY INSTRUCTIONS
PLEASE READ THEM BEFORE OPERATING THIS EQUIPMENT!

- 5 -
The exclamation point within an equilateral
triangle is intended to alert the user to the
presence of important operating and maintenance
instructions in the literature accompanying the
appliance.
CAUTION: Hot Surface! Do Not Touch!
Protective cover of the product may become
hot when operating this product continuously.
The crossed-out wheeled bin is the Europe
an Union symbol for indicating separate
collection for electrical and electronic equipment.
This product contains electrical and electronic
equipment which should be reused, recycled or
recovered and should not be disposed of with
unsorted regular waste. Please return the unit or
contact the authorised dealer from whom you
purchased this product for more information.
The product meets the relevant directives
and standards of the European Union.
Supplied with alternating current (AC).
115 V / 230 V Nominal supply voltage.
50 Hz / 60 Hz Nominal supply frequency.
MARKINGS

- 6 -
Before installing the stereo power amplier qualiton
A50i, please study this user manual carefully!
Operating your power amplier in a manner it is de‐
signed for ensures you an utmost musical experi‐
ence and a reliable operation.
If you have any questions on our products or ser‐
vices, please do not hesitate to contact us on our
website www.audiohungary.com
PREFACE

- 7 -
- 1pc qualiton a50i stereo amplier
- 1pc user manual
- 1pc standard mains cable
- 1pc remote control
- 1pc torx wrench (TX10)
CONTENTS OF PACKAGE

- 8 -
TECHNICAL SPECIFICATION
NOMINAL OUTPUT POWER
2 X 50W Stereo (measured by 1 kHz sine wave; THD < 0,75%)
TOTAL HARMONIC DISTORTION
< 0.75% (f = 1 kHz - measured at maximal output power)
FREQUENCY RESPONSE
30 Hz - 70 kHz (-3 dB, measured at maximal output power)
INPUT SENSITIVITY
425 mV asymmetric input
GAIN
+33.5 dB (8 Ω); +25.5 dB (4 Ω)
INPUT IMPEDANCE
10 kΩ
NOMINAL LOAD IMPEDANCE
4 Ω and 8 Ω
OUTPUT POLARITY
non inverting
SIGNAL - TO - NOISE RATIO
> 95 dB
POWER CONSUMPTION
300 W
VACUUM TUBE SET
4 x KT120; 4 x E88CC; 2 x ECC83
WEIGHT
25 kg
- 9 -
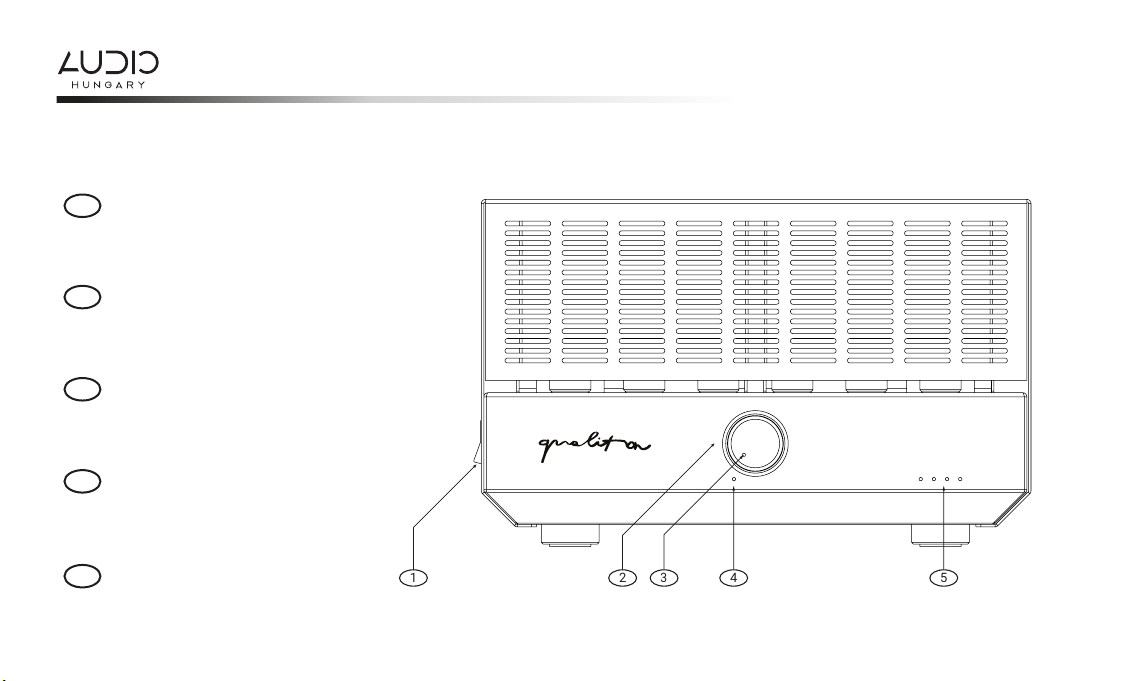
FRONTPANEL
3
1 2 4 5
Main switch
Input selector rotary
switch
Volume control
Status indicator LED
LEDs indicating active input
1
2
3
4
5
- 10 -
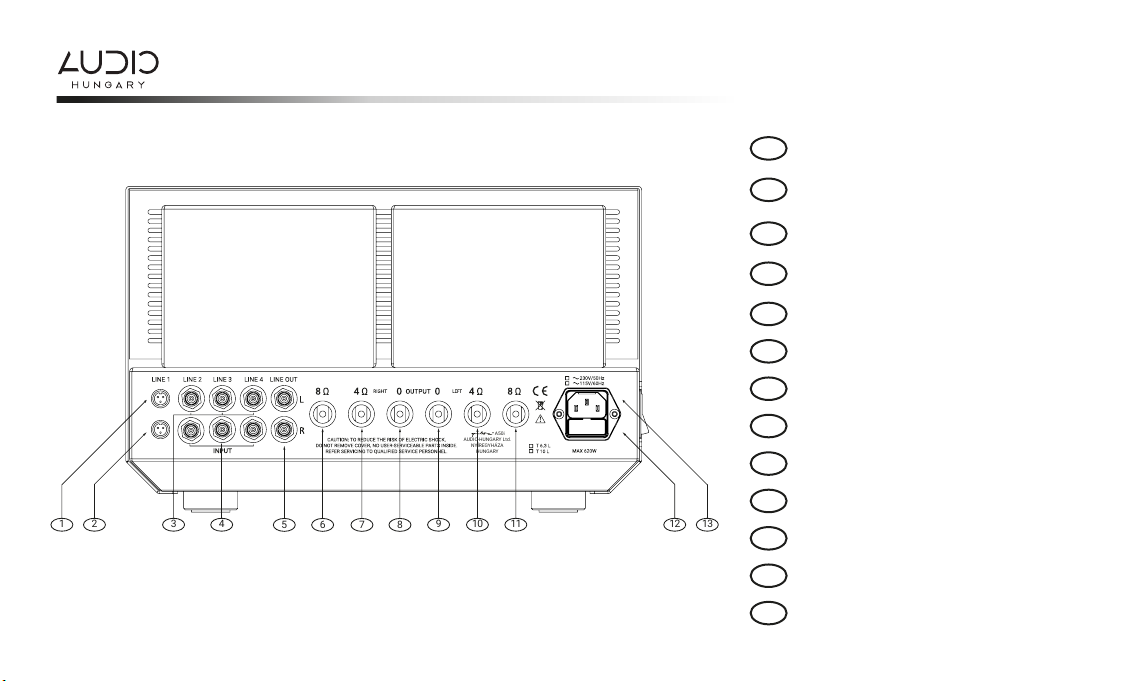
REAR PANEL
1 9 10 112 3 4 12 13
8765
AUDIO-HUNGARY Ltd.
NYÍREGYHÁZA
HUNGARY
A50i
Line input (symmetric)
(1pc mini XLR) - Left side (L)
Line input (asymmetric)
(3pc RCA) - Left side (L)
Output - Right side (8 Ω)
Line output (asymmetric)
Output - Right side (4 Ω)
Output - Right side (0 Ω)
Output - Left side (0 Ω)
Output - Left side (8 Ω)
Output - Left side (4 Ω)
Built-in fuse box in the AC socket
AC socket
Line input (symmetric)
(1pc mini XLR) - Right side (R)
Line input (asymmetric)
(3pc RCA) - Right side (R)
1
2
3
4
5
6
7
8
9
10
11
12
13

- 11 -
INSERTING / REPLACING BATTERY
PLEASE NOTE: A20i’s remote control comes without
battery. The remote control operates with type A23
battery. Battery should be installed by the user before
rst use:
1. Unscrew the screws on the back (a., b., c.) with the
torx wrench, included in the package, then remove the
cover! (d.)
2. Insert an A23 battery, as shown in the
diagram!
3. Put back the cover and fasten it tightening the
screws!
Communication indicator LED
Volume UP
MUTE
Volume DOWN
REMOTE CONTROL
1
2
3
4
volume
mute
234
1

- 12 -
BEFORE FIRSTUSE
Qualiton A50i amplier is shipped with the vacuum
tubes packed in foam blocks. These must be
unpacked and installed before you attempt to operate
the amplier.
Follow these instructions for removal of the packing
foam before connecting the AC power supply cord to
the Qualiton A50i.
Failure to do so has the potential of a Fire Hazard,
resulting in damage to the Qualiton A50i and the
surrounding environment.
Included tubes are: 4 x KT120; 4 x E88CC; 2 x ECC83
INSERTING / REPLACING BATTERY
T X 10
1.
a.
b.
c.
d.
a.
b.
c.
d.
2. 3.

- 13 -
BEFORE FIRSTUSE
Unplug your amplier and do
not operate it at least 2 hours
before replacing tubes!
1. Unscrew the screws a.b.c.d.
with a torx 10 wrench!
2. Remove the protective cover
in the indicated direction!
3. Remove the vacuum tubes
carefully, then insert the
replacement tubes on their
spots!
T X 10
(OPTIONAL) a.
b.
c.
d.
T X 10
1 2

- 14 -
VACUUM TUBES LAYOUT
BEFORE FIRSTUSE
5. Follow the layout shown in the gure below to
place the tubes correctly.
6. Firmly seat each tube in its matching socket,
taking care to ‘key’ the tube pins to the socket holes.
Retain the foam blocks with other packing materials
for possible future use.
7. After placing the protective cover back, fasten it
with the screws.
KT120
E88CC E88CCECC83E88CC E88CCECC83
KT120 KT120 KT120

- 15 -
PLACEMENT
IMPORTANT! Due to the vacuum tube construction
of the amplier, it may heat up during use. Thus,
choose a location for installation where the
appliance can be well ventilated!
The ventilation holes of the amplier must not be
covered (by tablecloth, curtain, newspaper, book,
etc.)! Impairing ventilation can lead to overheating
and irregular operation conditions!
Do not stack multiple units on top of each other.
Avoid relocating the appliance from cold to warm
surroundings! Sudden temperature changes can
lead to moisture condensation. Please wait until
moisture is evaporated before putting your amp-
lier into operation!
The aforesaid applies to the very rst installation
of the amplier as well. Prior to the rst installa-
tion, leave the amplier at its place of operation at
least for 2 hours. Once this time is over, the amp-
lier can be powered up!
The appliance is designed for indoor use. Do not
operate it in wet, humid surroundings!

- 16 -
PLACEMENT
Do not store any electrical device or object in a pe-
rimeter of 200 millimetres around your amplier! Do
not use the appliance next to heating sources and
radiators! Keep it away from hot or dusty
environment and ame!
200 mm
200mm 200mm

- 17 -
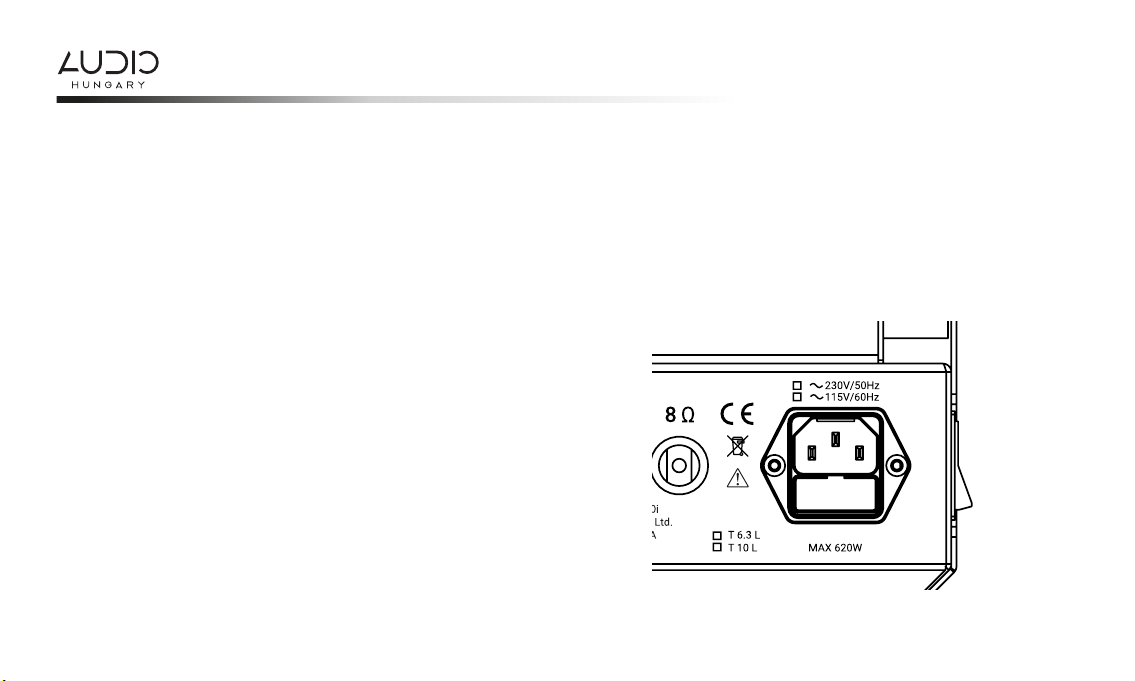
Appliance can operate at 60 Hz with 115 V AC line
voltage, or at 50 Hz with 230 V AC line voltage. The
standard IEC power inlet with fuse holder are placed
on the rear panel.
The amplier must be connected to a mains socket
outlet with a protective earthing connection.
The appliance can be operated safely only with the
supplied mains cable.
Make sure that cables connecting the amplier to
the speakers as well as cables connected to the
ports of the amplier can be effortlessly connected!
The amplier can be connected to an audio system
through RCA ports placed at the rear panel.
According to the nominal impedance of the
speakers used, the amplier outputs are speaker
terminals marked 0 Ω and 8 Ω.
With the input selector rotary switch, the chosen
input source can be activated. The activated source
is indicated by one illuminated led, from the left to
the right in order: LINE 1; LINE 2; LINE 3.
Never operate the amplier without a sucient
load!
Do not power up the amplier until correct loads
(8 Ω, marked on the amplier) are connected to the
output terminals.
INSTALLATION / CONNECTIONS
- 18 -
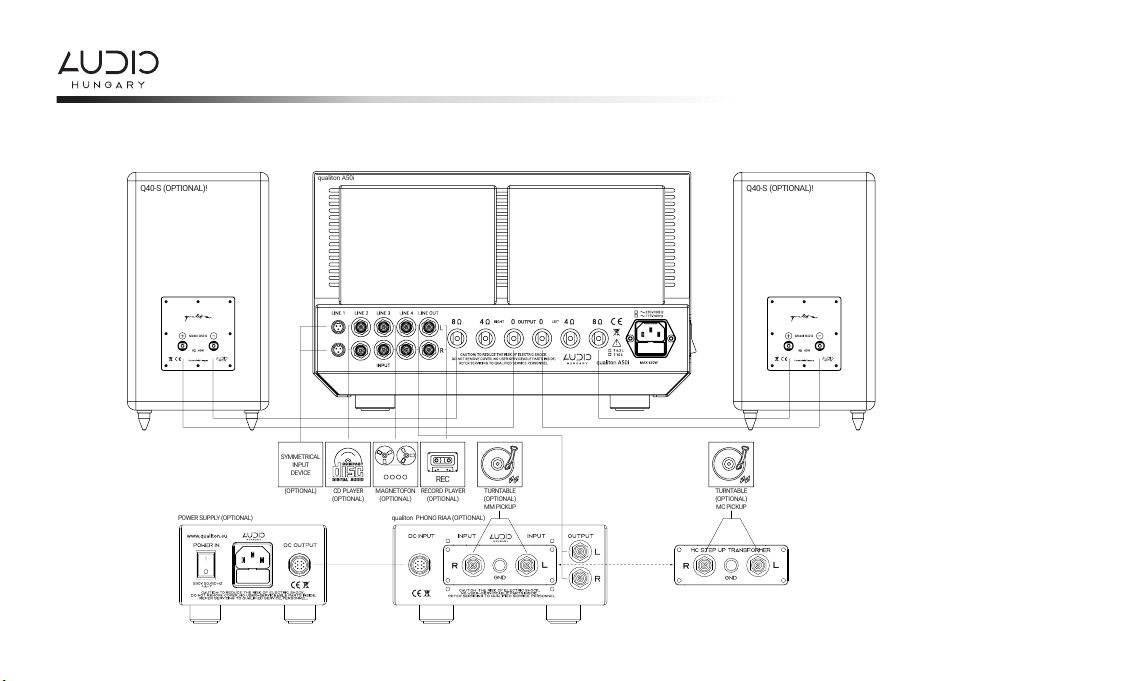
CONNECTION DIAGRAM
The diagram applies to
connecting 8 Ω speakers.
CD PLAYER
(OPTIONAL)
(OPTIONAL)
SYMMETRICAL
INPUT
DEVICE
MAGNETOFON
(OPTIONAL)
TURNTABLE
(OPTIONAL)
MMPICKUP
RECORD PLAYER
(OPTIONAL)
REC
TURNTABLE
(OPTIONAL)
MCPICKUP
qualiton A50i
POWER SUPPLY (OPTIONAL) qualiton PHONO RIAA (OPTIONAL)
!
Q40-S (OPTIONAL)! Q40-S (OPTIONAL)!

- 19 -
CAUTION! Improper installation may cause
malfunction!
Before powering up your amplier, make sure
protective cover, ports, plugs and cables are
checked for intactness!
You must not start up damaged or faulty appliance.
In case of any malfunction, unplug your amplier
immediately!
Components must not be changed or repaired by
the user. In case of a malfunction, the protective
cover must not be opened or removed!
In case of emergency, unplug your amplier
immediately!
In case of faulty operation, contact your local
dealer!
Improper repair may lead to loss of warranty!
The appliance may only be used by qualied
adults or children above 14 years of age if super-
vised by a qualied adult!
Keep the appliance out of the reach of children!
Make sure your domestic animal does not lie or
sit on the top of the appliance!
If you do not use your amplier for a long time,
unplug the appliance carefully!
OPERATION - SAFETY RECOMMENDATIONS
- 20 -
OPERATION - SAFETY RECOMMENDATIONS
Do not block the openings of your amplier since
this may lead to re!
The IEC power inlet features a built-in fuse holder.
The specication of replacement fuses are: T 2.0 L
for 230 V AC mains and T 4.0 L for 115 V AC mains.
Be careful with appliance cables! Do not lead them
across sharp surfaces, do not clam them together
and do not leave them in a hanging position!
You must not operate the appliance with damaged
cables!
In case of re, you must not use water to extinguish
the re, even if the amplier is switched off!
Never touch the appliance or its mains cable with
wet hands!
Clean the appliance with a dry cloth while it is
unplugged!
Table of contents
Other Audio Hungary Amplifier manuals

Audio Hungary
Audio Hungary Qualiton X200 User manual

Audio Hungary
Audio Hungary Qualiton A20i User manual

Audio Hungary
Audio Hungary Qualiton APR 204 User manual

Audio Hungary
Audio Hungary qualiton phono User manual

Audio Hungary
Audio Hungary Qualiton A20i User manual

Audio Hungary
Audio Hungary Qualiton C200 User manual

Audio Hungary
Audio Hungary Qualiton A35 User manual

Audio Hungary
Audio Hungary QUALITON X2 User manual


