Audio-Visual Station AVS-3210CYC User manual

User Manual
LED Cyclorama Model: AVS-3210CYC
LED COLOR WASH
1. Product details-------------------------------------------------------------1
1.Specification-------------------------------------------------------------1
1.2. Features--------------- --------------------------------------------------1
1.3. Fast Instructions-------------------------------------------------------2
1.4. Master Light-------------------------------------------------------------3
1.5. Master/slave-------------------------------- ----------------------------3
2. Operating Instructions----------------------------------------------------4
2.1. Keyboard Functions-----------------------------------------------------4
2.1.1.Basic Instructions--------------------------------------------------4
2.1.2.Key Pass Word-----------------------------------------------------4
2.2.Menu Navigation-------------------------------------------------------4
2.3.Menu Description------------------------------------------------------6
2.3.1.Static Mode(STAT)-----------------------------------------------6
2.3.2.Auto Mode(AUTO)-----------------------------------------------6
2. 3. 3. Sound Control------------------------------------------------------7
2.3.4.DMX and Slave Mode(RUN)-------------------------------------7
2.3.5.DMX Setting(DMX)----------------------------------------------7
2.3.6.DMX Mode Select(PERS)----------------------------------------8
2.3.7.ID Setting(ID)---------------------------------------------------8
2.3.8.Over-tempreature Protection(TEMP)-------------------------8
2.3.9.Scene Edit(EDIT)------------------------------------------------9
2.3.10.Setting(SET)----------------------------------------------------9
2.3.11.White Balance Setting(CAL1)---------------------------------10
2.3.12.Color Adjustment(CAL2)--------------------------------------11
2.3.13.Key Protection Setting(KEY)----------------------------------11
2.4.Controller Operation--------------------------------------------------11
2.4.1.DMX Channels-----------------------------------------------------11
2.4.2.Color List-----------------------------------------------------------15
3.Edit Instructions----------------------------------------------------------15

1.Product Details
1.1.Specifications
Input Voltage:AC100-240V 50/60Hz
Power:320W
LED:32 pcs 10W 5-in-1 LED
Beam Angle:25
Life:min 50,000 hours
Control Mode:DMX,Master/slave,Auto-run
DMX Modes: 7 DMX working modes
DMX channel:12CH/3CH/4CH/5CH/6CH/7CH/3CH
IP Rating:IP20
Product Size:575*115*115mm
N.W.:5.0KG
1.2.Features
■3 Control Modes
◆ External Control
DMX512 control(7DMX working modes)
Master/slave control
◆ Auto-run
Onboard Program
Various gradul, puls color change
Various strobe effects: speed change (slow to fast), mix(strobe+colors、
strobe+color change)……
Editable Programs
Functional,useful editable programs. Programs can be edited without
external controller. Programs like color change, step change, strobes, can
be combined ramdonly.
Prorgams can be downloaded from master light
◆ Static Color Mode
A certain color can be set without a controller, and strobe on that color is
available.
■“Light Cut Software”
At “STAG” Mode, if the main dimmer is at value “0” when onboard
program or edited program is working, the light will be off,while program
is still working.
Difference to “BLACKOUT”: it is just for the lights,no effect to the
controller.
■ID Setting
At “STAG”mode,Lights with the same ID(Max 66 ) can be controlled
seperately.Effects includes: light up one by one,color change,strobe,
gradul change,etc.
■Non-linear and linear dimming
16 bit(60000 steps)
■White Balance
white color at different color tempreature
■Color Reset
Software for adjusting the current.
■Display Protection
Display will turn off if no work for 30 seconds, press any keep to exit the
protection mode.
■Over-tempreature Protection
A certain value of tempreature can be set to protect the lights
■Pass word for button operation
1.3.Fast Instructions
■Mode change and setting
◆At main menu, all functions showing on display are under external DMX
control.
◆DMX512 is the default mode, the lights can only be controlled by DMX,
12

the 4th dot flickers. If not,check the connection.
●For choosing DMX Mode, press“MENU” until it shows“PERS”, then
press“ENTER” to confirm.
●5 dimming speeds to determine the softness and degree.
Press”SET”—“DIM” and the 11CH under “STAG” mode
●For choosing master/slave mode, Press ”RUN” then choose”SLAV”,then it
receives data from master light or download edited program from master
light.
■Make sure there is only one DMX controller or only one master light. With
more than 2, the lights will not work properly due to the siganl
interferance.
◆ Static Mode, press “STAT”, then it is master light.
◆ Auto-run mode, press “AUTO“, Then it is master light.
1.4.Master Light
■The fixture becomes master light at the following cases.
At “STAT”
At “AUTO”
At “EDIT”
Uploading programs at “UPLD” under “SET”
1.5.Multi-lights working Synchronously
When using a controller to control more lights and use the strobe and
auto-run function, the controller can only send data, strobe and auto-run
program are determined by the lights themselves. Oscillator frequency for
each light is not exactly the same, so if you don’t control them, the lights
might not work synchronously after a long time.Anyway, we can solve this
problem.
1) In actual usage, all lights might be powered on at different time,and the
connection to controller might be at different time too,then they might be
not able to work synchronously. If this happens, change the
value of the push on controller, for example, push the putter from 20 to 0,
then push back to 20, then they will work synchronously.
2)Using a controller to edit the strobe and prorgams, they will work
synchronously.
3) Lights under master/slave mode will work synchronously.
2.Operating Instructions
2.1.Display information
2.1.1.Basic Usage
【MENU】Main Menu Select or Exit
【ENTER】Enter or Choose the Submenu
【UP】Menu Select or data Increase
【DOWN】Menu Select or data Decrease
2.1.2.Key Pass Word
【UP、DOWN、UP、DOWN】+【ENTER】
Press【UP】,then press【DOWN】,then press【UP】,then press【DOWN】,
then press【ENTER】to confirm
2.2.Menu Navigation
3
MENU ENTER UP DOWN
4

2.3.Menu Description
2.3.1.Static Mode(STAT)
At【STAT】,press【ENTER】to enter static mode,then the light is master light
Press【ENTER】to choose the submenu:【Red】、【Green】、【Blue】【Strobe】
Press【UP】/【DOWN】to choose the value
Press【MENU】to exit, then it comes to external control mode
2.3.2.Auto Mode
5
6

At【AUTO】,press【ENTER】to enter auto mode,then the light is master light
Press【UP】/【DOWN】to choose the onboard program or the edited program
Press【MENU】to exit, then it comes to erternal control mode
2. 3. 3 Sound Control(SOUND)
At【SOUND】, press【ENTER】to enter Sound Control mode,then the light
is master light
Press【UP】/【DOWN】to choose the 【MOD1】or 【MOD2】
Press【MENU】to exit, then it comes to erternal control mode.
2.3.4.DMX and Slave Mode(RUN)
At【RUN】,press【ENTER】to enter,the the light is at external control mode
Press【UP】/【DOWN】to choose【DMX】or【SLAV】by a controller.
Press【UP】/【DOWN】to choose【1~512】,press【MENU】to exit.
【DMX】means the light can only controlled by a controller
【SLAV】means it only receives signal from master light
Press【MENU】to exit
2.3.5.DMX Setting(DMX)
At【DMX】, press【ENTER】to enter,then the light is controlled
can be activated by DMX Channel 6.
2.3.6.DMX512 Mode Select(PERS)
At【PERS】, press【ENTER】to enter,then it’s controlled by an external
controller.
Press【UP】/【DOWN】to choose the DMX working mode( check the channel
list for the specific modes)
Press【MENU】to exit
2.3.7.ID Setting(ID)
At【ID】,press【ENTER】to enter,then the lights can be controlled by an
external controller.
Press【UP】/【DOWN】to choose【1~66】,press【MENU】to exit.
2.3.8.Over-tempreature Protection(TEMP)
At【TEMP】Press【ENTER】,then the lights can be controlled by an external
controller.
Press【UP】/【DOWN】to choose【CURR】or【TOP】
At【CURR】press【ENTER】,the current temp is shown(Notes:the tempreature
might not be accurate due to the materal andlocation, it is
7 8
just for reference.Press 【MENU】to exit.
At【TOP】press【ENTER】,set the tempreature.(default 85 degree),press
【UP】/【DOWN】to choose from(20~150),Press 【MENU】to exit.
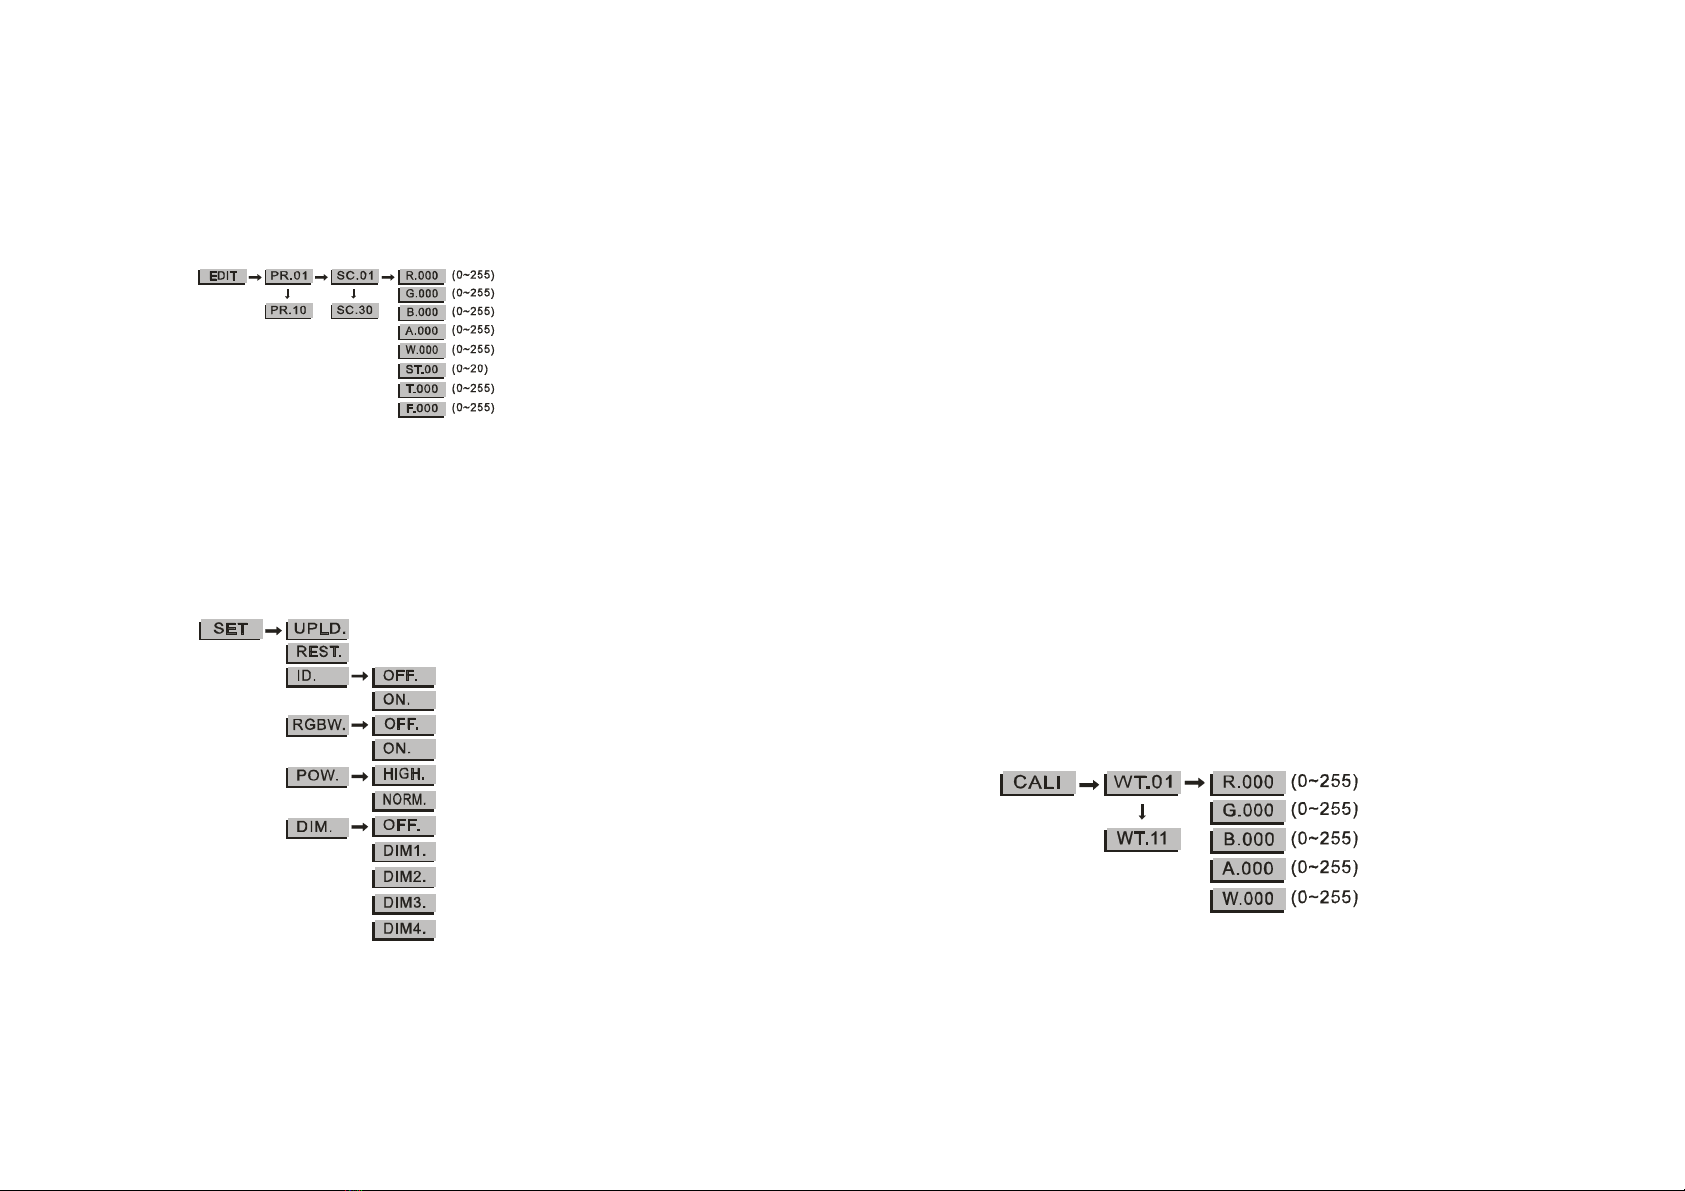
2.3.9.Scene Edit(EDIT)
At【EDIT】press【ENTER】,then it can be edited and becomes the master light.
Press【ENTER】to the submenu or data select, Press 【MENU】to exit.
Press【UP】/【DOWN】to choose the program, scene or data value.(See
detailed information at Edit Instructions)
2.3.10.Setting(SET)
At【SET】Press【ENTER】,then the light exits the external control mode.
【UPLD】means sending edited programs,press【ENTER】to enter the pass
word confirmation,then press【UP、DOWN、UP、DOWN】+【ENTER】,the light
turns yellow,it emans data is being sending,and it shows the sending
process, after sending, the light turns green. Slave light will turn green after
receiving. If it stays yellow, it means the data sending is failed.If this
happens, power off the slave light and do it again.
【REST】means restore the factory default,press【ENTER】to enter, password:
【UP、DOWN、UP、DOWN】+【ENTER】
【ID】means ID switch setting, press【ENTER】to enter,then press【UP】/
【DOWN】to choose【ON】ID setting is allowed,【OFF】ID setting is forbiden.
【RGBW】means color adjustment,press【ENTER】to enter,then press【UP】
/【DOWN】to choose【ON】color adjustment is allowed,or 【OFF】forbidden.
RGB ratio can be setting under【CAL2】
【POW】means power setting,press【ENTER】to enter,press【UP】/【DOWN】
to choose【Normal】or【High】,【Normal=33%】,【High=100%】
【DIM】means non-linear dimming speed setting,press【UP】/【DOWN】to
choose,【OFF】means close the function of dimming speed,【DIM1】means
speed1(fastest),【DIM2】means speed 2,【DIM3】means speed 3,
【DIM4】
means speed 4(the slowest),The slower the speed, the smoother the
dimming.
2.3.11.White Balance Setting(CAL1)
At【CAL1】,press【ENTER】to enter,then the light is at the mode of external
control
Press【UP】/【DOWN】to choose【White 1~11】,press【ENTER】to set.
Press 【ENTER】to choose 【Red】、【Green】、【Blue】、【Yellow】,【White】
9 10

Press【UP】/【DOWN】to choose【0~255】
Note:When it is in DMX mode【STAG】,These 11 white balance
2.3.12.Color Adjustment(CAL2)
At【CAL2】press【ENTER】to enter【RGBW】,then the light is at the mode
of external control
Press【ENTER】to choose【Red】、【Green】、【Blue】、【Yellow】
Press 【UP】/【DOWN】to choose the color ratio【25~255】
2.3.13.Key Protection Setting(KEY)
At【KEY】, press【ENTER】to enter, then the light is at the mode of external
control
Press【UP】/【DOWN】to choose【ON】/【OFF】
If you choose【ON】,the keys will be locked once the light is in protection
mode. Even if you restart it again, they will be still locked. For unlocking,
please press the pass word【UP、DOWN、UP、DOWN】+【ENTER】
If you choose【OFF】,the keys will be never locked.
2.4.Controller Operation
2.4.1.DMX Channels
7 DMX working modes:【STAG】、【ARC.1】、【AR1.d】、【ARC.2】、【AR2.d】、
【AR2.S】、【HSV】
STAG Mode
11 12
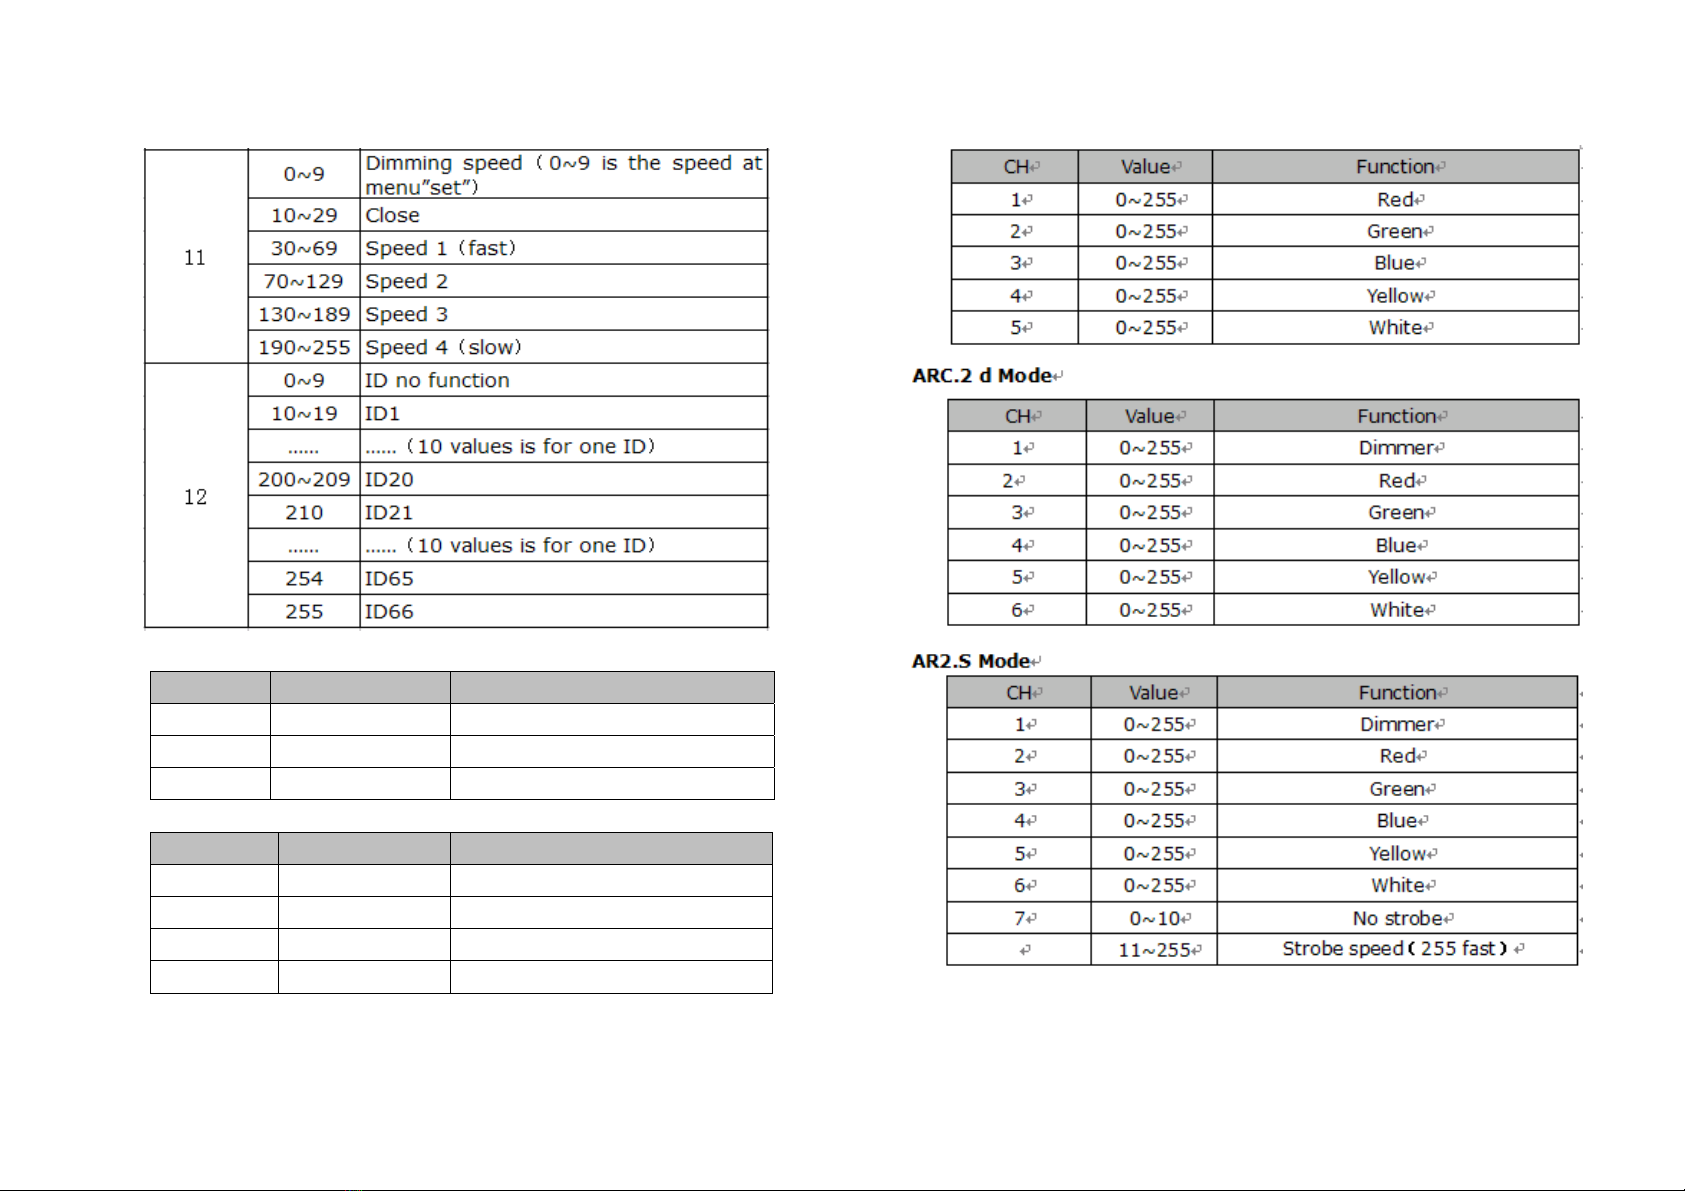
ARC.1 Mode
CH Value Function
1 0~255 Red
2 0~255 Green
3 0~255 Blue
AR1.d Mode
CH Value Function
1 0~255 Dimmer
2 0~255 Red
3 0~255 Green
4 0~255 Blue
ARC.2 Mode
HSV Mode
13 14
CH Value Function
1 0~255 H (hues) (0~100%)
2 0~255 S (saturation) (0~100%)
3 0~255 V (value) (0~100%)
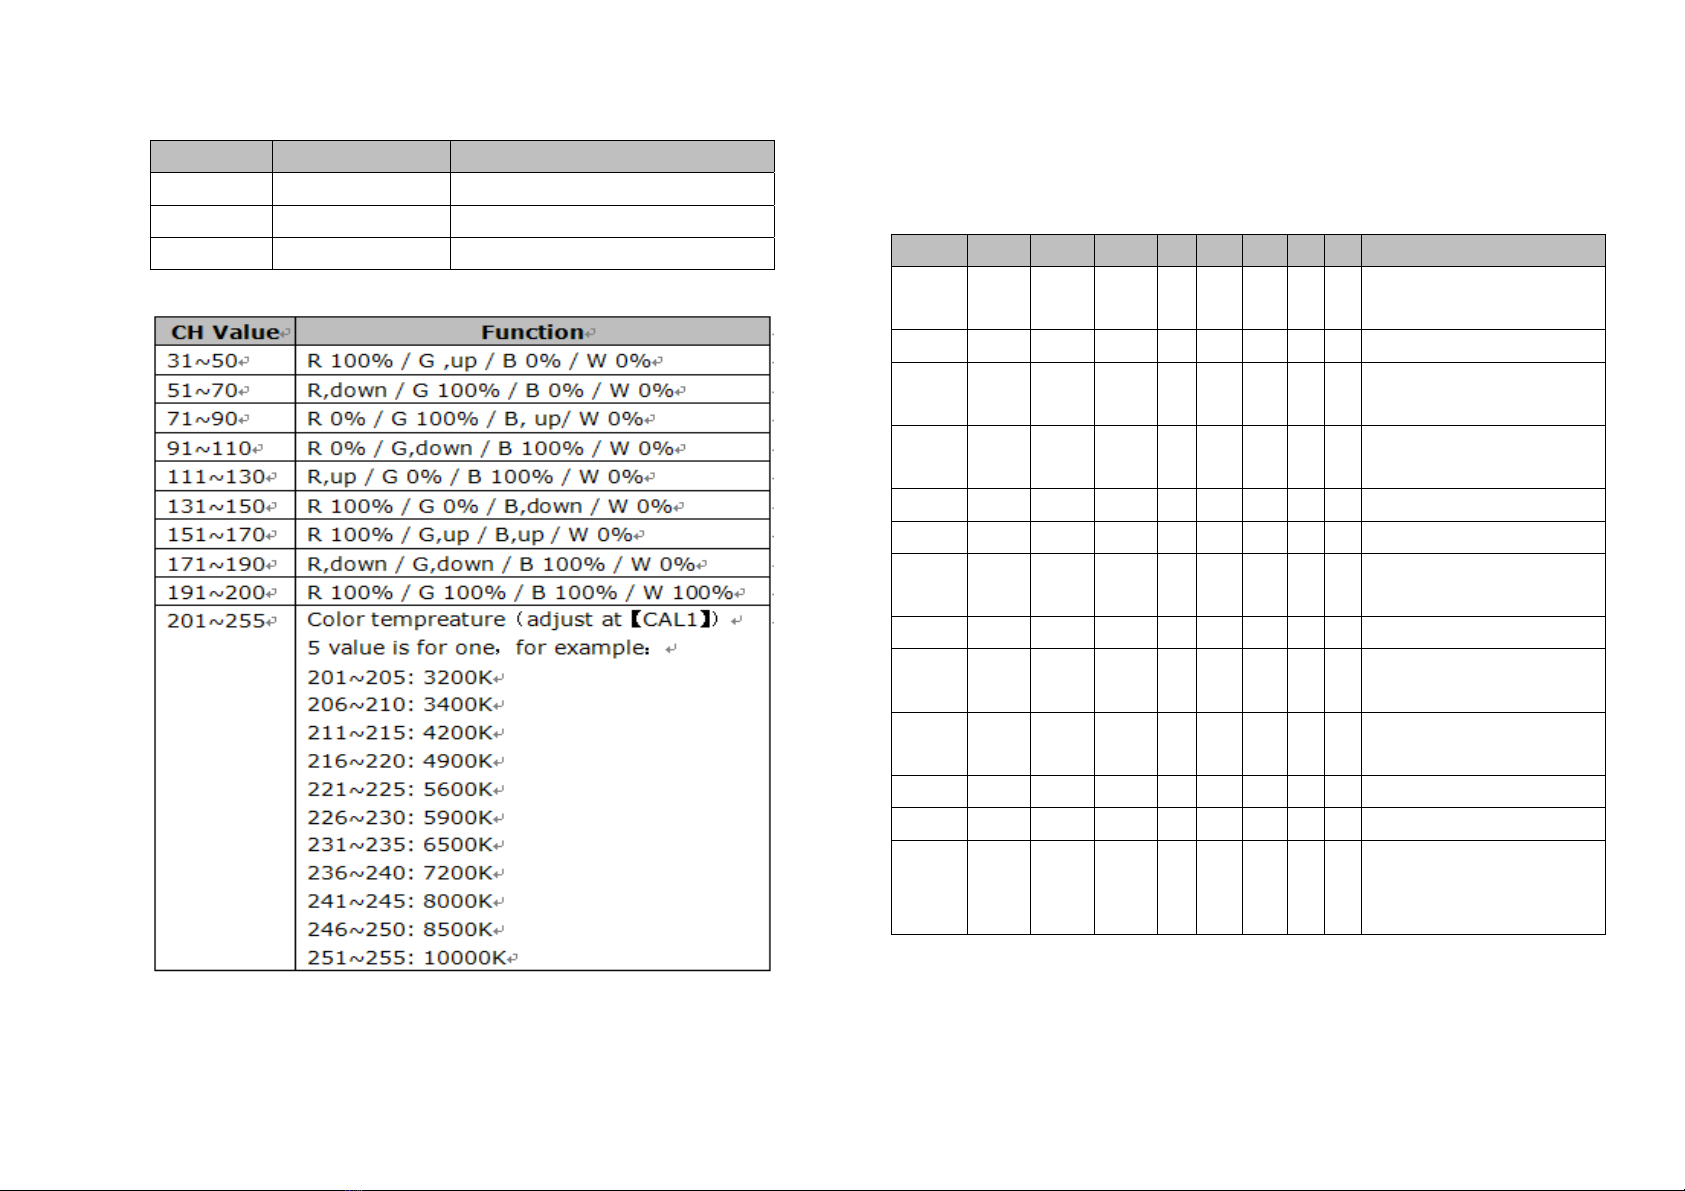
2.4.2.Color List
3.Edit Instructions
Max 10 programs can be edited, each program has 30 scenes, each scene
has 8 functions : R-red, G-green, B-blue, Y-yellow, W-white, ST-strobe, T-timing,
F-fading time. For better understanding on the functions, we provide an
example as follows:
Scene R G B Y W ST T F Effect
SC.01 255 0 0 0 0 0 2 2 R,gradual brighter (2
sec)
SC.02 0 0 0 0 0 0 2 2 R,gradual dim off
SC.03 0 255 0 0 0 0 4 2 G,gradual brighter (2
sec),stay for 2 sec
SC.04 0 0 0 0 0 0 4 2 G, stay for 2 sec, then
dim off (2 sec)
SC.05 0 255 255 0 0 0 2 2 GB,gradual brighter
SC.06 0 0 255 0 0 0 2 2 G,dim off; B,stay
SC.07 255 0 0 0 0 0 2 2 R gradual brighter,and B
dim off
SC.08 255 0 0 0 0 0 1 0 R, stay for 1 sec
SC.09 0 255 0 0 0 0 1 0 From R step change to
G,G stay for 1 sec
SC.10 0 0 255 0 0 0 1 0 from G step change to B,
B stay for 1 sec
SC.11 0 0 0 0 0 0 1 0 Off for 1 sec
SC.12 255 255 255 0 0 2 5 0 RGB strobe
…… 0 0 0 0 0 0 0 0 Scenes with time of 0
will not work, until the
next (not 0) turns up.
Fading is determined by two scenes beside each other, the efect can only be
seen when the whole prorgam is running.If the timming value is 0,this scene will
be ignored. If the fading time is longer than timming time, the timming time will
15 16

become the fading time.
Strobe and fading time can be setted together. If you are not familiar with the
setting, please takes notes on paper, then set according to what you write,
check the effect, and adjust the value.EDIT is not difficult, you can start from
the easy ones, then try the complex ones. Once you master it, you will find it
very helpful. When you reset the default function under” SET”,the edited
programs will be still there.
17
Table of contents


