AudioAffairs RW010 User manual

clock radio
operation manual
RW010
RW010.book page 1 Wednesday, September 27, 2017 10:08 am 10
Machine Translated by Google

EN
EN
2
Power supply................................................ ............... 15 8.
Operation ................................ ............................................ 16 8.1.
Basic operation ..................................................... ......................16
8.2. Set time ................................................ .......................17 8.3.
Switching off with SLEEP ................................................ ..............17
8.4. Minute Minder (NAP Timer) ............................................ ......18
8.5. Load external devices ........................................ .................18
9. Radio ............................. .................................................. ..... 20 9.1.
Set station ..................................................... .......................20
9.2. Save stations ................................................ .......................20
22
24
24
.................................................. ................................
Scope of delivery................................................. ........................
6 4. Safety instructions....................... ........................................ 6 5.
Device overview ...... .................................................. .......... 10 6.
Preparation ..................................... .................................... 14 6.1.
Setting up the device ..................................................... ..............14
6.2. antenna ................................................ .......................................14
7.
www.latupo.com
13. Troubleshooting ..................................................... ................ 25
14. Technical data................................. ................................... 26 15.
Hotline ........... .................................................. .................... 27 16.
Guarantee .......................... .................................................. ... 28
00800 - 456 22 000
1. Thank you for your trust! ..................................... 3 2.
General ......... .................................................. ................... 4 3.
12. Disposal ..................................... .......................
clock radio
CUSTOMER SERVICE
10. Alarm
clock 11. Cleaning ............................................ ................................
RW010.book page 2 Wednesday, September 27, 2017 10:08 am 10
Machine Translated by Google

EN
1. THANK YOU FOR YOUR TRUST!
EN
Waterloohain 9 - 22769 Hamburg
We hope you enjoy your new clock radio!
Article
Germany
model
Web
Many thanks for your trust!clock radio
ManualID
www.latupo.com
clock radio
Manufacturer
CUSTOMER
SERVICE 00800 - 456 22 000
We congratulate you on your new radio alarm clock and are convinced that you will be satisfied
with this modern device.
RW010
3 www.latupo.com
In order to guarantee that your clock radio always works optimally and is ready to perform, and to
ensure your personal safety:
PO51001218 / PE /2017
Before using the device for the first time, read these operating instructions thoroughly
and, above all, follow the safety instructions!
Latupo Ltd
RW010.book page 3 Wednesday, September 27, 2017 10:08 am 10
Machine Translated by Google

EN
2. GENERAL
•
keep the manual
Awards/Icons
NOTE: Facts and special features that should be taken into account when using
the device.
4
Intended use The clock radio is a
consumer electronics device.
This device is intended for receiving and playing radio stations and for charging
external devices.
CUSTOMER SERVICE
clock radio
General
The device is intended for private use and is not suitable for commercial use. Any
other use or modification is excluded from the intended use.
00800 - 456 22 000
If necessary, you will find the following warnings in these operating instructions:
www.latupo.com
DANGER! High risk: Ignoring the warning can cause damage to life and
limb.
• All activities on and with this device may only be carried out as described in
these operating instructions. • Keep these instructions.
WARNING! Medium risk: Ignoring the warning can cause injury or serious
property damage.
If you pass the device on to others, please include these operating
instructions.
CAUTION: Low Risk: Ignoring warning can cause minor injury or property damage.
RW010.book page 4 Wednesday, September 27, 2017 10:08 am 10
EN
Machine Translated by Google

EN
5 www.latupo.com
Example: Press the NAP/SLEEP button.
• Action instructions with a fixed order are always numbered
(1st, 2nd, 3rd, etc.).
General
clock radio
Note on the declaration of conformity Latupo
GmbH hereby declares that this product conforms to the basic requirements
and other relevant regulations of the RED Directive 2014/53/EU, the EMC
Directive 2014/30/EU, the ErP Directive 2009/125/EG, the low voltage
directive 2014/35/EU and the ROHS directive 2011/65/EG.
• Information on the display is written in italics (oblique font).
The complete declaration of conformity and these operating instructions
as a PDF can be found on the Internet at www.latupo.com.
This symbol marks the product as a device of protection class II. Devices with
this protection class have reinforced or double insulation.
ben.
Type plate • The
type plate with the technical data is on the back
Example: Search appears on the display.
of the device.
• Keys that should be pressed are always written in bold .
CUSTOMER
SERVICE 00800 - 456 22 000
RW010.book page 5 Wednesday, September 27, 2017 10:08 am 10
EN
Machine Translated by Google

EN
4. SAFETY PRECAUTIONS
3. SCOPE OF DELIVERY
00800 - 456 22 000
General information • The
type plate with the technical information is located on the bottom
te of the device.
www.latupo.com
• Before connecting the device, please read the safety instructions and the operating
instructions carefully. This is the only way to use all functions safely and reliably.
scope of delivery
• Packaging material is not a child's toy. Children are not allowed to play with the
plastic bags. There is a risk of suffocation. • This device can be used by children
aged 8 and over and by people with reduced physical, sensory or mental abilities or
lack of experience and knowledge if they are supervised or have been instructed
in the safe use of the device and the resulting hazards have understood.
clock radio
• Children must be supervised to ensure they are not involved
play on the device.
When unpacking, make sure that the following items are included:
• Modifications to the device are not permitted.
• Clock radio •
User manual (incl. guarantee card)
6CUSTOMER SERVICE
RW010.book page 6 Wednesday, September 27, 2017 10:08 10
EN
Machine Translated by Google

EN
EN
dent moisture in the device. Leave the device switched off for a few hours.
advises.
• Protect the device and the mains plug from moisture, dripping or
clock radio safety instructions
Splashing water: There is a risk of electric shock. For example, do not place
vases or the like filled with liquids on or near the device.
• The device is not designed for use in rooms with high humidity (e.g.
• Heavy objects must not be placed on the device. • Protect the
device from heat: there is a risk of fire. Do not cover the ventilation slots. If you
place the device on a shelf, leave a space of at least 10 cm on all sides. •
The device must not be covered (e.g. with newspapers, pillows or blankets).
• Candles and other open flames must be kept away from this product at all
times to prevent the spread of fire.
Ambient conditions • If the
device is moved from a cold to a warm place, Kon
• Set up the device so that it is not exposed to direct sunlight. • Place
the device on a firm, level surface. • Furniture is coated with a variety of
materials and treated with different care products. Some of these substances
may contain components that attack and soften the silicone feet. If
necessary, place a non-slip pad under the item.
bathroom). Observe the ambient conditions specified in the technical data.
• Prevent foreign objects and liquids from entering the Ge
CUSTOMER
SERVICE 00800 - 456 22 000 7 www.latupo.com
RW010.book page 7 Wednesday, September 27, 2017 10:08 10
Machine Translated by Google
power connection
EN
•
•
EN
8th
• To pull the mains plug out of the socket, always hold the plug, never the
pull cable.
CUSTOMER SERVICE
DANGER! Never open the housing of the device, it contains no serviceable parts!
There is a risk of death from electric shock when the housing is open.
00800 - 456 22 000
clock radiosafety instructions
www.latupo.com
DANGER! If liquids or foreign objects get into the device, pull the mains plug
immediately. Have the device checked before using it again.
Malfunctions •
If the mains cable or the device is damaged, immediately pull the mains plug out of the socket. •
Do not use the device if there is visible damage to the housing, the mains plug or the mains
cable. Repairs to the device may only be carried out by the service center in order to avoid hazards.
• Only connect the mains plug to a properly installed, easily accessible 230 V ~ 50 Hz socket. After
connection, the socket must remain easily accessible. • Lay the mains cable in such a way that
it does not become a tripping hazard. • When setting up the device, make sure that power or
other cables
not be pinched or crushed. • In the event of a
thunderstorm, pull the mains plug out of the socket. • The device is not
disconnected from the mains after it has been switched off. In order to do this,
Cleaning and care • Do not use
caustic or abrasive cleaning agents. This
pull out the mains plug.
could damage the surface of the device.
RW010.book page 8 Wednesday, September 27, 2017 10:08 am 10
Machine Translated by Google

batteries
EN
EN
clock radio
9 www.latupo.com
keep batteries out of the reach of small children. If a battery has been swallowed,
medical help must be sought immediately. • Do not charge or reactivate batteries by
any other means, disassemble, throw in fire, or short-circuit. • Remove the batteries from the device
if you do not intend to use it for a long period of time or if the battery power is exhausted. The
batteries could leak and damage the device. • Do not expose batteries to excessive heat, do not lay
them down
safety instructions
CUSTOMER
SERVICE 00800 - 456 22 000
• Observe the correct polarity (+/–) when inserting the batteries. • Clean battery and
device contacts before installing batteries. • Batteries can be fatal if swallowed. Keep this
• If battery acid has leaked, avoid contact with skin, eyes and mucous membranes. In the event of
contact with the acid, immediately rinse the affected areas with plenty of clear water and consult
a doctor immediately.
• Only use batteries of the same brand and type, do not mix used and new batteries. Always
replace both batteries.
radiators and do not expose them to direct sunlight. Otherwise there is an increased risk of
leakage.
RW010.book page 9 Wednesday, September 27, 2017 10:08 am 10
Machine Translated by Google
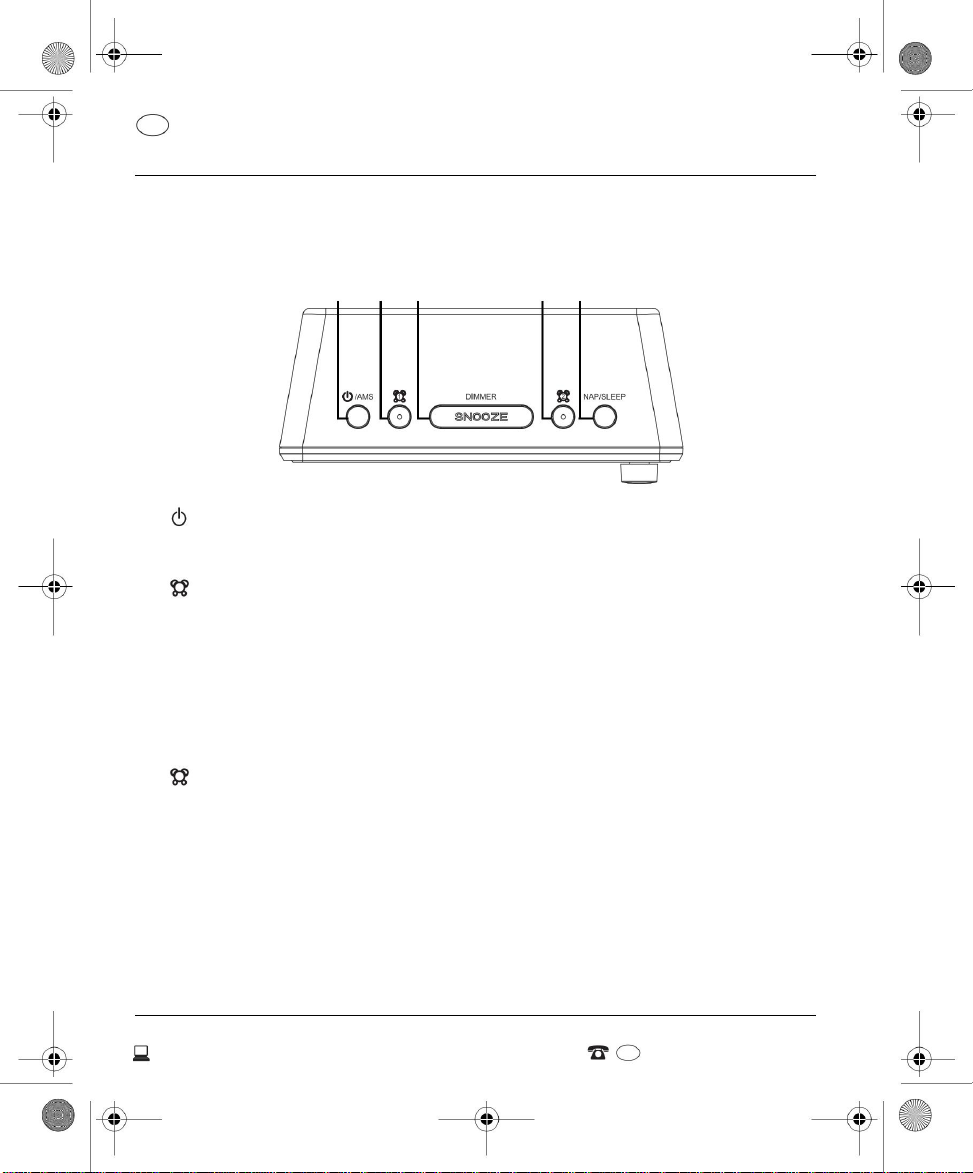
View from above
5 NAP/SLEEP
1
10
/AMS
3 SNOOZE/DIMMER on alarm: snooze button (switch off alarm for 9 minutes)
switch to stand-by, switch on from stand-by in operation:
press and hold for automatic station search and station memory
CUSTOMER SERVICE
clock radioDevice overview
Alarm 1: turn alarm 1 on and off // alarm sound or
Alarm 2: turn alarm 2 on and off // alarm sound or
Radio: Short press repeatedly to select the saved
select radio
select radio
00800 - 456 22 000
call up the station
Radio: Store stations manually
Press and hold for automatic channel search upwards Press
briefly: Set sleep timer Press repeatedly: Set switch-off time Press
and hold: Set minute minder (NAP) Press repeatedly: Set time
for minute minder
Press and hold for automatic channel search down
www.latupo.com
Change display (3 levels)
5. DEVICE OVERVIEW
EN
2
1
RW010.book page 10 Wednesday, September 27, 2017 10:08 am 10
451 23
2
4
EN
Machine Translated by Google

front view
EN
9
8th
6
7
SLEEP
EN
CUSTOMER
SERVICE 00800 - 456 22 000
6 VOLUME/HOUR –/+ Control volume / set time
CLOCK
Time/Alarm: Set hours Function switch:
Set time Set alarm 1 Time / radio mode
Set alarm 2 8 TUNING/MIN. –/+ Radio:
select frequency / select memory
location
Device overviewclock radio
AL2SET
7TIMESET
Time/Alarm: Set minutes Display of
information, e.g. B. frequency, time, alarm time etc.
9 displays
11
www.latupo.com
AL1SET
RW010.book page 11 Wednesday, September 27, 2017 10:08 am 10
Machine Translated by Google

13 12
11
10
14
CUSTOMER SERVICE
Wire antenna
14 5V 1A USB port: only for charging externaldevices CHARGE ONLY
Device overview clock radio
10
00800 - 456 22 000
www.latupo.com
11
12
Battery
compartment
Loudspeaker 12 AC ~ Power cord 13 ANT.
EN
rear view
EN
BATCH ONLY
5V 1A
RW010.book page 12 Wednesday, September 27, 2017 10:08 am 10
ANT.
OPEN
AC~
Machine Translated by Google
12 3 4
10
6
5
9
12 7
8th
11
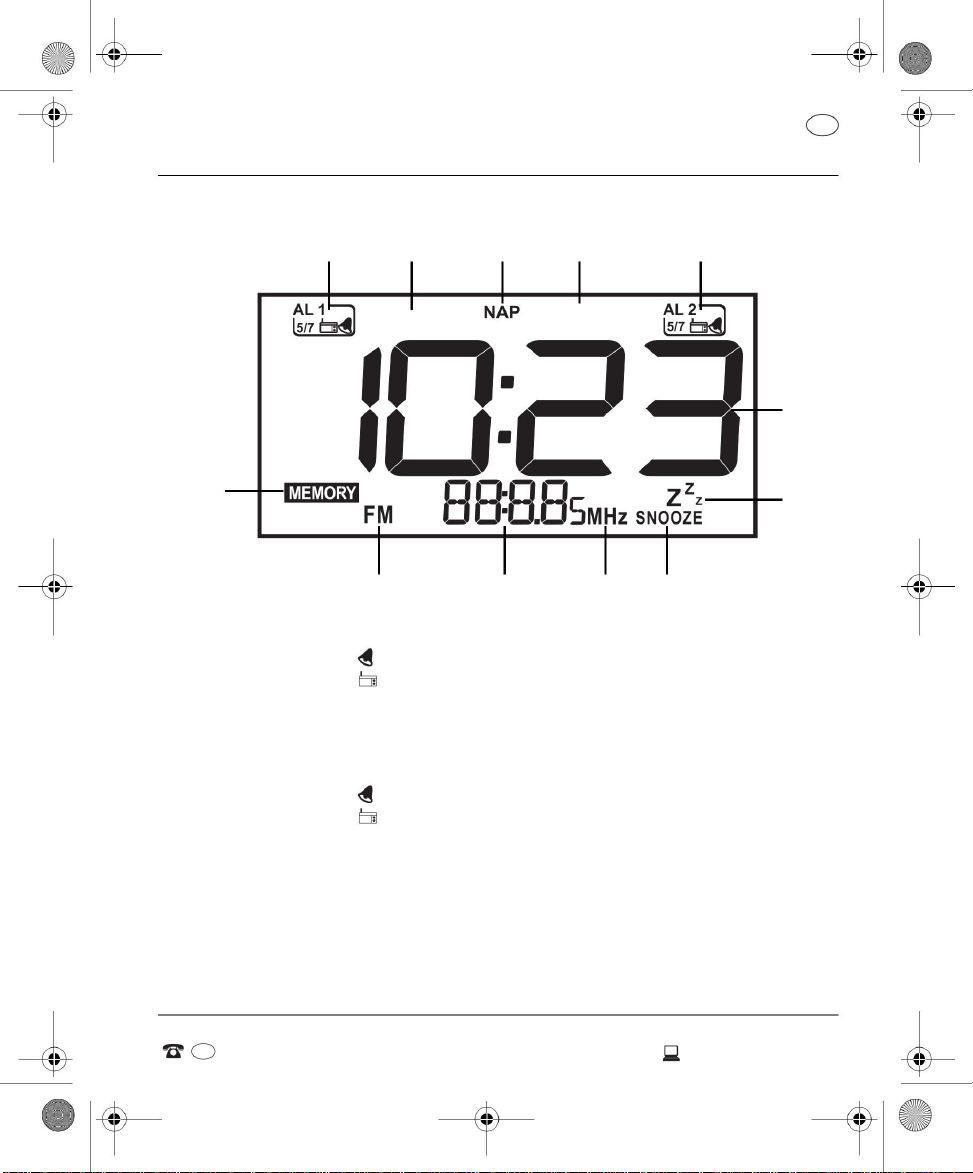
11 pm
Alarm 2 active
2 SLEEP Minute Minder (NAP) active
Receiving FM station flashes while
storing stations
9MHz _
Device overview
6
Wake up with alarm sound
Snooze function activated
Alarm with radio operation
4
CUSTOMER
SERVICE 00800 - 456 22 000
Wake up with alarm sound
12 MEMORIES
3 NAP
1 AL 1
10
Activated weekdays of the alarm clock
Auto power off enabled
Display of frequency / alarm time / storage space
8 SNOOZE
Alarm with radio operation
clock radio
Frequency display unit (FM)
7ZZZ _Display of the time the
alarm of the timer is active (NAP)
5 AL 2
13
www.latupo.com
Alarm 1 active
EN
screen
EN
SLEEP
RW010.book page 13 Wednesday, September 27, 2017 10:08 am 10
MONTUEWED
THUFRISATSUN
Machine Translated by Google

EN
6. PREPARATION
6.2 ANTENNA
6.1 INSTALLATION OF THE DEVICE
to find.
DANGER! Protect the device from moisture, dripping or splashing water: there is a risk of
electric shock. The device is not designed for operation in rooms with high humidity (e.g.
bathrooms). • Completely remove all packaging parts. • Place the device on a stable, level
surface. • Do not expose the device to extreme heat or humidity. Make sure the device is adequately
ventilated from all sides.
14
clock radio
preparation
1. Unwrap and straighten the antenna.
CUSTOMER SERVICE
00800 - 456 22 000
2. Try different positions to find the best reception quality
www.latupo.com
RW010.book page 14 Wednesday, September 27, 2017 10:08 am 10
EN
Machine Translated by Google

EN
7. POWER SUPPLY
power connection
Inserting the batteries
The backup batteries ensure that the time, the set alarm times and the saved
stations are retained in the event of a power failure.
clock radio
the polarity (+/–).
HINTS:
power supply
2. Insert the two 1.5V batteries into the battery compartment. Take note
• If no batteries are inserted, the display shows 0:00 after the end of the power cut. After that, the
clock continues. Both alarm times are set back to 00:00. • Even if the batteries are inserted,
the display will be switched off in the event of a power failure. You will not be able to listen to
the radio or be woken up again until the device is reconnected to the power cord.
The device is designed for alternating current 230 V ~ 50 Hz. •
Only connect the device to an easily accessible 230 V ~ 50 Hz socket . The socket must remain
easily accessible after connection.
•
1. Remove the battery compartment cover on the back of the clock radio.
15
www.latupo.com
You can also operate the clock radio without batteries. However, after a power failure
you will have to reset the time and alarm times and save the stations again.
3. Replace and close the battery compartment cover.
You need two 1.5 V batteries (type LR03 / AAA), which you can obtain from specialist
retailers.
CUSTOMER
SERVICE 00800 - 456 22 000
RW010.book page 15 Wednesday, September 27, 2017 10:08 10
EN
Machine Translated by Google

service clock radio
NOTE: The device still consumes some power even after it has been switched off.
The setting is displayed and saved when the power is turned off.
Adjust the desired volume by rotating the VOLUME/HOUR –/+ control . The
display 0-15 can be seen while turning the control (00 = sound off).
Press the SNOOZE/DIMMER button to adjust the brightness of the display in 2
levels or to switch it off.
Turn device on/off • Press /
AMS to turn on the device. • Press the /AMS button
again to switch the unit to stand-by mode. The time is also displayed in stand-by
mode if the display lighting has not been switched off automatically with the
SNOOZE/DIMMER button or between 11:00 p.m. and 4:59 a.m.
CUSTOMER SERVICE
00800 - 456 22 000
16
Pull out the mains plug if you do not intend to use the device for a long period of
time. You will then need to reset the clock and alarm if no backup batteries are
installed.
www.latupo.com
RW010.book page 16 Wednesday, September 27, 2017 10:08 10
8.1 BASIC OPERATION
EN
8. OPERATION
dimmer
volume
EN
Machine Translated by Google

3. Short presses on the NAP/SLEEP button will toggle between SLEEP 120, 90, 60,
30, 15, 10, 5 minutes or OFF. After approx. 3 seconds the normal display
appears again and the setting is saved. After the set time has elapsed, the device
switches off.
1. Set the function switch to TIME SET. The time display flashes.
2. Rotate the VOLUME/HOUR –/+ control to set the hour.
NOTE: When the sleep function is activated, the remaining time can be displayed
by briefly pressing the SLEEP button once.
3. Rotate the TUNING/MIN –/+ control to set the minutes.
CUSTOMER
SERVICE 00800 - 456 22 000
service
clock radio
4. Set the function switch to CLOCK. The display stops flashing and the setting is
saved.
17
www.latupo.com
Automatic switch-off Between
11:00 p.m. and 4:59 a.m. the display lighting is switched off 5 seconds after each
keystroke. • You can switch the function on and off by briefly pressing the and NAP/
SLEEP buttons at the same time. The display briefly shows: - ON: The display lighting
is switched off between 11:00 p.m. and 4:59 a.m.
With the sleep function you can set a time after which the device switches off.
- OFF: The display lighting is not switched off.
1. Set the function switch to CLOCK.
2. Briefly press the NAP/SLEEP button. SLEEP and 120 appear in the display.
If Sleep was already activated, the remaining time until switching off is displayed.
RW010.book page 17 Wednesday, September 27, 2017 10:08 am 10
2
EN
EN
8.3 SWITCHING OFF WITH SLEEP
8.2 SET TIME
Machine Translated by Google

alarm clock
If you have not pressed any button for approx. 3 seconds, the display jumps back to the
normal display. The minute minder is started automatically. You can see that the timer is
active by the NAP display. • When the alarm time has expired, an alarm sounds. Press
/AMS to silence the alarm.
2. Plug the other end of the charging cable into the USB socket on the external
NOTE: To turn off the feature before the alarm ends, press NAP/SLEEP for about 2 seconds
and then repeatedly until OFF appears.
device.
service
18
clock radio
NOTES: •
Only external devices can be charged via the USB port. • The device must be connected
to the mains for charging.
A suitable USB charging cable is available from specialist retailers.
With the timer, you can set a wake-up time of between 5 and 90 minutes in 5-minute
increments. The timer always wakes you up with an alarm tone and can also be used while
the radio is on.
•
CUSTOMER SERVICE
00800 - 456 22 000
1. Press the NAP/SLEEP buttons for about 2 seconds . NAP and 05 appear in the display. If
the minute minder was already switched on, the time remaining until the alarm sounds is
displayed.
The device has a charging function. You can use external devices such as B. charge a
smartphone.
www.latupo.com
2. Press the NAP/SLEEP button repeatedly within 3 seconds to set the alarm time to the
desired value between 05 (5 minutes) and 90 (90 minutes).
1. Insert the USB-A plug of the USB charging cable into the socket on the radio
RW010.book page 18 Wednesday, September 27, 2017 10:08 am 10
EN
EN
8.5 CHARGING EXTERNAL DEVICES
8.4 NAP TIMER
Machine Translated by Google

service
4. After charging, disconnect the devices from each other.
19 www.latupo.com
clock radio
3. The loading of the external device starts after a few seconds. It doesn't
matter whether the device is switched on or in standby mode; it just
needs to be connected to the mains.
CUSTOMER
SERVICE 00800 - 456 22 000
RW010.book page 19 Wednesday, September 27, 2017 10:08 10
EN
EN
Machine Translated by Google
You can store up to 20 FM stations.
www.latupo.com
Automatic station search The
automatic station search automatically searches and saves the first 20 stations
with sufficient reception.
NOTE: If you search again, the previously saved stations will be overwritten.
clock radioradio
1. Set the function switch to CLOCK.
- You can stop the search by pressing or again .
-
2. Press /AMS to turn on the device.
20
3. Press and hold the /AMS button until the display changes to show the frequency.
The channel search begins and the first 20 channels found
You can read the set frequency on the display. • Completely
unwind the wire antenna. Try different positions to improve the reception quality
and change the location of the device if necessary. • Tune in the desired
station by turning the TUNING/MIN –/+ control . The frequency can be
changed in 0.05MHz increments. • Press the or button for approx. 2 seconds to
activate the automatic search. The search ends at the first station with a
sufficiently strong signal. starts scanning toward lower frequencies. starts the
search in the direction of higher frequencies.
CUSTOMER SERVICE
00800 - 456 22 000
9.2 STORE STATION
9.1 TUNE IN TRANSMITTERS
9. RADIO
EN
1
1
1
2
2
2
RW010.book page 20 Wednesday, September 27, 2017 10:08 am 10
-
EN
Machine Translated by Google
Table of contents


