SHANLONYI SL-2011 User manual

AM/FM Radio Clock & Projection & USB Charger
THE BEST CHOICE FOR YOUR FAMILY
User Manual
Version 1.0
SHANLONYI

Preface
Thank you for choosing our SL-2011 AM/FM Projecon Alarm Clock Radio.
We have created a simplified user manual for your convenience, hoping that it
will be easy enough for all to understand and follow.
Please keep this manual for your references.
Statements
We do not offer any guarantees for this product ,if misused or used in any
other manner not spulated in our user’s manual. This product was tested and
working properly when it was shipped to us. This item will not be replaced or
warraned if misused or abused in any other manner then what is spulated in the
user’s guide.
We reserve the right to change and or modify our user’s manual at any me.

Contents
Chapter 1 LOCATION OF CONTROLS
Chapter 2 POWERING & TIME SETTING
Chapter 3 PROJRCTION MODE
Chapter 4 HIGH-LOW DIMMER/DST SWITCH
Chapter 5 ALARM SETTING
Chapter 6 SNOOZE SETTING
Chapter 7 SLEEP TIMER SETING
Chapter 8 AM/FM RADIO SETTING
Chapter 9 RADIO CHANNEL STOPAGE AND PRESETTING
Chapter 10 USB CHARGING
Chapter 11 RECOVERY
Chapter 12 BATTERY BACK-UP
Chapter 13 SPECIFICATIONS & CAUTION

Chapter 1 LOCATION OF CONTROLS
1.SET TIME/RADIO CHANNEL STORAGE AND PRESET
2.HOUR/TUNING-
3.MINUTE/TUNING+
4.HIGH-LOW DIMMER/DST Switch
5.SNOOZE/SLEEP
6.
7.
8.RADIO/RADIO OFF
(Press and hold for at least 2 second to return to CLOCK mode)
VOLUME +
VOLUME-
5V1A
DC IN:5V
CHARGE OUT
CAUTION
RISK OF ELECTRIC SHOCK
DO NOT OPEN
WARNING: SHOCK HAZARD-DO NOT OPEN.
AVIS:RISQUE DE CHOC ELECTRIOUENE PAS OUVRIR.
OPEN
1234
16
17
18
12
20 2125 22
24
25
11
10
23
5678919
15
14
13
-01-
A
DST
1
1
Radio

ALARM 1/ALARM OFF
ALARM 2/ALARM OFF
9.PROJRCTION ON/FILP/OFF
10.
11.
12.AM INDICATOR
13.AM/FM INDICATOR
14.DST INDICATOR
15.ALARM 1 BUZZER INDICATOR
16.ALARM 1 RADIO INDICATOR
17.ALARM 2 BUZZER INDICATOR
18.ALARM 2 RADIO INDICATOR
19.FOCUS RING
20.BATTERY DOOR
21.USB PORT
22.DC JACK
23.FM ANTENNA
24.SPEAKER
25.HOLDER
-02-

Chapter 2 POWERING ON & TIME SETTING
Inialized Seng
1. Connect 2pcs 1.5v ”AAA” size baeries to the proper terminals in the baery
compartment.(baeries are not included)
2. Connect the adapter line to DC jack, then plug into a 100~240V AC wall power
outlet.
3. Press
4. Press to set the hour.
5. Press to set the minute.
6. Press once to confirm or wait for 5 seconds to confirm.
To change current me
1. Check whether AM/FM radio is closed, if not,
off unl radio indicator is off.
2. Press to maintain display flash.
3. Repeat the above step <Inialize Seng 4-5-6>.
5V1A
DC IN:5V
CHARGE OUT
CAUTION
RISK OF ELECTRIC SHOCK
DO NOT OPEN
WARNING: SHOCK HAZARD-DO NOT OPEN.
AVIS:RISQUE DE CHOC ELECTRIOUENE PAS OUVRIR.
OPEN
OK
SNOOZE
SLEEP
-03-
Radio
A
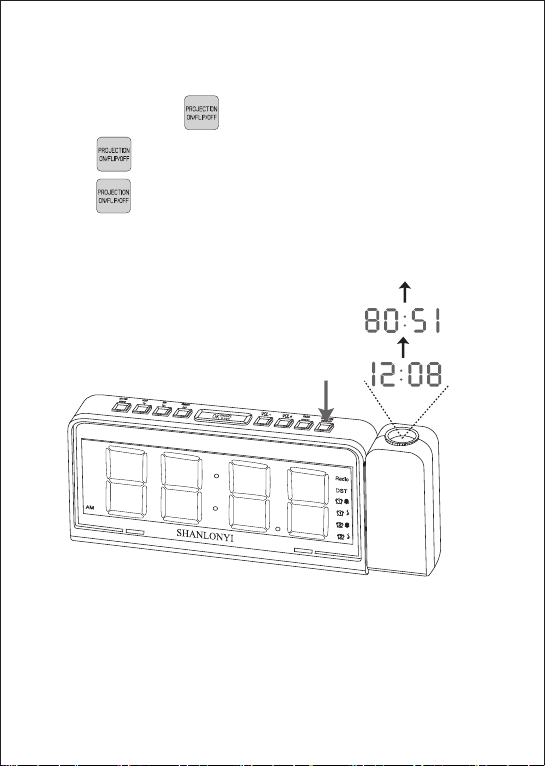
Chapter 3 PROJECTION MODE
1. Press Projecon mode to turn on projecon.
2. Press once again to flip the projecon me reversely.
3. Press once again to turn off projecon.
Note: 1. Best projecon distance is between 1.5 to 3.0 meters.
2. Projector is a common LED Light. So the projector is not visible in dayme.
Turn OFF
-04-
DST
1
1
Radio

Chapter 4 HIGH-LOW DIMMER/DST SWITCH
HIGH-LOW DIMMER
Repeat to switch the display brightness from High Medium Low.
DST SWITCH
1. Hold press to light up the DST indicator
2. An hour will be added to the current me on the display.
3. To turn offDST, Hold unl the DST indicator
turns off.
Note. Depending on your locaon and whether or not DST(Day Saving Time)
is available.
-05-
OK
SNOOZE
SLEEP
OK
SNOOZE
SLEEP
1
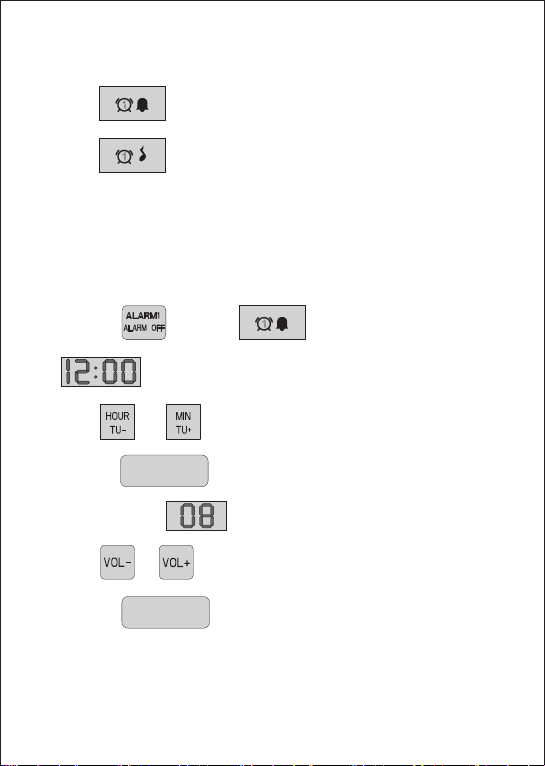
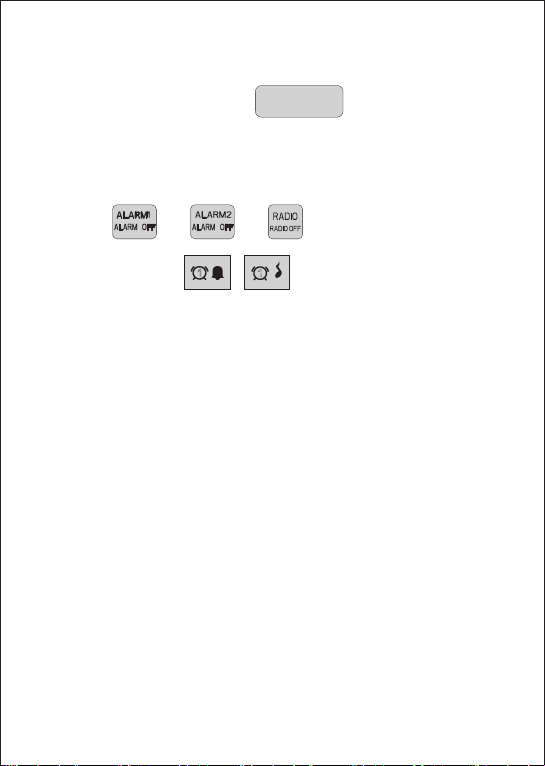
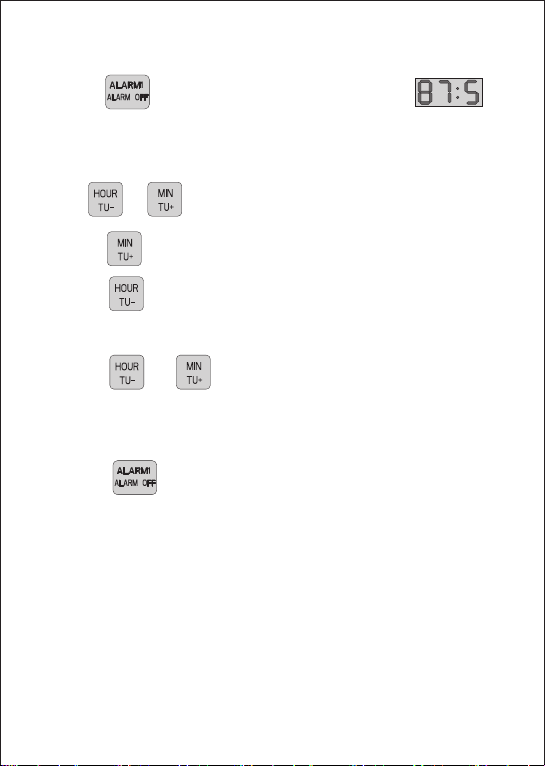
Chapter 5 ALARM SETTING
Indicator means wake to buzzer.
Indicator means wake to radio.
Both indicators are offmeans alarms inacve.
This product features convenient dual alarms.Each alarm funon can be set
independentle,with a choice of Wake To Radio or Wake To Buzzer.
Set alarm wake to buzzer
1. Press once to light up buzzer indicator.
Display start flashing.
2. Repeat to set alarm me.
or
3. Only press to confirm alarm me and then enter into alarm
volume,Display show .Speaker plays the corresponding volume.
4. Repeat to set your desired alarm volume.
5. Press once or wait for 5 seconds to confirm alarm 1 seng.
Seng alarm 2 wake to buzzer same as above.
-06-
1
1
OK
SNOOZE
SLEEP
OK
SNOOZE
SLEEP
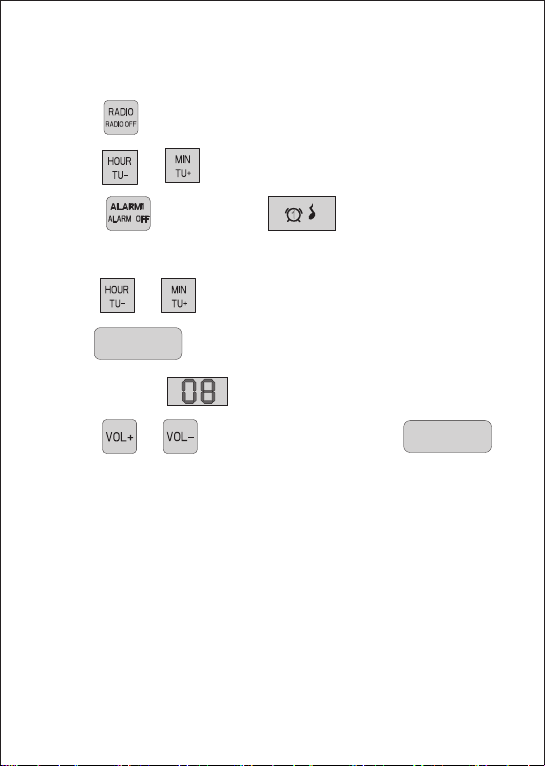
Set alarm wake to AM/FM radio
1. Repeat to turn o FM radio or AM radio.
2. Repeat to tune into your desired radio channel.
3. Repeat unl the indicator light up, display
start flashing.
4. Repeat and to set alarm me.
5. Press to confirm alarm me and then enter into alarm
volume,Display show .Speaker plays the corresponfing volume.
6. Repeat to set your desired radio alarm.Press oror
or
wait for 5 seconds to confirm alarm 1 seng.
Seng Alarm 2 wake to radio is as same as above.
-07-
1
OK
SNOOZE
SLEEP
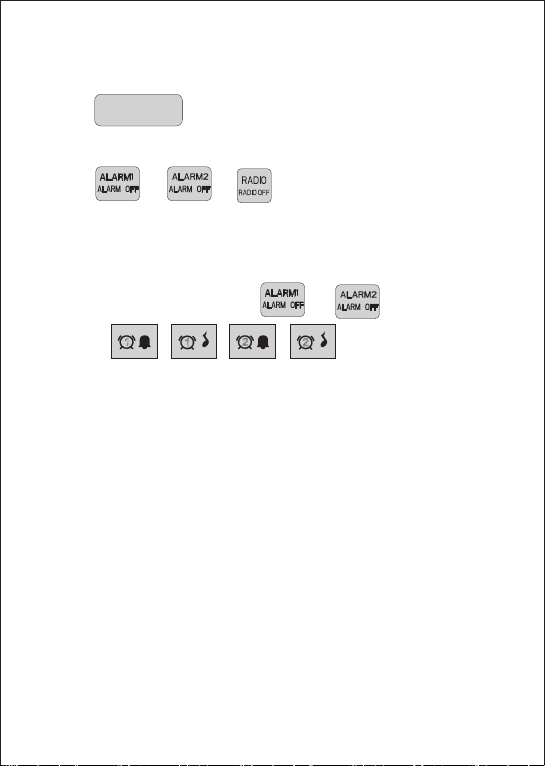
Turn offAlarm
When alarm sounds, you can either do:
1. Press to temporarily turn offalarm for 9 minutes.
Alarm will ring every next 9 minutes.
2. Press or or to turn offalarm for 24 hours.
The alarm indicator is sll on, which means alarm is sll acvated and will ring aer
24 hours.
3. To completely turn offalarm, Repeat or
unl all
indicators disappear from the display.
-08-
1
1
2
2
OK
SNOOZE
SLEEP
Chapter 6 SNOOZE SETTING
When alarm 1 or alarm 2 sounds,Press to temporarily turn off
alarm for 9 minutes.
Once SNOOZE funcon is acvated,the corresponding alarm indicator will flash.
Press once or or to turn off
SNOOZE,alarm indicator stops flashing.
-09-
1
1

OK
SNOOZE
SLEEP
OK
SNOOZE
SLEEP
Chapter 7 SLEEP TIMER SETTING
The SLEEP mer funcon allows the radio to play in blocks of 10, 20, 30, 40, 50, 60, 70,
80, or 90 minutes before turning off automacally, so you can enjoy falling asleep
when listening to the radio.
1. Repeat press to turn on the FM or AM radio.
2.Press once ,display show .
3. Repeat to select your desired sleep me.
Sleep me show on the display in sequence as 90>80>70>60>50>40>30>20>10>OFF
4. Wait for 2 seconds ,display will return to me.
-10-
Chapter 8 AM/FM RADIO SETTING
1. Repeat unl display show FM or AM frequency, such as .
2. Manual Tuning Radio Channel
Repeat or to tune into the desired radio channel.
Each press ,FM frequency will tune up by 0.1 MHZ.
Each press ,FM frequency will tune down by 0.1 MHZ.
Auto Scanning Radio Channel
Hold press or for more than 2 seconds to start auto scanning.
Scanning will stop automacally once received a available radio channel.
3. Turn offradio.
Hold press to turn off radio, display return back to me.
AM frequency:520kHz ~ 1710kHz,520kHz preset as a default.
FM frequency:87.5Mhz ~ 108MHz,87.5MHZ preset as a default.
-11-
OK
SNOOZE
SLEEP
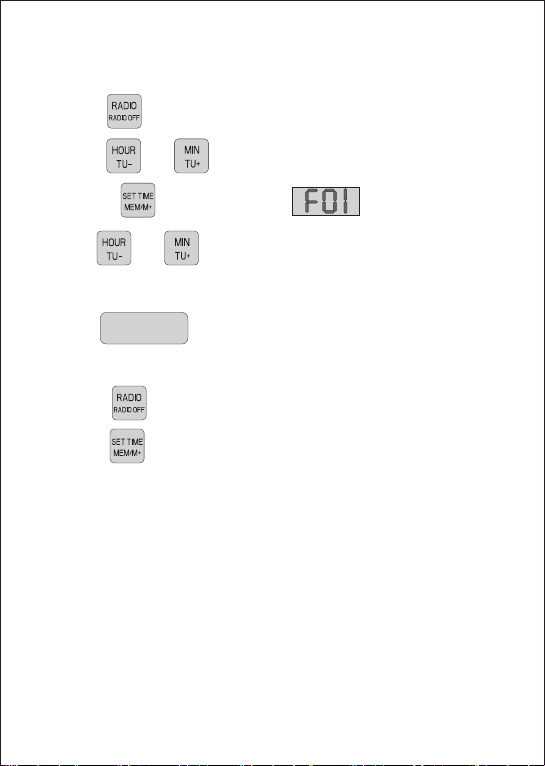
Chapter 9 RADIO CHANNEL STORAGE AND PRESETTING
Store your desired radio channel
1. Repeat to turn on AM or FM radio.
2. Repeat or
or
to turn into your des ired radio channel.
3. Hold press unl the display flashes .
4. Press to select sequence of channel storage.F01, F02, F03,
F04, F05, F06, F07, F08, F09 and F10.
5. Press to save preseng channel.
Turn into your saved radio channel
1. Repeat to turn on AM or FM radio.
2. Repeat to choose your preseng radio channel, such as F01
3. Wait for 5 seconds to confirm your preseng radio channel. Display will return to
the current me.
-12-

Chapter 10 USB CHARGING
1. Plug into outlet and connect with AC power.
2. Connect the charging cable with the device and this clock.
5V1A DC IN:5V
CHARGE OUT
CAUTION
RISK OF ELECTRIC SHOCK
DO NOT OPEN
WARNING: SHOCK HAZARD-DO NOT OPEN.
AVIS:RISQUE DE CHOC ELECTRIOUENE PAS OUVRIR.
OPEN
-13-

Chapter 11 RECOVERY
When something wrong happens to this product such as display show abnormal
numbers , key dysfuncon or no effect, please unplug the DC adapter and take the
1.5V ” AAA” size baeries our, then the product can be restored.
Chapter 12 BATTERY BACK-UP
(For Temporary Time Storage Only)
Connect a 3 volt(1.5V “AAA” size * 2pcs.)baery(not included) to the terminals inside
the baery compartment. In the event of a power interrupon, your set will not work
normally from the mains supply but there is now the advantage that your clock me
will connue to work. The clock display will not light up, as the clock me will be
held in the memory. This also enables you to move the set from place to place
without re-seng the clock every me. The baery back-up system is only meant to
be used from short temporary power interrupon, For longer duraon, the baery
may become exhausted or there may be some deviaon in accuracy. When the
baery is exhausted, it should be removed from the set to prevent leakage. If you do
not wish to take advantage of the baery back-up system, your set will work
normally without a baery. However, if disconnected from the mains, the clock
figures will flash when the mains are re-connected and you must re-set the clock as
described in the Electronic Clock Operaon paragraph
-14-

Chapter 13 SPECIFICATIONS & CAUTION
Power Source: AC/DC Adapter-Auto Voltage 100V~240V, 50/60Hz
Radio Frequency: FM 87.5 ~ 108 MHz
AM520 ~ 1710 KHz
Power Consumpon: 7.5W
Speaker: 8 /1W
USB Output: 5V 1.5A
DC baery:3V(1.5V “AAA” size * 2pcs.For memory.Not included)
WARNING:TO REDUCETHE RISK OF ELECTRIC SHOCK,DO NOT EXPOSE THIS APPLIANCE
TO RAIN OR MOISTURE.
CAUTION:THE CLOCK RADIO MUST NOT BE USED IN ANY ENVIRONMENT WHERE IT
MAY BE SUBJECT TO THE DRIPPING OR SPLASHING OF WATER OR OTHER LIQUIDS.
DO NOT CONNECT THE ANTENNA WIRE ON THE BACK OF THIS SET TO ANY OUTDOOR
ANTENNA.
The main plug is used as the disconnect device, the disconnect device shall remain
readily from power, the main plug of the apparatus must be disconnected from the
mains socket outlet completely.
BACK OF SET: Baery compartment for 3 volt (1.5V”AAA” size *2 pcs.) baery(not
included) for temporary me storage.
Electrical products should not be disposed of with household waste.
Thank you to recycle collecon points provided for this purpose.
Consult with your local authories or dealer for advice on recycling.
The lightning flash and
arrowhead within the
triangle is a warning
sign alerting you of
“dangerous voltage”
inside the product.
CAUTION
RISK OF ELECTRIC SHOCK
DO NOT OPEN
CAUTION:TO REDUCE THE RISK
OF ELECTRIC SHOCK,DO NOT
REMOVE COVER(ON BACK).NO
USER-SERVICEABLE PARTS
INSIDE,PEFER SERVICING TO
QUALIFIED SERVICE
PERSONNEL.
The exclamation point
within the triangle is a
warning sign alerting you
of important instructions
accornpanying the
product.
-15-

Speak with our experts
ShanLonYi-SUP@outlook.com
Table of contents


