AudioLogic ALDV243 User manual
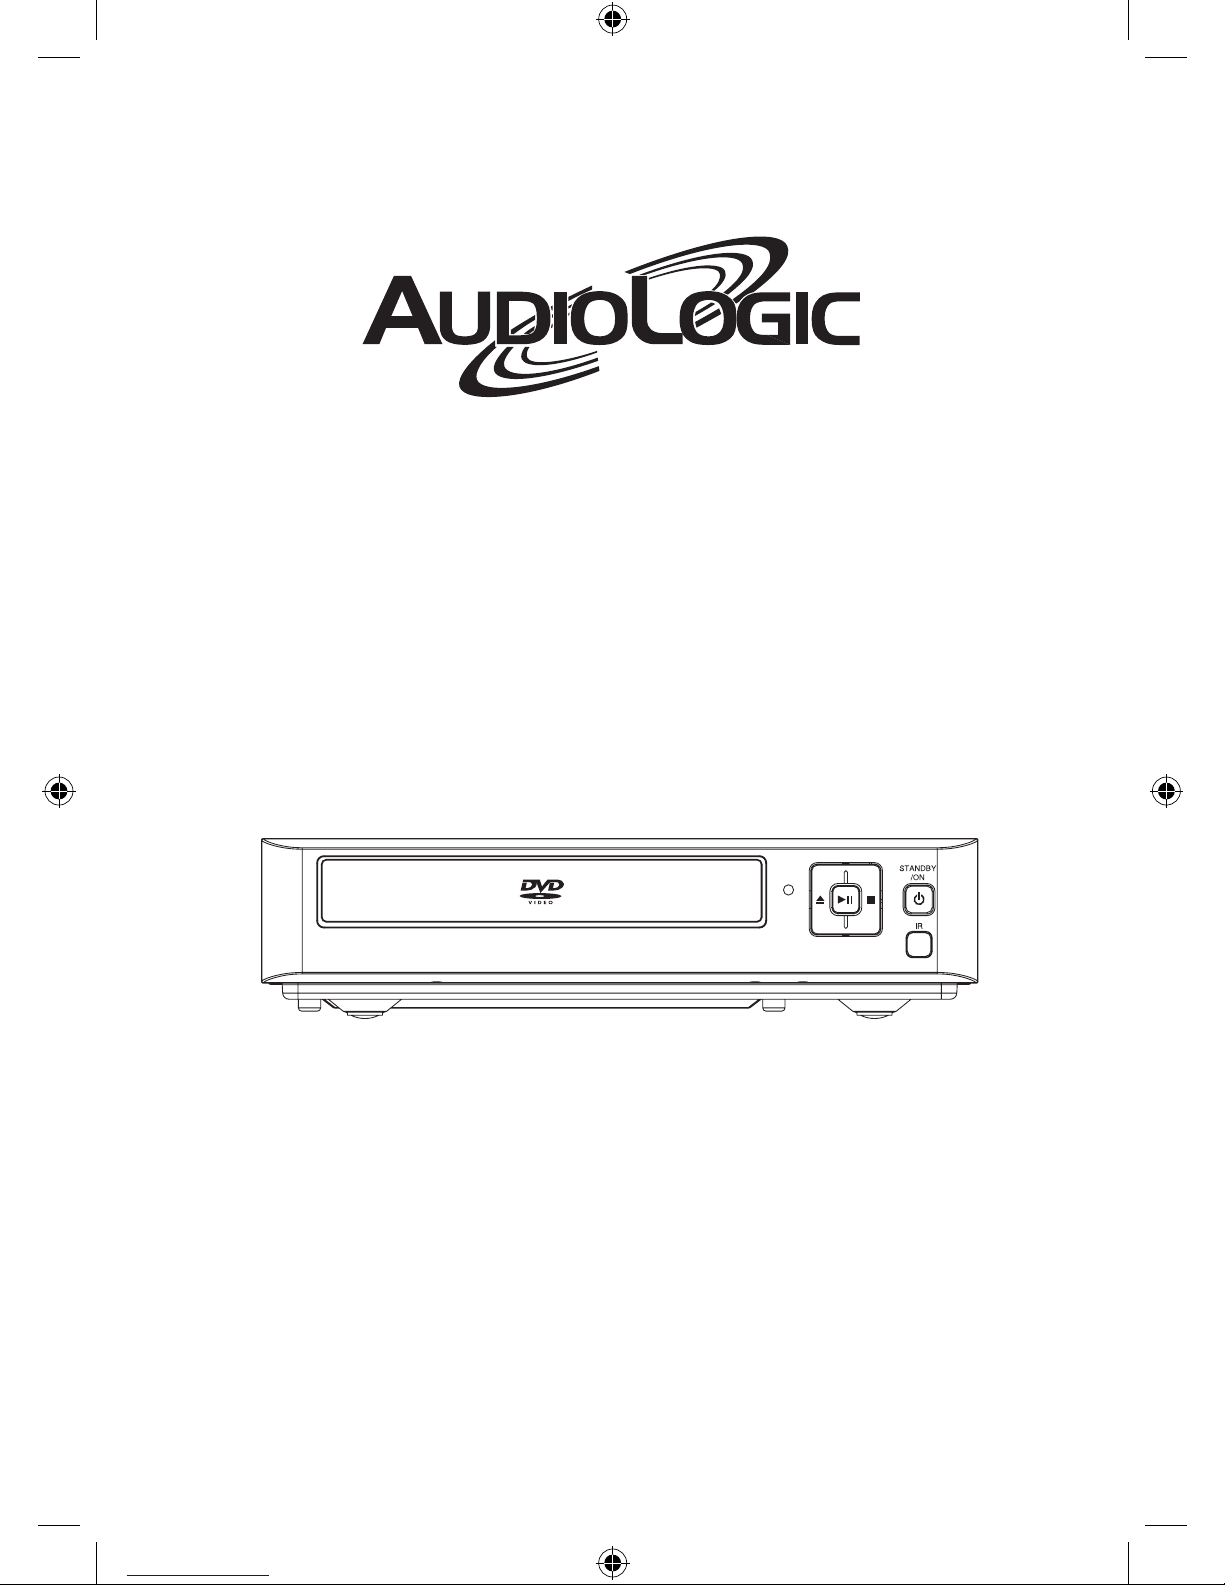
DVD / CD PLAYER
LECTEUR DVD / CD
ALDV243
OPERATION MANUAL
MANUEL DE FONCTIONNEMENT
THIS INSTRUCTION BOOK MAY CONTAIN ERRORS AND OMISSIONS.
DESIGN AND SPECIFICATION ARE SUBJECT TO CHANGE WITHOUT NOTICE.
CE LIVRET D’INSTRUCTIONS PEUT CONTENIR DES ERREURS ET DES OMISSIONS. LE CON-
CEPT ET LES CARACTÉRISTIQUES SONT SUJETS À CHANGEMENT SANS PRÉAVIS.
ALDV243 Eng.indd 1 2008/4/25 9:25:39 AM
2
IMPORTANT
Since CD circuitry may cause interference with other radio tuners nearby, switch this recorder off when not
in use or move it away from an affected radio tuner.
This device complies with Part 15 of the FCC Rules. Operation is subject to the following two conditions:
(1) This device may cause harmful interference, and (2) this device must accept any interference received,
including interference that may cause undesirable operation.
Warning: Changes or modications to this unit not expressly approved by the party responsible for
compliance could void the user’s authority to operate the equipment.
NOTE: This equipment has been tested and found to comply with the limits for a Class B digital device,
pursuant to Part 15 of the FCC Rules. These limits are designed to provide reasonable protection against
harmful interference in a residential installation. Changes or modications not expressly approved by the
party responsible for compliance could void the user’s authority to operate the equipment. This equipment
generates uses and can radiate radio frequency energy and, if not installed and used in accordance with
these instructions, may cause harmful interference to radio communications. There is no guarantee that
interference will not occur in a particular installation. If this equipment does cause harmful interference
to radio or television reception, which can be determined by turning the equipment off and on, the user is
encouraged to try to correct the interference by one or more of the following measures:
• Increase the separation between the equipment and receiver.
• Connect the equipment into an outlet on a circuit different from that to which
the receiver is connected.
• Consult the dealer or an experienced radio / TV technician for help.
This Class B digital apparatus complies with Canadian ICES-003.
SAFETY CERTIFICATION
This digital apparatus is made and tested to meet safety standards of the FCC, requirements
and compliance with safety performance of the U.S. Department of Health and Human Services,
and also with FDA Radiation Performance Standards 21 CFR Subchapter J.
WARNING
To prevent re or shock hazard, do not expose this appliance to rain or moisture.
The apparatus should not be exposed to dripping or splashing and that no objects lled with
liquids, such as vases, shall be placed on the apparatus.
The ventillation should not be impeded by covering the ventilation openings with items, such as
newspapers, table-cloths, curtains, etc.
Naked ame sources, such as lighted candles, should not be placed on the apparatus.
The mains plug is used as the disconnect device, the disconnect device should remain readily operable.
In order to disconnect the apparatus from the mains completely, the mains outlet plug should
be disconnected from the electrical outlet completely.
CAUTION
-
To prevent electric shock, do not use this (polarized) plug with any extension cord, receptable or other outlet
unless the plug can be fully inserted without exposing any parts of this blades.
-
To prevent electric shock, match the wide blade of the plug to the wide slot and fully insert.
RISK OF ELECTRIC SHOCK
DO NOT OPEN
WARNING: TO REDUCE THE
RISK OF ELECTRIC SHOCK,
DO NOT REMOVE COVER (OR
BACK). NOUSER-SERVICEABLE
PARTS INSIDE, REFER
SERVICING TO QUALIFIED
SERVICE PERSONNEL.
The exclamation point within
an equilateral triangle is
intended to alert the user to
presence of important operating
and maintenance (servicing)
instructions in the literature
accompanying the appliance.
The lighting ash with arrowhead
symbol, within an equilateral
triangle, is intended to alert the
user to the presence of uninsulated
“dangerous voltage” within the
product’s enclosure that may be of
sufcient magnitude to constitute a
risk of electric shock to persons.
ALDV243 Eng.indd 2 2008/4/25 9:25:42 AM

3
IMPORTANT SAFETY INSTRUCTIONS
1. Read these instructions.
2. Keep these instructions.
3. Heed all warning.
4. Follow all Instructions.
5. Do not use this apparatus near water.
6. Clean only with a dry cloth.
7. Do not block any of the ventilation openings.
Install in accordance with manufacturer’s instructions.
8. Do not install near any heat source such as radiators, heat registers,
stoves, or other apparatus (including ampliers) that produce heat.
9. Do not defeat the safety purpose of the polarized or
grounding-type plug. A polarized plug has two blades with
one wider than the other. A grounding type plug has two
blades and a third grounding prong. The wide blade or the
third prong are provided for your safety. If the provided plug does not t into
your outlet, consult an electrician for replacement of the obolete outlet.
10. Protect the power cord from being walked on or pinched, particularly at
plugs, convenience receptacles, and the point where they exit from the
apparatus.
11. Only use attachments/accessries specied by the manufacturer.
12. Use only with a cart, stand, tripod, bracket, or table specied by the
manufacturer, or sold with the apparatus. When a cart is used, use
caution when moving the cart/apparatus combination to avoid injury
from tip-over.
13. Unplug this apparatus during lightning storms or when unused for long
periods of time.
14. Refer all servicing to qualied service personnel. Servicing is required when
the apparatus has been damaged in any way, such as if the power-supply
cord or plug is damaged, liquid has been spilled or objects have fallen into
the apparatus, or when the apparatus has been exposed to rain or moisture,
does not operate normally, or has been dropped.
Class II equipment symbol
This symbol indicates that the unit has a double insulation system.
ALDV243 Eng.indd 3 2008/4/25 9:25:44 AM
4
Getting Started
Before attempting to connect, operate or adjust this product, please read these
instructions completely and keep this manual for future reference.
Dear customers :
May we take this opportunity to thank you for purchasing this DVD Player.
We strongly recommend that you carefully study the operating instructions before operating
the unit.
Main Features
• Front loading DVD / CD player.
• Built-in Dolby Digital.
Standards
Video : NTSC
Audio : PCM (48 or 96 kHz), 2 Channel MPEG layer 2, Dolby AC-3 line out
Features of audio specications
– DOLBY Digital 2 ch decoding output.
– DOLBY for Digital (Coaxial) output
– Linear PCM output.
Consumers should note that not all high denition television sets are fully com-
patible with this product and may cause artifacts to be displayed in the picture.
In case of 525 or 625 progressive scan picture problems, it is recommended that
the user switch the connection to the “STANDARD DEFINITION” output. If there
are questions regarding our TV set compatibility with this model 525p and 625p
DVD player, please contact our customer service center.
This product incorporates copyright protection technology that is protected
by method claims of certain U.S. patents and other intellectual property rights
owners. Use of this copyright protection technology must be authorized by
Marcrovision Corporation, and is intended for home and other limited viewing
uses only unless otherwise authorized by Macrovision Corporation. Reverse
engineering or disassembly is prohibited.
Manufactured under license from Dolby Laboratories. “Dolby”, “Pro Logic” and
the double-D symbol are trademarks of Dolby Laboratories. Condential unpub-
lished works. ©1992-1997 Dolby Laboratories, Inc. All rights reserved.
ALDV243 Eng.indd 4 2008/4/25 9:25:44 AM
5
* Player is CD-R, CD-RW compatible.
Note: CD-R, CD-RW Discs recorded with writing device can only be used when they are
correctly treated.
Region Management Information
This DVD Player is designed and manufactured to respond to the Region Management
Information that is recorded on a DVD disc. If the Region number described on the DVD
disc does not correspond to the Region number of this DVD Player, this DVD player
cannot play that disc.
This Region number of this DVD player is .
Disc manintenace
– Before playback, wipe the disc from the center hole toward the outer edge with a clean
cloth.
– Never use benzine, thinner, cleaning uid, static electricity prevention liquids or any
other solvent.
Note : Dirty disc may cause bad picture.
Audio &
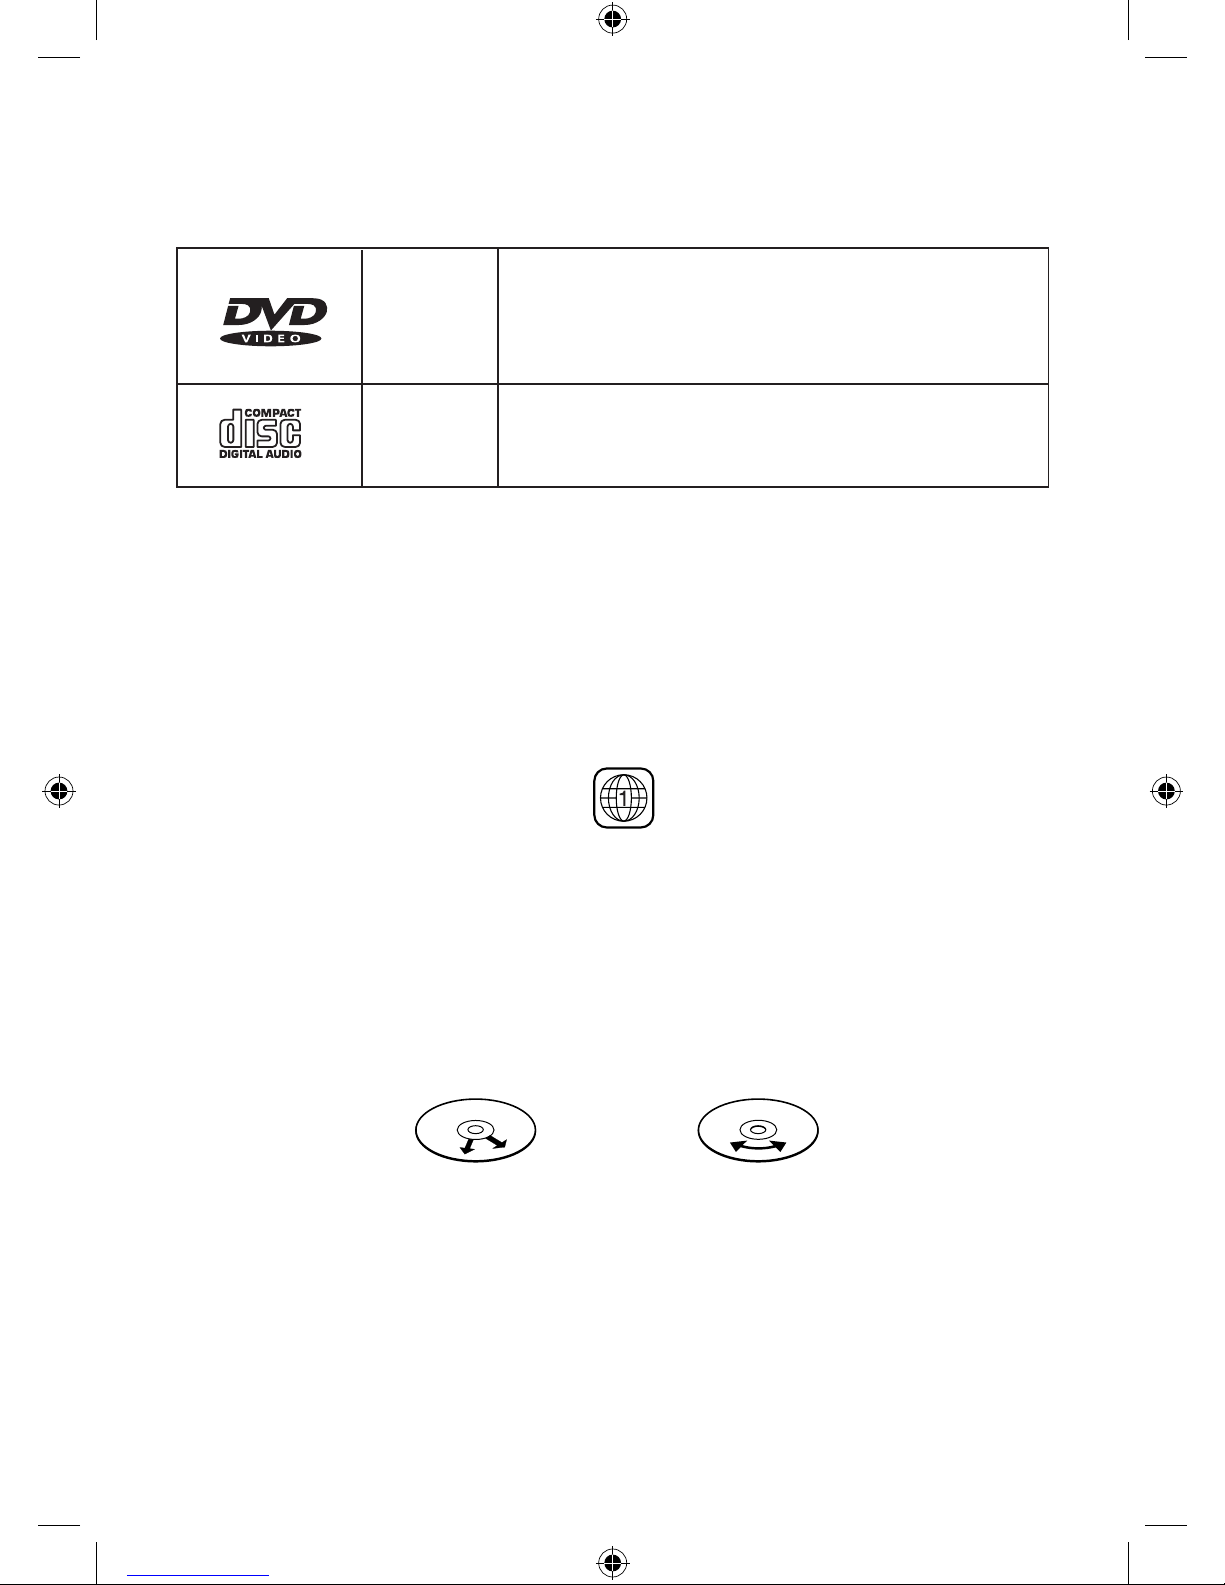
Video
Audio
Disc size 12cm
single side, single layer / single side, double layer
PAL and NTSC DVD disc
Playback time 135min / 240min max.
Disc size 12cm / 8cm
CD disc
Playback time 74min/20min max.
Getting Started
Disc types
Correct
From the center to the edge
Incorrect
ALDV243 Eng.indd 5 2008/4/25 9:26:52 AM
6
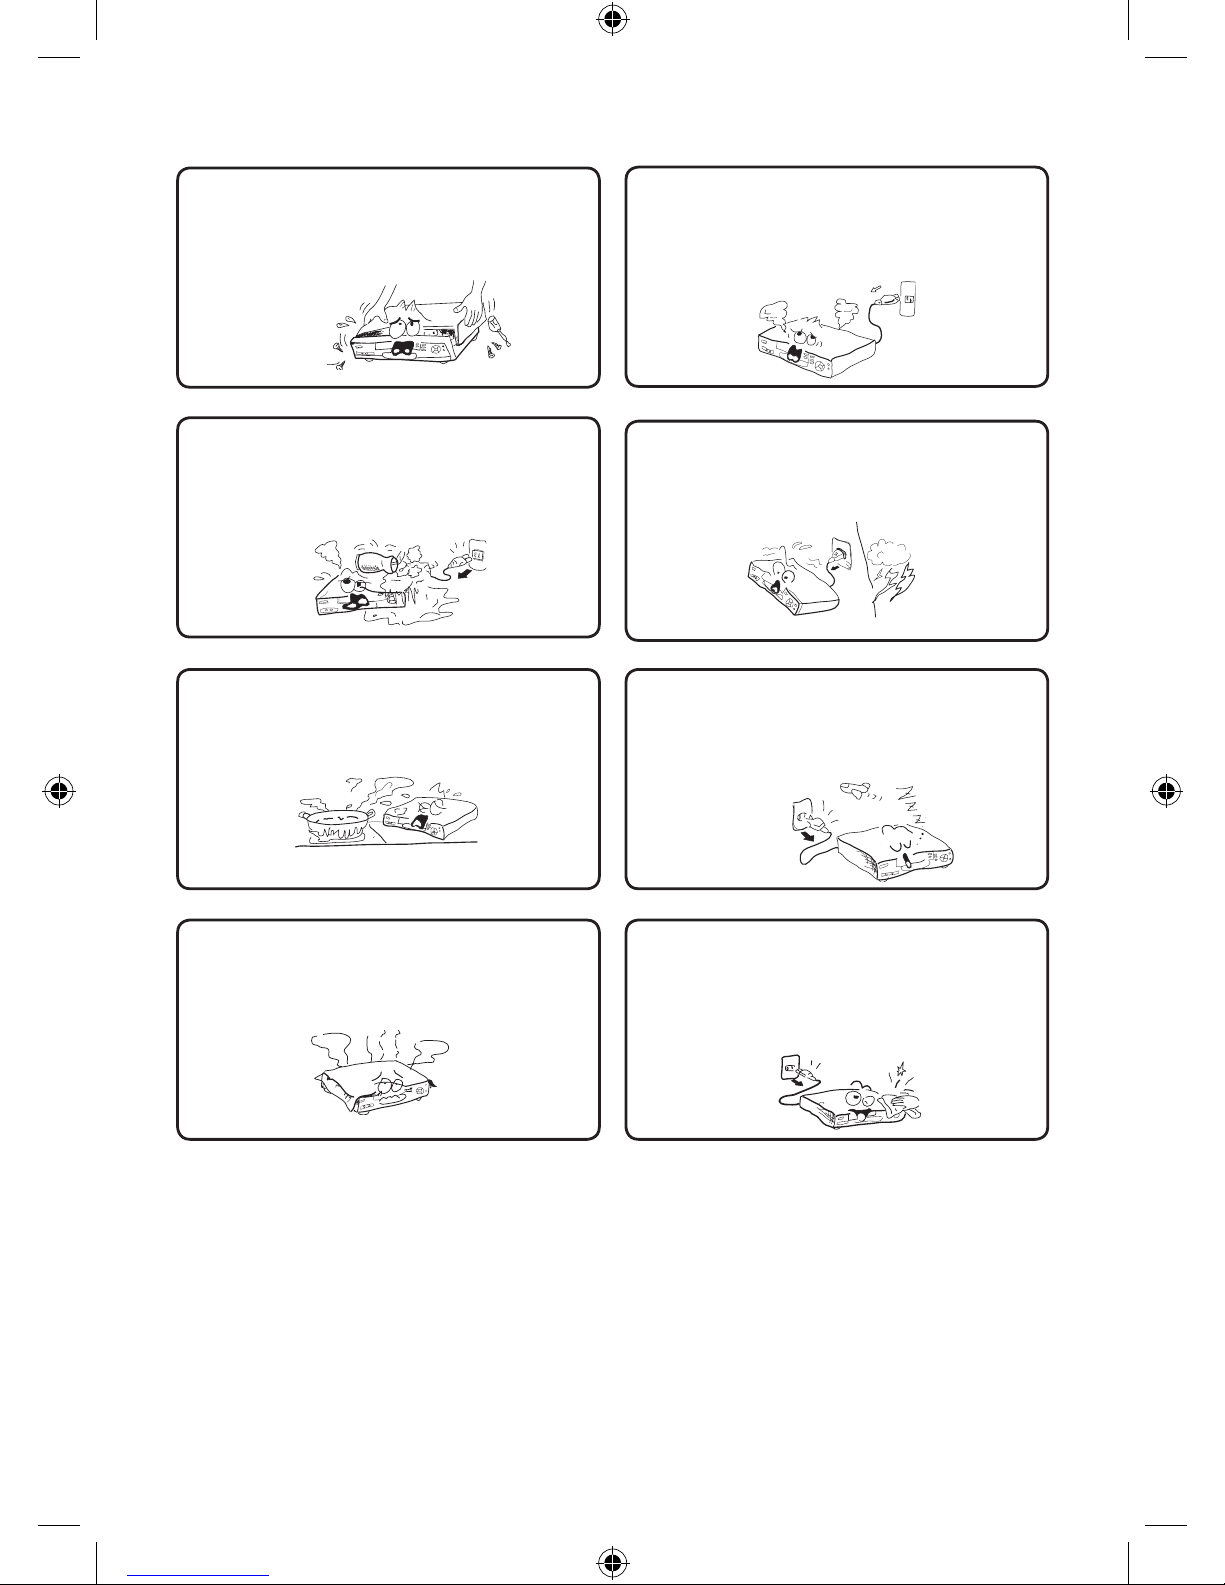
Safety precautions
Warning
To avoid electrical shock, do not open
the cabinet, refer servicing to qualied
personnel only.
Warning
Keep the unit away from ower vases,
tubs, sinks, etc. If liquids are spilt into
the unit, serious damage could occur.
Warning
Do not expose this equipment to rain
or moisture.
Warning
Do not block ventilation holes of the unit
so that air can circulate freely,
Attention
If smoke, malodour or unrelated noise
are emitted from the unit, turn off the
power and disconnect the AC power
cord.
Attention
Touching the unit is dangerous
especially if during thunder.
Attention
When left unused for a long period of
time, the unit should be unplugged from
the household AC outlet.
Attention
Be sure to turn the unit off and disconnect the AC
power cord before cleaning the unit surface. If the
surface is dirty, wipe clean with a cloth which has
been dipped in a weak soap and water solution
and wrung out thoroughly, and then wipe again
with a dry cloth.
Note: This unit is a class 1 laser product and uses a visible laser beam which could
cause hazardous radiation exposure if directed. Be sure to operate it correctly as
instructed.
ALDV243 Eng.indd 6 2008/4/25 9:26:59 AM
7
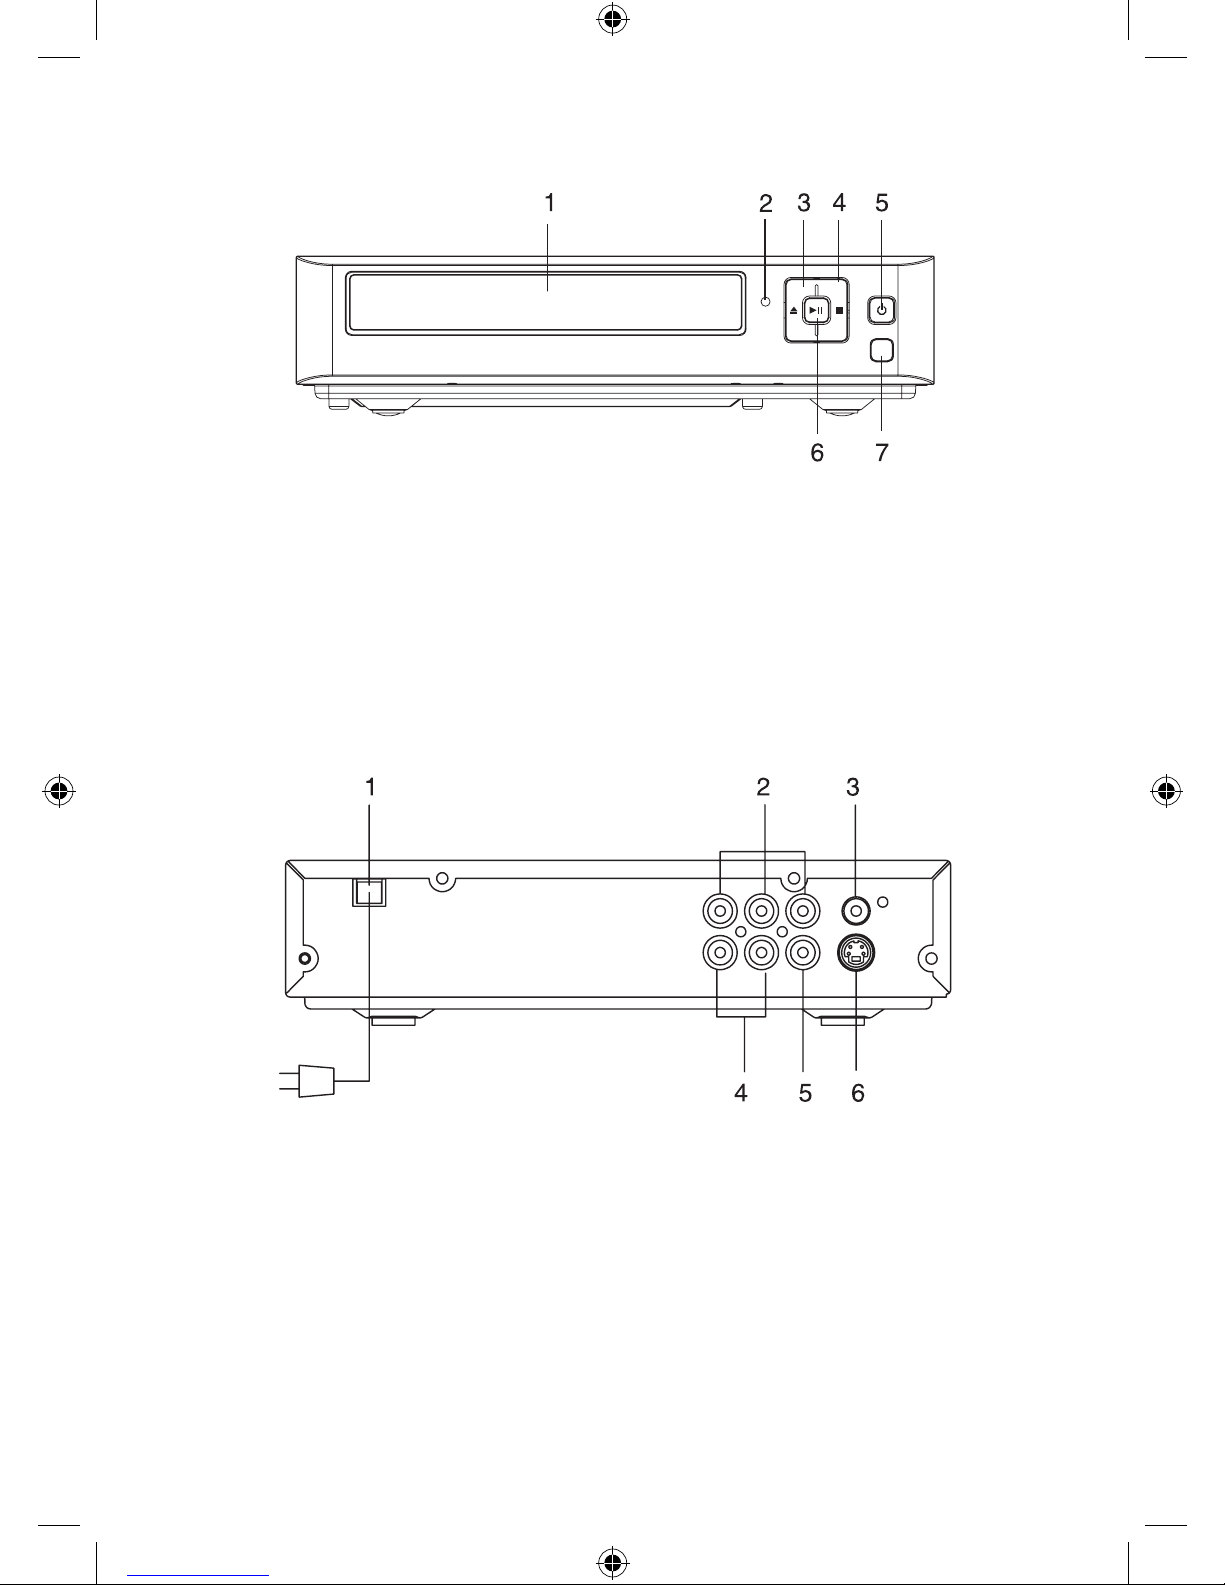
Front Panel Control
1. Disc Tray
2. Standby Indicator
Green - Play mode
Red - Standby mode
3. Open/Close Button
4. Stop Button
5. Standby / ON Button
6. Play / Pause Button
7. Remote Sensor
Rear Panel Control
1. AC Power Cord
2. Y, Pb/Cb, Pr/Cr output
3. Video output (composite)
4. Analog Audio output
5. Digital Audio output (coaxial)
6. S-Video output
ALDV243 Eng.indd 7 2008/4/25 9:27:01 AM

8
Battery installation (remote control unit)
1. Remove the battery cover.
2.
Insert two batteries (AAA) making sure the polarity (+/-) matches the marks inside the
unit.
3. Replace the cover.
– Do not attempt to recharge, short-circuit, disassemble, heat or throw the batteries into
the re.
– Do not mix old and new batteries
– Dispose of properly in accordance with local law.
Note : Weak batteries can leak and severely damage the remote control unit.
Remote Control Unit
1. Standby/On Button
2. Display Button
3. DVD Menu Button
4. Slow Button
5. Audio Button
6. Search Button
7. Fast Forward / Fast Backward Button
8. Setup Button
9. Direction Buttons
( Up / Down / Left / Right )
10. Play Button
11. Step/Pause Button
12. Angle Button
13. Subtitle Button
14. Cancel Button
15. P. Scan Button
16. Eject Button
17. Numeric Buttons
18. Previous/Next Button
19. Mute Button
20. Enter Button
21. Stop Button
22. Zoom Button
23. Program Button
24. Volume –/+ Button
25. Repeat Button
26. Repeat A-B Button
* Press STANDBY/ON button when DVD player is on, the DVD player will switch to standby mode,
LED will turn to RED.
1
2
3
4
5
6
7
8
9
10
11
12
13
14
15
16
17
18
19
20
21
22
23
24
25
26
ALDV243 Eng.indd 8 2008/4/25 9:27:05 AM

9
Connect To TV
Caution : Turn off all the equipment before any installation.
This unit provides several types of video and audio signals output. They are :
• Y, Pb/Cb, Pr/Cr output
• RCA output
• S-Video Output
User can choose a suitable connection type to connect the player to TV.
1. Y, Pb/Cb, Pr/Cr output
2. Connection via Composite (RCA) Cable
In this type of connection, we have to connect the Left/Right Audio Cables (Red and
White) and a Video signal (Yellow).
3. Connection via S-Video Cable
Video in
Audio in R
Audio in L
S-Video in
Audio in R
Audio in L
ALDV243 Eng.indd 9 2008/4/25 9:27:08 AM

10
Connection to Amplier
There are two different types of connection between the DVD player and an amplier.
• Digital output via Coaxial Cable (Connection 1).
• 2 channels (left/right) Audio Output (connection 2-3)
Note:
1. The Digital output cut off, when Analog output was selected.
2. The Analog output cut off, when Digital output was selected.
Video output
2
1
3
ALDV243 Eng.indd 10 2008/4/25 9:27:09 AM
11
Operation
TV Selection
Turn on the TV, the DVD player and the Audio Amplier System (if any).
1. Press the “TV/VIDEO” button on the TV.
2. Select the Video Mode (TV).
Note: If there are more than 1 AV channel for the TV, select the channel you have
connected to the DVD player.
3. Select the Correct Audio Input on the AV Amplier (if any)
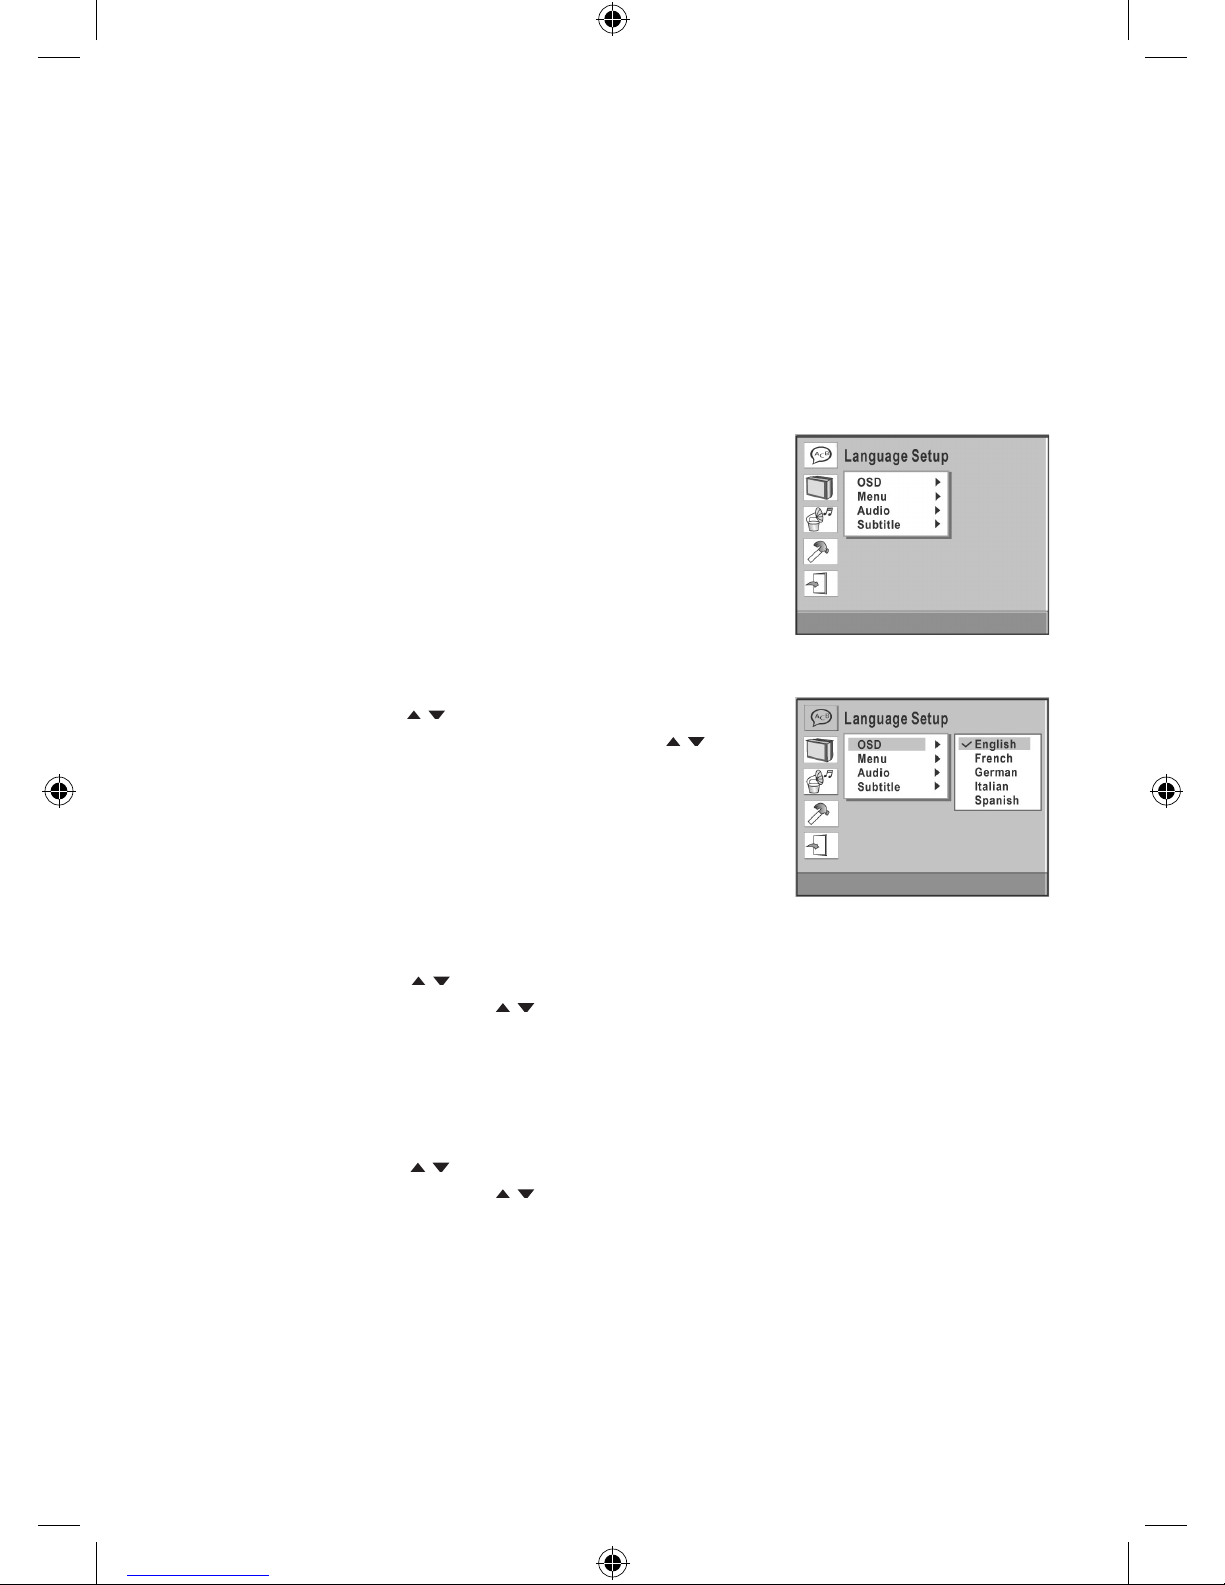
1. LANGUAGE SETUP MENU
In stop mode press SETUP button and highlight
languages setup then press ENTER button to
conrm.
• OSD
Press direction / button to highlight the OSD and press
ENTER button, then press the direction / button to
select the desired OSD language.
• English • Italian
• French • Spanish
• German • Portuguese
• MENU
Press direction / button to highlight the MENU and press the ENTER button,
then press the direction / button to select the desired MENU language.
• English • Italian
• French • Spanish
• German • Portuguese
• AUDIO
Press direction / button to highlight the AUDIO and press the ENTER button,
then press the direction / button to select the desired AUDIO language.
• English • Italian
• French • Spanish
• German • Portuguese
ALDV243 Eng.indd 11 2008/4/25 9:27:10 AM

12
• SUBTITLE
Press direction / button to highlight the SUBITITLE and press the ENTER button,
then press the direction / button to select the desired SUBTITLE language.
• English • Italian
• French • Spanish
• German • Portuguese
2. SCREEN SETUP MENU
In stop mode press SETUP button and highlight SCREEN setup then press ENTER
button to conrm.
To select the desired item by use the direction / , / button.
• TV TYPE: 4:3 PS (Pan Scan)
4:3 LB (Letter Box)
16:9 (wide screen)
• SCREEN SAVER: ON
OFF
• VIDEO OUTPUT: S-Video
CVBS + YUV
YUVP - SCAN
• BRIGHTNESS: NORMAL
BRIGHT
SOFT
• CONTRAST: -4
-3
-2
-1
0
+1
+2
+3
+4
ALDV243 Eng.indd 12 2008/4/25 9:27:12 AM

13
3. AUDIO SETUP MENU
In stop mode press SETUP button and highlight AUDIO setup then press ENTER
button to conrm.
To select the desired item by use the direction / , / button.
DIGITAL OUT: SPDIF/PCM
SPDIF/RAW
4. CUSTOM SETUP
In stop mode press SETUP button and highlight CUSTOM setup then press ENTER
button to conrm. To select the desired item by use the direction / , / button.
• ANGLE MARK: ON
OFF
“ANGLE MARK”, there are “ON” and “OFF” two choice for this item. If in the “ON”
mode, when play a disc which the content is multi-angle shot, you may press the
ANGLE button on the remote control to enjoy the scene in different angles.
• DEFAULT: READ
This setting is used to return the unit back to the factory default settings. Select
DEFAULT, then press ENTER and when the menu switches to “READ” press
ENTER again. To exit without making the changes use the button to back out
of the menu.
DVD Menu Play
This function is only available when playing a DVD movie and is used to access Casting
information, Porduction History, Special Features.
1. When a DVD is playing, press the DVD MENU button on the remote control to enter
the DVD Root Menu.
2. Use the Direction button ( / / / ) to select the required item from the list
presented.
3. Press ENTER to conrm and start the selection.
Audio
This funciton is applicable for DVD only.
- Pressing AUDIO button will change the Audio channel between those available on the
DVD.
REW / F.F. ( / )
This function is applicable for DVD and CD audio but with different effects. The FAST
FORWARD key and FAST BACKWARD key are used to achieve fast play function.
- For DVD, there are 5 different levels of speed (2x, 4x, 8x, 16x, 32x). Every successive
key press will increment the speed of quick play.
- For CD audio, the FORWARD/BACKWARD will perform quick rolling on the music
output.
Note : Press PLAY button at any stage will resume to normal speed.
ALDV243 Eng.indd 13 2008/4/25 9:27:14 AM

14
PREV. / NEXT ( / )
During playback, press one of the PREV. / NEXT buttons (PREVIOUS button and NEXT
button)
- When the PREV. button is pressed once, the pickup returns to the beginning of the
PREVIOUS playing chapter or track.
- When the NEXT button is pressed once, the pickup will go to the beginning of next
chapter or track.
P. SCAN (PROGRESSIVE SCAN)
Press this button to enter to the P-SCAN mode. Press this button again switch back to
normal interlace mode.
Note : To select P-SCAN mode, the P-SCAN output must be connect to P-SCAN TV,
otherwise the picture will be unstable and picture will disappear.
Slow
The Slow Forward is applicable for DVD. There are 5 steps of slow motion speed, 1/2, 1/4,
1/8, 1/16, 1/32. Successive key presses will decrement the playback speed.
Note: Press PLAY button to switch back to normal playback speed.
Repeat Mode
This function is available for DVD and CD audio but with different effects.
- For DVD disc playback, the user can choose to repeat the current chapter, current title
or disc. Each subsequent key press of the REPEAT key can change between these
three options.
- For CD, user can choose to repeat the current track or the whole disc (Repeat All). Each
subsequent key press of the REPEAT key can change between these two options.
Repeat A – B
The user can specify the repeating interval by marking the starting point and the end
point.
1. Press the REPEAT A-B button to mark the starting point (Playback will continue).
2. Press the REPEAT A-B button to mark the end point (The marked part will be repeated
automatically.)
Note : Press the REPEAT A-B button during repetition will disable the Repeat mode.
Subtitle
This function is only applicable for DVD disc. It can change the subtitle language shown
on the screen.
Note : The number of subtitle available depends on the information recorded on the DVD
disc itself.
Angle
Some discs may have multiple viewing angles during production. Use the ANGLE button
to select the viewing angle shown on the screen.
Note :
The number of Angle of View depends on the information recorded on the DVD disc.
ALDV243 Eng.indd 14 2008/4/25 9:27:15 AM
15
Search
The user can access a specic location or a specic track by keying in the target time or
the track number.
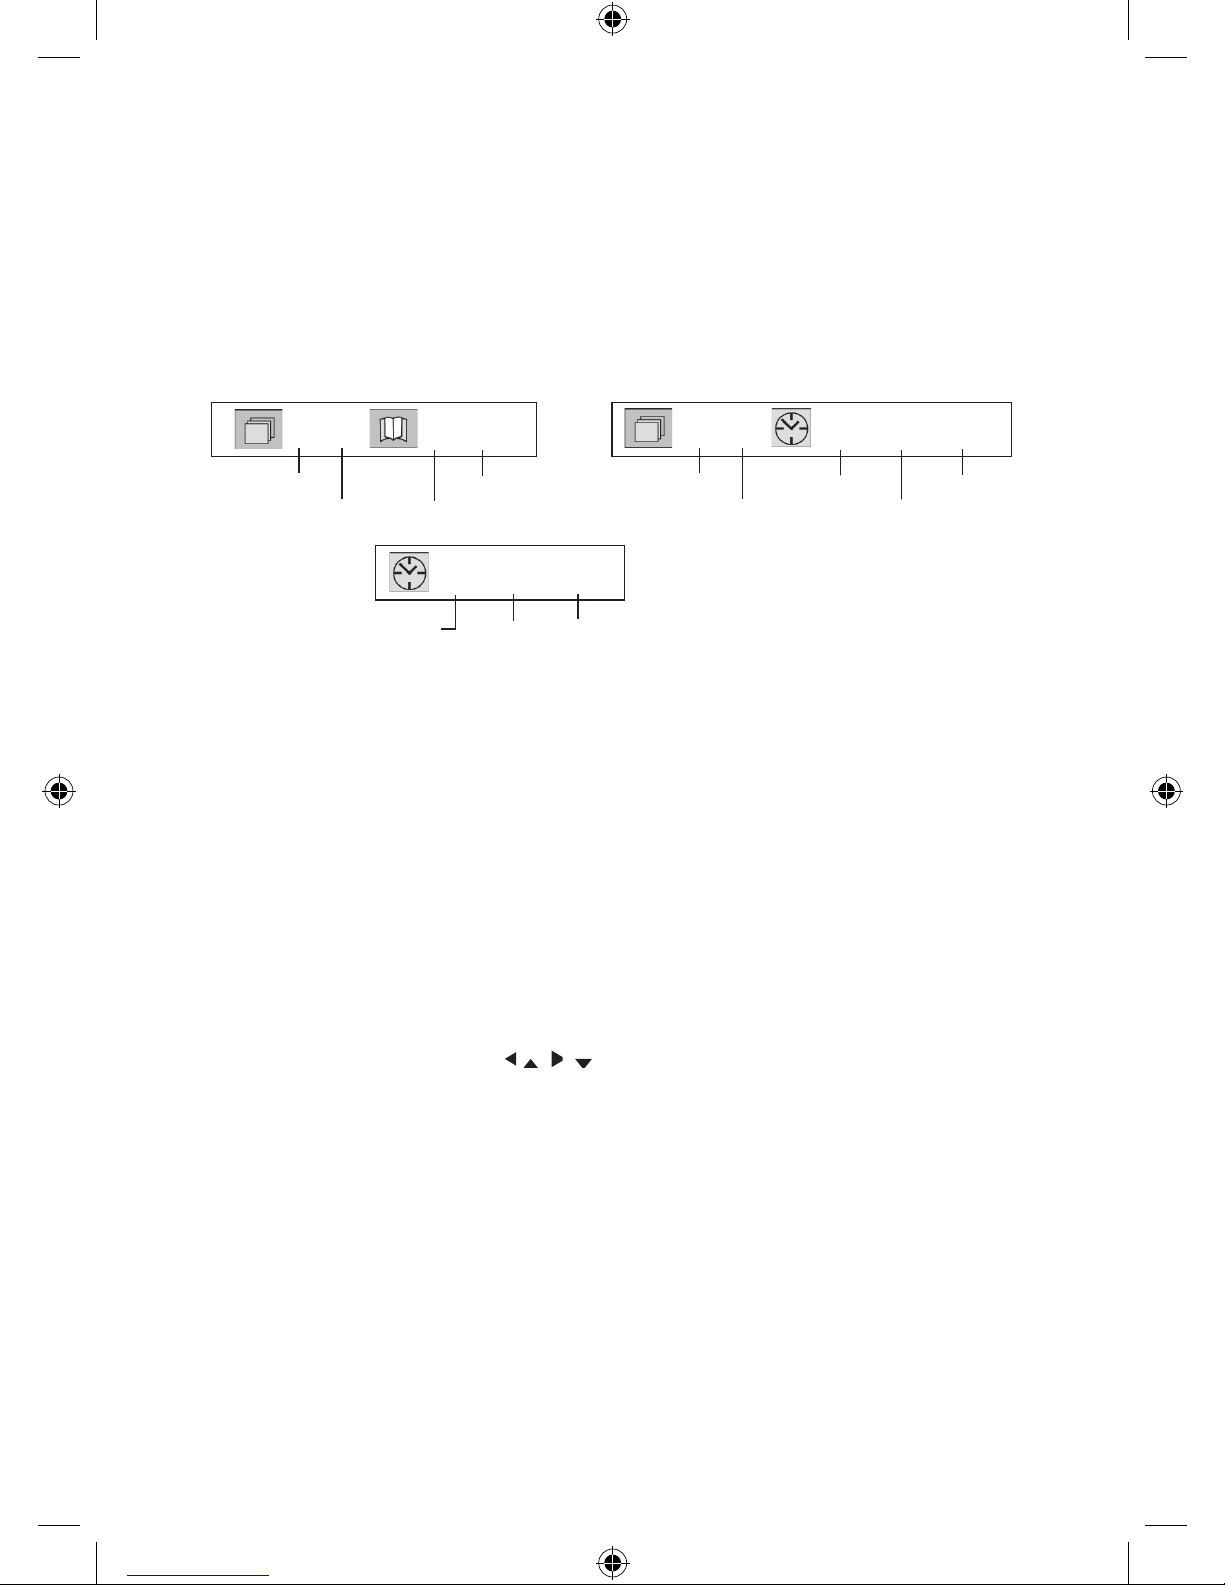
1. Press the SEARCH button to enter the Search Mode.
2. Use the Direction buttons to enter the desired “Title”, or “Chapter” data then press the
ENTER button to jump to the required location.
3. Press the SEARCH button twice and enter the required time using the NUMERIC
buttons IN ORDER. (To enter 1 hour, 25 mins and 45 seconds enter the numbers as
1, 25, 45.) then press ENTER to jump.
- Pressing the SEARCH button ONCE - Pressing the SEARCH button TWICE
• For CD Mode
Display
Pressing this button will show the time and status information on the screen. Pressing a
second time will present addtitional information on the current settings. Press third time
to cancel.
Resume Play
This function is in playback mode. When the STOP button is pressed once, the player will
enter the Resume Play mode. At this time, if the PLAY button is pressed, the player will
resume playback at the location where the STOP button was pressed. If the STOP button
is pressed a second time, resume mode cancels and the DVD stops completely.
Zoom
This function is enlarge or reduce a still picture or a moving picture by pressing the ZOOM
button to select one of the 2 levels of zooming (2x and 4x).
NOTE: Use the Direction button ( ) to navigate within the image.
X / X X / XX
Current title Total chapters
Total title Current chapter
X / X XX : XX : XX
Current title Hour Second
Total title Minute
XX : XX : XX
Hour Minute Second
ALDV243 Eng.indd 15 2008/4/25 9:27:15 AM
16
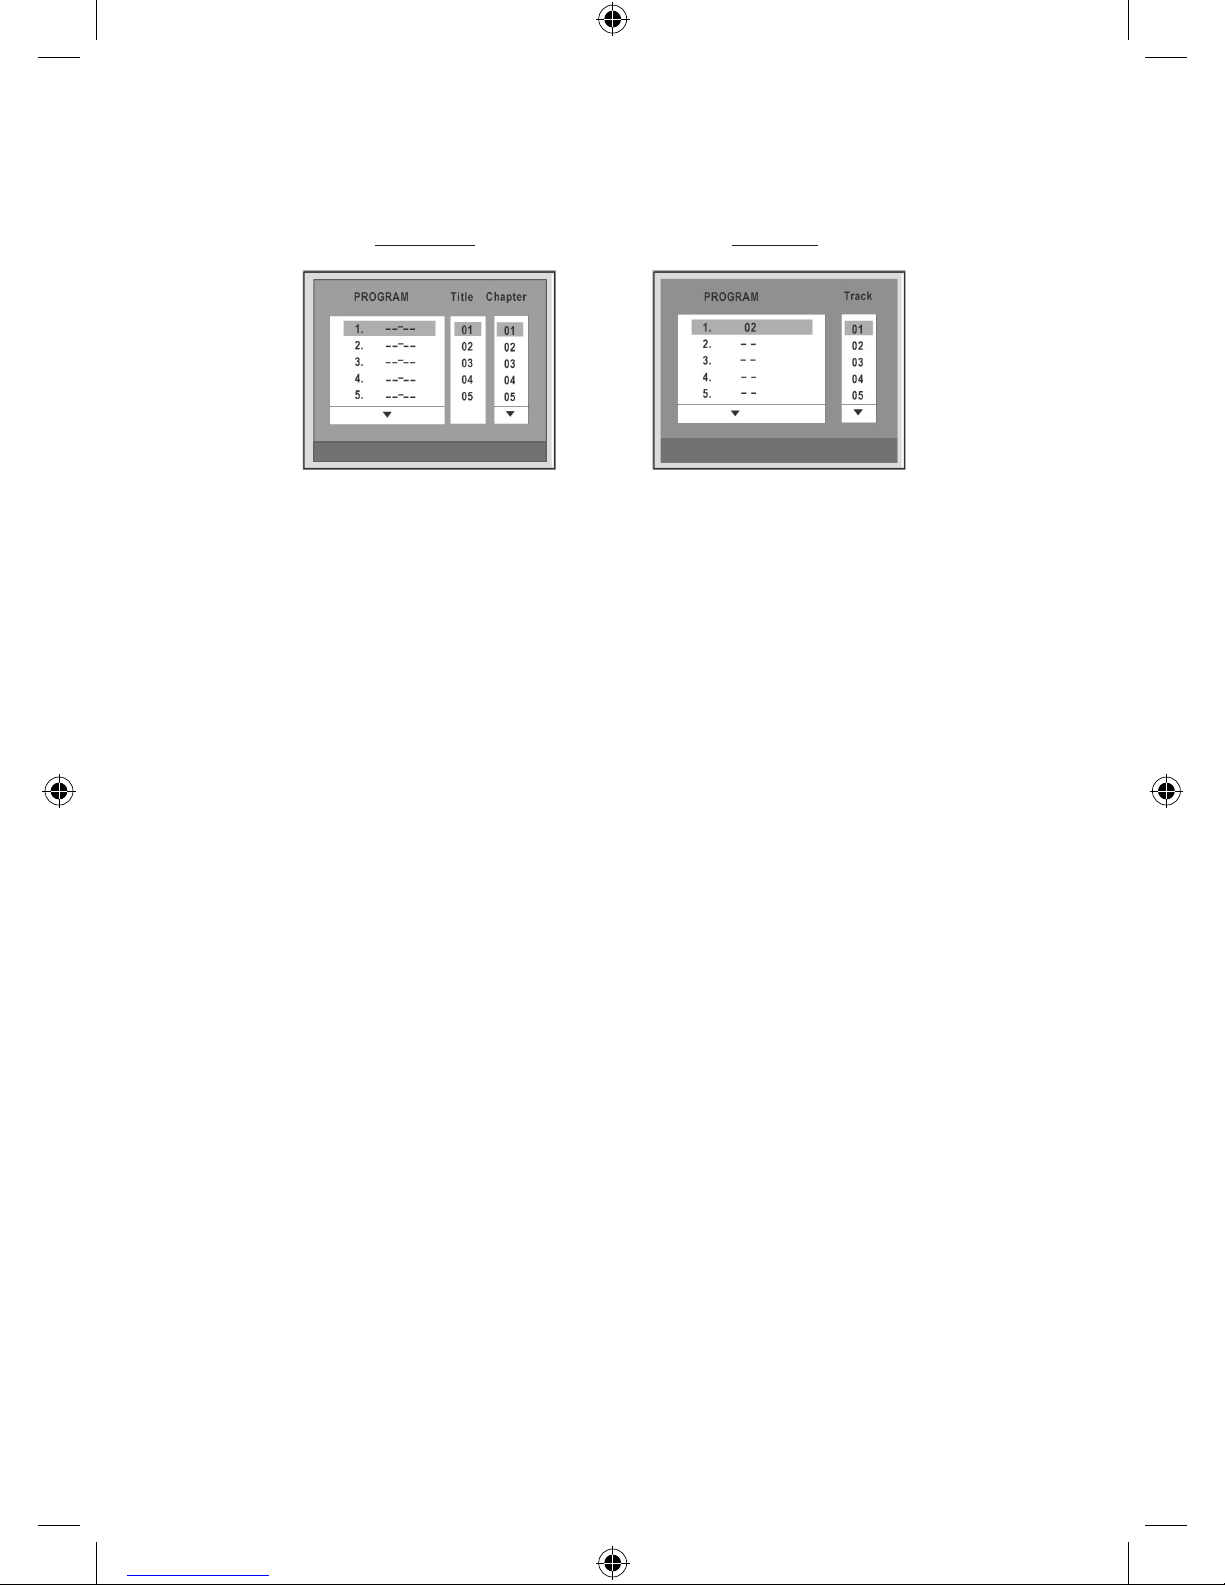
Program Mode
This function is to allow programming of a track/chapter/title playback sequence according
to your preference.
FOR DVD FOR CD
1. Press the PROGRAM button. The Program Sequence tabel will be shown on the
screen.
2. Enter the desired track number according to the your preference using the Number
keys (0-9).
3. When the programming is completed, press PLAY button on the remote control to start
program play.
To cancel the program:
Move the highlight cursor to desired Program by using the Direction buttons, then press
the CLEAR button to remove the selected program.
Picture CD
Load a picture CD into the tray. This player will only identify the disk and display les in
the jpg format. If the disc type can be identied, the player will start showing the pictures
one by one (Slide Show Mode).
Operations:
During Slide Show Mode:
• Press the STOP button to shift to the Digest Mode in which 1 to 20 pictures will be
shown on the screen each time.
Note Some disc may be cannot shift to digest mode, it is depends on the disc
format.
• Presa the PAUSE button to freeze the screen, so that the current picture can be held
for a long time. To resume the slide show mode, press PLAY button.
• Press the NEXT button on the remote control to skip the next picture.
• Press the PREVIOUS button on the remote control to return previous picture.
ALDV243 Eng.indd 16 2008/4/25 9:27:16 AM

17
TROUBLE SHOOTING
Check the following guide for the possible cause of a problem before contacting service.
Symptom
No Power
The power is on,
but DVD player
does not work
No Picture
No Sound
The playback
picture is poor
The DVD player
does not start
playback
The Remote
Control does not
work properly
Cause
• The power cord is disconnected.
• No disc is inserted.
• The TV is not set to receive DVD
signal output.
• The video cable is not connected
securely.
•
The connected TV power is turned off.
• The equipment connected with the
audio cable is not set to receive
DVD signal output.
• The audio cable is not connected
securely.
•
The power of the equipment connected
with the audio cable is turned off.
• The Digital Audio Output is set to
the wrong position.
• The disc is dirty.
• No disc is inserted.
• An unplayable disc is inserted.
• The disc is placed upside down.
• The disc is not placed with the
guide.
• The disc is dirty.
• A menu is on the TV screen.
• The remote control is not pointed
at the remote sensor of the DVD
player.
• The remote control is too far from
the DVD player.
•
There is an obstacle in the path of the
remote control and the DVD player.
• The batteries in the remote control
are exhausted.
Correction
• Plug the power cord into the wall
outlet and unit securely.
• Insert a disc. (Check that the DVD or
audio CD indicator in the DVD display
is lit.)
•
Select the appropriate video input mode on
the TV so the picture from the DVD player
appears on the TV screen.
• Connect the video cable into the
jacks securely.
• Turn on the TV.
• Select the correct input mode of the
audio receiver so you can listen to the
sound from the DVD player.
• Connect the audio cable into the
jacks securely.
• Turn on the equipment connected with
the audio cable.
•
Set the Digital audio Output to the correct
position, then turn on the DVD player
again by pressing the STANDBY button.
• Clean the disc.
• Insert a disc
• Insert a playable disc. (Check the disc
type, color system.)
•
Place the disc with the playback side down.
• Place the disc on the disc tray correctly
inside the guide.
• Clean the disc.
• Press the SET UP button to turn off the
menu screen.
• Point the remote control at the remote
sensor of the DVD player.
• Operate the remote control within
about 23ft (7m).
• Remove the obstacle.
• Replace the batteries with new ones.
ALDV243 Eng.indd 17 2008/4/25 9:27:17 AM

18
SPECIFICATION
GENERAL
Power source AC 120V ~ 60Hz
Power consumption 10W
Mass 1.6 Kg
External dimensions (WxDxH) 256 x 225 x 56 mm
Operating conditions Temperature: 5°C to 35°C
Operation status Horizontal
Operating humidity 5% to 90%
CD/DVD
Laser Semiconductor laser, wavelength 650nm
Signal system NTSC
Frequency response (audio) 4Hz to 20 KHz
Signal to noise ratio (audio) More than 90dB (1KHz, NOP, 20KHz LPF/A-Filter)
Dynamic range (audio) More than 95dB
Harmonic distortion (audio) 0.2% (1KHz)
VIDEO
Video output 1.0V (p-p), 75 ohm, negative sync., RCA jack
S-Video output (Y) 1.0V (p-p), negative sync., Mini DIN 4-pin x 1
(C) 0.3V (p-p), 75 ohm
Component video (Y, Pb/Cb, Pr/Cr) (Y) 0.7V (p-p), negative sync. RCA jack
(Pb/Cb) 0.7V (p-p), 75 ohm
(Pr/Cr) 0.7V (p-p), 75 ohm
* Design and specication are subject to change without notice.
ALDV243 Eng.indd 18 2008/4/25 9:27:17 AM

AUDIOLOGIC
LIMITED WARRANTY
We at Audiologic believe you will be pleased with your new Audiologic Product. Please read this Warranty carefully.
Audiologic warrants this product to be free from manufacturing defects including original parts and workmanship for
a period of 1 year from the date of original purchase in and if used in Canada.
Should you nd your unit is not operating properly during the terms of full coverage of this warranty (1 year), Audiologic
will provide one of the following options (at Audiologic’s discretion), providing the manufacturing defect is veried
along with the date of purchase.
Repair service for 1 year from the date of original purchase at no charge for labour and parts. Replacement of your
defective unit with either a new, refurbished, or equivalent model at no charge for 1 year from the date of original
purchase.
CUSTOMER OBLIGATIONS
This warranty applies to the product from the original date of purchase at retail. Therefore, the owner must provide
a copy of the original, dated bill of sale. No warranty service will be performed without a bill of sale. Transportation
to and from the service depot is the responsibility of the owner.
This warranty is void if the product is:
A) Damaged through negligence, abuse, misuse, accident or acts of God.
B) Used in commercial applications or rentals.
C) Modied or repaired by anyone other than Audiologic or their expressly authorized representative.
D) Damage resulting from the improper connection to equipment of other manufacturers.
This warranty does not cover:
A) Cost incurred in the shipping of the product to and from the Audiologic authorized repair facility listed.
B) Damage or improper operation caused by the failure to follow the operating instructions provided with the
product.
C) Routine adjustments to the product which can be performed by the customer as outlined in the owner’s
manual.
D) Damage to compact disc, or audio tape.
E) Signal reception problems caused by external factors.
F) Products not purchased in Canada.
G) Damage to the products used outside Canada.
THIS WARRANTY IS NON-TRANSFERABLE AND APPLIES SOLELY TO THE ORIGINAL PURCHASER AND DOES
NOT EXTEND TO SUBSEQUENT OWNERS OF THE PRODUCT. ANY APPLICABLE IMPLIED WARRANTIES,
INCLUDING THE WARRANTY OF MERCHANTABILITY, ARE LIMITED IN DURATION TO A PERIOD OF THE
EXPRESSED WARRANTY AS PROVIDED HEREIN BEGINNING WITH THE DATE OF THE ORIGINAL PURCHASE
AT RETAIL AND NO WARRANTIES, WHETHER EXPRESSED OR IMPLIED SHALL APPLY TO THE PRODUCT
THEREAFTER. AUDIOLOGIC MAKES NO WARRANTY AS TO THE FITNESS OF THE PRODUCT FOR ANY
PARTICULAR PURPOSE OR USE.
THE EXTENT OF AUDIOLOGIC’S LIABILITY UNDER THIS LIMITED WARRANTY IS THE REPAIR OR REPLACEMENT
PROVIDED ABOVE AT THE SOLE DISCRETION OF AUDIOLOGIC IN NO EVENT SHALL AUDIOLOGIC’S
LIABILITY EXCEED THE PURCHASE PRICE PAID BY THE PRUCHASER. UNDER NO CIRCUMSTANCES SHALL
AUDIOLOGIC BE LIABLE FOR ANY LOSS, DIRECT, INDIRECT, INCIDENTAL FORESEEN, UNFORESEEN, SPECIAL
OR CONSEQUENTIAL DAMAGE ARISING OUT OF OR IN CONNECTION WITH THE USE OF THIS PRODUCT.
THIS WARRANTY IS VALID ONLY IN CANADA. THIS WARRANTY GIVES YOU SPECIFIC LEGAL RIGHTS.
HOWEVER, YOU MAY HAVE OTHER RIGHTS WHICH MAY VARY FROM PROVINCE TO PROVINCE. SOME
PROVINCES DO NOT ALLOW LIMITATIONS ON IMPLIED WARRANTIES OR EXCLUSION OF CONSEQUENTIAL
DAMAGE, THEREFORE THESE RESTRICTIONS MAY NOT APPLY TO YOU.
THIS INSTRUCTION BOOK MAY CONTAIN ERRORS AND OMISSIONS.
DESIGN AND SPECIFICATION ARE SUBJECT TO CHANGE WITHOUT NOTICE.
Cosmo Communications Service
55 Travail Road Unit 2
Markham, Ontario
L3S-3J1
Phone: (905) 209-0488 Fax: (905) 209-0489
www.cosmocanada.com
ALDV243 Eng.indd 19 2008/4/25 9:27:17 AM

20
IMPORTANT
Le circuit CD risquant de causer du brouillage à d’autres syntonisateurs radio situés à proximité, fermez
cet appareil lorsqu’il n’est pas utilisé ou placez-le loin du syntonisateur radio affecté.
Ce dispositif se conforme à la partie 15 des règlements du FCC. Le fonctionnement est assujetti aux deux
conditions suivantes : (1) Ce dispositif ne peut pas causer des brouillages préjudiciables et (2) ce dispositif
doit accepter le brouillage reçu, y compris le brouillage qui peut causer un fonctionnement indésirable.
Avertissement : Des changements ou des modications à cet appareil non expressément approuvés par la
personne responsable de la conformité pourrait annuler le droit à l’utilisateur de faire fonctionner cet appareil.
REMARQUE : Cet équipement a été testé et s’est avéré conforme aux limites d’un dispositif numérique
de classe B, conformément à la partie 15 des règlements du FCC. Ces limites sont conçues pour fournir
une protection raisonnable contre les brouillages préjudiciables dans une installation résidentielle. Cet
équipement crée, utilise et peut radier de l’énergie de fréquence radio et s’il n’est pas installé et utilisé
conformément aux instructions, il peut causer un brouillage dangereux aux communications radio.
Les changements ou les modications pas expressément approuvés par la partie responsable de la
conformité ont pu vider l’autorité de l’utilisateur pour actionner l’équipement. Toutefois, il n’y a aucune
garantie qu’un tel brouillage ne surviendra pas dans une installation en particulier. Si cet équipement
cause un brouillage préjudiciable à la réception de radio ou de télévision, pouvant être déterminé en
mettant en marche et en arrêtant l’équipement, nous encourageons l’utilisateur à essayer de corriger
tel brouillage en se conformant à l’une ou plusieurs des mesures suivantes :
• Augmentez la séparation entre l’équipement et le récepteur.
•
Raccordez l’équipement à une prise sur un circuit différent de celui sur lequel le récepteur est raccordé.
• Consultez le marchand ou un technicien expérimenté en radio/télévision pour obtenir de l’aide.
Cet appareil numérique de classe B se conforme à la norme canadienne ICES-003.
CERTIFICATION DE SÉCURITÉ
Ce lecteur CD est fabriqué et testé pour se conformer aux normes de
sécurité du FCC, ainsi qu’aux exigences concernant le US Department
of Health and Human Services ainsi qu’aux normes de performance
de rayonnement du FDA, 21 CFR sous-chapitre J.
AVERTISSEMENT
Pour réduire le risque d’incendie ou de chocs électriques, ne pas exposer cet
appareil à la pluie ou à l’humidité.
L’appareil ne devrait pas être exposé aux égouttements ou aux éclaboussures et aucun objet rempli de liquide,
tel que vases, ne devrait être placé sur l’appareil.
On devra éviter d’entraver la ventilation en recouvrant les ouvertures de ventilation avec des journaux, nappes, rideaux, etc.
Aucune source de ammes nues, comme de bougies allumées, ne devrait être placée sur l’appareil.
La prise électrique est utilisée en tant que dispositif de débranchement. Le dispositif de débranchement devrait
rester facilement utilisable.
Pour débrancher entièrement l’appareil de la prise électrique, la che électrique devrait être débranchée complètement de la prise.
IMPORTANT
-
Pour éviter un choc électrique, ne vous servez pas de cette che (polarisée) avec un l de rallonge, une prise
ou autre système, à moins que la che puisse être entièrement insérée sans exposer une partie des lames.
-
Pour éviter un choc électrique, faites correspondre la lame large de la che à la fente large, entièrement insérée.
MI S E E N GARD E : P O U R
RÉDUIRE LE RISQUE D’INCENDIE
ET DE CHOC ÉLECTRIQUE, NE
RETIREZ PAS LE COUVERCLE
(OU LE DOS) DE L’APPAREIL.
RÉFÉREZ LES RÉPARATIONS
SEULEMENT À UN PERSONNEL
DE RÉPARATION QUALIFIÉ.
Le point d’exclamation à l’intérieur
d’un triangle équilatéral est
conçu pour avertir l’utilisateur
de la présence d’instructions de
fonctionnement et d’entretien
(service) importantes dans la
documentation accompagnant cet
appareil.
L
e signe d’éclair avec une pointe de
èche à l’intérieur d’un triangle équilatéral
est conçu pour avertir l’utilisateur de la
présence d’une tension dangereuse non
isolée à l’intérieur de l’enceinte de cet
appareil, qui peut avoir une magnitude
sufsante pour constituer un risque de
choc électrique à toute personne.
PRODUIT LASER
CLASSE 1
ATTENTION
RISQUE DE CHOC ÉLECTRIQUE
NE PAS OUVRIR
ALDV243 Fre.indd 20 2008/4/25 9:28:48 AM
Table of contents
Languages:


