Audiophilleo PurePower User manual

audioPhilleo
perceive the world through hearing
Owner Manual
PurePower
Revision 1.1 April 20, 2012
Audiophilleo LLC
8476 Portland Pl
McLean, VA
support@audiophilleo.com
Phone 703-674-816

1
Table of Contents
Document History .......................................................................2
Getting Started............................................................................3
Introduction......................................................................................3
Box Contents...................................................................................4
Connections.....................................................................................4
PurePower user interface ...........................................................7
Changing the battery.................................................................11
Firmware Update with Windows...............................................12
Step 1: Enter Firmware Upgrade Mode.........................................12
Step 2: Driver installation...............................................................13
Step 3: Run Firmware Tool............................................................15
Firmware Update with MacOS..................................................18
Step 1: Enter Firmware Upgrade Mode.........................................18
Step 2: Software installation..........................................................19
Step 3: Run Firmware Tool............................................................19
Specifications............................................................................21
Noise .............................................................................................21
Compatibility..................................................................................21
Physical.........................................................................................21
Electrical........................................................................................22

2
Document History
Date
Revision
Change
April 16, 2012
1.0
Initial release
April 19, 2012
1.1
Added MacOS firmware
upgrade procedure.

A U D I O P H I L L E O 1 & 2 U S E R M A N U A L
3
Getting Started
Introduction
hank you and congratulations for purchasing the PurePower VLN battery power supply. We designed these devices to be the easy to
use and provide the lowest possible noise as well as best isolation from dirty USB power, giving you peace of mind and allowing you
to focus on other aspects of improving your audio system. An Audiophilleo1 or Audiophilleo2 enhanced with the PurePower
upgrade has many advantages:
Very low noise battery supply of the output stage and clocks. The level of noise is lower than any power supply which is powered by
AC power, and much lower noise than any commonly used wall wart.
No high frequency power supply noise gets passed through to the DAC, providing the ultimate clarity, separation, and sound staging.
AP1/2 USB and the output stage are completely isolated from each other, causing the Audiophilleo to be almost completely immune
to USB power and signal noise. This makes expensive USB cables and customized USB ports even less important when trying to
achieve the best sound, making the PurePower the smartest and most effective way to optimize your sound.
The PurePower supply is designed to provide the user with the cleanest possible power without user intervention. It detects when the
Audiophilleo1/2 is actively drawing power and always tries to provide PURE mode (running from battery and physically disconnected via
relays from the “PC USB” port to avoid power pollution). When the PurePower detects that the AP1/2 stopped drawing power (which
happens ~30 minutes after stopping music playback), charging automatically starts and continues until the battery is full or playback is
resumed. This ensures that when you start a music listening session, the battery is always fully charged to provide 15 hours of continuous
PURE music playback.
Chapter
1
T

A U D I O P H I L L E O 1 & 2 U S E R M A N U A L
4
Box Contents
The PurePower ships with the following items:
One PurePower power supply.
One 12 inch USB A-B Cable (for optionally daisy chaining the Audiophilleo1/2 USB connection through the PurePower).
One 12 inch custom threaded barrel connector cable for the most reliable power connection between the PurePower and
Audiophilleo1/2
Connections
Figure 1 shows how to connect the PurePower and Audiophilleo1/2 together. There is no need for any installations or configuration. Just
make the following 3 cable connections:
1. Use the included 12 inch barrel connector cable to connect the AP1/2 barrel connector to the PurePower “AP POWER” connector.
This connection is shown in green in Figure 1.
2. Just use a standard USB A-B cable to plug the PurePower “PC USB” connector into any available USB port on your computer and
charging will begin automatically. This is also shown in red. Note that a Mac may ask you to configure a network device. You should
do this so that it does not ask it again (While charging using Option 2 below, the PurePower has to configure itself as a USB device in
order to legally draw 500mA from the USB port).
3. You have 2 options for connecting the AP1/2 USB port to the PC:
a. Option 1: Connect the AP1/2 USB port to the PurePower “AP USB” port using the included 12 inch USB A-B cable. This
connection is shown in red in Figure 1. Option 1 makes connection of the two devices very convenient due to less cabling.
Note that the “AP USB” port is directly connected to the “PC USB” port and therefore simply passes power and signal
through to the AP1/2 like an extension cable.
b. Option 2: You may alternatively plug the AP1/2 USB port directly into the PC as shown in Figure 2. In this case nothing is
plugged into the PurePower “AP USB” port.

A U D I O P H I L L E O 1 & 2 U S E R M A N U A L
5
You are finished. You can start to enjoy your music!
Figure 1 Connections –Option1: Audiophilleo1/2 USB cable feeds through the PurePower

A U D I O P H I L L E O 1 & 2 U S E R M A N U A L
6
Figure 2 Connections –Option 2: Audiophilleo1/2 USB cable connected directly to PC

A U D I O P H I L L E O 1 & 2 U S E R M A N U A L
7
PurePower user interface
The PurePower includes a joystick and backlit LCD display to provide status information in a user-friendly way. The joystick supports five
directions: LEFT, RIGHT, UP, DOWN, and CLICK. After powering up, the main screen is displayed. The interface is similar to that of the
Audiophilleo2.
When in the main screen, UP or DOWN scrolls between 3 different main screen views:
Voltage Battery time left 15 hour voltage graph
These screens differ in what is shown in large text in the middle. Table 1 below summarizes the meaning of the different text shown n the
screen.
Text
Description
APON
APOFF
The top left screen shows APON when power is being drawn by the AP1 or AP2 and APOFF
otherwise. When APOFF is shown and greyed out, this means that the barrel power cable is not
plugged into the PurePower “AP POWER” connector.
Chapter
2

A U D I O P H I L L E O 1 & 2 U S E R M A N U A L
8
PURE
CHARGE
LOW
The top right screen shows PURE when the PurePower is physically disconnected from the “PC
USB” power input through the use of relays. In this case there is no electrical connection between
then “PC USB” port and the PurePower (except for feeding through to the “AP USB” port, of
course). In this mode, very low noise power is being fed to the AP since.
CHARGE is displayed when the PurePower is charging the internal battery. In this mode the “PC
USB” power input is used to charge the battery and feed the AP for continuous operation.
LOW is displayed when the battery voltage is too low for normal operation (<3V). In this mode, the
unit will also shut off the display to conserve power.
PC
The bottom left screen shows “PC” not greyed out when a good power source is plugged into the
“PC USB” input.
14H
This gives a rough estimate for the remaining number of hours of PURE playtime the battery can
deliver.
3.24V
This is the measured voltage of the battery. Note that a higher voltage does not make the AP
perform better as the PurePower delivers the optimum voltage range.
.21A
The bottom right screen shows the number of Amps being drawn by the AP out of the “AP
POWER” connector. “.21A” means 210mA.
When in the main screen, RIGHT enters the main menu. This optionally allows for changing setting, firmware upgrades, and additional status
information. When in the menu, LEFT goes back to the main screen (when in the top level menu) or to previous higher menu level. RIGHT
or PUSH enters the currently highlighted sub-menu. UP and DOWN scroll through the menus or changes numeric values.
Fiture 3 shows all the menu screens with a summary of what they do. Note that under normal conditions, the Charging->Advanced settings
should not be changed.
In addition to the screens shown in Figure 3, various messages can pop of for 1 second. For example, when a cable is plugged into or
unplugged from the PurePower, a corresponding message appears on the screen. Also, when charging starts or stops a message is displayed.

A U D I O P H I L L E O 1 & 2 U S E R M A N U A L
9
Note: If the PurePower malfunctions, it should restart automatically. If it ever becomes unresponsive, simply PUSH the joystick and hold
for 8 seconds to reboot your unit.
Note: After a period of non-use, the PurePower will automatically enter a low power state and the screen may be turned off. Simply plug or
unplug a cable or use the joystick to restore the screen.

A U D I O P H I L L E O 1 & 2 U S E R M A N U A L
10
Figure 3 The menu tree
main
menu
Settings
Charging
Start Now
starts a
charge cycle
immediately.
Stop Now
stops
charging.
Advanced
Auto Level is
the mA above
which the AP is
considered on.
Start Volt is the
battery voltage
below which
charging is
started.
Stop Volt is the
battery voltage
above which
charging is stopped
when APON
Display
Sleep is the number
of secinds the LCD
backlight takes to
turn off
Playback. When
TurnOff is checked,
the LCD is powered
off when the AP is
playing music,
minimizing noise.
Firmware
About
Defaults. Sets
all setting to
default
values.
Update
Status

A U D I O P H I L L E O 1 & 2 U S E R M A N U A L
11
Changing the battery
ne of the design requirements was to make the battery user replaceable. This gives you the peace of mind that the power supply can
provide many years of service and is not limited by the lithium polymer battery life. Typical battery life is expected to be
approximately 3 years. Battery change only requires a Phillips screw driver and the removal of 2 screws.
Note: This section of the manual will be updated with the battery change procedure (including images) in the future.
Chapter
3
O

A U D I O P H I L L E O 1 & 2 U S E R M A N U A L
12
Firmware Update with Windows
ur devices are designed with modular firmware that is easily updated. Updates will be released based on feature requests and bug
reports. Please let us know if you have any requests. We will try to include any reasonable requests in the next firmware update.
Firmware upgrade is supported under Windows and MacOS. For MacOS please see chapter 5. For updates please check
http://audiophilleo.com/support.aspx.
Note: If you enter firmware update mode and decide not to proceed with an upgrade, just push the joystick LEFT to resume normal
operation.
Note: After a successful update procedure the PurePower will automatically reboot and start the new firmware. You may confirm the
firmware version my going to the Firmware->About screen.
Step 1: Enter Firmware Upgrade Mode
Plug the PurePower into the PC using the “PC USB” port. To enter firmware upgrade mode simply go to Firmware->Update. When
prompted with the “Push joystick up and hold” screen, push joystick UP and hold for several seconds. After the screen displays “Thank you.
Use PC to update firmware.” you may release the joystick. The backlight will rapidly flash about 5 times and then start to flash slowly (once
every few seconds). Once the backlight starts to flash slowly you may continue to the next step. The PurePower is now in firmware upgrade
mode. The Windows PC sees it as a USB serial port.
Chapter
4
O

A U D I O P H I L L E O 1 & 2 U S E R M A N U A L
13
Step 2: Driver installation.
1. Unzip the contents of this zip file into a folder anywhere on your hard disk. You can do this b y right clicking on the zip file and
selecting “Extract All…” from the popup menu.
2. Click on the windows “Start” menu in the bottom left of the screen, then right click on “Computer” and left click on “Manage”
If a security message pops up, select yes. The “Computer Management” console windows will open. Left click “Device Manager”,
double click “Ports (COM & LPT)”. This gives you a list of installed ports. You want the PurePower to show up as one of these
ports.
3. To determine which port is the PurePower, unplug the PurePower and check which port disappears. Then re-plug the PurePower to
check that the port once again reappears. If instead of a COM port you get an “unknown device” (or something similar), then this
means that the computer did not recognize the PurePower as a serial port. In that case, right click on the “unknown device” as shown

A U D I O P H I L L E O 1 & 2 U S E R M A N U A L
14
in the image above and select “Update Driver Software…” in the popup menu. Then select “Browse my computer for driver
software”. Then click the “Browse” button and browse to the directory where you unzipped this file. Click “Next” and finish the
update procedure. If you receive any warnings about driver signing, please accept them and install the driver anyway. It should finally
say “Windows has successfully updated your driver software”.
4. Note the COM port which is assigned to the PurePower. For example, in the figure below we are showing the PurePower as
“COM18”. Since your computer may have several COM ports, you can determine which one belongs to the PurePower by
disconnecting it from the computer and seeing which COM port disappears from the device manager. Then you can reconnect it to
the computer and the COM port should re-appear.

A U D I O P H I L L E O 1 & 2 U S E R M A N U A L
15
Step 3: Run Firmware Tool
You are now ready to perform the upgrade. This is done by double clicking on the “updatePP” file in this unzipped folder. The following
window will open:

A U D I O P H I L L E O 1 & 2 U S E R M A N U A L
16
Please enter the number of the PurePower serial port and press Enter. In this example it is 18. Then you should see the following:

A U D I O P H I L L E O 1 & 2 U S E R M A N U A L
17
The PurePower will reboot and the update procedure is finished. Congratulations!

A U D I O P H I L L E O 1 & 2 U S E R M A N U A L
18
Firmware Update with MacOS
ur devices are designed with modular firmware that is easily updated. Updates will be released based on feature requests and bug
reports. Please let us know if you have any requests. We will try to include any reasonable requests in the next firmware update.
Firmware upgrade is supported under Windows and MacOS. For Windows please see chapter 4. For updates please check
http://audiophilleo.com/support.aspx.
Note: If you enter firmware update mode and decide not to proceed with an upgrade, just push the joystick LEFT to resume normal
operation.
Note: After a successful update procedure the PurePower will automatically reboot and start the new firmware. You may confirm the
firmware version my going to the Firmware->About screen.
Step 1: Enter Firmware Upgrade Mode
Plug the PurePower into the PC using the “PC USB” port. To enter firmware upgrade mode simply go to Firmware->Update. When
prompted with the “Push joystick up and hold” screen, push joystick UP and hold for several seconds. After the screen displays “Thank you.
Use PC to update firmware.” you may release the joystick. The backlight will rapidly flash about 5 times and then start to flash slowly (once
every few seconds). Once the backlight starts to flash slowly you may continue to the next step. The PurePower is now in firmware upgrade
mode. The Windows PC sees it as a USB serial port.
Chapter
5
O
A U D I O P H I L L E O 1 & 2 U S E R M A N U A L
19
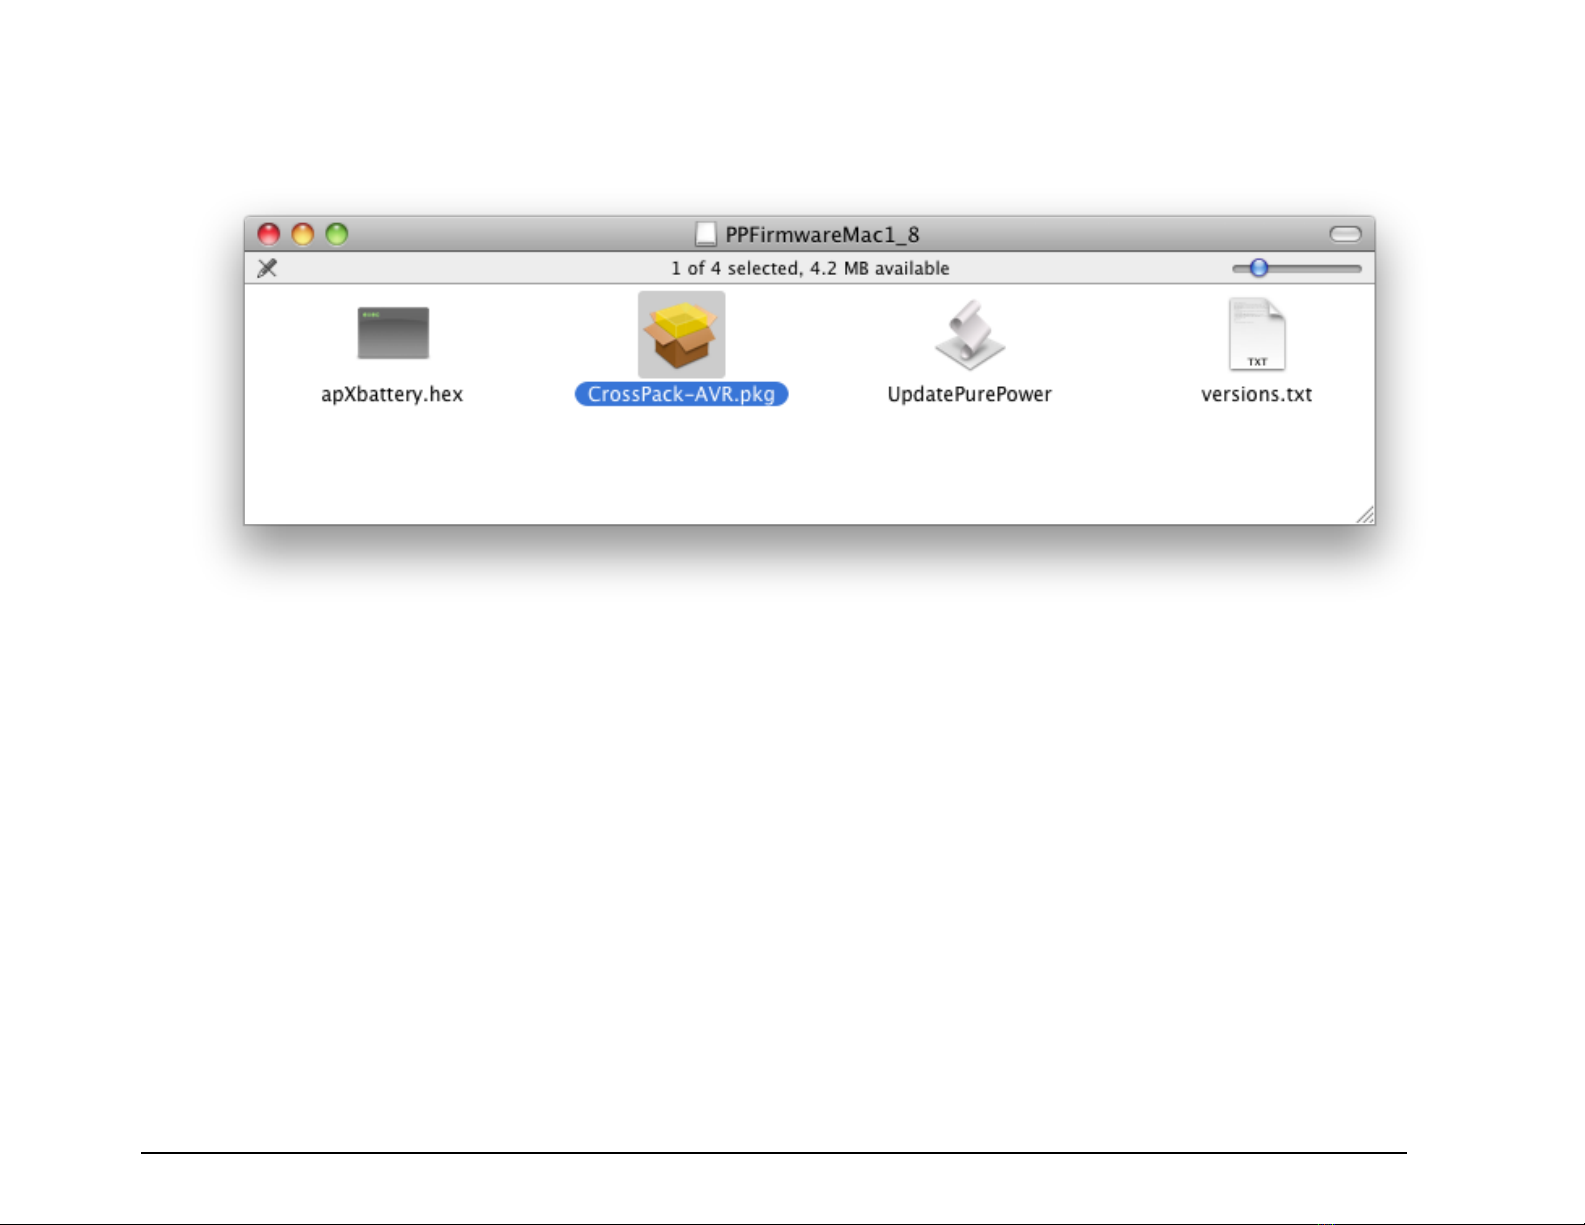
Step 2: Software installation.
1. Double click the firmware DMG image file you downloaded in order to mount it. You will see this window:
2. Double click on “CrossPack-AVR.pkg”and follow the installation instructions to the end. Note that this only needs to be done once
per computer.
Step 3: Run Firmware Tool
You are now ready to perform the upgrade. This is done by double clicking on the “UpdatePurePower” file. After a few seconds, the
following window should open. Note that the bottom should say “avrdud: xxxx bytes of flash verified”. The PurePower should reboot and be
running the new firmware.
Table of contents


