audiophony PA DZONE88 User manual

USER GUIDE
H11041 - Version 1 / 01-2020
8x8 DIGITAL MATRIX
DZONE
POWER
NET
LINK
INPUT
ABCDEFGH
1 2345678
48V
OUTPUT
P
U
S
H
E
N
T
E
R
SELECT
ESC
ETHERNET
AC 100-240V 50/60Hz
GPIO RS 485 RS 232
RXV123 54 678G TXG
8 7 6 5 4 3 2 1
OUTPUT INPUT
H G F E D C B A
Page 2
DZONE88 - Digital array, 8 inputs 8 outputs
English
Instructions and recommendations
1 - Read the instructions:
It is recommended that you read all operating and usage instructions before using
the appliance.
2 - Keep the instructions:
It is recommended that you keep the operating and usage instructions for future
reference.
3 - Heed the warnings:
Please heed all warnings and operating instructions of the product.
4 - Follow the instructions:
It is recommended that all operating and usage instructions be followed.
5 - Water and humidity:
Do not use this appliance near water, for example, near a bathtub, washbowl, sink or
laundry tub; or in a wet location or near a swimming pool, etc...
6 - Installation:
Do not place this appliance on an unstable stand, tripod, bracket, or table. The appliance
may fall, causing serious injury to a child or adult and serious damage to the unit.
Only use a rolling cabinet, a shelf, a tripod, a stand or a table recommended by the
manufacturer or sold with the appliance. In all cases, when installing the appliance,
follow the manufacturer's instructions and use only with tools recommended by the
manufacturer.
Care should be taken when moving the cabinet while the appliance is in use. Sudden
stops, excessive force and rough surfaces may cause the unit to tip over.
7 - Ceiling or wall mounting:
It is recommended that you contact your dealer before mounting.
8 - Ventilation:
Slots and openings in the casing are provided for ventilation, to ensure the product
can be used with confidence and to prevent overheating. These openings should not
be blocked or covered. Care must be taken to never block these openings by placing
the product on a bed, sofa, blanket or other such surface. This appliance should not be
placed in an enclosed installation such as a suitcase or rack unless proper ventilation
has been provided or the manufacturer's instructions have been followed.
9 - Heat:
It is recommended that the product be kept away from heat sources such as radiators,
stoves, heat reflectors, or other products (as well as amplifiers) that produce heat.
10 - Power supply:
This product operates only on the voltage indicated on the label on the back of the
unit. If you are unsure of the voltage of your electrical system, consult your dealer or
power company.
11 - Protecting electrical cables:
Care must be taken to ensure that electrical cables are not likely to be walked on or
pinched by objects placed upon or against them, paying particular attention to the
cables around the plugs and their exit points on the appliance.
12 - Cleaning:
Unplug the appliance from the wall outlet before cleaning. Do not use accessories
not recommended by the manufacturer. Use a damp cloth to wipe the surface of the
appliance. Do not place the device underwater.
13 - Period of non-use:
Unplug the power cord from your player if you are not going to use it for a long period.
14 - Objects or liquid ingress:
Never allow objects of any kind to enter this appliance through the openings as they
may cause a fire or electric shock.
Never spill liquids of any kind on the product.
15 - Damage requiring maintenance:
Refer all servicing to qualified service personnel in the following cases:
- When the power cord or plug is damaged.
- If liquid has been spilled or objects have fallen into the product.
- If the product has been in contact with rain or water.
- If the product does not operate normally by following the instructions.
- If the product has received a shock.
16 - Maintenance/servicing:
Do not attempt to service this product yourself. Doing so would expose you to
dangerous voltage. Refer all servicing to qualified service personnel.
17 - Operating environment:
Operating temperature and humidity: +5 to +35°C; relative humidity not exceeding
85% (unobstructed ventilation hole).
Do not install the unit in a poorly ventilated space or a place subject to high humidity
or direct sunlight (or strong artificial light).
1 - Safety instructions
Important safety information
This appliance is designed to operate in a heated space
and away from any form of humidity or water splashes. Use
in humid, unprotected areas or areas subject to extreme
temperature fluctuations may pose a risk to the appliance and
any person in the vicinity.
Only competent technical services recognized by CONTEST
are authorized to carry out maintenance on this device. Routine
maintenance procedures must be carried out in accordance
with the precautions described in this manual.
This appliance contains non-insulated parts inside its casing
that are live and whose voltage is high enough to pose a risk
of electric shock. Under no circumstances should you perform
maintenance on this appliance while the power is on.
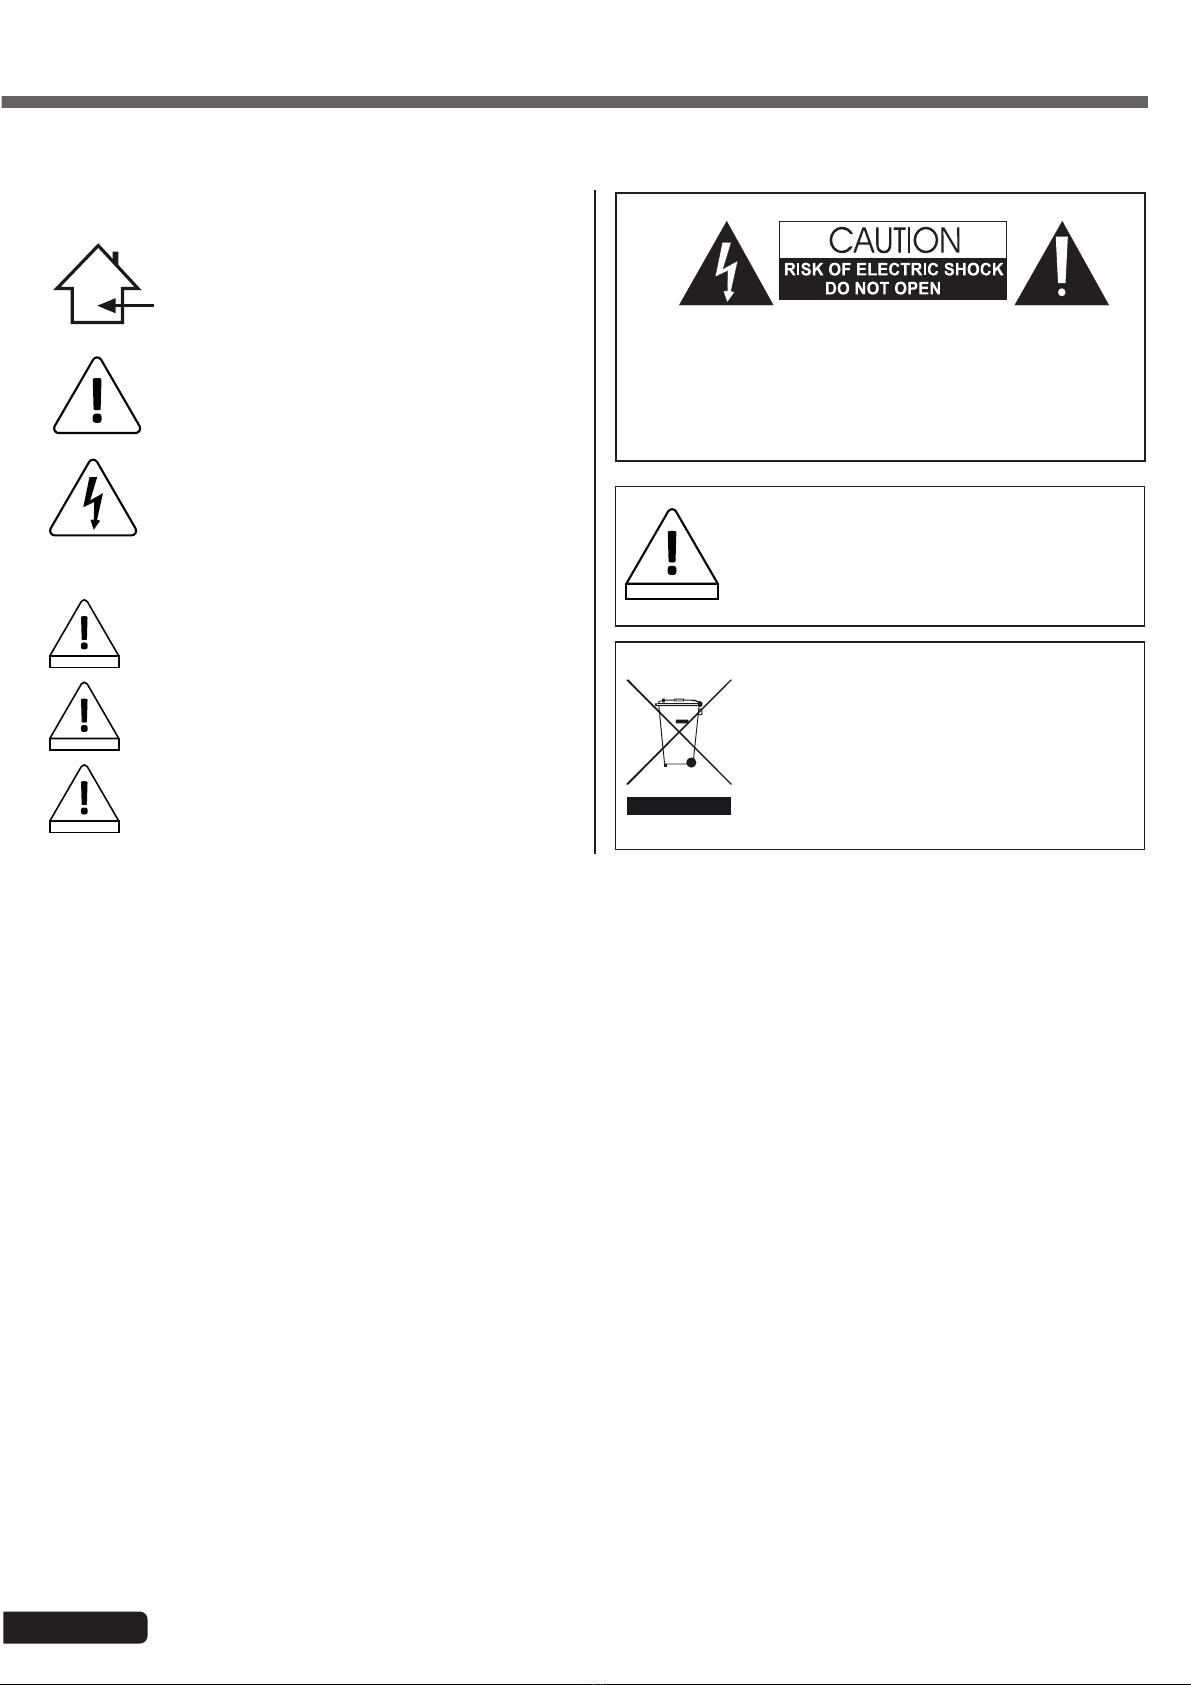
Symbols used
IMPORTANT
The IMPORTANT symbol indicates an important recommendation for
use.
WARNING
The WARNING symbol indicates a risk to the physical integrity of the
user and any other person present.
The product may also be damaged.
CAUTION
The CAUTION symbol indicates a risk of damage to the product.
WARNING: To reduce the risk of electric shock, never remove the covers.
There are no user-serviceable parts inside the casing. Contact qualified service
personnel for maintenance of this appliance.
To reduce the risk of electric shock, do not use an extension cord, multi-socket,
or other connecting device unless all metal parts that come into contact with each
other are completely out of reach.
WARNING
Noise level
Public address systems are capable of delivering a sound
pressure level (SPL) that is harmful to human health.
Seemingly non-critical sound pressure levels can damage
hearing if a person is exposed to them over a long period.
Do not stand in the immediate vicinity of operating
loudspeakers.
Environmental protection
• HITMUSIC is an advocate of protecting the environment
- we only sell clean products that comply with RoHS
standards.
• Your product is made of materials that must be recycled.
Do not dispose of it as household waste and bring it to your
local waste sorting centre. Authorised sorting centres will
take back your appliance at the end of its service life in
order to dispose of it in an environmentally-friendly manner.
• For more information:
http://www.hitmusic.fr/directives-deee.php.

Page 3
DZONE88 - Digital array, 8 inputs 8 outputs English
2 - Specifications
DSP module
Processor 32-bit 300MHz floating/fixed-point DSP
Latency < 1ms
A/D and D/A conversion 24-bit
Sampling rate 48KHz
Analogue input and output
Input channels 8 balanced inputs/line or mic level
Audio connectors 12-pin 3.81mm Phoenix plug
Input impedance 11.5kHz
Maximum input level 14dBu/line, -7dBu/mic
Phantom power +48VDC, 6.5mA, separately assignable to each channel
Output channels 8 balanced outputs, line level
Output impedance 150 Ohms
Audio specifications
Frequency response Line: 20Hz-20kHz (±0.5dB)
Mic: 20Hz-20kHz (±1.5dB)
Total harmonic distortion Line: -90dB (@12dBu, 1kHz, A-weighted)
Mic: -86dB (@-7dBu, 1kHz, A-weighted)
Signal-to-noise ratio Line: 105dB (@12dBu, 1kHz, A-weighted)
Mic: 95dB (@-7dBu, 1kHz, A-weighted)
Connector and indicators
USB Micro-B type, driverless
TCP/IP RJ-45
RS232 Serial communication port
RS485 Serial communication port
LED indicators Power, Link, phantom power, audio inputs and outputs
Electrical and physical specifications
Power supply AC100-240V 50/60Hz
Dimensions 483 x 210 x 44 mm
Net weight 2.8kg
Operating temperature -20°C to 80°C
Package contents
DZONE88 array
1x IEC power cord
1X USB flash drive containing the software
1 USB-A/USB-B cord
User guide
Page 4
DZONE88 - Digital array, 8 inputs 8 outputs
English
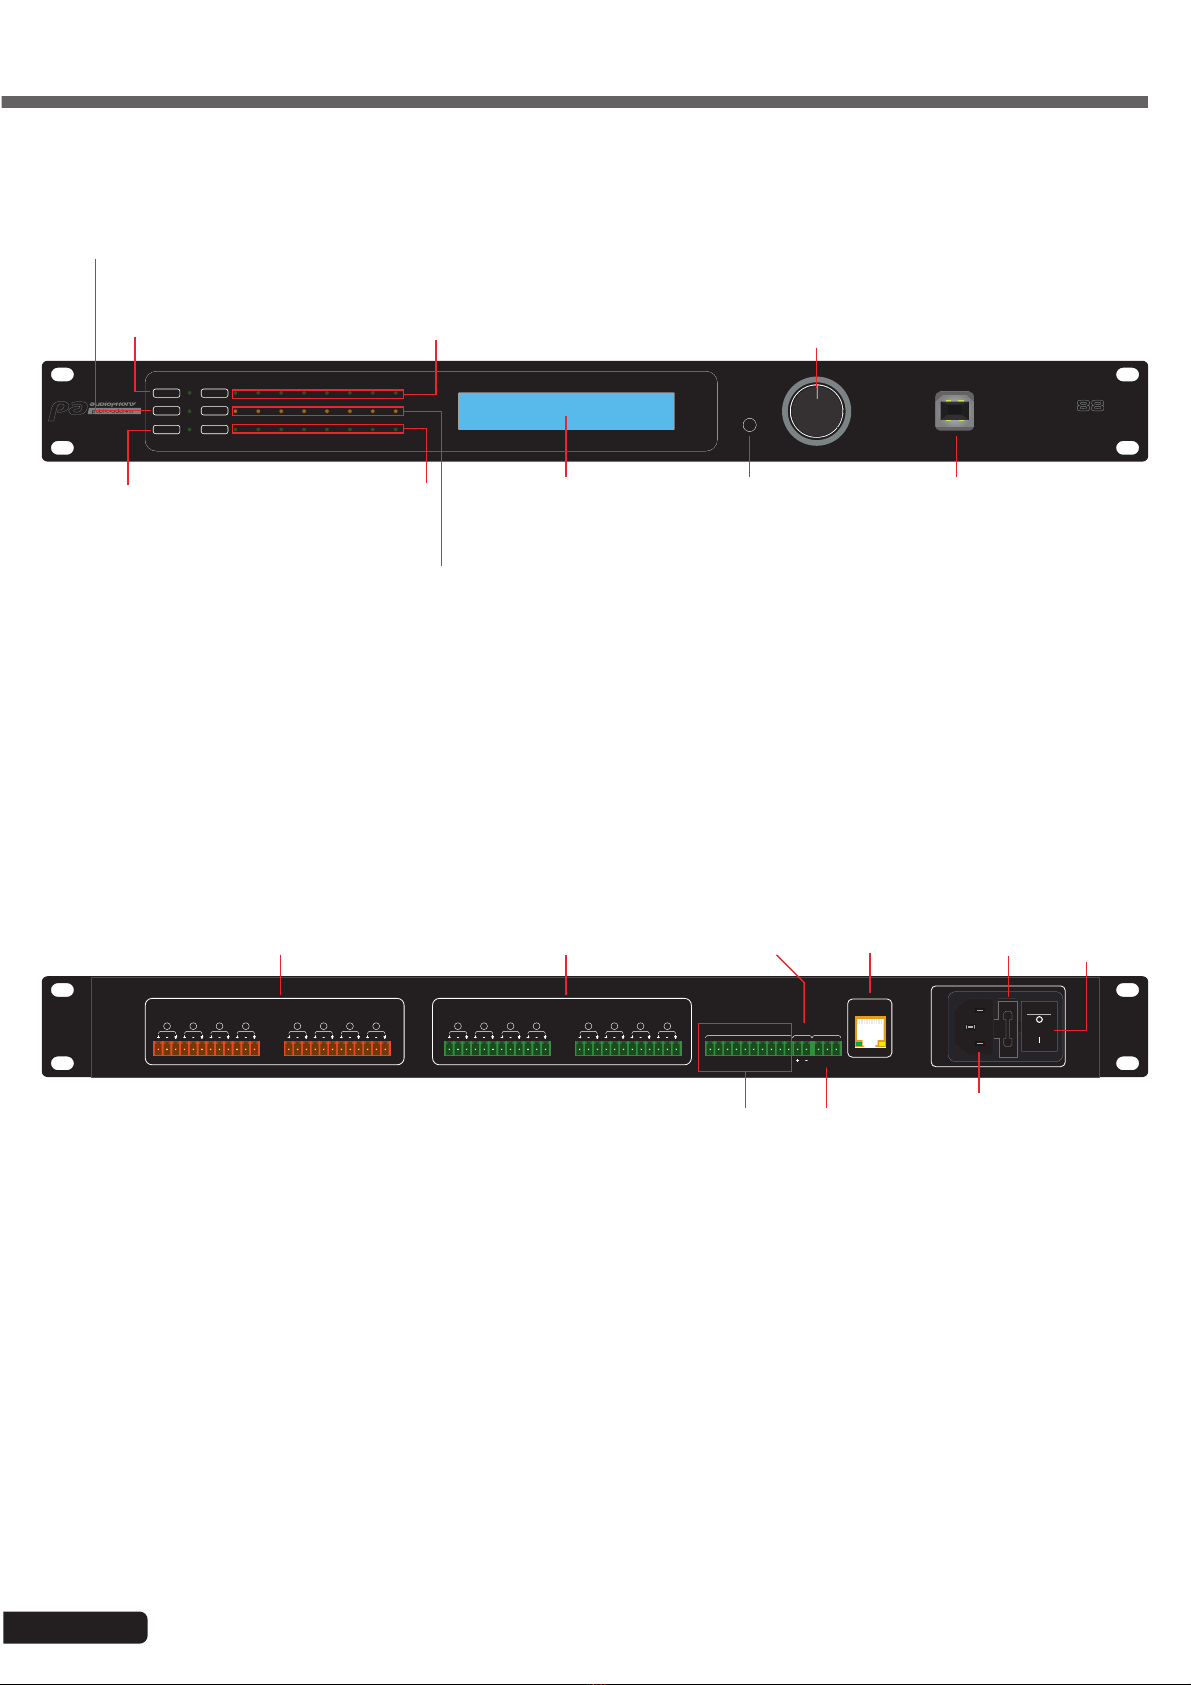
3 - Appliance overview
ETHERNET
AC 100-240V 50/60Hz
GPIO RS 485 RS 232
RXV12 3 54678G TXG
8 7 6 5 4 3 2 1
OUTPUT INPUT
H G F E D C B A
Power button
Fuse
Power input
RJ45 port
RS485 port
Outputs Inputs
RS232 port
GPIO
8x8 DIGITAL MATRIX
DZONE
POWER
NET
LINK
INPUT
ABCDEFGH
1 2345678
48V
OUTPUT
P
U
S
H
E
N
T
E
R
SELECT
ESC
LCD display Return button USB B port
Navigation wheel
Phantom power
indicators
Output indicatorsComputer
connection
indicator
Power indicator
Dante connection indicator
(unused)
Input indicators

Page 5
DZONE88 - Digital array, 8 inputs 8 outputs English
4 - Menus
DZONE88
192.168.111.199
SALLE1 Main menu
MENU *1 IN VOLUME
IN
VOL A
E
B
F
C
G
D
H
Menu 1:
Adjusting input levels.
Select the channel, press the wheel and adjust the level.
Press again to confirm.
MENU *2 OUT VOLUME
OUT
VOL 2
6
3
7
4
7
Menu 2:
Adjusting output levels.
Select the channel, press the wheel and adjust the level.
Press again to confirm.
1. Default P
2.SALLE 1
PRESETS
MENU *3 PRESETS Menu 3:
Selecting saved presets.
The presets that you have saved via the software can be
accessed directly from this menu.
A
CLINE
LINE B
DLINE
MIC 5DB
MENU *4 INPUT SOURCE Menu 4:
Setting the type of each input.
Each input can be either line level or mic level.
For mic-level inputs, you can set the level in 5 dB steps.
IP :192.168.111.199
GATE
: 0. 0. 0. 0 OK
MENU *5 IP SET
Menu 5:
Setting the IP address and subnet mask.
[DZONE88 ] OK
MACHINE NAME
MENU *6 RENAME
Menu 6:
Renaming the appliance.
*YES NO
SCREEN AUTO LOCK ?
MENU *7 SECURITY Menu 7:
Locking the screen.
To avoid mishandling, you can activate the screen
lock.
To unlock the screen, press and hold down the
wheel for more than 5 seconds.
Page 6
DZONE88 - Digital array, 8 inputs 8 outputs
English
5 - Software
5-1 Introduction to the software
The software provides users with a quick interface to control one or more machines, configuration settings can be stored in
preset files, which is very convenient for recalling or resetting the various applications.
5-2 Operating system, environment and installation
The software is compatible with Windows 7, Windows 8 and Windows 10 operating systems on which .NET Framework 4.0
is installed.
.NET Framework NET 4.0 is available for download from the Microsoft®website.
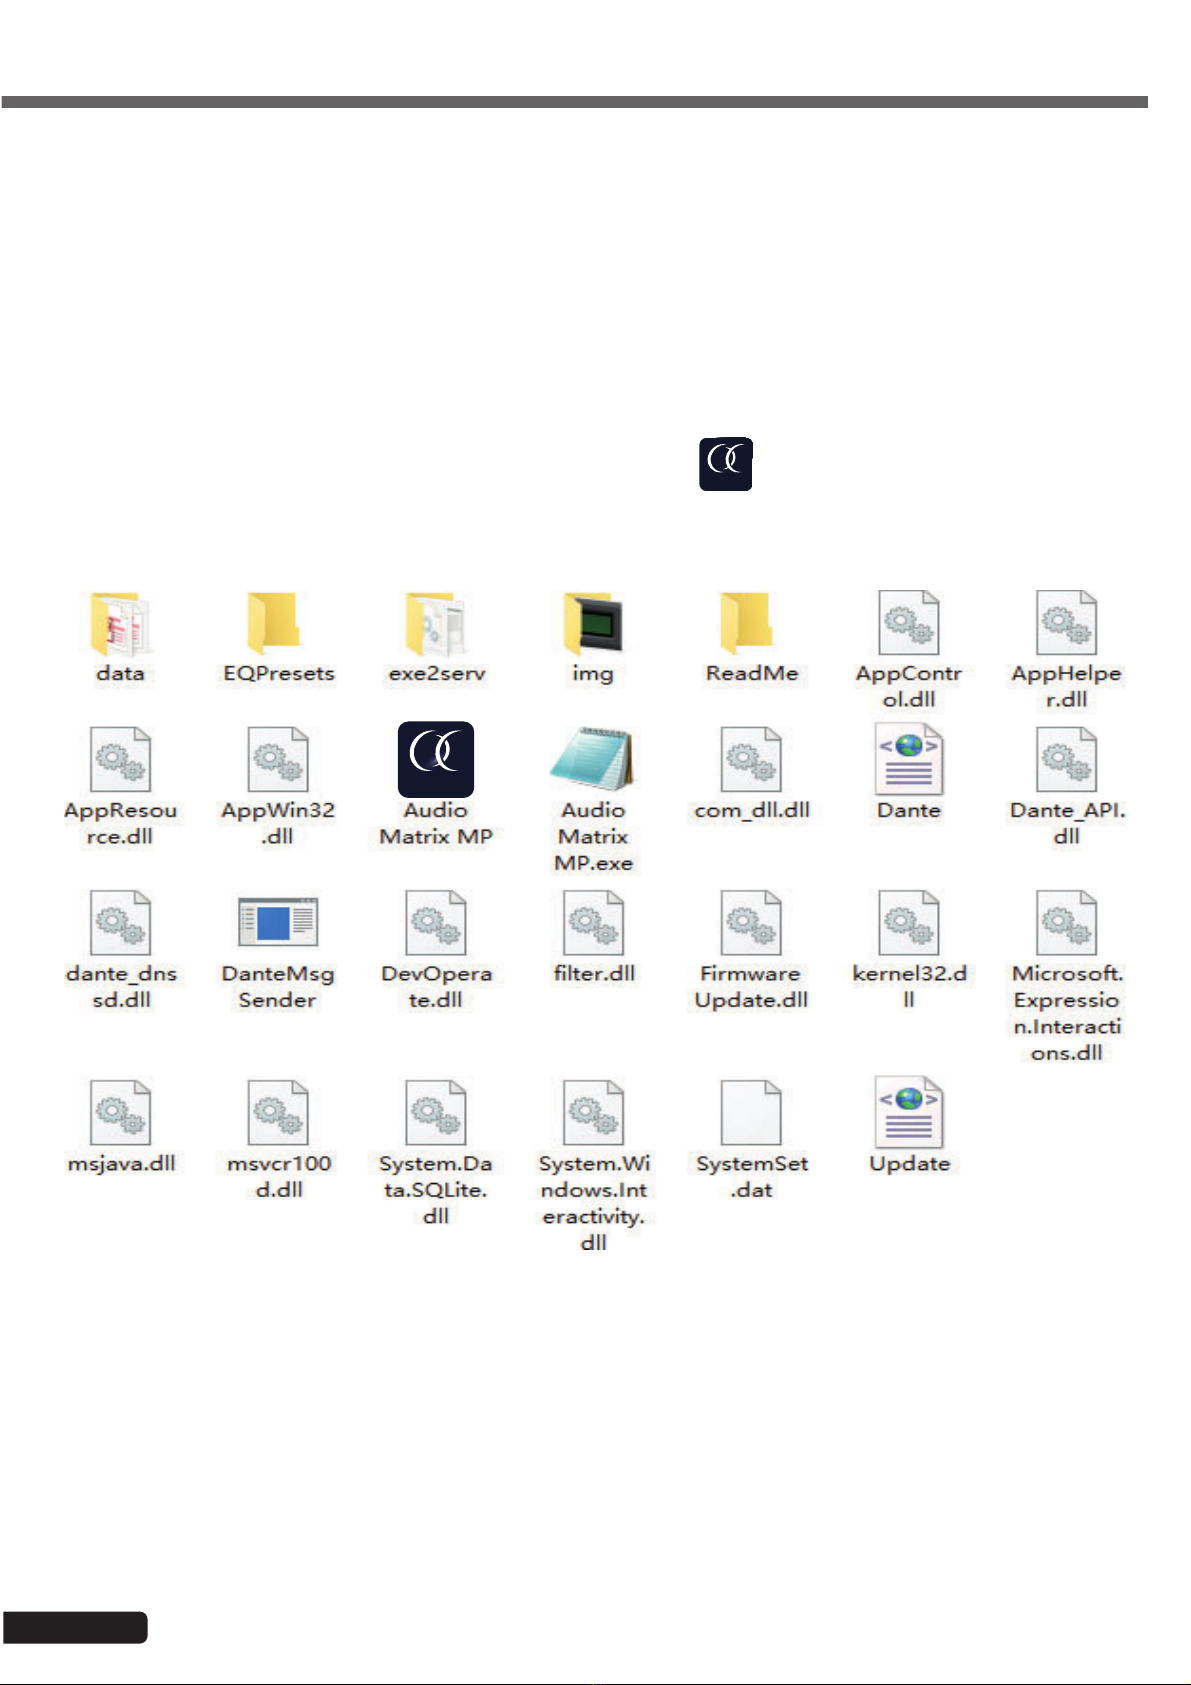
The software does not require any particular installation.
Unpack the archive in a directory of your choice by double-clicking on the DZONE88 icon
DZONE88

Page 7
DZONE88 - Digital array, 8 inputs 8 outputs English
5-3 Interface overview
Software main page
Once connected to the array, the software looks like this:
Page 8
DZONE88 - Digital array, 8 inputs 8 outputs
English
1 - Main menu
2 - Scan button: Find the various devices connected to the computer
3 - Setting button: Manage the different types of connections
4 - Link button: Manage groups of devices (if several are connected)
5 - List of detected devices
6 - IP address of the computer running the software
7 - DSP buttons: Access settings for all DSP functions
8 - Input and output module interface
9 - List of inputs and outputs
5-3-1 List of menus
New Project - Create a new project
New Device - Add a new array
Open - Open an existing project
Save - Save the current project
Save As - Save the current project under a different name
Device menu
Device - Manage the names, IP addresses, etc. of connected arrays.
Channels - Rename the input and output channels
Channel Copy - Copy parametres from one or more channels to another array
Central Control - Manage all the functions from a single menu
GPIO - Assign an action to each GPIO connection
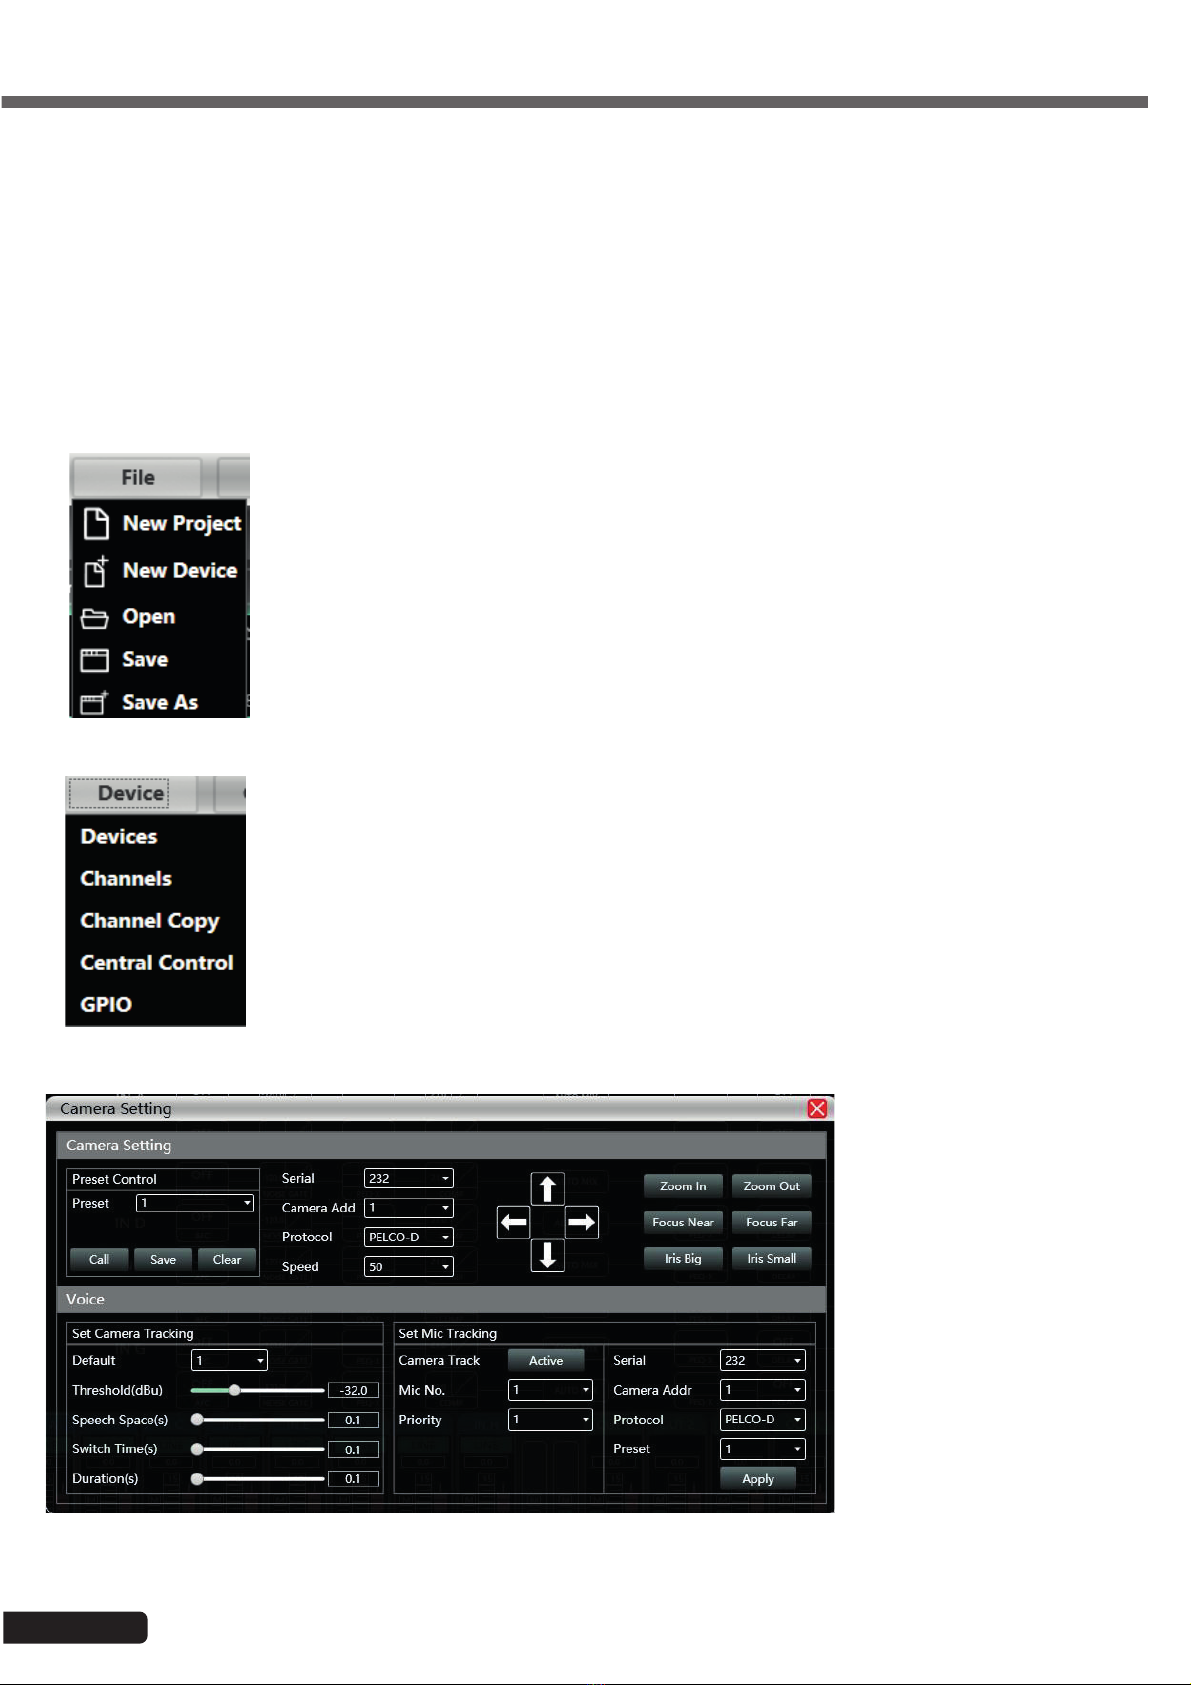
Camera menu
The Camera menu provides
access to a remote
management interface for
motorised cameras
Page 9
DZONE88 - Digital array, 8 inputs 8 outputs English
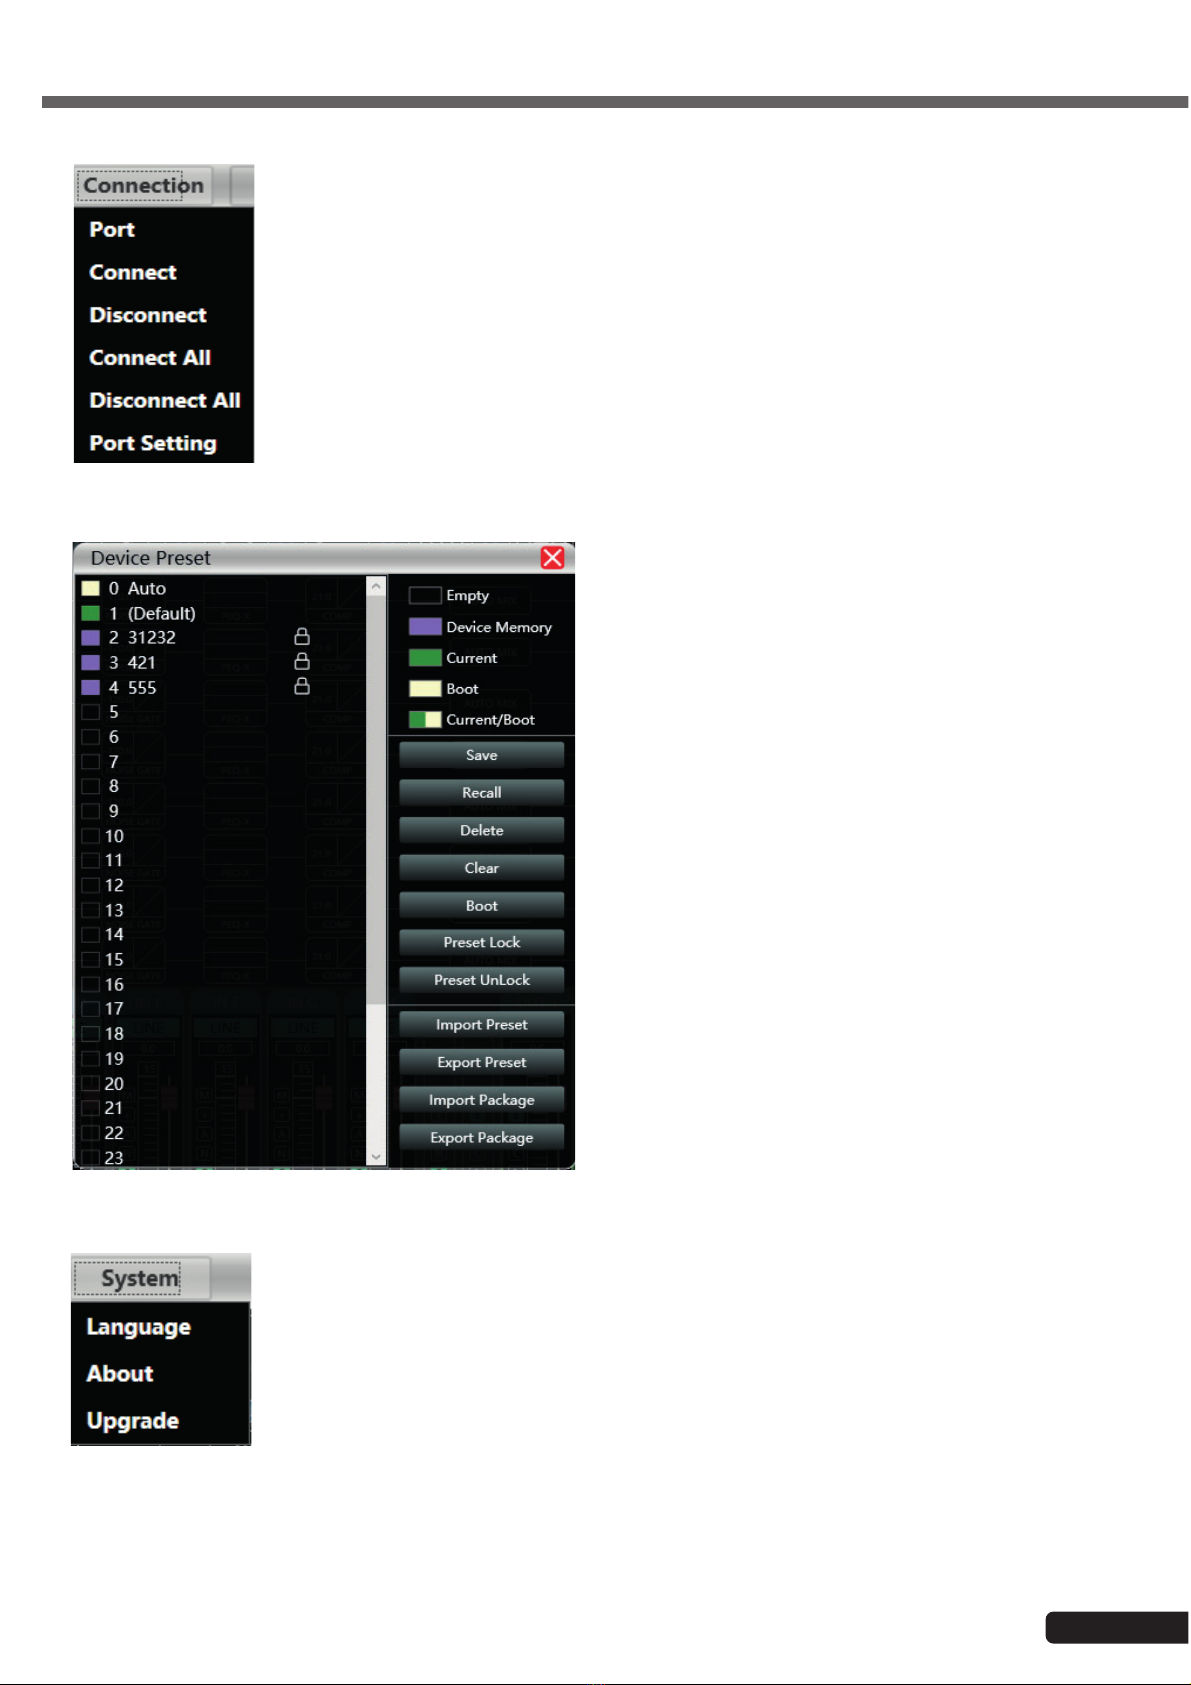
Connection menu
Preset menu
Save - Save all current parametres to the array
Recall - Retrieve parametres from the array
Delete - Delete the selected preset
Clear - Delete all presets from the array
Boot - Assign a preset as a startup preset
Preset Lock - Lock a preset with a password
Preset UnLock - Unlock a preset
Import Preset - Import a preset from the computer
Export Preset - Save a preset to the computer
Import Package - Import a group of presets from the computer
Export Package - Save a group of presets to the computer
System menu
Language - Select the language of the interface
About - Provides information on internal software and array firmware versions
Upgrade - Install an update

Page 10
DZONE88 - Digital array, 8 inputs 8 outputs
English
5-3-2 Device management area
Scan - Detect all arrays connected to the network
If several arrays are connected, several scans will have to be performed.
Setting - Choose the ports on which the detection operations take
place. Opposite is the port configuration window.
Click "Refresh" to update the port list.
Link - Create groups of arrays in order to control several parameters on several arrays at the same time.
5-3-3 Device list
After scanning or manually adding arrays, all the connected arrays will appear in
this list

Page 11
DZONE88 - Digital array, 8 inputs 8 outputs English
5-3-4 IP address
When opened, the software shows the IP address of the computer in the lower-left corner
of the main window.
Input settings Gate settings Compressor
settings
Compressor
settings
Output
settings
Delay settings Limiter
settings
Mastering
settings
Anti-feedback
settings
Parametric
equaliser settings
Parametric
equaliser
settings
Auto-mix
settings
Double-click on each of these buttons to open the corresponding module.
The blue buttons correspond to the inputs, the green buttons correspond to the outputs.
You can open several modules at the same time.
5-3-5 DSP module access buttons
Each window gives access to the detailed settings of each function.

Page 12
DZONE88 - Digital array, 8 inputs 8 outputs
English
5-3-6 List of input and output channels
For each channel, you can view levels, input types (mic/line), channel names and DSP shortcuts.
• M stands for Mute
• + stands for polarity
• A stands for anti-feedback
• N stands for gate
• E stands for equaliser
• D stands for delay
• C stands for compressor
• L stands for limiter
6 - Functions
6-1 Input interface
Double-click on the button.
The input interface is used to:
-Set the polarity
-Mute the channel: Mute
-Select the type of input: Line, microphone or test signal.
The test signal is sent to two channels at the same time.
When the channel is on microphone level, phantom power can
be enabled and the gain setting ranges from 0 to 40dB.
6-2 Test interface
In the input setting interface, click on "Setting".
The generator can send three
types of signals:
-Sine: Adjustable gain and
frequency
-Pink noise: Adjustable gain
-White noise: Adjustable
gain
The test signal is sent to two
channels simultaneously.

Page 13
DZONE88 - Digital array, 8 inputs 8 outputs English
6-3 Feedback reduction interface
Double-click on the button.
The feedback reducer has two levels
Level 1 and Level 2.
Level 2 is more powerful than level 1.
6-4 Noise Gate setting interface
Double-click on the button.
6-5 Input equalisation
Double-click on the button. You can enlarge the window by clicking on the button, allowing for better accuracy.
6-5-1 Function buttons

Page 14
DZONE88 - Digital array, 8 inputs 8 outputs
English
Function buttons are located at the top of the window.
-Phase: Displays the phase curve of the current channel
-View: Shows or hides the 21 equalisation points.
-Bypass: Disables the equaliser settings without resetting its positions.
-Preset: Saves current equaliser settings to your computer and cancels existing equaliser settings.
-Copy: Copies the current settings to apply them to another channel.
-Paste: Applies the settings copied using the “Copy” button.
-Reset: Applies the default values of the equaliser.
6-5-2 Multiple views
6-5-3 Graphic equalisation
Move the equalisation points to the desired setting.
6-5-4 Equalisation by value
Each equalisation point can be selected using the buttons below the graph.
Each button shows the frequency and gain values.
For each equalisation point you can activate or deactivate the adjustment, specify the
type of equalisation, enter the frequency, the Q factor and the gain.
Page 15
DZONE88 - Digital array, 8 inputs 8 outputs English
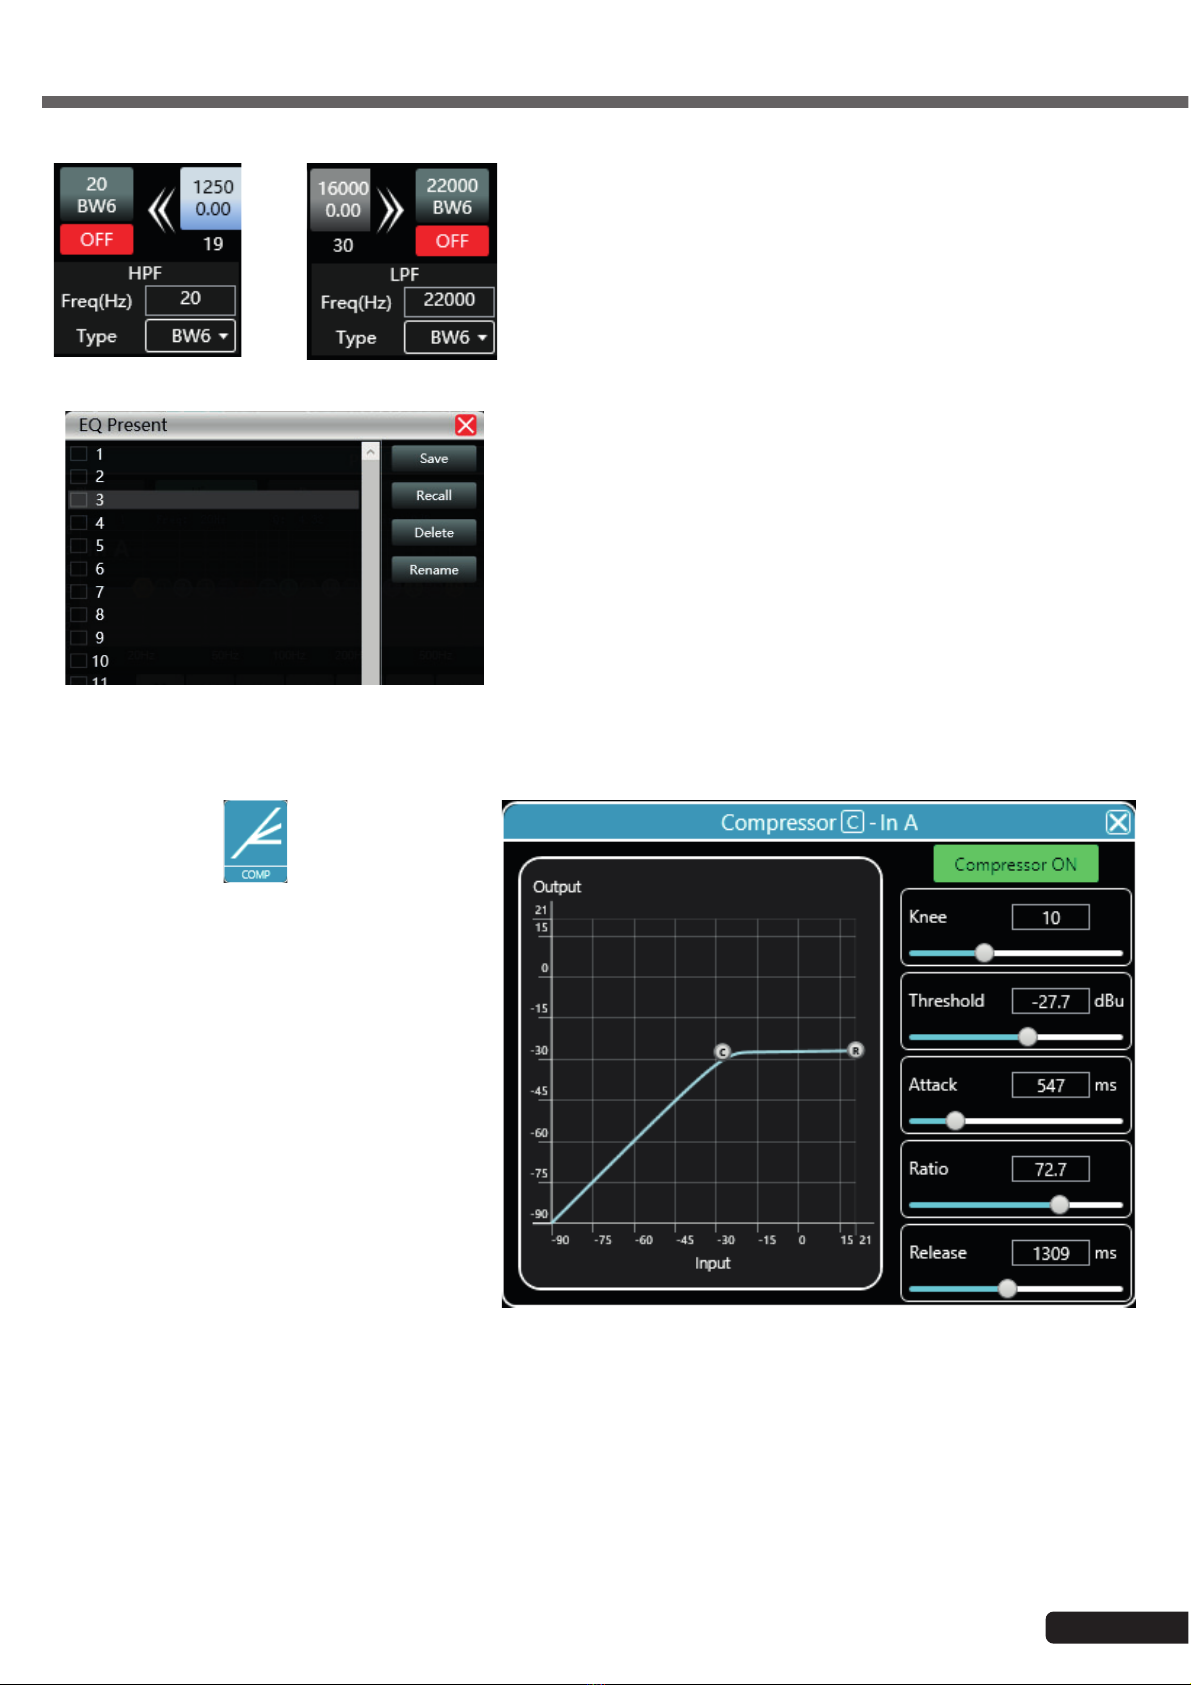
6-5-5 High-pass and low-pass filters
On either side of the EQ point selection buttons are the high-pass and
low-pass filters.
For each of them, you can choose the frequency on which they act
and the value of the slope.
6-5-6 Equalisation presets
This window allows you to save an equalisation preset on the
computer, retrieve one from the computer, delete or rename it.
6-6 Input compressor
Double-click on the button.
The window opposite shows the available settings
for the input compressor.
When the function is active, you can graphically
move the curve to modify the threshold and ratio.
Page 16
DZONE88 - Digital array, 8 inputs 8 outputs
English
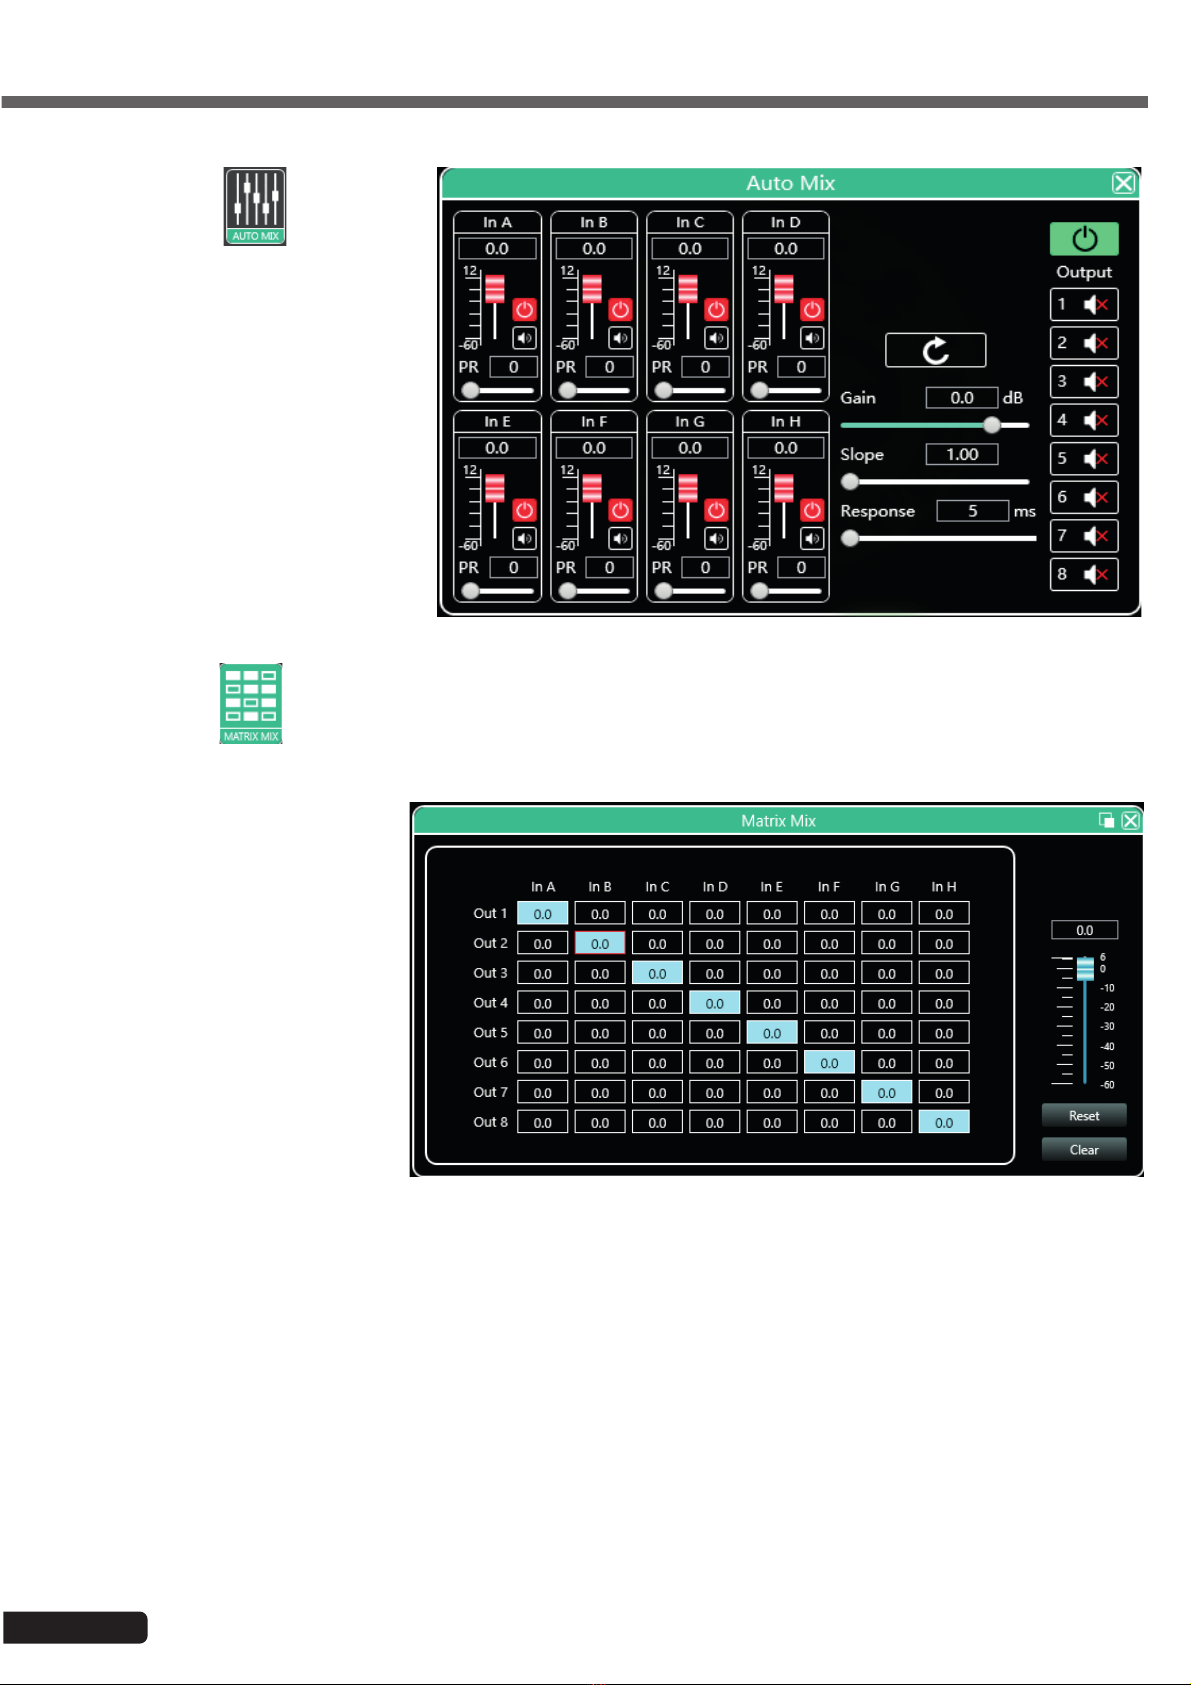
6-7 Auto-mix
Double-click on the button.
This function allows you to manage the
priority order of the input channels and the
output channels that will be affected by
this order.
For each input channel you can specify a
priority level (PR) and an input level ranging
from -60dB to 12dB.
6-8 Array
Double-click on the button.
The top row represents the inputs and
the left column represents the outputs.
Each input can be assigned to one or
more outputs.
To assign an input to an output,
double-click on the box corresponding
to the desired connection.
For each connection, you can specify
the gain level using either the slider on
the right or the input field.
The "Reset" button resets the
connections as shown in the figure
opposite.
The "Clear" button clears all
connections.
Page 17
DZONE88 - Digital array, 8 inputs 8 outputs English
6-9 Output equalisation
Double-click on the button.
This section works like the equalisation section described in paragraph 5.5.
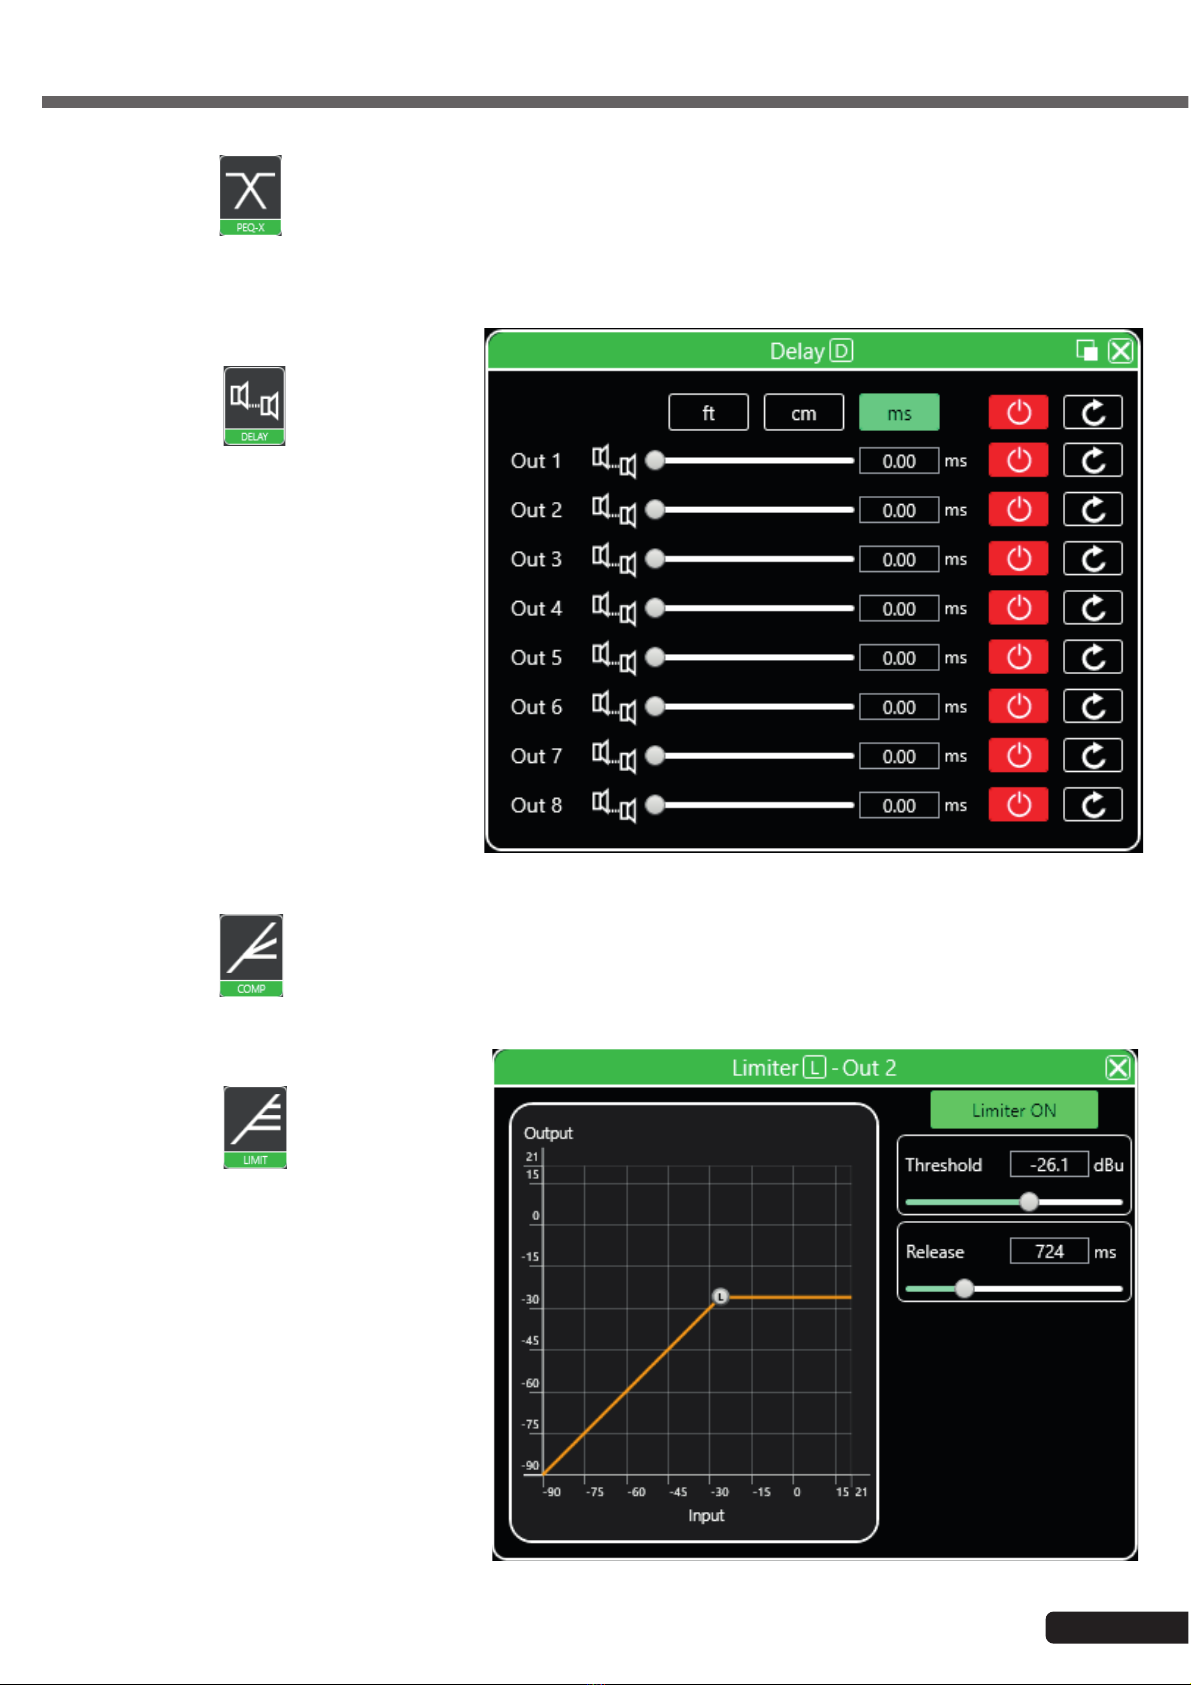
6-10 Output delay
Double-click on the button.
For each output, you can set a different delay.
Delays can be displayed in feet (ft), cm or
milliseconds (ms).
To enable the delay on an output channel, click
on the red button to change it to green.
The circular arrow resets the delay to zero.
6-11 Output compressor
Double-click on the button.
This section works like the compressor section described in paragraph 5.6.
6-12 Output limiter
Double-click on the button.
The window opposite shows the settings
available for the limiter.
Once the function is active, you can graphically
move the curve to modify the threshold value.

Page 18
DZONE88 - Digital array, 8 inputs 8 outputs
English
6-13 Output interface
Double-click on the button.
The output interface is used to:
-Set the polarity
-Mute the channel: Mute
-Set the gain.
The slider on the right represents the master
6-14 Input channels
Each input channel is broken down as follows:
Channel name
Gain in dB
Gain adjustment
Group assignation
Input type: Line or mic
Function status
• M stands for Mute
• + stands for polarity
• A stands for
anti-feedback
• N stands for gate
• E stands for equaliser
• C stands for compressor
The "Mute" (M) button is red when the channel is muted. The function buttons (+, A, N, E et C) are green when the
corresponding function is active on the current channel.
Page 19
DZONE88 - Digital array, 8 inputs 8 outputs English
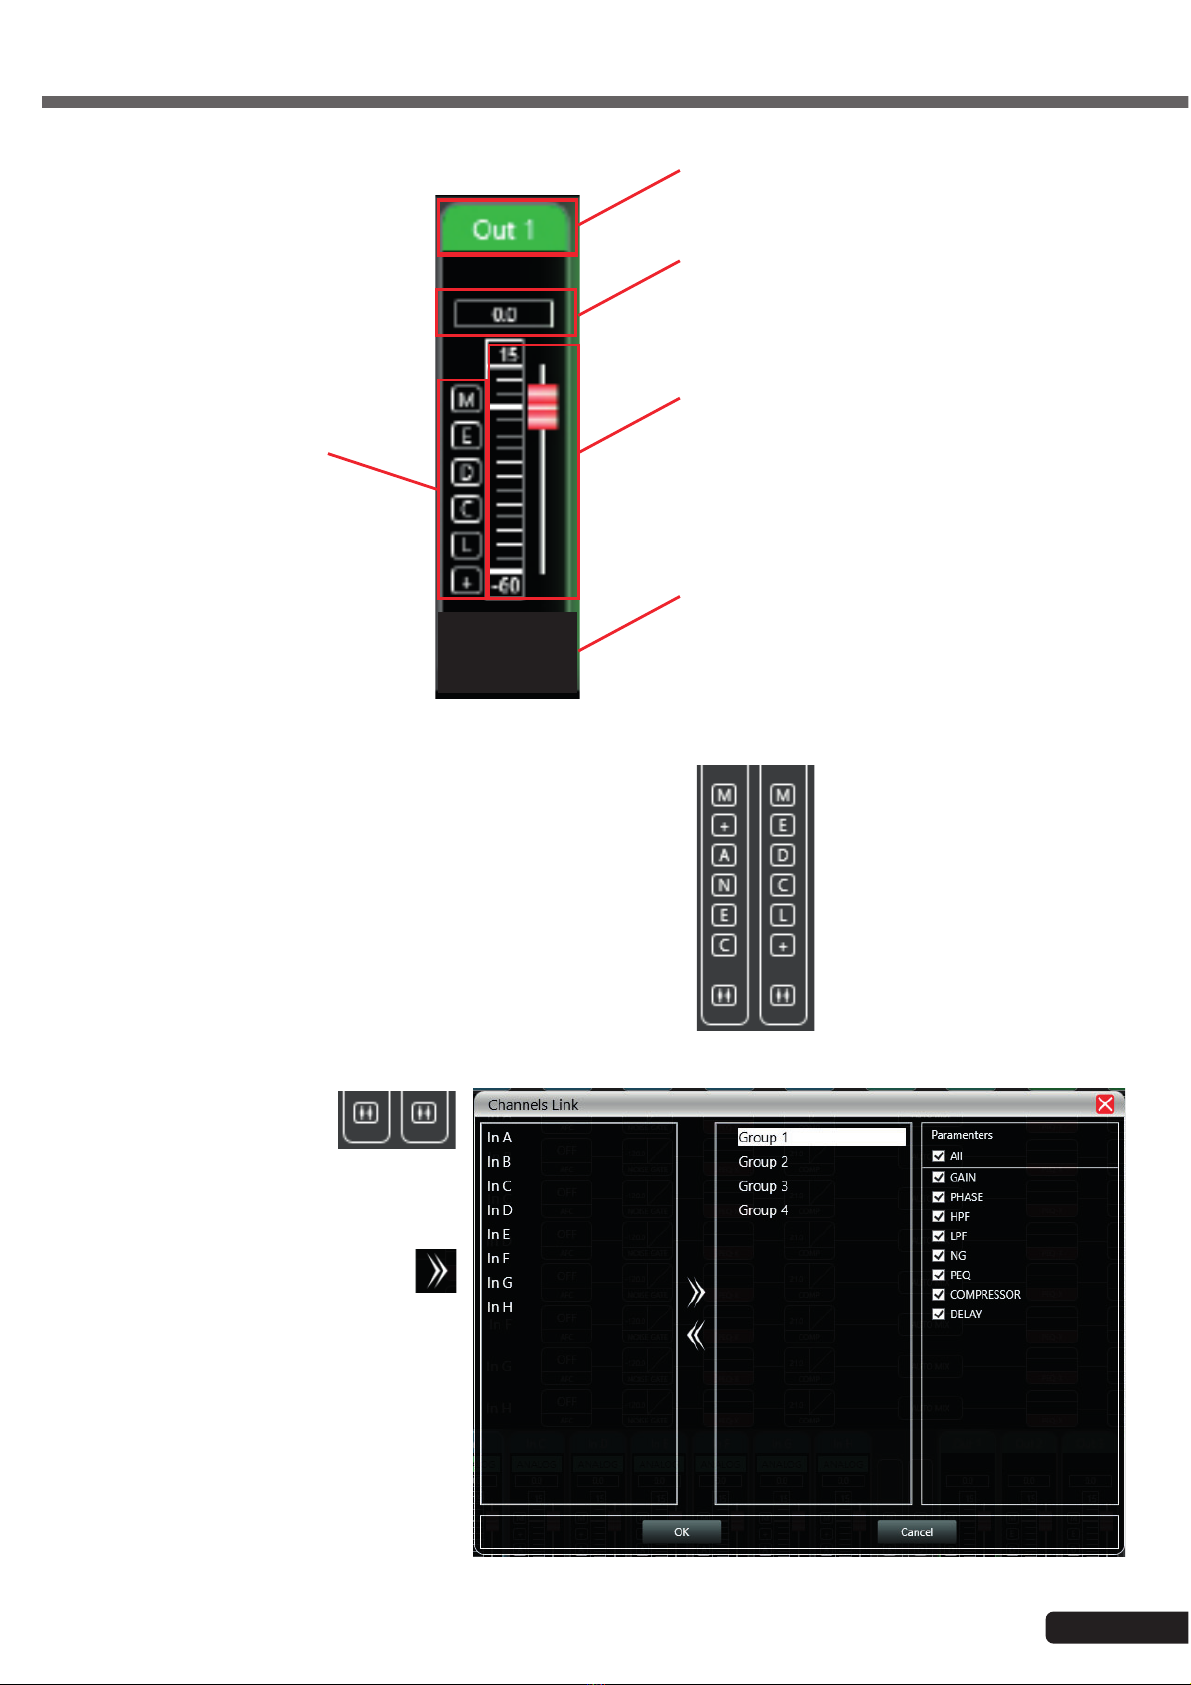
6-15 Output channels
Channel name
Gain in dB
Gain adjustment
Group assignation
Function status
• M stands for Mute
• D stands for delay
• E stands for equaliser
• C stands for
compressor
• L stands for limiter
• + stands for polarity
The "Mute" (M) button is red when the channel is muted. The function buttons (E, D, C, L et +) are green when the
corresponding function is active on the current channel.
The central part located between the input and output channels
allows you to assign one or more functions to all channels.
The left part relates to the input channels, the right part relates to
the output channels.
6-16 Channel grouping
At the bottom of the central
part there are two buttons that
give access to the channel
grouping function.
This function has four groups in which you can
add the channels of your choice. Select the
channels you want to group and click the
arrow.
On the right side of the window, you can
choose the functions that will be common to
the channels belonging to the same group.

Page 20
DZONE88 - Digital array, 8 inputs 8 outputs
English
6-17 Device management
On the left side of the software is the list of connected devices.
For each device, there is:
-Its number.
-Its name. If it is connected via TCP, the name does not appear.
-The IP address if connected via TCP
-USB if connected via USB
-The COM port number if connected via a COM port
From left to right are the following buttons:
-A Mute button that mutes all input and output channels
-A refresh button
-A button to delete the device
When you click on one of the areas corresponding to a device, the central software window will be updated with the current
settings for that device.
When a device is selected, the device icon is surrounded by a green border.
In the main menu, click on "File" and "New Device".
Select the desired virtual device from the list and add it.
Note: Adding a new device does not mean that it is automatically connected.
6-18 Equipment management
-Software Info: Displays software and
firmware version numbers and version dates.
-Device Info: Displays the name of the device
and the name of the group to which it belongs
if any.
-Device IP Info: Displays the device IP
address, subnet mask and MAC address.
You can change the IP address of the
device - click OK for the change to take effect.
This manual suits for next models
1
Table of contents
Other audiophony Music Mixer manuals

audiophony
audiophony MX44 User manual

audiophony
audiophony LIVEtouch20 User manual

audiophony
audiophony MYA5D User manual

audiophony
audiophony MIXtouch8 User manual

audiophony
audiophony PREZONE444 User manual

audiophony
audiophony PA PREZONE88 User manual

audiophony
audiophony DIGITAL-3 User manual

audiophony
audiophony MX822 User manual

audiophony
audiophony PMX34 User manual

audiophony
audiophony GOA9C User manual


