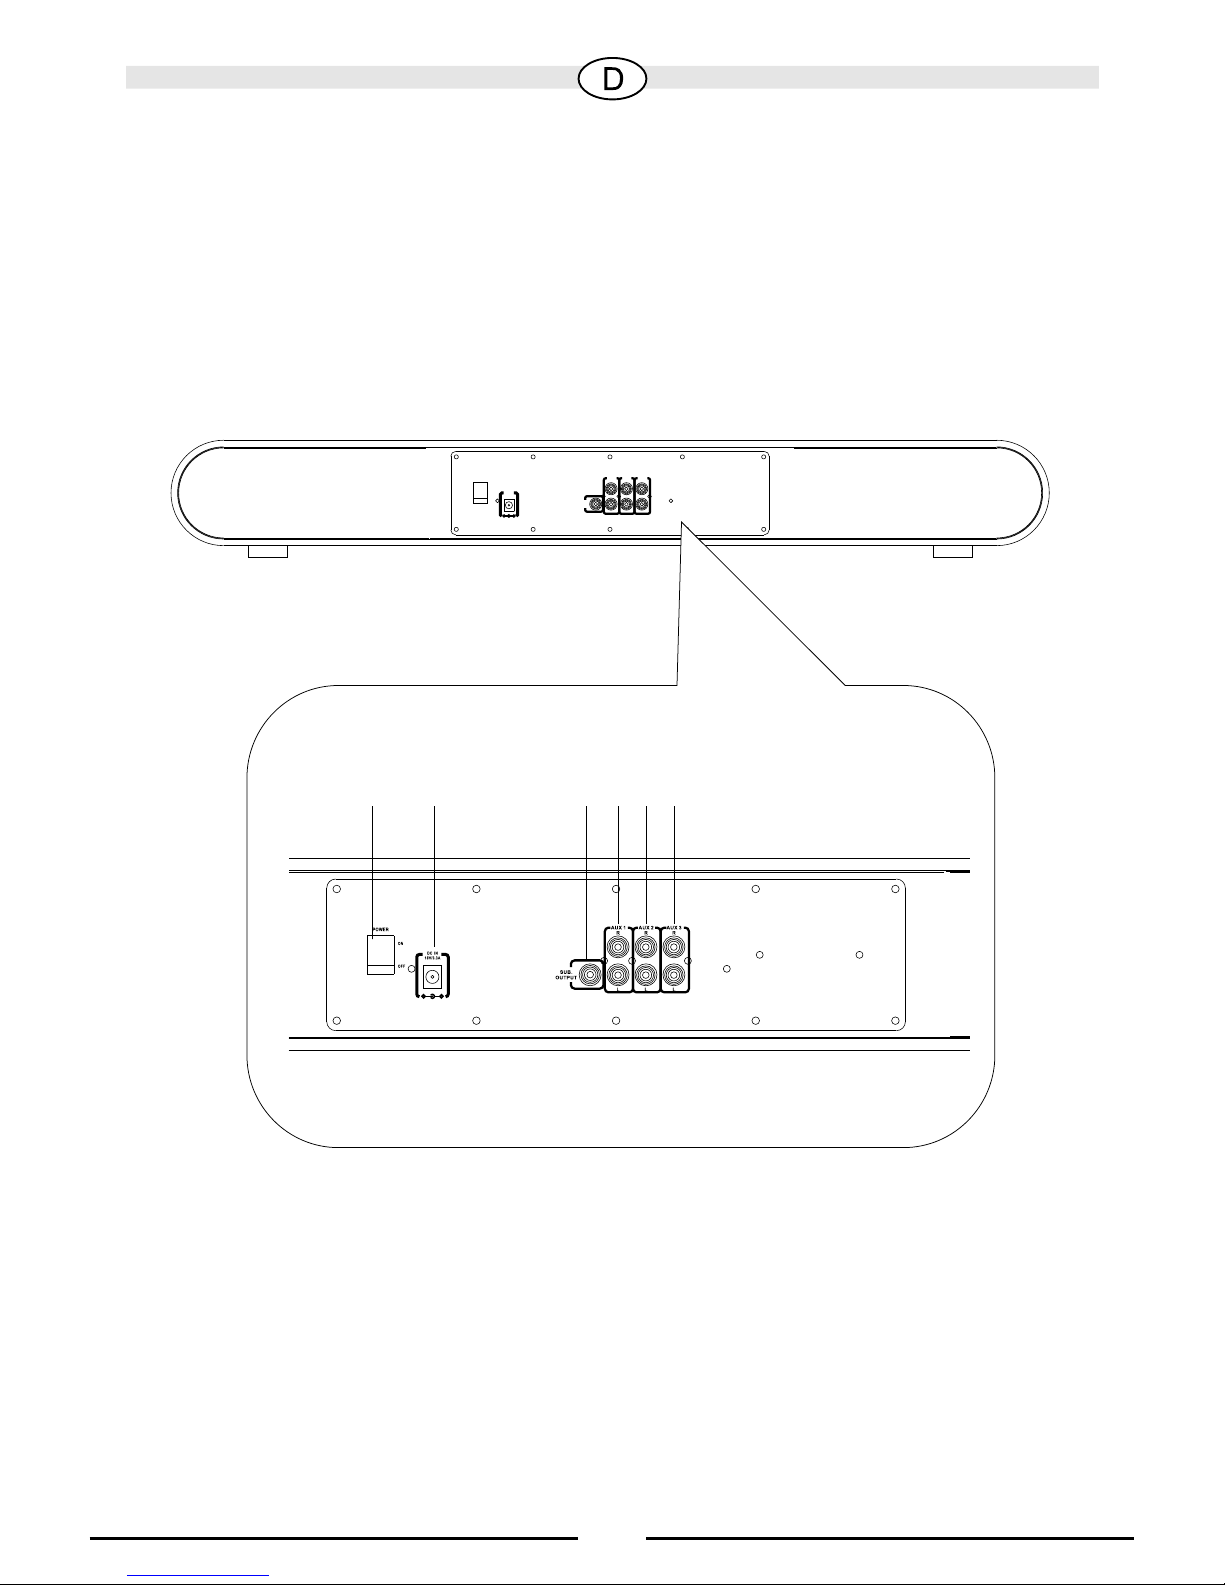
Audiovox FTS 100 User manual

3D
AUX1AUX3
FM
AM
SUB
AUX2
CLK
FTS 100
Wichtige Hinweise zur Installation / Garantieurkunde
Important notes for installation / warranty card
Mode d’emploi / certificat de garantie
Avvertenze importanti per l’installazione / certifcato di garanzia
Notas importantes sobre la instalación y certificado de garantía
Важная информация по инсталляции / гарантия

2
Inhalt
Sicherheitshinweise 4
Entsorgungshinweise 4
Beschreibung des FTS 100 5/6
Anschlüsse 7
Beschreibung der Fernbedienung 8
Inbetriebnahme 9
Technische Daten 10
Garantiebedingungen/Garantiekarte 46/47
Contents
Safety precautions 11
Instructions for disposal 11
Description of the FTS 100 12/13
Connections 14
Description of the Remote Control 15
Operation 16
Specifications 17
Warranty conditions / warranty card 46/47
Sommaire
Consignes de sécurité 18
Instructions pour la mise au rebut 18
Description du FTS 100 19/20
Connecteurs 21
Description de la télécommande 22
Mise en service 23
Caractéristiques techniques 24
Conditions de garantie / carte de garantie 46/47

3
Indice
Avvertenze di sicurezza 25
Avvertenze per lo smaltimento 25
Descrizione del FTS 100 26/27
Attacchi 28
Descrizione del telecomando 29
Messa in funzione 30
Dati tecnici 31
Condizioni di garanzia / Scheda di garanzia 46/47
Índice
Precauciones de seguridad 32
Instrucciones de eliminación 32
Descripciòn del FTS 100 33/34
Conexiones 35
Descripciòn del control remoto 36
Primeros pasos 37
Especificaciones 38
Condiciones de garantía / tarjeta de garantia 46/47
Содержание
Указания по безопасности 39
Указания по утилизации 39
Описание FTS 100 40/41
Разъемы 42
Описание пульта дистанционного управления 43
Включение 44
Технические данные 45
Гарантийные условия / Гарантийная карточка 46/47

Sehr geehrter Kunde,
vielen Dank, dass Sie sich für den Audiovox FTS 100 entschieden haben.
Bitte lesen Sie unsere folgenden Hinweise vor Inbetriebnahme des FTS 100 genau
durch.
Sicherheitshinweise
Setzen Sie das Gerät, das Netzteil und die Fernbedienung weder Wasser noch
Feuchtigkeit aus.
Betreiben Sie das Gerät nur im angegebenen Temperaturbereich von 0°C bis
40°C.
Sorgen Sie für eine ausreichende Belüftung des Gerätes. Ein Mindestabstand
von 10 cm zu Gegenständen seitlich, nach hinten und oben sollte nicht
unterschritten werden.
Bei Kontakt mit Feuchtigkeit oder Flüssigkeiten sofort den Netzstecker ziehen.
Reinigen Sie das Gerät nur mit einem trockenen Tuch. Verwenden Sie keine
Reinigungsmittel oder chemische Lösungsmittel, da sonst die Oberfläche
beschädigt werden könnte.
Öffnen Sie niemals das Gerät.
Bei sichtbaren Beschädigungen des Netzkabels darf das Gerät nicht mehr
betrieben werden. Ein beschädigtes Kabel darf nicht repariert, sondern muss
ausgetauscht werden.
Überlassen Sie Wartungs- oder Reparaturarbeiten immer qualifiziertem
Fachpersonal.
Entsorgungshinweise
Gemäß der europäischen Richtlinie 2002/96/EC müssen alle
elektrischen und elektronischen Geräte über lokale Sammelstellen
getrennt entsorgt werden. Bitte beachten Sie die lokalen Vorschriften
und entsorgen Sie Ihre Altgeräte nicht mit dem normalen Hausmüll.
!
!
!
!
!
!
!
!
4

5
VORDERSEITE
3D
AUX1AUX3
FM
AM
SUB
AUX2
CLK
Sensor-Tastenfeld
21 3 4 5
67
3D
AUX1AUX3
FM
AM
SUB
AUX2
CLK
BESCHREIBUNG DES FTS 100
1. Standby/Power-Taste 5. Volume-Up-Taste, lauter
2. Mute-Taste, Stummschaltung 6. Sensor für die Fernbedienung
3. INPUT-Taste, Wahl des Eingangs 7. LED-Anzeige
4. Volume-Down-Taste, leiser

1. Netzschalter
2. Eingang für das separate Netzteil
3. Subwoofer Ausgang
4. Aux1 Cinch-Eingang
5. Aux2 Cinch-Eingang
6. Aux3 Cinch-Eingang
RÜCKSEITE
DC IN
18V/3.3A
POWER
ON
OFF
SUB.
OUTPUT
AUX 2AUX 1
L
RAUX 3
L
R
L
R
21 3 456
6
BESCHREIBUNG DES FTS 100

ANSCHLÜSSE
7
TV
DVD
Subwoofer-Ausgang
Steckdose
Rückseite des FTS 100
Verbinden Sie jeweils die beiden Stereokanäle
mit der gewünschten Audioquelle (CD, DVD,
MP3, iPOD, Spielkonsole, Computer usw.)
oder

1
AUX1AUX2AUX3
EFFECT SET
SUB
SUB
VOL
VOL
6
2
58
3
47
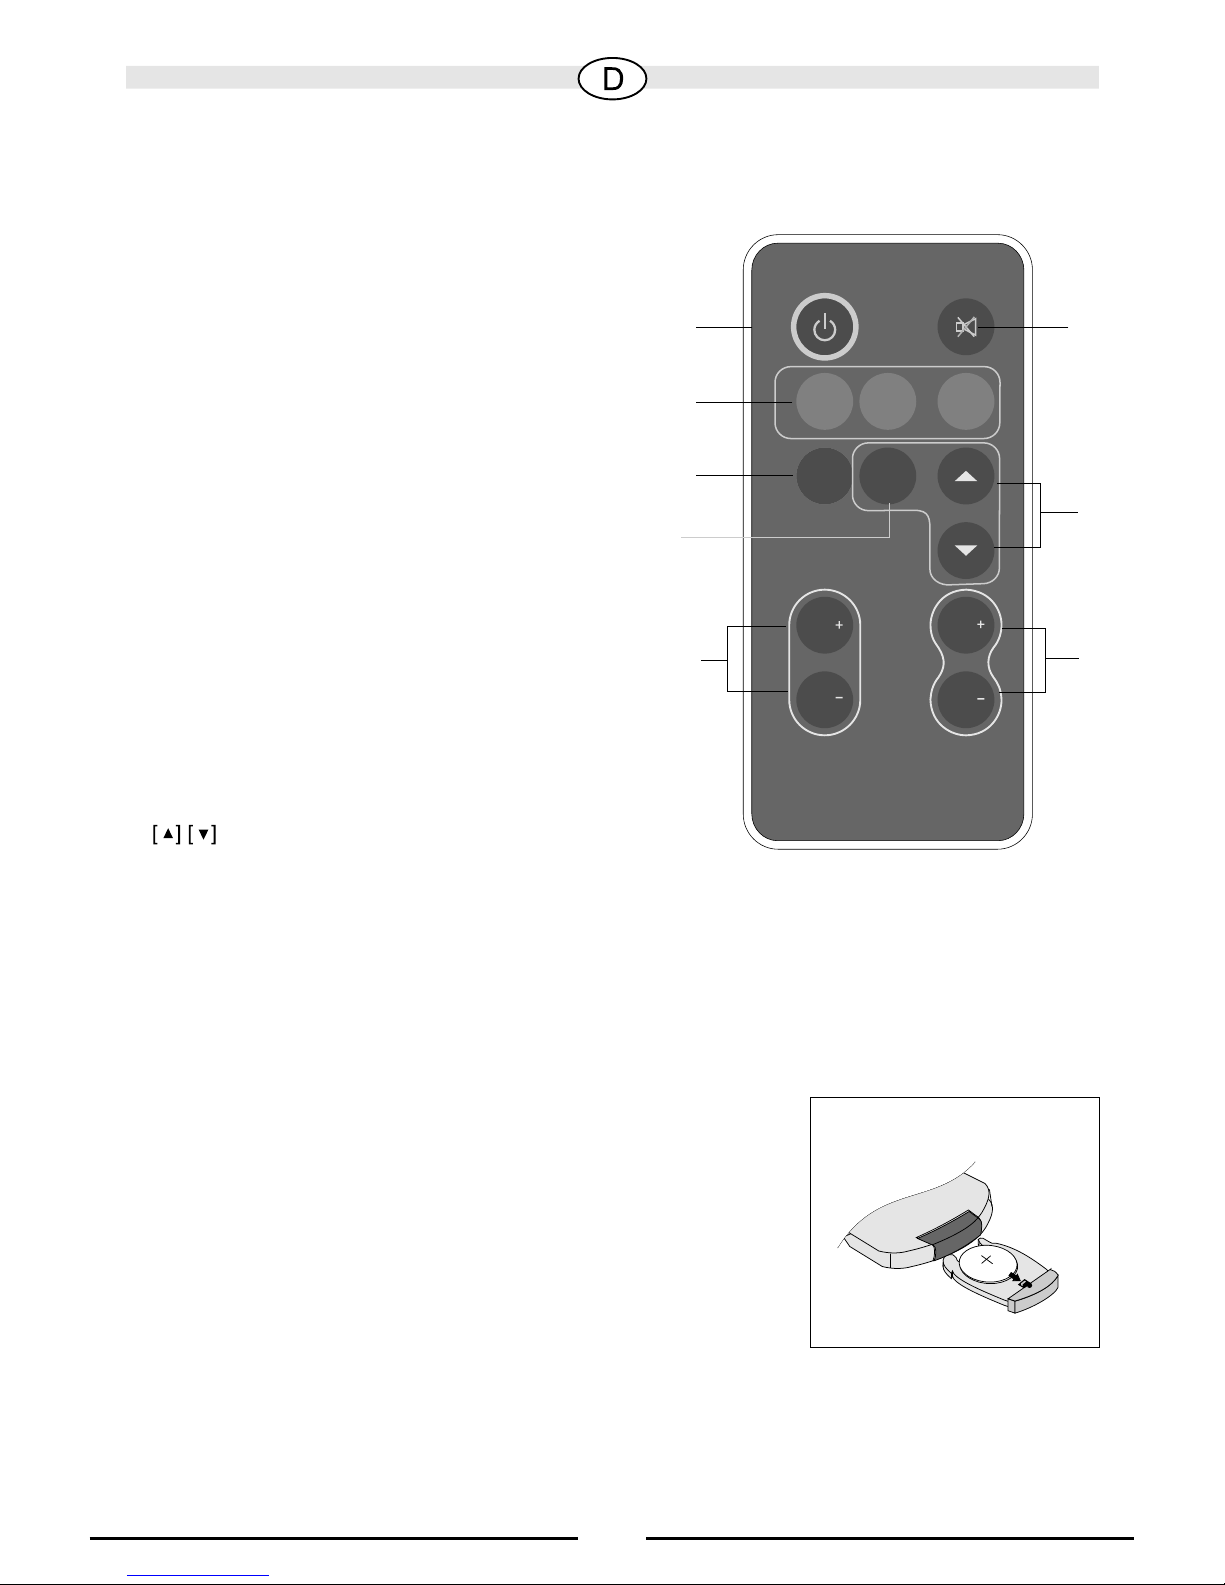
Batterie einsetzen/auswechseln
Die Fernbedienung wird von einer vorinstallierten Lithium-
Batterie versorgt. Um ein Entladen vor der Benutzung des
Gerätes zu verhindern, wurde ein Isolierstreifen eingesetzt.
Bitte entfernen Sie diesen vor der ersten Benutzung. Sollte
die Fernbedienung nicht einwandfrei funktionieren, muss die
Batterie durch eine Batterie des gleichen Typs ersetzt
werden. Öffnen Sie das Batteriefach. Ziehen Sie die Batterie
in Pfeilrichtung aus dem Fach. Bevor Sie die leere Batterie
entfernen, merken Sie sich bitte genau die Position. Das "+"
Zeichen muss nach oben zeigen, andererseits funktioniert
die Fernbedienung nicht und kann sogar beschädigt
werden. Wechseln Sie die Batterie und schieben Sie das
Fach wieder zurück.
BESCHREIBUNG DER FERNBEDIENUNG
8
Wichtig: Batterien müssen vorschriftsmäßig entsorgt werden und gehören nicht in den
Hausmüll.
1.Standby/Power:
Schaltet das Gerät ein/aus.
2.Input
AUX1: Drücken Sie diese Taste, um den
AUX1-Eingang zu aktivieren.
AUX2: Drücken Sie diese Taste, um den
AUX2-Eingang zu aktivieren.
AUX3: Drücken Sie diese Taste, um den
AUX3-Eingang zu aktivieren.
3.Effect
Bei Tastendruck wird der 3D-Sound-Effekt
eingeschaltet. Ein weiterer Druck schaltet
den 3D-Sound-Effect wieder ab.
4.Set
Taste zur Einstellung der Uhrzeit.
5.Subwoofer Volume +/-
Erhöht/senkt die Lautstärke des Subwoofers.
6.Mute
Schaltet die Tonwiedergabe aus/an.
7.Drücken Sie diese Tasten, um die
gewünschte Uhrzeit einzustellen.
8.Master Volume +/-
Erhöht/senkt die Gesamtlautstärke

INBETRIEBNAHME
ON/OFF
Schließen Sie das separate Netzteil auf der Rückseite des FTS 100 an. Verbinden
Sie die Audioquellen mit den gewünschten AUX-Eingängen (Cinch) auf der
Rückseite des Gerätes; wenn vorhanden auch den Subwoofer. Stecken Sie den
Netzstecker in eine Steckdose und schalten Sie den FTS 100 mit dem Netzschalter
auf der Rückseite ein. Drücken Sie nun den STANDBY-Knopf auf der Vorderseite des
Gerätes oder auf der Fernbedienung, das Gerät ist nun im STANDBY-Modus.
INPUT MODUS
Drücken Sie den INPUT Knopf auf der Vorderseite des Gerätes und wählen Sie
zwischen AUX1, AUX2, und AUX3. Mit den AUX-Knöpfen (1, 2, 3) auf der
Fernbedienung können Sie die Eingänge direkt anwählen.
LAUTSTÄRKEREGELUNG
Sie können den MASTER VOLUME-Regler auf der Vorderseite des FTS 100
benutzen, oder die VOL (+/-)-Tasten auf der Fernbedienung. Mit den SUB VOLUME
(+/-) Tasten auf der Fernbedienung können Sie die Lautstärke des Subwoofers
anpassen.
MUTE
Wenn Sie die MUTE-Taste auf der Vorderseite oder auf der Fernbedienung
betätigen, wird der FTS 100 stumm geschaltet. Ein erneuter Druck auf eine dieser
Tasten deaktiviert die Stummschaltung wieder.
EINSTELLEN DER UHRZEIT
Wenn Sie die SET-Taste auf der Fernbedienung drücken, beginnt die
Stundenanzeige zu blinken. Mit den Tasten können Sie nun die richtige
Uhrzeit einstellen. Ein weiterer Druck auf die SET-Taste lässt die Minutenanzeige
blinken, mit der Sie ebenso verfahren. Danach wird die richtige Uhrzeit noch einmal
mit der SET-Taste bestätigt.
HINWEISE:
Bitte beachten Sie auch die Bedienungsanleitungen der anderen angeschlossenen
Geräte.
Manche DVD-Player liefern einen sehr hohen Ausgangspegel. Sollten bei hohen
Lautstärken Verzerrungen auftreten, stellen Sie das Gerät am MASTER VOLUME
Regler leiser, um Beschädigungen am Verstärker oder den Lautsprechern zu
vermeiden.
" " " "
9

10
AUSGANGSLEISTUNG
Subwoofer (RMS) 30 W
Front-/ Center-Lautsprecher (RMS) 3 x 10 W
Maximale Ausgangsleistung (Impuls) 150 W
Abmessungen (B x H x T) 800 x 96 x 170 mm
ZUBEHÖR
Fernbedienung inkl. Batterie
Cinchkabel
Bedienungsanleitung
Netzteil
Technische Änderungen vorbehalten.
TECHNISCHE DATEN

11
Dear customer,
thank you for choosing the Audiovox FTS 100.
Please read the following information carefully before starting to use your FTS 100.
Safety precautions
• Do not expose the device, the mains adapter and the remote control to water or
moisture.
• Only operate the device in the specified temperature range of 0°C to 40°C.
• Make sure there is sufficient ventilation for the device. There must be a minimum
gap of 10 cm between objects to the side, to the rear and above the device.
• In the event of contact with moisture or liquids remove the mains adapter
immediately.
• Only clean the device using a dry cloth. Do not use any cleaning agents or chemical
solvents when cleaning, as these could damage the surface of the device.
• Never open the device.
• The device should not continue to be operated if there is visible damage to the
mains cable. A damaged cable should not be repaired, but must be replaced.
• Always refer to a qualified specialist for any maintenance or repair work.
Instructions for disposal
In accordance with European Directive 2002/96/EC all electrical and
electronic appliances must be disposed of separately via local collection
points. Please observe the local regulations and do not dispose of your
old appliances with normal household waste.

12
Front panel
3D
AUX1AUX3
FM
AM
SUB
AUX2
CLK
Sensor keypad
21 3 4 5
67
3D
AUX1AUX3
FM
AM
SUB
AUX2
CLK
DESCRIPTION OF THE FTS 100
1. Standby/power button 5. Volume-Up button, louder
2. Mute button, mute function 6. Sensor for the remote control
3. Input button, select the input 7. LED display
4. Volume-Down button, quieter

Rear panel
DC IN
18V/3.3A
POWER
ON
OFF
SUB.
OUTPUT
AUX 2AUX 1
L
RAUX 3
L
R
L
R
21 3 456
13
DESCRIPTION OF THE FTS 100
1. Power switch
2. Input for the separate mains adapter
3. Subwoofer output
4. AUX1 RCA jack input
5. AUX2 RCA jack input
6. AUX3 RCA jack input

CONNECTIONS
14
TV
DVD
Subwoofer output
Socket
Rear of the FTS 100
Connect the two stereo channels to the desired
audio source (CD, DVD, MP3, iPod, games
console, computer, etc.)
or

1. Standby/Power
Switches the device on/off.
2.Input
AUX1: Press this button to activate the AUX1
input.
AUX2: Press this button to activate the AUX2
input.
AUX3: Press this button to activate the AUX3
input.
3.Effect
Pressing this button will activate the 3D
sound effect. Pressing the button again will
deactivate the 3D sound effect.
4.Set
Button for setting the time.
5.Subwoofer Volume +/-
Increases/decreases the volume of the
subwoofer.
6.Mute
Switches the sound on/off.
7.Press these buttons to set the desired time.
8.Master Volume +/-
Increases/decreases the overall volume
1
AUX1AUX2AUX3
EFFECT SET
SUB
SUB
VOL
VOL
6
2
58
3
47
Inserting/replacing the battery
The remote control is powered by a pre-installed lithium
battery. An isolating strip has been inserted to prevent the
battery from running out before the device is used. Please
remove this before the first use.
If the remote control doesn't work flawlessly, the battery must
be replaced with a new battery of the same type.
Open the battery compartment. Remove the battery from the
compartment in the direction of the arrow. Before removing
the empty battery please observe its exact position. The "+"
symbol must face upwards otherwise the remote control will
not work and it could become damaged. Exchange the
battery and slide the compartment closed again.
Old batteries are hazardous waste and must be
disposed of in accordance with current regulations.
Battery disposal
DESCRIPTION OF THE REMOTE CONTROL
15

INITIAL OPERATION
ON/OFF
Connect the separate mains adapter to the rear of the FTS 100. Connect the audio
sources to the desired AUX inputs (RCA) on the rear of the device, as well as the
subwoofer if available. Insert the mains adapter into an electric socket and switch on
the FTS 100 using the power switch on the rear. Now press the STANDBY button on
the front of the device or on the remote control. The device is now in the STANDBY
mode.
INPUT MODE
Press the INPUT button on the front of the device and choose between AUX1, AUX2
and AUX3. You can select these inputs directly by using the AUX buttons (1, 2, 3) on
the remote control.
VOLUME CONTROL
You can use the MASTER VOLUME controller on the front of the FTS 100 or the VOL
(+/-) buttons on the remote control.
The volume of the subwoofer can be adjusted by using the SUB VOLUME (+/-)
buttons on the remote control.
MUTE
If you press the MUTE button on the front or on the remote control, the sound of the
FTS 100 will be muted. Pressing one of these buttons again will deactivate the mute
function.
SETTING THE TIME
If you press the SET button on the remote control, the hours will start to flash. You can
now set the correct time by using the “5” “6” buttons. Pressing the SET button again
will make the minutes start to flash; use the same method to set the minutes. Confirm
the correct time by pressing the SET button once again.
PLEASE NOTE
Please also observe the instruction manuals for the other connected devices.
Some DVD players deliver a very high output level. If distortions occur at high
volumes, decrease the volume on the device by using the MASTER VOLUME
controller; doing this will prevent causing damage to the amplifier or the speakers.
16

17
OUTPUT POWER
Subwoofer (rated power) 30 W
Front / Centre speaker (rated power) 3 x 10 W
Max power output (pulse power) 150 W
Dimensions (W x H x D) 800 x 96 x 170 mm
Scope of delivery
Remote control incl. battery
RCA cable
Instruction manual
Mains adapter
Subject to technical change.
SPECIFICATIONS

Chère cliente, cher client,
Merci d'avoir choisi le FTS 100 de Audiovox.
Avant d'utiliser votre FTS 100, veuillez lire attentivement les informations qui suivent.
Consignes de sécurité
• N'exposez l'appareil, le bloc d'alimentation et la commande ni à l'eau ni à
l'humidité..
• Utiliser l'appareil uniquement dans une plage de température de 0 à 40 °C.
• S'assurer que l'appareil est placé dans un endroit suffisamment ventilé. Ne placer
aucun objet à moins de 10 cm des faces latérales, arrière et supérieure de
l'appareil.
• En cas de contact avec un milieu humide ou liquide, retirer l'adaptateur secteur
immédiatement.
• Nettoyer l'appareil avec un chiffon sec uniquement. Ne pas utiliser d'agents
nettoyants ou de solvants chimiques, ceux-ci pouvant endommager la surface de
l'appareil.
• Ne jamais ouvrir l'appareil.
• Ne pas continuer à utiliser l'appareil en cas de dommage visible sur le câble
secteur. Un câble endommagé ne doit pas être réparé mais doit être remplacé.
• Toujours demander conseil à un spécialiste pour tout travail de maintenance ou de
réparation.
Instructions pour la mise au rebut
Conformément à la directive européenne 2002/96/CE, tous les
appareils électriques et électroniques usagés doivent être triés et
déposés dans des points de collecte locaux. Veuillez respecter les
réglementations locales et ne pas jeter vos appareils usagés avec les
déchets ménagers.
18

19
Vue avant
3D
AUX1AUX3
FM
AM
SUB
AUX2
CLK
Clavier à effleurement
21 3 4 5
67
3D
AUX1AUX3
FM
AM
SUB
AUX2
CLK
DESCRIPTION DU FTS 100
1. Touche Standby/Power 5. Touche Volume-Up, plus fort
2. Touche Mute, sourdine 6. Capteur pour télécommande
3. Touche Input, sélection de l'entrée 7. Affichage à LED
4. Touche Volume-Down, plus faible

Vue arrière
DC IN
18V/3.3A
POWER
ON
OFF
SUB.
OUTPUT
AUX 2AUX 1
L
RAUX 3
L
R
L
R
21 3 456
20
DESCRIPTION DU FTS 100
1. Interrupteur d'alimentation
2. Entrée pour bloc d'alimentation externe
3. Sortie subwoofer
4. Entrée cinch AUX1
5. Entrée cinch AUX2
6. Entrée cinch AUX3
Table of contents
Languages:
Other Audiovox Speakers manuals

Audiovox
Audiovox XS4420SM User manual

Audiovox
Audiovox AW877 User manual

Audiovox
Audiovox Jensen JSP1044 Installation instructions

Audiovox
Audiovox Speaker User manual

Audiovox
Audiovox SL50 User manual

Audiovox
Audiovox AW850 User manual

Audiovox
Audiovox SL40 User manual

Audiovox
Audiovox Marbl II User manual

Audiovox
Audiovox MS1701 Guide