August DVB600 User manual

August International Ltd
United Kingdom
Tel:+44 (0) 845 250 0586
www.augustint.com
DVB600
User Manual
Android and Satellite TV Box
Decoder Satellitare Android
Sintonizador Satélite y Android
Décodeur Satellite Android
Android Box und Satelliten Receiver
EN
FR
DE
IT
ES

Table of Contents
1. Safety Instructions.................................................. 01
2. Main Features..........................................................02
3. Box Contents...........................................................02
4. Part Names and Functions....................................... 03
4.1 Front Panel..........................................................03
4.2 Left Side..............................................................03
4.3 Back Panel.......................................................... 03
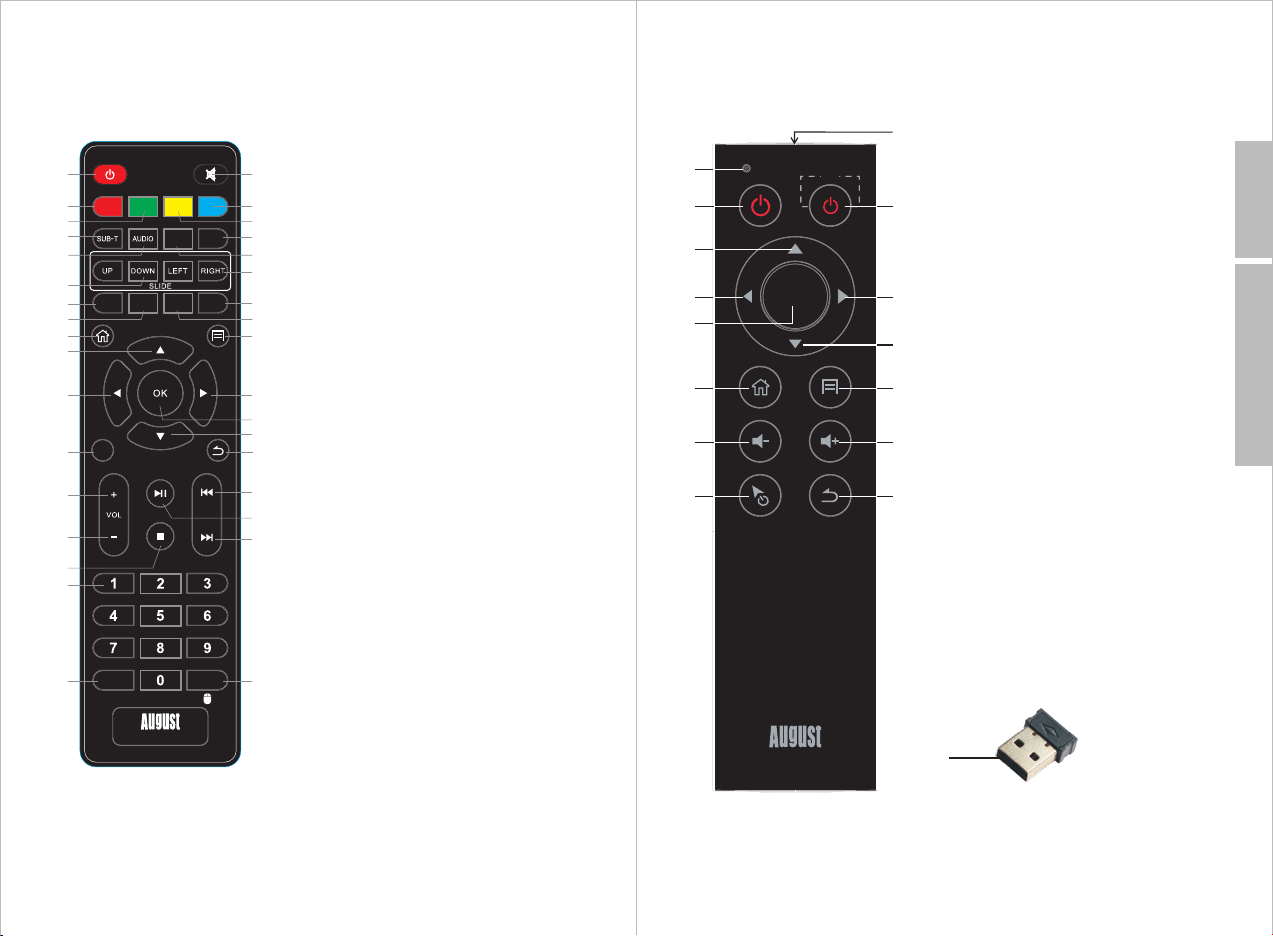
4.4 Remote Control (refer to the QSG we have)............ 04
4.4.1 IR remote control for DTV mode............... ..... 04
4.4.2 2.4G wireless remote control.........................05
5. Battery Replacement.............................................. 07
6. Connection and Set Up............................................ 07
6.1 Connecting the power adaptor............................... 07
6.2 Connecting the Audio Optical Output......................08
6.3 Connecting the HDMI Output.................................08
6.4 Connecting to the Ethernet....................................09
6.5 RF Cable Connection Description.......................... 09
6.6 Connecting to the Wi-Fi........................................ 10
7. Operation................................................................ 11
7.1 Initial Installation................................................. 11
7.2 DTV.................................................................... 13
7.2.1 Channel Scan..............................................14
7.2.2 DTV Mode................................................... 19
7.2.3 Recordings Settings..................................... 33
7.2.4 DTV settings................................................34
7.3 FAV APP.............................................................. 39
7.4 ALL APPS............................................................40
7.4.1 Play Store....................................................40
7.4.2 Movie Player................................................41
7.4.3 FileBrowser.................................................42
7.4.4Miracast.......................................................42
7.5 System Settings...................................................44
7.5.1Quick Switch Between Apps...........................44
7.5.2Settings....................................................... 44
8. Troubleshooting......................................................50
9. Specifications......................................................... 51
10. Warranty................................................................52

-1-
English
1. Safety Instructions
Maintenance
Please unplug all connection wires before start cleaning this machine.
Storage and Use
Never expose
the receiver to
moisture,dust
oil or smoke.
Never put this
machine in
containers that
are unstable as
this may cause
damage.
Never extrude
or chafe this
machine with
sharp objects.
Keep this
machine away
from hot or
cold places.
Working
temperature of
this device is
0゚C ~ 50゚C,
storage
temperature is
Keep the
away
from water or
damp
environment.
Receiver
Avoid
dropping or
exposing to
impacts.
Please wipe this
machine
and buttons with
a softcloth. Only
clean the screen
with professional
LCD TV screen
cleanser.
Never wipe this
machine with an
abrasive cloth,
detergent
powder, alcohol
and benzene etc.
various
propellants or
chemical
cleaning products.
Alcoh ol
-10゚C ~ 60゚C.
User Manual
Thank you for purchasing the August DVB600 Android and Satellite
TV Box. This user manual is designed to familiarise you with all the
features of this device. Please take the time to read this user manual
carefully, even if you are already familiar with a similar product.
Safety
To ensure the safety of you and others, please read the Safety
Instructions before using this device. Please do not disassemble the
product, it can be unsafe and will invalidate the manufacturer's
warranty.
Disposal
Please ensure the product and accessories are disposed of in
compliance with the WEEE (Waste Electrical and Electronic
Equipment) Directive and any other regulations applicable to your
country.
Always check with the environmental agency and any other relevant
authorities for current disposal regulations.
Customer Service
You can contact us by phone on: +44 (0)845 250 0586 or by email at:
service@augustint.com should you require further technical support
or customer service.
Never try to repair or modify this device yourself, this will invalidate
the warranty, may cause further damage to the device and could cause
personal injury. In the case of any fault, please turn off the device
immediately and contact August International customer services or
your retailer to arrange a professional repair.
Back to Content

-2- -3-
English
Smart Satellite Box Remote Control Air Mouse Remote Control
Power Adaptor
QSG
HDMI 4 x AAA Batteries
4. Part Names and Functions
4.1 Front Panel
HDMI
OPTICAL
LAN
RF IN
DC12V 1.5A
STANDBY
1
1 2
2 3
1 2 3 4 5
1.Standby Button
2. Status LED
3. USB Port
4.2 Left Side
1. SD Card Rader
2. USB ports
4.3 Back Panel
1. LNB In
2. Audio Optical Output
3. Network Interface
4. HDMI Out
5. Power DC In
DVB600
Quick Start Guide
Android and Satellite Box
Decoder Satellitare Android
Sintonizador Satélite y Android
Décodeur Satellite Android
Android Box und Satelliten Receiver
EN
FR
DE
IT
ES
F1
EPG
F2
TTX
F3
INFO
F4
REC
SET
R/L
RECAL L
ASPECT
DVB600
FIND SAT
TV/
RADIO
FAV
TV
OK
DVB600
2. Main Features
Receives DVB-S & DVB-S2 Freesat TV
Smart Box with Android 4.4 KitKat
Time-Shift with Live Recording
Supports Video/Music/Photo Playback
HDMI Output up to 1080p
3. Box Contents
Back to Content

-4-
English
-5-
F1
EPG
F2
TTX
F3
INFO
F4
REC
SET
R/L
RECALL
ASPECT
DVB600
FIND SAT
TV/
RADIO
FAV
1 18
2 19
421
23
926
3 20
6
11 27
12 30
14
16
17 34
522
7
8
10
13
24
25
29
28
31
33
32
15
1. Power ON/OFF
2. Red Button / Aspect Ratio
3. Green Button / Screen Size
4. Subtitle Options
5. Audio Language Options
6. Scroll Up and Down for Menu and Channel List
7. F1 Function or 7 Days Electronic Program Guide
8. F2 Function or Open and Close Teletext
9. Home
10. Up / Channel Up in DTV Mode
11. Left
12. System Settings
13. Volume Up
14. Volume Down
15. Stop / Stop Recording
16. Numbers
17. TV and Radio Channel Switch Confirm Settings
18. Mute / Unmute
19. Blue Button Exit all Settings
20. Yellow Button
21. Select Satellite Program or Group Options
22. Quickly Find Channel from Channel List
23. Scroll Left and Right
24. F4 Function / Start recording
25. F3 Function or Channel Information
26. Main Menu and List all Short Key Functions in
DTV mode
27. Right
28. Confirm in General mode and Channel list in
DTV mode
29. Down and Channel Down in DTV mode
30. Press to Go Back one level.
Press and hold to return to home page
31. Previous track
32. Play/Pause in Player mode.
Press to start time shift in DTV mode.
Press and hold to active favourite Channel list in
DTV mode
33. Next track or switch AUDIO track in DTV mode
34. Press to display recently watched channel list
Press and hold to active / deactivate air mouse
function
4.4 Remote Control
4.4.1.DTV Remote Control 4.4.2 Smart Remote Control
1. Status LED
2. Power Button
3. Up
4. Left
5. OK
6. Home
7. Volume Down
8. Air Mouse
9. Learning Button
10. Right
11. Down
12. Menu
13. Volume Up
14. Return
15. IR LED
16.USB Receiver
16
TV
OK
TV
DVB600
1
2
4
6
7
8
9
10
11
12
13
14
15
5
3
Back to Content

-7-
English
-6-
5. Battery Replacement
1. Press and slide the battery cover in direction shown.
2. Remove old AAA batteries if required.
3. Insert new AAA batteries following the positive and negative markings.
4. Replace battery cover and slide to lock.
6. Connection and Set Up
6.1 Power Adaptor Connection
1. Connect the power adaptor to the DC IN 12V socket.
2. Plug the power adaptor into the mains power socket.
HDMI
OPTICAL
LAN
RF IN
DC12V 1.5A
Learning Button Function
There is one learning button on the remote control. It can record any
button's function on the other IR remote control.
1. Press and hold the learning button for 6 seconds to active the
learning function. Once activated, the status LED will light blue.
2. While activated, aim the desired IR remote control to the IR LED on
the DVB600's smart remote control. As shown in the picture below.
3. Press the button to be recorded.
4. Once the recording has finished, the status LED will flashes 2 times
0.5-5cm
Back to Content

-9-
English
6.4 Ethernet Connection
1. Connect the DVB600 to your router using an Ethernet cable.
2. Select from the home screen.
3. Select ‘Advanced option’.
4. Select ‘Proxy settings’ and press <OK> to change the proxy
hostname.
5. Select ‘IP settings’ and press <OK> to change the IP setting
between DHCP and Static.
Note: If DHCP is enabled on your router, the DVB600 will
automatically connect to the router once the Ethernet cable is
inserted; If DHCP is not enabled on your router, you will need to
manually input an IP address.
6.5 RF Cable Connection
HDMI
OPTICAL
LAN
RF IN
DC12V 1.5A
Broadband Internet connection
Internet
Broadband Router/Modem
Wired Network
HDMI
OPTICAL
LAN
RF IN
DC12V 1.5A
-8-
6.2 Audio Optical Output Connection
1. Insert the audio optical cable to the audio optical output on the
DVB600.
2. Insert the audio optical cable to the audio optical input on the
receiver device.
6.3 HDMI Output Connection
Once connected, select the input source on you TV to correct HDMI
port.
HDMI
OPTICAL
LAN
RF IN
DC12V 1.5A
Optical connection cable to
compatible speaker system
HDMI connection cable to TV
HDMI
OPTICAL
LAN
RF IN
DC12V 1.5A
Back to Content

-11-
English
-10-
6.6 Wi-Fi Connection
The DVB600 is able to connect wirelessly to your router. Please note
that, for video streaming, an internet bandwidth of at least 2Mbps is
recommended. To stream HD movies from an internal network an
Ethernet cable connection is recommended.
Note: The DVB600 will disable the Wi-Fi function when the Ethernet
cable is inserted.
1. Select from the home screen.
2. Under available networks, it will list three best signal network.
Select 'See all' to see all the available networks.
3. Use <▲> or <▼> to select the network and press <OK> to confirm.
4. Enter the network password if requested.
5. Select 'Next' from the on screen keyboard to save and connect to
the network.
7. Operation
7.1 Initial Installation
Important: Ensure the satellite dish and the cables are properly
installed to get the best signal.
A setup wizard will be run on the first time use of the DVB600. All the
settings can be changed later.
1. Use <◀> and <▶> to select your language and press <OK> to
confirm.
2. Use <▲> and <▼> to select the resolution and press <OK> to
confirm.
3. Use <▲> and <▼> to adjust the screen size and press <OK> to
confirm.
Back to Content

-13-
English
-12-
4. Select the type of network connection. Press <OK> to confirm or
change the settings for Wi-Fi network.
5. Use <▲> and <▼> to select between ‘Timezone’, ‘Date’ and ‘Time’,
press <OK> to enter.
5.1. Use <▲> and <▼> to change the timezone and press <OK> to
confirm.
5.2. Use <▲> and <▼> to change the date; Use <◀> and <▶> to
change between year, month and day. Use <▶> to highlight ‘Set’ then
press <OK> to confirm.
5.3. Use <▲> and <▼> to change the time; Use <◀> and <▶> to
change between hour, minute and AM / PM. Use <▶> to highlight
‘Set’ then press <OK> to confirm.
6. Select ‘DTV’ to finish the settings and start DTV; select ‘Finish’ to
go to the home page. Press <OK> to confirm.
Note: Freesat Channels are pre-stored on the device and only
require the satellite dish to be correctly installed. If your dish is
oriented towards the Astra Satellite, you can select finish and go to
the DTV App to start watching TV without having to perform a scan.
7.2 DTV
The DVB600 can be used to watch, record and playback satellite TV.
To switch to DTV mode select ‘DTV’ from the home screen.
Back to Content

English
7.2.1 Channel Scan
If there are no channels saved on the DVB600, a channel scan will
have to be performed. Select ‘Installation’ in the ‘DTV’ page and
press <OK> to enter the channel installation page.
Press< > to list all operation
7.2.1.1 Satellite Selection
1. Use <▲> and <▼> to highlight the desired satellite from the left
hand side of the screen. Detailed information will be displayed on the
right hand side.
2. Press <OK> to select the desired satellite. The signal strength and
quality status will be displayed at the bottom of the screen.
7.2.1.2 Quick Channel Scan
If you wish to use the default settings to perform an automatic
channel scan, press < > to enter the ‘Scan’ options. Use <▲> and
<▼> to highlight ‘Press OK to scan’ then press <OK>.
7.2.1.3 Adding a Transponder (TP)
Press <F1> to see the default frequency list and enter the ‘SAT / TP
Edit’.
1. Press < > to add a TP.
2. Use <▲> and <▼> to select the Frequency, Polarity and Symbol
Rate.
3. Use the number pad to input the values for frequency and symbol
rate.
4. Use <◀> and <▶> to change the polarity between V (Vertical) and
H (Horizontal).
5. Once finished, select ‘OK’ or ‘Cancel’ and press <OK> to confirm.
Note: TP is in short for transponder. A transponder is a series of
interconnected units that form a communications channel between
the receiving and the transmitting antennas.
-14- -15-
Back to Content

English
7.2.1.4 Editing a Transponder
1. Use <▲> and <▼> to select a TP in the list.
2. Press the < > to edit the TP.
3. Use <▲> and <▼> to select the Frequency, Polarity and Symbol
Rate.
4. Use the number pad to input the values for frequency and symbol
rate.
5. Use <◀> and <▶> to change the polarity between V (Vertical) and
H (Horizontal).
6. Once finished, select ‘OK’ or ‘Cancel’ and press <OK> to confirm.
7.2.1.5 Deleting a Transponder
1. Use <▲> and <▼> to select a TP in the list.
2. Press < > to delete the TP.
3. Select ‘OK’ or ‘Cancel’ and press <OK> to confirm.
Note: You can also use <◀> and <▶> keys to change TPs in the
detailed page.
7.2.1.6 Options
To manually change the following options, use:
1. <▲> and <▼> to select one
2. Then <◀> and <▶> keys to change the settings
- LNB Type
Low Noise Block Downconverter. Change this setting to match the
range of the converter.
- SatCR
Enable this to set the LNB to unique channel, if mutable receivers are
using the same coax cable.
- LNB Power
Enable this to give power to the LNB to receive vertical channels only
(13V), horizontal channels only (18V) or switch between vertical and
horizontal.
- 22KHz
By turning the 22KHz option on and off, the receiver will automatically
switch between the two ports allowing reliable operation that
sometimes fails when using a 2X1 DiSEqC switch.
- ToneBurst
Adjust ToneBurst between none, A and B.
- DiSEqC1.0
This setting allows you to switch between up to 4 satellite sources.
- DiSEqC1.1
This setting allows you to switch between up to 4 satellite sourc
-17--16-
Back to Content

English
- Motor
If your satellite dish doesn’t have a motor, this function will not be
available.
7.2.1.7 Manual Channel Scan
1. Press < > to perform a manual scan.
2. Some settings can be changed before performing the scan.
3. Use <▲> and <▼> to select and use <◀> and <▶> keys to change
the settings.
- Scan
Select between:
• All TP to scan transponders which are in the receiver’s database
(Recommended)
• Blind to scan every possible frequency
• One TP to scan only the currently selected transponder
• One TP + NIT to scan the currently selected transponder and the
Network Information Table by the satellite service provider.
- Scan Type:
Select between:
• All to save all scanned channels
• FTA to save only the free to air channels (Recommended)
- Service Type
Select between:
• All to save TV and Radio channels (Recommended)
• TV to save only TV channels
• Radio to save only radio channels
-18-
- SAT Type:
Select between:
• Single to search a single satellite
• Multi to search all selected satellite. Not available if only one
satellite is selected on the left hand side of the screen.
4. Use <▲> and <▼> to select ‘Press <OK> to Scan’ then press <OK>
to confirm. If you wish to exit press < > and select ‘OK’, ‘Exit’ or
‘Cancel’.
7.2.2 DTV Mode
7.2.2.1Channel Information
Press <F3/INFO> in TV/Radio mode to show the “now and next
program information” for the current channel/station including signal
strength and quality. The display also shows whether subtitles and
Teletext information are available.
Press <F3/INFO> a second time to show detailed information.
Press <F3/INFO> a third time to show the satellite information for the
current channel.
To close the channel information, press <F3/INFO> a last time.
Alternately.
-19-
Back to Content

English
7.2.2.2 Channel List
Press <OK> in the TV or Radio mode to show the channel list. Press
<TV/Radio> to switch between the TV and Radio channel list.
Press <▲> or <▼> to select the desired channel, then press <OK> to
confirm.
Press < > to close the list.
7.2.2.3 Recall
Press <RECALL> in TV or Radio mode to display recently watched
channel list. Use <▲> or <▼> to select the channel then press <OK>
to switch between them.
7.2.2.4 Record
To record a program, a USB removable storage - such as USB stick or
hard drive - with sufficient remaining space is required.
Plug your USB removable storage into one of the USB sockets.
Press <F4/REC> to start an instant recording of the program being
watched using the pre-set PVR settings.
Press <F4/REC> again to show the recording details. This will also
enable you to set the recording duration using the number keys and
pressing <OK> to confirm.
-20- -21-
Back to Content

English
Use <◀> or <▶> to jump the recording backwards or forwards by 30
seconds.
Press and hold the <◀> or <▶> for fast backwards or forwards.
Press < > to end Time Shift.
Note: Time Shift settings can be changed in DTV Settings. Please
refer to section 7.2.4
7.2.2.6 EPG
Press <F1/EPG> in TV mode or select EPG from the DTV home
screen to view the Electronic Program Guide. This function only
supports the program guide for the current and next program,
scheduled viewing or scheduled recording of programs.
Press < > to move to the next channel.
Press < > to move to the previous channel.
Press < OK > to show the program information.
Press < > to set the schedule options.
To stop recording, press < >.
Note: The recording settings can be changed in the DTV settings.
Please refer to section 7.2.4.6.
7.2.2.5 Time Shift
To use Time a USB removable storage - such as USB stick or hard
drive - with sufficient remaining space is required.
Press < > to start Time Shift.
Press < > to pause and resume the program.
-22- -23-
Back to Content

Note : Schedule options only apply on future programs.
- Select ‘Record’ to set a scheduled recording
- Select ‘Cancel this’ to cancel
- Press <OK> to confirm.
- Select ‘Play’ to set a reminder for viewing a future program
- Select ‘Cancel this’ to cancel
- Press <OK> to confirm.
7.2.2.7 Timer
Timer function allows scheduling recordings or reminders for viewing
a future program.
1. Press < > to show the menu list then use <▲> or <▼> to select
‘Timer’. Press OK to enter.
2. Press < > to add an event (action)
3. Use <▲> and <▼> to change between options:
- Actions: use <◀> or <▶> to change between ‘Record’ and ‘Watch’.
- Repeat: use <◀> or <▶> to change between ‘Once’, ‘Daily’ and
‘Weekly’.
English
-25--24-
Back to Content

English
Note: When weekly repeat is chosen, select the day for which the
reminder or recording should repeat. Use the arrow keys to select the
day then press <OK> to confirm. Select ‘Cancel’ to return without
saving or select ‘OK’ to save. The ‘Repeat’ will highlight the selected
date.
4. Select ‘Starts’ then press <OK> to enter the start time. Use <◀> or
<▶> to change between time and date, Use <▲> and <▼> to change
the time and date. Select ‘Cancel’ to return or select ‘OK’ to save.
5. Select ‘Duration (Min)’ and use the number keys to change the
duration.
6. Select ‘Channel’ and press <OK> to enter the channel list. Use
<▲> and <▼> to change the channel or press < > to find a channel
(search). Press <OK> to save.
7. Select ‘Cancel’ to return or select ‘OK’ to save the timer.
8.Press< > to delete the current chosen timer
7.2.2.8 Channel List
To show the channel list, press <OK> in DTV mode or select ‘TV
Channel’ in DTV home screen.
Press <TV / Radio> to switch between TV channels and Radio
stations.
Use <▲> or <▼> to select a channel. The satellite and TP information
will be displayed at the bottom of the list.
Press <OK> to change the channel.
Use <▲> or <▲> to select one then press <OK> to save.
-26- -27-
Back to Content

English
Press < > to search a channel by entering its name using the on
screen keyboard.
Press < > to display channels on different satellite.
7.2.2.9 Channel Manager
Select ‘Channel manager’ in the DTV home screen to enter the
channel manager.
The default password is ‘0000’.
Press <TV/Radio> to change between TV and radio channel list.
Use <◀> and <▶> to change between groups, use <▲> and <▼> to
select channel.
- Selecting Channels
Press < > to switch between ‘Single Select’ and ‘Multiple Select’.
Note: For multiple select: press <OK> to select individual channels
to add to the multiple selection or press <F2> to select all.
- Deleting Channels
Press < > to delete the selected channel(s). Select ‘OK’ to confirm
or ‘Cancel’ to return.
-28- -29-
Back to Content

English
- Moving Channels
In single select mode press < > to move a selected channel up. In
multiple select mode, move the selected channel(s) to a highlighted
point.
NOTE:It is recommended not to modify the Channel List in the UK as
it may affect Freesat Channel N° and the working condition of the
box.
- Locking a Channel
Press the yellow button to lock / unlock the selected channel(s).
The icon will show for the locked channel(s).
- Skipping a Channel
Press <F1> button to skip / un-skip the selected channel(s).
The icon will show for the skipped channel(s).
- Rename a channel
1. Press <F2> to rename a select channel.
2. Enter the new name by using on screen key board
3. Press< > and select ‘OK’ to save.
- Channel Groups
Use <◀> and <▶> to change between groups.
Personal groups (labelled in blue) can be added, deleted and
renamed.
Default groups (labelled in orange) cannot be deleted or renamed.
• Adding a New Group
1. Use <◀> and <▶> to select a personal group then press < >.
2. Enter the group name by using on screen keyboard.
3. Press and select ‘OK’ to save.
-30- -31-
Back to Content

English
• Deleting a Group
1. Use <◀> and <▶> to select a personal group then press < >.
2. Select ‘cancel’ to exist without deleting or select ‘OK’ to delete the
group.
• Renaming a Group
1. Use <◀> and <▶> to select a personal group then press < >.
2. Enter the group name by using on screen keyboard.
3. Press and select ‘OK’ to save.
• Adding Channels to Personal Group
1. Select channel(s) (see Selecting Channels)
2. Press < > to add selected channel(s) to a personal group as
favourite.
3. Select a personal group press <OK> then press < > to go back.
4. The icon will show for the channels that are in favourite.
7.2.3 Recordings Settings
Press < > in DTV mode or select ‘Recordings’ in the DTV home
screen to enter the PVR function.
-32- -33-
FAV
Back to Content

English
In a sub-menu, use <▶> to display the settings.
Press <OK> to change the settings.
Use <◀> to back one level.
- 7.2.4.1 AV Settings
- Aspect Ratio
Select between:
• Auto to adjust the aspect ratio automatically.
• Full to fit the aspect ratio to full screen.
- Switch Channel Mode
Select between:
• Freeze to freeze the picture when switching channels
• Black to display a black screen when switching channels
- Audio Mode
Select between:
• Stereo to have right and left channel accordingly
• Left to have the left Channel only on both speakers
• Right to have the right channel only on both speakers.
- Time Setting
Select between:
• DTV Time which can differ depending of your time zone and the
satellite used
• Internet time which will be the time for your actual time zone
- Channel List Type
Select between:
• Simple to display the channel list only
• EPG to display the channel with current program information
Use <▲> and <▼> to select a recorded file.
Press <OK> to start playback.
Press < > to browse USB recordings files.
Press < > to browse SD card recordings files.
Press < > to list all operation
Press < > to delete selected file the file.
7.2.4 DTV settings
Press < > in DTV mode or select ‘DTV Settings’ in DTV home
screen to enter the DTV settings.
Use <▲> or <▼> to change between options.
Use <▶> to enter a sub-menu for each option.
-34- -35-
Back to Content
Table of contents