Aulic Vanity User manual

AULIC vanity
INSTALLATION
INSTRUCTION
CARE, MAINTENANCE AND WARRANTY
It is the responsibility of the installer to make any adjustments to doors /
drawers after installation if required. There may have been some movement in
transportation and installation which causes doors/drawers to become unaligned.
Prior to installation it is important to unpackage & inspect your products to ensure
no damage has occurred in transit and that the product IS CORRECT.If damages
has occurred, or a visible defect exists, do not proceed with installation and contact
supplier IMMEDIATELY.
NO CLAIMS FOR DAMAGES / DEFECTS WILL BE RECOGNIZED AFTER INSTALLATION.
IMPORTANT

01 02
INSTALLATION CHECKLIST
IMPORTANT TIPS
1
2
1
2
3
3
Check Products for Any Damages
Check Support Beam
Check Your Wall is Flat and Plumb
Prior to installation it is important to unpackage & inspect your products to ensure
no damage has occurred in transit and that the product IS CORRECT. If damages
has occurred, or a visible defect exists, do not proceed with installation and
contact supplier IMMEDIATELY.
No claims for damages/defects will be recognized after installation.
Wall hung furniture & basins require fixing to a support beam fitted between
the studs to give a solid wall backing to attach the vanity to.
The cabinet should be installed over the top of a tiled wall with adequate clearance
for doors and drawers to open. Aulic do not recommend tiling in furniture due
to moisture and mould build up which can damage the material and void the
warranty.
It is recommended that vanities are installed at least 300mm away from wet areas
such as showers and baths.
It is the responsibility of the installer to make any adjustments to doors /
drawers after installation if required. There may have been some movement in
transportation and installation which causes doors/drawers to become unaligned.
Before installing, check that your wall is flat and plumb. If not, the cabinet will need
to be packed out so that sits level, otherwise the cabinet may twist, causing doors
and drawers to fall out of alignment and not function properly.

03 04
Step 1
Step 1Required ToolsRequired Tools
Supplied Spare Part
Step 2
Step 3
Step 2
Step 4
Screwdriver
(Ø4.2x60mm)
Tape measure
(Ø8X40mm)
Pencil Silicone
Silicone
Electric drill Drill bit(Ø8) Soft Hammer Spirit lever
INSTALLATION INSTRUCTION INSTALLATION INSTRUCTION
A
A
B
B

05 06
1
1
2
3
4
2
Remove the drawer
Fully extend the drawer.
Undo screws underneath left and right side of drawers connecting to
runners.
Locate the grey tabs underneath the drawer. Pull out tabs until you hear a
click.
Lift the drawer up and out.
Note: When putting drawers back, please exactly reverse the steps of
removal to secure drawers.
Reassemble the drawer
Option One only with screws
Option two with grey tabs
Steps to Remove the drawer
Steps to reassemble the drawer
Open the drawer and discharge
the screw in the runner for both
sides
Make the draw front connected
with the drawer
Hold the drawer up and take out
it slowly
Insert the drawer back on
runners
Adjusting the fastenings, and
make the draw front away from
whole drawer
Use the screw fix the runner
and drawer
Tab Screws
REMOVE DRAWERS
07 08
Option three with Marcella drawers
Note: When putting drawers back, please exactly reverse the steps of
removal to secure drawers. Please make sure runners are against the
drawer properly.
It is very important to ensure that the unit is level & plumb, using a spirit level.
This will ensure that doors and drawers (where applicable) will be square
within the frame. There is a small amount of final adjustment within door &
drawer components if necessary after installation - see details above.
ADJUSTMENTS
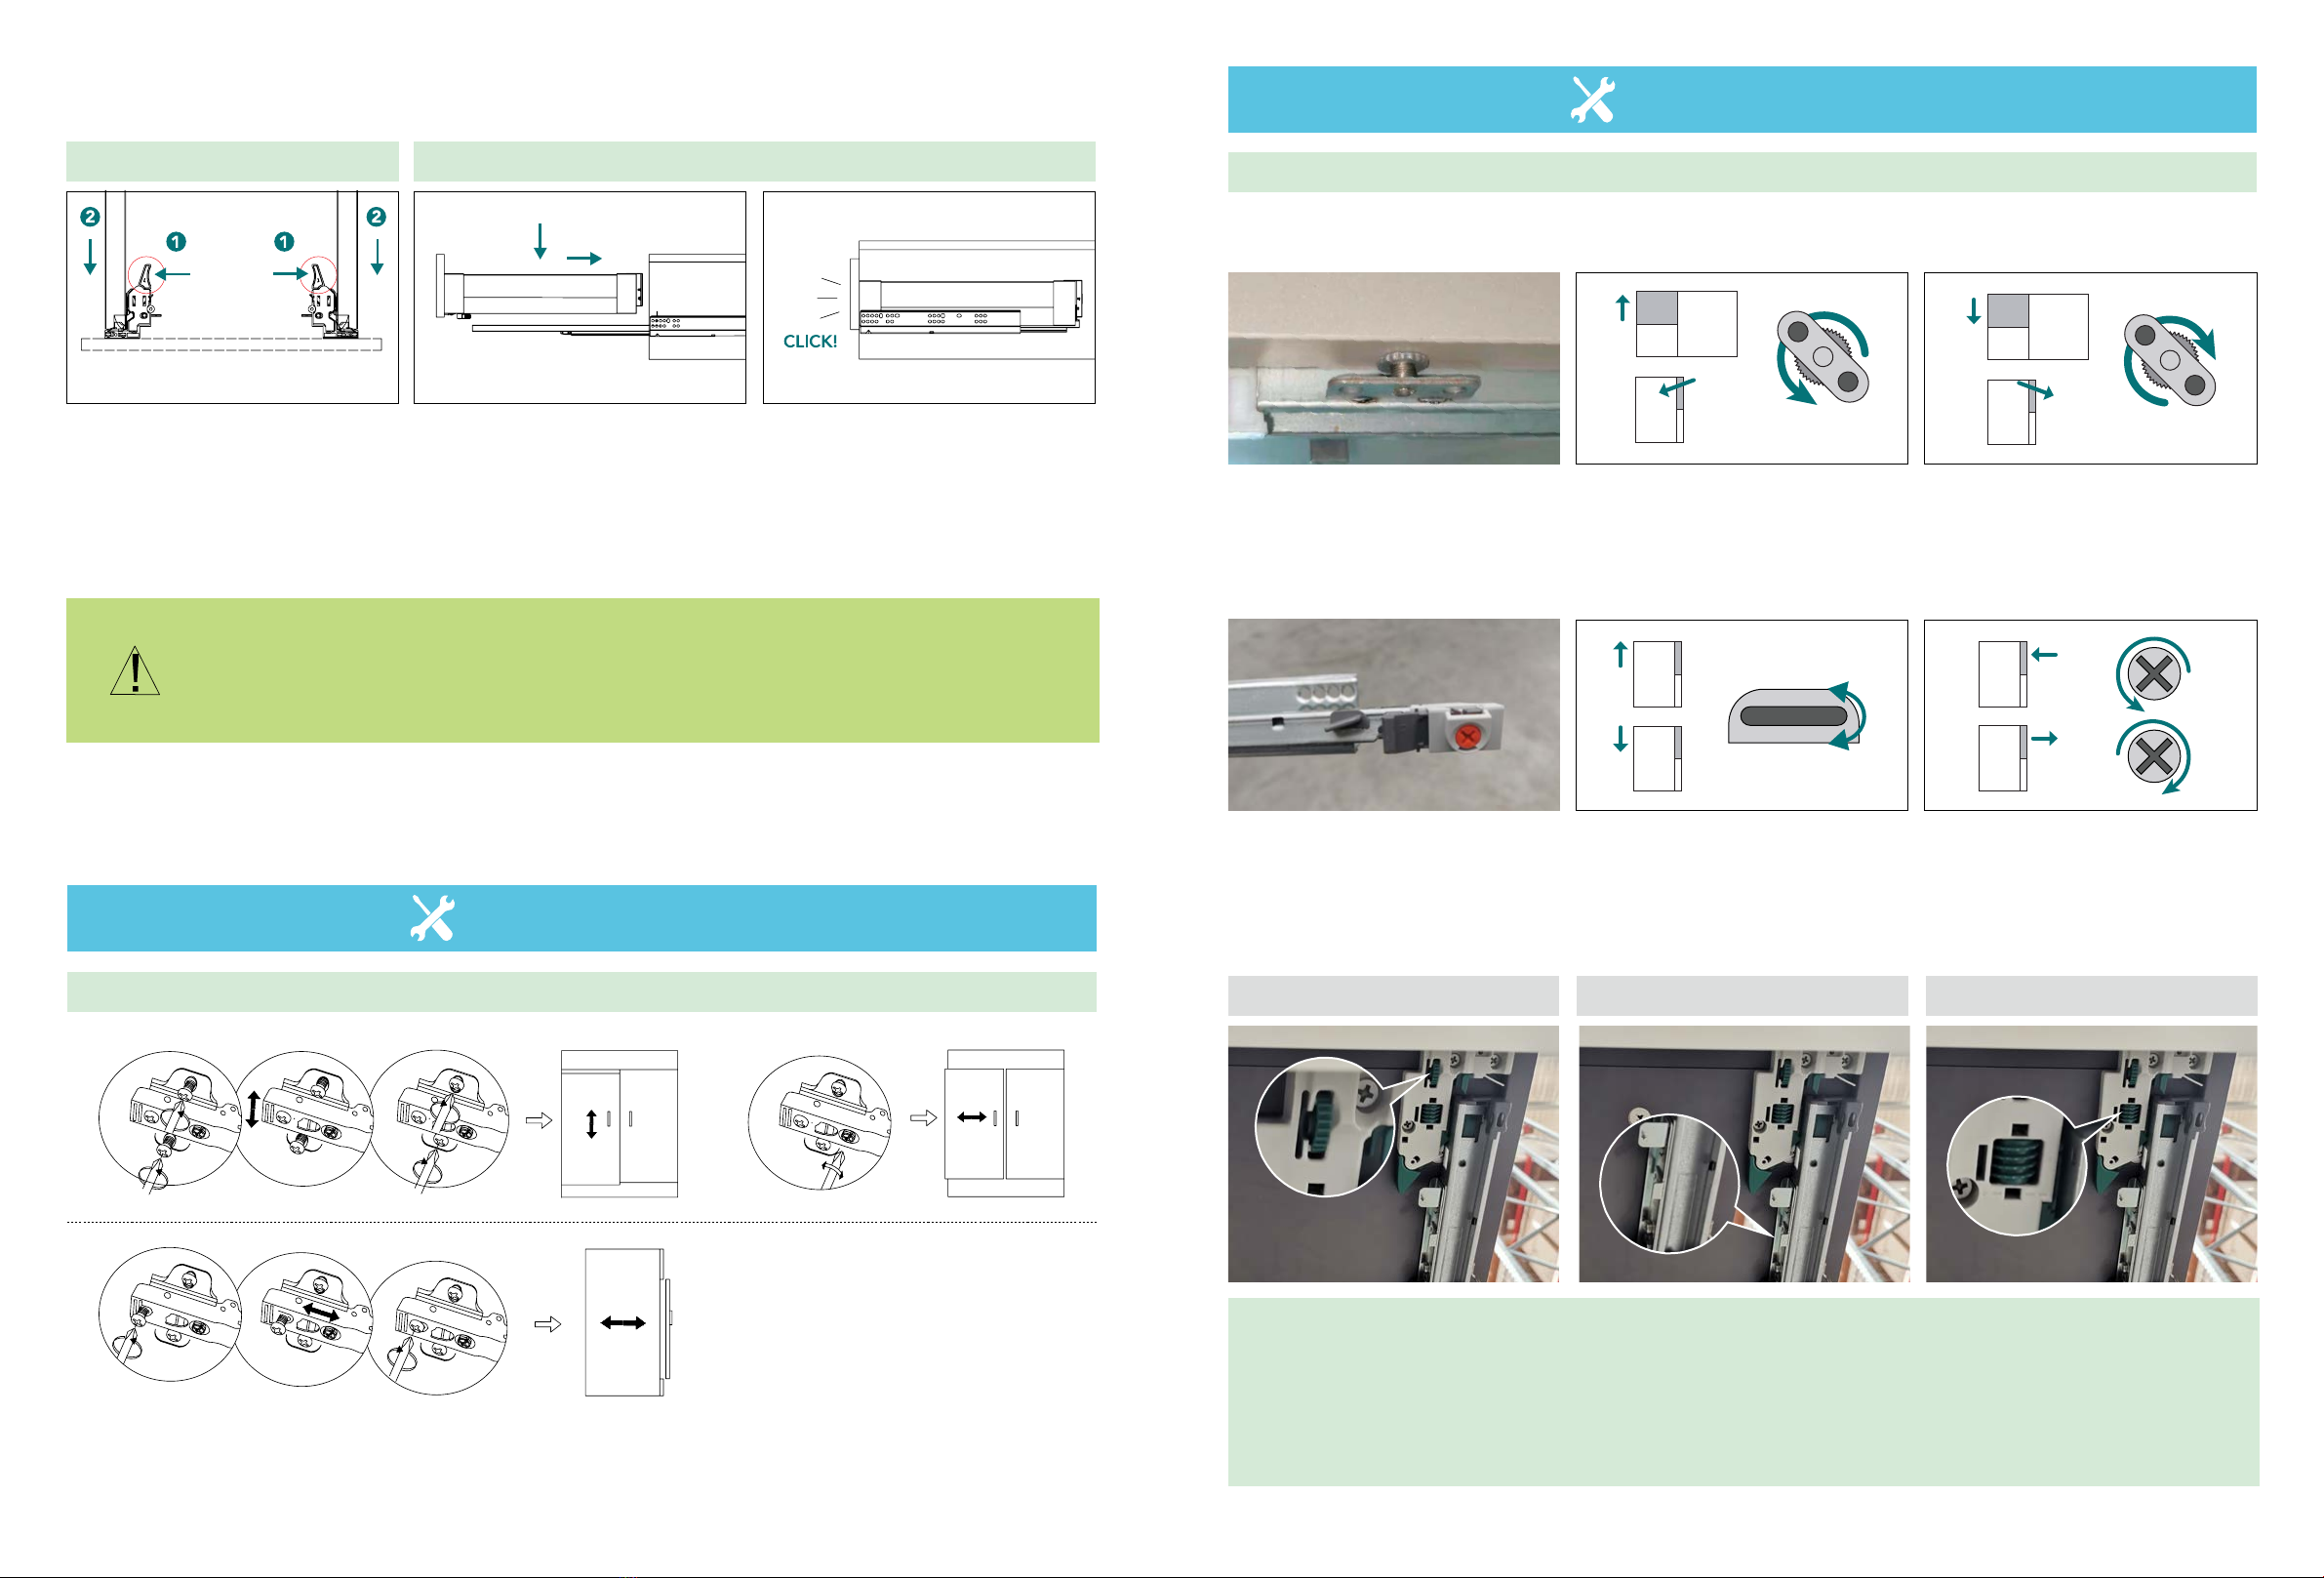
ADJUSTMENTS
Lateral adjustment Depth adjustment Height adjustment
Adjust the drawer
Adjust the door
Adjusting nut on underside of
drawers
Adjusting nuts on underside of
drawers
To adjust the drawer UP
(backwards tilt) turn anti-
clockwise.
To adjust the drawer UP
(backwards tilt) turn anti-
clockwise.
To adjust the drawer down
(forward tilt) turn clockwise.
To adjust the drawer out turn
clockwise.
Removing drawer Inserting drawer
Pull drawer out and squeeze
both levers in on the underside
of the drawer, at the same time
(to activate release) and pull
drawer out to remove.
extend drawer runners out and
place drawer on runners.
Push drawer closeed until it is
about 2cm out from the vanity.
You will then need to apply a
little force on the drawer front
(near the bottom) to push
closed and connect runners in
place.
Other drawer
Mia drawer
Marcella drawer

09 10
CARE and MAINTENANCE WARRANTY
Conditions
For cabinets
For benchtops
Aulic products are manufactured from materials that are greatly adapted to bathroom.
However, no abrasive cleaners or wax-based creams are used on any gloss cabinets as
this can result in a build-up of deposits/scratches that will detract from the appearance.
Sufficient ventilation is required to avoid excessive moisture.
The best way will be simply wipe over with a clean and soft cloth. Any excessive moisture
or water spillage will always be taken into care.
ALEX GROUP AUS PTY LTD is made to the highest industry standards and quality,
referring to table below for warranty periods.
Vanity
Cabinet 10 years replacement products or parts.
12 months replacement products or parts & labour
2 years replacement products or parts.
12 months replacement products or parts & labour
12 months replacement products or parts & Labou
12 months replacement products or parts & Labour
Top/Top with
undermount basin
Other Products
Commercial Use
To remove scratches, marks, etc. on two pack polyurethane, rub gently with car
cutting compound, car polish or household brass/silver cleaner used for car re-
treatment, followed by buffing with a car polish and a clean, soft cloth.
Use only a soft cloth and weak solution of non abrasive detergent to maintain the
finish on your ceramic top or stone top.
Aulic cabinets used in construction are moisture-resistant, but not water-proo.
Scratches cannot be repaired or removed on the glazed surface of ceramic tops
All cabinets should be installed against tiles, instead of in the tiles. Cabinets should
be at least 300mm away from bathtubs or showers to avoid water damage.
Some visual distortion may occur on ceramic tops which is handcrafted product.
This is not a defect.
1
1
2
2
3
3
1
2
3
5
4
6
Installation is made by a LICENSED tradesman.
Failure derives from a fault in the quality of the product.
Proof of purchase should be provided when making a claim.
All cabinets are engineered for moisture proof.
The product should be installed properly.
This warranty does not cover scratching or normal wear and tear, as these
are not manufacturing faults.
To fullest extent under the law, ALEX GROUP AUS PTY LTD is not liable for damage to any person
or property and any indirect consequence or other loss, ALEX GROUP AUS PTY LTD liability does
not include the cost of installation or removal of any product and no warranty will be supplied if
damage occurs during or after INSTALLATION or a damaged or incorrect part has been installed.
The warranty does not cover the issue by improper installation, accidents, misuse, abuse and
negligence, installation or part installation by the purchaser or any person other than a LICENCED
TRADESPERSON. Must avoid contact with hard sharp objects due to the nature of stainless steel
material it can be SCRATCHED with normal day to day use this is not covered by warranty. Don't
use Harsh cleaning products that contain chlorides and halides eg ( Bromine, Lodine and
Fluorine). Don't use Hydrochloric Acid (HC) for cleaning this will lead to pitting and stress corrosion
cracking (SCC).
Table of contents
Popular Indoor Furnishing manuals by other brands

Regency
Regency LWMS3015 Assembly instructions

Furniture of America
Furniture of America CM7751C Assembly instructions

Safavieh Furniture
Safavieh Furniture Estella CNS5731 manual

PLACES OF STYLE
PLACES OF STYLE Ovalfuss Assembly instruction

Trasman
Trasman 1138 Bo1 Assembly manual

Costway
Costway JV10856 manual


