Aunex AP-9EQ User manual

AP-9EQ
9 Band Premium Performance Equalizer
Installation and Operation Manual
Please take time to thoroughly read through this manual to familiarize yourself with your new equalizer.
This will ensure that your equalizer will perform at its optimum capabilities.
Para obtener una copia de este manual en español, visite www.aunexusa.com y luego vaya a la página
del producto que necesita. Haga clic en la pestaña Soporte y descargue su manual en español.

1
Congratulations and thank you for purchasing an Aunex
Premium In-Dash Equalizer with a Built-In Line Driver. This product
has been engineered and manufactured utilizing precision quality
partsandcraftsmanship. Improvementsinsoundqualityandsystem
performance will be greatly enhanced with the use of this equalizer.
To ensure maximum performance we highly recommend you have
your new Aunex product installed by an Authorized Aunex Dealer.
Should you decide to install this product yourself, please make
sure to read this manual thoroughly to familiarize yourself with
the necessary installation requirements and tuning procedures.
Please read your warranty and retain a copy of your purchase
receipt and original carton should your equalizer ever needs
to be serviced and warranted.
Visit our website for the latest information on all Aunex products
at: www.aunexusa.com. If you have any questions regarding
this product, please contact your Authorized Aunex Dealer for
assistance or call / email Aunex Technical Support
Caution: Continuous exposure to sound pressure levels over 100dB may
cause permanent hearing loss. High powered audio systems can produce
sound pressure levels that can exceed over 150dB. Please limit your
exposure to continuous high listening volumes.

2
Features of the AP-9EQ
• 9-Band In-Dash Equalizer; -18dB to +18dB level adjustment
o Center Frequencies: 80Hz, 120Hz, 200Hz, 500Hz, 1kHz,
3kHz, 6kHz, 10kHz, 15kHz
• Line Driver with 9 Volts Maximum Output
• Master Volume Control Knob
• Fader Control Knob
• Independent Subwoofer Level Control Knob
• Front Variable Subwoofer Frequency Knob (40Hz – 150Hz)
• Dual Input Source Selector - Main Input or Auxiliary Input
• Rear 3.5mm Auxiliary Input
• Balanced Dierential Front, Rear, Subwoofer RCA Outputs
• Low Level RCA Input Compatible
• PWM Ultra-Fast Switching Power Supply
• Blue Backlight Illumination
What’s Included
• (1) AP-9EQ Equalizer
• (1) 2 Amp In-Line Fuse
• (1) 3 Pin Power Connector Plug
• (2) Mounting Brackets
• (4) Self Tapping Screws
• (4) Machine Screws
• (4) Lock Washer
• (1) Instruction Manual
• (1) Sticker

3
Important Safety Considerations
• To prevent personal injury and damage to the unit, please read
the following instructions in this manual.
• This product is designed to use in vehicles with 12Volt,
negative-ground electrical systems.
• Install this product in a dry location away from your vehicles’
safety equipment (airbags, seat belt system, etc.). Water and
humidity may damage internal components.
• Use the included mounting accessories to secure this product
so that it does not come loose.
• Check before drilling to make sure you do not drill into any vital
vehicle system.
• Protect all system wiring from sharp metal edges.
• Do not disassemble or modify this unit; doing so will void your
manufacturer’s warranty.
Important Installation Precautions
Installation of mobile audio equipment requires experience.
Although this manual provides general installation procedures,
it will not show the exact installation method for your particular
vehicle.
If you do not have the required knowledge and experience,
we recommend that you have your equipment installed by an
Authorized Aunex Dealer.
• Turn o all stereo and other electrical devices before you begin.
• Disconnect the negative (-) lead from your vehicle’s battery to
avoid an electrical short.
• Check the mounting depth to make sure there is sucient room
for your installation placement preference.
• When running power cables through sheet metal it is best to use
grommets and loom to properly insulate the metal edges.

4
Mounting Placement
The AP-9EQ was designed to be installed in or near the
dashboard of most vehicles. The front panel was designed
so that the equalizer would be mounted ush to your vehicles’
dash. There are dash kits from many brands that allows for the
equalizer to be mounted alongside your headunit. Check with your
Authorized Aunex Dealer for additional information and options.
Other popular mounting options are under the dashboard or in
your glove compartment. For these methods, you will use the
supplied mounting brackets as shown below. Make sure there
are no items behind the area where the screws will be driven.
For optimum sound quality, it is highly recommended that you
purchase Aunex wiring accessories as they are designed to give
your equalizer and ampliers the high-quality signal it needs to
operate at peak performance levels. Aunex has everything from
RCA cables and power wire to speaker wire and battery connectors.

5
1. Main Volume: This inner knob controls the volume level of your
Front, Rear and Subwoofer outputs. It is recommended that you
set your radio volume at the desired listening level and make
your sound adjustments from your equalizer.
2. Fader: This outer knob on the Main Volume Control will allow you
to fade the signal level between your Front and Rear outputs.
This will allow you to have Front and Rear fading capabilities with
only one pair of inputs.
3. Subwoofer Volume: This inner knob controls the volume level
of your Subwoofer Outputs. The Main Volume Knob will also decrease
the volume of your subwoofer output but will not increase
the output of the subwoofer(s) volume pass where the Subwoofer
Volume Knob is set to.
4. Subwoofer Frequency: This outer knob allows you to select
the center frequency range of your subwoofer output from 40Hz
to 150Hz.
5. Dual Input Selector: This button allows you to select the input
signal from either your main Head Unit or Aux Input.
6. Equalizer Knobs: These 9 knobs allow you to control 9 bands
of equalizations (Bass) 80Hz, 120Hz, (Upper Bass to Lower
Midrange) 200Hz, 500Hz, (Midrange) 1kHz, (Upper Midrange)
3kHz, (Presence / Sibilance Register) 6kHz, (Brilliance / Sparkle
Register) 10kHz and (Open Air) 15kHz with a 18dB of defeat or
boost.
Front Panel Controls
1 2 3 4 5 6

6
1. Power Connector: This connector has inputs for Ground,
Remote and Power.
a. Ground: Use the same gauge wire that is being used for the
Power connection and run your ground wire to this negative
terminal. Good ground points are from your battery, a ground
buss or a veried ground location that is clean. This will
minimize the possibility of noise induced into the system.
(Factory head unit ground is not recommended as it can
induce unwanted noise.)
b. Remote: Use a 22 to 18 Gauge wire from your head unit’s
remote turn-on (+12VDC Switched) and run it to remote
terminal.
c. Power: Use the supplied in-line fuse and connect it to a
constant positive +12 volt source. Use the same gauge wire
that is used for the ground; preferably 18 Gauge or larger and
run it to the +12 Volt terminal.
2. Auxiliary Input: This rear 3.5mm input jack allows you to
connect your phone or portable audio player directly to your
equalizer. Be sure to select Aux Input mode when in use from
the front panel button.
Low Level RCA Connections: Aunex recommends using high
quality RCA Interconnects such as the Aunex AP RCA and AE
RCA series. Consult with your Authorized Aunex Dealer to see
what cable and length works best for your installation. (Note:
Avoid crossing your power and wire ground with your RCA
cables. This will help prevent noise interference.)
3. Main: Use this pair of inputs to connect your main source /
headunit.
Rear Panel Controls
1 3 4 5 62

7
4. Subwoofer: Use this pair of outputs to connect to your
subwoofer amplier or subwoofer channels of your amplier.
5. Front: Use this pair of outputs to connect to your front amplier
or front channels of your amplier.
6. Rear: Use this pair of outputs to connect to your rear amplier
or rear channels of your amplier.
The above example illustrates the most common use of the
AP-9EQ utilizing 3 ampliers and a headunit.
Rear Panel Controls Continued
Installation Diagram
Ground
Remote
Fuse
Power / 12V Battery
RCA
Aux
PHONE
RADIO AMP. AMP. AMP.

8
Tuning the 9 Bands of equalization is set by your listening
preference as dierent music genre are produced with
dierent quality and dierent equalizations. The AP-9EQ was
designed to help you compensate these recording dierences by
allowing you to ne tune your system for your listening enjoyment.
The 9 Bands of equalization does not aect your
subwoofer channel as your subwoofer channel already has its
own independent frequency range and volume knob. Instead the
equalization bands will only aect the Front and Rear Outputs.
- Bass (80Hz Centered): Use this knob sparingly as most
coaxials speakers and components cannot handle 18dB of
boost. However, in some music you will nd that turning up this
knob will enhance the low frequency output.
- Upper Bass (120Hz Centered): Use this knob to control
frequencies that are above subwoofer bass and below midrange
which is also called low order harmonics. This range is normally
associated with Male vocals, brass instruments.
- Upper Bass (200Hz Centered): Use this knob to control
frequencies that are associated lower end of vocals, deeper
notes from synthesizers, low brass and piano.
- Lower Midrange (500Hz Centered): Use this knob to control
the lower midrange frequencies. Adding to much boost in this
region makes things sound muddy and congested. Not adding
enough boost in this region can make sound seem thin and weak.
- Midrange (1kHz Centered): Use this knob to control the
midrange frequencies. Adding volume here should be used
sparingly as too much can give things a metallic sound and
can wear down on your ears quickly if raised too much.
- Upper Midrange (3kHz Centered): Use this knob to control the
upper midrange frequencies. Adding or reducing here can raise
or lower the snap of higher instrumentation quickly such as
acoustic and electric guitar and piano.
Equalization Adjustments

9
- Presence / Sibilance Register (6kHz Centered): Use this knob
to control what is referred to as the presence zone and includes
the highest range of pitches produced by most natural
instruments. Boosting this range can make the music sound more
forward. Reducing this range can open the sound and push
instruments away for more depth.
- Brilliance / Sparkle Register (10kHz Centered): Use this knob
to increase or decrease the vibrancy and clarity of this frequency
region. The sound of cymbal oats around this region.
- Open Air (15kHz Centered): Use this knob to control the higher
overtones of instrumentation and synth eects from electronic
music. Boosting this region too much can make things start to
sound synthetic.
Equalization Adjustments Continued

10
Total Outputs 3
Total Inputs 2
Output Voltage 9 Volts Maximum
Frequency Response 10Hz – 60kHz
9 Band Eq. Center Freq. 80Hz, 120Hz, 200Hz, 500Hz, 1kHz,
3kHz, 6kHz, 10kHz, 15kHz
Defeat / Boost -18dB / +18dB
Variable Sub. Freq. 40Hz – 150Hz
THD + Noise < 0.2%
S/N Ratio A-Weighted > 120dB
Channel Separation 87dB @ 1kHz
Input Sensitivity 250mV – 10V
Input Impedance 10.2k Ohms
Operating Voltage 9 – 18 Volts DC
Fuse Requirement 2A (Included)
Dimensions (H x W x D) 1.0 x 7.0 x 4.2
Inches / MM 25 x 179 x 106
Technical Specications
*Due to continuous product improvements; specications and features are
subject to change without notice. Please visit www.aunexusa.com for the
most current information.
*This manual is the exclusive property of Aunex, Inc. Any reproduction of this
manual or use other than its intended purposes is strictly prohibited without
the express written consent of Aunex, Inc. ©Copyright 2020 Aunex, Inc.
11
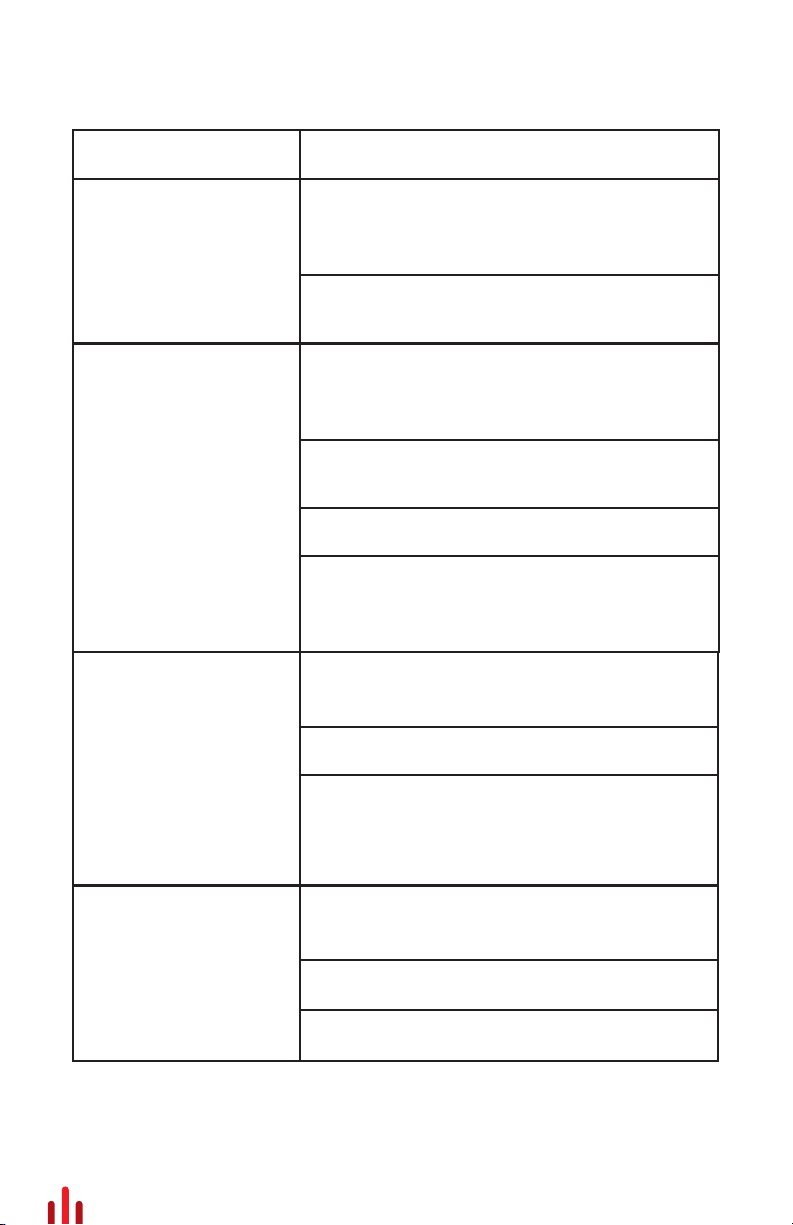
Troubleshooting
Problem Solution
Equalizer does not
work; no LED’s on
1. Check to see if Power, Remote
and Ground is connected to the
equalizer
2. Check Power and Remote Turn-on
lead for proper +12 Voltage
Equalizer powers
up; no sound
1. Check to see if Power, Remote
and Ground is connected to the
equalizer
2. Check Power and Remote Turn-on
lead for proper voltage
3. Center the Fader knob
4. Push the source button on the
front panel to make sure you have
selected the correct input mode
Hissing noise from
speakers
1. Readjust your ampliers gains to a
lower voltage setting
2. Readjust your source unit volume
3. Make sure your RCA’s is routed
away from your Power and Ground
connections (Eq and Ampliers)
Distorted sound
from speakers
1. Readjust your ampliers gains to a
lower voltage setting
2. Readjust your source unit volume
3. Readjust your equalization knobs
12
California’s Proposition 65 (Prop 65) entitles consumers in
California to special warnings for products that contain
chemicals knows to the state of California to cause cancer, birth
defects or other reproductive harm if consumers are
exposed to such chemicals above certain threshold levels.
While this law is only for California and Aunex sells products to
consumers in California, Aunex is required to display this warning.
California Prop 65 Warning
Warning: This product can expose you to
chemicals which are known to the State of
California to cause cancer or birth defects
or other reproductive harm. For more
information visit www.p65warnings.ca.gov.
Limited Warranty – Electronic Processors
Aunex, Inc. warrants this product to be free of defects in
materials and workmanship for a period of 2 years from the original
purchase date. This warranty is non-transferrable and applies
only to the original purchaser from an Authorized Aunex Dealer.
Should service be necessary within the warranty period, Aunex will
at its discretion repair or replace the defective unit with a new or
remanufactured product at no charge. Damage caused by
misuse, abuse, accidental damage, product modication, failure to
follow installation instructions, unauthorized repairs will not be
covered under warranty. This warranty does not cover incidental or
consequential damages and does not cover the cost of having
the unit removed or reinstalled. Cosmetic damages by accident or
normal wear and tear are not covered under warranty.
Subsequent damage to other component will be not covered.
Warranty

13
Warranty will be voided if the product’s serial number has been
removed or defaced. Any applicable implied warranties are
limited in duration to a period of the express warranty as
provided in this manual beginning with the date of the original
purchase and no warranties whether express or implied shall
apply to this product thereafter. Some states do not allow limitation
on implied warranties; therefore, these exclusions may not
apply to you. This warranty gives you specic legal rights;
however, you may have other rights that vary from state to state.
All warranty returns should be sent to Aunex freight prepaid
and must be accompanied by proof of purchase; a copy of the
purchase sales receipt. All returns whether sent by the Dealer of
purchase or directly from the consumers must have a valid RMA
number (Return Merchandise Authorization). Returns without a
valid RMA number will be refused. The RMA number must
be clearly written on the outside of your return package.
Non-defective units will be returned to sender freight collect.
Customers are responsible for shipping charges and insurance
in sending products back to Aunex. Freight damage on returns is
not covered under warranty so be sure to package your return in
the original box or packaged securely in another box to prevent
possible freight damage. Warranty expiration on items without proof
of purchase will be determined from the manufacturing date code.
Products purchased outside of the United States of America are
covered by that country’s distributor and not by Aunex, Inc.
For Service Information in the U.S.A. and to obtain a Return
Merchandise Authorization number RMA) please call Aunex at
(909) 589-5010.
Warranty Continued

This page is left blank intentionally.

Declare Your Independence!
Aunex, Inc.
13865 Magnolia Avenue, Unit C
Chino, CA 91710
T. (909) 589-5010 / F. (909) 589-5011
8:30am – 5:30pm (PST – Pacic Standard Time)
www.aunexusa.com
Table of contents
Other Aunex Stereo Equalizer manuals


