auray RF-PBO-16 User manual

1RF-PBO-16 Owner’s Manual
Premium Reflection Filter
RF-PBO-16
Owner’s Manual

2RF-PBO-16Owner’s Manual
• Keep this manual in a safe place for future reference.
• Do not attempt to disassemble or repair this equip-
ment—doing so will void the warranty, and Auray
will not be responsible for any damage.
• Handle the unit with care.
• Make sure everything is secure before proceeding.
• Make sure the item is intact and that there are no
missing parts.
• To avoid damage to your reflection filter, be careful
not to overtighten or improperly thread any of the
threaded fittings.
• All images are for illustrative purposes only.
!
Precautions
Thank you for choosing Auray.
The Auray RF-PBO-16 Premium Reflection Filter provides
music producers, broadcasters, and podcasters with advanced
microphone isolation. When recording vocals, voiceovers, or
podcasts in a studio or acoustically untreated space, the RF-PBO-16
creates a dry and close sound for clean vocal tracks. This reflection
filter is designed with multilayered protection that absorbs
unwanted ambient noise and controls acoustic reflections that can
compromise your recording or broadcast.
The filter employs high-density open-cell acoustic foam to
absorb sound. Additional inner acoustic layers combine for
advanced isolation with near-zero coloration. The vented shield
is constructed with rugged ABS plastic and creates a more open
sound while it prevents bounce-back reflections.
The RF-PBO-16 is compatible with most mic stands and shock
mounts, and it will even work in inverted position with a mic stand
and studio boom.
3RF-PBO-16 Owner’s Manual
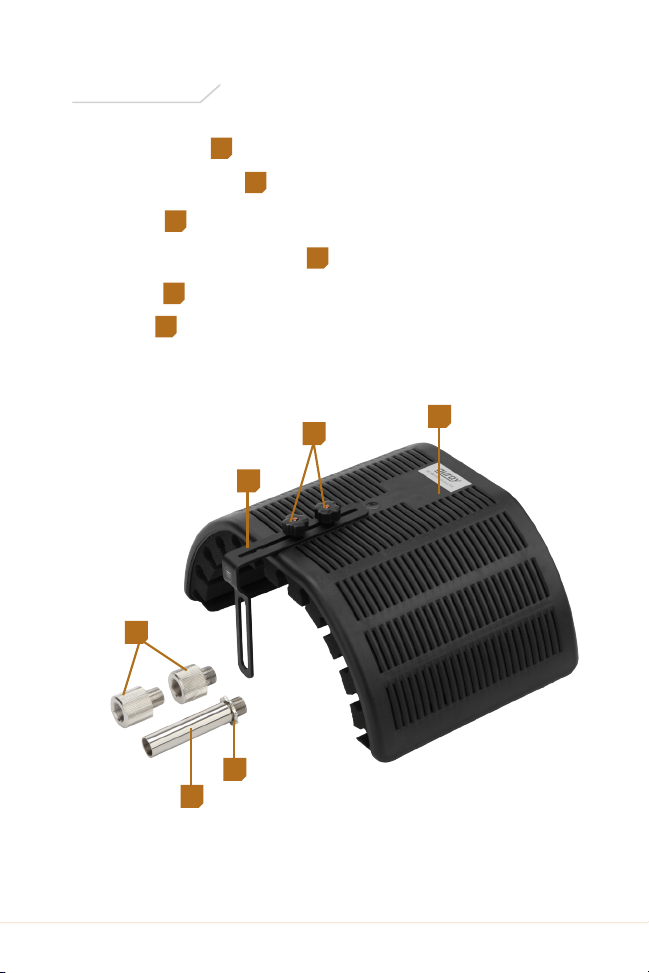
Reflection filter 1
Locking screws (×2) 2
L bracket 3
Threaded thumbscrews (×2) 4
Extender 5
Star nut 6
Overview
1
2
3
4
5
6
4RF-PBO-16Owner’s Manual
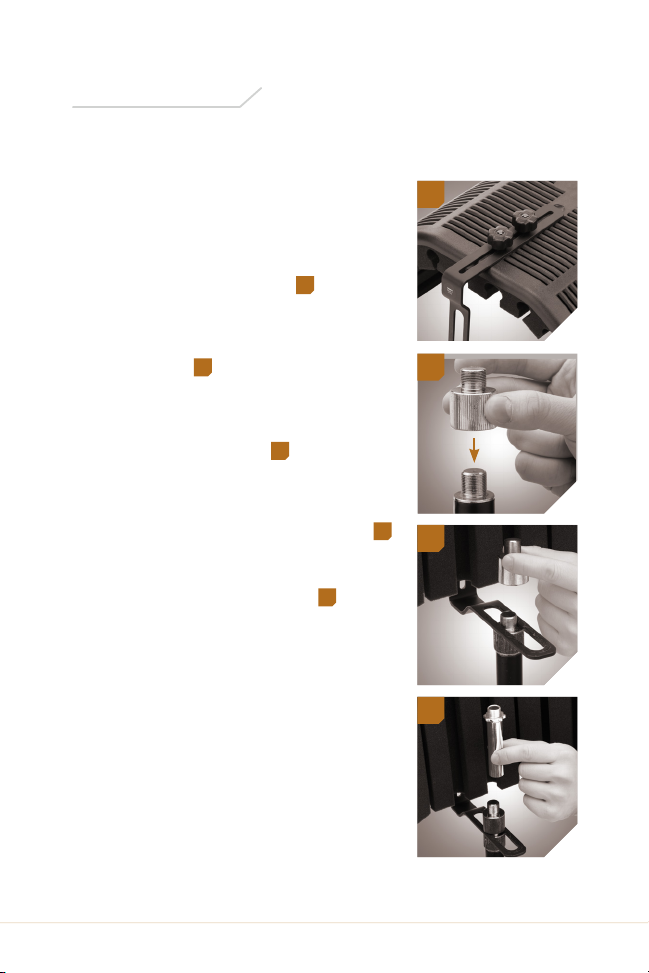
Vertical Setup
1. If the L bracket is not attached
to the filter: Align the slot on the
flat side of the L bracket with the
screw holes on the back of the
filter. Tighten the two locking
screws until secure. 1
2. Screw one of the thumbscrews
onto the threaded post of the mic
stand. 2
3. Place the thumbscrew’s
threaded post through the slot
on the L bracket. 3
4. Attach the second thumbscrew
to the first thumbscrew to secure
the filter. Tighten until secure. 3
5. Screw the extender onto the post
of the top thumbscrew. 4
6. Attach your shock mount to
the extender, and secure it by
tightening the star nut. Mount
your microphone into the shock
mount.
Instructions
1
2
3
4

5RF-PBO-16 Owner’s Manual
1
5
6
7
Inverted Setup
1. If the L bracket is not attached
to the filter: Align the slot on the
flat side of the L bracket with the
screw holes on the back of the
filter. Tighten the two locking
screws until secure.
2. Screw one of the thumbscrews
onto the threaded post of the
mic mount on your mic
boom. 5
3. Invert the filter, and place
the thumbscrew’s threaded
post through the slot on the L
bracket. 6
4. Attach the second thumbscrew
to the first thumbscrew to
secure the filter. Tighten until
secure. 6
5. Screw the extender onto the
post of the top thumbscrew. 7
6. Attach your shock mount to
the extender, and secure it by
tightening the star nut. Mount
your microphone into the shock
mount. 8
8

6RF-PBO-16Owner’s Manual
11
12
9
10
Adjusting the Microphone
Position
To center the microphone capsule
vertically:
1. Support the reflection filter
from below with one hand, and
loosen the two locking
screws. 9
2. Adjust the height of the shield
relative to the microphone, and
retighten the locking screws. 10
To adjust the distance of the
microphone from the filter:
1. Loosen the bottom
thumbscrew 11 , and slide the
extender and microphone
along the L-bracket slot. 12
2. Once you have placed the
microphone in the correct
position, tighten the top
thumbscrew until secure.

7RF-PBO-16 Owner’s Manual
Material:
Outer: ABS plastic shield
Inner: High-density open-cell acoustic foam layer , double wool layer
Shield dimensions (H × W × D):
11.8 × 16.5 × 7.75 in. (30 × 42 × 19.7 cm)
Extender height: 3.5 in. (9 cm)
Weight: 3.5 lb. (1.6 kg)
Specifications

This Auray product is warranted to the original purchaser to be
free from defects in materials and workmanship under normal
consumer use for a period of one (1) year from the original
purchase date or thirty (30) days after replacement, whichever
occurs later. The warranty provider’s responsibility with respect
to this limited warranty shall be limited solely to repair or
replacement, at the provider’s discretion, of any product that fails
during normal use of this product in its intended manner and in its
intended environment. Inoperability of the product or part(s) shall
be determined by the warranty provider. If the product has been
discontinued, the warranty provider reserves the right to replace
it with a model of equivalent quality and function.
This warranty does not cover damage or defect caused by misuse,
neglect, accident, alteration, abuse, improper installation or
maintenance. EXCEPT AS PROVIDED HEREIN, THE WARRANTY
PROVIDER MAKES NEITHER ANY EXPRESS WARRANTIES NOR
ANY IMPLIED WARRANTIES, INCLUDING BUT NOT LIMITED TO
ANY IMPLIED WARRANTY OF MERCHANTABILITY OR FITNESS
FOR A PARTICULAR PURPOSE. This warranty provides you with
specific legal rights, and you may also have additional rights that
vary from state to state.
To obtain warranty coverage, contact the Auray Customer Service
Department to obtain a return merchandise authorization (“RMA”)
number, and return the defective product to Auray along with the
RMA number and proof of purchase. Shipment of the defective
product is at the purchaser’s own risk and expense.
For more information or to arrange service, visit www.aurayaudio.com
or call Customer Service at 212-594-2353.
Product warranty provided by the Gradus Group.
www.gradusgroup.com
AURAY is a registered trademark of the Gradus Group.
© 2016 Gradus Group LLC. All Rights Reserved.
One-Year Limited Warranty
GG1
Table of contents
Other auray Microphone manuals


