Aurora Lite Bank Orion 200 User manual

Orion 200 / Orion 400
Contents
Modern compact and robust
Modern design constructed from durable red reinforced
polycarbonate to protect internal components and still remain
extremely light weight and portable.
Safety features
External shock protection with over-heat/over-charge functions.
Auto power dump
Automatically dumps high power when setting unit to lower power.
Dual power output display feature
Power output is displayed in f-stops and W/s.
Modular circuit board design
Plug in modular design with no soldering or internal wiring.
Accurate and easy power control
Accurate exposure over 5 f-stops.
1/10th f-stop power increments.
Full power to 1/32 by one long button push.
1/32 to full power by one long button push.
Modeling lamp
Full / Off / Proportional
Fast acting fuse for modeling lamp
Visual flash confirmation
Flash ready indicator beep when charged
Fan cooled for extra reliability and stability
5 Volt sync circuit
One touch lock button
Rapid recycle time
Short flash duration
Compatible with all Aurora accessories
Excellence In Lighting
1. Before use
2. Parts
3. Control panel functions
4. Operation
5. Specification
6. Trouble shooting
7. Warranty card
741-1 Sangyeok-dong, Buk-gu, Korea Tel : (82-53) 384-9874 Fax : (82-53) 384-9886
1. Before use
This flash unit is precision piece of equipment.
Please read the instructions thoroughly before use
Power
Protective cap should be removed before operation.
Insert power cord to socket on flash firmly, improper connection may cause fire.
Do not use damaged power cord or power socket. It may cause electric shock and fire.
Do not use the flash unit with other electrical appliances in the same socket, overheating may occur and cause fire and/
or electric shock.
Do not bend or pull or press power cord. It may cause electric shock and fire.
Use grounded power sockets only.
Settings
Mount the flash unit securely on a lighting stand or other secure mounting
Turn off power and pull out all plugs when carrying.
Do not use the flash unit in damp or wet conditions or where there is flammable material nearby.
Do not cover the flash with curtains or clothes.
Use only in a well ventilated space.
Storage
Keep the flash out of the reach of children.
Keep the ventilation holes of the unit clean at all time.
Keep the flash away from flammable or explosive materials.
Turn off the flash and unplug the power cord if it smokes or smells of burning or sounds unusual
Contact your local dealer or service center for repair.
If the unit is dropped and broken contact your local dealer or service center.
Keep pins in the power plug and their contact parts clean at all time.
Clean with a soft dry cloth only.
Do not use with incorrect accessories. It is recommended you use or genuine Aurora accessories.
Modeling Lamp
To avoid burns do not touch modeling lamp when it is on.
To avoid eye damage do not look at modeling lamp when it is illuminated.
Do not expose modeling lamp to rain or moisture.
Turn the flash off and unplug the power cord when replacing modeling lamp. Do not touch modeling lamp with
bare hands, use cotton gloves or a soft cloth
m
ly, improper connection may cau
se
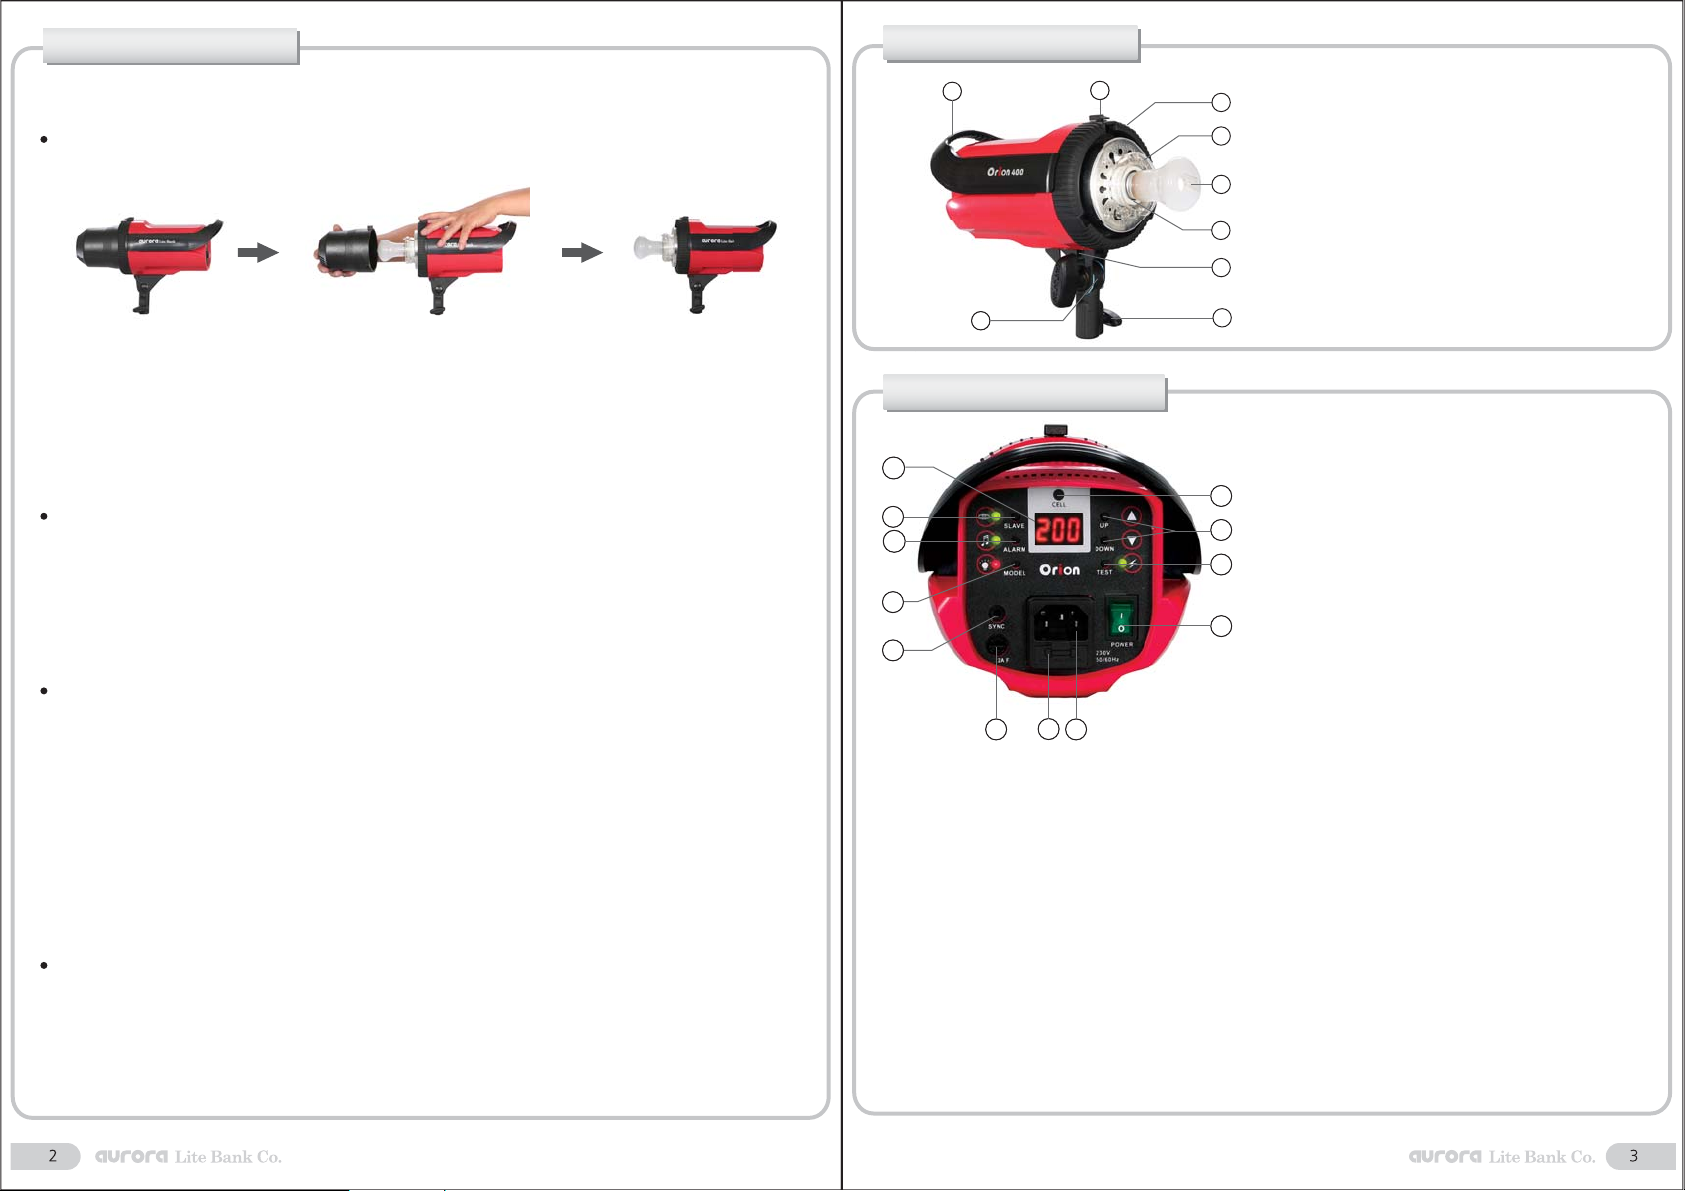
2. Parts
3. Control panel functions
9
12
① Handle
② Locking lever
③ Mounting plate
④ Flashtube
⑤ Modeling
⑥ Modeling lamp socket
⑦ Umbrella fixing
⑧ Tightening screw
⑨ Tilt mounting bracket
1
2
3
4
7
10
12
11
8
9
5
6
①Photo cell:
Light sensor
②
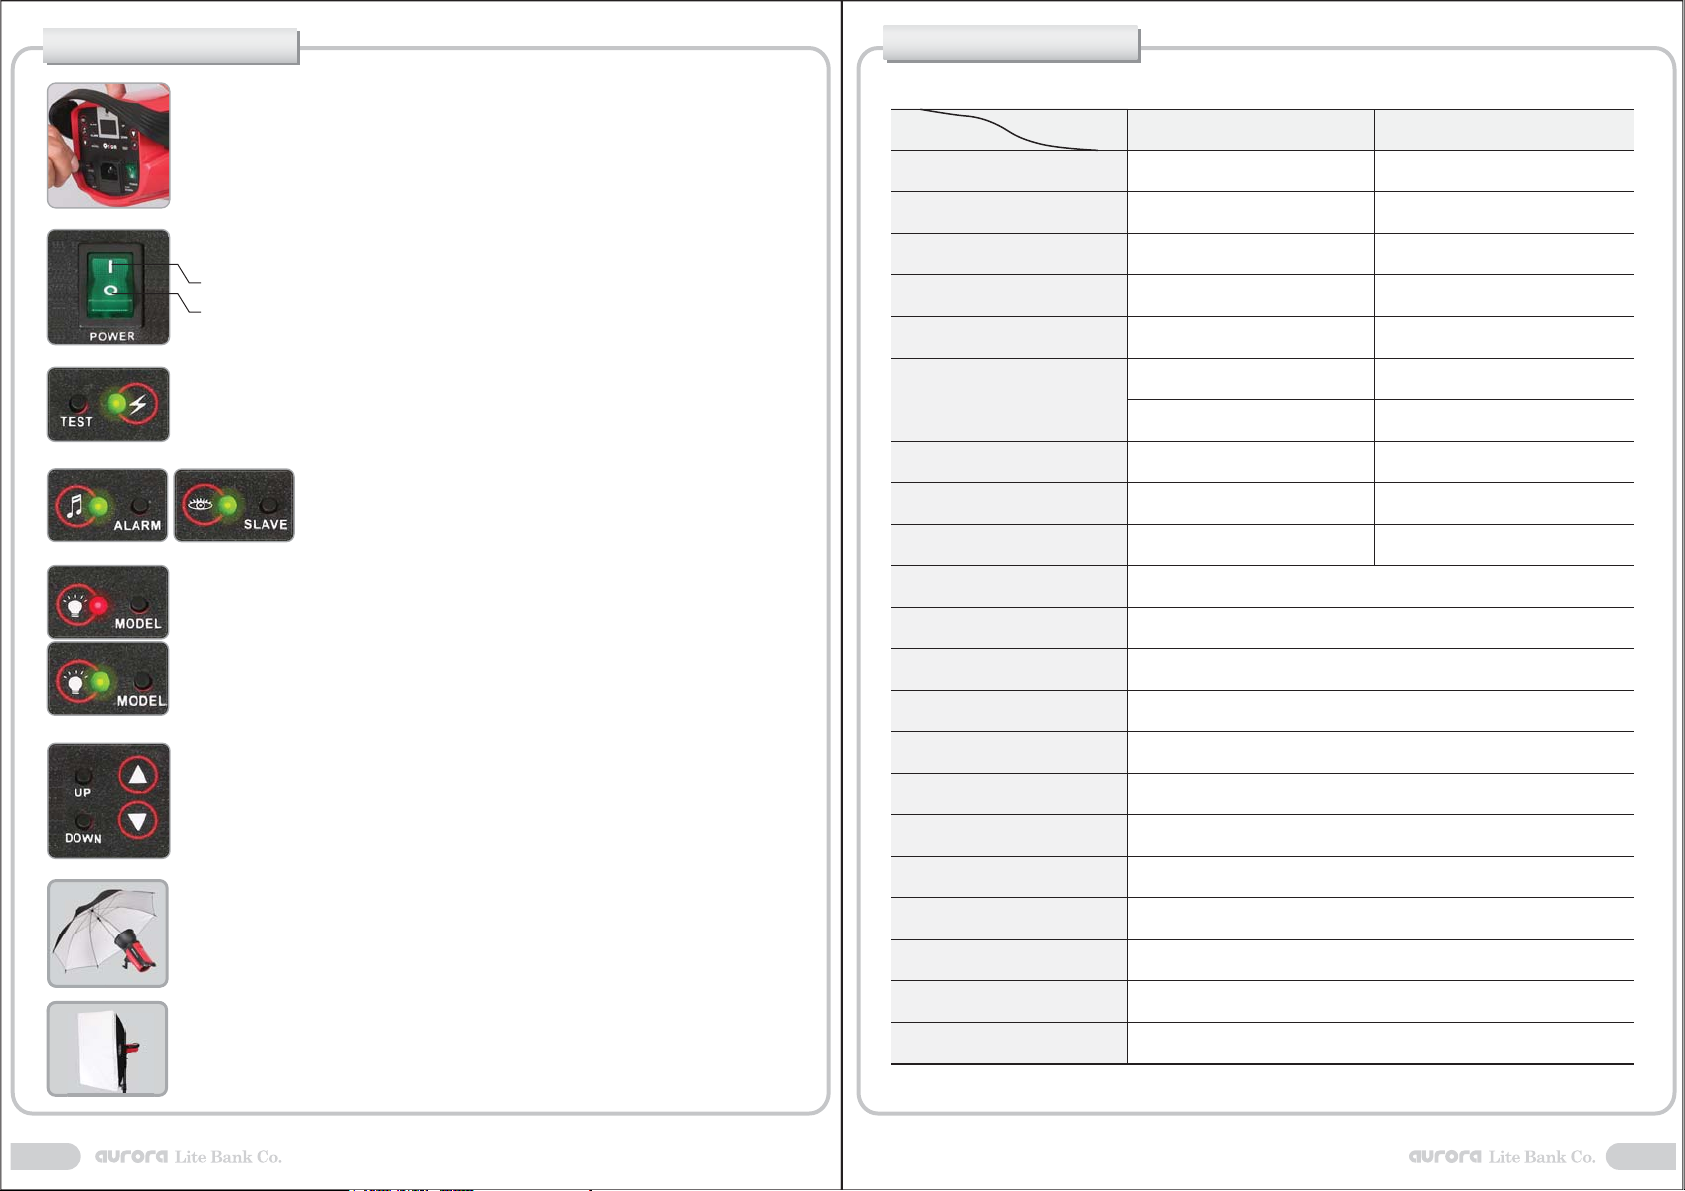
Up/Down
Flash output increases and decreases by
1/10 f-stop – full power to 1/32 or 1/32 to full power.
③Test:
Flash trigger
Green LED indicates ready to trigger and no LED
indicates still charging.
④Power on/off switch
⑤
Power inlet
⑥Main fuse
⑦Modeling lamp fuse
⑧Sync socket
⑨Model:
3 modes for modeling lamp control
- Press Model button once (red LED/Full mode): modeling lamp sets to maximum output.
- Press Model button twice (green LED/Proportional mode): modeling lamp is proportional to flash output
- Press Model button three times (no LED/Off mode): modeling lamp is controlled by slider on back panel.
⑩
Alarm:
Audible alarm indicates charge status.
Alarm on: Alarm beeps while charging and stops when fully charged
Alarm off: Modeling lamp flickers when fully charged.
⑪
Slave
Slave on: Flash unit syncs. by light sensor as well as sync. cord.
Slave off: Flash unit syncs. by cord only.
⑫Power Display:
Output display in Ws or f-stop To change power display from f-stop to Ws or vice versa, press up
and down buttons at the same time for more than 10 seconds. If the unit overheats, power display winder will flicker
and the alarm will beep. The modeling lamp will go off and unit will stop functioning except for the cooling fan. When
cooled, the unit will restart automatically.
6
8
3
4
5
7
5. Specification
ORION 200 ORION 400
Max Power 200 Ws 400 Ws
Power Increment 1/10 f-stop 1/10 f-stop
L x W x H 24 x 13.5 x 17 cm 24 x 13.5 x 17 cm
Weight 1.4 kg 1.65 kg
Power Display Ws or f-stop Ws or f-stop
Power Range
FULL~1/32 FULL~1/32
5 f-stops (3Ws to 200Ws) 5 f-stops (12Ws to 400Ws)
Duration(T=0.5)
Recycle Time 0.2 ~ 1.4 sec
1/2950 sec
0.2 ~ 1.6 sec
Colour Temperature 5500+/-250k 5500+/-250k
Modeling Lamp 100W, 150W
Operating Voltage AC 230V 50Hz/60Hz or 120V 50Hz/60Hz
Auto Dump Yes
Ready Sound Yes (On/O)
Standard Reector Included Yes
Fan Cooled Yes
Slave Cell Yes ( On / O )
Modeling Control Full / Proportional / O
Flash Test Button Yes
Sync Voltage 5V DC
Power Cord Included 5m long
Sync Cord Included 3.5mm ( Mono - Pc ) / 5m long
1/2000 sec
MODEL
SUBJECT
5
4. Operation
8)To use an umbrella, mount a standard reflector and insert the umbrella shaft
through reflector hole and into the two holes in the tilt mount. After use, cool
down the flash unit and umbrella. Do not pull out the umbrella before cooling.
9)To use a softbox, assemble the softbox prior to placing it onto the flash.
Fit the claws of the adaptor into the holes in the flash front panel and then rotate the softbox
clockwise until it clicks into place. To detach the softbox, make sure the unit is cool enough to touch;
press the locking button with one hand and rotate the softbox anti clockwise with the other hand to remove it
1)Make sure modeling lamp switch and power switch are off.
2)Connect sync cord and power cord to appropriate sockets.
3)Turn on the power switch.
ON
OFF
4)Press test button to ensure the unit is functioning correctly
5)All switches are one-touch. ALARM, SLAVE and MODEL are off by default.
(Turn them on as per your requirements).
6)“MODEL” button offers 3 different modes:
- Press Model button once (red LED / Full mode): modeling lamp sets to maximum output.
- Press Model button twice (green LED / Proportional mode): modeling lamp is proportional to flash output
- Press Model button three times (no LED / Off mode): modeling lamp is controlled
by slider on back panel.
7)To Increase or decrease flash power, press up and down buttons.
When power output is decreased, the flash will trigger automatically and dump excess power.
4
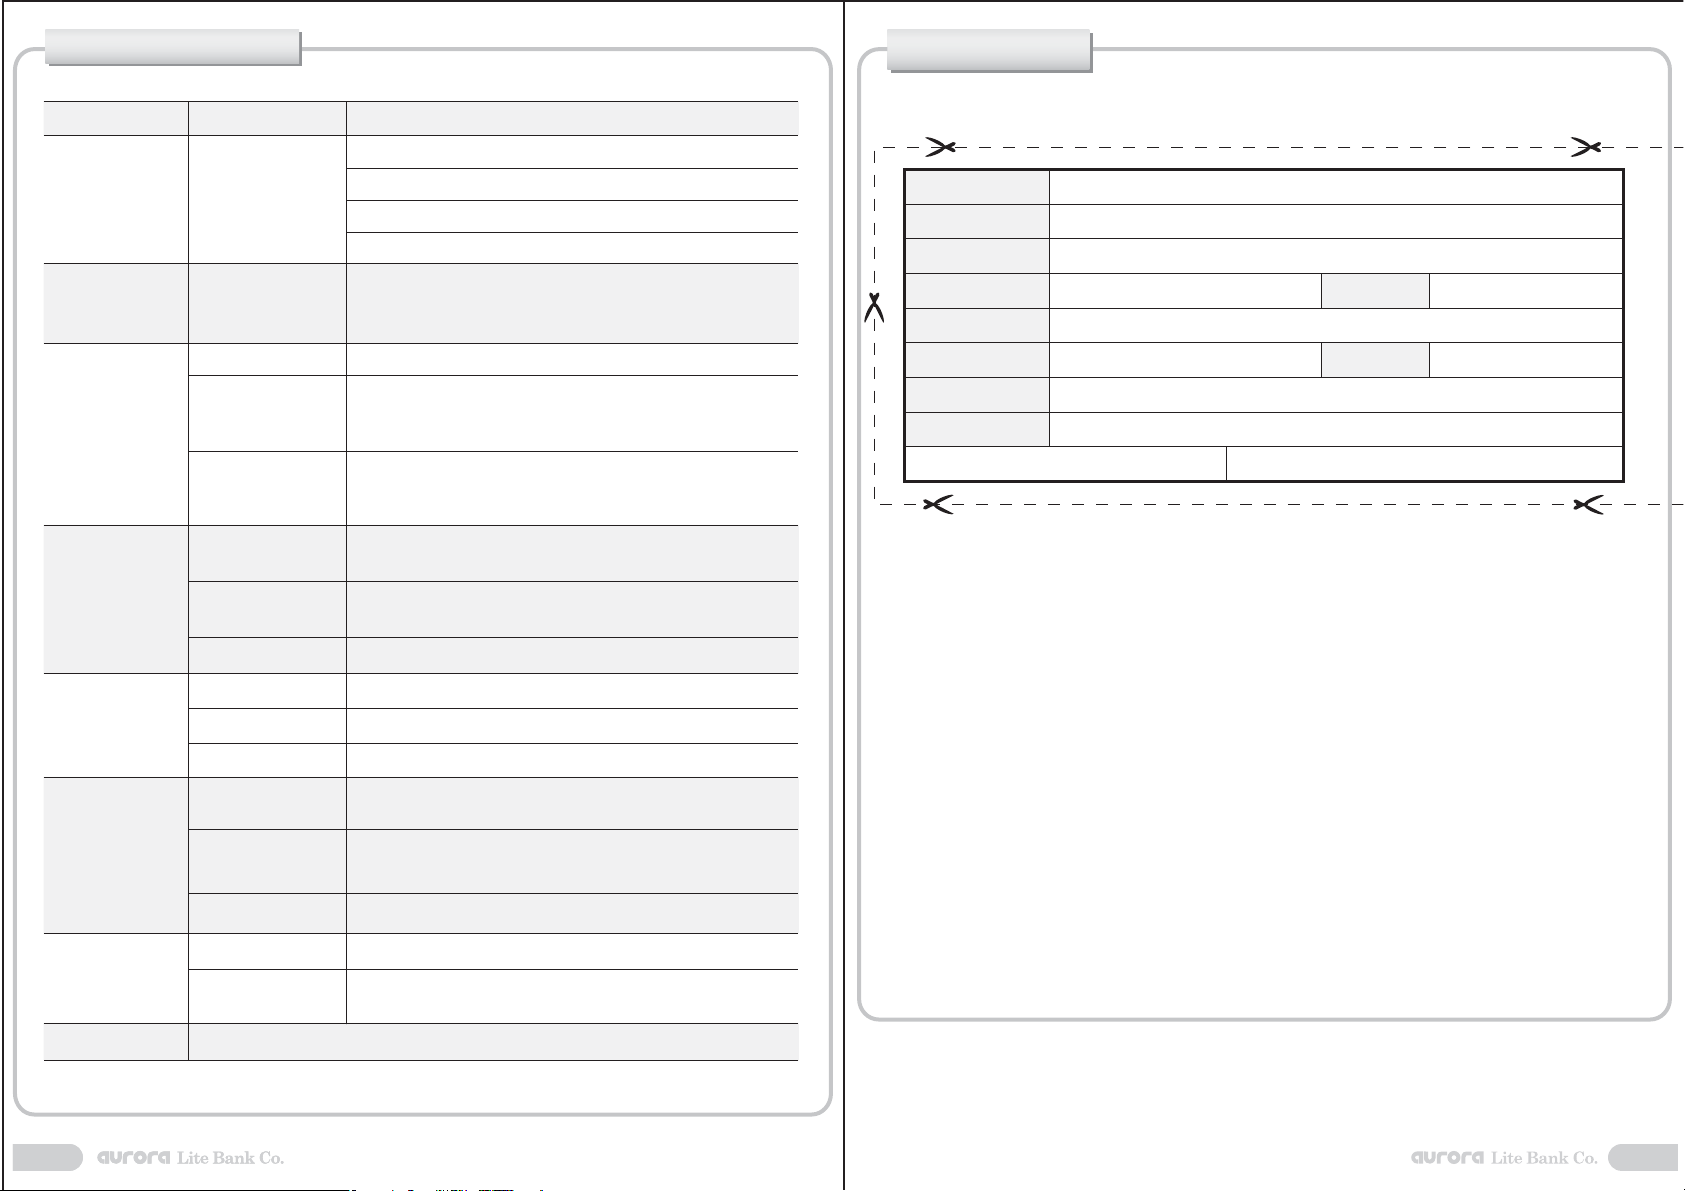
For warranty, please fill out this form and mail to Aurora Lite Bank Co.,
741-1 Sangyeok-dong, Buk-gu, Dae-gu, 702-101, Korea or fax to +82-53-384-9886.
Aurora Lite Bank warrants this product to be free of defects in materials and workmanship
for a period of 12 months from the date of purchase.
We or our authorized service centre will repair or replace this product without charge with
respect to the parts and labor, providing our examination indicates that functional defect
exists under normal usage.
This warranty, however, does not include damage caused by the following reasons and
repair or replace for defects due to the followings will be charged.
- Abuse and improper handling
- Improper maintenance
- Unauthorized repairs or modifications
- Natural disaster such as flood, moisture or animal damage
- Defective connection tools
- When wasting parts; modeling lamp, soft box, flash tube, synchro cord,
connecting cable, photo condenser need to be replaced
This warranty is valid only for the original owner and applies to customers who properly fill
out and return this warranty card.
Where did you purchase this product?
Name
Street Address
City
State/Province Zip Code
Country
Phone Number Fax Number
E-mail Address
Purchase Date
※ This product can be modified For better quality and function without prior notice.
Warranty Card
7
6. Trouble shooting
Does not operate No power to unit
Check if power cord is connected to AC inlet and outlet properly.
Flash res on its’ own.
Sync via photo cell
from another ash.
Turn o the slave and check if it still res
Modeling lamp does
not light.
Switched o Check if modeling lamp switch is o.
Will not re when
power is on.
Defective sync socket
or sync cord
Try to trigger with test button. Check sync socket and cord.
Continuous beeping
Problem with charging
Check input voltage is not lower than required
Others Consult with authorized service center, dealers or the manufacturer
Overheating Check if cooling fan operates normally.
If it does, cool the ash before trying to re-use.
Defective RF trigger
or no batteries in RF
receiver or transmitter
Try to trigger with test button. Check RF transmitter and receiver
operation.
Defective ashtube Try to trigger with test button. Replace ash tube with new one.
Lamp blown Replace with a new modeling lamp.
Fuse blown. Replace blown fuse with a new fuse of the same rating.
Defective sync cable
or RF receiver
Disconnect sync cable and check if it still res.
Defective test buttonr
Check if test button works properly.
Colour cast in images
Cover up surrounding wall and oor with black fabric or paper.
No sync through
photo cell
Slave is o Turn slave on.
Ambient light is too
bright and ‘blinding’
slave cell
Isolate the ash from other light sources such as the sun.
Cover up the part of photo cell which is being exposed to too
bright ambient light.
Light from another
ash does not reach
to the photo cell
Move the ash unit so that light from the other unit reaches the
slave cell.
Check if power switch is on
Check if main fuse is blown.
Check if there is power to the A/C socket and that the switch is on.
Symptom Possible Cause Solution
Flash unit is reecting
o coloured walls of
wallpaper
6
This manual suits for next models
1
Other Aurora Lite Bank Camera Flash manuals

Popular Camera Flash manuals by other brands


Sony
Sony HVL-FH1100 operating instructions

Altura Photo
Altura Photo AP-FLS-UNV1 user manual

Pentax
Pentax 201SA - AF - Hot-shoe clip-on Flash operating manual

Metz
Metz MECABLITZ 45 CL-1 NiMH Operating instruction

Strobies
Strobies Tli-N instruction manual

Metz
Metz MECABLITZ 36 AF-3 C operating instructions