AUTO-XS CPL-2054U User manual

ID: #05007
m
y
h
a
n
s
e
c
o
n
t
r
o
l
.
c
o
m
M
A
N
U
A
L
D
E
V
E
L
O
P
E
D
I
N
G
E
R
M
A
N
Y
User-friendly
Manual
User Guide
Manual
del usuario
CAR BATTERY CHARGER
CARGADOR DE BATERÍA DE
COCHE/MOTOCICLETA
English .....Page 06
Español ....Página 26
KorrekturV_3

Contents
Overview .............................................................................3
Use........................................................................................5
Product contents/device parts...........................................6
General information............................................................7
Reading and storing the instruction manual ......................7
Explanation of symbols ...........................................................7
Safety...................................................................................8
Proper use................................................................................. 8
Safety notes.............................................................................. 9
First use.............................................................................. 13
Checking the charger and product contents..................... 13
Operation........................................................................... 13
Functionality of the charger ................................................. 13
Display indicators....................................................................14
Charging programs................................................................15
Special functions.....................................................................15
Connecting the charger.........................................................16
Starting the charging process..............................................18
Charging process....................................................................19
Disconnecting the charger................................................... 20
Cleaning and maintenance................................................21
Storage .............................................................................. 22
Troubleshooting................................................................ 22
Technical data ................................................................... 23
Disposal..............................................................................24
Warranty card....................................................................45
Warranty conditions..........................................................46
KorrekturV_3

A
3
USA
1
2
3
5 4
KorrekturV_3
4
USA
B
6 7 8 9 10
12
13
1415
11
KorrekturV_3

G
5
USA
F
D
C
E
H
[KA
KorrekturV_3

6
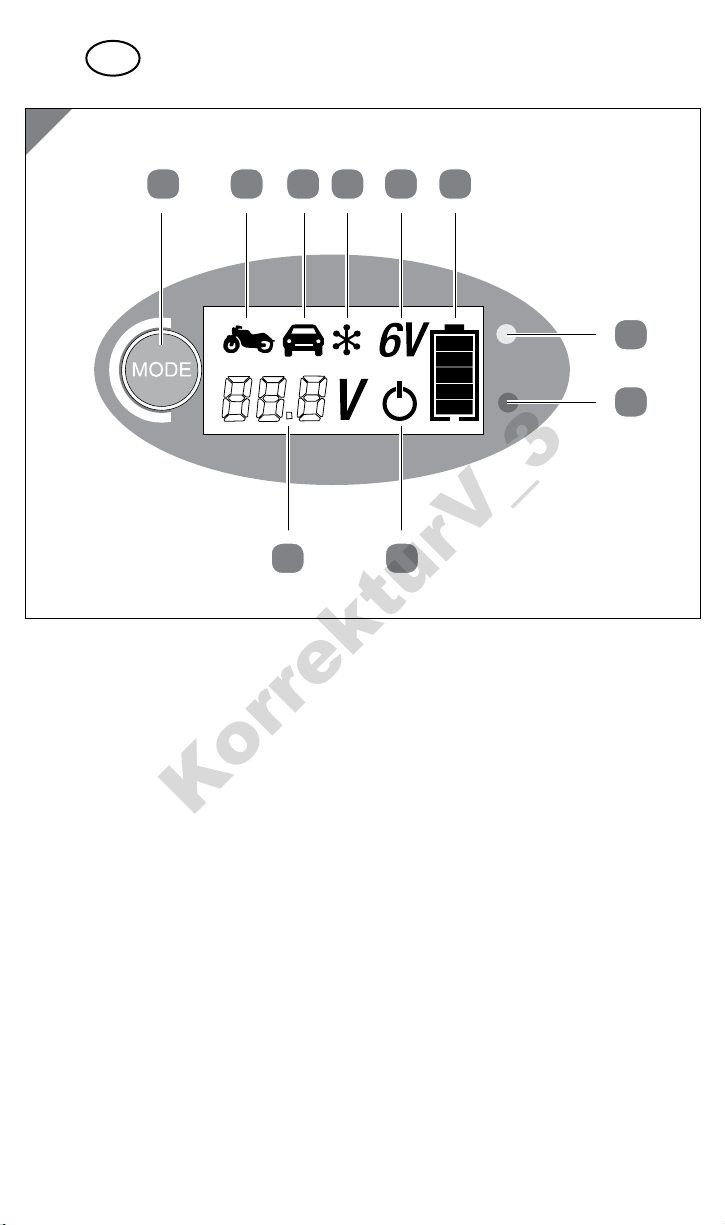
Product contents⁄device parts
1Control panel with display
2Mains cord
3Battery connector cord
4Red battery terminal clamp, positive pole (+)
5Black battery terminal clamp, negative pole (-)
6Mode button
7Motorcycle charging program indicator
8Car charging program indicator
9Cold charging program indicator
10 6V charging program indicator
11 Battery charge level indicator
12 Mains indicator
13 Error indicator
14 Standby mode indicator
15 Voltage indicator
USA
KorrekturV_3

AFTER SALES SUPPORT
USA
General information
7
USA
1 888 367 7373 customer-service@wk-usa.com
General information
Reading and storing the instruction manual
This instruction manual accompanies the car battery charger
shown on the title page. It contains important information on set-
up and handling.
For improved readability, the car battery charger will be referred
to only as the “charger” below.
Before using the charger, read the instruction manual carefully. This particu-
larly applies for the safety notes. Also observe the instruction manual of the
vehicle manufacturer. Failure to observe the instruction manuals may result in
serious injury or damage to the charger, the battery or the vehicle.
When abroad, you must also observe country-specific guidelines and laws.
Store the instruction manual for further use. Make sure to include this instruc-
tion manual when passing the charger on to third parties.
Explanation of symbols
The following symbols and signal words are used in this instruction manual, on
the charger or on the packaging.
WARNING! This signal symbol/word designates a hazard
with moderate risk, which may result in death
or severe injury if not avoided.
CAUTION! This signal symbol/word designates a hazard
with low risk that, if not avoided, may result in
minor or moderate injury.
NOTICE! This signal symbol/word warns of possible
damage to property.
This symbol provides you with useful supplementary information
on handling and operation.
LCD
DISPLAY
The charger features an energy-saving, low-radiation liquid
crystal display.
KorrekturV_3
Safety
USA
AFTER SALES SUPPORT
8
USA
1 888 367 7373
customer-service@wk-usa.com
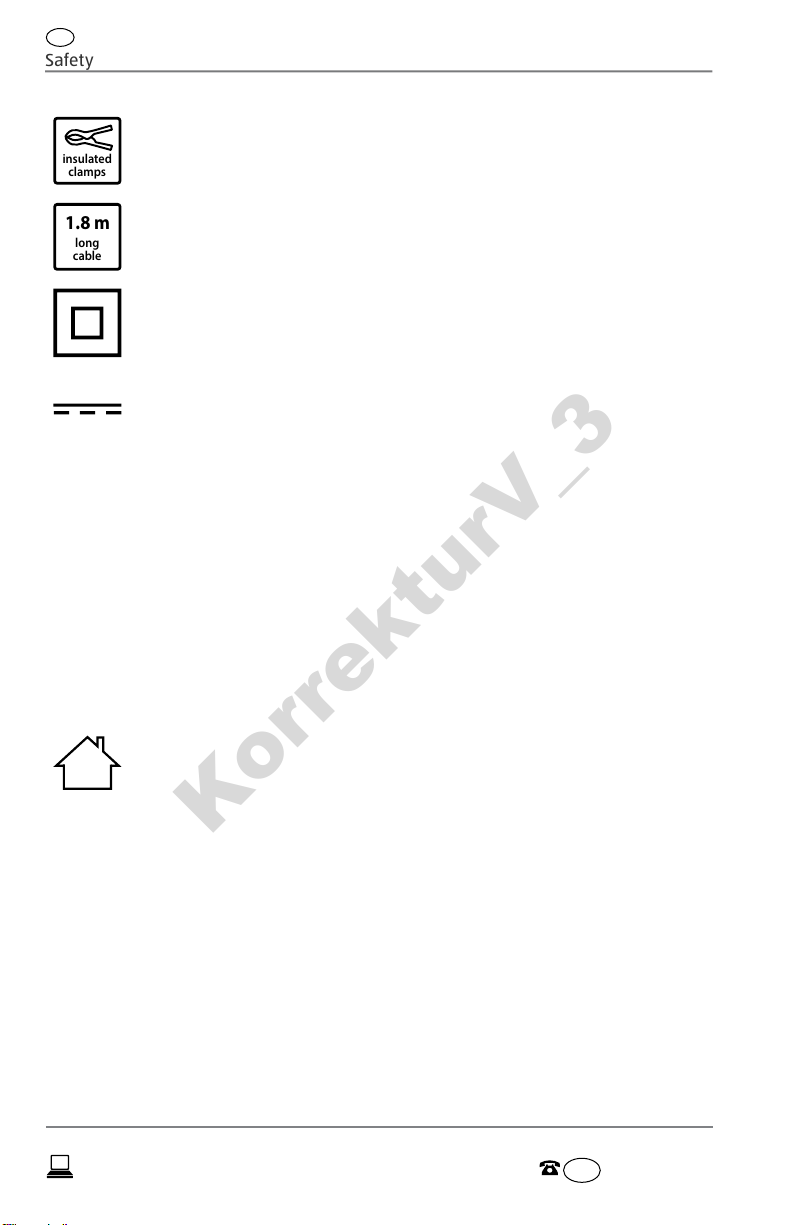
insulated
clamps
The battery terminal clamps (+/-) have a protective cover made of
plastic.
long
cable
1.8 m
The length of the power cable is 5.9 feet (1.8m).
The charger complies with protection class 2.
The charging current is direct current.
+Plus, positive polarity
-Minus, negative polarity
IP65 The IP code provides information on the protection class for pro-
tection against contact/foreign bodies and protection against
water/moisture.
The charger is dustproof and protected against water jets.
Products marked with this symbol may only be operated in in-
door areas.
Safety
Proper use
The charger is exclusively designed for charging lead batteries containing an
electrolyte solution or electrolyte gel with a nominal voltage of 6V or 12V. The
battery you intend to charge must correspond with the specification of suitable
batteries (see section “Technical data”). This charger may not be used to charge
other batteries as its strong charging currents may result in severe injury or
even in death.
KorrekturV_3

AFTER SALES SUPPORT
USA
Safety
9
USA
1 888 367 7373 customer-service@wk-usa.com
The charger is only intended for private use and is not suitable for commercial
purposes. It is not suitable for jump starting vehicles. Start by fully charging the
car battery and remove the charger before you start the vehicle.
Only use the charger as described in this instruction manual. Using it in any
other way is deemed improper and may result in damage to property or even
personal injury. The charger is not a children’s toy.
The manufacturer or vendor cannot be held liable for damages incurred
through improper or incorrect use.
Safety notes
WARNING!
Risk of electric shock!
A faulty electrical installation or excessive line voltage may re-
sult in an electric shock.
− Only connect the charger to a properly installed socket.
The line voltage of the socket must correspond to the data
on the nameplate specification of the charger.
− Only connect the charger to an easily accessible socket so
that you can quickly disconnect it from the grid in case of a
failure.
− Do not connect the charger if it exhibits visible damages,
the power cable or power plug is defective or if you sus-
pect a defect.
− Only have damaged chargers or power cable replaced by
the manufacturer or its customer service team or a similar
qualified person to avoid risks.
− Always switch the charger off and pull the power plug out
of the socket when you are not using the charger, cleaning
it or in the event of a fault.
− Do not under any circumstances extend the mains or bat-
tery connector cord.
− The charger may not be operated with an external timer
or separate telecontrol system.
− Never touch the power plug with damp hands.
KorrekturV_3
Safety
USA
AFTER SALES SUPPORT
10
USA
1 888 367 7373
customer-service@wk-usa.com
− Do not pull the power plug out of the socket by the power
cable; instead, always pull it out by the plug.
− Never use the power cable as a carrying strap.
− Lay the power cable so that it does not impair you, does
not pose a tripping hazard and no one accidentally pulls
on it. Do not kink the power cable and do not lay it over
sharp edges.
− Do not use the charger near fire, heat and prolonged ex-
posure to temperatures over 104°F (40°C).
− Only use the charger in indoor areas at an ambient tem-
perature between 23°F and 104°F (-5°C and +40°C).
Do not use it in wet rooms or in the rain.
− Never reach to retrieve the charger if it has fallen in water.
In such a case, immediately disconnect the power plug.
− Always take hold of the battery terminal clamps (+/-) on
the insulated area.
WARNING!
Danger for children and persons with impaired physical,
sensory or mental capacities (e.g. partially disabled per-
sons, older persons with reduced physical and mental ca-
pacities) or lack of experience and knowledge (e.g. older
children).
− This charger may be used by children ages eight and
over as well as persons with impaired physical, sensory or
mental capacities or those lacking experience and knowl-
edge if they are supervised or have been instructed in
how to safely use the charger and have understood the
risks associated with operating it.
− Cleaning and user maintenance must not be performed
by unsupervised children.
− Children may not play with the charger.
− Keep children under eight years of age away from the
charger and connection lines. Do not leave the charger
unattended while in operation.
KorrekturV_3
AFTER SALES SUPPORT
USA
Safety
11
USA
1 888 367 7373 customer-service@wk-usa.com
− Keep the charger out of the reach of children.
− Make sure that children do not play with the packaging
wrapper. They may get caught in it when playing and
suffocate.
WARNING!
Danger of explosion!
Hydrogen gas may be emitted while charging and trick-
le charging batteries. If this gas comes in contact with open
flames or sparks, this will trigger a highly explosive detonating
gas reaction.
Improper handling of the charger may produce sparks and
trigger an explosion.
− Avoid flames and sparks. Do not light a fire and do not
smoke in the direct vicinity of the charger.
− Charge the battery in an adequately ventilated room that
is not exposed to the elements or set up the battery on a
well ventilated area.
− Make sure that explosive or flammable substances, e.g. pet-
rol or solvents, cannot catch fire while using the charger.
− Observe the instructions in this instruction manual when
connecting and disconnecting the charger to prevent the
formation of sparks.
WARNING!
Risk of injury!
Handling batteries improperly may result in injury.
− Do not use any frozen, rechargeable batteries.
− Never disassemble, open or dismantle rechargeable cells
or batteries.
− Never expose cells and batteries to heat or fire.
− Never short-circuit cells or batteries.
KorrekturV_3

Safety
USA
AFTER SALES SUPPORT
12
USA
1 888 367 7373
customer-service@wk-usa.com
− Be absolutely sure to observe the positive symbol (+) and
negative symbol (-) on the battery and charger. Make sure
that the charger is correctly connected.
CAUTION!
Risk of chemical burns!
The battery contains highly corrosive battery acid. Contact with
battery acid from damaged, leaky batteries may result in burns
to your skin and eyes.
− Use acid-proof protective gloves, clothing and eye wear.
− Do not tilt the batteries as there is a risk of battery fluid
leaking through the vents.
− If the battery fluid comes into contact with your skin, rinse
the affected area for several minutes with plenty of water.
Take off moist clothing and wash it.
− In the event of contact with your eyes, rinse your eyes un-
der running water for several minutes.
− In the event of direct contact, seek immediate medical
advice.
− Use a dry, absorbent cloth to remove leaky battery fluid
and avoid contact with your skin by wearing e.g. acid-
proof protective gloves.
NOTICE!
Risk of damage!
Improper handling of the charger and battery may result in
damage to the charger and the battery.
− Only connect the charger to suitable batteries. Do not use
the charger for charging or trickle charging non-recharge-
able batteries.
− Do not expose the charger and battery to intense sunlight
for a prolonged period of time.
KorrekturV_3
AFTER SALES SUPPORT
USA
First use
13
USA
1 888 367 7373 customer-service@wk-usa.com
First use
Checking the charger and product contents
NOTICE!
Risk of damage!
If you are not cautious when opening the packaging with a
sharp knife or other pointy object, you may quickly damage
the charger.
− For this reason, be very careful when opening it.
− Remove all protective films.
1. Take the charger out of the packaging and check whether the charger
or the individual parts exhibit damages. If this is the case, do not use the
charger. Contact the manufacturer at the service address specified on the
warranty card.
2. Check to make sure that the delivery is complete (see fig. A).
Operation
Functionality of the charger
The charger automatically recognizes the connected battery type, 6V or 12V
battery.
If the battery terminal clamps 4and/or 5are incorrectly connected (re-
verse polarity), the error display 13 will illuminate in red. If the charger over-
heats or short circuits during operation, the error display will illuminate in red.
The charger switches to the standby mode 14 (see fig.C).
The charging process only starts when a charging program was selected with
the mode button 6.
If a 6V battery is connected, only the 6V charging program 10 can be acti-
vated with the mode button. Other settings are not possible with this charging
program.
If the charger recognizes a connected 12V battery, the mode button can be
used to select between the motorcycle 7, car 8and cold 9charging
programs.
The selected charging program, the current battery voltage 15 and the charge
level are shown during the charging process. As long as the charging process is ac-
tive, the frame around the battery symbol will blink on the display 1(see fig. E).
KorrekturV_3
Operation
USA
AFTER SALES SUPPORT
14
USA
1 888 367 7373
customer-service@wk-usa.com
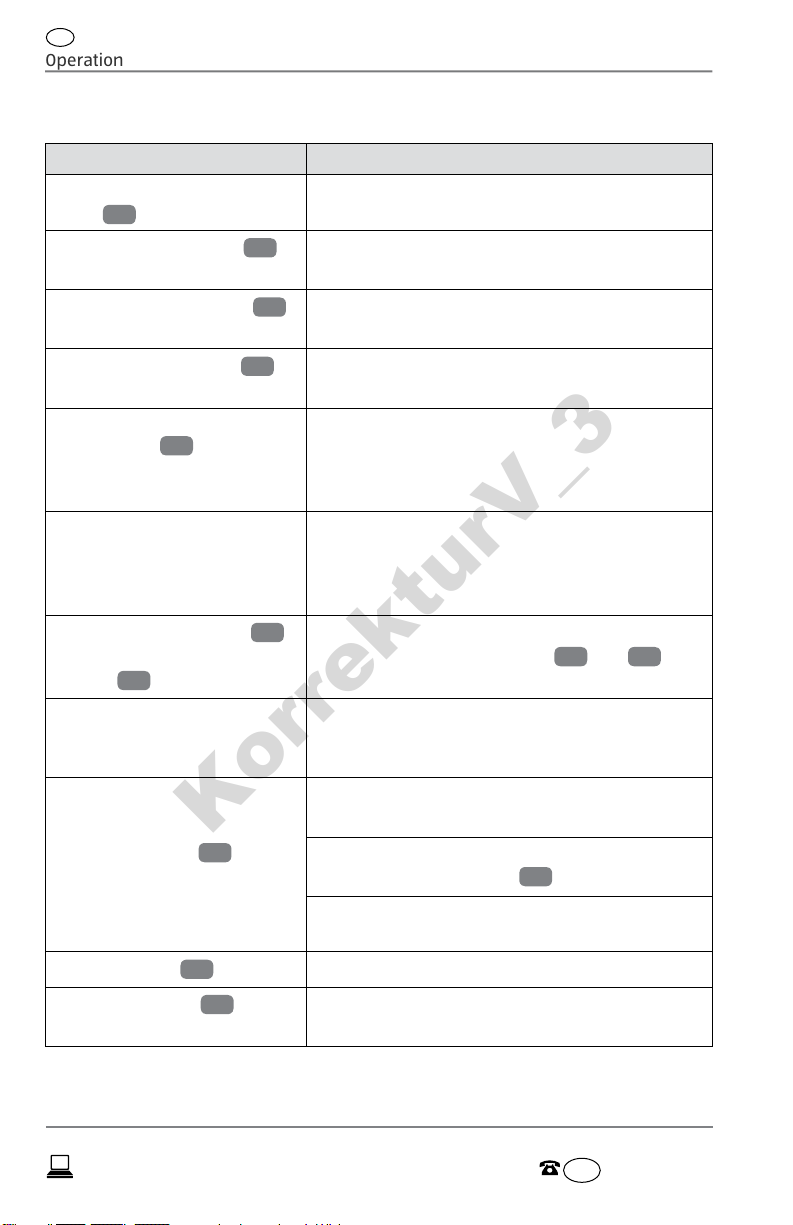
Display indicators
Symbol Level
Motorcycle charging pro-
gram 7is shown.
The motorcycle charging program for 12V bat-
teries with 1.2Ah – 14Ah is selected.
Car charging program 8is
shown.
The car charging program for 12V batteries
with 14Ah – 120Ah is selected.
Cold charging program 9
is shown.
The charging program for 12V batteries with
14Ah – 120Ah is selected.
6 V charging program 10 is
shown.
The 6 V charging program for 6 V batteries
with 1.2Ah – 14Ah is selected.
The bars for the battery
charge level 11 are par-
tially full and the frame is
blinking.
The battery is charging.
The bars for the battery
charge level are full fill
and the frame is displayed
continuously.
The battery is fully charged.
Power supply indicator 12
flashes in green, the
display 1is blinking.
The charger is connected to the grid.
The battery terminal clamps 4and 5are
not connected or are not correctly connected.
Power supply indicator is
permanently illuminated in
green.
The charger is connected to the grid.
The battery terminal clamps are connected.
The error display 13 lights
up in red.
The battery terminal clamps are incorrectly
connected (reverse polarity).
A short circuit occurred. The charger will
switch to standby mode 14 .
The charger is overheated. It switches to
standby mode.
Standby mode 14 is shown. The charger is in standby mode.
Voltage indicator 15 dis-
plays a value.
The voltage indicator displays the current
voltage for the connected battery.
KorrekturV_3

AFTER SALES SUPPORT
USA
Operation
15
USA
1 888 367 7373 customer-service@wk-usa.com
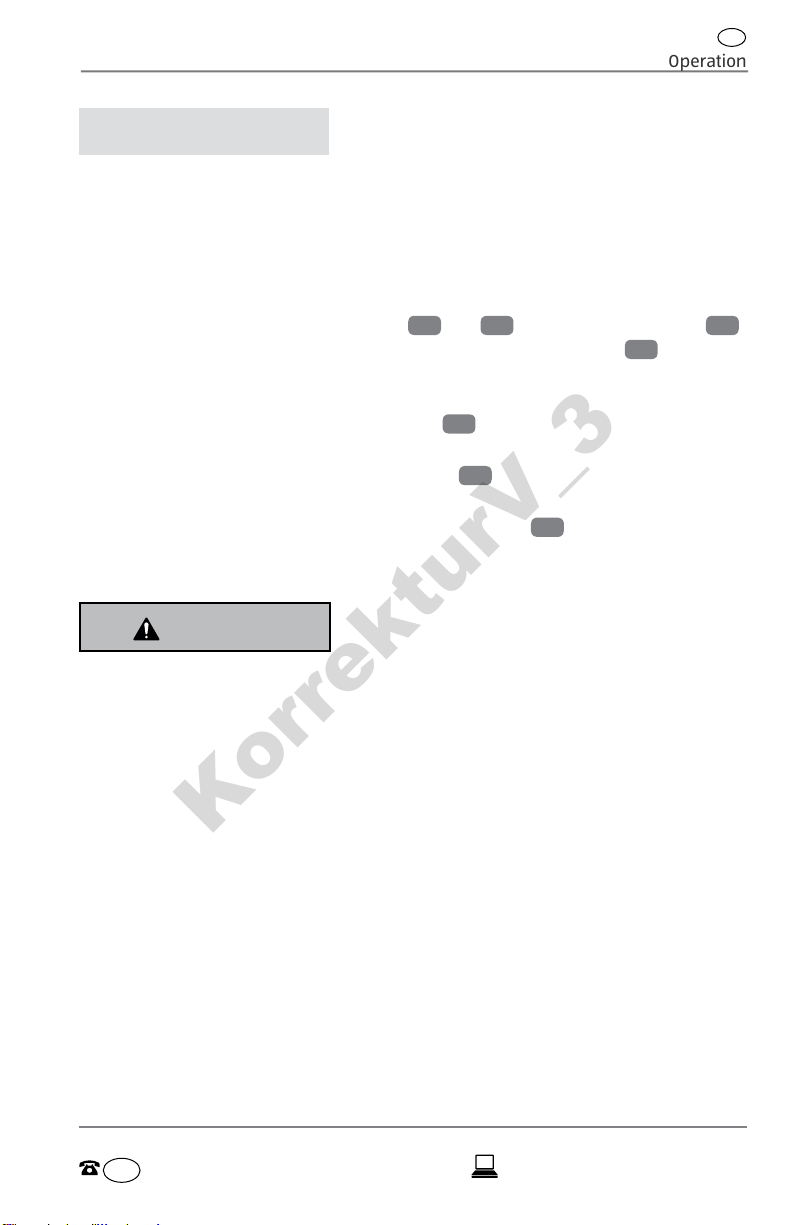
Symbol Level
The voltage indicator dis-
plays Err. The battery is not suitable or defective.
The voltage indicator blinks. The battery is reactivated with an impulse
charge.
Charging programs
The charger has four charging programs:
• Motorcycle charging program 7:
Suitable for 12V batteries with a rated capacity of 1.2Ah to 14Ah. The battery
is charged with a limited charging current of 0.8A.
• Car charging program 8:
Designed for normal 12V car batteries with a rated capacity of 14Ah to
120Ah. The battery is charged with an elevated charging current of 3.8A.
• Cold charging program 9:
This charging program is suitable for charging normal 12V car batteries
with a rated capacity of 14Ah to 120Ah at low temperatures below 32°F
(0°C). The battery is charged with an elevated charging voltage and a high
charging current of 3.8A.
• 6V charging program 10 :
Special program for charging 6V batteries with a rated capacity of 1.2Ah to
14Ah. The adapted charging current amounts to 0.8A.
Depending on the battery's charge level, the charger will ad-
just the charging currents. The specified maximum charging
current will only be used to charge the battery during the
main charging phase. Just before the maximum charge is
reached, the charger operates with lower charging current.
This ensures that the battery is charged gently and effectively
up to the full capacity.
Special functions
Reactivating deep discharged 2 V batteries
Impulse charging pre-charges deep discharged 12V batteries to 10.5V. If a bat-
tery voltage of 10.5V has been reached, the battery will be charged up to full
capacity via the respectively selected charging program.
During reactivation, the charger will operate with reduced charging current
alternating between 0.07A and 0.8A.
KorrekturV_3
Operation
USA
AFTER SALES SUPPORT
16
USA
1 888 367 7373
customer-service@wk-usa.com
Fault protection function
If the charger detects a short circuit, contact interruption or incorrect polarity
while charging, the charger will automatically end the charging program and
switch to standby mode 14 (see fig. C).
Protection against overheating
If the temperature of the heat sink inside the charger increases to 212°F
(100°C), the charger will reduce the charging current until the heat sink has
cooled down to normal operating temperature.
Trickle charge
Once the battery is fully charged, the charger will automatically switch to trickle
charge. At the same time, the charging process will be interrupted depending
on the voltage measured or the full charge of the battery will be maintained
with low charging currents of 0.07A and 0.8A.
• The battery can be continuously connected to the charger
without this resulting in damage or loss of battery power.
• The trickle charge can be used to maintain a battery.
Connecting the charger
WARNING!
Danger of explosion!
An electrical short-circuit may occur if connected incorrectly.
Sparks may form that could trigger an explosion.
− Always start by connecting the battery to the charger.
Then insert the power plug of the charger in the socket.
This is the only way to prevent the formation of sparks.
− Never connect the charger with the grid if the red error in-
dicator lights up. Check to make sure that the battery ter-
minal clamps red (+) and black (-) are correctly assigned to
the poles (+/-) of the battery.
− Be absolutely sure to observe the steps described in this
section.
KorrekturV_3
AFTER SALES SUPPORT
USA
Operation
17
USA
1 888 367 7373 customer-service@wk-usa.com
NOTICE!
Risk of damage!
Covering the charger during the charging process may cause
the charger to overheat and damage the charger.
− Do not cover the charger during operation.
If you confuse the positive pole with the negative pole (reverse polarity) when
connecting the battery terminal clamps 4and 5, the red error indicator 13
will immediately light up. The charger will switch to standby mode 14 .
Charging the battery outside of the car
1. Connect the red battery terminal clamp 4to the positive pole (+) of the
battery.
2. Connect the black battery terminal clamp 5to the negative pole (+) of the
battery.
3. Connect the charger to the grid via the mains cord 2.
Charging the battery in the vehicle
WARNING!
Risk of injury!
If the vehicle is in a faulty state when handling the charger and
battery, this may result in severe injury.
− If the battery is firmly mounted in the vehicle, make sure
that the vehicle is not running and is in a secured stand-
still. Switch the ignition off for this. Park the vehicle and
apply the parking brake for e.g. cars or use a rope for e.g.
electrical motor boats.
KorrekturV_3
Operation
USA
AFTER SALES SUPPORT
18
USA
1 888 367 7373
customer-service@wk-usa.com
WARNING!
Danger of explosion!
In general, the negative pole (-) of the car battery is connected
with the chassis. But there are also exceptions. When connect-
ing the battery terminal clamps, reversing the poles may result
in a short-circuit, sparks and an explosion.
− Check which of the battery poles (+ or -) in the vehicle is
directly connected to the chassis. This determines the or-
der for safely attaching the battery terminal clamps.
1. Check which battery pole (+ or -) is not directly connected to the chassis. If
this concerns
• the positive pole (+) of the battery, connect the red battery terminal
clamp (+) 4to the positive pole (+) of the battery.
• the negative pole (-) of the battery, connect the black battery terminal
clamp (-) 5to the negative pole (-) of the battery.
2. To connect to the vehicle chassis, connect the free battery terminal clamp
to a screw or bare metal as far away from the battery and the petrol line as
possible.
3. Connect the charger to the grid via the mains cord 2.
As soon as the charger is connected to the grid, the following will appear on
the display 1
• the standby mode 14 indication
• the empty battery symbol for the charge level indicator 11 and
• the current voltage measured for the battery 15 (see fig. D).
The green power supply indicator 12 will illuminate.
You have successfully connected the charger.
Starting the charging process
Automatic battery detection
The charger will automatically detect the type of battery connected.
• If the voltage of the battery is less than 3.8V or greater than 15V, the battery
is not suitable or defective. The display will show the measured voltage
of the battery for 3 seconds. Then the error message Err will appear. The
charger is in standby mode 14 (see fig.G).
KorrekturV_3

AFTER SALES SUPPORT
USA
Operation
19
USA
1 888 367 7373 customer-service@wk-usa.com
− Disconnect the charger (see section “Disconnecting the charger”).
• If the charger measures a battery voltage between 3.8V and 7.3V, the char-
ger will detect a 6V battery.
− Start the 6V charging program by pushing the mode button 6.
• If the measured battery voltage is between 10.5V and 15V, the charger will
detect a 12V battery.
− Push the mode button and select from the motorcycle 7, car 8and
cold 9charging programs.
Reactivation of deep-discharged V batteries with pulse
charging
If the charger measures a battery voltage between 7.3V and 10.5V, this may
concern a full 6V battery or a deep discharged 12V battery.
− Push the mode button to start a charging program.
The charger will initiate an additional check measurement. The display will
alternate between two readouts during the measurement (see fig. H). The
measurement will take 1.5 minutes.
If after 1.5 minutes, the battery voltage measured is between 7.5V and
10.5V, the charger will recognize the battery as a 12 V battery and start the
motorcycle charging program 7with pulse charging to reactivate the
battery. The voltage indicator will blink.
Once the battery has reached a voltage of 10.5V, the charger will switch to
normal continuous trickle charge. The charging current now corresponds
to the selected 12V charging program. The voltage indicator will be shown
continuously.
Reactivation via pulse charging is the same for all 12V charging pro-
grams.
For this reason, they can, even if the battery voltage is still below
10.5 V, still switch to the car 8or cold 9charging programs de-
pending on the connected battery or the ambient temperatures.
Tap the mode button 6to do so.
If the battery voltage is still at 7.4V or 7.5V after 1.5 minutes, the battery is de-
fective. The charger will switch to standby mode 14 for reasons of safety.
− Disconnect the charger (see section “Disconnecting the charger”).
Charging process
If the correct charging program is selected and initiated, the display will show 1
• the symbol for the respective charging program ( 7, 8, 9or 10 ).
• the voltage indicator 15 (displays the current voltage for the battery).
KorrekturV_3
Operation
USA
AFTER SALES SUPPORT
20
USA
1 888 367 7373
customer-service@wk-usa.com
• the indicator for the battery charge level 11 (indicates the charge level
while the fields that are full indicate existing capacity; blank fields indicate
missing charge).
The frame around the battery symbol will blink during the charging process
(see fig. E).
Once the battery is fully charged,
• all fields of the battery symbol are full and the frame will be shown continu-
ously in the indicator.
• The voltage indicator will show CHA (see fig. F).
The charger will switch to trickle charge to maintain the battery’s charge level.
Disconnecting the charger
WARNING!
Danger of explosion!
Improperly disconnecting the charger may produce sparks. An
explosion may be triggered by highly explosive detonating gas
resulting from the charging process.
− Always disconnect the charger from the grid first.
− Follow the correct order of steps when disconnecting the
battery terminal clamps (+/-) from the battery or chassis.
The order of steps for disconnection corresponds to the reverse order of steps
for connecting the charger:
1. Pull the power plug out of the socket.
2. If you charged the battery outside of the vehicle, disconnect the
1. black battery terminal clamp 5from the negative pole (-) of the battery
first,
2. the red battery terminal clamp 4from the positive pole (+) of the bat-
tery afterwards.
If you charged a battery built into the car, disconnect the
1. battery terminal clamp connected to the chassis first and
2. the battery terminal clamp connected to the battery afterwards.
You have successfully disconnected the charger.
KorrekturV_3
Other manuals for CPL-2054U
1
Table of contents
Languages:
Other AUTO-XS Batteries Charger manuals


