autoEXACT AE150 User manual

1.5AMP MULTI-USE SMART BATTERY CHARGER
OUTPUT: 12Vdc 1.5A
INPUT:220-240Vac1A50/60HZ
5AMP MULTI-USEAUTOMOTIVE BATTERY CHARGER
OUTPUT: 12Vdc 5A
AE500E
INPUT: 220 - 240Vac 1A 50/60HZ
3AMP MULTI-USE SMART BATTERY CHARGER
OUTPUT: 12Vdc 3A
AE300E
INPUT: 220 - 240Vac 1A 50/60HZ
5AMP MULTI-USE AUTOMOTIVE BATTERY CHARGER
OUTPUT: 12Vdc 5A
AE500E
INPUT: 220- 240Vac1A50/60HZ
READ ENTIRE MANUAL BEFORE USING THIS PRODUCT
Model AE150/AE300/AE500
MULTI-USE SMART BATTERY CHARGER
OWNER’S MANUAL
Voltage: 12V Amperage: by Models
5A 3A
1.5A
Certified by
Californiia BCS Regulations
MULTI-USE SMART BATTERY CHARGER
MODEL NO. AE150/AE300/AE500
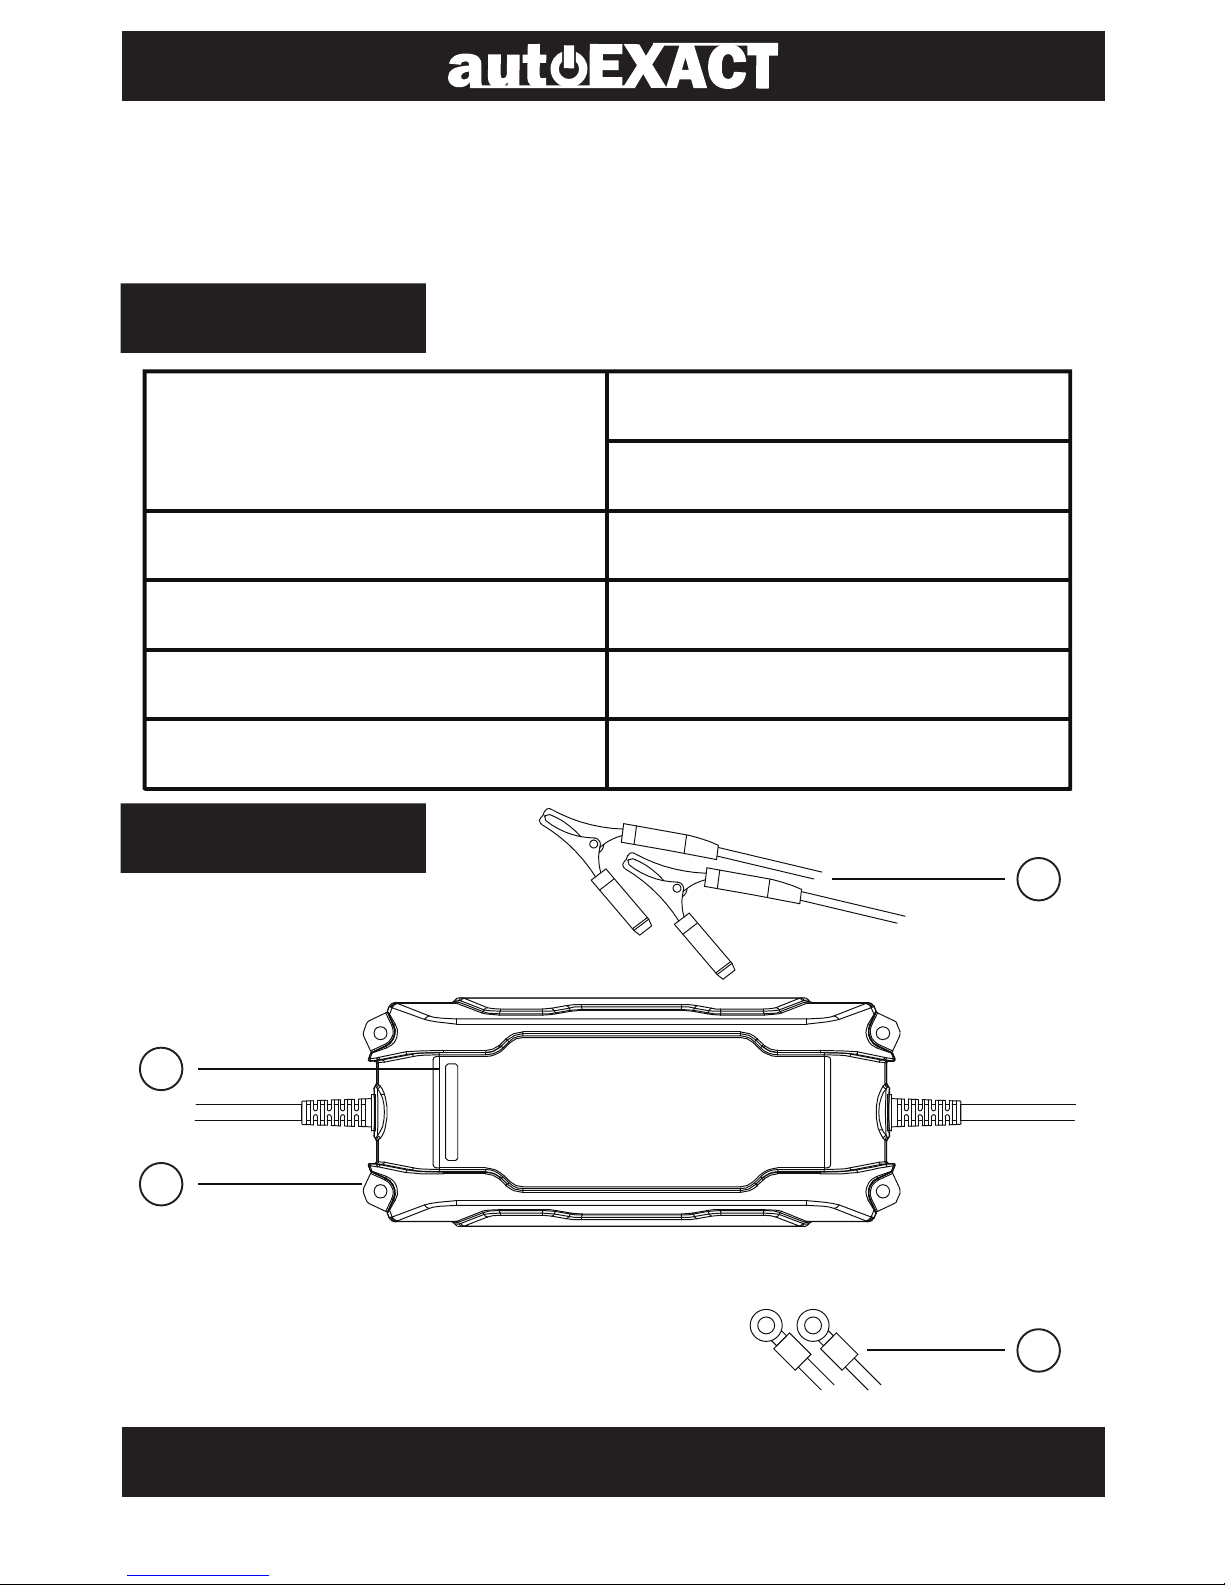
Input Voltage
Output Current Rating
220V - 240V AC 50Hz (E)
12V - 1.5A/3A/5A Max.
14.8V
17’’ L x 7.3’’ W x 4.8’’ H
1.1 lbs
Maximum Charge Voltage
Size
Weight
- 1 -
1. Battery Clip Cable Assembly
2. Ring Terminal Cable Assembly
3. LED Indicators
4. Mounting Holes
1
2
3
4
110V - 120V AC 60Hz (A)
FEATURES
SPECIFICATIONS

- 2 -
IMPORTANT SAFETY INSTRUCTIONS
READ AND SAVE THIS SAFETY AND INSTRUCTION MANUAL
1. This manual contains important safety and operating instructions
for this battery charger/maintainer. Please read, understand and
follow these instructions and precautions carefully.
2. Use this charger only on 12 volts LEAD ACID, AGM and GELLED
ELECTROLYTE (GEL-CELL) batteries. Do not attempt to use on
other voltages and types of batteries (DRY CELL, NICKEL CADMIUM,
NICKEL METAL HYDRIDE, etc.) commonly found in small home
appliances. This may cause chargers and batteries to burst, resulting
in damage or injury to person and property.
3. Do not expose this charger to direct sunlight, rain or snow.
4. If the battery is installed, please make sure that the vehicle is
turned off all loads and no loads are presented.
5. Do not use attachments to this charger that are not recommended.
Non-recommended attachments may result in injury, electric shock, or
fire and voids the warranty.
6. To reduce risk of damage to electric plug and cord, pull by plug
rather than cord when disconnecting charger.
7. If it is necessary to use an extension cord, it should be properly
grounded cord. Use of improper extension cord could result in a risk
of fire and electric shock.
8. Do not operate charger with damaged cord or plug – replace the
cord or plug immediately.
9. Do not operate charger if it receives a sharp blow, been dropped,
or otherwise damaged in any way; take it to an authorized service
center for repair.
10. Do not disassemble charger; take it to an authorized service
center for repair. When service or repair is required. Incorrect
reassembly may result in a risk of electric shock or fire.
11. To prevent injury during cleaning or maintenance, disconnect all
batteries and move them to clear access to the unit. Unplug this

- 3 -
charger from the wall outlet. Use a slightly dampened cloth to clean
the housing and lead sets. Do not use solvents or soaps.
12. Place the power cords in a location where will not be stepped on,
tripped over, or subjected to stress or abuse of any kind.
13. Never attempt to charge a frozen battery. Allow the battery to
return to room temperature before connection. Suggested operation
range 0 C (32 F) to 50 C (122 F) in ambient temperature.
14. Never use this charger in or on any boat or watercraft directly.
You must remove the battery from the boat or watercraft and charge
the battery at the properly installed location of this charger.
15. It is not suggested to expose the charger to moisture and should
not be subjected to inclement weather.
PERSONAL PRECAUTIONS
RISK OF EXPLOSIVE GASES
1. Working in the vicinity of a lead acid battery is dangerous. Battery
generate explosive gases during operation. For this reason, it is of
utmost importance that you follow the instructions each time you use
the charger.
2. To reduce risk of battery explosion, follow these instructions and
those published by the battery manufacturer and manufacturer of any
equipment you intend to use in the vicinity of the battery. Observe
cautionary markings on these items.
3. Someone should be within range of your voice or close enough to
come to your aid when you work near a lead acid battery.
4. Have plenty of fresh water and soap nearby in case battery acid
contacts skin, clothing or eyes.
5. Wear complete eye protection and protective clothing.
6. Avoid touching eyes while working near battery.
7. Be extra cautious to reduce risk of dropping a metal tool onto the
battery. It could spark or short-circuit the battery or other electrical

- 4 -
parts and could cause an explosion.
8. Remove personal metal items such as rings, bracelets, necklaces
and watches when working with a lead acid battery. It can produce a
short circuit current high enough to weld a ring or the like to metal
causing a severe burn.
9. This appliance is not intended for use by persons (including
children) with reduced physical, sensory or mental capabilities, or lack
of experience and knowledge, unless they have been given
supervision or instruction concerning use of the appliance by a person
responsible for their safety.
10. Children should be supervised to ensure that they do not play with
the appliance.
PREPARING TO CHARGE
RISK OF CONTACT WITH BATTERY ACID. BATTERY ACID IS A
HIGHLY CORROSIVE SULFURIC ACID.
1. Be sure area around battery is well ventilated while battery is being
charged. Gas can be forcefully blown away by using a piece of
cardboard or other nonmetallic material as a fan.
2. Clean battery terminals. Be careful to keep corrosion from coming
in contact with eyes.
3. Inspect the battery for cracked or broken case or cover. If battery is
damaged, do not use charger.
4. If the battery is not sealed maintenance free, add distilled water in
each cell until battery acid reaches level specified by the manufacturer.
This helps purge excessive gas from cells. Do not overfill. For a
battery without cell caps, carefully follow manufacturer’s recharging
instructions.
5. If necessary to remove battery from vehicle to charge, always
remove ground terminal from battery first. Make sure all accessories
in the vehicle are off to ensure you do not cause any arcing.
6.Study all battery manufacturer’s specific precautions such as

- 5 -
removing or not removing cell caps while charging and recommended
rates of charge.
7. Determine voltage of battery by referring to car owner’s manual and
make sure it matches output rating of battery charger.
8. If the battery and terminals have a white or bluish crust on them, the
charging system may be having problem. These problems should be
corrected before the battery is replaced after charging.
CHARGER/MAINTAINER LOCATION
RISK OF EXPLOSION AND CONTACT WITH BATTERY ACID.
1. Locate charger as far away from battery as DC cables permit.
2. Never place charger directly above battery being charged. Gases
from battery will corrode and damage charger.
3. Never allow battery acid to drip on charger when reading gravity or
filling battery.
4. Do not operate charger in a closed area or restrict ventilation in any
way.
5. Do not set a battery on top of charger.
SETTING UP & OPERATIONS
1. Make sure the room has plenty of ventilation.
2. Mount this charger away from any vehicle repair or service.
Make sure never to start or run an engine near the batteries being
charged.
3. Be sure the total amperage used by this charger should not exceed
the amperage capacity of the supply source. If you do not know how
to determine this, have a qualified electrician determine the capacity
for you.
4. Connect and disconnect DC output clips only after setting any
charger switches to off position and removing AC cord from electric
outlet. Never allow clips to touch each other.

- 6 -
5. Make sure the battery terminals are clean. Wire brush them if
necessary. Clamp the black end (NEG, -) to the negative battery
terminal. Clamp the red end (POS, +) to the positive battery terminal.
6. Connect the charger to a grounded power receptacle that is
wired in compliance with local electrical codes.
Note that side mounted batteries will require the insertion of a lead
post adapter. Plain bolts are not safe. They will not allow for accurate
reading and should not be used.
CHARGE TIME CALCULATION
This charger has a rated output of Ampere. (by models) These outputs
will vary with the age and condition of the battery being charged.
Find your battery’s rating on the chart below, and note the charge time
given for each charger setting.
Use the following table to more accurately determine the time it will
take to bring a battery to full charge. Identify where your battery fits
into the chart.
Cars, Trucks, Pickup, etc.
BATTERY SIZE (RATING)
Motorcycle, Garden Tractor, etc.
5 hrs
6 hrs
M
M
M
M
M
M
3 hrs
3.5 hrs
8 hrs
6 hrs
15 hrs
18 hrs
23 hrs
11 hrs
NR
NR
6 hrs
3.5 hrs
10 hrs
12 hrs
15 hrs
7.5 hrs
100 CCA
120 CCA
200 CCA
300 CCA
400 CCA
500 CCA
600 CCA
750 CCA
NR: Not Recommended M: Maintenance
AE150 AE300 AE500

- 7 -
CHARGING WHEN BATTERY IS INSTALLED IN VEHICLE
1. Position the AC and DC cables to reduce the risk of damage by the
hood, door and moving or hot engine parts.
NOTE that if it is necessary to close the hood during the charging
process, ensure that the hood does not touch the metal part of the
battery clips or cut the insulation of the cables.
2. Stay clear of fan blades, belts, pulleys and other parts that can
cause injury.
3. Determine which post of the battery is grounded (connected) to the
chassis. If the negative post is grounded to the chassis (as in most
vehicles), see step to negative-grounded vehicle. If the positive post
is grounded to the chassis, see step to positive-grounded vehicle.
FOR A NEGATIVE-GROUNDED VEHICLE
Connect the POSITIVE (red) clip from the battery charger to the
POSITIVE (POS, +) ungrounded post of the battery. Connect the
NEGATIVE (black) clip to the vehicle chassis or engine block away
from the battery. Do not connect the clip to the vehicle chassis or
engine block sheet-metal body parts. Connect to a heavy gauge metal
part of the frame or engine block.
FOR A POSITIVE-GROUNDED VEHICLE
Connect the NEGATIVE (black) clip from the battery charger to the
NEGATIVE (NEG, -) ungrounded post of the battery. Connect the
POSITIVE (red) clip to the vehicle chassis or engine block away from
the battery. Do not connect the clip to the carburetor, fuel lines or
sheet-metal body parts. Connect to a heavy gauge metal part of the
frame or engine block.
Connect the AC supply cord to the electrical outlet for processing the
charging.

- 8 -
CHARGING WHEN BATTERY IS OUTSIDE VEHICLE
1. Connect the POSITIVE (red) charger clip to the POSITIVE (POS, +)
post of the battery.
2. Connect the NEGATIVE (black) charger clip to the NEGATIVE
(NEG, -) post of the battery.
3. Connect the AC supply cord to the electrical outlet.
4. When disconnecting the charger, always do so in the reverse order
of the connecting procedure and break the first connection while as
far away from the battery as practical.
NOTE that a marine battery must be removed and charged on shore.
To charge it onboard requires equipment specially designed for
marine use.
AC CONNECTIONS
1. This battery charger is for use on 110-120 Vac and 220- 240 Vac
separately. Check your AC volt and make sure the version you take
is correct.
2. The plug must be plugged into an outlet that is properly installed
and grounded in accordance with all local codes and ordinances.
3. The plug pins must fit the receptacles. Do not use with an
ungrounded system.
4. Never alter AC cord or plug provided. If it does not fit the outlet,
have prosper grounded outlet installed by a qualified electrician.
Improper connection can result in a risk of an electric shock or
electrocution.

- 9 -
CHARGING INDICTION
When the charger is being used, it shows LED lights as follows,
indicating the status of the charging.
NO AC Power (all lights off)
There is no AC power applied. Check the AC end.
STAND BY (green blinking only)
The clamps are not connected to battery properly.
CHARGING (green & red lit)
The charger is charging the battery.
DEFECTIVE BATTERY (yellow lit only)
The battery cannot hold a charge. Immediate
replacement is recommended.
DEEPLY DISCHARGED BATTERY (yellow blinking,
green & red lit)
It takes more time to charge a deeply discharged battery.
Replace the battery if the charger keeps indicating this stage.
75% CHARGED (green lit & red light blinking)
The battery is 75% charged and ready for load test or can
be returned to serve.
FULLY CHARGED (green lit only)
The battery is fully charged. The charger will shift to the
maintenance mold.
75%

- 10 -
TROUBLESHOOTING
1. Problem: No LED lit.
Possible Cause: AC end is not making a good connection.
Solution: Check for poor connection at AC side.
2. Problem: Green LED keeps blinking.
Possible Cause: Clamps are not making a good connection.
Solution: Check for poor connection at battery and frame.
3. Problem: Yellow LED blinks/ Red lit/Green lit
Possible Cause: The battery is sulfated.
Solution: Try to charge the battery for 24 hrs. If the LED keeps
lighting this way, replace the battery immediately.
4. Problem: Yellow LED lit right away when hooking onto battery.
Possible Cause: It is not a 12V battery.
Or, the battery is just charged.
Solution: Check if it is a 12V battery. The charger will give you
a warning if you are connecting to the incorrect
application.
Or, the battery is just charged with holding a high
voltage. Re-clamp the battery after having the voltage
drops back.
NOTE that if the troubleshooting cannot fix the issue you have, please
contact the distributor for the information.
This manual suits for next models
2
Table of contents
Other autoEXACT Batteries Charger manuals


