AUTOLIFT PRODUCTION EASYLift 1500 User manual

Read this safety carefully and keep manual in a convenient location for
future use. Non-compliance with these instructions may result in injury or
damage to the lift or vehicle
AUTOLIFT PRODUCTION
Prikop 836/6 | 602 00 Brno | Czech Republic
www.autoliftproduction.com | info@autoliftproduction.com

9

EASYLift1500EASYLift1500 can be used for passenger vehicles. Vehicles can be lifted with delivered
adapters (combine adapter beam + fork). Lifting equipment can be operated by instructed
person. Using lifting equipment EASYLift1500 is passenger vehicle supported by the
wheel or beam of the body and partly lifted to the needed position. After lifting, the vehicle
is tilted, so the access is possible to the chassis of the vehicle. Top height position of the
vehicle is at most 93 cm above the floor. Attention: Off-road vehicles with lower carrier
frame and self-supporting cabin cannot be lifted with adapter below the cabin.
Read the operating instructions caRead the operating instructions carefully before using the product.
These instructions and the warranty certificate are an integral part of the product.
Instructionsforuseandsafety
1. Lifting of a passenger vehicle is done with the EASYLift 1500 lifting equipment only on
horizontal and solid floors.
2.2. Use the parking brake of the vehicle before lifting the vehicle. Turn the front wheels of
the vehicle in the direction of the direct drive. Remove the ignition key and fix the steering
wheel firmly. The steering wheel must be in a fixed position so that it can not rotate and
thus change the stability of the vehicle. When using a fork adapter under the vehicle
wheel.
3.3. Tires of the raised vehicle must be dry. Never lift the vehicle with wet tires, as there is a
risk of slipping the tire from the fork of the lifting device. Tires must not be underinflated
to prevent the wheel of the vehicle from being dropped. The "fork" adapter under the
vehicle wheel can be used for 14 "and larger tires.
4. Set the EASYLIFT1500 lifting equipment with a fork under the tire of the vehicle so that
the lifting device is as close as possible to the lifted vehicle.
Liftinggear
The EASYLift1500 can be operated using an electric hand drill. Important is the toThe EASYLift1500 can be operated using an electric hand drill. Important is the torque of
a handheld electric drill, optimally 35Nm (Photo 1). Power consumption of the 750 to 1200
W electric drill corresponds to the weight of the lifted vehicle. When using an electric hand
drill, it is necessary to include the lowest speed, ie. 1st speed max. 300-400 rpm. The
electric hand drill must be equipped with double insulation. In the case of electric
handheld drills, the hammering function must not be used - it could damage the lifting
gear!
Generalinformation
-3-
The manufacturer and seller are not responsible for any injuries or damages that result from
incorrect assembly or usage. This warranty guarantees the EASYLift1500 to be free of all defects
in material and workmanship for 3 years from the date of purchase (or delivery, whichever comes
first) by the original purchaser. Accessories are covered by a warranty for a period of 12 months.
The warranty will not apply unless all the instructions in user manual have been adhered to.
TTo obtain warranty service, you must first contact us to determine the problem and the most
appropriate solution for you. You can contact us by email at: [email protected]
All warranty repairs and services must be performed by an authorized AUTOLIFT PRODUCTION
ltd.. All expenses related to replacing or repairing a defective part under this warranty shall
be assumed by the AUTOLIFT PRODUCTION ltd., except for the shipping expenses
to/from AUTOLIFT PRODUCTION ltd. which shall be assumed by the buyer, unless otherwise
agagreed by AUTOLIFT PRODUCTION ltd. and customer. This Warranty does not cover any issue
that is caused by the following:
Conditions, malfunctions or damage not resulting from defects in material or workmanship, any
damage resulting from improper maintenance, any damage of a product resulting from
unauthorized modification of the product, any damage caused by using equipment beyond
recommended capacity, any damage caused by natural disaster, any damage resulting from fluid
infiltrationinfiltration or dump. This list is not restrictive. Recognition of a warranty claim can never lead to
an extension of the warranty period or to the beginning of a new warranty period if the equipment
has been replaced.
Equipment or parts exchanged under the warranty are therefore owned by AUTOLIFT
PRODUCTION ltd.
AUTOLIFT PRODUCTION ltd. reserves the right to reject any claim in cases where purchase can
not be verified or when it is clear that the product has not been properly maintained.
Keep the pKeep the proof of purchase as proof of the date of purchase.
Devices must be returned to AUTOLIFT PRODUCTION ltd. in a non-disassembled
condition, in an acceptably clean condition, together with the proof of purchase.
Warranty
-4-
1. Always use the lifting device on a solid and level floor that provides sufficient support
for the lift.
2. Do not exceed the permitted lifting capacity of the lift!
3. Under no circumstances should the maximum lift height indicated by the red marker
be exceeded! (Photo 3).
4. Do not touch the vehicle if it is being lifted or lowered!
5. It is strictly forbidden to use shock absorbing air tools to drive the EASYLift1500 lifting 5. It is strictly forbidden to use shock absorbing air tools to drive the EASYLift1500 lifting
equipment!
6. When the lift is in the lower base position (Photo 4), turn off the drill immediately!
Failure to do so may result in irreparable damage to the lift mechanism.
7. It is forbidden to work under the vehicle without the use of a car stand.
8. After mounting the vehicle on the jack, make sure the vehicle is stable on the lift.
9. Do not drive with the vehicle on the lift.
10.10. Never use the lift if it is damaged. It is forbidden to make any changes and
adjustments to the lift.
11. The lift is designed exclusively for lifting a passenger car.
-5-
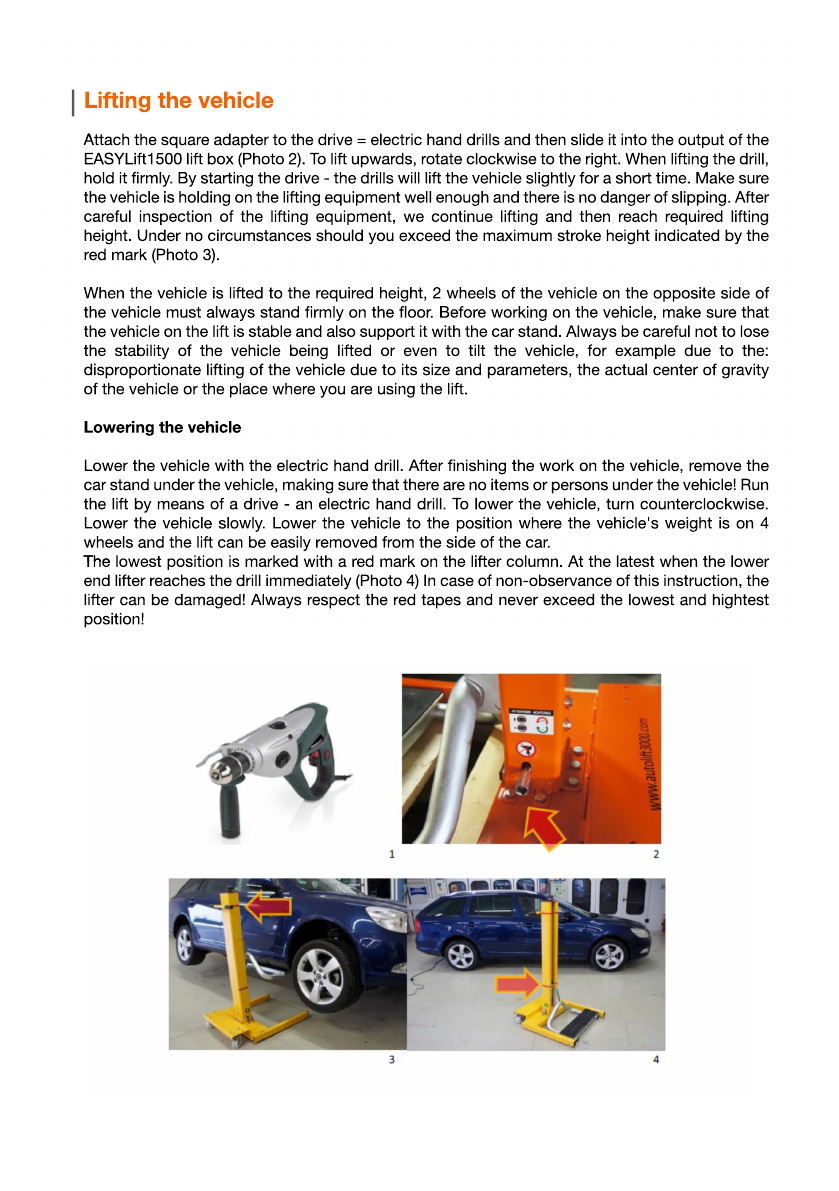
AttachAttach the square adapter to the drive = electric hand drills and then slide it into the output of the
EASYLift1500 lift box (Photo 2). To lift upwards, rotate clockwise to the right. When lifting the drill,
hold it firmly. By starting the drive - the drills will lift the vehicle slightly for a short time. Make sure
the vehicle is holding on the lifting equipment well enough and there is no danger of slipping. After
careful inspection of the lifting equipment, we continue lifting and then reach required lifting
height. Under no circumstances should you exceed the maximum stroke height indicated by the
red mark (Photo 3).
WhenWhen the vehicle is lifted to the required height, 2 wheels of the vehicle on the opposite side of
the vehicle must always stand firmly on the floor. Before working on the vehicle, make sure that
the vehicle on the lift is stable and also support it with the car stand. Always be careful not to lose
the stability of the vehicle being lifted or even to tilt the vehicle, for example due to the:
disproportionate lifting of the vehicle due to its size and parameters, the actual center of gravity
of the vehicle or the place where you are using the lift.
Loweringthevehicle
LowerLower the vehicle with the electric hand drill. After finishing the work on the vehicle, remove the
car stand under the vehicle, making sure that there are no items or persons under the vehicle! Run
the lift by means of a drive - an electric hand drill. To lower the vehicle, turn counterclockwise.
Lower the vehicle slowly. Lower the vehicle to the position where the vehicle's weight is on 4
wheels and the lift can be easily removed from the side of the car.
TheThe lowest position is marked with a red mark on the lifter column. At the latest when the lower
end lifter reaches the drill immediately (Photo 4) In case of non-observance of this instruction, the
lifter can be damaged! Always respect the red tapes and never exceed the lowest and hightest
position!
Liftingthevehicle
-6-
AttachAttach the square adapter to the drive = electric hand drills and then slide it into the output of the
EASYLift1500 lift box (Photo 2). To lift upwards, rotate clockwise to the right. When lifting the drill,
hold it firmly. By starting the drive - the drills will lift the vehicle slightly for a short time. Make sure
the vehicle is holding on the lifting equipment well enough and there is no danger of slipping. After
careful inspection of the lifting equipment, we continue lifting and then reach required lifting
height. Under no circumstances should you exceed the maximum stroke height indicated by the
red mark (Photo 3).
WhenWhen the vehicle is lifted to the required height, 2 wheels of the vehicle on the opposite side of
the vehicle must always stand firmly on the floor. Before working on the vehicle, make sure that
the vehicle on the lift is stable and also support it with the car stand. Always be careful not to lose
the stability of the vehicle being lifted or even to tilt the vehicle, for example due to the:
disproportionate lifting of the vehicle due to its size and parameters, the actual center of gravity
of the vehicle or the place where you are using the lift.
Loweringthevehicle
LowerLower the vehicle with the electric hand drill. After finishing the work on the vehicle, remove the
car stand under the vehicle, making sure that there are no items or persons under the vehicle! Run
the lift by means of a drive - an electric hand drill. To lower the vehicle, turn counterclockwise.
Lower the vehicle slowly. Lower the vehicle to the position where the vehicle's weight is on 4
wheels and the lift can be easily removed from the side of the car.
TheThe lowest position is marked with a red mark on the lifter column. At the latest when the lower
end lifter reaches the drill immediately (Photo 4) In case of non-observance of this instruction, the
lifter can be damaged! Always respect the red tapes and never exceed the lowest and hightest
position!
Liftingthevehicle
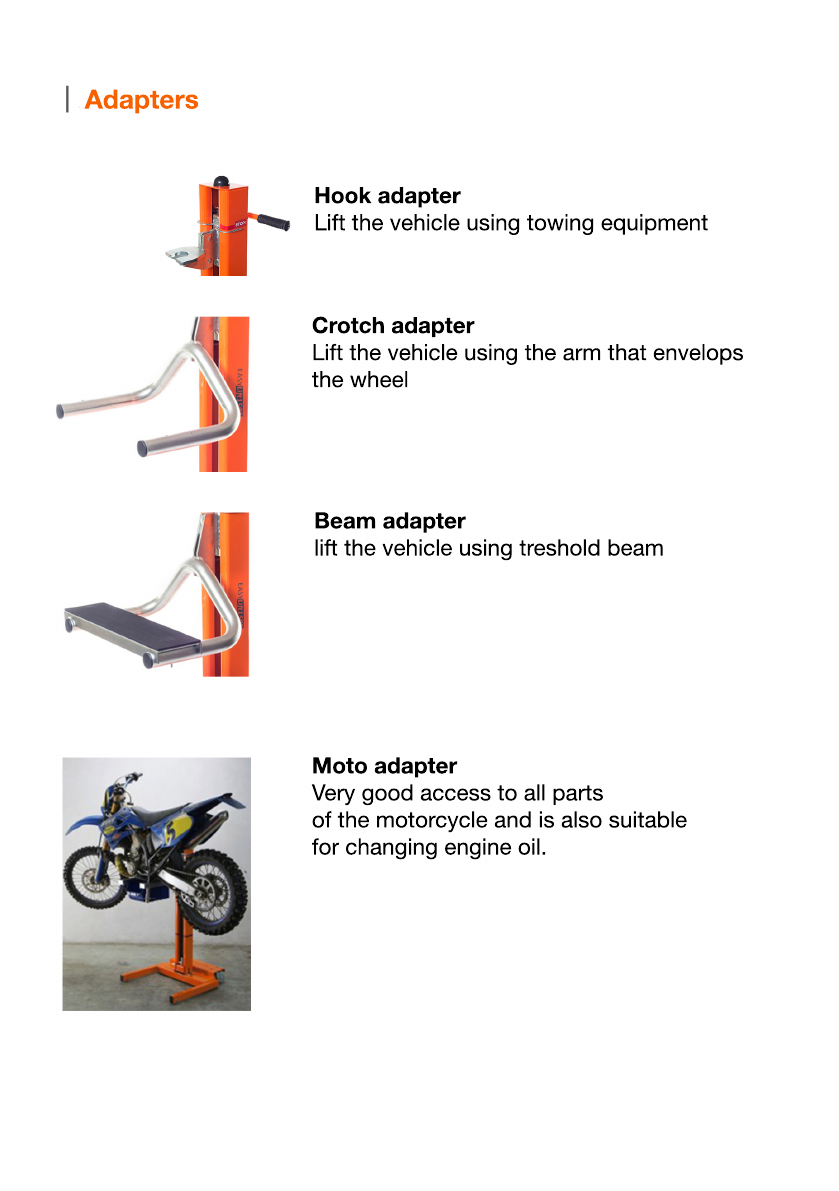
Beamadapter
lift the vehicle using treshold beam
Motoadapter
Very good access to all parts
of the motorcycle and is also suitable
for changing engine oil.
Crotchadapter
Lift the vehicle using the arm that envelops
the wheel
Hookadapter
Lift the vehicle using towing equipment
Adapters
-7-
-8-
EASYLift1500
EL 1500

-9-
1500 kg / 3307 lbs
780 x 700 x 1370 mm
30.75 x 27.50 x 54 inch
59 kg / 130 lbs
93 cm / 36.75 inch
EASYLift1500
Table of contents
Popular Lifting System manuals by other brands


Upright
Upright ab62 Operator's manual

ATH-Heinl
ATH-Heinl Cross Lift 50+ operating instructions

Challenger Lifts
Challenger Lifts EW0820 Installation, operation & maintenance manual

Snorkel
Snorkel S2255RTE Repair parts manual

AUTEC
AUTEC ALM-6040FL User & installation manual

Hyster
Hyster C477 Service & repair manual

CRAIN
CRAIN 280 instruction manual

JLG
JLG 600AJ Service and maintenance manual

WERTHER INTERNATIONAL
WERTHER INTERNATIONAL 204I/B 3SF Instruction and maintenance manual

Dolphin
Dolphin Poollift Neptune with Transporter Operating and Product Care Instructions

Bruno
Bruno VPL-3100 installation manual

Titan Lifts
Titan Lifts HD2P-9000AC Installation, operation & maintenance manual