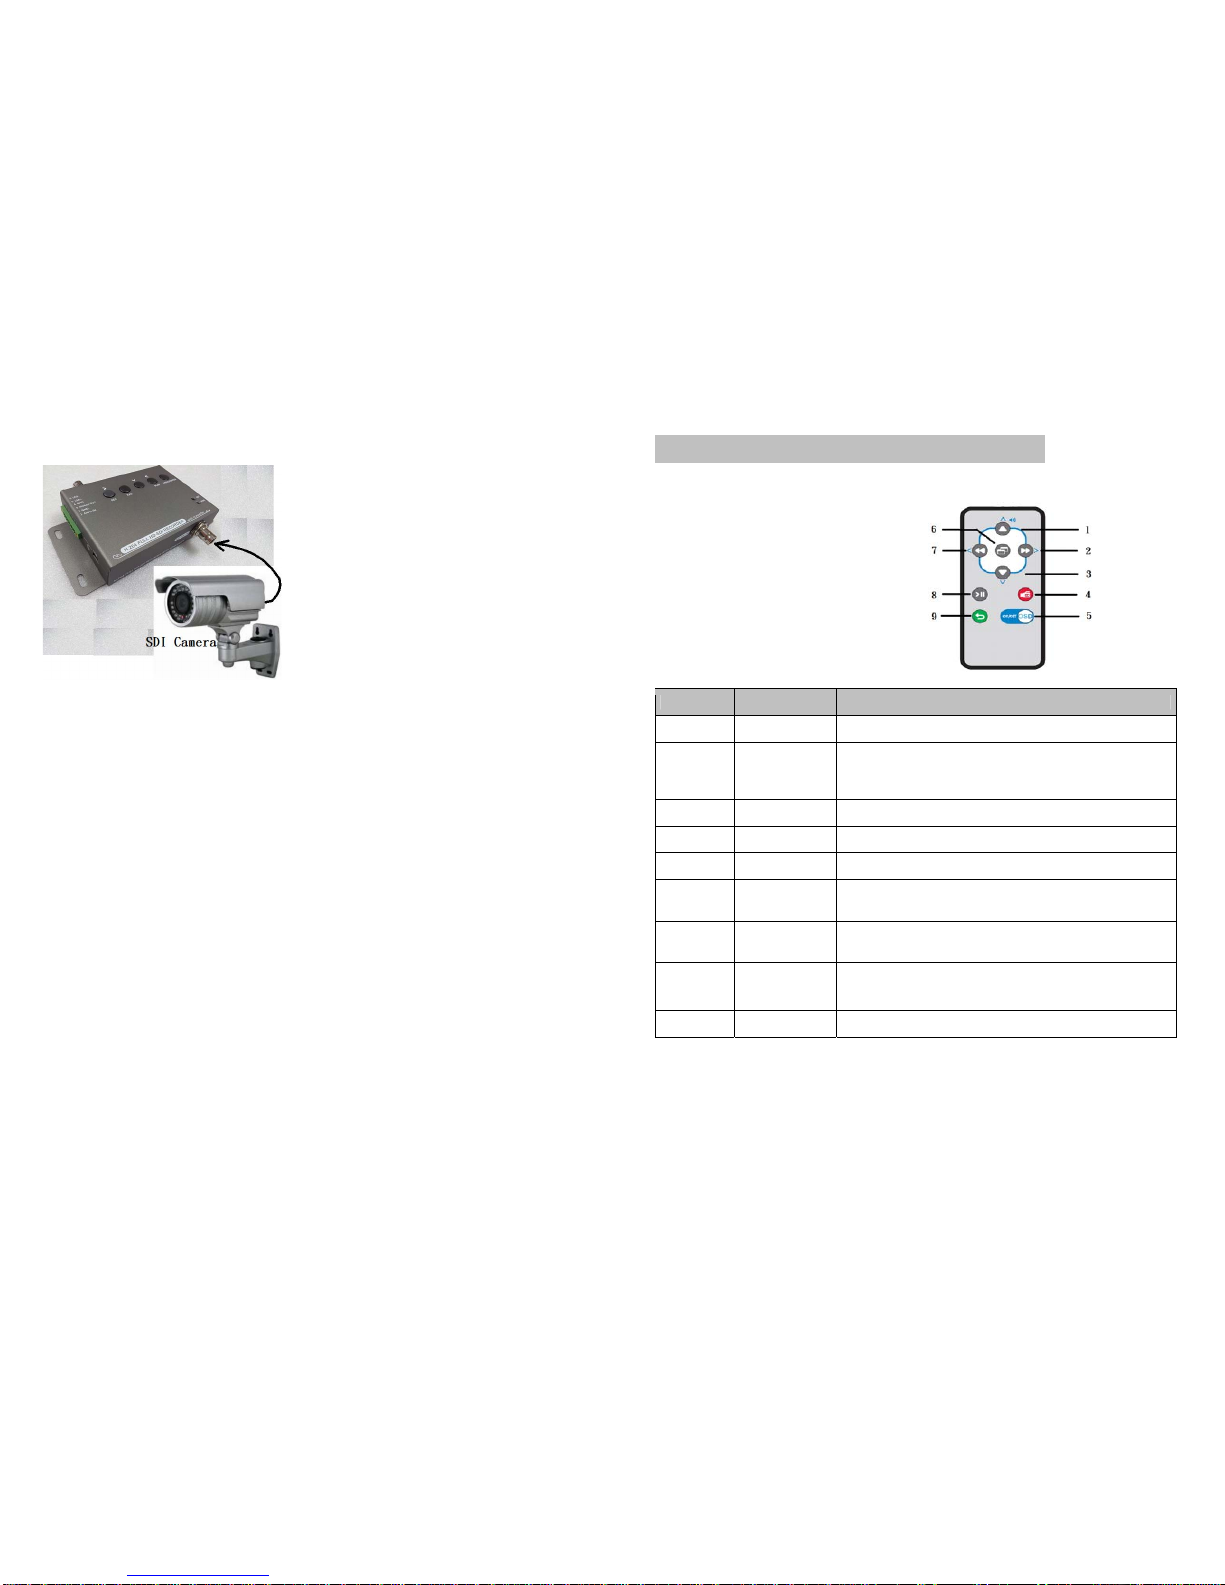
AV Rise AR1012 User manual

1
H.264 Full HD-SDI recorder with
converter
2
INSTRUCTION MANUAL
Safety Precautions
WARNING: The lightning flash with an arrowhead symbol within an
equilateral triangle is intended to alert the user to the presence of un-insulated
“dangerous voltage”.
CAUTION: The exclamation point within an equilateral triangle is
intended to alert the user to presence of important operating and maintenance.
Do not power sources other than that specified and do not expose this appliance to
rain or moisture.
Do not install the product in an environment where the humidity is high.
Unless the product is waterproof or weatherproof, otherwise poor image quality
may occur.
Do not drop the product or subject them to physical shocks.
Except for vandal-proof or shockproof product, otherwise malfunctions may occur.
Never keep the product to direct strong light. It can damage the product.
Do not spill any kind of liquid on the product.
If it gets wet, wipe it dry immediately, Alcohol or beverage can contain minerals
that corrode the electronic components.
Do not install the product in extreme temperature conditions.
Use this product under conditions where temperatures are between -10∘C(14
∘F) ~50∘C.(122∘F). Be especially careful to provide ventilation when
operating under high temperature
It is advised to read the safety precaution guide
through carefully before operating the product,
to prevent any possible danger.

3
Table of Contents
Warning
4
Components
5
Installation
6
Operation
8
Button Functions
7
Initial Start Up 11
Live View 13
Record View 13
Main Menu View 14
Search and Play 14
Set Date/Time
16
Set Motion Detection 17
Manual Record 18
Schedule Record 19
Schedule Setup 20
SD card options 22
System Status 22
POWER ON SETUP 23
Factory Default 23
4
Warning
The recorder and camera requires periodic Inspection.
Contact an authorized technician to carry out the inspection.
Stop using your camera when you find itmalfunctioning.
If the camera emits smokeor isunusually hot for a long period, a fire may
be caused.
Do not install the camera on a surface that can not support it.
If the camera is installed on an inappropriate surface it may fall and cause
injury.
Do
not hold plugwith wet hands.
It could cause an electric shock.
Do not disassemble the camera.
It may result in an electricshock orother hazards.
Do not use the camera close to a gas or oil leak
Itmay result ina fire orotherhazards.

5
Components
1.
FullHD-SDIrecorder
2.
Power Adapter
DC 12V
/1
A
3.
2 pieces of irons and screws
4.
Remote Control
5.
Instruction Guide
6
Installation
*Mounting with included wall mount bracket
*SD-Card Insertions:
*HDMI out, HD-SDI out and CVBS out connections

7
*HD-SDI input connections
8
Operation
●Button Functions
No. Name Function
1Up Button Menu : Navigate up
2Right Button
Menu : Increase value
Playback : Fast forward
Playback Paused : Step forward
3Down Button Menu : Navigate down
4Record Button Recording function
5OSD Button OSD on/off
6Menu/Enter
Button
Menu : Navigate enter
7Left Button Playback : Fast rewind
Playback Pause
d
: S
t
e
p
rewin
d
8Play Button Playback /Pause functions
9Exit Button Menu : Exit sub menu/main menu

9
Operation continued
-Side 1
No. Name Function
1SD card slot
SD card storage connection - SD card should
be inserted with the label facing the front
of the device.
2Power switch Power ON/OFF for system
3 IR receiver Remote controller for receiving signals
-Side 2
No. Name Function
1DC Jack Max. DC12V/1A
2Video out Video output signals for general Monitor/TV
3 HDMI out HDMI 1080P/720P output for TV
10
4 SDI out SDI 1080P/720P out for SDI monitor
-Side 3
No. Name Function
1HD SDI in Full HD SDI input for 1080P/720P camera
-Side 4
No. Name Function
1
Termina l
Alarm in (N.C./N.O. selection)
2GND for alarm in
3 Motion out for open/short
4 GND for motion out
5 LED+ (showing status same as the one of Recording
LED)
6 LED- (showing status same as the one of Recording LED)
7 USB Device USB, User can access files from
recorder to PC/Notebook through mini USB

11
-Top
No. Name Function
1Power LED Show power on status
2REC LED Show SD card running status :
*LED flashing : No insert SD card or SD card
accessing fail
*LED lighting : SD card is recording
*No light : SD card is inserted SD slot but no
record.
3
5 keys setting
Menu/Enter button
4 Play/Navigate down button
5 Navigate right button
6 Stop/Exit button
7 Record/Navigate up button
●Initial Start Up 12
1. To turn the device ON/OFF:
▪Make sure if recorder is power switch is at OFF state
▪Plug DC12V adaptor in DC Jack for power on
▪Insert SD card in SD slot
▪Switch power switch ON for starting running system
NOTE: Each time after power-on, the system auto-detects its peripherals. When
the REC LED flashing indicates the SD is proceeding testing (complete boot time is
several seconds) When an image file error has been detected, the system will
display error message on OSD
2. The default menu language is Japanese. To change the languages:
▪Select [POWER ON SETUP] in the main menu. Here you can change the
language of the menu. System support languages : English and Japanese.
3. After successful start-up the recorder shows the live view.
▪If schedule recording has been programmed, the device will automatically
resume this schedule.
▪During recording, The REC LED indicator will be lighting
4. If the symbol [ SD NOT READY] is shown, the SD-Card has not been
recognized, or the SD-Card is inserted improperly.
▪If the SD-Card cannot be recognized the REC LED flashes red. In this case,
inserted SD card, erase the SD-Card contents, or re-format the card.
5. If the write-protection on the side of the SD-Card is activated, It is only possible
to read recorded data
6. When SD-Card is writing data during recording, record indicator will light on.
7. After power-loss the system auto returns to previous recording mode.
Attention
-Never remove the SD-Card during the boot process, This can lead to permanent
damage of recorded data.
●Live View

13
User will see the OSD on screen as below when user power on machine
No. OSD Functions
1 Shows the current date and time.
2 Shows the connecting camera resolution. The recorder support 1080P and 720P
3 Shows the SD card status :
“ SD NONE” means no inserting SD card
No showing “SD NONE”symbol means SD card ready
Note : The OSD can be ON/FF when pressing[ ]
●Record View
No. Recording View Function
1 Flashing recording status.
There are four kinds of recording status:
*(H)RECORDING : Manual recording by Hand
*(M)RECORDING : Motion recording by Motion trigger
*(A)RECORDING : Trigger recording byAlarm in
*(C)RECORDING : Continue recording by hour in schedule
There are priority for H>A>M>C
Note : The lighting record LED on top of case indicates that the system is currently loading files
14
on to the SD-Card.
‧Do not withdraw the SD-Card while recording. It may destroy the stored data.
‧Power loss during recording result in incomplete videos or errors.
●Main Menu view
When user press “Menu/Enter” button, He will see the main menu on OSD as above.
Here we will introduce every functions as below.
●Search and Play
There are two kind of play back recorded video on machine :
1. Play back newest video directly :
On live view, Please press “ ” button, and you will see the most newest recorded video
playing on screen. And you can user some buttons to control play forward/rewind/pause
functions as below.
2. Using Search and Play to play the selected videos :
When user press “Menu/Enter’ button in Search and Play. He will see the sub menu as
below:

15
No. Name Function
1Recorded files by date Recorded files by sorted date
2All files by date Total recorded files by date
3 Pointed file There is block line that points on this file to be played
back
4 Time showing on file Starting time that block line that points on this file to
be played back
Press to select the file for playing on Search and Play and you can select some buttons
for forward, rewind, step rewind and step forward functions as below:
Symbol Playback Function
1. Normal playback speed
2. During playback, press[ ]button to pause playback and press
again to return to playback status
During the normal playback press [ ]or [ ] button to fast rewind or
fast forward
By pressing in the same direction again you raise the search
speed(Speed :X2/X4/X8/X16/X32). Press[ ]button to playback at
normal speed from [ ]or [ ]
Note: There is no this button on machine, You only can use this
button on remote controller
Navigate up in menu
Navigate down in menu
Stop recording or stop playing back button
Exit from menu to live view
OSD is on/off button on live view
16
Playback using a Computer
All files on the SD-Card are stored in a folder named DVH264 and will have an approximate of
3MB~100MB, and will be ordered chronologically. These files can be viewed with Microsoft
Media Player or DivX Player. In order to playback the files correctly, an update to the audio and
video codec of the Windows Media Player may be necessary.
SD-Card Maintenance
1. The device supports only FAT32 file system. It is unable to determine other file systems.
Please format the SD card (enter [MAIN MENU/SD CARD OPTIONS] and select “Format
Disk”)
2. When using SD card, you need to choose class 10 or above and Do not use no any brand from
manufacturer.
Firmware Update
Use the SD card to update your system newest firmware. Here Just agent is permitted to update
firmware only.
1. Using your computer, copy firmware into the directory of the SD card.
2. Switch off the device, then insert the SD card into the device, switch on the main power
3. Wait for 20~50 seconds, the system updating will be completed and return back to live view.
You can check your version number in [MAIN MENU/SYSTEM STATUS/VERSION].
Do not remove the SD-Card while booting, if a power-loss
occurs while completing step 3, please repeat step 2 and 3.
●Set Date/Time

17
‧Date Format : Here you can change the way the date is displayed
‧Year/Month/Date/Time Adjustment: Here you can change the date and time.
‧DST : It is for day time saving (Default is OFF)
●Set Motion Detect
Press “Set Motion Detect” button under main menu, system will enter sub menu as below:
Under “Set Motion Detect”, Entering SET MD AREA:
SET MD AREA
The motion detection area is split up into 16x12 cells. Cells which are marked to detect
motion are displayed in red. One or more red cells from a block.
In order to navigate use[ AND ] buttons and confirm by pressing [ ] button.
Press[ ] or [REC]record button in order to change the editing mode.
‧CELL EDIT : Here you can (de-)activate every single cell.
‧DEL BLOCK : Here you can deactivate a complete block of cells.
‧DEL ALL : Here You can deactivate all cells at once.
‧ADD BLOCK : Here you can activate a complete block of cells
18
‧ADD ALL : Here you can activate all cells at once.
Under “Set Motion Detect”, Press[]button and system will enter SET MD SENSITIVITY:
SET MD SENSITIVITY
Here you can set the sensitivity level of motion detection.
‧MD ENERGY : Shows the current recognized motion.
‧MD THRESHOLD : By pressing the buttons [ ]or[ ] you can set the value when
motion detection is triggered. The lower the value is set. The more sensitive motion
detection reacts.
●Manual Record
Under Manual Record, Please enter it and will image as below

19
No. Manual Recor
d
Function
1 Set the current record resolution.
There are two kinds of resolution to be selected : 1920*1080P and 1280*720P
2 Set the recorded frame rates :
1080P : 1,4,10,15,20 and 25 fps
720P : 1,4,10,15,20,25 and 30 fps
3 Set recorded video quality : High, Normal and Basic
●Schedule Record
Under the main menu, Press [ ]button and system will enter as below OSD:
No. Schedule Recor
d
Function
1 Show the trigger settings: 1920*1080/25fps high quality (Default setting)
recording status. Please enter “Event record” if user like to change different
setting.
2 Show the motion settings: 1920*1080/25fps high quality(Default setting)
recording status. Please enter “Event record” if user like to change different
setting.
3 Show the motion settings: 1920*1080/4fps high quality(Default setting)
recording status. Please enter “Continue record” if user like to change
different setting.
20
Schedule Setup
Under the schedule record, Press [ ]button and system will enter as below OSD:
There are four kinds of different trigger modes by hour. User need to turn schedule on
before using the trigger modes as below:
No. Schedule Setup Function
1 : motion trigger mode
2 : Alarm in trigger mode
3 : Accept all trigger modes : Manual > Alarm in> Motion>Continue
4 : Continue record by hour
5 : No any action in this hour
Event Record
There are frame rates and quality to be changed for Motion and Alarm in as below:

21
No. Event Record Function
1 Video Size :Set the recorded frame rates for Motion and Alarm in mode :
1080P or 720P
2 Frame Rate : Set different frame per second for Motion and Alarm in
mode :
1080P : 1,4,10,15,20 and 25 fps
720P : 1,4,10,15,20,25 and 30fps
3 Recorded quality : High , Normal and Basic modes
4 Duration : Recording time after being triggered by Motion or Alarm in.
The time is 1~90 seconds
5 Pre-record : Recording time before being triggered by Motion or Alarm in.
The time is 0~10 seconds
Continue Record
There are frame rates and quality to be changed for continue record as below:
No. Continue Recor
d
Function
1 Video Size :Set the recorded frame rates for continue mode : 1080P or 720P
2 Frame Rate : Set different frame per second for continue mode :
1080P : 1,4,10,15,20 and 25 fps
720P : 1,4,10,15,20,25 and 30fps
3 Recorded quality : High , Normal and Basic modes
22
●SD Card Options
Showing SD card information and format it.
No. SD card options
1 SD TOTAL : Show the total capacity of the inserted SD card.
2 SD REMAIN : Show the remaining capacity of the inserted SD card.
3 MAX FILESIZE : Here you can set the max. File size(3~100MB) of a
recording if the size is reached a new file is created.
4 CARD FULL : Here you can choose what happens when the total capacity of the
SD card is reached.
-STOP : The recording is stopped.
-LOOP : The recording continues. The oldest files are replaced by new recordings
5 FORMAT DISK : Here you can format the SD card. All data that include
recorded video and media video will be deleted.
●System Status
Here you can find a summary of the firmware version and the recording settings.

23
Language : show “English” or “Japanese” version
Version : working software version
SD full : show “loop’ or “stop’ after writing data full in SD card
Manual status : 1280*720 30 FPS and high quality recording
Motion status : 1280*720 30 FPS and high quality recording
Alarm status : 1280*720 30 FPS and high quality recording
Continue status : 1280*720 30 FPS and high quality recording
●Power On Setup
Here user can set language and output resolutions
No. Power On Setup
1 Language : Support English and Japanese
2 TV Output : Support under resolutions
1080P30, 1080i60, 720P30 and 720P60
3 Alarm Input : Support “N.C” and N.O.”
N.C. : normal close and trigger when wires(Alarm in and GND) are opened.
N.O. : normal open and trigger when wire(Alarm in and GND) are closed.
●Factory Default
Here you can reset all settings, except Date and Time, to factory default.
‧Press [ ] button to reset to factory default.
‧To be back , press [ ] button and return to the main menu
Table of contents
Popular Voice Recorder manuals by other brands

Yellowtec
Yellowtec iXm Briefing Book

Yamaha
Yamaha PocketrakCX - POCKETRAK CX 2 GB Digital... owner's manual

Inter-m
Inter-m PV-6232A Operation manual

Aiwa
Aiwa IC-M8 Service manual

Olympus
Olympus LS-10 - Linear PCM Recorder 2 GB Digital... instructions

Sony
Sony BM-535 Operating Instructions (primary... operating instructions