AVID HIFI SIGSUM User manual

SIGSUM
High Performance Integrated Amplier
USER MANUAL

2
Topic Page
Welcome 3
Cauon 3
Key Sigsum features 4
Placement 5
Connecon Types 5
Phono Input 6
Line Input 7
Pre-out 8
Loudspeaker Connecons 9
Mains Power 10
Headphone Use 11
Mono Operaon 11
Mute 11
Amplier Protecon 11
Troubleshoong 12
Specicaons 13
Declaraon of Conformity 14
Warranty 15
Table of Contents

3
Welcome to your AVID Sigsum Amplier
Congratulaons on purchasing your AVID Sigsum integrated amplier. Using the highest
quality materials during assembly and built to the highest industry standards, your AVID
Sigsum amplier should provide you with many years of trouble-free enjoyment.
Please read this manual carefully to ensure you understand all the features and operang
funcons available.
Cauon
• This unit is heavy, and it is recommended that at least two people are used when moving the unit.
• Care should be taken to ensure that the unit is switched o and unplugged from the mains before
connecng or disconnecng any other equipment to your Sigsum. This is to protect your speakers from
any momentary high-level signals which, due to the high power capabilies of the Sigsum, could cause
damage.
• There are no user-serviceable parts inside—please do not, under any circumstances, remove the
cover of the Sigsum—doing so would expose you to potenally lethal voltages and void your warranty.
• Only clean your Sigsum with a dry micro-bre cloth.
• Take care to ensure the unit is not exposed to water or other liquids. If you believe water may have
entered the case, turn the unit o at the socket immediately and seek advice from your dealer before
aempng to use it again.

4
Key Sigsum Features:
• 1,100 VA Toroidal transformer—132,000uF Capacitance Reservoir
The ‘heart’ of any amplier, the power supply must provide for any energy demands made by the amplier. Working
together these two key components maintain a massive energy reservoir that allows the amplier to react to the complex
dynamic power demands created by the music. The size of both these devices ensure that the rest of the amplier will
never place demands that cannot be met by the supply
• 50mm, High Quality Volume Potenometer
Illustrang that not all volume controls are born equal! This massive brass-cased device oers a level of transparency
unequalled. It’s reassuringly weighty but smooth acon indicave of the highest levels of build quality and ensures
long-term reliability.
• Fully discrete, high current, output stage
Many lesser ampliers make do with their output devices integrated into a single, large chip—this is very convenient for
the manufacturer, but places some serious limitaons on the performance capability of the unit. With a fully discrete
design, we are able to ensure that the very best devices are used, as well as ensuring that parameters such as peak
current, output impedance and thermal performance are never compromised.
• 4 Line level Inputs—2 Balanced, 2 unbalanced
Up to four line-level devices can be connected to the amplier, the higher quality balanced inputs (with the use of a
suitable adapter) can be converted to unbalanced mode if required. All inputs oer the same high performance levels with
regard to sensivity and bandwidth, with the balanced inputs inherently oering the best performance with regards to
noise rejecon. The input sockets themselves have been chosen to oer the best in terms of audio performance and
long-term reliability
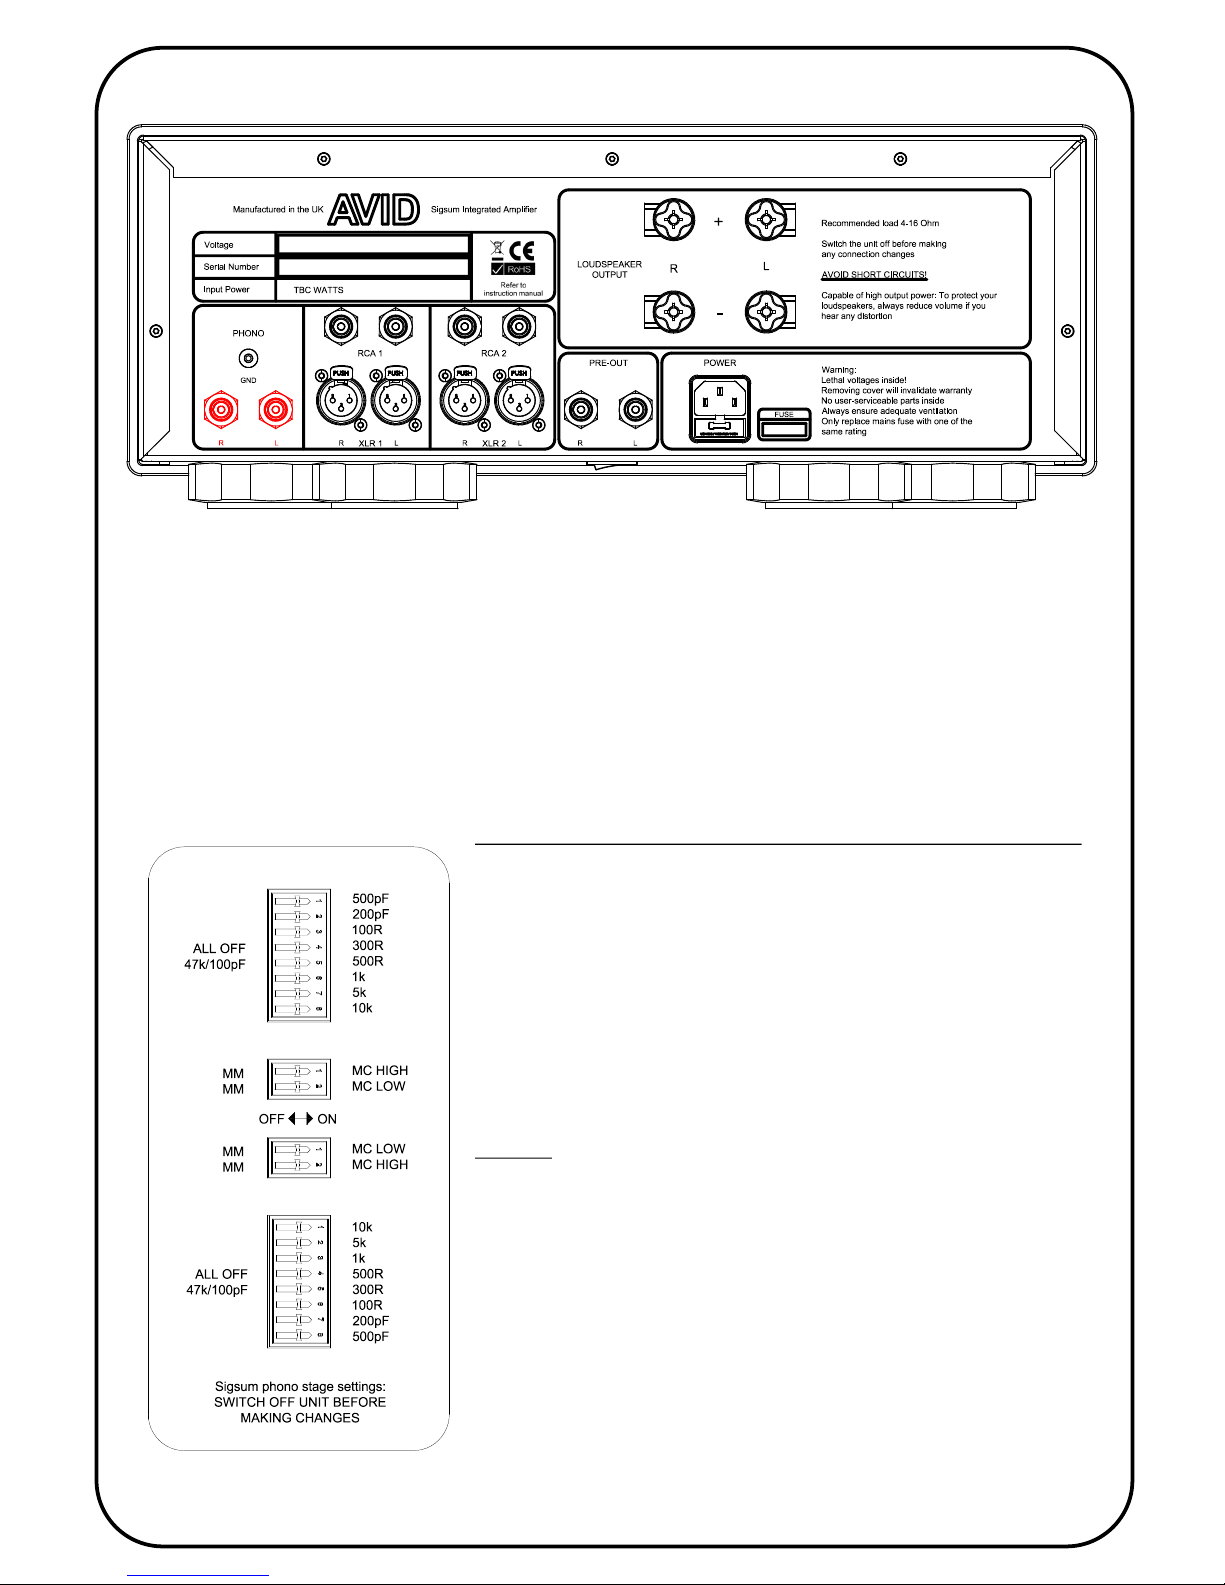
• High performance Phono stage with adjustable gain, input resistance and capacitance
Derived from our hugely successful Pulsus phono stage, the Sigsum's phono stage oers unrivalled performance and
exibility when compared to other designs. Designed to oer the best performance in terms of distoron, noise and
compliance with the RIAA specicaon—but most importantly, it sounds superb.
• Superior headphone amplier, capable of driving almost any convenonal, dynamic headphone
Most headphone ampliers take the form of an aerthought, but nothing could be further from the truth with the Sigsum.
As with the main output stage, this amplier is designed to use discrete components selected to oer the best
performance, and the widest compability with the diverse selecon of headphones available today. Working in pure Class
‘A’ at low to medium volume levels this is a ’proper’ headphone amplier complete with its own dedicated power feed.
• Unbalanced Pre-amp output for future systems upgrades
Whilst the performance of the amplier is exemplary when compared with the very best integrated designs, we know that
with me, people oen look for ways of improving performance further sll. By using the Pre-out sockets built-in to the
Sigsum, it is possible to upgrade to even greater performance levels with the addion of the Celsus power amplier (or any
other power amplier in the AVID range).

5
CONNECTION TYPES
Your AVID amplifier can make use of a either Balanced (XLR), Unbalanced (RCA), or any combination of the two
types of input.
WHICH SHOULD I USE?
Whenever possible you should use balanced connections, however in recognition that not all sources provide
balanced connections, unbalanced connections may be used when necessary.
WHAT’S THE MAIN BENEFITS OF USING BALANCED INPUTS?
All audio cables are susceptible to picking up noise (even screened cables). Any wire will act as an aerial, in that they
can pick up electromagnetic interference, whether that be radio signals, or simply the energy created by a something
like a spark from a thermostat being tripped. Balance inputs generally offer higher performance, thanks to their
superior noise rejection characteristics. This reduced noise allows for greater dynamics and generally improved
transparency.
• UNBALANCED CONNECTIONS
Conventional, unbalanced connections make use of two conductors—one carrying the signal, and the other is
a ground reference (0V), which can also take the form of a shield (in the case of coaxial cables). The use of
coaxial cables can improve susceptibility to noise, however it can never be completely removed.
• BALANCED CONNECTIONS
A balanced connection is different in that there are two signal cables, one with the positive phase of the
signal, and the other with the negative (a mirror image of the positive signal, if you like). When the signal
reaches the amplifier, the two signals are effectively subtracted from each other (but as one is negative, the
signal is effectively added). Just like any other cable, they are susceptible to external electrical noise sources.
The difference is that both the negative and positive wires are likely to be equally affected. The benefit here is
that when these two signals are effectively ‘subtracted’ from each other in the amplifier, any noise effectively
disappears leaving a pristine signal.
PLACEMENT
• Place your Sigsum on a sturdy and level surface
• Avoid locaons where your Sigsum may be aected by direct sunlight or damp.
• Keep your Sigsum away from heat sources
• Do not place the Sigsum in an enclosed space such as a closed cabinet unless venlaon has been catered for
• Do not place any objects on top of the amplier, which would obstruct air-ow

6
PHONO INPUT
The phonostage of your Sigsum can be configured for cartridges of various types in terms of Sensitivity, Impedance, and
Capacitance. In the first instance, please refer to your cartridge documentation to ascertain the initial settings for your
cartridge. The phono settings are accessible from beneath the unit—take care when turning the unit over, and ensure it is
resting on a soft, clean cloth to ensure none of the finishes are damaged during the procedure.
The phonostage provides an earthing post that should be connected to the turntable earth cable—failure to do so will result
in high levels of hum.
In the absence of full cartridge documentation, please follow these guidelines
Initial setup
The settings are configured using the switches accessible through the apertures
on the bottom, towards the rear of the case. Using a pen tip, you can slide each
arrow to either the ON of OFF position.
Moving Magnet
A standard Moving Magnet cartridge is the easiest to configure—simply ensure all
the switches are set to OFF—this is a starting
Sensitivity
There are three sensitivity levels available increasing from MM, MC LOW and MC
HIGH.
Check what type of cartridge you have. If you are uncertain, set the dial to MM.
If you have an MC cartridge, then set the dial to MC (mid).
Play a piece of music with which you are familiar. Adjust the volume control to a
comfortable listening level, if the volume control is much beyond the half way
point, you should probably consider increasing the sensitivity level, if the volume is
immediately very loud, then choose a lower sensitivity.
Some very high output MC cartridges work well using the MM setting—no harm
will be done by experimenting with settings.

7
Resistance
Normally, the ideal aim is to match the amplifiers input impedance to that of the cartridge, this will ensure maximum signal
transfer, and minimise noise (hiss) —however, if you do not have this information (remember you can check the
manufacturer’s website), you can safely experiment with any of the possible values—again, tune by ear to get the most
pleasing sound.
Most MM cartridges are 47k, high output MC cartridges also tend to benefit from a high resistance setting, however low
output MC cartridges are invariably low impedance, suggesting a low resistance setting. Please experiment with this setting,
as the minor adjustments can make worthwhile improvement to the overall performance.
Capacitance
The effect of the capacitance setting is most obvious at high frequencies, but can be quite subtle. The values chosen are
affected by the design of cartridge, but also but the connecting cables—so there is no absolutely correct setting, and
experimentation is recommended until you find a setting that suits your set-up and personal preference.
Low impedance designs tend to be largely unaffected by capacitance settings, but high impedance designs, and especially MM
cartridges can be greatly affected. Start by okaying a selection of tracks you know well and adjust the setting until you find one
where you feel the best balance of detail and musicality are achieved.
LINE INPUT
The Sigsum has Four line inputs: two Balanced and two Unbalanced— which you choose depends on your source equipment,
but if you have the choice, we recommend using Balanced. These are referred to as Line Level inputs, and can be used to
connect to any standard piece of audio equipment, such as CD, Media Streamer, or FM/DAB Tuner.
Unbalanced
The unbalanced inputs make use of the two pairs of RCA connectors immediately above the three pin XLR sockets—these
sockets are labelled RCA 1 and RCA 2.

8
Balanced
The unbalanced inputs make use of the two pairs of RCA connectors immediately above the three pin XLR sockets—these
sockets are labelled XLR 1 and XLR 2.
XLR connectors make use of a locking mechanism—please make sure that the plugs are pushed in all the way, and that these
engage correctly (you should hear a click when they engage).
PRE-OUT
The Sigsum is capable of outputting to an external amplifier should you require. This signal is affected by the position of the
volume control—so your Sigsum takes the role of a high quality Pre-Amplifier, allowing you an upgrade path to the likes of the
Celsus power amplifier

9
Loudspeaker Connections
The Sigsum outputs its power through two pairs of binding posts—these are compatible with both 4mm/banana plugs and
Spade connectors
The Sigsum has a sophisticated protection circuit to prevent damage from DC offsets, short-circuits and overheating, but it is
always wise to avoid situations where these situations may occur.
Always make sure that all connections are tight—loose connections can result in intermittent sound, loss of efficiency and
damage to the terminals, due to arcing.
Speaker cable
Feel free to experiment with the type of loudspeaker cable you use—there is no definitive answer as to which is best, as this
is all to do with system matching– and personal taste. Keep in mind that this is a high current design, so to reap the maximum
benefits, the cable resistance should be kept as low as possible. This can be achieved by keeping cable runs as short as
necessary and using a cable with a large cross-sectional area.
Correct Phase
It is important to ensure that your loudspeakers are connected “in phase”. This simply means that, for both the left and right
channels, the positive output connections are connected to the positive terminals on the loudspeakers, and similarly the
negative outputs are connected to the negative loudspeaker connections. It sounds very simple, but it is surprising how often
mistakes are made with this. You will know if you have got this correct, as when you listen to the system you should have
strong bass and a very obvious centrally located image—out of phase will have a diffuse image, and very weak bass. Use of
the Mono button will help clarify this issue—if you listen to the signal in mono and the speakers are connected correctly, you
should hear a VERY strong centrally located signal—out of phase speaker will sound very diffuse with no discernible image.

10
Mains Power
Mains power is supplied via the standard IEC 3-pin connector on the rear panel. The mains circuit does incorporate filtering
circuits to ensure the feed is clean, and therefore the use of external mains filtering systems is unnecessary.
We recommend, for safety reasons, that connecting the mains should be left as the last step.
Switching on
Before switching the unit on, ensure the volume control is turned to its minimum level (fully anticlockwise). Your Sigsum
amplifier has a mains switch, which is hidden on the bottom of the unit, in the middle of the front panel. There will be a few
clicks from internal relays as the protection circuit is activated during the first few seconds. There is a single, blue LED on the
left of the unit (in the large ‘A’) that is illuminated whenever the unit is on.

11
Headphone Use
Your Sigsum incorporates a high quality headphone amplifier capable
of driving most conventional, dynamic headphones. Please be aware
that, because of the amplifier’s ability to drive a wide range of head-
phones, it is capable of driving sensitive designs to very high levels.
Please make sure that you do not use excessive levels, especially
over prolonged periods—permanent hearing damage will result.
Mono Operation
The Sigsum has the ability to switch the stereo signal to mono.
Mono operation is active when its associated Blue LED is illuminated.
Mute
The output from the Sigsum can be temporarily silenced by pressing
the Mute button—again, its operation is indicated by a blue LED.
Press the button again, to go back to normal operation.
Always check that the volume setting has not been inadvertently increased before unmuting the amplifier.
Amplifier protection
In the event of a fault occurring , the unit will protect itself—this will happen when a DC offset or short-circuit is
detected, or if the unit exceeds its maximum safe operating temperature. Should any of these faults occur, the MUTE
light will illuminate. In the case of overheating, the unit will reset itself, once it has cooled sufficiently, however, in any
event, you should switch your Sigsum off, and investigate the likely fault (check your loudspeaker cabling, and ensure the
unit has sufficient cooling). If the protection circuit activates on a regular basis, please contact your dealer for support.

12
TROUBLESHOOTING
Operation of your Sigsum is generally straight-forward, but if you are having problems, please use the following sequence:
Fault Soluon
No Power light 1: Ensure the power lead is plugged in, and that the power socket is switched on
2: Ensure the Power switch under the unit is in the ON posion
3: Check for damage to the mains lead—Try an alternave cable
4: Check the mains input fuse (unplug from the mains before checking)
No Sound 1: Check that the volume control is not turned all the way down
2: Check the correct source is selected, and plugged in
3: Check the Mute buon is out (and its associated light is o)
4: Check that any headphones have been unplugged from the Sigsum
5: Check that the speakers cables are correctly connected at both ends
Distorted sound 1: If the volume is excessively high, turn the volume down
2: If you are listening to the Phono input, reduce the sensivity (see PHONO INPUT)
Hum from Phono input 1: Ensure that the turntables earth cable has been aached to the earth post on the
rear of the amplier
2: Check the same connecon on your turntable—refer to units documentaon
Sound cuts out 1: Check amplier and speaker terminals for loose, or shorted connecons
2: Ensure that the unit has adequate cool air and venlaon
Mute light on when Mute
buon o
This indicates a fault:
1: Check for short-circuits at either end of the loudspeaker cable
2: Check that the unit is not overheang
3: Consult your dealer if problem persists.

13
Specicaon
POWER
Connuous power output (20Hz—20kHz at 0.5% THD):
Both channels, 8Ω, 20Hz—20kHz: 110 W
Harmonic distoron, 80% power, 8Ω at 1kHz: 0.003%
Recommended loudspeaker impedance: 4-16 Ω
INPUTS
Phono
Gain: 48dB – 60dB – 70dB
Input resistance: 100R – 300R - 500R – 1K – 5K – 10K – 47K
Input capacitor: 100pF – 200pF – 500pF
Distoron: Less than 0.001%
RIAA Accuracy: + 0.5dB 5Hz – 70KHz (Neumann HF correcon)
Noise (A weighted): MM –81dB MC –67dB (high seng)
Channel separaon: < -85dB 5Hz – 20KHz
Line (RCA and XLR)
Nominal sensivity: 340mV Volume Full 100W XLR
Input impedance: 33 kΩ XLR 82 kΩ RCA
Maximum input: 11 Vrms XLR
Frequency response: 5Hz—over 80kHz ± 1dB
Signal/noise rao:
XLR (Awtd) 50 W, ref. 1V input: 100 dB
RCA (Awtd) 50 W, ref. 1V input: 100 dB
OUTPUTS
Preamplier output
Nominal output level: 11 V
Output impedance: 47 Ω
Headphone Output
Maximum output level into 600Ω: 10 V RMS
Output impedance: 1 Ω
Load range: 20 Ω—600 Ω

14
Specicaon (connued)
POWER CONSUMPTION
Input voltage (region dependent) 115V or 230V AC
Power Consumpon (Max) 59 Was No Signal Idle
800 Was Clipping 4Ω Load
DIMENSIONS AND Weights
Unit (including output terminals -W x D x H) : 471mm x 500mm x 190mm
Packed: 600mm x 570mm x 260mm
Unit weight: 31.2kg
Packed weight: 34.5kg
DECLARATION OF CONFORMITY
EC Declaraon of Conformity 06 December 2017
We declare that our Sigsum integrated amplier conforms to direcves
and harmonized internaonal standards:
EMC (89/36/EEC) Electromagnec conformity
BS EN 60065: 1994
Safety requirements for mains operated electronic and related apparatus for household and similar use.
CENELEC HD21/22 Flexible cables and cords
EN 55020: 1988 Electromagnec Immunity
EN 55013: 1990 Electromagnec Emissions
C. Mas Director AVID HIFI Limited

15
Warranty Statement UK Residents
AVID HIFI Limited products are warranted against defects in materials and workmanship for a period of two years from the original date of
purchase, or no later than three years from the date of shipment to an authorized AVID agent, which ever comes rst, extending to ve
years subject to the product owner having submied the Registraon form (www.avidhi.com/register.htm). Also the following condions
being observed.
• The product must have been purchased through an authorized AVID dealer
• By default, the warranty is in favour of the original purchaser only, however warranes are transferable providing the new owner
completes the online product registraon form. In this case, warranty obligaon will pass from dealer to manufacturer.
• During the warranty period, AVID will repair, or replace any defects due to material or workmanship, without charge for parts or
labour.
• Should product need to be returned, a wrien descripon of the defect and a photocopy of the original purchase receipt must
accompany it. Receipts must show the model, serial number, date of purchase, name and address of purchaser and authorized
dealer and the price paid.
• Returned product must be packed in the original packing and returned to AVID or original dealer by the customer at his/her
expense. AVID will pay return freight of its choice.
• The warranty is void if the product has been used or handled other than in accordance with the instrucon manual supplied, abused
or misused, damaged by accident, neglect or in being transported, or the defect is due to the product being repaired or tampered
with by anyone other than AVID or a dealer with prior authorizaon.
• The warranty is void if the product serial number has been removed, altered or made illegible.
• The warranty is void if the product has been taken out of the country of purchase.
• AVID shall not be held liable for incidental or consequenal damages of any kind arising from the sale or use of its products.
• The warranty applies to ex-demonstraon product, using manufacture date as purchase date.
• Where the product is sold under a consumer transacon (as dened by the Sale of Goods Act 1979) the statutory rights of the
purchaser are not aected by this warranty.
• Products are sold on the basis of specicaons applicable at the me of sale. AVID shall have no obligaon to modify or to update
products once sold.
Outside UK
AVID has formal distribuon in many countries throughout the world. In each country the AVID importer has contractually accepted the
responsibility for the product warranty. Warranty should normally be obtained from the imporng agent or distributor from whom you
obtained your product. In the unlikely event of service required beyond the capability of the importer, AVID will, of course, back up the
warranty.
• Where product has been either supplied directly or there is no current distributor, AVID accepts responsibility for the warranty
period. Returned product must be packed in the original packing and returned to AVID by the customer at his/her expense.
AVID will pay return freight of its choice. The warranty is only valid in the country of purchase.
• Products outside their original desnaon requires that units with remaining warranty be returned to the country of purchase for
the warranty to be valid. Customer is responsible for freight both ways and all associated import and export charges.
• Foreign distributors are not required to provide warranty service, repair or change AC mains voltage on units that they did not
originally import and sell.
• Foreign distributors may at their discreon oer service for a fee.
MISCELLANEOUS. ANY IMPLIED WARRANTIES RELATING TO THE ABOVE PRODUCT SHALL BE LIMITED TO THE DURATION OF THIS
WARRANTY. THE WARRENTY DOES NOT EXTEND TO ANY INCIDENTAL OR CONSEQUENTIAL COSTS OR DAMAGES TO THE PURCHASER.
WARRANTOR. Inquiries regarding the Limited Warranty may be sent to the following address:
AVID HIFI Limited. Bicton Industrial Park, Kimbolton, Hunngdon. PE28 0LW ENGLAND

16
AVID HIFI Ltd
Bicton Industrial Park,
Kimbolton, Huntingdon,
Cambridgeshire.
PE28 0LW
ENGLAND
Company Registered No: 5435528 — VAT Registration No: GB 694 9858 48 — Directors: C. Mas & S.J. Mas
Updated 9th October 2018
Table of contents
Other AVID HIFI Amplifier manuals