AVIN AA-BE46 User manual

Operating Manual


Thank you for choosing this unit as your navigator.
Please read through these instructions so you will know how to operate
your model properly. After you have finished reading the instructions,
keep this document in asafeplace for future reference.
keep this document in asafeplace for future reference.
your model properly
Please read through these instructions so you will know how to operate
Thank you for choosing this
keep this document in asafeplace for future reference.
After you have finished reading the instructions,.your model properly
Please read through these instructions so you will know how to operate
unit as your navigatorThank you for choosing this
keep this document in asafeplace for future reference.
After you have finished reading the instructions,
Please read through these instructions so you will know how to operate
.unit as your navigator
After you have finished reading the instructions,
Please read through these instructions so you will know how to operate


\\ 01
Content
Precautions - - - - - - - - - - - - - - - - - - - - - - - - - - - - - - - - - - - - - - - - - - - - - - - - 3
Specifications - - - - - - - - - - - - - - - - - - - - - - - - - - - - - - - - - - - - - - - - - - - - - - - 5
1. Basic Operations - - - - - - - - - - - - - - - - - - - - - - - - - - - - - - - - - - - - - - - - - - - 7
1-1Panel - - - - - - - - - - - - - - - - - - - - - - - - - - - - - - - - - - - - - - - - - - - - - - - - 7
1-2Buttons - - - - - - - - - - - - - - - - - - - - - - - - - - - - - - - - - - - - - - - - - - - - - - - 7
1-3 Connector instruction - - - - - - - - - - - - - - - - - - - - - - - - - - - - - - - - - - - - - 9
1-4Desktop - - - - - - - - - - - - - - - - - - - - - - - - - - - - - - - - - - - - - - - - - - - - - - 11
2. Features - - - - - - - - - - - - - - - - - - - - - - - - - - - - - - - - - - - - - - - - - - - - - - - - 14
2-1Radio - - - - - - - - - - - - - - - - - - - - - - - - - - - - - - - - - - - - - - - - - - - - - - - -14
2-2Disc - - - - - - - - - - - - - - - - - - - - - - - - - - - - - - - - - - - - - - - - - - - - - - - - -16
CD mode - - - - - - - - - - - - - - - - - - - - - - - - - - - - - - - - - - - - - - - - - - - - -16
VCD mode - - - - - - - - - - - - - - - - - - - - - - - - - - - - - - - - - - - - - - - - - - - -18
DVD mode - - - - - - - - - - - - - - - - - - - - - - - - - - - - - - - - - - - - - - - - - - - -19
2-3 USB/SDHC- - - - - - - - - - - - - - - - - - - - - - - - - - - - - - - - - - - - - - - - - - - -20
USB USB Music - - - - - - - - - - - - - - - - - - - - - - - - - - - - - - - - - - - - - - - -20
USB /SD Photo - - - - - - - - - - - - - - - - - - - - - - - - - - - - - - - - - - - - - - - - 21
USB /SD Video- - - - - - - - - - - - - - - - - - - - - - - - - - - - - - - - - - - - - - - - - 22
2-4FileManager - - - - - - - - - - - - - - - - - - - - - - - - - - - - - - - - - - - - - - - - - - - 23
2-5 Bluetooth - - - - - - - - - - - - - - - - - - - - - - - - - - - - - - - - - - - - - - - - - - - - - 24
Pairing - - - - - - - - - - - - - - - - - - - - - - - - - - - - - - - - - - - - - - - - - - - - - - - 24
Disconnect - - - - - - - - - - - - - - - - - - - - - - - - - - - - - - - - - - - - - - - - - - - - 24
Hands-free calling - - - - - - - - - - - - - - - - - - - - - - - - - - - - - - - - - - - - - - -25
Bluetooth audio stream - - - - - - - - - - - - - - - - - - - - - - - - - - - - - - - - - - - 27
2-6 iPod - - - - - - - - - - - - - - - - - - - - - - - - - - - - - - - - - - - - - - - - - - - - - - - - - 28
2-7 Auxiliary Equipment - - - - - - - - - - - - - - - - - - - - - - - - - - - - - - - - - - - - - -30
Auxiliary audio/video equipment - - - - - - - - - - - - - - - - - - - - - - - - - - - - - 30
Rear view camera - - - - - - - - - - - - - - - - - - - - - - - - - - - - - - - - - - - - - - - 30

02 //
2-8 GPS Navigation - - - - - - - - - - - - - - - - - - - - - - - - - - - - - - - - - - - - - - - - 31
2-9 OBD2- - - - - - - - - - - - - - - - - - - - - - - - - - - - - - - - - - - - - - - - - - - - - - - 32
2-10 The browser - - - - - - - - - - - - - - - - - - - - - - - - - - - - - - - - - - - - - - - - - 34
2-11 The use of touch screen - - - - - - - - - - - - - - - - - - - - - - - - - - - - - - - - - 34
3. Settings - - - - - - - - - - - - - - - - - - - - - - - - - - - - - - - - - - - - - - - - - - - - - - - - - 36
3-1Wireless and Internet - - - - - - - - - - - - - - - - - - - - - - - - - - - - - - - - - - - - -36
3-2equipment - - - - - - - - - - - - - - - - - - - - - - - - - - - - - - - - - - - - - - - - - - - - 37
3-3 Persona - - - - - - - - - - - - - - - - - - - - - - - - - - - - - - - - - - - - - - - - - - - - - -39
3-4Individual account - - - - - - - - - - - - - - - - - - - - - - - - - - - - - - - - - - - - - - - 42
3-5 system - - - - - - - - - - - - - - - - - - - - - - - - - - - - - - - - - - - - - - - - - - - - - - - 42
4. Troubleshooting - - - - - - - - - - - - - - - - - - - - - - - - - - - - - - - - - - - - - - - - - - - 45
5. Standard unit and Accessories list - - - - - - - - - - - - - - - - - - - - - - - - - - - - - - 46
2-9 OBD2- - - - - - - - - - - - - - - - - - - - - - - - - - - - - - - - - - - - - - - - - - - - - - - 32
2-8 GPS Navigation - - - - - - - - - - - - - - - - - - - - - - - - - - - - - - - - - - - - - - - -
2-9 OBD2- - - - - - - - - - - - - - - - - - - - - - - - - - - - - - - - - - - - - - - - - - - - - - - 32
2-8 GPS Navigation - - - - - - - - - - - - - - - - - - - - - - - - - - - - - - - - - - - - - - - -
2-9 OBD2- - - - - - - - - - - - - - - - - - - - - - - - - - - - - - - - - - - - - - - - - - - - - - - 32
312-8 GPS Navigation - - - - - - - - - - - - - - - - - - - - - - - - - - - - - - - - - - - - - - - -
3-4Individual account - - - - - - - - - - - - - - - - - - - - - - - - - - - - - - - - - - - - - -
- - - - - - - - - - - - - - - - - - - - - - - - - - - - - - - - - - - - - - - - - - - - - -393-3 Persona
- - - - - - - - - - - - - - - - - - - - - - - - - - - - - - - - - - - - - - - - - - - - 373-2equipment
3-1Wireless and Internet
- - - - - - - - - - - - - - - - - - - - - - - - - - - - - - - - - - - - - - - - - - - - - - - - - 363. Settings
The use of touch screen - - - - - - - - - - - - - - - - - - - - - - - - - - - - - - - - -12-1
The browser - - - - - - - - - - - - - - - - - - - - - - - - - - - - - - - - - - - - - - - - - 342-10
2-9 OBD2- - - - - - - - - - - - - - - - - - - - - - - - - - - - - - - - - - - - - - - - - - - - - - - 32
3-4Individual account - - - - - - - - - - - - - - - - - - - - - - - - - - - - - - - - - - - - - -
- - - - - - - - - - - - - - - - - - - - - - - - - - - - - - - - - - - - - - - - - - - - - -39
- - - - - - - - - - - - - - - - - - - - - - - - - - - - - - - - - - - - - - - - - - - - 37
- - - - - - - - - - - - - - - - - - - - - - - - - - - - - - - - - - - - -363-1Wireless and Internet
- - - - - - - - - - - - - - - - - - - - - - - - - - - - - - - - - - - - - - - - - - - - - - - - - 36
The use of touch screen - - - - - - - - - - - - - - - - - - - - - - - - - - - - - - - - -
The browser - - - - - - - - - - - - - - - - - - - - - - - - - - - - - - - - - - - - - - - - - 34
2-9 OBD2- - - - - - - - - - - - - - - - - - - - - - - - - - - - - - - - - - - - - - - - - - - - - - - 32
- 423-4Individual account - - - - - - - - - - - - - - - - - - - - - - - - - - - - - - - - - - - - - -
- - - - - - - - - - - - - - - - - - - - - - - - - - - - - - - - - - - - - - - - - - - - - -39
- - - - - - - - - - - - - - - - - - - - - - - - - - - - - - - - - - - - - - - - - - - - 37
- - - - - - - - - - - - - - - - - - - - - - - - - - - - - - - - - - - - -36
- - - - - - - - - - - - - - - - - - - - - - - - - - - - - - - - - - - - - - - - - - - - - - - - - 36
34The use of touch screen - - - - - - - - - - - - - - - - - - - - - - - - - - - - - - - - -
The browser - - - - - - - - - - - - - - - - - - - - - - - - - - - - - - - - - - - - - - - - - 34
2-9 OBD2- - - - - - - - - - - - - - - - - - - - - - - - - - - - - - - - - - - - - - - - - - - - - - - 32
5. Standard unit and
- - - - - - - - - - - - - - - - - - - - - - - - - - - - - - - - - - - - - - - - - - - 45roubleshooting4. T
3-5 system - - - - - - - - - - - - - - - - - - - - - - - - - - - - - - - - - - - - - - - - - - - - - - -
- - - - - - - - - - - - -Accessories list
- - - - - - - - - - - - - - - - - - - - - - - - - - - - - - - - - - - - - - - - - - - 45
3-5 system - - - - - - - - - - - - - - - - - - - - - - - - - - - - - - - - - - - - - - - - - - - - - - -
46- - - - - - - - - - - - - - -- -- - - - - - - - - - - - -
- - - - - - - - - - - - - - - - - - - - - - - - - - - - - - - - - - - - - - - - - - - 45
423-5 system - - - - - - - - - - - - - - - - - - - - - - - - - - - - - - - - - - - - - - - - - - - - - - -
02 //

\\ 03
Notes on installation:
It’shighlyrecommended that the unit beinstalled byaprofessional car audio
installer.
This software requires that the navigation system is properlyconnected to your
vehicle’sparking brake and depending on your vehicle, additional installation
may berequired.
This device is used on cars with 12V power supply(grounding wire is required).
,PSURSHULQVWDOODWLRQPD\FDXVHEDWWHU\GUDLQRUDVKRUWFLUFXLW
The car’sbattery shouldbedisconnected before installation to avoid any
electrical problems.
,IWKHXQLWGRHVQRWSRZHURQGRXEOHFKHFNDOOSRZHUFRQQHFWLRQVDQGSRZHU
fuses.
3URWHFWWKHXQLWVXUIDFHIURPGDPDJH
'RQRWH[SRVHWKHXQLWWRDQ\PRLVWXUHRUOLTXLGDVLWFRXOGFDXVHDQHOHFWULFDO
shock and damage the unit or the car’selectrical system.
%HVXUHWRIL[WKHXQLWVHFXUHO\WRFDUEHIRUHRSHUDWLRQ
Notes on safety:
&RPSO\ZLWK\RXUORFDOWUDIILFUXOHVODZVDQGUHJXODWLRQVUHJDUGLQJSURSHUXVH
of this device.
Donot watch or operate the unit whiledriving, as it may lead to distraction and
cause an accident. Park your car in asafe place to watch or operate the unit.
Donot use the setup feature or any other function which coulddivert your
attention from the road.
When reversing your car, besure to look back and watch your surroundings
carefullyfor your safety. Donot depend on the rear view camera exclusively.
will not beheldliablefor any misuse or accidents related from the
misuse of this device, or from misuse of any of its accessories.
NOTES
The photos and figures in this manual are for reference only.
The screens shown in the examples may differ from actual
screens, which may bechanged without notice for
performance and functional improvements.
Precautions
NOTES
The screens shown in the examples may dif
The photos and figures in this manual are for reference only
The screens shown in the examples may dif
The photos and figures in this manual are for reference only
ff
fer from actua
ples may dif
The photos and figures in this manual are for reference only
fer from actual
.
The photos and figures in this manual are for reference only
This software requires that the navigation system is properlyconnected to your
.installer
shighlyrecommended that the unit beinstalled byaprofessional car audioIt’
Notes on installation:
NOTES
performance and functional improvements.
screens, which may bechanged without notice for
The screens shown in the examples may dif
This software requires that the navigation system is properlyconnected to your
shighlyrecommended that the unit beinstalled byaprofessional car audio
Notes on installation:
performance and functional improvements.
screens, which may bechanged without notice for
The screens shown in the examples may dif
This software requires that the navigation system is properlyconnected to your
shighlyrecommended that the unit beinstalled byaprofessional car audio
performance and functional improvements.
screens, which may bechanged without notice for
fer
from
actua
ples may dif
ff
This software requires that the navigation system is properlyconnected to your
shighlyrecommended that the unit beinstalled byaprofessional car audio
fer from actual
Precautions
QXHKWWFHWRU3
fuses.
VHRGWLQXHKWI,
electrical problems.
sbattery shouldbedisconnected before installation to avoid any’The car
DWVQLUHSRUSP,
This device is used on cars with 12V power supply(grounding wire is required).
may berequired.
sparking brake and depending on your vehicle, additional installationvehicle’
HJDPDGPRUIHF
D
I
ID
UXVWL
ODNFHKFHOEXRGQRUHZRSWRQV
electrical problems.
sbattery shouldbedisconnected before installation to avoid any
QLDUG\UHWWDEHVXDF\DPQRLWDOOD
This device is used on cars with 12V power supply(grounding wire is required).
may berequired.
sparking brake and depending on your vehicle, additional installation
UHZRSGQDVQRLWFHQQRFUHZRSO
sbattery shouldbedisconnected before installation to avoid any
WLXFULFWURKVDUR
This device is used on cars with 12V power supply(grounding wire is required).
sparking brake and depending on your vehicle, additional installation
U
This device is used on cars with 12V power supply(grounding wire is required).
sparking brake and depending on your vehicle, additional installation
Donot use the setup feature or any other function which coulddivert your
cause an accident. Park your car in asafe place to watch or operate the unit.
Donot watch or operate the unit whiledriving, as it may lead to distraction and
of this device.
\KWLZ\OSPR&
Notes on safety:
W[LIRWHUXVH%
shock and damage the unit or the car
HVRS[HWRQR'
Donot use the setup feature or any other function which coulddivert your
cause an accident. Park your car in asafe place to watch or operate the unit.
Donot watch or operate the unit whiledriving, as it may lead to distraction and
GQDVZDOVHOXUFL
I
I
II
DUWODFROUXR
Notes on safety:
RHU
R
I
IR
HEUDFRW\OHUXFHVWLQXHKW
selectrical system.’shock and damage the unit or the car
XTLOURHUXWVLRP\QDRWWLQXHKWH
Donot use the setup feature or any other function which coulddivert your
cause an accident. Park your car in asafe place to watch or operate the unit.
Donot watch or operate the unit whiledriving, as it may lead to distraction and
XUHSRUSJQLGUDJHUVQRLWDOXJHU
QRLWDUHSR
selectrical system.
DFLUWFHOHQDHVXDFGOXRFWLVDGLX
cause an accident. Park your car in asafe place to watch or operate the unit.
Donot watch or operate the unit whiledriving, as it may lead to distraction and
HV
OD
misuse of this device, or from misuse of any of its accessories.
carefullyfor your safety
When reversing your car
attention from the road.
w
misuse of this device, or from misuse of any of its accessories.
will not beheldliablefor any misuse or accidents related from the
. Donot depend on the rear view camera exclusivelycarefullyfor your safety
,besure to look back and watch your surroundingsWhen reversing your car
attention from the road.
Donot use the setup feature or any other function which coulddivert your
misuse of this device, or from misuse of any of its accessories.
will not beheldliablefor any misuse or accidents related from the
. Donot depend on the rear view camera exclusively
,besure to look back and watch your surroundings
Donot use the setup feature or any other function which coulddivert your
will not beheldliablefor any misuse or accidents related from the
.. Donot depend on the rear view camera exclusively
\\ 03

04 //
Precautions
Operating precautions
Please read the following precautions before use, and kindlycomplywith all of them
to operate it in proper ways for the best use of the unit.
1. Becareful when installing third party application as they can cause the system to
become unstable. Wedo not provide any support for third party application or
guarantee any third party apps to becompatiblewith the unit.
2. Ifyou run into software issues you can restore the unit back to Factory Default.
Torestore Factory Defaultgo to: (Settings-Advanced settings-Privacy-Restore
factory default). (Note: All the softwares installed bythe user, settings, and data
will bedeleted).
3. Start Time: Coldboot time 15-25 seconds, Warm boot time 2-3 seconds from
standbymode. The system will go into standbymode (standbytime can be
adjusted in Settings menu) after turning off the car and removing the key out of
the ignition. The unit can beswitched ON within 2-3 seconds from standbymode.
Inorder to prevent over discharge of the battery, the device is equipped with low
battery detection protection. Ifthe car’s battery voltage is detected to below while
the unit is in sleep mode the system will automaticallyfullypower down the unit to
prevent battery discharge.
4. Wewarrant the Device against defects in materialsand workmanship under
ordinary consumer use for one year from the date of original retail purchase.
During this warranty period, if adefect arises in the Device, and you follow the
instructions for returning the Device, we will,at our option, to the extent permitted
bylaw, either (i) repair the Device using either new or refurbished parts,
or (ii) replace the Device with anew or refurbished Device that is equivalent to the
Device that is to bereplaced. This limited warranty applies, to the extent permitted
bylaw, to any repair, replacement part or replacement device for the remainder of
the original warranty period. This limited warranty applies onlyto hardware
components of the Device that are not subject to accident, misuse, neglect, fire
or other external causes, alterations, repair, or commercial use. The limited
warranty covers the original purchaser and original receipt of purchase will be
required for warranty claims. Ifthe security seal on the unit is broken or if there is
any tampering of the unit hardware or software all warranty will bevoid.

\\ 05
Specification
Basic Specification:
Power ------------------------- DC12V
Resistance ------------------- 4ȍ
Max Power Output --------- 4X45W
Volume Control ------------- 15 dB (Bass 100Hz,Treble10KHz)
DVD Disc
CompatibleDiscs ---------- MPEG4.DVD.Super VCD.MP3.CD-R.
CD-RW Picture-CD
Video Standard ------------- Auto/NTSC/PAL
Installation Angle----------- 0--+/-30
Video
Video Mode ------------------ 4:3 Mailbox Mode/ 4:3 Full screen /16:9 Modes
Video Output ---------------- 1.0Vp-p.75ohms
Horizontal Resolution ----- 500
Productfeatures
Ɣ2SHUDWLQJ6\VWHP$QGURLG
Ɣ*+='XDOFRUHSURFHVVRU
Ɣ*%5$0
Ɣ;+'UHVROXWLRQGLVSOD\
Ɣ0XOWLWRXFKFDSDFLWLYHVFUHHQ
Ɣ6XSSRUWV+'9LGHRVXSWR3DQG3
Ɣ6XSSRUWV6'FDUGVXSWR*%
Ɣ6XSSRUWV:L)LDQG*86%0RGHP
Ɣ%OXHWRRWK+DQGVIUHH$'3$95&3
Ɣ6XSSRUWV%OXHWRRWK2%'

06 //
Specification
Audio
Line-outMax Output------------------- 2V rms/10k(20Hz-20KHz)
SUB-outMax Output------------------- 2V rms/10k(20Hz-120Hz)
FrequencyRange ----------------------- 20Hz-20KHz
S/N Ratio ---------------------------------- 90dB
Dynamic Scope ------------------------- 80dB
AM Tuner
AM FrequencyRange ----------------- 522-1620KHz (Euro/ China)
Intermediate Frequency---------------- 450KHz
UsableSensitivity(G%G%ȝ9
FM Tuner
FM FrequencyRange ------------------ 87.5-108KHz
Intermediate Frequency--------------- 10.7KHz
UsableSensitivity(G%G%ȝ9
S/N Ratio --------------------------------- 60dB
Stereo Separation----------------------- 30dB(1KHz)
FrequencyResponse------------------ 30-15000Hz
GPSReceiver
DCVoltage-------------------------------- 3V-5V
DCCurrent-------------------------------- 10mA Max
CenterFrequency----------------------- 1575.42 MHz±1MHz
V.S.W.R------------------------------------ 1.5:1(Voltage Standing Wave Ratio)
Band Width-------------------------------- ±5MHz
Impedance-------------------------------- 50ohm
PeakGain---------------------------------- > -4dBic Based on 7x7cm ground plane
Gain Coverage---------------------------- > -4dBic at -90°<0<+90°(over75% Volume)
Polarization RHCP
LNAGain (Withoutcable)------------- 28dB Typical
NoiseFigure------------------------------ 1.5dB
FilterOutBand Attenuation----------- (f0=1575.42 MHz)
7dB Min f0+/-20MHz
20dB Min f0+/-50MHz
30dB Min f0+/-100MHz

\\ 07
Basic Operation
1-1. Panel
1-2. Buttons
12 3
5
6
78
10
12
13
6
4
9
11
13
AA-BE46
1-2. Buttons
1. Discslot
2. Microphone
The Microphone isused forBluetooth Hands-free phone calling / Voice
Commands.
3. Reset key
Useatinypin to press the Reset keyinside that holeto reboot the system
when
the system crashes/freezesunexpectedly.
4. Play& Pause
5. DiscEject
6.Previous,and Next
7.Android BACK
Basic Operation

8.MENU:Click it whilein any App,turn to themenu pageof that App.
9.Home:Press it to return to desktop.
10.“NAVI” can bemappedto your choice of Navigation Apps;
11. Power / Volume(Theleft turn knob)
* Power on: Press theleft turn knob to switchon theunit whileits connected;
* Power off / Reboot: Longpress theleft turn knob afewseconds,theunit will
pop up twooptions : Power off & Reboot,simplytouchtheoption on thescreen.
* Volumecontrol: Simplyturn theleft turn knob in clockwise or counterclockwise
to increase or decrease thevolume,
* Mute mode: Short press theleft turn knob theunit will bemuted.
12. TheRightturn knob
* Seek up/down(Radio mode);
* Previous/Next(Disc/USB/SD playback mode);
* Backgroundlightcontroller (Dimmer,Press theknob to switchbetween 3
brightness modes).
13. Micro SD cardslots
Theunit supports USB flashmemory stick andMicro SD cardmemory up to
64GB.
Dismount themor Switchoff theunit before pullingout either USB Flashdriveor
Micro SD cardto prevent filecorruption.
Note: Toupdate thesoftware,theupdate software shouldbeput into aSD card
andinsertedinto NAVI SD cardslot.
Note: For BMW withfactory navigation systemthere is an addtional step needed
duringinstall for theunits button illumination to work andthelights to dimwith
thedimmer switchon thedashboard. You will needto use awire tap and
connect theorangewire fromthecableharness directlybehindtheunit to the
12v power wire fromthecigarette lighter. Doingthis will power on thebutton
illumination andallowsit to dimaccordingto thedimmer switchon thedasboard.
This step is onlyrequiredif your BMW hadthefactory navigation systemandyou
are nowusingthe6M extension cable.
Basic Operation
08 //
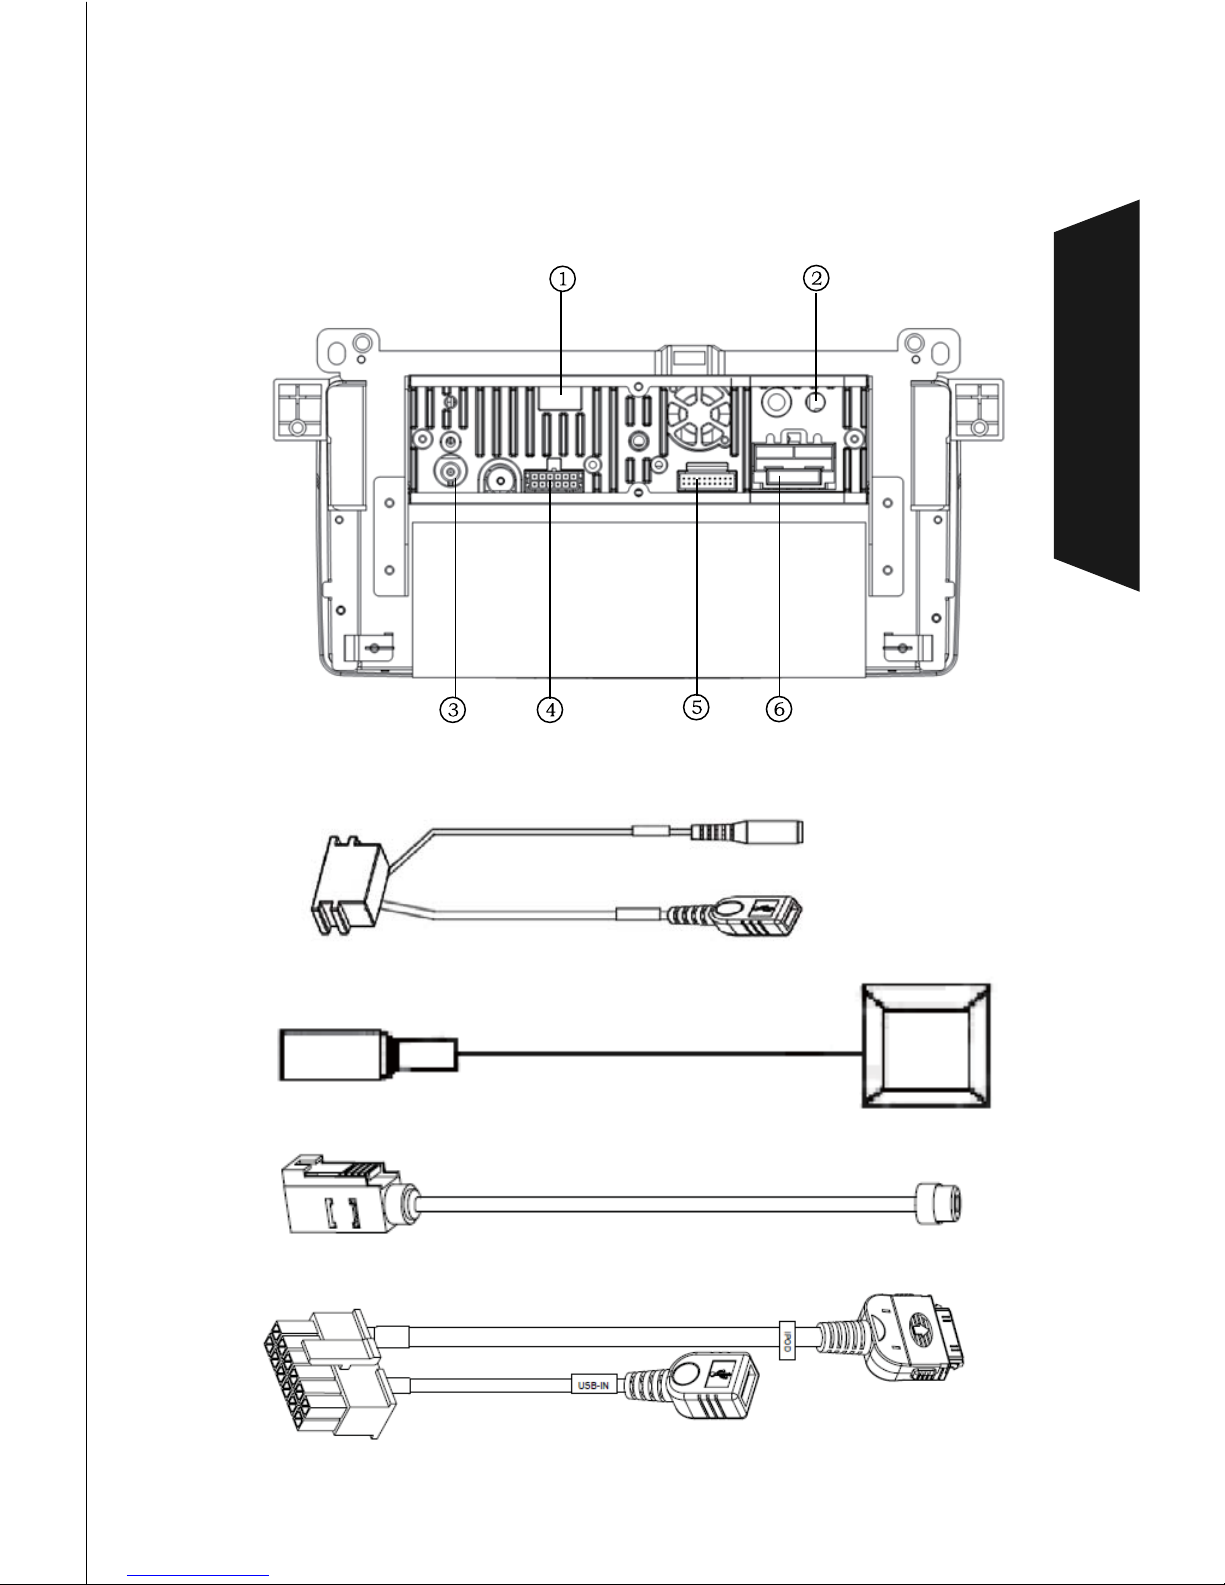
1-3. Connectorsinstruction
① USB/ Microphone
② GPS Antenna Interface ( withGPS Antenna )
③ Radio Antenna Interface
④ iPOD/USB
External GPS Antenna
Basic Operation
External Microphone In
USB Port 1
\\ 09
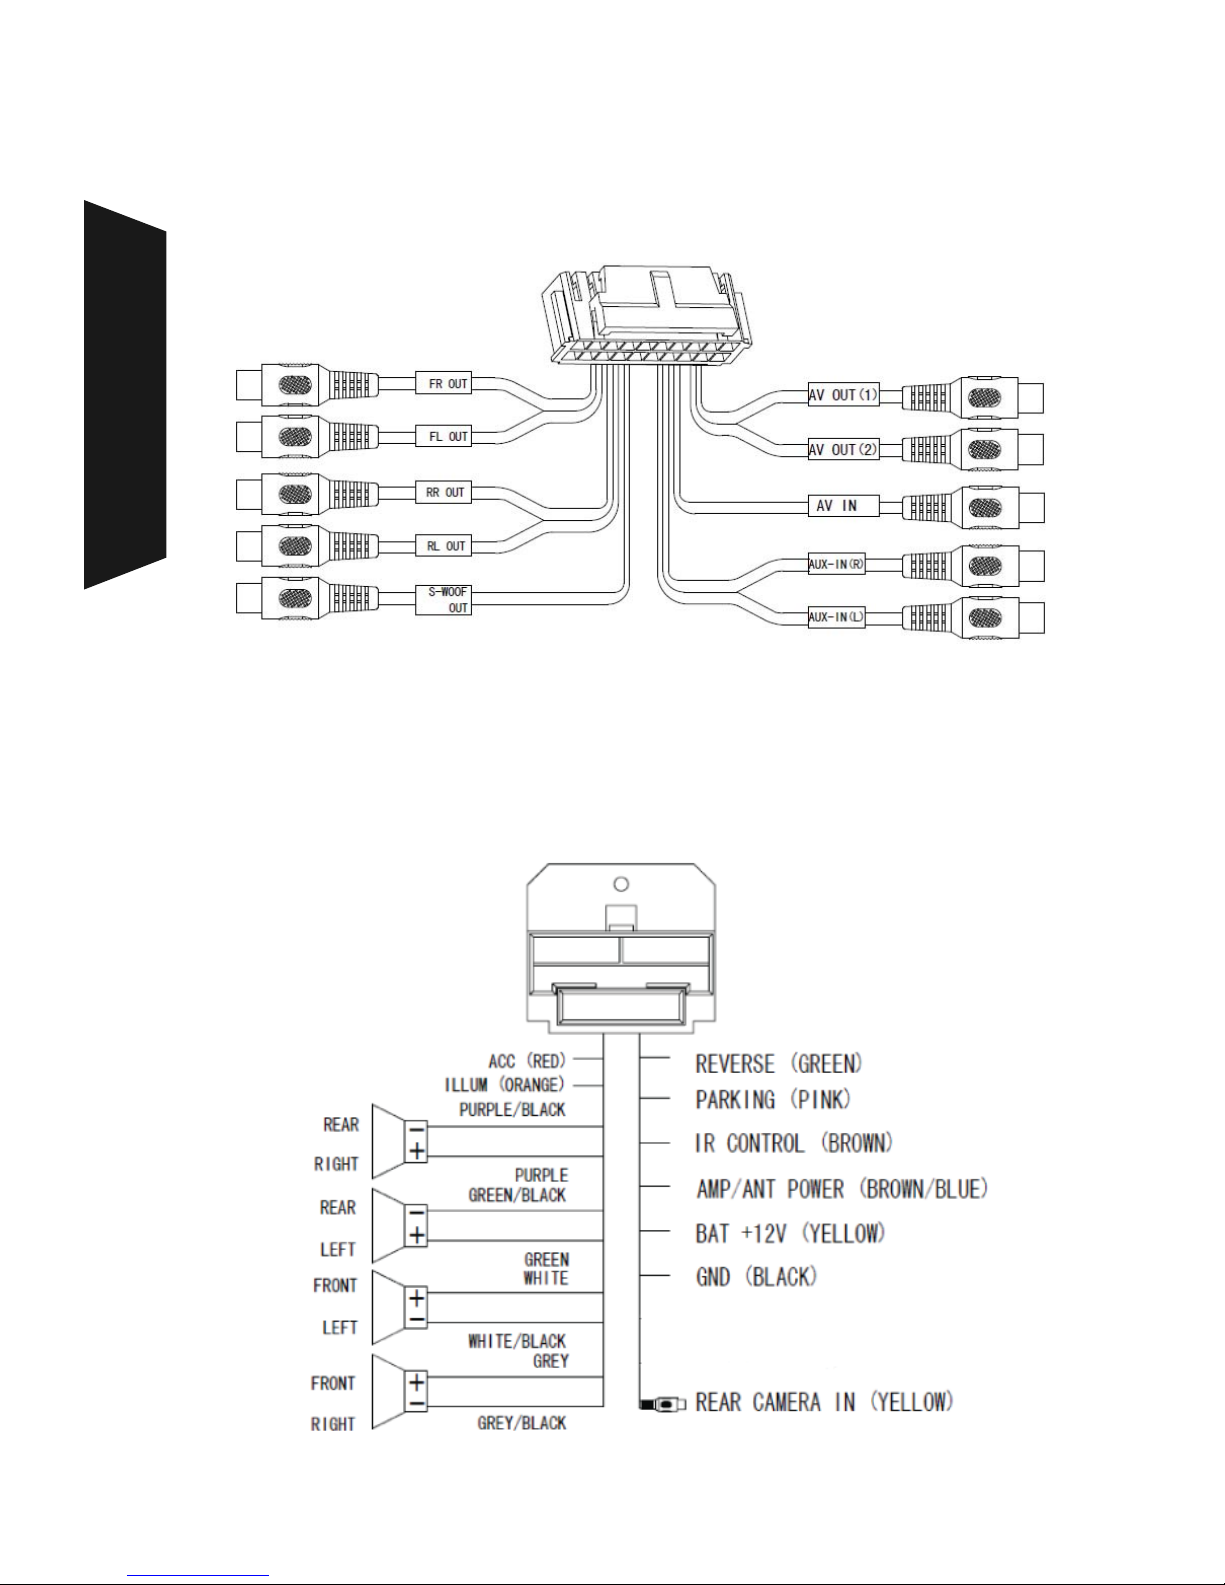
⑤ RCA
2xVideo output,2x Audio output(L/R), 1x Video input,1x Audio input(L/R)
1x Subwoofer out
⑥ OEM Connector (PlugWithOEM harness,plug&play)
Basic Operation
10 //

1. HOME key.
* Press it to return to main menu interface.
2. MENU key,
* Click it whilein any App,turn to themenu pageof that App.
* Click it whilein any HomeScreen thesystemwill pop up atool bar at thebottom:
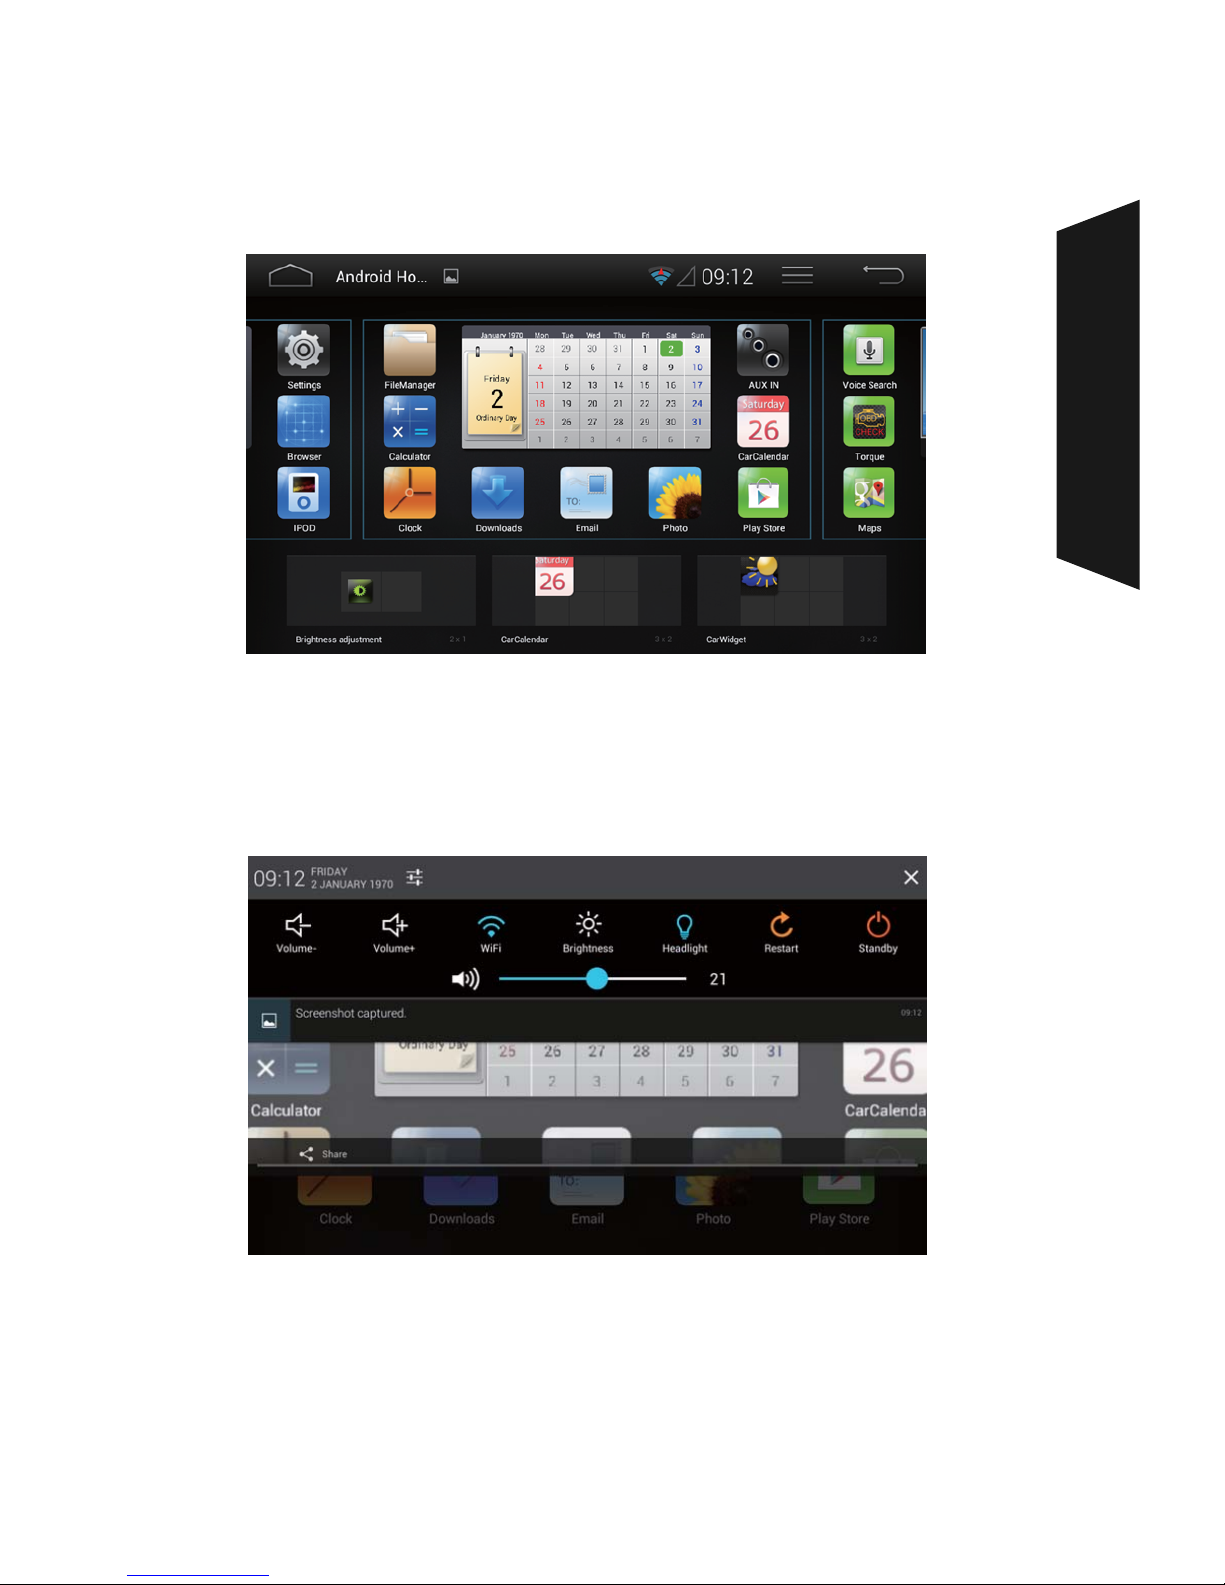
Themain menu interface
1-4. Desktop
Click on theAndroidicon or Back button to enter theAndroidHomeScreen
Ɣ)URPWKH+RPH6FUHHQ\RXFDQUHDUUDQJHDSS,FRQVDGG:LGJHWVDQG
uninstall apps.
MoveIcons: Holdtheicon for 1secondthen you can dragit to any position in
themain interface
Ɣ8QLQVWDOOLQJ$SSV+ROGWKHLFRQVHFRQGWKHQGUDJLWWRWKHUHF\FOHELQ
Desktop
\\ 11

12 //
Desktop
①Wallpaperedit, two groups
ofpreset wallpapers:
* Live Wallpapers
* Wallpapersmanager
②Desktop editmode:
* Move the positionofthe Apps,
Press & holdany ofthe icons, dragitto
the placeyouwant, andrelease it.
* Uninstall thirdpartyApps, press & holdthe thirdpartyApp’sicon,dragitto
Trash can thenrelease, the system will pop upan option:
Simplyclick “Uninstall” to uninstall thatApp, click “Cancel” to close it.
③System settings
3. Same asAndroidBACK key
* Click itwhilein any ofthe system Apps (likeRadio, DVD, USB/SD, BT) ,
system will close the display with the app runningin the background.
Apps.
4. Clock: Click thisiconto enterclock / alarminterface.
5. Network connectionstatusbar
3G,WiFi& Bluetooth connections’ statuswill bedisplayed here.
\\ 13
Desktop
Ɣ/RQJSUHVVDQGKROGDQ\HPSW\DUHDRQWKH+RPH6FUHHQWRHGLWWKH+RPH
Screenpages.
Ɣ1RWLIFDWLRQ6WDWXV%DU
Onany screentouchthe top ofthe screenandslide downto reveal the
notificationscreen. The notificationscreenwill display Volume, WIFI Switch,
Brightness, Restart, Standbyoptions.
Ɣ,QVWDOOLQJ$SSOLFDWLRQ³$SSV´
Youcan downloadandinstall apps directlyonlinefrom the GooglePlay store
orinstall apps stored onyour SDcardorUSB drives.

14//
Features
2-1. Radio
1MENU: Press ittodisplaythe menubar
①Press GoTotomanuallyinput astation frequency.
②AutoSearchandscansradio stations, any operation will stop
scanning, Radio will playthe first station automaticallyoncescanningisfinished.
③SearchPlayscansradio stationsautomaticallyandplayfoundstation
forabout 5 seconds thengoes on scanning. Any operation will stop
scanning. Radio will playthe first station automaticallyoncethe scanningfinish.
④Radio mode.
Local mode: Receive onlylocal station whichhas strongsignals.
DX mode: Beabletoreceive remote station.
⑤ Exitandcloses the Radio app
Features
\\ 15
Features
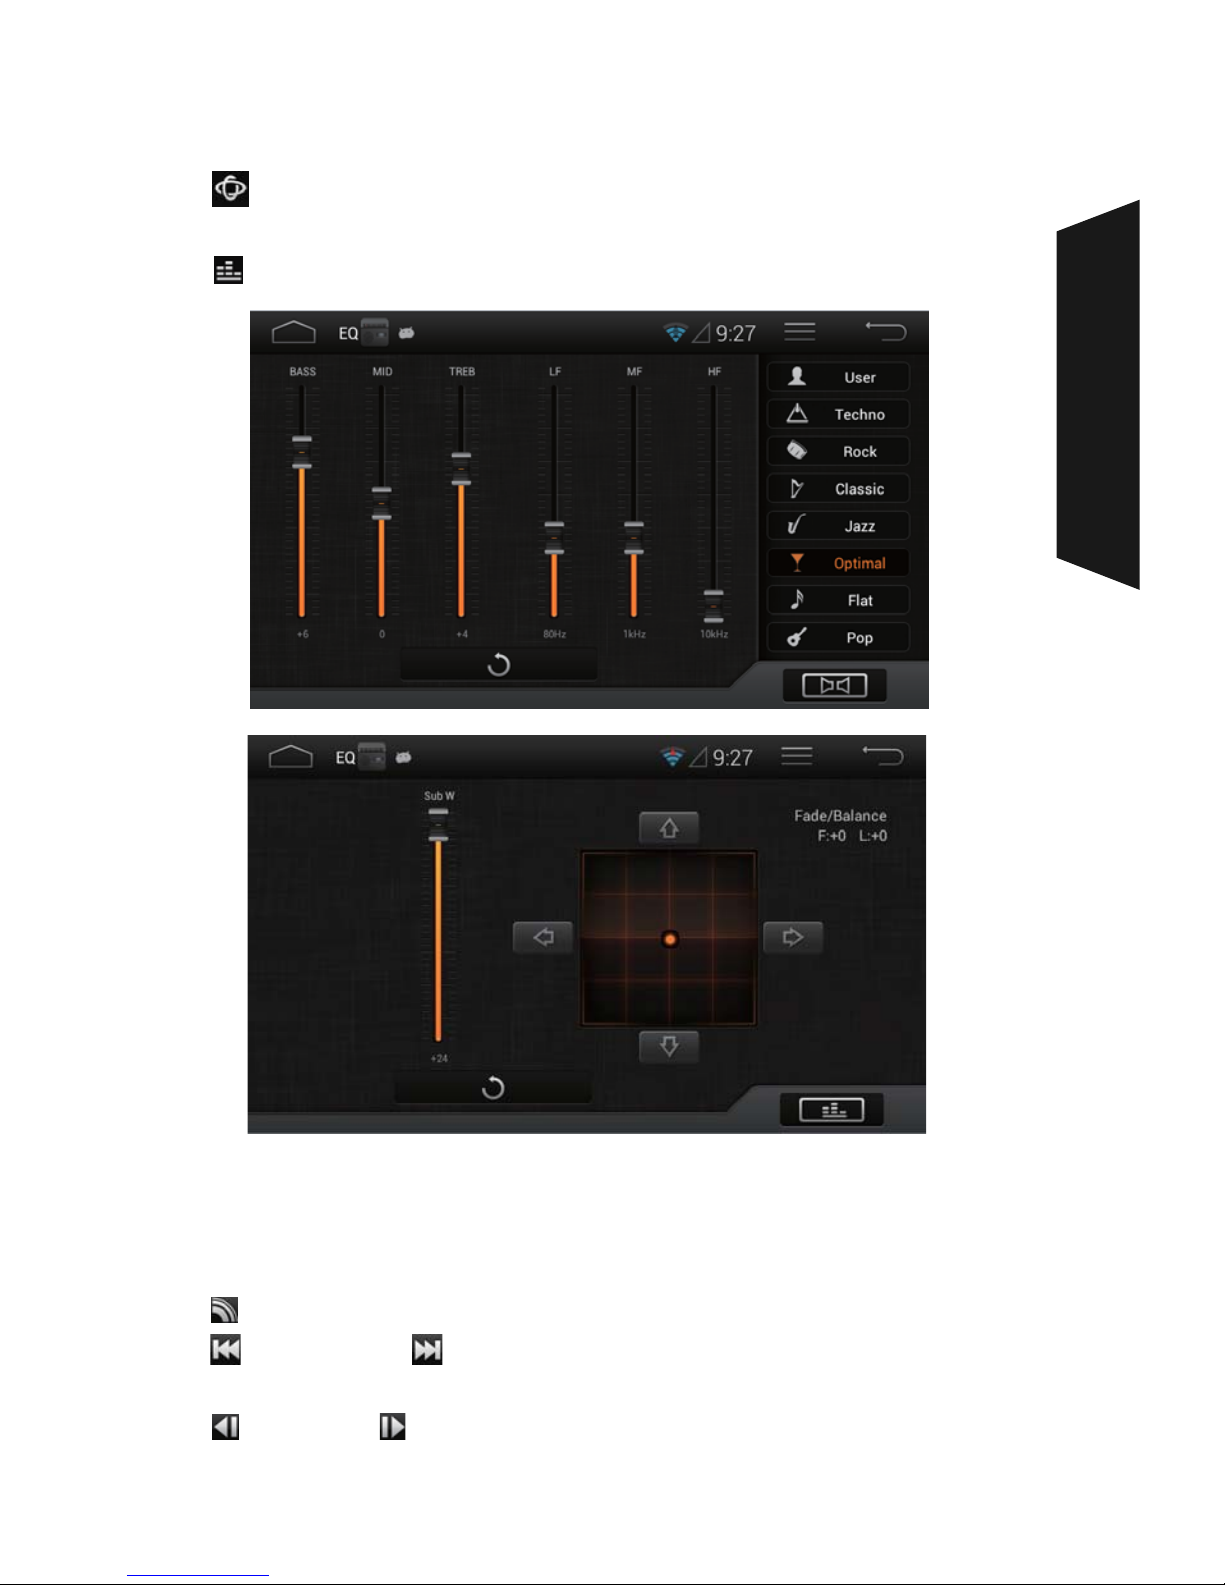
2. Visualizer
Click toswitchtodifferentvisualizer modes.
3. Equalizer /Fade &Balancer
4. Favorite stations:
P1- P6: Press any of those iconsfor3seconds, orpress the currentstation and
drag ittooneof those positions, thenthe currentstation will bestored intothat
position.
5. Band:Press toswitchthe bandbetweenFM1, FM2,FM3, AM1andAM2
6. Seekdown&Seekup: Scanningstopswhenthe unitreceives a
station. Repeat thisprocedure until the desired station isreceived.
7. Stepup&Stepdown: Adjust the frequency incrementally.

16 //
Features
2-2. Disc
DVD Video
DVD
*1Audio files canalsobestored.
*2Videofiles canalsobestored.
The followingmediafiles are alsosupported: MP3,WMA, AAC, WAV,Xvid, WMV,
MPEG1/2/4, AVC, AVI,AFS
Insert the Disc(label side up) andplayback will start automatically.
DVD-R*1/DVD-RDL*1/DVD-RW*1(Videomode/VRmode)
DVD+R*1/DVD+RDL*1/DVD+RW*1
VideoCD (Ver. 1.0/1.1/2.0)
VCD
CD
Audio CD
CD-ROM*2/CD-R*2/CD-RW*2
Discsymbol Discformat
Table of contents


